Haier 2HUM18R03/R2(DB) Mode d'emploi
- Catégorie
- Climatiseurs split-system
- Taper
- Mode d'emploi

SPLIT TYPE ROOM AIR CONDITIONER
OPERATION MANUAL
Please read this operation manual before using the air conditioner.
No.00105
HSM09HA03/R2(DB)
HSM12HA03/R2(DB)
2HUM18R03/R2(DB)

CE
Tutti i prodotti sono conformi alle seguenti normative europee:
- Direttiva 73/23/EEC Basso Voltaggio
- Direttiva 2006/95/EC Basso Voltaggio
- Direttiva 89/336/EEC Compatibilità elettromagnetica
- Direttiva 2004/108/EC Compatibilità elettromagnetica
ROHS
Il prodotto è conforme alla normativa 2002/95/EEC sulla restrizione d’uso di
sostanze inquinanti negli apparecchi elettrici ed elettronici.
WEEE
Informativa al consumatore come previsto dalla normativa europea
2002/96/CE riguardante i rifiuti di apparecchiature elettriche ed elettroniche.
SPECIFICHE DI SMALTIMENTO:
Il climatizzatore è contrassegnato con questo simbolo,
ciò significa che i prodotti elettrici ed elettronici non
possono essere smaltiti insieme ai rifiuti domestici non
differenziati. Non cercare di demolire il sistema da soli:
la demolizioni dei sistemi di condizionamento, nonché il
recupero del refrigerante, dell’olio e di qualsiasi altra
parte devono essere eseguiti da un installatore qualifi-
cato in conformità alla legislazione locale e nazionale
vigente in materia.I climatizzatori devo essere trattati presso una struttura spe-
cializzata nel riutilizzo, riciclaggio e recupero dei materiali. Il corretto smaltimen-
to del prodotto eviterà le possibili conseguenze negative all’ambiente e alla
salute dell’uomo. Per maggiori informazioni contattare l’installatore o le autori-
tà locali. Le batterie devono essere tolte dal telecomando e smaltite separata-
mente conformemente alla legislazione locale e nazionale vigente in materia.
CONFORMITÀ ALLE DIRETTIVE EUROPEE PER I MODELLI:
Haier Industrial Park, No.1 Haier Road, Qingdao, P.R.China
IT
CE
All the products are in conformity with the following European provision:
- Low Voltage Directive 73/23/EEC
- Low Voltage Directive 2006/95/EC
- Electromagnetic CompatibilitY 89/336/EEC
- Electromagnetic CompatibilitY 2004/108/EC
ROHS
The products are fulfilled with the requirements in the directive 2002/95/EEC of the
European parliament and of the council on the Restriction of the use of Certain Haz-
ardous Substances in Electrical and Electronic Equipment (EU RoHS Directive)
.
WEEE
In accordance with the directive 2002/96/CE of the European parliament,
herewith we inform the consumer about the disposal requirements of the
electrical and electronic products.
DISPOSAL REQUIREMENTS:
Your air conditioning product is marked with this sym-
bol. This means that electrical and electronic products
shall not be mixed with unsorted household waste.
Do not try to dismantle the system yourself: the dis-
mantling of the air conditioning system, treatment of
the refrigerant, of oil and of other part must be done
by a qualified installer in accordance with relevant
local and national legislation. Air conditioners must be
treated at a specialized treatment facility for re-use, recycling and recovery.
By ensuring this product is disposed of correctly, you will help to prevent
potential negative consequences for the environment and human health.
Please contact the installer or local authority for more information. Battery
must be removed from the remote controller and disposed of separately in
accordance with relevant local and national legislation.
EUROPEAN REGULATIONS CONFORMITY FOR THE MODELS:
EN
CE
Tous les produits sont conformes aux directives européennes suivantes:
- Directive 73/23/CEE Basse tension
- Directive 2006/95/CE Basse tension
- Directive 89/336/CEE Compatibilité électromagnétique
- Directive 2004/108/CE Compatibilité électromagnétique
ROHS
L'appareil est conforme à la directive 2002/95/CEE relative à la limitation de
l'utilisation de certains substances dangereuses dans les équipements élec-
triques et électroniques.
DEEE (WEEE)
Information au consommateur comme le prévoit la directive européenne
2002/96/CE relative aux déchets d'équipements électriques et électro-
niques.
SPECIFICATIONS POUR L'ELIMINATION:
Ce pictogramme, apposé sur le climatiseur, signifie
que les équipements électriques et électroniques ne
peuvent pas être éliminés avec les déchets ménagers
non triés. Ne pas essayer de démanteler l'équipement
soi-même: le démantèlement des systèmes de clima-
tisation, ainsi que la récupération du frigorigène, de
l'huile et de toute autre partie doivent être effectués
par un installateur qualifié conformément à la législa-
tion locale et nationale en vigueur en la matière. Les climatiseurs doivent être
traités dans un centre spécialisé dans la réutilisation, le recyclage et la valo-
risation des matériaux. L'élimination correcte de ces appareils permet d'évi-
ter les effets nocifs sur l'environnement et la santé humaine. Pour plus de
renseignements contacter l'installateur ou les autorités locales. Les piles doi-
vent être retirées de la télécommande et éliminées séparément, conformé-
ment à la législation locale et nationale en vigueur en la matière.
CONFORMITÉ AUX DIRECTIVES EUROPÉENNES POUR LES MODÈLES:
FR

Haier Industrial Park, No.1 Haier Road, Qingdao, P.R.China
CE
Todos los productos están en conformidad con las siguientes Normativas
Europeas:
- Bajo Voltaje directiva 73/23/EEC
- Bajo Voltaje directiva 2006/95/EC
- Compatibilidad electromagnética 89/336/EEC
- Compatibilidad electromagnética 2004/108/EC
ROHS
Los productos cumplen los requisitos de la directiva 2002/95/EEC del parla-
mento Europeo y el consejo regulador Del uso de materiales peligrosos en
equipamientos eléctricos Y electrónicos. (EU RoHS Directiva).
WEEE
De acuerdo con la directiva 2002/96/CE del parlamento Europeo, Informa-
mos al consumidor acerca del reciclage de los productos Electrónicos y
eléctricos.
REQUISITOS PARA LA ELIMINACIÓN:
Su acondicionador de aire está marcado con este
símbolo. Esto significa que los productos eléctricos y
electrónicos no deben mezclarse con el resto de resi-
duos domésticos no clasificados.
No intente desmontar el sistema usted mismo: El des-
mantelamiento del acondicionador de aire, así como
el tratamiento del refrigerante, aceite y otros compo-
nentes, debe ser efectuado por un instalador compe-
tente de acuerdo con las normas locales y nacionales aplicables. Los acon-
dicionadores de aire deben ser tratados en instalaciones especializadas para
su reutilización, reciclaje y recuperación. Al asegurarse de desechar este pro-
ducto de la forma correcta, està contribuyendo a evitar posibles consecuen-
cias negativas para el entorno y para la salud de las personas. Contacte, por
favor, con el instalador o con las autoridades locales para obtener más infor-
mación. Las pilas del control remoto deben extraerse y eliminarse por sepa-
rado y de acuerdo con la normativa local y nacional aplicable.
CONFORMIDAD EUROPEA DE LAS REGULACIONES PARA LOS MODELOS:
ES

Questo prodotto contiene gas fluorurati ad effetto serra inclusi nel Protocollo
di Kyoto. Non liberare tali gas nell’atmosfera.
Tipo di refrigerante: R410A
Valore GWP*: 1975
*
GWP = potenziale di riscaldamento globale
Compilare con inchiostro indelebile,
• 1 la carica di refrigerante di fabbrica del prodotto
• 2 la quantità di refrigerante aggiuntiva nel campo e
• 1+2 la carica di refrigerante totale
sull’etichetta di carica del refrigerante fornita con il prodotto
L’etichetta compilata deve essere collocata in prossimità della portata di cari-
ca del prodotto (ad esempio, nell’interno del coperchio della valvola d’inter-
cettazione).
A contiene gas fluorurati ad effetto serra inclusi nel protocollo di Kyoto
B carica di refrigerante di fabbrica del prodotto: vedi targhetta con il nome
dell’unità
C quantità di refrigerante aggiuntiva nel campo
D carica di refrigerante totale
E unità esterna
F cilindro del refrigerante e collettore di carica
INFORMAZIONI IMPORTANTI SUL REFRIGERANTE UTILIZZATO
Haier Industrial Park, No.1 Haier Road, Qingdao, P.R.China
1
1+2=
kg
R410A
2
kg
2=
1=
B
C
D
FE
kg
Contains fluorinated greenhouse gases
covered by the Kyoto Protocol
A
This product contains fluorinated greenhouse gases covered by the Kyoto
Protocol. Do not vent into the atmosphere.
Refrigerant type: R410A
GWP* value: 1975
*
GWP = global warming potential
Please fill in with indelible ink,
• 1 the factory refrigerant charge of the product
• 2 the additional refrigerant amount charged in the field and
• 1+2 the total refrigerant charge
on the refrigerant charge label supplied with the product.
The filled out label must be adhered in the proximity of the product charging
port (e.g. onto the inside of the stop valve cover).
A contains fluorinated greenhouse gases covered by the Kyoto Protocol
B factory refrigerant charge of the product: see unit name plate
C additional refrigerant amount charged in the field
D total refrigerant charge
E outdoor unit
F refrigerant cylinder and manifold for charging
IT
IMPORTANT INFORMATION REGARDING THE REFRIGERANT USED
EN
Ce produit contient des gaz à effet de serre fluorés encadrés par le protoco-
le de Kyoto. Ne pas laisser les gaz s’échapper dans l’atmosphère.
Type de réfrigérant: R410A
Valeur GWP*: 1975
*
GWP = potentiel de réchauffement global
Prière de compléter à l’encre indélébile,
• 1 la charge de réfrigérant d’usine du produit
• 2 la quantité de réfrigérant supplémentaire chargée sur place et
• 1+2 la charge de réfrigérant totale
sur l’étiquette de charge de réfrigérant fournie avec le produit.
L’étiquette complétée doit être apposée à proximité de l’orifice de recharge
du produit (par ex. à l’intérieur du couvercle de la vanne d’arrêt).
A contient des gaz à effet de serre fluorés encadrés par le protocole de
Kyoto
B charge de réfrigérant d’usine du produit: voir plaquette signalétique de
l’unité
C quantité de réfrigérant supplémentaire chargée sur place
D charge de réfrigérant totale
E unité extérieure
F cylindre de réfrigérant et collecteur de recharge
INFORMATION IMPORTANTE RELATIVE AU RÉFRIGÉRANT UTILISÉ
FR

Haier Industrial Park, No.1 Haier Road, Qingdao, P.R.China
1
1+2=
kg
R410A
2
kg
2=
1=
B
C
D
FE
kg
Contains fluorinated greenhouse gases
covered by the Kyoto Protocol
A
Este producto contiene los gases fluorados de efecto invernadora regulados
por el Protocolo de Kioto. No vierta gases a la atmósfera.
Tipo de refrigerante: R410A
Valor GWP*: 1975
*
GWP = Potencial de calentamiento global
Rellene con tinta indeleble,
• 1 la carga de refrigerante de fábrica del producto
• 2 la cantidad adicional de refrigerante cargado en campo y
• 1+2 la carga total de refrigerante
En la etiqueta de carga de refrigerante suministrada con el producto.
La etiqueta rellenada debe pegarse cerca de la conexión de carga del pro-
ducto (p.ej. en el interior de la cubierta de la válvula de tope).
A Contiene los gases fluorados de efecto invernadora regulados por el
Protocolo de Kioto
B Carga de refrigerante de fábrica del producto: véase placa de especifi-
caciones técnicas de la unidad
C Cantidad adicional de refrigerante cargado en campo
D Carga total de refrigerante
E Unidad exterior
F Cilindro del refrigerante y dosificador de carga
INFORMACIÓN IMPORTANTE EN RELACIÓN AL REFRIGERANTE UTILIZADO
ES

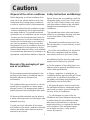
Before disposing an old air conditioner that
goes out of use, please make sure it's inop-
erative and safe. Unplug the air conditioner
in order to avoid the risk of child entrapment.
It must be noticed that air conditioner system
contains refrigerants, which require speciali-
zed waste disposal. The valuable materials
contained in an air conditioner can be recycled
.Contact your local waste disposal center for
proper disposal of an old air conditioner and
contact your local authority or your dealer if
you have any question. Please ensure that
the pipework of your air conditioner does not
get damagedprior to being picked up by the
relevant waste disposal center, and contribute
to environmental awareness by insisting on an
appropriate, anti-pollution method of disposal.
Cautions
Disposal of the old air conditioner
All the packaging materials employed in the
package of your new air conditioner may be
disposed without any danger to the
environment.
The cardboard box may be broken or cut into
smaller pieces and given to a waste paper
disposal service. The wrapping bag made of
polyethylene and the polyethylene foam pads
All these valuable materials may be taken to
a waste collecting center and used again after
adequate recycling.
Consult your local authorities for the name
and address of the waste materials collecting
centers and waste paper disposal services
nearest to your house.
Disposal of the packaging of your
new air conditioner
Before starting the air conditioner, read the
information given in the User's Guide caref-
ully. The User's Guide contains very impor-
tant observations relating to the assembly,
operation and maintenance of the air
conditioner.
The manufacturer does not accept respon-
sibility for any damages that may arise due
to non-observation of the following
instruction.
Damaged air conditioners are not to be
put into operation. In case of doubt, consult
your supplier.
Use of the air conditioner is to be carried
out in strict compliance with the relative
instructions set forth in the User's Guide.
Installation shall be done by professional
people, don't install unit by yourself.
For the purpose of the safety,the air con-
ditioner must be properly grounded in acco-
rdance with specifications.
Always remember to unplug the air
conditioner before openning inlet grill. Never
unplug your air conditioner by pulling on
the power cord. Always grip plug firmly and
pull straight out from the outlet.
All electrical repairs must be carried out
by qualified electricians. Inadequate repairs
may result in a major source of danger for
the user of the air conditioner.
Safety Instructions and Warnings
Do not damage any parts of the air
conditioner that carry refrigerant by piercing
or performating the air conditioner's tubes
with sharp or pointed items, crushing or
twisting any tubes, or scraping the coatings
off the surfaces. If the refrigerant spurts
out and gets into eyes, it may result in
serious eye injuries.
1

Do not obstruct or cover the ventilation
grille of the air conditoner.Do not put fingers
or any other things into the inlet/outlet and
swing louver.
Do not allow children to play with the air
conditioner.In no case should children be
allowed to sit on the outdoor unit.
The refrigerating circuit is leak-proof.
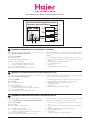
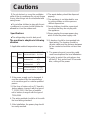
1.Applicable ambient temperature range:
Specifications
The machine is adaptive in following
situation
11 .The power plug and connecting cable
must have acquired the local attestation.
2. If the power supply cord is damaged, it
must be replaced by the manufacturer
or its service agent or a similar qualified
person.
3. If the fuse of indoor unit on PC board is
broken,please change it with the type of
T. 3.15A/ 250V. If the fuse of outdoor
unit is broken,change it with the type of
T.25A/250V
4. The wiring method should be in line with
the local wiring standard.
5. After installation, the power plug should
be easily reached.
6. The waste battery should be disposed
properly.
7. The appliance is not intended for use
by young children or infirm persons
without supervision.
8. Young children should be supervised
to ensure that they do not play with
the appliance.
9.Please employ the proper power plug,
which fit into the power supply cord.
Cautions
2
Cooling
Indoor
Maximum:D.B/W.B
Maximum:D.B/W.B
Maximum:D.B
Maximum:D.B
Maximum:D.B
Minimum:D.B/W.B
Maximum:D.B/W.B
Minimum:D.B/W.B
Outdoor
Indoor
Outdoor
Heating
32
o
C/23
o
C
24
o
C/18
o
C
-7
o
C/-8
o
C
46
o
C/26
o
C
18
o
C
27
o
C
15
o
C
18
o
C/14
o
C
12.In order to protect the units,please turn
off the A/C first, and at least 30 seconds
later, cutting off the power.
10. A breaker should be incorporated into
fixed wiring. The breaker should be
all-pole switch and the distance between
its two contacts should be not less than
3mm.

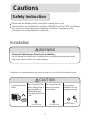
Cautions
STRICT
ENFORCEMENT
Safety Instruction
Installation
WARNING
Please read the following Safety Instructions carefully prior to use.
The instructions are classified into two levels, WARNING and CAUTION according to
the seriousness of possible risks and damages as follows. Compliance to the
instructions are strictly required for safety use.
Please call Sales/Service Shop for the Installation.
Do not attempt to install the air conditioner by yourself because improper works
may cause electric shock, fire, water leakage.
lnstallation in a inadequate place may cause accidents. Do not install in the following place.
Connect the earth
cable.
earthing
Do not install in the
place where there is
any possibility of
inflammable gas
leakage around the
unit.
Do not get the unit
exposed to vapor
or oil steam.
Check proper
installation of the
drainage securely
PROHIBITION PROHIBITION
CAUTION
3

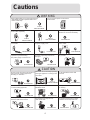
Cautions
WARNING
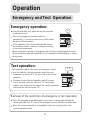
When abnormality such as burnt-small found,
immediately stop the operation button and
contact sales shop.
OFF
Use an exclusive power source with a
circuit breaker
ENFORCEMENT
Connect power supply cord
to the outlet completely
Use the proper voltage
Do not use power supply cord
in a bundle.
Take care not to damage
the power supply cord.
Do not use power supply cord
extended or connected in halfway
STRICT
ENFORCEMENT
STRICT
STRICT
ENFORCEMENT
PROHIBITION
PROHIBITION
PROHIBITION
PROHIBITION
Do not start or stop the
operation by disconnecting
the power supply cord and so on.
Do not channel the air flow directly
at people, especially at infants or
the aged.
Do not try to repair or reconstruct
by yourself.
Do not use for the purpose of storage of
food, art work, precise equipment,
breeding, or cultivation.
CAUTION
Take fresh air occasionally especially
when gas appliance is running at the
same time.
PROHIBITION
STRICT
ENFORCEMENT
Do not operate the switch with
wet hand.
PROHIBITION
PROHIBITION
4
PROHIBITION
PROHIBITION
PROHIBITION
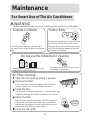
Do not install the unit near a fireplace
or other heating apparatus.
Check good condition of the
installation stand
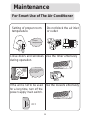
Do not pour water onto the unit
for cleaning
PROHIBITION
Do not place animals or plants in
the direct path of the air flow
Do not place any objects on or
climb on the unit.
Do not place flower vase or water
containers on the top of the unit.
Do not insert objects into the air
inlet or outlet.
PROHIBITION
PROHIBITION
PROHIBITION

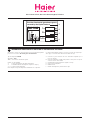
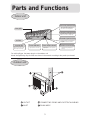
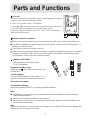
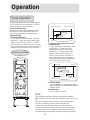
Parts and Functions
Indoor unit
5
Outdoor unit
Inlet grille
Air filter
Vertical flap
Power indicator
Timer mode indicator
Operation mode indicator
Remote signal receiver
Emergency switch(manual)
Test running switch(manual)
Use remote controller to
adjust up and down air flow.
(Don't adjust it manually.)
Lights up when unit starts.
Lights up when Timer operation
is selected.
Lights up during compressor
running.
A beeping sound is generated when
a signal from remote controller is
received.
Used when remote controller is lost or
defective. Unit will run temporarily.
Used only for test running in cooling
when room temp. is below 16
o
C.
Don't use it in normal operation.
OUTLET
CONNECTING PIPING AND ELECTRICAL WIRING
DRAIN HOSE
INLET
For multi-split type, the power plug is on the outdoor unit
Actual inlet grille may vary from the one shown in the manual according to the product purchased

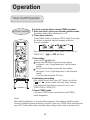
16. SIGNAL SENDING display
17. POWER/SOFT display
18. Left/right air flow display
19. TEMP display
Remote controller: to display the TEMP. setting.
20. TIMER OFF display
21. CLOCK display
22. FAN button
Used to select fan speed: LOW,MED, HI, AUTO
23. ON/OFF button
Used for unit start and stop.
24. SLEEP button
Used to select sleep mode.
25. SET button
Used to confirm timer and clock settings.
26. POWER/SOFT button
27. LOCK
Used to lock buttons and LCD display. If
pressed, the other buttons will be disabled
and the lock condition display appears.
Press it once again, lock will be canceled
and lock condition display disappears.
28. CODE
Used to select CODE A or B with a press,A or
B will be displayed on LCD.
Please select A without special explanation.
1. SWING button
Used to select up or down air sending direction.
2. HOUR button
Used to set clock and timer setting.
3. MODE button
Used to select operation mode. AUTO,
COOL,DRY, FAN,HEAT.
4. HEALTH button
Used to set healthy operation.
5. CLOCK button
Used to set correct time.
6. TIMER button
Used to select TIMER ON,
TIMER OFF, TIMER ON-OFF.
7. RESET
When the remote controller appears
abnormal, use a sharp pointed article
to press this button to reset the
remote controller normal
11. LOCK display
12. FAN SPEED display
13. TIMER ON display
14. TEMP button
Used to select your desired temperature.
15. Operation mode display
LOW
Operation mode AUTO HEAT FANCOOL DRY
Remote controller
HI
MED AUTO
Parts and Functions
6
10. SWING UP/DOWN display
NOTE: (1)The following functions and related displays are not available
(2) Cooling only unit do not have functions and displays related with heating.
8. HEALTH display
9. SLEEP display

Remove the batteries in case unit won't be in usage for a long period. If there are any display after
taking-out, just need to press reset key.
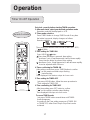
Parts and Functions
Clock Set
When unit is started for the first time and after replacing batteries in remote
controller, clock should be adjusted as follows:
Remote controller's operation
3. After time setting is confirmed, press SET, "AM" or "PM" stop flashing,
while clock starts working.
2. Press or to set correct time. Each press will increase or decrease 1
min. If the button is kept depressed, time will change quickly.
1. Press CLOCK button,"AM" or "PM" flashes.
When in use, put the signal transmission head directly to the receiver hole on the indoor unit.
The distance between the signal transmission head and the receiver hole should be within 7 m
without any obstacle as well.
Don't throw or knock the remoter controller.
When electronic-started type fluorescent lamp or change-over type fluorescent lamp or wireless
telephone is installed in the room, the receiver is apt to be disturbed in receiving the signals,
so the distance to the indoor unit should be shorter.
Loading of the battery
Load the batteries as illustrated right
2 R-03 (7#) batteries
Remove the battery cover:
Slightly press" "area and push down the cover
as illustrated.
Load the battery:
Be sure that the loading is in line with the "+" *"- ".
request as illustrated on the bottom of the case.
Put on the cover again.
Confirmation indicator:
After pressing power ON/OFF, if no display, reload the batteries.
Note:
Full display or unclear display during operation indicates the batteries have been used up.
Please change batteries.
Used two new same-typed batteries when loading.
If the remote controller can't run normally during operation, please remove the batteries and
reload several minutes later.
Hint:
7

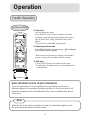
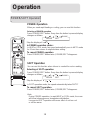
Press HEALTH button, the health function stops.
The pilot light of healthy process on the display board
is extinguished.
BRIEF INTRODUCTION TO HEALTH OPERATION
The anion generator in the air conditioner can generate a lot of anion to
effectively balance the quantity of position and anion in the air and also to kill
bacteria and speed up the dust sediment in the room and finally clean the air
in the room.
Note
When the fan in the indoor unit does not work, the health lamp lights up, but
the anion generator does not release anion.
Operation
Health Operation
Remote controller
1. Unit start
Then set up the comfortable working state.
Link with electronic power.
Press ON/OFF on the remote controller, unit starts.
The liquid crystal will display the working state of last
time (Except Timer, Sleep, Power/Soft and Health
airflow).
2. Select operation mode
Press HEALTH button. For each press, is displayed.
hence healthy process begins.
When indoor wind machine is running, it has healthy
process function. (It's available under any mode)
3. Unit stop
8

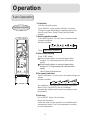
Operation
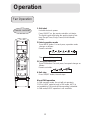
Auto Operation
Remote controller
About Auto Operation
Under the mode of auto operation, air conditioner will
automatically select Cool or Heat operation according
to room temperature.
1. Unit start
Link with electronic power.
Press ON/OFF on the remote controller, unit starts.
The liquid crystal will display the working state of last
time (Except Timer, Sleep, Power/Soft and Health
airflow).
2.Select operation mode
Press MODE button. For each press, operation mode
changes as follows:
Remote controller:
Then Select Auto operation
AUTO COOL DRY FAN HEAT
9
Press FAN button. For each press, fan speed changes as
follows:
Remote controller:
Press TEMP. button
Every time the button is pressed, temp.setting
increase 1
o
C,if kept depressed, it will increase
rapidly
Every time the button is pressed, temp.setting
decrease 1
o
C,if kept depressed, it will decrease
rapidly
Select a desired temperature.
4.Fan speed selection
3.Select temp.setting
5.Unit stop
Air conditioner is running under displayed wind speed
When FAN is set to AUTO, the air conditioner
automatically adjusts the fan speed according to room
temperature.
Press ON/OFF button, the unit stops.
LOW
MED
HI
AUTO

Operation
Cool Operation
Remote controller
1. Unit start
Link with electronic power.
Press ON/OFF on the remote controller, unit starts.
The liquid crystal will display the working state of last
time (Except Timer, Sleep, Power/Soft and Health
airflow).
2.Select operation mode
Press FAN button. For each press, fan speed changes as
follows:
Press MODE button. For each press, operation mode
changes as follows:
Remote controller:
Remote controller:
Then Select COOL operation
Press TEMP. button
Every time the button is pressed, temp.setting
increase 1
o
C,if kept depressed, it will increase
rapidly
Every time the button is pressed, temp.setting
decrease 1
o
C,if kept depressed, it will decrease
rapidly
Select a desired temperature.
4.Fan speed selection
3.Select temp.setting
5.Unit stop
Air conditioner is running under displayed wind speed
When FAN is set to AUTO, the air conditioner
automatically adjusts the fan speed according to room
temperature.
Press ON/OFF button, the unit stops.
AUTO
LOW
MED
HI
AUTO
COOL DRY FAN HEAT
10

Operation
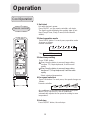
Dry Operation
Remote controller
1. Unit start
Link with electronic power.
Press ON/OFF on the remote controller, unit starts.
The liquid crystal will display the working state of last
time (Except Timer, Sleep, Power/Soft and Health
airflow).
2.Select operation mode
Press FAN button. For each press, fan speed changes as
follows:
Press MODE button. For each press, operation mode
changes as follows:
Remote controller:
Remote controller:
Then Select DRY operation
Press TEMP. button
Every time the button is pressed, temp.setting
increase 1
o
C,if kept depressed, it will increase
rapidly
Every time the button is pressed, temp.setting
decrease 1
o
C,if kept depressed, it will decrease
rapidly
Select a desired temperature.
4.Fan speed selection
3.Select temp.setting
5.Unit stop
Press ON/OFF button, the unit stops.
COOL operation starts when room
temp.is higher than temp.setting.
On reaching temp.setting +2
o
C
unit will run in mild DRY mode.
Ultra-low air flow
Temp.setting+2
o
C
Temp.setting
AUTO
LOW
MED
HI
AUTO
COOL DRY FAN HEAT
11
Air conditioner is running under displayed fan speed.
In DRY mode, when room temperature becomes
lower than temp.setting+2
o
C,unit will run intermittently
at LOW speed regardless of FAN setting.

Operation
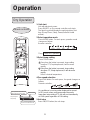
Fan Operation
Remote controller
1. Unit start
Link with electronic power.
Press ON/OFF on the remote controller, unit starts.
The liquid crystal will display the working state of last
time (Except Timer, Sleep, Power/Soft and Health
airflow).
2.Select operation mode
Press FAN button. For each press, fan speed changes as
follows:
Press MODE button. For each press, operation mode
changes as follows:
Remote controller:
Remote controller:
Then Select FAN operation
3.Fan speed selection
4.Unit stop
About FAN operation
In FAN operation mode, the unit will not operate in
COOL or HEAT mode but only in FAN mode ,AUTO is
not available in FAN mode.And temp.setting is disabled.
In FAN mode,SLEEP operation is not available.
Press ON/OFF button, the unit stops.
AUTO
LOW
MED
HI
COOL DRY FAN HEAT
12

Operation
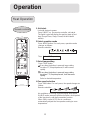
Heat Operation
Remote controller
1. Unit start
Link with electronic power.
Press ON/OFF on the remote controller, unit starts.
The liquid crystal will display the working state of last
time (Except Timer, Sleep, Power/Soft and Health
airflow).
2.Select operation mode
Press FAN button. For each press, fan speed changes as
follows:
Press MODE button. For each press, operation mode
changes as follows:
Remote controller:
Remote controller:
Then Select HEAT operation
Press TEMP. button
Every time the button is pressed, temp.setting
increase 1
o
C,if kept depressed, it will increase
rapidly.
Every time the button is pressed, temp.setting
decrease 1
o
C,if kept depressed, it will decrease
rapidly.
Select a desired temperature.
4.Fan speed selection
3.Select temp.setting
Air conditioner is running under displayed wind speed
IN HEAT mode, warm air will blow out after a short period
of the time due to cold-draft prevention function.
AUTO
LOW
MED
HI
AUTO
COOL DRY FAN HEAT
When FAN is set to AUTO, the air conditioner
automatically adjusts the fan speed according to room
temperature.
13
6

Operation
14
(5)Air flow direction adjustment
After operation mode is selected, vertical flap will open automatically according to the mode.
Referring to the Fig.
COOL
HEAT
COOL
HEAT
About 10
o
About 60
o
About 10
o
About 45
o
About 60
o
better set a temp. difference of 3-5
o
C between indoor and outdoor temp. in COOL mode.
Hints
As cold air flows downward in COOL mode, adjusting air flow horizontally will be much more
helpful for a better air circulation.
As warm air flows upward in HEAT mode, adjusting air flow downward will be much more
helpful for a better air circulation.
Be careful not to catch a cold when cold air blows downward.
It is harmful to your health in summer to go frequently in and out of places where temp.
difference is above 7
o
C. Temp. difference of 3-5
o
C will remove your fatigue.
More than this, unit's load can be reduced and power consumption cut down as well. So, you'd
(6)Unit stop
Press ON/OFF button.
Only time remains on LCD.
All indicators on indoor unit go out.
Vertical flap closes automatically.
Cautions:
Unit won't restart until 3 minutes have
elapsed, due to system protection.
HEAT mode is not available on
cooling only unit.
It is advisable not to keep vertical flap at
downward position for a long time in COOL
or DRY mode, otherwise, condensate
water might occur.
Cautions:
Cautions:
When humidity is high, condensate water
might occur at air outlet if all horizontal
louvers are adjusted to left or right.
Move the horizontal blade by a knob on air
conditioner to adjust left and right direction
referring to Fig.
Left and right air flow adjustment
(manual)
Press SWING button, vertical flap will move within
the range shown in the Fig. Press SWING button
stop it at a fixed position.
Up and down (Use remote controller)

Before going to bed, you can simply press the
SLEEP button and unit will operate in SLEEP
mode and bring you a sound sleep.
Use of SLEEP function
After the unit starts, set the operation status,
then press SLEEP button before which the
clock must be adjusted and time being set.
Operation Mode
1. In COOL,DRY mode
1 hours after SLEEP mode starts, temp. will
become 1
O
C higher than temp. setting. After
another 1 hours, temp. rises by 1
O
C further.
The unit will run for further 6 hours then stops.
Temp. is higher than temp. setting so that room
temperature won't be too Iow for your sleep.
Remote Controller
SLEEP operation starts SLEEP operation stops
SLEEP
operation starts
SLEEP
operation stops
Approx.6hrs
1 hr
1 hr
1 hr
3 hrs
3 hrs
Rises 1
O
C
Rises 1
O
C
Rises 1
O
C
Temp.setting
Temp.setting
Unit stop
Unit stop
In COOL, DRY mode
In HEAT mode
Decreases 2
O
C
Decreases 2
O
C
1 hr
Sleep Operation
2.
3.
In HEAT mode
1 hours after SLEEP mode starts, temp
will become 2
O
C lower than temp.
setting. After another 1 hours, temp
decrease by 2
O
C further. After more
another 3 hours, temp. rises by 1
O
C
further. The unit will run for further 3
hours then stops. Temp. is lower than
temp. setting so that room temperature
won't be too high for your sleep.
In AUTO mode
The unit operates in corresponding sleep
mode adapted to the automatically selected
operation mode.
4. In FAN mode
It has no SLEEP function.
Note
The sleeping hours lasts 8 hours and couldn't be adjusted.
When timing on function is set, the sleeping function can't be set
up
After the sleeping function is set up, if user resets timing on
function, the sleeping function will be cancelled; the
machine will be in the state of timing-on. If the sleeping
function and timing-on function are set up at the same time,
no matter which one is operated earlier, the machine will be
off automatically, and the other function will also be cancelled.
Operation
15
La page est en cours de chargement...
La page est en cours de chargement...
La page est en cours de chargement...
La page est en cours de chargement...
La page est en cours de chargement...
La page est en cours de chargement...
La page est en cours de chargement...
La page est en cours de chargement...
La page est en cours de chargement...
La page est en cours de chargement...
-
 1
1
-
 2
2
-
 3
3
-
 4
4
-
 5
5
-
 6
6
-
 7
7
-
 8
8
-
 9
9
-
 10
10
-
 11
11
-
 12
12
-
 13
13
-
 14
14
-
 15
15
-
 16
16
-
 17
17
-
 18
18
-
 19
19
-
 20
20
-
 21
21
-
 22
22
-
 23
23
-
 24
24
-
 25
25
-
 26
26
-
 27
27
-
 28
28
-
 29
29
-
 30
30


Haier 2HUM18R03/R2(DB) Mode d'emploi
- Catégorie
- Climatiseurs split-system
- Taper
- Mode d'emploi
dans d''autres langues
Documents connexes
-
Haier 2HUM18R03/R2(DB) Manuel utilisateur
-
-
-
-
-
-
-
Haier AD24MS1ERAD Operating Manual And Instructions
-
-