Danby DSL120BA Le manuel du propriétaire
- Taper
- Le manuel du propriétaire

THROUGH-THE-WALL AIR CONDITIONER SLEEVE INSTALLATION INSTRUCTIONS
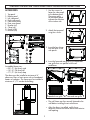
ACCESSORIES
1. Top panel
2. Bottom panel
3. Left side panel
4. Right side panel
5. Front cover panel
6. Rear cover panel
7. Bracket (x4)
8. Clasp (x4)
9. Screw (x28)
10. Washer (x8)
1
2
3
4
5
6
7
8
9
10
4” min
1/2” min
Assembled dimensions:
• 25 1/2” (64.8 cm) wide
• 15 1/4” (38.8 cm) tall
• 17 1/2” (44.4 cm) deep
The sleeve must be installed a minimum of 4”
above any fl oor or heat source such as baseboard
heaters or radiators. The sleeve must be installed a
minimum of 1/2” outside the building.
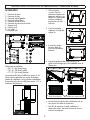
1. Use four screws to
fasten the side panels
to the bottom panel.
The arrow marks
on the bottom panel
indicate the direction
of the indoor side.
2. Attach the top panel
using four screws.
3. Insert the four clasps
into the holes in the
side panels.
Expanded rear grille Louvered rear grille
4. Insert the louvered rear grille or the expanded
rear grille that was packed with the air
conditioner.
• The wall sleeve must be securely fastened to the
wall before installing the air conditioner.
• After the sleeve is installed, caulk where
necessary around the entire interior and exterior
wall opening.
1

INSTRUCTIONS D’INSTALLATION DU MANCHON DU CLIMATISEUR AU MUR
ACCESSOIRES
1. Panneau du haut
2. Panneau du bas
3. Panneau latéral gauche
4. Panneau latéral droit
5. Panneau de couverture
6. Panneau de couverture arrière
7. Support (x4)
8. Fermoir (x4)
9. Vis (x28)
10. Rondelle (x8)
1
2
3
4
5
6
7
8
9
10
4” min
1/2” min
Dimensions assemblées:
• 25 1/2” (64.8 cm) large
• 15 1/4” (38.8 cm) grand
• 17 1/2” (44.4 cm) profond
Le manchon doit être installé à au moins 4” au-
dessus de tout plancher ou source de chaleur,
comme les radiateurs ou les plinthes chauffantes.
Le manchon doit être installé à au moins 1/2“ à
l’extérieur du bâtiment.
1. Utilisez quatre
vis pour fi xer les
panneaux latéraux au
panneau inférieur. Les
fl èches sur le panneau
inférieur indiquent
la direction du côté
intérieur.
2. Fixez le panneau
supérieur à l’aide de
quatre vis.
3. Insérez les quatre
fermoirs dans les
trous des panneaux
latéraux.
Grille arrière élargie
Grille arrière à persiennes
4. Insérez la grille arrière à persiennes ou la
grille arrière élargie qui a été emballée avec le
climatiseur.
• Le manchon mural doit être solidement fi xé au
mur avant d’installer le climatiseur.
• Une fois le manchon installé, calfeutrez si
nécessaire autour de toute l’ouverture du mur
intérieur et extérieur.
2

INSTRUCCIONES DE INSTALACIÓN DE LA MANGA DEL ACONDICIONADOR DE AIRE
ACCESORIOS
1. Panel superior
2. Panel inferior
3. Panel lateral izquierdo
4. Panel lateral derecho
5. Panel frontal
6. Panel de la cubierta posterior
7. Soporte (x4)
8. Broche (x4)
9. Tornillo (x28)
10. Arandela (x8)
1
2
3
4
5
6
7
8
9
10
4” min
1/2” min
Dimensiones ensambladas:
• 25 1/2” (64.8 cm) amplio
• 15 1/4” (38.8 cm) alto
• 17 1/2” (44.4 cm) profundo
La manga debe instalarse a un mínimo de 4“ por
encima de cualquier piso o fuente de calor, como
calentadores de placa base o radiadores. La
manga debe instalarse a un mínimo de 1/2“ fuera
del edifi cio.
1. Use cuatro tornillos
para sujetar los
paneles laterales al
panel inferior. Las
marcas de fl echa en el
panel inferior indican
la dirección del lado
interior.
2. Coloque el panel
superior con cuatro
tornillos.
3. Inserta los cuatro
broches en los
agujeros en los
paneles laterales.
Rejilla trasera expandida
Rejilla trasera tipo persiana
4. Inserte la rejilla posterior con rejilla o la rejilla
posterior expandida que estaba empacada con
el acondicionador de aire.
• La manga de la pared debe estar bien sujeta a
la pared antes de instalar el acondicionador de
aire.
• Después de instalar la manga, selle donde sea
necesario alrededor de la abertura de la pared
interior y exterior.
3
-
 1
1
-
 2
2
-
 3
3


Danby DSL120BA Le manuel du propriétaire
- Taper
- Le manuel du propriétaire
dans d''autres langues
- English: Danby DSL120BA Owner's manual
- español: Danby DSL120BA El manual del propietario
Autres documents
-
LG URNU96GB8A2.ENWALEU Manuel utilisateur
-
LG LP153CD3B Le manuel du propriétaire
-
LG LP153HDUC Mode d'emploi
-
Fedders A7U08W2B Le manuel du propriétaire
-
-
Friedrich WCT08A10A WCT10A10A WCT10A30A WCT12A10A WCT12A30A WCT16A30A WET10A33A WET12A33A WET16A33A WHT12A33A Mode d'emploi
-
-
Friedrich KCQ05A10A Guide d'installation
-
Maytag 23-11-2251N-004 Guide d'installation