
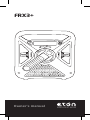
Owner’s manual
FRX3+

FRX3+ OWNER’S MANUAL
2

FRX3+ OWNER’S MANUAL
3
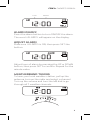
Thank you for purchasing the Eton FRX3+. We
want you to thoroughly enjoy the use of this
product. To take advantage of its many excellent
and unique features, we urge you to carefully read
the user’s manual.
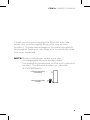
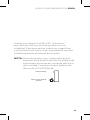
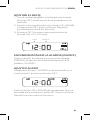
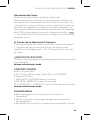
NOTE: Before initial use, make sure the
rechargeable lithium battery pack
(included) is connected to the unit’s electric
socket. The lithium battery is rated at
3.7V/2600mAh.
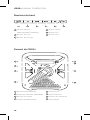
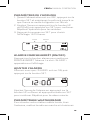
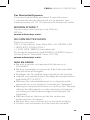
Lithium Batteries
Socket
Lithium Batteries
(Included)
AAA Battery
Compartment

FRX3+ OWNER’S MANUAL
4
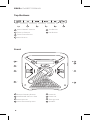
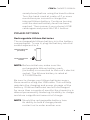
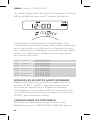
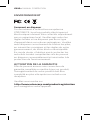
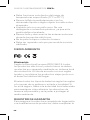
Front
Top Buttons
1
Alarm ON/OFF Button
2
Tune Up Button
3
Tune Down Button
4
Alert Button
5
Set Button
6
Cell Button
7
Power/Standby Button
8
AM/FM/WB Selector Dial
9
Volume Knob
10
Hand Turbine/Dynamo
11
Mute On
12
Mute Off
13
Tuning Knob
14
Speaker
11
12
13
14
1 2 3 4 5 6
7
8
9
10

FRX3+ OWNER’S MANUAL
5
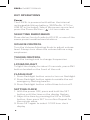
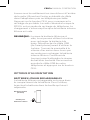
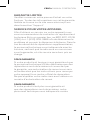
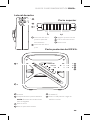
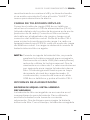
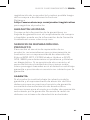
Back
Right Side
Top Side
15
Flashlight and
Flashing Beacon
Button
16
Flashlight and Beacon
17
Strap Hole
18
Glow in Dark Bezel
19
Solar Panel
20
Antenna
21
Battery Compartment
NOTE: Rechargeable lithium
battery slot
22
AUX Port
23
Earphone Port
24
DC-input
25
Cellphone Charge USB Port
22
23
24
25
15
16
19
18
17
20
21

FRX3+ OWNER’S MANUAL
6
KEY OPERATIONS
Power
The FRX3+ is powered with either the internal
rechargeable lithium battery (2600mAh, 3.7V) or
USB DC-in (included). Select the power source and
press the Power Button < > to turn radio on.
SELECTING RADIO BAND
Move dial on front of radio to AM, FM, or one of the
seven preset weatherband stations.
VOLUME CONTROL
Turn the Volume Adjusting Knob to adjust volume
level. Always turn down the volume before using
earphones.
TUNING CONTROL
Turn the tuning knob to change frequencies.
LCD BACKLIGHT
To light the display for about 5 seconds, press ANY
button located on the front of the unit.
FLASHLIGHT
1. Press ashlight button once to turn on ashlight.
2. Press ashlight button again to enable the red
emergency ashing beacon.
3. Press ashlight button a third time to turn off.
SETTING CLOCK
1. With the power OFF, press and hold the SET
button until the time on the display ashes.
2. Adjust the time by pressing the UP or DOWN
button, then press SET to conrm. Repeat for
the minute value.
3. Press SET again to select 12/24 hour clock
display

FRX3+ OWNER’S MANUAL
7
Hour Minute
ALARM ON/OFF
Press the alarm button to turn ON/OFF the alarm.
The word <ALARM> will appear on the display.
ADJUST ALARM
Make sure <ALARM> is ON, then press SET the
button.
Adjust hour of alarm by pressing the UP or DOWN
button, then press SET to conrm. Repeat for the
minute value.
WEATHERBAND TUNING
To hear your local weather station, pull up the
antenna, turn on the radio and select a channel.
Turn up the volume and turn the WB dial to go
through all 7 weather channels.

FRX3+ OWNER’S MANUAL
8
WB frequency appears on the display. You will
only hear one channel, but if you hear a weather
broadcast on more than one, select the strongest.
The strongest one will usually be your local
weather station. Below are the frequencies that
correspond to the radio’s channels:
WB1; Channel 1 162.400 MHz
WB2; Channel 2 162.425 MHz
WB3; Channel 3 162.450 MHz
WB4; Channel 4 162.475 MHz
WB5; Channel 5 162.500 MHz
WB6; Channel 6 162.525 MHz
WB7; Channel 7 162.550 MHz
SETTING WEATHERBAND ALERTS
Tune to WB for your location and press the ‘ALERT’
button. ‘ALERT’ will ash in the display and the
audio will turn off. The radio will continue to
monitor your WB station and will activate the audio
if an alert is issued. Press the ‘ALERT’ button again
to turn off the alert.
CELL PHONE CHARGING
Plug your phone’s USB cell phone charging cord
into the USB PHONE CHARGER jack (located under
the rubber cover on the back of the radio.). Plug the
other end of the cord into the cell phone charging
tip and then into the jack of the cell phone. Press
the CELL button to start dump charge. the radio will
turn off while the FRX3+ is in cell phone charging
mode. Charging stops once the internal lithium
battery is out of power.
NOTE: When the lithium battery is out of power,
the hand turbine may be used to recharge
the battery. Disconnect the USB cable (to

FRX3+ OWNER’S MANUAL
9
smartphone) before using the hand turbine.
Turn the hand crank at a rate of 2 or more
revolutions per second to charge the
internal lithium battery. Continue turning
until the desired battery level has been
reached. Then connect your phone’s USB
cable again and press the CELL button.
POWER OPTIONS
Rechargeable Lithium Batteries
The rechargeable lithium battery is in the battery
compartment. To use it, plug the battery into the
socket adjacent to it.
Lithium Batteries
Socket
Lithium Batteries
(Included)
AAA Battery
Compartment
NOTE: Before initial use, make sure the
rechargeable lithium battery pack
(included) is connected to the unit’s electric
socket. The lithium battery is rated at
3.7V/2600mAh.
Be sure to charge your lithium batteries every
three months using the USB cable. This will help
maintain the charging and power storage of the
battery. If lithium batteries are left discharged
for more than a couple of months the chemistry is
altered permanently hindering its ability to charge
and store a signicant amount of charge.
NOTE: Should the rechargeable battery lose
its ability to hold a charge please
contact us to order another one.

FRX3+ OWNER’S MANUAL
10
RECHARGING LITHIUM BATTERIES
USB Cable Power
To charge the lithium battery via the USB port (DC-
in), make sure the unit is on Dynamo Power option.
Plug the USB cable port into the computer, plug the
other port into the mini USB jack. The recharge icon
<
> appears. It takes about 2 hours to recharge.
Solar Power
When in Dynamo Power mode and the solar panels
are in direct sunlight (not through a window or
in the shade), the lithium rechargeable battery
recharges automatically. The LCD power status bar
(under DYN) will show the recharging icon <
>. It
takes about 10 hours to recharge via solar.
Via Hand Crank/Dynamo
Crank for 4 minutes to get 1 minute of talk time on
most smartphones or 10-15 minutes of radio time.
NEED HELP?
Check our website for FAQ’s for the
FRX3+ or www.etoncorp.com.
CONTACT US.
Etón Corporation, 1015 Corporation Way, Palo
Alto, CA 94303, USA. 1-800-872-2228 (U.S.);
650-903-3866 (worldwide); M-F, 8:00-4:30,
Pacic Standard Time; www.etoncorp.com.
WARNING
• Do not expose this appliance to rain or moisture.
• Do not submerge or expose for extended period
to water.

FRX3+ OWNER’S MANUAL
11
• Protect from high humidity and rain.
• Only operate within specied temperature range
(0 °C to 40 °C).
• Unplug immediately if liquid has been spilled or
any object has fallen into the apparatus.
• Clean only with a dry cloth. Do not use detergents
or chemical solvents as this might damage the
nish.
• Unplug and disconnect external antennas during
lightning storms.
• Do not remove cover [or back].
• Refer servicing to qualied service personnel.
ENVIRONMENT
Disposal
According to the European Directive 2002/96/
EC all electrical and electronic products must be
collected separately by a local collection system.
Please act according to your local rules and do
not dispose of your old products with your normal
household waste.
Please dispose of all types of batteries per
your Government, State or Local rules and/or
regulations. If you are unsure, please call the
appropriate local authority to nd out how to
dispose of them safely and help protect the
environment.

FRX3+ OWNER’S MANUAL
12
WARRANTY REGISTRATION
To ensure full warranty coverage or product
updates, registration of your product should be
completed as soon as possible after purchase or
receipt. Please go to
http://www.etoncorp.com/productregistration
to register your product.
LIMITED WARRANTY
Retain your proof of purchase or the receipt.
Limited Warranty information can be viewed at
www.etoncorp.com in the Support section.
SERVICE FOR YOUR PRODUCT
To obtain service for your product, we recommend
rst contacting an Etón service representative at
800-872-2228 US or (650) 903-3866 for problem
determination and trouble-shooting. If further
service is required, the technical staff will instruct
how to proceed based on whether the radio is still
under warranty or needs non-warranty service.
WARRANTY
If your product is still in warranty and the Etón
service representative determines that warranty
service is needed, a return authorization will
be issued and instructions for shipment to an
authorized warranty repair facility. Do not ship
your radio back without obtaining the return
authorization number.

FRX3+ OWNER’S MANUAL
13
NON-WARRANTY
If your product is no longer under warranty and
requires service our technical staff will refer you to
the nearest repair facility that will be able to best
handle the repair.
For service outside of North America, please
refer to the distributor information included at
time of purchase/receipt.

FRX3+ MANUAL D’OPÉRATION
14

FRX3+ MANUAL D’OPÉRATION
15
Merci d’avoir acheté le Etón FRX3+. Nous voulons
que vous jouissiez pleinement l’utilisation
de ce produit. Pour prendre avantage de ses
excellentes et uniques caractéristiques, nous vous
encourageons à lire attentivement le manuel de
l’utilisateur.
Remarque: Avant la première utilisation, assurez-
vous que l’assemblage de batterie
(inclus) soit branché à la douille élec-
trique de l’unité. La batterie lithium
est évaluée à 3,7V/2600mAh.
Douille pour
batteries Lithium
Batteries Lithium
(incluent)
Compartiment
de batterie AAA

FRX3+ MANUAL D’OPÉRATION
16
Devant du FRX3+
Boutons du haut
1
Bouton d’alarme
MARCHE/ARRÊT (ON/OFF)
2
Bouton Tune Up
3
Bouton Tune Down
4
Bouton ALERT
5
Bouton SET
6
Bouton CELL
7
Bouton Power/Standby
8
Cadran de sélecteur AM/FM/WB
9
Bouton du volume
10
Turbine à main/Dynamo
11
Muet Activé
12
Muet Désactivé
13
Bouton de commande
14
Haut-parleur
11
12
13
14
1 2 3 4 5 6
7
8
9
10

FRX3+ MANUAL D’OPÉRATION
17
Derrière du FRX3+
Côté droit
Côté haut
15
Lampe de poche
et bouton de
phare clignotant
16
Lampe de poche
et phare
17
Orice de ourroie
18
Biseau uoescent
19
Panneau solaire
20
Antenne
21
Compartiement de la
batterie
REMARQUE :
Emplacement pour batterie
au lithium rechargeable
22
Port AUX
23
Port pour écouteur
24
Entrée CC
25
Port USB chargeur de
téléphone cellulaire
22
23
24
25
15
16
19
18
17
20
21

FRX3+ MANUAL D’OPÉRATION
18
PRINCIPALES OPÉRATIONS
Alimentation
La FRX3+ est alimentée avec soit une batterie au
lithium rechargeable interne (2600 mAH, 3,7V)
ou une alimentation USB (incluse). Sélectionnez
la source d’alimentation et appuyez sur le bouton
d’allumage< >pour allumer la radio.
SÉLECTION DE LA FRÉQUENCE RADIO
Déplacez le bouton sur le devant de la radio sur
AM, FM, ou une des sept stations weatherband
prédénies.
CONTRÔLE DU VOLUME
Ajustez le volume en tournant le bouton approprié.
Diminuez toujours le volume avant d’utiliser des
écouteurs.
CHANGEMENT DE FRÉQUENCES
Tournez le bouton approprié pour changer de
fréquence.
RÉTROÉCLAIRAGE LCD
Pour allumer l’écran pendant environ 5 secondes,
appuyez sur n’importe quel bouton situé sur le
devant de l’appareil.
LAMPE DE POCHE
1. Appuyez une fois sur le bouton de lampe de
poche pour allumer la lampe de poche.
2. Appuyez à nouveau sur ce bouton pour activer le
signal lumineux clignotant rouge d’urgence.
3. Appuyez une troisième fois sur le bouton de
lampe de poche pour l’éteindre.

FRX3+ MANUAL D’OPÉRATION
19
PARAMÈTRES DE L’HORLOGE
1. Quand l’alimentation est sur OFF, appuyez sur le
bouton SET et maintenez-le enfoncé jusqu’à ce
que l’heure se mette à clignoter sur l’écran.
2. Ajustez l’heure en appuyant sur le bouton UP
ou DOWN, puis appuyez sur SET pour conrmer.
Répétez l’opération pour les minutes.
3. Appuyez à nouveau sur SET pour choisir
l’afchage 12/24 heure.
Heure Minute
ALARME MARCHE/ARRÊT (ON/OFF)
Appuyez sur le bouton alarme pour mettre en
MARCHE/ARRÊT l’alarme. Le mot <ALARM >
apparaitra sur l’affchage.
AJUSTER L’ALARME
Assurez-vous que <ALARM> est sur ON, puis
appuyez sur le bouton SET.
Ajustez l’heure de l’alarme en appuyant sur le
bouton UP ou Down et appuyez ensuite sur SET
pour confrmer. Répétez pour la valeur minute.
PARAMÉTRAGE WEATHERBAND
Pour écouter votre station météo locale, tirez
l’antenne, mettez la radio en marche et choisissez

FRX3+ MANUAL D’OPÉRATION
20
un canal. Augmentez le volume et tournez le cadran
WB pour aller à travers les 7 canaux de météo.
La fréquence WB apparait sur l’affchage. Vous
n’entendrez qu’un seul canal, mais si vous entendez
une transmission sur plus qu’un, choisissez le plus
fort. Celuicisera, en général, votre station de météo
locale. Les fréquences cidessous correspondent
aux canaux de radio.
WB1; Channel 1 162.400 MHz
WB2; Channel 2 162.425 MHz
WB3; Channel 3 162.450 MHz
WB4; Channel 4 162.475 MHz
WB5; Channel 5 162.500 MHz
WB6; Channel 6 162.525 MHz
WB7; Channel 7 162.550 MHz
RÉGLER LES ALERTES WEATHERBAND
Réglez WB selon où vous êtes et appuyez sur le
bouton ‘ALERT’. ‘ALERT’ clignotera dans l’écran
et le son se désactivera. La radio continuera
d’enregistrer votre station WB est activera le son
en cas d’alerte. Appuyez à nouveau sur le bouton
‘ALERT’ pour éteindre l’alerte.
CHARGEMENT DE PORTABLE
Branchez le câble de recharge USB de votre
téléphone au port USB PHONE CHARGER (qui se
La page est en cours de chargement...
La page est en cours de chargement...
La page est en cours de chargement...
La page est en cours de chargement...
La page est en cours de chargement...
La page est en cours de chargement...
La page est en cours de chargement...
La page est en cours de chargement...
La page est en cours de chargement...
La page est en cours de chargement...
La page est en cours de chargement...
La page est en cours de chargement...
La page est en cours de chargement...
La page est en cours de chargement...
La page est en cours de chargement...
La page est en cours de chargement...
La page est en cours de chargement...
La page est en cours de chargement...
La page est en cours de chargement...
La page est en cours de chargement...
-
 1
1
-
 2
2
-
 3
3
-
 4
4
-
 5
5
-
 6
6
-
 7
7
-
 8
8
-
 9
9
-
 10
10
-
 11
11
-
 12
12
-
 13
13
-
 14
14
-
 15
15
-
 16
16
-
 17
17
-
 18
18
-
 19
19
-
 20
20
-
 21
21
-
 22
22
-
 23
23
-
 24
24
-
 25
25
-
 26
26
-
 27
27
-
 28
28
-
 29
29
-
 30
30
-
 31
31
-
 32
32
-
 33
33
-
 34
34
-
 35
35
-
 36
36
-
 37
37
-
 38
38
-
 39
39
-
 40
40


dans d''autres langues
Documents connexes
-
Eton ARCFR360WXR RED Manuel utilisateur
-
Eton FR370 (FR 370) Manuel utilisateur
-
Eton SOLARLINK FR360 Le manuel du propriétaire
-
-
-
-
-
Eton FRX1 Manuel utilisateur
-
-

