Haier AS07NS1HRA-Grey Manuel utilisateur
- Catégorie
- Climatiseurs split-system
- Taper
- Manuel utilisateur

SPLIT TYPE ROOM AIR CONDITIONER
OPERATION MANUAL
AS07QS2ERA
AS09QS2ERA
AS12QS2ERA
0010563750
Please read this operation manual before using the air conditioner.
Keep this operation manual for future reference.
Contents
PARTS AND FUNCTIONS ...................................1
OPERATION.........................................................2
CAUTIONS...........................................................10
TROUBLE SHOOTING ........................................11
English
Índice
COMPONENTES Y FUNCIONES.................................12
FUNCIONAMIENTO......................................................13
PRECAUCIONES..........................................................21
RESOLUCIÓN DE PROBLEMAS .................................22
Español
Sommario
PARTI E FUNZIONI.......................................................23
FUNZIONAMENTO .......................................................24
AVVERTENZE...............................................................32
RISOLUZIONE DEI PROBLEMI....................................33
Italiano
Table des matières
ELEMENTS ET FONCTIONS .......................................34
UTILISATION.................................................................35
AVERTISSEMENTS......................................................43
DEPANNAGE ................................................................44
Français
Inhalt
TEILE UND FUNKTIONEN ...........................................45
BETRIEB .......................................................................46
VORSICHTSMASSNAHMEN........................................54
FEHLERBEHEBUNG ....................................................55
Deutsch


English
1
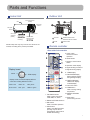
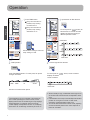
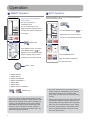
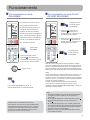
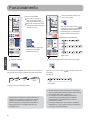
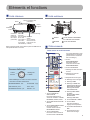
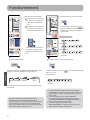
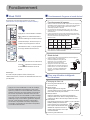
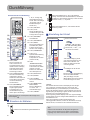
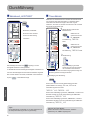
Parts and Functions
Indoor Unit Outdoor Unit
Remote controller
Actual indoop unit may vary from the one shown in the
manual, according to the product purchased.
Air Purifying Filter
(inside)
Emergency
Switch
Display board
Outer side of the controller
Display board
Aureol
TEMP display
Display mode, the aureole display different
colour when setting different function
COOL: blue HEAT: red FAN: yellow
AUTO: white DRY: cyan HEALTH: green
Nano-aqua
generator
(inside)
(Adjust up and
Don’t adjust it
manually)
Vertical blade
(Adjust left and
OUTLET
CONNECTING PIPING
AND ELECTRICAL WIRING
INLET DRAIN HOSE
Inlet
Inlet grille
Outlet
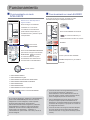
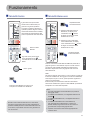
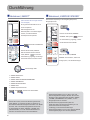
1. FAN SPEED button
Used to select fan speed:
LOW, MED, HI, AUTO
2. SWING LEFT/RIGHT button
3. DRY button
Used to set DRY operation.
4. HEAT button
Used to set HEAT operation.
(Cooling only unit do not
have displays and functions
related with heating.)
17
QUIET
SOFT
iFP
ECO
TIMER ON OFF
PM
AM
COOL
ON/OFF
HEAT
DRY
FAN
SPEED
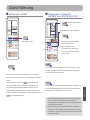
2
13
14
15
16
ECO
FAN
COOL
SMART
HEAT
DRY
CTD
SET TEMP.
ROOM TEMP.
AUTO AUTO
AUTO
FAN
SPEED
POWER
11
12
.
4
5. COOL button
Used to set COOL
operation.
6. QUIET button
7. Display of each function
status
8. Operation mode display
9. Signal sending end device
10. Signal sending display
11. TEMP display
12. FAN SPEED display
Swing up/down display
swing left/right display
13. TIMER ON display
TIMER OFF display
CLOCK display
14. ON / OFF button
15. TEMP button
used to change setting
temperature
16. SWING UP/DOWN
button
17. ECO button
power saving function

English
2
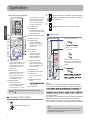
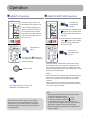
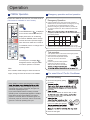
Operation
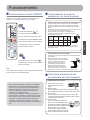
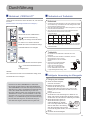
Loading of the battery
Clock set
Load the batteries as illustrated. 2 R-03 batteries,
resetting key (cylinder); Be sure that the loading is
in line with the “+”/“-”;
Load the battery, then put on the cover again.
Press CLOCK button,
Press “+” or “-” to set
correct time.
Each press will increase or
decrease 1min. If the button is
kept pressed, time will change
quickly.
press CONFIRM, “AM” and
starts working.
Note:
The distance between the signal transmission head and
the receiver hole should be within 7m without any obstacle
change-over wireless telephone is installed in the type
in receiving the signals, so the distance to the indoor unit
should be shorter.
Full display or unclear display during operation indicates the
batteries have been used up. Please change batteries.
If the remote controller can’t run normally during operation,
please remove the batteries and reload several minutes later.
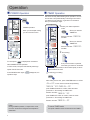
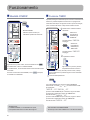
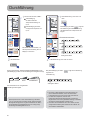
Inner side of the controller
CHILD
LOCK
SLEEPSMART
FAN
COOL
SMART
HEAT
DRY
CTD
SET TEMP.
ROOM TEMP.
AUTO AUTO
AUTO
FAN
SPEED
POWER
SOFT
iFP
ECO
TIMER ON OFF
PM
AM
19
20
21
22
23
24
25
27
28
30
31
18
26
FRESH
LIGHT
10
QUIET
29
32
33
18. CODE button
Used to select CODE A or B
with a press, A or B will be
displayed on LCD. Please
select A without special
explanation.
19. RESET button
When the remote controller
appears abnormal, use
a sharp pointed article to
press this button to reset
the controller normal.
20. INQUIRE button
Inquire the external
environmental temperature
and the operating power
of the machine. (e.g. when
the panel display “01”, the
operating power is 100W;
when the panel display
“02”, the operating power
is 200W, and so forth)
21. POWER button
22. LIGHT button
Control the lightening and
extinguishing of the indoor
LED display board.
23. HEALTH AIRFLOW button
24. HEALTH button
25. SMART button
Used to set SMART
operation. (This function
is unavailable on some
models.)
26. SLEEP button
27. 10 ºC button
special heating set
function: 10 degree
heating maintaining
(valuable for RS)
28. CHILDLOCK button
If pressed, the other
buttons will be disabled.
Press it once again, lock
will be cancelled.
29. FRESH button
30. TIMER ON / OFF button
31. HOUR button
used to change clock or
timer
32. CANCEL/CONFIRM
button
clock settings.
33. CLOCK button
The following functions and related displays are not
available:
20
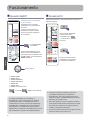
Remove the battery cover;
1
2
3
1
2
3
PM
AM
QUIET
SMART
SLEEP
10
LIGHT
CHILD
LOCK
FRESH
Hint:
Remove the batteries in case unit won’t be in usage for
a long period. If there are any display after taking-out,
just need to press reset key.

English
3
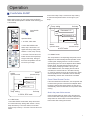
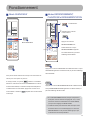
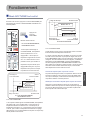
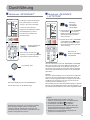
QUIET Operation
COOL,HEAT and DRY Operation
QUIET Operation
Unit start.
Select operation mode.
Press the COOL button on
the remote control. When
COOL appears on the remote
control, the display board will
turn BLUE.
Press the HEAT button on the remote control. When HEAT
appears on the remote control, the display board will turn
RED.
Press the DRY button on the remote control. When DRY
appears on the remote control, the display board will turn
CYAN.
You can use this function when silence is needed for rest or
reading.
For each press,
SOFT
is displayed Air conditioner starts
POWER function operation. In SOFT operation mode, fan
speed automatically takes low speed of AUTO fan mode.
Press SOFT button again,
SOFT
disappears, the operation
stops.
Operation
1. In DRY mode, when room temperature becomes
lower than temp. setting +2 ºC, unit will run
intermittently ai LOW speed regardless of FAN
setting.
2. Remote controller can memorize each operation
status. When starting it next time, just press ON/
OFF button and unit will run in previous status.
AM
QUIET
FAN
SPEED
ECO
SOFT
.
QUIET
QUIET
1
2
AM
QUIET
FAN
SPEED
ECO
.

English
4
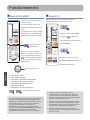
Unit will start running to reach the
temp. setting on LCD.
8SDQGGRZQDLUÀRZGLUHFWLRQ
COOL/DRY:
For each press of “
” button, air
ÀRZGLUHFWLRQRQUHPRWHFRQWUROOHU
displays as follows according to
different operation modes:
FAN Operation
LOW MED HI AUTO
Press FAN SPEED button. For each press, fan speed
changes as follows:
Unit will run at selected fan speed.
Press TEMP button.
Every time the button is
pressed, temp. setting
increases 0.5 ºC.
Every time the button is
pressed, temp. setting
decreases 0.5 ºC.
Operation
y
When humidity is high, condensate water might occur
at air outlet if all vertical louvers are adjusted to left or
right.
y
,WLVDGYLVDEOHQRWWRNHHSKRUL]RQWDOÀDSDWGRZQZDUG
position for a long time in COOL or DRY mode,
otherwise, condensate water might occur.
y
$VFROGDLUÀRZVGRZQZDUGLQ&22/PRGHDGMXVWLQJ
DLUÀRZKRUL]RQWDOO\ZLOOEHPXFKPRUHKHOSIXOIRUD
better air circulation.
The temperature can be increased or decreased by
0.5 ºC while operating the remote control, but the
display board of the air conditioning unit only displays
integral degrees. For example, when the remote
control displays a temperature of 24.5 ºC, the display
board of the air conditioning unit will only show 24 ºC.
1
2
AM
QUIET
ECO
FAN
SPEED
.
.
1
2
AM
QUIET
ECO
FAN
SPEED
.
HEAT:
SMART:
Initial state
/HIWDQGULJKWDLUÀRZGLUHFWLRQ
Initial state
For each press of “
” buttor, remote controller
displays as follows:
remote controller:

English
5
The water-ion generator in the
airconditioner can generate a lot
of anion effectively balance the
quantity of position and anion in
the air and also to kill bacteria
and speed up the dust sediment
LQWKHURRPDQG¿QDOO\FOHDQWKH
air in the room.
3UHVVWKHEXWWRQRIKHDOWKDLUÀRZDJDLQERWKWKHLQOHW
and outlet grills of the air conditioner are opened, and
the unit goes on working under the condition before the
VHWWLQJRIKHDOWKDLUÀRZIXQFWLRQ$IWHUVWRSSLQJWKHRXWOHW
grille will close automatically.
Notice:
Cannot pull direct the outlet grille by hand. Otherwise, the
grille will run incorrectly. If the grille is not run correctly,
stop for a minute and then start, adjusting by remote
controller.
Remote controller can memorize each operation status.
when starting it next time, just press ON/OFF button and
unit will run in previous status.
The setting of
KHDOWKDLUÀRZ
function
The cancel of
WKHKHDOWKDLUÀRZ
function
Press HEALTH
button
aureol: “green”
Press HEALTH button for twice press,
disappears, the operation stops.
For each press,
is displayed
Air conditioner starts health anion
function operation.
Operation
When indoor fan motor is running, it has healthy
process function. (It’s available under any mode)
When the fan in the indoor unit does not work, the
health lamp lights up, but the anion generator does
not release anion.
HEALTH Operation
HEALTH AIRFLOW Operation
AM
SMART
SLEEP
LIGHT
CHILD
LOCK
FRESH
QUIET
AM
SMART
SLEEP
LIGHT
CHILD
LOCK
FRESH
QUIET
3UHVVWKHEXWWRQRIKHDOWKDLUÀRZ
appears on the display. Avoid
WKHVWURQJDLUÀRZEORZVGLUHFWWR
the body.
3UHVVWKHEXWWRQRIKHDOWKDLUÀRZ
again,
appears on the display.
$YRLGWKHVWURQJDLUÀRZEORZV
direct to the body.
Note:
$IWHUVHWWLQJWKHKHDOWKDLUÀRZIXQFWLRQWKHSRVLWLRQ
RILQOHWDQGRXWOHWJULOOVLV¿[HG
2. In heating, it is better to select the
mode.
3. In cooling, it is better to select the
mode.
4. In cooling and dry, using the air conditioner for a
long time under the high air humidity, a phenomenon
falling drips of water occurs at the outlet grille.
5. Select the appropriate fan direction according to the
actual conditions.

English
6
Set Clock correctly before starting Timer operation. You can
let unit start or stop automatically a following times: Before
you wake up in the morning, or get back from outside or
after you fall asleep at night.
POWER Operation
When you need rapid cooling,
you can use this function.
Select your desired operation
mode.
Time setting.
&RQ¿UPLQJ\RXUVHWWLQJ
Remote controller: “
TIMER ON
”
ZLOOÀDVK
Remote controller: “
TIMER OFF
”
ZLOOÀDVK
$IWHUVHWWLQJFRUUHFWWLPHSUHVV&21),50EXWWRQWRFRQ¿UP
“
ON
” or “
OFF
”RQWKHUHPRWHFRQWUROOHUVWRSVÀDVKLQJ
TIMER ON
ĺ
OFF / TIMER ON
ĸ
OFF
SUHVV7,0(521EXWWRQWRFRQ¿UPIROORZWKHVDPH
procedure in “Time setting for TIMER OFF”
Remote controller:
TIMER ON
ĺ
OFF
SUHVV7,0(52))EXWWRQWRFRQ¿UPIROORZWKHVDPH
procedure in “Time setting for TIMER ON”
Remote controller:
TIMER ON
ĸ
OFF
Every time the button is pressed,
time setting increases or decreases
Select your desired
TIMER ON.
Select your desired
TIMER OFF.
For each press,
is displayed Air conditioner
starts POWER function operation.
In COOL mode, fan speed automatically takes high
speed of AUTO fan mode.
Press POWER button again,
POWER
disappears, the
operation stops.
POWER Operation
TIMER Operation
AUTO
POWER
AM
SMART
SLEEP
LIGHT
CHILD
LOCK
FRESH
QUIET
Hints:
During POWER operation, in rapid COOL mode,
the room will show inhomogeneous temperature
distribution.
To cancel TIMER mode
Just press CANCEL button several times until TIMER
3
QUIET
1
TIMER ON
AM
SMART
SLEEP
LIGHT
CHILD
LOCK
FRESH
1
2
1 min, if kept depressed, it will increase rapidly. It can be
adjusted within 24 hours.
Operation

English
7
Before going to bed, you can simply press the SLEEP
button and unit will operate in SLEEP mode and bring you
a sound sleep.
3 hours then stops. Temp. is lower than temp. setting
so that room temperature won’t be too high for your
sleep.
Approx. 6hrs
Temp. setting
Decreases 2
º
C
Decreases 2
º
C
Unit stop
Rises 1
º
C
Rises 1
º
C
Rises 1
º
C
Temp. setting
In COOL, DRY mode
In HEAT mode
Unit stop
1 hr
1 hr
1 hr
3 hrs
3 hrs
1 hr
SLEEP
operation starts
SLEEP
operation starts
SLEEP
operation stops
SLEEP
operation stops
Press SLEEP
button.
Operation Mode
1. In COOL, DRY mode
1 hours after SLEEP mode
starts, temp. will become 1 ºC
higher than temp. setting. After
another 1 hours, temp. rises by
1 ºC further. The unit will run for
further 6 hours then stops Temp.
is higher than temp. setting so
that room temperature won’t be
too low for your sleep.
2. In HEAT mode
1 hours after SLEEP mode starts, temp will become
2 ºC lower than temp. setting. After another 1 hours,
temp decrease by 2 ºC further. After more another
3 hours, temp. rises by 1 ºC further. The unit will run for
further
3. In SMART mode
The unit operates in corresponding sleep mode, which
adapted to the automatically selected operation mode.
4. When quiet sleeping function is set to 8 hours the
quiet sleeping time can not be adjusted. When TIMER
function is set, the quiet sleeping function can’t be
set up. After the sleeping function is set up, if user
resets TIMER function, the sleeping function will be
cancelled; the machine will be in the state of timing-
on, if the two modes are set up at the same time, either
RIWKHLURSHUDWLRQWLPHLVHQGHG¿UVWWKHXQLWZLOOVWRS
automatically, and the other mode will be cancelled.
Power Failure Resume Function
,IWKHXQLWLVVWDUWHGIRUWKH¿UVWWLPHWKHFRPSUHVVRUZLOO
not start running unless 3 minutes have elapsed. When
the power resumes after power failure, the unit will run
automatically, and 3 minutes later the compressor starts
running.
Note to the power failure resume:
SUHVVWKHVOHHSEXWWRQWHQWLPHVLQ¿YHVHFRQGVDQG
enter function after hearing four sounds. And press the
VOHHSEXWWRQWHQWLPHVZLWKLQ¿YHVHFRQGVDQGOHDYH
this function after hearing two sounds.
Comfortable SLEEP
Operation
AUTO
AM
QUIET
SMART
SLEEP
LIGHT
CHILD
LOCK
FRESH

English
8
(This function is unavailable on
some models)
One key can give you a
comfortable room!
The air conditioning unit can
judge the indoor temperature and
humidity, and make the adjustment
accordingly.
SMART start
aureol: “ white”
or SMART stops
Press ON/OFF button, unit starts.
Press SMART button “
” is
displayed on the remote controller
Now, the display board of the air
conditioning unit will turn WHITE.
Automatic adjusting with the environmental temperature,
running with power saving.
Under the cooling, heating and dehumidifying mode,
press the smart key to enter the smart function. Under
the smart running mode, when the air conditioning is
running, it will automatically select cooling, heating,
dehumidifying or blowing mode as When the smart
function is running, press the “cooling” “heating” or
“dehumidifying” key to switch to the other mode, you
will exit from the smart function.
y
The power saving function only works under the
cooling, heating or dehumidifying mode, after the
power saving function is set, press the sharp,
mute, sleep, or smart key to exit the power saving
function.
y
After the power saving is set, the host machine will
automatically adjust the setting temperature, and
automatically control the switch of the compressor,
which may be inconsistent with the user’s setting.
y
The power saving function is more effective after
the air conditioning has been running for a long
time (more than 2 hours)
y
SMART FRESH
y
SMART Defrost
y
SMART FAN SPEED
y
SMART FAN HEALTH
y
SMART DRY
y
SMART SOFT
y
SMART Control temperature
SMART Operation
ECO Operation
QUIET
SMART
SLEEP
LIGHT
CHILD
LOCK
FRESH
SMART
AUTO
AM
SMART
ECO
AM
FAN
SPEED
ECO
QUIET
.
Press ECONOMY button “
ECO
” is
displayed on the remote controller,
unit will run in ECONOMY operation.
Press ECONOMY button
again, ECONOMY disappears,
the operation stops.
Operation

English
9
Exhaust the vitiated air from the room, and inhale fresh air.
(This function is unavailable on some models.)
Press FRESH button “
is displayed
on the remote controller and Now, the
display board of the air conditioning
unit will turn GREEN, and the change-
for-fresh-air function operation begins.
Note: Since this model has no fresh air
unit installed, there is no change for the
operating status.
For twice press , the display “
”
disappears and the change-for-fresh-
air function operation is canceled.
Press “HEALTH” button when operating in heating
pressing “HEALTH” button, it displays in green for
3 seconds, then red for 10 seconds, and green for
3 seconds, repeating this cycle.
If you press “FRESH” button in heating or health
operating mode, a purple display appears in addition
to the above red and green display cycle; that is,
purple for 3 seconds, red for 10 seconds, green for
3 seconds, purple for 3 seconds, red for 10 seconds,
green for 3 seconds, repeating this cycle.
Emergency Operation:
Use this operation only when the remote controller is
defective or lost, and with function of emergency running,
air conditoner can run automatically for a while.
When the emergency operation switch is pressed, the
“Pi” sound is heard once, which means the start of this
operation.
emergency operation starts, the unit will run automatically in
the following modes:
Room
temperature
Designated
temperature
Timer
mode
Fan
speed
Operation
mode
Above 24 ºC 24 ºC No AUTO COOL
Below 24 ºC 24 ºC No AUTO HEAT
It is impossible to change the settings of temp. and fan
speed, It is also not possible to operate in timer or dry mode.
Test operation:
T
est operation switch is the same as emergency switch.
Use this switch in the test operation
when the room temperature is below
16 ºC, do not use it in the normal
operation.
Continue to press the test operation
switch for more than 5 seconds.
After you hear the “Pi” sound twice,
Air Filter cleaning
1.
Open the inlet grille by pulling
it upward
2.
downward.
3.
Use a vacuum cleaner to remove dust, or wash
completely in the shade.
4.
the “FRONT” indication is facing
to the front. Make sure that the
the stopper. If the right and left
defects.
5.
Close the inlet grille
FRESH Operation
Emergency operation and test operation
For smart Use of The Air Conditioner
Operation
AM
SMART
SLEEP
LIGHT
CHILD
LOCK
FRESH
QUIET
Note:
If the unit didn’t install change-for-fresh-air electrical
engine, change-for-fresh-air function is not available.
Pi
Pi Pi
Once every
two weeks

English
10
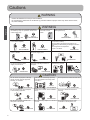
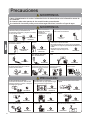
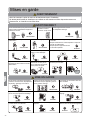
Cautions
WARNING
WARNING
Check proper installation of the
drainage securely
Use an exclusive power
source with a circuit
breaker
When abnormality such as burnt-small found,
immediately stop the operation button and
contact sales shop.
Please call Sales/Service Shop for the Installation.
Do not attempt to install the air conditioner by yourself because improper works may cause electric shock,
¿UHZDWHUOHDNDJH
Do not start or stop the operation
by disconnecting the power
supply cord and so on.
Take care not to damage
the power supply cord.
Do not use power supply
cord in a bundle.
Use the proper voltageConnect power supply cord
to the outlet completely
STRICT
ENFORCEMENT
OFF
Do not use for the purpose of storage
of food, art work, precise equipment,
breeding, or cultivation.
Connect the earth cable.Do not try to repair or
reconstruct by yourself.
1.Do not use power supply cord extended or
connected in halfway
2.Do not install in the place where there is any
SRVVLELOLW\RILQÀDPPDEOHJDVOHDNDJHDURXQGWKH
unit.
3.Do not get the unit exposed to
vapor or oil steam.
'RQRWFKDQQHOWKHDLUÀRZGLUHFWO\
at people, especially at infants or
the aged.
Do not insert objects into the air inlet or outlet.
STRICT
ENFORCEMENT
STRICT
ENFORCEMENT
STRICT
ENFORCEMENT
PROHIBITION
PROHIBITION
PROHIBITION
PROHIBITION PROHIBITION
earthing
CAUTION
Do not place animals or plants in the
GLUHFWSDWKRIWKHDLUÀRZ
'RQRWLQVWDOOWKHXQLWQHDUD¿UHSODFH
or other heating apparatus.
Take fresh air occasionally especially
when gas appliance is running at the
same time.
Do not place any objects on or climb on
the unit.
Check good condition of the installation
stand
Do not operate the switch with wet hand.
'RQRWSODFHÀRZHUYDVHRUZDWHU
containers on the top of the unit.
Do not pour water onto the unit for
cleaning
STRICT
ENFORCEMENT
PROHIBITION
PROHIBITION
PROHIBITION
PROHIBITION
PROHIBITION
PROHIBITION PROHIBITION
PROHIBITION
PROHIBITION

English
11
Trouble shooting Cautions
Before asking for service, check the following
¿UVW
Phenomenon Cause or check points
Normal
Performance
inspection
The system
does not restart
immediately.
y
When unit is stopped, it won’t restart
immediately until 3 minutes have elapsed
to protect the system.
y
When the electric plug is pulled out
and reinserted, the protection circuit
will work for 3 minutes to protect the air
conditioner.
Noise is heard
y
During unit operation or at stop, a
swishing or gurgling noise may be heard.
$W¿UVWPLQXWHVDIWHUXQLWVWDUWWKLV
noise is more noticeable. (This noise is
JHQHUDWHGE\UHIULJHUDQWÀRZLQJLQWKH
system.)
y
During unit operation, a cracking noise
may be heard. This noise is generated
by the casing expanding or shrinking
because of temperature changes.
y
6KRXOGWKHUHEHDELJQRLVHIURPDLUÀRZ
LQXQLWRSHUDWLRQDLU¿OWHUPD\EHWRRGLUW\
Smells are
generated.
y
This is because the system circulates
smells from the interior air such as the
smell of furniture, paint, cigarettes.
Mist or steam are
blown out.
y
During COOL or DRY operation, indoor
unit may blow out mist. This is due to the
sudden cooling of indoor air.
In dry mode, fan
speed can’t be
changed.
y
In DRY mode, when room temperature
becomes lower than temp. setting +2 ºC,
unit will run intermittently at LOW speed
regardless of FAN setting.
Multiple
check
y
Is power plug inserted?
y
Is there a power failure?
y
Is fuse blownout?
Poor cooling
y
,VWKHDLU¿OWHUGLUW\"
Normally it should be cleaned every
15 days.
y
Are there any obstacles before inlet and
outlet?
y
Is temperature set correctly?
y
Are there some doors or windows left
open?
y
Is there any direct sunlight through the
window during the cooling operation?
(Use curtain)
y
Are there too much heat sources or too
many people in the room during cooling
operation?
y
Do not obstruct or cover the ventilation grille of the air conditoner. Do not
SXW¿QJHUVRUDQ\RWKHUWKLQJVLQWRWKHLQOHWRXWOHWDQGVZLQJORXYHU
y
Do not allow children to play with the air conditioner. In no case should
children be allowed to sit on the outdoor unit.
6SHFL¿FDWLRQV
y
The refrigerating circuit is leak-proof.
The machine is adaptive in following situation
1. Applicable ambient temperature range:
2. If the power supply cord is damaged, it must be replaced by the
PDQXIDFWXUHURULWVVHUYLFHDJHQWRUDVLPLODUTXDOL¿HGSHUVRQ
3. If the fuse of indoor unit on PC board is broken, please change it with
the type of T.3.15A/ 250V. If the fuse of outdoor unit is broken, change it
with the type of T.25A/250V
4. The wiring method should be in line with the local wiring standard.
5. After installation, the power plug should be easily reached.
6. The waste battery should be disposed properly.
7KHDSSOLDQFHLVQRWLQWHQGHGIRUXVHE\\RXQJFKLOGUHQRULQ¿UPSHUVRQV
without supervision.
8. Young children should be supervised to ensure that they do not play with
the appliance.
3OHDVHHPSOR\WKHSURSHUSRZHUSOXJZKLFK¿WLQWRWKHSRZHUVXSSO\
cord.
$EUHDNHUVKRXOGEHLQFRUSRUDWHGLQWR¿[HGZLULQJ7KHEUHDNHUVKRXOG
be all-pole switch and the distance between its two contacts should be
not less than 3mm.
11. The power plug and connecting cable must have acquired the local
attestation.
,QRUGHUWRSURWHFWWKHXQLWVSOHDVHWXUQRIIWKH$&¿UVWDQGDWOHDVW
30 seconds later, cutting off the power.
3OHDVHGRQ¶WLQVHUWDQ\VHQVRURQZD\VWRSYDOYHSLSH¿WWLQJ
Cooling
Indoor
Maximum: D.B/W.B 32 ºC/23 ºC
Minimum: D.B/W.B 21 ºC/15 ºC
Outdoor
Maximum: D.B/W.B 43 ºC/26 ºC
Minimum: D.B 18 ºC
Heating
Indoor
Maximum: D.B 27 ºC
Minimum: D.B 0 ºC
Outdoor
Maximum: D.B/W.B 24 ºC/18 ºC
Minimum: D.B/W.B -7 ºC/-8 ºC
Outdoor
(INVERTER)
Maximum: D.B/W.B 24 ºC/18 ºC
Minimum: D.B -15 ºC
EUROPEAN REGULATIONS
CONFORMITY FOR THE MODELS
CE
All the products are in conformity with the following
European provision:
- Low Voltage Directive 73/23/EEC
- Low Voltage Directive 2006/95/EC
- Electomagnetic Compatibility 89/336/EEC
- Electomagnetic Compatibility 2004/108/EC
ROHS
7KHSURGXFWVDUHIXO¿OOHGZLWKWKHUHTXLUHPHQWVLQWKHGLUHFWLYH((&
of the European parliament and of council on the Restriction of the use of
Certain Hazardous Substances in Electrical and Electronic Equipment
(EU RoHS Directive)
WEEE
In accordance with the directive 2002/96/CE of the European parliament,
herewith we inform the consumer about the disposal requirements of the
electrical and electronic products.
DISPOSAL REQUIREMENTS:
Your air conditioning product is marked with this symbol. This
means that electrical and electronic products shall not be mixed
with unsorted household waste. Do not try to dismantle the
system yourself: the dismantling of the air conditioning system,
treatment of the refrigerant, of oil and of other part must be done by a
TXDOL¿HGLQVWDOOHULQDFFRUGDQFHZLWKUHOHYDQWORFDODQGQDWLRQDOOHJLVODWLRQ
Air conditioners must be treated at a specialized treatment facility for reuse,
recycling and recovery. By ensuring this product is disposed of correctly, you
will help to prevent potential negative consequences for the environment
and humen health. Please contact the installer or local authority for more
information. Battery must be removed from the remote controller and
disposed of separately in accordance with relevant local and national
legislation.


Español
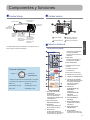
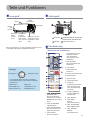
Componentes y funciones
Unidad interior
Unidad exterior
Mando a distancia
La unidad interior podría ser distinta a la que aparece en el
manual, según el producto adquirido.
)LOWURSXUL¿FDGRUGH
aire (interior)
Interruptor de
emergencia
Panel de
indicadores
Parte externa del mando
Panel de indicadores
Aureola
Indicador de
TEMPERATURA
Muestra el modo del aire acondicionado. La aureola
cambia de color según la función que esté activa.
FRÍO: azul CALOR: rojo
VENTILADOR: amarillo AUTOMÁTICO: blanco
SECO: cian SALUDABLE: verde
Generador
de aniones
negativos
(interior)
Alerón horizontal
(permite ajustar
la dirección del
ÀXMRGHDLUHKDFLD
arriba y hacia
abajo; no lo ajuste
manualmente)
Paleta vertical
(permite ajustar la
GLUHFFLyQGHOÀXMR
de aire hacia la
izquierda y hacia
la derecha)
SALIDA DE AIRE
TUBOS DE CONEXIÓN Y
CABLEADO ELÉCTRICO
ENTRADA DE AIRE
MANGUITO DE DRENAJE
Toma de entrada
Rejilla de
entrada de aire
Salida de aire
1. Botón VELOCIDAD DEL
VENTILADOR
Se utiliza para seleccionar
el nivel de velocidad del
ventilador: BAJA, MEDIA, ALTA
y AUTOMÁTICA
2. Botón OSCILACIÓN
IZQUIERDA/DERECHA
3. Botón SECO
Se utiliza para establecer el
funcionamiento en SECO.
4. Botón CALOR
Se utiliza para establecer el
funcionamiento en CALOR. Las
unidades que solo dispongan
17
QUIET
SOFT
iFP
ECO
TIMER ON OFF
PM
AM
COOL
ON/OFF
HEAT
DRY
FAN
SPEED
2
13
14
15
16
ECO
FAN
COOL
SMART
HEAT
DRY
CTD
SET TEMP.
ROOM TEMP.
AUTO AUTO
AUTO
FAN
SPEED
POWER
11
12
.
4
de funciones de refrigeración
no poseen pantallas ni
funciones relacionadas con la
calefacción.
5. Botón FRÍO
Se utiliza para establecer el
funcionamiento en FRÍO.
6. Botón SILENCIOSO
7. Muestra el estado de cada
función.
8. Indicador de modo de
funcionamiento
9. Extremo de envío de señal
10. Indicador de envío de señal
11. Indicador de TEMPERATURA
12. Indicador de VELOCIDAD
DEL VENTILADOR Indicador
de oscilación arriba/abajo
Indicador de oscilación
izquierda/derecha
13. Indicador de
TEMPORIZADOR DE
ENCENDIDO
Indicador de
TEMPORIZADOR DE
APAGADO
Indicador de RELOJ
14. Botón ENCENDIDO/
APAGADO
15. Botón TEMPERATURA
Se utiliza para cambiar la
temperatura.
16. Botón OSCILACIÓN
ARRIBA/ABAJO
17. Botón AHORRO
Se utiliza para cambiar a la
función de ahorro de energía.
12

Español
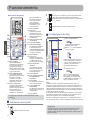
Funcionamiento
Instalación de las pilas
&RQ¿JXUDFLyQGHOUHORM
(QOD¿JXUDVHPXHVWUDHOPRGRGHFDUJDGHODVSLODV
2 pilas R-03, botón de restablecimiento (cilindro).
Asegúrese de que las pilas se insertan con la polaridad
“+”/“-” correcta.
Inserte las pilas y vuelva a colocar la tapa.
Pulse el botón RELOJ.
Pulse “+” o “-” para establecer
la hora correcta.
&RQ¿UPHODKRUD
Cada vez que pulse un botón, la
hora se aumentará o reducirá en
1 minuto. Si mantiene un botón
pulsado, la hora avanzará o
retrocederá rápidamente.
8QDYH]FRQ¿UPDGDODKRUD
pulse el botón CONFIRMAR.
Tras hacerlo, el indicador “AM”
o “PM” dejará de parpadear, y el
reloj se pondrá en marcha.
Nota:
La distancia entre el cabezal de transmisión de la señal y el
RUL¿FLRGHOUHFHSWRUGHEHVHUGHXQRVPHWURVVLQREVWiFXORV6L
VHLQVWDODQOiPSDUDVÀXRUHVFHQWHVGHDUUDQTXHHOHFWUyQLFRRVH
utilizan teléfonos inalámbricos en la sala, el receptor podría tener
problemas para recibir las señales, por lo que la distancia hasta la
unidad interior deberá ser menor.
Si se activan todos los indicadores de la pantalla o no es posible
visualizarlos correctamente durante el uso, es señal de que las
pilas se han agotado, por lo que deberá cambiarlas.
Si el mando a distancia no funciona con normalidad durante su
uso, extraiga las pilas y vuelva a insertarlas pasados unos minutos.
Parte interna del mando
CHILD
LOCK
SLEEPSMART
FAN
COOL
SMART
HEAT
DRY
CTD
SET TEMP.
ROOM TEMP.
AUTO AUTO
AUTO
FAN
SPEED
POWER
SOFT
iFP
ECO
TIMER ON OFF
PM
AM
19
20
21
22
23
24
25
27
28
30
31
18
26
FRESH
LIGHT
10
QUIET
29
32
33
18. Botón CÓDIGO
Permite seleccionar el
CÓDIGO A o B al pulsarlo.
En la pantalla LCD se
mostrará A o B, según el
código elegido. Seleccione
el código A si no ha recibido
ninguna indicación.
19. Botón RESTABLECER
Si el mando a distancia
presenta alguna anomalía,
introduzca un objeto
SXQ]DQWHHQHORUL¿FLR
para pulsar este botón y
restablecer el mando.
20. Botón CONSULTAR
Consulta la temperatura
ambiente externa y la
potencia de funcionamiento
de la máquina. (p. ej.
cuando en el panel se
muestra “01”, la potencia
de funcionamiento es
de 100 W; cuando en
el panel se muestra
“02”, la potencia
de funcionamiento
es de 200 W, y así
sucesivamente).
21. Botón INTENSO
22. Botón LUZ
Controla la activación
y desactivación de la
iluminación del panel de
indicadores LED de la
unidad interior.
23. Botón FLUJO DE AIRE
SALUDABLE
24. Botón SALUDABLE
25. Botón INTELIGENTE
Se utiliza para establecer
el funcionamiento en
modo INTELIGENTE. Esta
función no está disponible
en algunos modelos.
26. Botón SUEÑO
27. Botón 10 ºC
Función de calefacción
especial: mantenimiento
de calefacción de 10
grados (valioso para RS)
28. Botón BLOQUEO
INFANTIL
Si se pulsa, los demás
botones se bloquearán.
Si se vuelve a pulsar, se
anulará el bloqueo.
29. Botón FRESCO
30. Botón TEMPORIZADOR
DE ENCENCIDO/
APAGADO
31. Botón HORA
Se utiliza para cambiar el
reloj o el temporizador.
32. Botón CANCELAR/
CONFIRMAR
6HXWLOL]DSDUDFRQ¿UPDUOD
FRQ¿JXUDFLyQGHOUHORM\HO
temporizador.
33. Botón RELOJ
Las siguientes funciones no están disponibles en este
modelo:
20
Extraiga la tapa de las pilas;
1
2
3
1
2
3
PM
AM
QUIET
SMART
SLEEP
10
LIGHT
CHILD
LOCK
FRESH
Comenzará a parpadear el
indicador “AM” o “PM”.
Sugerencia:
Extraiga las pilas si no tiene intención de utilizar la unidad
durante un periodo largo de tiempo. Si observa alguna
pantalla extraña después de extraer las pilas, deberá pulsar el
botón de reinicio.
13

Español
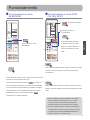
)XQFLRQDPLHQWRHQPRGR
SILENCIOSO
)XQFLRQDPLHQWRHQPRGR)5Ë2
&$/25\6(&2
Funcionamiento en modo
SILENCIOSO
Arranque de la unidad.
Seleccione el modo de
funcionamiento.
Pulse el botón FRÍO del mando
a distancia. Cuando se muestre
FRÍO en el mando a distancia, el
panel de indicadores se volverá
AZUL.
Pulse el botón CALOR del mando a distancia. Cuando se muestre
CALOR en el mando a distancia, el panel de indicadores se
volverá ROJO.
Pulse el botón SECO del mando a distancia. Cuando se muestre
SECO en el mando a distancia, el panel de indicadores se volverá
CIAN.
Puede utilizar esta función cuando necesite que la unidad funcione
de forma silenciosa para descansar o leer.
Cada vez que pulse el botón, aparecerá
SOFT
y la unidad de
aire acondicionado comenzará a funcionar en el modo INTENSO.
(QHOPRGRGHIXQFLRQDPLHQWR68$9(HOYHQWLODGRUVHFRQ¿JXUD
automáticamente a la velocidad BAJA del modo del ventilador
AUTOMÁTICO. Vuelva a pulsar el botón SUAVE.
SOFT
desaparecerá y la unidad se detendrá.
Funcionamiento
1. En el modo SECO, cuando la temperatura de la sala es
LQIHULRUDODWHPSHUDWXUDFRQ¿JXUDGD&HOHTXLSR
funcionará de forma intermitente a BAJA velocidad,
LQGHSHQGLHQWHPHQWHGHODFRQ¿JXUDFLyQGHOYHQWLODGRU
2. El mando a distancia permite memorizar cada estado de
funcionamiento. Al arrancar el equipo la próxima vez solo
necesitará pulsar el botón ENCENDIDO/APAGADO. El
equipo se activará en su estado anterior.
AM
QUIET
FAN
SPEED
ECO
SOFT
.
QUIET
QUIET
1
2
AM
QUIET
FAN
SPEED
ECO
.
14

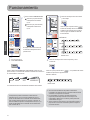
Español
El equipo comenzará a funcionar
al alcanzar la temperatura de la
pantalla LCD.
'LUHFFLyQGHÀXMRGHDLUHKDFLDDUULED
y hacia abajo
FRÍO/SECO:
Cada vez que se pulse el botón “
”,
ODGLUHFFLyQGHOÀXMRGHDLUHHQHOPDQGR
a distancia se mostrará de la siguiente
manera, según los distintos modos de
funcionamiento:
BAJA MEDIA ALTA AUTOMÁTICA
Pulse el botón VELOCIDAD DEL VENTILADOR. Cada vez que
pulse el botón, la velocidad del ventilador cambiará de acuerdo con
el ciclo ilustrado a continuación:
La unidad funcionará a la velocidad de ventilador seleccionada.
Pulse el botón TEMPERATURA.
Cada vez que pulse el botón,
la temperatura aumentará
0,5 ºC.
Cada vez que pulse el botón,
la temperatura disminuirá
0,5 ºC.
Funcionamiento
y
Si el nivel de humedad es alto podría condensarse
humedad en la salida de aire si se ajustan todas las lamas
verticales a la izquierda o la derecha.
y
Es aconsejable no mantener la aleta horizontal en
la posición hacia abajo durante mucho tiempo en el
modo FRÍO o SECO. De lo contrario, podría producirse
condensación de agua.
y
$OÀXLUHODLUHIUtRKDFLDDEDMRHQHOPRGR)5Ë2DMXVWDUHO
ÀXMRGHDLUHHQGLUHFFLyQKRUL]RQWDOD\XGDUiDPHMRUDUOD
circulación del aire.
La temperatura puede aumentarse o disminuirse en
intervalos de 0,5 ºC con el mando a distancia, pero el
panel de indicadores de la unidad de aire acondicionado
solo muestra grados enteros. Por ejemplo, cuando en el
mando a distancia aparece una temperatura de 24,5 ºC, el
panel de indicadores de la unidad de aire acondicionado
solo mostrará 24 ºC.
1
2
AM
QUIET
ECO
FAN
SPEED
.
.
1
2
AM
QUIET
ECO
FAN
SPEED
.
CALOR:
INTELIGENTE:
Estado inicial
'LUHFFLyQGHÀXMRGHDLUHKDFLDODL]TXLHUGD\KDFLD
la derecha
Estado inicial
Cada vez que se pulse el botón “
”, en la pantalla del mando
a distancia aparecerá lo siguiente:
Mando a distancia:
Funcionamiento en
modo VENTILADOR
15

Español
El generador de aniones con el que
está equipado el aparato de aire
acondicionado permite generar gran
cantidad de aniones destinados a
HTXLOLEUDUFRQH¿FDFLDODFDQWLGDG\
posición de los aniones suspendidos en
el aire, eliminar las bacterias y acelerar
la deposición de polvo en la habitación,
todo ello con el objetivo de limpiar el
aire contenido en la misma.
3XOVHGHQXHYRHOERWyQGHÀXMRGHDLUHVDOXGDEOH/DVUHMLOODV
de entrada y salida de aire del aparato de aire acondicionado se
abrirán y la unidad comenzará a funcionar en el estado que tenía
DQWHVGHHVWDEOHFHUODIXQFLyQGHÀXMRGHDLUHVDOXGDEOH&XDQGR
se detenga, la rejilla de salida de aire se cerrará automáticamente.
Aviso:
No tire directamente de la rejilla de salida de aire con la mano. Si
no sigue esta indicación, la rejilla no funcionará correctamente.
Si la rejilla no funciona correctamente, detenga el funcionamiento
durante un minuto y, a continuación, vuelva a intentarlo realizando
el ajuste con el mando a distancia.
El mando a distancia permite memorizar cada estado de
funcionamiento. Al arrancar el equipo la próxima vez solo
necesitará pulsar el botón ENCENDIDO/APAGADO. El equipo se
activará en su estado anterior.
&RQ¿JXUDFLyQGHOD
IXQFLyQGHÀXMRGH
aire saludable
Cancelación de la
IXQFLyQGHÀXMRGH
aire saludable
Pulse el botón
SALUDABLE.
aureola: “verde”
Pulse el botón SALUDABLE dos veces. El
símbolo desaparecerá y la unidad se detendrá.
Cada vez que pulse el botón,
aparecerá
y la unidad de aire
acondicionado comenzará a funcionar
en el modo de aniones saludables.
Funcionamiento
Cuando el motor del ventilador interior está en
funcionamiento, la función de proceso saludable estará
activa (está disponible bajo cualquier modo). Cuando el
ventilador de la unidad interior no funciona, la lámpara
de indicación de estado saludable se ilumina, pero el
generador de aniones no libera aniones.
)XQFLRQDPLHQWRHQPRGR
SALUDABLE
)XQFLRQDPLHQWRHQPRGR)/8-2
'($,5(6$/8'$%/(
AM
SMART
SLEEP
LIGHT
CHILD
LOCK
FRESH
QUIET
AM
SMART
SLEEP
LIGHT
CHILD
LOCK
FRESH
QUIET
1). 3XOVHHOERWyQGHÀXMRGHDLUH
saludable.
aparecerá en la
SDQWDOOD(YLWHTXHHOÀXMRGHDLUHVH
dirija directamente al cuerpo.
2). 3XOVHGHQXHYRHOERWyQGHÀXMRGH
aire saludable.
aparecerá en la
SDQWDOOD(YLWHTXHHOÀXMRGHDLUHVH
dirija directamente al cuerpo.
Nota:
1. 'HVSXpVGHHVWDEOHFHUODIXQFLyQGHÀXMRGHDLUHVDOXGDEOH
las rejillas de entrada y salida de aire se quedarán en
SRVLFLyQ¿MD
2. En el modo de calefacción, es mejor seleccionar el modo
.
3. En el modo de refrigeración, es mejor seleccionar el
modo .
4. En el modo de refrigeración y seco, si utiliza el aparato de
aire acondicionado durante un periodo de tiempo prolongado
en un entorno con alta humedad, tendrá lugar el fenómeno
de goteo de agua en la rejilla exterior.
5. Seleccione la dirección del ventilador adecuada conforme
a las condiciones reales.
16

Español
&RQ¿JXUHFRUUHFWDPHQWHHOUHORMDQWHVGHLQLFLDUHOXVRGHO
temporizador. Puede programar el equipo para que arranque o
se detenga automáticamente en las siguientes situaciones: antes
de despertarse por la mañana, al volver de la calle o después de
quedarse dormido por la noche.
Funcionamiento en modo INTENSO
Puede utilizar esta función cuando
necesite refrigerar la habitación
rápidamente.
Seleccione el modo de
funcionamiento que desee.
&RQ¿JXUDFLyQGHOWLHPSR
&RQ¿UPDUVXFRQ¿JXUDFLyQ
Mando a distancia: “el indicador
de
TEMPORIZADOR DE
ENCENDIDO
” parpadeará.
Mando a distancia: “el indicador de
TEMPORIZADOR DE APAGADO
”
parpadeará.
8QDYH]GH¿QLGDODKRUDFRUUHFWDSXOVHHOERWyQ&21),50$5SDUD
FRQ¿UPDUODRSHUDFLyQ(OLQGLFDGRU³
ENCENDIDO
” o “
APAGADO
”
dejará de parpadear en el mando a distancia.
TEMPORIZADOR DE ENCENDIDO
ĺ
APAGADO /
TEMPORIZADOR DE ENCENDIDO
ĸ
APAGADO
3XOVHHOERWyQ7(0325,=$'25'((1&(1','2SDUDFRQ¿UPDU
la operación. Siga el mismo procedimiento que en la sección
³&RQ¿JXUDFLyQGHKRUDGHO7(0325,=$'25'($3$*$'2´
Mando a distancia:
TEMPORIZADOR DE ENCENDIDO
ĺ
APAGADO
3XOVHHOERWyQ7(0325,=$'25'($3$*$'2SDUDFRQ¿UPDU
la operación. Siga el mismo procedimiento que en la sección
³&RQ¿JXUDFLyQGHKRUDGHO7(0325,=$'25'((1&(1','2´
Mando a distancia:
TEMPORIZADOR DE ENCENDIDO
ĸ
APAGADO
Cada vez que pulse el botón, el valor
del tiempo aumentará o disminuirá
Seleccione el valor
TEMPORIZADOR
DE ENCENDIDO que
desee.
Seleccione el valor
TEMPORIZADOR
DE APAGADO que
desee.
Cada vez que pulse el botón, aparecerá
y la unidad de aire
acondicionado comenzará a funcionar en el modo INTENSO.
(QHOPRGRGHIXQFLRQDPLHQWR)5Ë2HOYHQWLODGRUVHFRQ¿JXUD
automáticamente a la velocidad ALTA del modo del ventilador
AUTOMÁTICO.
Vuelva a pulsar el botón INTENSO.
POWER
desaparecerá y la
unidad se detendrá.
)XQFLRQDPLHQWRHQPRGR,17(162
)XQFLRQDPLHQWRHQPRGR
7(0325,=$'25
AUTO
POWER
AM
SMART
SLEEP
LIGHT
CHILD
LOCK
FRESH
QUIET
Sugerencias:
Si se selecciona el modo rápido FRÍO en el modo de
funcionamiento INTENSO, la habitación no presentará una
distribución homogénea de la temperatura.
Para cancelar el modo de TEMPORIZADOR
Pulse el botón CANCELAR varias veces hasta que
desaparezca el icono del modo TEMPORIZADOR.
3
QUIET
1
TIMER ON
AM
SMART
SLEEP
LIGHT
CHILD
LOCK
FRESH
1
2
1 minuto. Si mantiene pulsado el botón, el aumento se
producirá rápidamente. Puede ajustar cualquier hora
comprendida en un intervalo de 24 horas.
Funcionamiento
17
La page est en cours de chargement...
La page est en cours de chargement...
La page est en cours de chargement...
La page est en cours de chargement...
La page est en cours de chargement...
La page est en cours de chargement...
La page est en cours de chargement...
La page est en cours de chargement...
La page est en cours de chargement...
La page est en cours de chargement...
La page est en cours de chargement...
La page est en cours de chargement...
La page est en cours de chargement...
La page est en cours de chargement...
La page est en cours de chargement...
La page est en cours de chargement...
La page est en cours de chargement...
La page est en cours de chargement...
La page est en cours de chargement...
La page est en cours de chargement...
La page est en cours de chargement...
La page est en cours de chargement...
La page est en cours de chargement...
La page est en cours de chargement...
La page est en cours de chargement...
La page est en cours de chargement...
La page est en cours de chargement...
La page est en cours de chargement...
La page est en cours de chargement...
La page est en cours de chargement...
La page est en cours de chargement...
La page est en cours de chargement...
La page est en cours de chargement...
La page est en cours de chargement...
La page est en cours de chargement...
La page est en cours de chargement...
La page est en cours de chargement...
La page est en cours de chargement...
La page est en cours de chargement...
La page est en cours de chargement...
La page est en cours de chargement...
La page est en cours de chargement...
-
 1
1
-
 2
2
-
 3
3
-
 4
4
-
 5
5
-
 6
6
-
 7
7
-
 8
8
-
 9
9
-
 10
10
-
 11
11
-
 12
12
-
 13
13
-
 14
14
-
 15
15
-
 16
16
-
 17
17
-
 18
18
-
 19
19
-
 20
20
-
 21
21
-
 22
22
-
 23
23
-
 24
24
-
 25
25
-
 26
26
-
 27
27
-
 28
28
-
 29
29
-
 30
30
-
 31
31
-
 32
32
-
 33
33
-
 34
34
-
 35
35
-
 36
36
-
 37
37
-
 38
38
-
 39
39
-
 40
40
-
 41
41
-
 42
42
-
 43
43
-
 44
44
-
 45
45
-
 46
46
-
 47
47
-
 48
48
-
 49
49
-
 50
50
-
 51
51
-
 52
52
-
 53
53
-
 54
54
-
 55
55
-
 56
56
-
 57
57
-
 58
58
-
 59
59
-
 60
60
-
 61
61
-
 62
62


Haier AS07NS1HRA-Grey Manuel utilisateur
- Catégorie
- Climatiseurs split-system
- Taper
- Manuel utilisateur
dans d''autres langues
- italiano: Haier AS07NS1HRA-Grey Manuale utente
- English: Haier AS07NS1HRA-Grey User manual
- español: Haier AS07NS1HRA-Grey Manual de usuario
- Deutsch: Haier AS07NS1HRA-Grey Benutzerhandbuch
Documents connexes
-
Haier AS07QS2ERA / AS09QS2ERA / AS12QS2ERA Le manuel du propriétaire
-
-
-
-
Haier AS07BS4HRA Operation Manual And Installation Manual
-
-
-
Autres documents
-
Whirlpool AMD 082/1 Mode d'emploi
-
LG S3NM09JA2FA Mode d'emploi
-
-
-
Saunier Duval SDH 12-050NW Le manuel du propriétaire
-
Midea Mobile 35C Le manuel du propriétaire
-
 Pro Breeze PB-F03B-UK-PLUGRW-FBA Manuel utilisateur
-
Hisense L1-04 Manuel utilisateur
-
York TIWM012B21S Manuel utilisateur
-
