Plantronics Voyager 815 Le manuel du propriétaire
- Catégorie
- Écouteurs
- Taper
- Le manuel du propriétaire

BLUETOOTH
®
HEADSET
User Guide
Guía del usuario
Guide de l'utilisateur
Guia do Usuário

2
Plantronics Voyager 815
EN ENGLISH
TABLE OF CONTENTS
Welcome 3
What is Bluetooth? 3
Package Contents & Features 4
Charging 5
Pairing 6
Custom Fit 8
Headset Controls 11
Indicators 13
Range 13
Hands-Free Features 14
Multipoint (Using more than one Bluetooth device) 15
Optional Accessories 16
Troubleshooting 17
Product Specifications 18
Technical Assistance 18
Limited Warranty 18
Important Safety and Operational Information 19
Regulatory Notices 21

3
Plantronics Voyager 815
EN ENGLISH
WELCOME
Thank you for choosing the Plantronics Voyager™ 815 headset. To get the
most from your new headset, we recommend that you take the following
steps:
Read this User Guide, including all the safety information at the end of this 1.
guide, before you use your headset.
If you need assistance, please do the following:2.
Follow the steps in the “Troubleshooting” section on page 17.•
Contact the Plantronics Technical Assistance Center at 866-363-BLUE (2583) •
or visit www.plantronics.com/support.
Visit 3. www.plantronics.com/productregistration to register your headset online
so we can provide you with the best possible service and technical support.
NOTE: If you are considering returning the product, please contact the Technical
Assistance Center first.
WHAT IS Bluetooth?
Bluetooth wireless technology provides a way for devices to communicate
with each other using short-range radio frequency instead of wires.
Any two Bluetooth devices can communicate as long as they both have
Bluetooth turned on, they are within range, and they have been paired – a
quick “handshake” that connects the two devices.
Bluetooth range is up to 33 feet (10 metres). Obstructions, such as walls
or other electronic devices, can cause interference or shorten the effective
range. For optimal performance, place your headset and phone on the
same side of your body.

4
Plantronics Voyager 815
EN ENGLISH
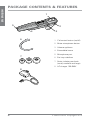
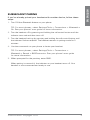
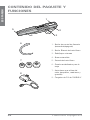
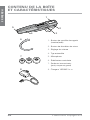
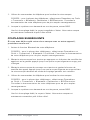
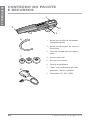
PACKAGE CONTENTS & FEATURES
Call control button (on/off)1.
Mute microphone button2.
Volume up/down3.
Extendable boom4.
Microphone port5.
Ear loop stabiliser6.
Noise isolating ear buds 7.
(small, medium and large)
AC charger 100-240V8.
1
4
3
5
6
7
2
8

5
Plantronics Voyager 815
EN ENGLISH
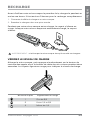
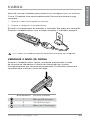
CHARGING
Before you use your headset for the first time, charge it for at least 1 hour.
It takes approximately 3 hours to fully charge your headset.
Connect the charger cable to the headset.1.
Plug the charger into a power outlet. 2.
While your headset is charging, the indicator glows red. When your
headset is fully charged, the indicator turns off.
WARNING: Do not use your headset while it is connected to the charger.
CHECK THE CHARGE LEVEL
When your headset is on, simultaneously press and hold the call control
button and the volume down button for about two seconds. The indicator
flashes red to show the charge level.
Red Flashes Battery Level
1 More than 2/3 full
2 1/3 to 2/3 full
3 Less than 1/3 full

6
Plantronics Voyager 815
EN ENGLISH
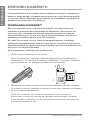
PAIRING
Pairing is the process of introducing your headset to your phone. Before
using your headset for the first time, you must pair it with your Bluetooth
phone. Normally you only need to pair your headset with your phone once.
To see a demo of the pairing process, visit www.plantronics.com/easytopair.
QUICKPAIR™ TECHNOLOGY
Your new headset includes Plantronics QuickPair technology to simplify
the Bluetooth setup process. The first time you turn your headset on, your
headset automatically enters pairing mode for 10 minutes. Once paired
successfully, your headset stays on for instant use.
If not successfully paired after 10 minutes, your headset automatically
powers off. When you turn the headset on again, it automatically goes
into pairing mode until successfully paired with a Bluetooth phone.
To pair your headset for the first time:
Turn ON the 1. Bluetooth feature on your phone.
TIP: For most phones, select Settings/Tools > Connections > Bluetooth > On.
See your phone’s user guide for more information.
Press and hold the call control button to turn on your headset. (The indicator 2.
flashes red/blue to show that the headset is on and in pairing mode.)
TIP: If you don’t see the red/blue flash, press and hold the call control
button to turn your headset off, and then press and hold the call control
button again until you see the red/blue flash.
Use the commands on your phone to locate your headset. 3.
TIP: For most phones, select Settings/Tools > Connections > Bluetooth >
Search > 8XXPlantronics. See your phone’s user guide for more information.
When prompted for the passkey, enter 0000. 4.
When pairing is successful, the red/blue indicator on your headset turns off.
Your headset is now connected and ready to use.
4
3
2
1

7
Plantronics Voyager 815
EN ENGLISH
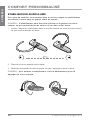
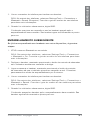
SUBSEQUENT PAIRING
If you’ve already paired your headset with another device, follow these
steps:
Turn ON the 1. Bluetooth feature on your phone.
TIP: For most phones, select Settings/Tools > Connections > Bluetooth >
On. See your phone’s user guide for more information.
Turn the headset off by pressing and holding the call control button until the 2.
indicator turns red and then turns off.
Turn the headset back on by pressing and holding the call control button until 3.
the indicator flashes red/blue. The headset remains in pairing mode for 3
minutes.
Use the commands on your phone to locate your headset. 4.
TIP: For most phones, select Settings/Tools > Connections >
Bluetooth > Search > 8XXPlantronics. See your phone’s user guide
for more information.
When prompted for the passkey, enter 0000. 5.
When pairing is successful, the indicator on your headset turns off. Your
headset is now connected and ready to use.

8
Plantronics Voyager 815
EN ENGLISH
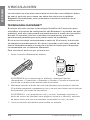
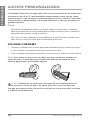
CUSTOM FIT
The Plantronics Voyager 815 headset comes with three sizes of noise-
isolating ear buds. We recommend that you try all three ear buds to find
the one that fits snugly in your ear. For added comfort and stability, you
can add the optional ear loop.
TIPS:
For optimum performance and a secure and comfortable fit, the headset •
should sit snugly in your ear canal with the microphone pointing toward the
corner of your mouth.
If the ear bud is too big or too small, the headset may not stay in your ear or •
you may have difficulty hearing.
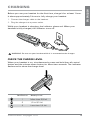
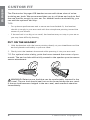
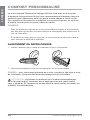
PUT ON THE HEADSET
Hold the headset with the boom pointing directly at your cheekbone and the 1.
ear bud placed comfortably in your ear canal.
Gently twist the headset downward while pressing it into your ear canal. 2.
TIP: For optimal voice clarity, point the boom toward the corner of your
mouth. The ear bud should be fully seated to the speaker post to ensure
secure attachment.
WARNING: Select an ear bud that can be comfortably inserted in the
ear canal. The ear bud should seal but not be forced down the ear canal.
If the ear bud becomes lodged in the ear canal, seek medical attention
immediately.

9
Plantronics Voyager 815
EN ENGLISH
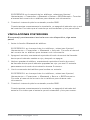
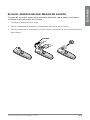
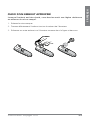
CHOOSE AN EAR BUD THAT FITS
When the ear bud fits properly, it should be sealed in your ear so that you
feel a slight amount of resistance when you remove the headset from
your ear.
Remove the headset from your ear.1.
Gently twist the ear bud while pulling it off the speaker post.2.
Press a different ear bud onto the speaker post with the stem side of the ear 3.
bud facing downward.

10
Plantronics Voyager 815
EN ENGLISH
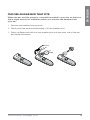
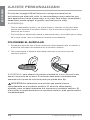
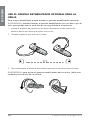
USE THE OPTIONAL EAR LOOP STABILISER
For increased stability, you can attach the optional ear loop stabiliser.
TIP: You can attach the ear loop stabiliser on either side of your headset,
so that you can wear the headset on your right or left ear.
Insert the ear loop tab into the slot on the underside of the headset until you 1.
feel it click into place.
Guide the loop behind your ear. 2.
Gently twist headset downward while pressing it into your ear. 3.
TIP: To remove the ear loop stabiliser from your headset, gently pull the
ear loop straight out of its slot.
CUSTOM FIT

11
Plantronics Voyager 815
EN ENGLISH
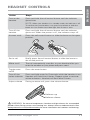
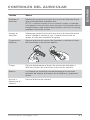
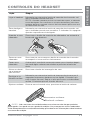
HEADSET CONTROLS
Action Steps
Turn on the
headset
Press and hold the call control button until the indicator
glows blue.
NOTE:
When your headset is in standby mode, the indicator is off.
To confirm that your headset is on, press any button or slide the
boom out. You should see a blue light flash or hear a tone.
Turn off the
headset
Press and hold the call control button until the indicator
glows red. When the power is off, the indicator stays off.
Answer a call
Press the call control button or slide the boom to the open
position.
End a call
Briefly press the call control button or slide the boom to
the closed position.
Make a call The call automatically transfers to your headset after you
enter the number on your phone and press send.
Toggle mute
on/off
Press the mute button.
Turn off the
online indicator
Press and hold mute for 2 seconds while the headset is on.
Headset will flash blue 4 times. Repeat action to activate
online indicators. Headset will flash blue 2 times.
Adjust volume
During an active call, press the volume button:
Volume up
Volume down
WARNING: Do not use headphones / headsets at high volumes for an extended
period of time. Doing so can cause hearing loss. Always listen at moderate levels. See
www.plantronics.com/healthandsafety for more information on headsets and hearing.

12
Plantronics Voyager 815
EN ENGLISH
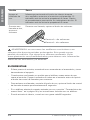
TIPS
If you’re wearing the headset, you hear ascending tones when the power turns •
on and descending tones when the power turns off.
When you receive a call, your phone may ring before your headset rings. Wait •
until you hear the ring in your headset to press the call control button and
answer the call.
To reject a call and send the caller to voice mail, press the call control button for •
about 2 seconds.
If your phone supports voice-dialing see “Hands-Free Features” on page 14 •
and the instructions that came with your phone.
When mute is on, a low tone plays every 60 seconds.•
HEADSET CONTROLS

13
Plantronics Voyager 815
EN ENGLISH
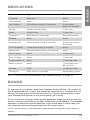
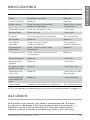
INDICATORS
Action Light Tone
Charging Solid red None
Fully charged None None
Low battery
3 red flashes every 10 seconds
3 high tones
every 10 seconds
Pairing Flashes red and blue 1 low tone
Paired Flashes blue 1 low tone
Turning on Solid blue for 2 seconds Ascending tones
Standby None None
Incoming call 3 blue flashes every 2 seconds 3 low tones every
2 seconds
Call in progress 1 blue flash every 2 seconds None
Missed call 3 purple flashes every 10 seconds None
Out of range None 1 high tone
Back in range None 1 low tone
Turning mute on None 1 low-high tone
Mute is active None 1 low tone every
60 seconds
Unmute None 1 high-low tone
Turning off Solid red for 4 seconds Descending tones
NOTE:
To turn off the online indicator, see “Headset Controls” on page 11.
RANGE
To maintain a connection, keep your headset within 33 feet (10 metres) of
the Bluetooth device. If there are obstacles between your headset and the
device you may experience interference. For optimal performance, place
your headset and phone on the same side of your body.
As you move out of range, audio quality degrades. When you are far enough
away to lose the connection, you hear a high tone in the headset. The headset
attempts to reconnect after 30 seconds. If you move back in range later, you
can manually reconnect by pressing the call control button.
NOTE: Audio quality is also dependent upon the device with which the headset is
paired.

14
Plantronics Voyager 815
EN ENGLISH
HANDS-FREE FEATURES
If your phone and your wireless service provider both support hands-free
operation, you can use the following features:
Action Steps
Redial the last number
you called
Double-click the call control button. You hear 2 low
tones after the second press.
Voice activated dialing
When the headset is on, press and hold the call
control button for about 2 seconds until you hear
1 low tone.
Reject a call
When your headset rings, press and hold the call
control button for about 2 seconds until you hear
1 long low tone.
ADDITIONAL FEATURES
Action Steps
Transfer a call from your
headset to your phone
While a call is in progress, press and hold the call
control button until you hear a low tone.
Transfer a call from your
phone to your headset
While a call is in progress, quickly press and
release the call control button. You will then hear
a low tone.
Enable/Disable online
indicators
Press and hold mute for 2 seconds. Headset will
flash blue 4 times. Repeat action to activate online
indicators. Headset will flash blue 2 times.
NOTE:
When the online indicator is disabled, other indicators, such as low battery
and missed call, still function.

15
Plantronics Voyager 815
EN ENGLISH
MULTIPOINT (USING MORE THAN
ONE Bluetooth DEVICE)
Plantronics Voyager 815 supports multipoint technology, which allows
you to stay connected with two different Bluetooth audio devices. Use one
headset between two different mobile phones.
PAIRING ANOTHER BLUETOOTH DEVICE
Repeat the pairing steps with the new device. See “Subsequent Pairing”
on page 7 for instructions.
ANSWERING A CALL
An incoming call from either phone rings through to your headset.
To answer a call, briefly press the call control button.•
USING LAST NUMBER REDIAL AND VOICE-ACTIVATED
DIALING
The headset initiates a call on the device you most recently used to make
an outgoing call. To use the second phone, initiate the call using the
controls on the second phone. The second phone forms a link with the
headset.
ANSWERING A CALL WHILE TALKING ON THE OTHER
DEVICE
Press the call control button once to hang up the existing call, and then press •
the call control button again to answer the new call from the other phone.

16
Plantronics Voyager 815
EN ENGLISH
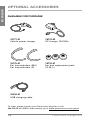
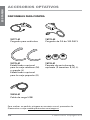
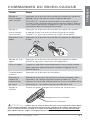
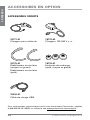
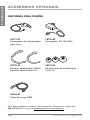
OPTIONAL ACCESSORIES
AVAILABLE FOR PURCHASE
76777-01
Vehicle power charger
76772-03
AC charger 100-240v
76775-01
Ear loop stabiliser (M/L)
Ear loop stabiliser (S)
76776-01
Ear bud replacement pack
(S, M, L)
To order, please contact your Plantronics supplier or call
866-363-BLUE (2583). Alternatively, go to www.plantronics.com/support.
76016-01
USB charging cable

17
Plantronics Voyager 815
EN ENGLISH
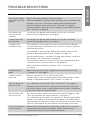
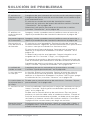
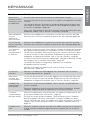
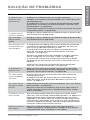
TROUBLESHOOTING
Problem Solution
My headset does
not work with my
phone.
Ensure that the headset is fully charged.
Make sure headset is paired with the phone you are trying to use.
Headset was not in discovery mode when mobile phone
menu selections were made. See “Pairing” on page 6.
Incorrect menu selections were made on your mobile phone.
See “Pairing” on page 6.
My phone did
not locate the
headset.
Turn both your phone and headset off and on, and then
repeat the pairing process on page 6.
I could not enter
my passkey.
Turn both your phone and headset off and on, and then
repeat the pairing process on page 6.
I cannot hear
caller/dial tone.
The headset is not turned on. Press the call control button
for approximately 2 seconds until you hear a tone or see the
indicator glow blue.
Your headset is out of range. Move the headset closer to the
phone or Bluetooth device. See “Range” on page 13.
Your headset battery is drained. Charge your battery using the
AC charger. See “Charging” on page 5.
The listening volume is too low. Press the volume up button
to increase the sound you hear in the headset.
Make sure the ear bud fits properly. See “Custom Fit”
on page 8.
Audio quality is
poor.
Make sure that you have a proper seal on the ear bud. See
“Custom Fit” on page 8.
Callers cannot
hear me.
Mute is turned on. Press the mute button.
Your headset is out of range. Move the headset closer to the
phone or Bluetooth device. See “Range” on page 13.
The ear buds do
not fit my ear.
Try a different size ear bud. See “Custom Fit” on page 8.
Remove the ear bud from your headset and then wash the
ear bud in warm soapy water. When the ear bud is complete-
ly dry, put it back on your headset.
My headset falls
out of my ear.
Use the ear loop stabiliser for increased lateral support. See
“Use the optional ear loop stabiliser” on page 10.
Try a different size ear bud. For a proper fit, the ear bud should
create a seal. When the ear bud fits properly, you should feel a
slight amount of resistance when you remove the headset from
your ear. See page 9 for instructions on choosing an ear bud.
My ear bud needs
to be cleaned.
Remove the ear bud from the headset and wash it in warm
soapy water and rinse thoroughly. When the ear bud is
completely dry, put it back on your headset.

18
Plantronics Voyager 815
EN ENGLISH
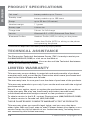
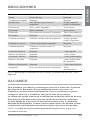
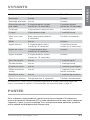
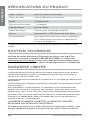
PRODUCT SPECIFICATIONS
Talk time* battery enables up to 7 hours
Standby time*
battery enables up to 160 hours
Range
up to 33 feet (10 metres)
Headset weight 11 grams
Battery type Lithium ion
Charge time 3 hours for full charge
Version Bluetooth 2.0 + EDR (Enhanced Data Rate)
Bluetooth Profiles:
Headset Profile (HSP) for talking on the phone.
Hands-free Profile (HFP) for talking on the phone
and operating the phone.
* Performance dependent on battery and may vary by device.
TECHNICAL ASSISTANCE
The Plantronics Technical Assistance Center (TAC) is ready to assist you.
Call 866-363-BLUE (2583) or visit us on the Web at
www.plantronics.com/support. You can also call the Technical Assistance
Center for accessibility information.
LIMITED WARRANTY
This warranty covers defects in materials and workmanship of products
manufactured, sold or certified by Plantronics which were purchased and
used in the United States and Canada.
The warranty lasts for one year from the date of purchase of the products.
This warranty extends to you only if you are the end user with the original
purchase receipt.
We will, at our option, repair or replace the products that do not conform
to the warranty. We may use functionally equivalent reconditioned/
refurbished/remanufactured/pre-owned or new products or parts.
To obtain service in the U.S., contact Plantronics at (866) 363-BLUE (2583).
To obtain service in Canada call (800) 540-8363.
THIS IS PLANTRONICS’ COMPLETE WARRANTY FOR THE PRODUCTS.
This warranty gives you specific legal rights, and you may also have
other rights that vary from state to state. Please contact your dealer or our
service center for the full details of our limited warranty, including items
not covered by this limited warranty.

19
Plantronics Voyager 815
EN ENGLISH
IMPORTANT SAFETY AND
OPERATIONAL INFORMATION
Please read the following safety and operational instructions before using
your Bluetooth headset. Keep these instructions for future reference.
When using your Bluetooth headset, these basic safety precautions and
warnings should be followed to reduce the risk of fire, electric shock,
injury to persons and damage to property.
This symbol
identifies and alerts the user to the presence of important
safety warnings.
WARNINGS
CHILDREN. Never allow children to play with the product – small parts may be •
a choking hazard.
Check local laws regarding use of a mobile phone and headset while driving. If •
you use the headset while driving, ensure your attention and focus remain on
driving safely.
Observe all signs that require an electrical device or RF radio product to be •
switched off in designated areas, such as hospitals, blasting areas, potentially
explosive atmospheres and aircraft. On aircraft, obey the airline regulations for
use of wireless equipment.
To reduce the risk of electric shock, explosion or fire use only the supplied •
charger or Class 2 AC adapter to charge the headset. Ensure that the voltage
rating (e.g. 120 V, 60 Hz) corresponds to the power supply you intend to use.
Do not disassemble the AC adapter as this may expose you to dangerous •
voltages or other risks. Incorrect reassembly can cause electric shock or fire
when the product is subsequently used.
Do not insert anything into the product because this may cause damage to the •
internal components or cause injury to you.
Avoid contact with liquids. Do not locate this product near water, for example, •
near a bath or sink, in a wet cellar or near a swimming pool.
Discontinue use of product and contact Plantronics if the product overheats, •
has a damaged cord or plug, if the product has been dropped or damaged, or if
the product has come into contact with liquids.

20
Plantronics Voyager 815
EN ENGLISH
Exposure to high volume sound levels may damage your hearing. Although •
there is no single volume setting that is appropriate for everyone, you should
always use your headset or headphones with the volume set at moderate
levels and avoid prolonged exposure to high volume sound levels. The louder
the volume, the less time is required before your hearing could be affected.
You may experience different sound levels when using your headset or
headphones with different devices. The device you use and its settings affect
the level of sound you hear. If you experience hearing discomfort, you should
stop listening to the device through your headset or headphones. To protect
your hearing, some hearing experts suggest that you:
Set the volume control in a low position before putting the headset or 1.
headphones on your ears.
Limit the amount of time you use headsets or headphones at high volume.2.
Avoid turning up the volume to block out noisy surroundings. 3.
Turn the volume down if the sound from the headset or 4.
headphones prevents you from hearing people speaking near you.
See www.plantronics.com/healthandsafety for more information
on headsets and hearing.
BATTERY WARNINGS
To reduce the risk of fire or injury to persons, read and follow these
instructions.
Charge the headset according to the instructions supplied with the unit.•
Do not expose the battery to high temperatures.•
Do not puncture or otherwise damage the battery. The cell contains corrosive •
materials which may damage eyes and skin and may be toxic if swallowed.
Do not short-circuit the battery, as this may result in a sudden rise in •
temperature.
Do not incinerate the battery. •
Never put batteries in mouth. If swallowed, contact your physician or local •
poison control centre.
Dispose of or recycle the battery according to local and regional regulatory •
requirements. Lithium Ion batteries are recyclable. For more information,
visit www.rbrc.org.
IMPORTANT SAFETY AND
OPERATIONAL INFORMATION
La page est en cours de chargement...
La page est en cours de chargement...
La page est en cours de chargement...
La page est en cours de chargement...
La page est en cours de chargement...
La page est en cours de chargement...
La page est en cours de chargement...
La page est en cours de chargement...
La page est en cours de chargement...
La page est en cours de chargement...
La page est en cours de chargement...
La page est en cours de chargement...
La page est en cours de chargement...
La page est en cours de chargement...
La page est en cours de chargement...
La page est en cours de chargement...
La page est en cours de chargement...
La page est en cours de chargement...
La page est en cours de chargement...
La page est en cours de chargement...
La page est en cours de chargement...
La page est en cours de chargement...
La page est en cours de chargement...
La page est en cours de chargement...
La page est en cours de chargement...
La page est en cours de chargement...
La page est en cours de chargement...
La page est en cours de chargement...
La page est en cours de chargement...
La page est en cours de chargement...
La page est en cours de chargement...
La page est en cours de chargement...
La page est en cours de chargement...
La page est en cours de chargement...
La page est en cours de chargement...
La page est en cours de chargement...
La page est en cours de chargement...
La page est en cours de chargement...
La page est en cours de chargement...
La page est en cours de chargement...
La page est en cours de chargement...
La page est en cours de chargement...
La page est en cours de chargement...
La page est en cours de chargement...
La page est en cours de chargement...
La page est en cours de chargement...
La page est en cours de chargement...
La page est en cours de chargement...
La page est en cours de chargement...
La page est en cours de chargement...
La page est en cours de chargement...
La page est en cours de chargement...
La page est en cours de chargement...
La page est en cours de chargement...
La page est en cours de chargement...
La page est en cours de chargement...
La page est en cours de chargement...
La page est en cours de chargement...
La page est en cours de chargement...
La page est en cours de chargement...
La page est en cours de chargement...
La page est en cours de chargement...
-
 1
1
-
 2
2
-
 3
3
-
 4
4
-
 5
5
-
 6
6
-
 7
7
-
 8
8
-
 9
9
-
 10
10
-
 11
11
-
 12
12
-
 13
13
-
 14
14
-
 15
15
-
 16
16
-
 17
17
-
 18
18
-
 19
19
-
 20
20
-
 21
21
-
 22
22
-
 23
23
-
 24
24
-
 25
25
-
 26
26
-
 27
27
-
 28
28
-
 29
29
-
 30
30
-
 31
31
-
 32
32
-
 33
33
-
 34
34
-
 35
35
-
 36
36
-
 37
37
-
 38
38
-
 39
39
-
 40
40
-
 41
41
-
 42
42
-
 43
43
-
 44
44
-
 45
45
-
 46
46
-
 47
47
-
 48
48
-
 49
49
-
 50
50
-
 51
51
-
 52
52
-
 53
53
-
 54
54
-
 55
55
-
 56
56
-
 57
57
-
 58
58
-
 59
59
-
 60
60
-
 61
61
-
 62
62
-
 63
63
-
 64
64
-
 65
65
-
 66
66
-
 67
67
-
 68
68
-
 69
69
-
 70
70
-
 71
71
-
 72
72
-
 73
73
-
 74
74
-
 75
75
-
 76
76
-
 77
77
-
 78
78
-
 79
79
-
 80
80
-
 81
81
-
 82
82


Plantronics Voyager 815 Le manuel du propriétaire
- Catégorie
- Écouteurs
- Taper
- Le manuel du propriétaire
dans d''autres langues
Documents connexes
-
Plantronics Voyager 855 Manuel utilisateur
-
Plantronics Discovery 975 Le manuel du propriétaire
-
Plantronics MX150PC Le manuel du propriétaire
-
Plantronics Voyager 510 Mode d'emploi
-
-
-
-
-
Plantronics Discovery 655 Le manuel du propriétaire
-
Plantronics 610 Manuel utilisateur

