
BEFORE FIRST TIME USE
1 Before using your iron for the first time, please remove all the packaging material.
2 When you turn on the iron for the first time it might emit an odor for the first ten
minutes. This is because the materials used in making the iron are heating up. The
odor is safe and should not re-occur after the initial heating.
USING YOUR IRON
3 Pour water carefully into the water tank without going over
“Max” line. Make sure the Water Inlet Door is closed to
avoid spilling while in use.
4 Plug in the iron into any polarized electrical outlet.
The Power LED Indicator Light on the display panel
will light up.
5 Set the desired fabric/temperature by pressing the
Fabric/Temperature Selector button on the handle of the iron.
6 The LED Indicator Light next to the selected temperature will flash green and then will
become solid green once the selected temperature is reached. If you wish to change
the temperature, press the Fabric/Temperature Selector button and the LED Indicator
Light will start to flash green to show that the iron is either heating up or cooling down.
The LED Indicator Light will turn solid green again when the iron reaches the selected
temperature.
7 Turn the Variable Steam/Self-Clean Dial to a select “ ” (high) or “ ” (low) steam
setting. Select “ ” on the Variable Steam/Self-Clean Dial for dry ironing. You can
now start ironing.
8 Use the Steam Burst Button to remove stubborn wrinkles. Allow an interval of 3
seconds between each burst. Overuse of the steam burst may cause water spitting or
weak steam performance.
9 The Steam Burst feature also works in the vertical position. This is especially useful to
remove wrinkles from hanging clothes, delicate garments and other fabrics. Hold the
iron in the upright position several inches away from the article.
10 Use the Spray Button to dampen the fabric to tackle tough wrinkles, if necessary.
ANTI-DRIP FUNCTION
11 The Anti-Drip Function is built in to this iron. It prevents water spitting when the
temperature is too low.
12 Steam cannot be produced if the soleplate is not hot enough. It may result in water
spitting or leaking from the soleplate. The Anti-Drip Function reduces water dripping
and leaking when ironing at low temperatures.
ANTI-CALCIUM
13 This iron has built in the anti-calcium system that prolongs the life of the iron.
14 If you have very hard water, we recommend using distilled water instead of tap water.
ELECTRONIC MULTI POSITION AUTO-OFF
15 This iron is equipped with an electronic auto-off feature that switches the iron off if
it has been idle for 15 minutes in the upright position and after 30 seconds in the
sideways or flat positions.
16 The LED Indicator Light next to the Auto-Off on the Fabric/Temperature Selector
display will flash red when the iron is in the auto-off mode. To turn the iron back on,
hold the iron in the horizontal position and gently rock the iron back and forth several
times until the Power Indicator Light is re-illuminated. Select the temperature again.
The iron might have to warm up for a minute if the auto-off feature was activated for an
extended time.
SELF-CLEANING
17 Fill the water tank to the “MAX” level. Do not overfill.
18 Stand the iron on its heel, standing up on a protected surface and plug into the
electrical outlet.
19 Set the Fabric/Temperature Selector to the Linen/Cotton “ ” setting. Wait until the
light stops flashing. The iron is now on the preset temperature.
20 Hold the iron horizontally over the sink. Turn and hold the Variable Steam Control Dial
all the way to the SELF CLEAN position.
21 Move the iron back and forth. Boiling water and steam will now be ejected from the
holes in the soleplate. Use caution when doing this as the water and the steam are hot
enough to cause burns.
22 Repeat step 19 until the impurities and scale are washed away.
23 Empty any excess water from the tank. Don’t touch the hot surfaces, water or steam
because injury may occur.
24 Release the steam dial and it will automatically go to the Linen/Cotton “ ” setting.
25 Place the iron in upright position and let it cool down.
USEFUL TIPS
26 Read all garment care labels before you start ironing. You can also test the
temperature of the iron on a hem or an inside seam.
27 Iron similar fabrics together and in sequence of synthetic fibers, nylon, silk/wool,
polyester, and cotton/linen. This will reduce the need to adjust the temperature
frequently.
TECHNICAL SPECIFICATIONS: 120 Volts, 60 Hz., 1800 Watts
IRONING GUIDE
FEATURES
STORAGE AND CARE
28 Always set the Variable Steam Control Dial to “ ” after you have emptied the
water tank.
29 Allow the iron to cool down before putting it away.
30 Place the iron in the upright position during heating up, cooling down and storage.
31 Avoid any sharp material contacting the soleplate.
32 Every two weeks, clean the exterior of the iron with a damp cloth and wipe dry.
33 If you use spray starch, wipe the soleplate occasionally with a soft, damp cloth to
prevent deposit build-up.
34 If the iron hasn’t been used in a few weeks, hold the iron horizontally and allow
steaming for 2 minutes before ironing.
ALWAYS REMEMBER
35 Turn the Fabric/Temperature Selector to “Nylon” and then unplug the iron from the
electrical outlet before pouring water into the iron.
36 Always empty the water in the iron after each use.
37 Never iron or steam clothes while they are being worn.
38 Be very careful when filling the iron with water. Injuries may occur if the hot metal
parts, hot water, or steam are contacted.
TROUBLE SHOOTING
This appliance has a polarized plug (one blade is wider than the other).
As a safety feature, this plug will fit into a polarized outlet only one way.
If the plug does not fit fully into the outlet, reverse the plug. If it still
does not fit, contact a qualified electrician. Do not attempt to defeat this
safety feature.
The iron doesn’t
heat up
An odor is being
emitted from the
new iron or small
particles are
coming out
Iron doesn’t
steam
Water droplets
coming from
steam vents.
Iron should be plugged into a polarized electric outlet only.
Make sure the plug is securely in the socket.
Temperature setting might be too low.
Try turning to a higher setting.
Auto-off feature is activated.
This is normal.
Follow the instructions for first-time use and allow iron to steam
through 2-3 fillings and press the Steam Burst Button occasionally
to eliminate small white particles.
Water tank may be empty or water level is very low. Add water.
Steam control is set on “ ”.
Make sure the Fabric/Temperature Selector setting and the
Variable Steam Control Dial are correctly set. For maximum steam,
set “ ” on steam control dial and the temperature setting should
be set on “Linen/Cotton”.
The soleplate is not hot enough and the anti-drip feature switches
off the steam. Always allow the iron to reach the selected
temperature with the Variable Steam Dial setting at “ ”. For more
steam, turn the Fabric/Temperature Selector to “Linen/Cotton” and
the Variable Steam Control Dial to “ ”.
If the temperature setting and steam control settings are correct
and there is no steam, gently move the iron left or right a couple
of times. Move the Variable Steam Control Dial from “ ” to “ ”
a few times.
Variable Steam Control Dial may be set in “SELF CLEAN” position.
Align the dial from the “ ” to “ ” on the steam setting.
Iron may not be hot enough. Set Fabric/Temperature Selector to
“Linen/Cotton” position. Always allow iron sufficient time to heat up
before activating the Variable Steam Control Dial.
The Steam Burst button may have been overused. Allow more time
between each burst.
SAVE THESE INSTRUCTIONS
ONE YEAR LIMITED WARRANTY
EURO-PRO Operating LLC warrants this product to be free from material defects
and workmanship for a period of one (1) year from the date of purchase when
utilized for normal household use, subject to the following conditions, exclusions and
exceptions.
The liability of EURO-PRO Operating LLC is limited solely to the cost of the repair
or replacement of the unit at our option. This warranty does not cover normal wear
of parts and does not apply to any unit that has been tampered with or used for
commercial purposes. This limited warranty does not cover damage caused by
misuse, abuse, negligent handling or damage due to faulty packaging or mishandling
in transit. This warranty does not cover damage or defects caused by or resulting
from damages from shipping or repairs, service or alteration to the product or any
of its parts, which have been performed by a repair person not authorized by
EURO-PRO Operating LLC.
If your appliance fails to operate properly while in use under normal household
conditions within the warranty period, you may return the complete appliance and
accessories with proof of purchase and date, freight prepaid. For customer service
support, call 1-800-798-7398 or visit our website at www.sharkclean.com.
If the appliance is found by EURO-PRO Operating LLC to be defective, in EURO-PRO
Operating LLC’s sole discretion, we will repair or replace it free of charge. Proof of
purchase date and check made payable to EURO-PRO Operating LLC in the amount
of $12.95 to cover the cost of return shipping and handling must be included.
This warranty is extended to the original purchaser of the unit and excludes all
other legal, implied and/or conventional warranties. The responsibility of EURO-PRO
Operating LLC if any, is limited to the specific obligations expressly assumed by it
under the terms of this Limited Warranty. In no event is EURO-PRO Operating LLC
liable for incidental or consequential damages to anyone of any nature whatsoever.
Some states do not permit the exclusion or limitation of incidental or consequential
damages, so the above may not apply to you.
This Limited Warranty gives you specific legal rights, and you may also have other
rights which vary from state to state or province to province.
*IMPORTANT: Carefully pack item to avoid damage in shipping. Be sure to include
proof of purchase date and to attach a tag to item before packing including your
name, complete address and phone number with a note giving purchase information,
model number and what you believe is the problem with the item. We recommend
you insure the package (as damage in shipping is not covered by your warranty).
Mark the outside of your package “ATTENTION CUSTOMER SERVICE”. We are
constantly striving to improve our products, therefore the specifications contained
herein are subject to change without notice.
CAUTION! TO PREVENT ELECTRIC SHOCK OR OTHER INJURY, before filling the iron with
water, make sure that the plug is removed from the outlet.
WARNING: Never fill the iron with fabric conditioner, starches, or any other solution, as
these will damage the steam mechanism. Do not use contaminated water.
CAUTION! TO AVOID FIRE, never leave iron unattended while it is plugged in.
CAUTION! TO PREVENT ELECTRIC SHOCK, never use the iron in a location where it
can fall or be pulled into water or any other liquid. If the iron falls into water or any other
liquid, unplug it immediately. DO NOT reach into the water or liquid.
WARNING: Never use scouring pads, abrasive or chemical cleaners, or solvents to
clean the exterior or soleplate of your iron. Doing so will scratch and/or damage the
surface.
CAUTION! DO NOT aim iron at face, towards yourself, or anyone else while using or
adjusting steam. Burns or serious injury may occur.
SPECIAL INSTRUCTIONS
1. To avoid a circuit overload, do not operate another high-wattage appliance on the
same circuit.
2. If an extension cord is absolutely necessary, use a 15-ampere cord. Cords rated for less
amperage may overheat. Use care to arrange the cord so that it cannot be pulled or
tripped over.
IMPORTANT SAFETY INSTRUCTIONS
READ ALL INSTRUCTIONS BEFORE USING YOUR IRON
When using your iron, basic safety precautions should always be followed,
including the following:
1. Use iron only for its intended use.
2. To protect against risk of electrical shock, do not immerse the iron in water or other
liquids.
3. DO NOT yank cord to disconnect from outlet. Grasp plug and pull to disconnect.
4. DO NOT allow cord to touch hot surfaces. Set the Fabric/Temperature Selector Button
to “Nylon” before unplugging the iron. Let iron cool completely before putting away. Loop
cord loosely around iron when storing.
5. Always disconnect iron from electrical outlet when filling with water, emptying, or when
not in use.
6.
DO NOT operate iron with a damaged cord, after the iron has been dropped or damaged
in any manner, or if it is leaking. To avoid the risk of electric shock, do not disassemble the
iron. Return to EURO-PRO Operating LLC for examination, repair, or adjustment. Incorrect
reassembly can cause the risk of electric shock when the iron is used.
7. IMPORTANT: This appliance is not intended for use by persons (including children) with
reduced physical, sensory or mental capabilities, or lack of experience and knowledge.
Close Supervision is necessary for any appliance being used near children. DO NOT
leave iron unattended while connected or on an ironing board.
8. Burns can occur from touching hot metal parts, hot water, or steam. Use caution when
you turn a steam iron upside down; there may be hot water in the reservoir.
9. When placing the iron in its upright position, ensure that the surface on which the iron is
placed is stable. Never use or rest the iron on an unstable surface.
10. While the iron is hot, never set iron on an unprotected surface - even if it is on its heel
rest.
11. Always store your iron standing upright, not on the soleplate. If stored face down, even
the smallest amount of moisture will cause the soleplate to corrode and stain.
12. This appliance is for household use only.
GI505series_55.E.F.130822.2
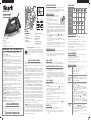
FABRIC TYPE
LABEL
INDICATION
FABRIC/TEMP.
SELECTOR
STEAM
CONTROL
BURST OF
STEAM
SPRAY
Please note
that the symbol
above on the
label
of your garment
means that
THE ARTICLE
CANNOT BE
IRONED
NONO NO YES
YESYES YES YES
Nylon
Wool or Silk Polyester
Linen or
Cotton
Nylon
Wool/SilkPolyester
Linen/Cotton
1 Stainless Steel Soleplate
2 Water Inlet Door
3 Spray Button
4 Fabric/Temperature Selector
5 Spray Nozzle
6 Steam Burst Button
7 Variable Steam/Self-Clean
Dial
8 Water Level Window
9 LED Indicator Light
10 Pivot Cord
11 Anti-Drip Function (not shown)
12 Built-In Anti-Calcium Filter
(not shown)
9
1 2 3
5
8
4
6
7
10
7
9
This manual covers model numbers:
GI505 55, GI505C 55, GI505WM 55
Euro-Pro Operating LLC
Newton, MA 02459
1-800-798-7398
COPYRIGHT© EURO-PRO OPERATING LLC 2013
PRINTED IN CHINA
Illustrations may differ from actual product.
Euro-Pro and Shark are trademarks of Euro-Pro Operating LLC.
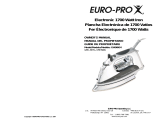
OWNER’S GUIDE
GI505 series

ATTENTION! AFIN D’ÉVITER LES DÉCHARGES ÉLECTRIQUES ET LES BLESSURES, assurez-vous
que le fer est débranché avant de le remplir d’eau.
AVERTISSEMENT : Ne remplissez jamais le fer avec un assouplisseur, de l’amidon ou toute
autre solution, car cela endommagera le mécanisme de vapeur de l’appareil. Ne le remplissez
pas d’eau contaminée.
ATTENTION! POUR ÉVITER LES RISQUES D’INCENDIE, ne laissez jamais l’appareil sans
surveillance lorsqu’il est branché.
ATTENTION! POUR ÉVITER TOUTE DÉCHARGE ÉLECTRIQUE, n’utilisez jamais le fer dans un
endroit où il pourrait tomber ou être poussé dans l’eau ou tout autre liquide. Si le fer tombe dans
l’eau ou un autre liquide, débranchez-le immédiatement. NE PAS tenter d’aller le chercher dans
l’eau ou le liquide en question.
AVERTISSEMENT : Ne jamais utiliser de tampons à récurer, abrasifs, nettoyeurs chimiques ou
solvants pour nettoyer la face extérieure de la plaque de votre fer. Vous risqueriez d’égratigner ou
d’endommager la surface.
ATTENTION! NE PAS diriger le fer vers le visage, vers vous-mêmes ou toutes autres personnes
lors de l’utilisation ou du réglage de la vapeur. Vous pourriez causer de graves brûlures ou
blessures.
INSTRUCTIONS PARTICULIÈRES
1. Pour éviter les surcharges de circuit, n’utilisez pas un autre appareil à puissance élevée sur le
même circuit.
2. Si vous devez absolument utiliser une rallonge, utilisez un cordon de 15 ampères. Les rallonges
électriques de calibre moindre peuvent surchauffer et causer un incendie ou une électrocution.
Disposez la rallonge de façon à ce que personne ne puisse la tirer ou trébucher sur le cordon.
AVANT LA PREMIÈRE UTILISATION
1 Avant d’utiliser votre fer pour la première fois, veuillez retirer tout le matériel d’emballage.
2 Lors de la première mise sous tension du fer, une odeur pourrait se dégager pendant les dix
premières minutes de fonctionnement. Il s’agit des matériaux composant le fer qui chauffent.
L’odeur est sans danger et ne devrait pas réapparaître après le chauffage initial.
AVANT LA PREMIÈRE UTILISATION
3 Remplissez délicatement le réservoir d’eau au niveau désiré sans
dépasser la ligne « MAX ». Assurez-vous que le couvercle de
l’orifice d’eau est fermé pour éviter toute éclaboussure d’eau
pendant l’utilisation du fer.
4 Branchez le fer dans une prise de courant polarisée. Le
voyant d’alimentation DEL du panneau d’affichage s’allumera.
5 Réglez le type de tissu et la température désirés en appuyant sur le bouton de sélection
correspondant sur la poignée du fer.
6 Le voyant DEL près de la température sélectionnée clignotera et deviendra vert lorsque le fer a
atteint la température désirée. Pour changer le réglage de température, appuyez sur le bouton
de sélection du type de tissu et de la température; le voyant DEL clignote pour indiquer que le
fer chauffe ou refroidit. Le voyant DEL deviendra vert de nouveau et restera allumé lorsque le fer
a atteint la température désirée.
7 Tournez le levier de commande de vapeur variable et d’autonettoyage au réglage de vapeur
approprié («
» élevé ou « » faible). À l’aide du cadran de commande de vapeur et
d’autonettoyage, sélectionnez «
» pour le repassage à sec. Vous pouvez maintenant
commencer le repassage.
8 Utilisez le bouton de jet de vapeur pour effacer les plis rebelles. Attendez trois secondes entre
chaque jet de vapeur. L’usage excessif du jet de vapeur peut causer des éclaboussures d’eau ou
affaiblir la puissance de la vapeur.
9 La fonction de jet de vapeur fonctionne également en position verticale. Cette fonction est
particulièrement utile pour effacer les faux plis des vêtements suspendus, des vêtements
délicats et autres tissus. Tenez le fer en position verticale, à plusieurs pouces de distance
des articles.
10 Appuyez sur le bouton de pulvérisation atomiseur pour humidifier le tissu afin d’effacer les plis
rebelles, le cas échéant.
FONCTION ANTIGOUTTE
11 Ce fer comporte une fonction antigoutte intégrée. Elle prévient les éclaboussures d’eau lors du
repassage à basse température.
12 Le fer ne produit aucune vapeur lorsque la plaque n’est pas suffisamment chaude. L’eau pourrait
vous éclabousser ou s’échapper par la plaque. La fonction antigoutte réduit les éclaboussures et
les fuites d’eau lors du repassage à basse temperature.
ANTICALCAIRE
13 Ce fer comporte un système anticalcaire intégré qui prolonge la durée de vie de l’appareil.
14 Si votre eau est très dure, nous vous recommandons d’utiliser de l’eau distillée au lieu de l’eau
du robinet.
ARRÊT AUTOMATIQUE ÉLECTRONIQUE À POSITIONS
MULTIPLES
15 Ce fer comporte une fonction d’arrêt automatique électronique. Cette fonction éteint l’appareil
lorsque celui-ci n’a pas bougé pendant 15 minutes en position verticale ou pendant 30 secondes
à plat ou latéralement.
16 Le voyant sur la poignée clignote en rouge lorsque le fer est en mode d’arrêt automatique.
Pour remettre le fer en marche, il suffit de balancer doucement le fer de l’avant vers l’arrière
à quelques reprises jusqu’à ce que le voyant DEL s’allume de nouveau. Le fer devra peut-être
réchauffer pendant quelques minutes si l’arrêt automatique a été activé pendant une période
prolongée.
AUTONETTOYAGE
17 Remplissez le réservoir au niveau « MAX ». Ne pas trop remplir le fer.
18 Déposez le fer droit sur son talon d’appui, sur une surface protégée, et branchez-le dans la
prise électrique.
19 Tournez le cadran de sélection du type de tissu et de température à la position «
»
« Linen/Cotton » (lin et coton). Attendez que le voyant cesse de clignoter. Le fer a maintenant
atteint la température préréglée.
20 Tenez le fer dans le sens horizontal, au-dessus de l’évier. Appuyez à fond vers la droite
sur le levier de commande de vapeur et maintenez-le enfoncé à la position SELF CLEAN
(autonettoyage).
21 Balancez le fer de l’avant vers l’arrière. L’eau chaude et la vapeur seront évacuées par les
orifices situés dans la plaque. Soyez prudent lors de cette étape, car l’eau et la vapeur sont
suffisamment chaudes pour causer des brûlures.
22 Répétez l’étape 19 jusqu’à ce que toutes les impuretés et le tartre soient éjectés.
23 Videz le réservoir d’eau. Ne touchez pas les surfaces chaudes, l’eau et la vapeur, car des
blessures pourraient survenir.
24 Relâchez la commande de vapeur et elle se mettra automatiquement à la position
« Linen/Cotton » (lin et coton) « ».
25 Déposez le fer en position verticale et laissez-le refroidir.
USEFUL TIPS
26 Read all garment care labels before you start ironing. You can also test the temperature of the
iron on a hem or an inside seam.
27 Iron similar fabrics together and in sequence of synthetic fibers, nylon, silk/wool, polyester, and
cotton/linen. This will reduce the need to adjust the temperature frequently.
SPÉCIFICATIONS TECHNIQUES : 120 Volts, 60 Hz., 1800 Watts
GUIDE DE REPASSAGE
CARACTÉRISTIQUES
RANGEMENT ET ENTRETIEN
28 Réglez toujours le cadran de réglage de vapeur variable à « » après avoir vidé le
réservoir d’eau.
29 Laissez le fer refroidir avant de le ranger.
30 Installez le fer en position verticale pendant qu’il réchauffe ou refroidit et lors du rangement.
31 Évitez tout contact entre la plaque et des objets tranchants.
32 Toutes les deux semaines, nettoyez la surface externe du fer à l’aide d’un linge humide et
essuyez-la.
33 Si vous utilisez de l’amidon en vaporisateur, essuyez la plaque de temps en temps avec un linge
doux et humide pour éviter l’accumulation de dépôts.
34 Si le fer n’a pas été utilisé depuis quelques semaines, tenez le fer en position horizontale et
laissez la vapeur s’évacuer pendant environ deux minutes avant de repasser.
NE PAS OUBLIER
35 Tournez le cadran de sélection du type de tissu à « Nylon », puis débrancher le fer avant de
verser de l’eau dans son réservoir.
36 Videz toujours le réservoir d’eau après chaque utilisation du fer.
37 Ne repassez jamais des vêtements, à sec ou à vapeur, pendant qu’ils sont portés.
38 Soyez très prudent lorsque vous remplissez le réservoir d’eau du fer. Des brûlures peuvent
survenir si vous touchez des pièces métalliques chaudes, l’eau chaude ou la vapeur.
DÉPANNAGE
Le fer ne
chauffe pas
Une odeur ou de
petites particules
s’échappent du
nouveau fer
Le fer ne produit
pas de vapeur
Des gouttes
d’eau
s’échappent
des orifices de
vapeur
Branchez le fer uniquement dans une prise électrique polarisée.
Assurez-vous que la fiche est bien insérée dans la prise.
Il est possible que la température réglée soit trop basse.
Essayez un réglage de température plus élevé.
La fonction d’arrêt automatique est activée.
Cela est normal.
Suivez les instructions de la première utilisation et laissez la vapeur
s’écouler pour deux ou trois remplissages. Appuyez sur le bouton
de jet de vapeur occasionnellement afin d’éliminer les particules
blanches.
Le réservoir est peut-être vide ou son niveau d’eau est très bas.
Ajoutez de l’eau.
La commande de vapeur est réglée à « ».
Assurez-vous que les réglages de type de tissu, de température et de
commande de vapeur variable sont adéquats. Pour utiliser la fonction
de vapeur maximale, réglez le cadran de réglage de vapeur à « »; la
température doit être réglée à « Linen/Cotton » (lin et coton).
La plaque n’est pas suffisamment chaude et la fonction antigoutte
désactive la vapeur. Laissez toujours le fer atteindre la température
sélectionnée avec le cadran de réglage de vapeur variable réglé à « ».
Pour augmenter la vapeur, tournez le cadran de sélection du type de
tissu et de la température à « Linen/Cotton » (lin et coton) et le cadran de
réglage de vapeur variable à « ».
Si les réglages de température et de vapeur sont adéquats, mais que le
fer ne produit aucune vapeur, balancez doucement le fer vers la gauche
ou vers la droite à quelques reprises. Déplacez le cadran de réglage de
vapeur variable de « » à « » à quelques reprises.
Il est possible que le cadran de réglage soit réglé à la position « SELF
CLEAN » (autonettoyage). Tournez le cadran de réglage de la vapeur de la
position « » à « ».
Le fer n’est peut-être pas assez chaud. Tournez le sélecteur de type
de tissu et de température à la position « Linen Cotton » (lin et coton).
Attendez que le fer réchauffe avant d’activer la commande de vapeur
variable.
Il est possible que le jet de vapeur ait été trop utilisé. Attendez plus
longtemps entre chaque jet.
GI505série_55.E.F.130822.2
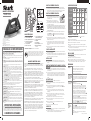
TYPE DE TISSU
INDICATION SUR
L’ÉTIQUETTE
RÉGL. DE TYPE
DE TISSU/TEMP.
COMMANDE
DE VAPEUR
JET DE
VAPEUR
VAPORISATEUR
Veuillez noter
que le symbole
ci-dessus,
lorsqu’il est sur
l’étiquette d’un
vêtement,
signifie que
CET ARTICLE
NE DOIT PAS
ÊTRE
REPASSÉ
NONNON NON OUI
OUIOUI OUI OUI
Nylon
Soie ou Laine Polyester
Coton ou
Lin
Nylon
Soie ou Laine Polyester
Coton ou
Lin
1 Plaque en acier inoxydable
2 Couvercle de l’orifice d’eaur
3 Bouton de pulvérisation atomiseur
4 Cadran de sélection du type de
tissu et de la température
5 Jet de vaporisation
6 Bouton de jet de vapeur
7 Levier de commande de vapeur
variable et d’autonettoyage
8 Fenêtre de niveau d’eau
9 Voyant DEL
10 Cordon pivotant
11 Fonction antigoutte (non illustré)
12 Filtre anticalcaire integer
(non illustré)
9
1 2 3
5
8
4
6
7
10
7
9
Ce manuel couvre les numéros de modèles:
GI505 55, GI505C 55, GI505WM 55
Euro-Pro Operating LLC, Newton, MA 02459,
1-800-798-7398
Copyright© Euro-Pro Operating LLC 2013
IMPRIMÉ EN CHINE
Les illustrations peuvent différer du produit réel.
Euro-Pro et Shark sont des marques de commerce de Euro-Pro Operating LLC.
CONSIGNES DE SÉCURITÉ IMPORTANTES
AVANT D’UTILISER VOTRE FER, LISEZ TOUTES LES DIRECTIVES
Certaines consignes de sécurité de base doivent toujours être respectées lors de
l’utilisation de votre fer électrique, notamment :
1. N’utilisez le fer qu’aux fins pour lesquelles il a été conçu.
2. Pour réduire le risque de décharge électrique, ne pas immerger l’appareil dans l’eau ou tout autre
liquide.
3. NE tirez PAS sur le cordon électrique pour débrancher l’appareil de la prise. Prenez la fiche et
tirez pour débrancher l’appareil.
4. NE PAS laisser le cordon électrique toucher de surfaces chaudes. Tournez le cadran de sélection
du type de tissu et de température à « Nylon » avant de débrancher le fer. Laissez le fer refroidir
complètement avant de le ranger. Enroulez lâchement le cordon d’alimentation autour du fer avant
de le ranger.
5. Débranchez toujours le fer de la prise électrique avant de le remplir d’eau ou de le vider, ou
lorsqu’il n’est pas utilisé.
6. NE PAS utiliser le fer à repasser si le cordon électrique est endommagé, s’il a été échappé ou
endommagé de quelque façon que ce soit, ou en présence d’une fuite. Pour éviter tout risque
de décharge électrique, ne démontez pas le fer. Retournez l’appareil à EURO-PRO Operating LLC
pour vérification, réparation ou réglage. Un mauvais assemblage augmente le risque de décharge
électrique lors de l’emploi du fer.
7. IMPORTANT :
Cet appareil n’est pas conçu pour être utilisé par des personnes (dont des
enfants) dont les capacités physiques, sensorielles ou mentales sont réduites ou dont l’expérience
et les connaissances sont insuffisantes.
Une
surveillance étroite
e
st nécessaire lors de l’usage de tout appareil par des enfants ou près
d’eux.
NE LAISSEZ PAS
le fer sans surveillance s’il est branché ou sur la planche à repasser.
8. Toucher les pièces métalliques, l’eau ou la vapeur chaudes peut causer des blessures. Soyez
prudent en retournant le fer; de l’eau chaude pourrait se trouver dans le réservoir.
9. Lorsque vous déposez le fer en position verticale, assurez-vous qu’il repose sur une surface
stable. N’UTILISEZ JAMAIS
le fer et ne le laissez jamais sur une surface instable.
10. Ne déposez jamais le fer sur une surface non protégée lorsqu’il est chaud, même s’il repose sur
son talon d’appui.
11. Rangez toujours votre fer en position verticale, et non sur sa plaque. S’il est rangé face vers le
bas, même la plus infime quantité d’humidité créera de la corrosion et de la rouille.
12. Cet appareil est conçu pour un usage domestique seulement.
CONSERVEZ CES CONSIGNES
GARANTIE LIMITÉE DE UN AN
EURO-PRO Operating LLC garantit ce produit contre toute défectuosité matérielle ou de main
d’œuvre pour une période d’un (1) an à compter de la date d’achat originale, lorsqu’utilisé
dans le cadre d’un usage domestique normal, sujet aux conditions, exclusions et exceptions
suivantes.
La responsabilité d’EURO-PRO Operating LLC est limitée au coût des réparations ou du
remplacement de l’appareil, à sa convenance. Cette garantie ne couvre pas l’usure normale
des pièces et ne s’applique pas aux appareils ayant été altérés ou utilisés à des fins
commerciales. Cette garantie limitée ne couvre pas les dommages causés par une mauvaise
utilisation, l’abus, la négligence lors de la manipulation, un emballage inadéquat ou la mauvaise
manipulation en transit. Cette garantie ne couvre pas les dommages ou défauts causés par
ou résultant du transport, des réparations, de l’entretien ou de l’altération du produit ou à ces
pièces effectuée par un réparateur non-autorisée d’EURO-PRO Operating LLC.
Si votre appareil ne fonctionne pas comme il le devrait lors d’un usage domestique normal
pendant la période de garantie, vous pouvez le retourner complet avec ses accessoires, frais
préaffranchis. Pour contacter le service d’assistance à la clientèle, appelez au
1-800-798-7398 ou visitez notre site Internet sur www.sharkclean.com.
S’il s’avérait que l’appareil possède une défectuosité, EURO-PRO Operating LLC le réparera ou
le remplacera sans frais, à sa seule discrétion. Une preuve d’achat incluant la date ainsi qu’un
chèque au nom d’EURO-PRO Operating LLC au montant de 12,95 $ pour couvrir les frais
d’expédition de retour et la manutention doivent être inclus.
Cette garantie est couverte pour l’acheteur initial du produit et exclue toute autre garantie
légale, implicite ou conventionnelle. La responsabilité d’EURO-PRO Operating LLC, s’il y en
a une, se limite aux obligations spécifiques exprimées sous les termes de cette garantie
limitée. En aucun cas, EURO-PRO Operating LLC ne peut être tenu responsable d’incidents
ou dommages indirects à quiconque et de toute nature que ce soit. Certaines provinces
n’autorisent pas l’exclusion ou la limitation de dommages circonstanciels ou conséquents,
auquel cas cette disposition ne s’appliquerait pas.
Cette garantie limitée vous confère des droits juridiques spécifiques, et d’autres droits légaux
vous sont peut-être disponibles, variant d’un état à l’autre d’une province à l’autre.
*IMPORTANT : Emballez soigneusement l’appareil pour éviter tout dommage lors du transport.
Assurez-vous de joindre la preuve d’achat et d’attacher à l’appareil une étiquette mentionnant
votre nom, adresse complète ainsi que le numéro de téléphone, de même que l’information
concernant l’achat, le numéro de modèle et le problème, selon vous, de l’appareil. Nous
vous recommandons d’assurer votre colis (puisque les dommages lors du transport ne sont
pas couverts par la garantie). Indiquez sur l’extérieur de votre colis « ATTENTION SERVICE À
LA CLIENTÈLE ». Nous essayons constamment d’améliorer nos produits, donc les clauses
contenues dans ce document peuvent changer sans préavis.
Cet appareil est doté d’un cordon à fiche polarisée (une lame de contact
est plus large que l’autre). Par sécurité, cette fiche ne s’insère que dans
un seul sens dans une prise polarisée. Si la fiche ne s’insère pas dans la
prise, retournez la fiche. Si elle ne s’adapte toujours pas, contactez un
électricien qualifié. Ne contournez pas cette mesure de sécurité.
MANUEL DU PROPRIÉTAIRE
GI505 série
-
 1
1
-
 2
2


dans d''autres langues
- English: Shark GI505 User manual
Documents connexes

Autres documents
-
Panasonic NI-S650TR Manuel utilisateur
-
-
-
 Euro-Pro GI490KM Le manuel du propriétaire
-
Panasonic NI-W450TS Manuel utilisateur
-
 Euro-Pro Shark GI460N Le manuel du propriétaire
-
 Euro-Pro Shark IR436 Le manuel du propriétaire


