Sony SU-558 Manuel utilisateur
- Catégorie
- Accessoires pour écran plat
- Taper
- Manuel utilisateur

4-098-717-03 (2)
Monitor Stand
Sony Corporation 2003 Printed in Japan
SU-558
•
Mounting Instructions
Instructions de montage
Montageanleitung
Instrucciones de montaje
Instruzioni per il montaggio
•
•
•
1
A
2
B
3
C
4
D
5
E
6
F
G
H
1
IJ
1 K
2 1
2 L
3
M
Français
Le SU-558 est un support d’écran conçu pour être utilisé avec le moniteur
d’écran LMD-170W/230W. Procédez comme suit pour assembler le support
d’écran au moniteur d’écran.
Assemblage du support d’écran au
moniteur d’écran
Avant d’installer le support d’écran
• Débranchez le cordon d’alimentation et tout câble de connexion du
moniteur d’écran.
• Dépliez un chiffon doux de grande taille.
• Le schéma illustre le moniteur d’écran LMD-170W, mais la procédure
expliquée est exactement la même que celle requise pour l’assemblage
du LMD-230W.
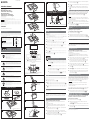
1 Dépliez un chiffon doux de grande taille sur une surface plate et stable
et posez-y doucement la face du moniteur d’écran. A
2 Alignez les quatre orifices situés à l’arrière du moniteur d’écran avec
les orifices correspondants du support d’écran et fixez fermement le
support d’écran à l’aide des quatre vis fournies (M4×12). B
3 Poussez les quatre butées sur les côtés du cache, comme illustré sur
le schéma, retirez le cache en le tirant vers vous. C
4 Raccordez de nouveau les câbles et groupez-les comme illustré sur le
schéma. D
5 Alignez le cache avec le support d’écran et fixez-le de nouveau en le
poussant. E
6 Alignez les broches sur le couvercle décoratif (fourni) avec les quatre
orifices situés à l’arrière du moniteur d’écran et fixez le cache en le
poussant fermement. F
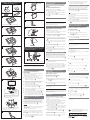
Afin de prévenir tout risque de
basculement du moniteur
Si vous installez ce moniteur sur une étagère, il risque de basculer ou de
tomber, ce qui pourrait vous blesser. Veillez à utiliser les trous de vis situés
dans la partie inférieure du support afin de fixer solidement le moniteur à
son support. Vous trouverez quatre trous de vis. Vérifiez l’emplacement de
ces trous et fixez des vis disponibles dans le commerce par-dessous la
base sur laquelle vous placerez le moniteur. G
Remarques
• Si les vis utilisées sont trop longues, vous risquez d’endommager le
support d’écran.
• N’installez pas le moniteur dans un endroit où il risque de subir des
vibrations ou des heurts.
Si vous utilisez le moniteur en position inclinée vers l’avant, comme indiqué
sur l’illustration, il risque de basculer ou de tomber, ce qui pourrait vous
blesser. Veillez à fixer l’accessoire fourni au support. H
1 Insérez les saillies de l’accessoire fourni dans les trous de la partie
inférieure du support, jusqu’à ce qu’elles s’encliquetent. I J
Réglage de l’angle d’inclinaison ou de la
position du moniteur d’écran
Pour régler l’angle d’inclinaison ou la position du
moniteur, vous devez le saisir à deux mains.
Pour relever le moniteur
1 Attrapez les deux côtés du moniteur. K
2 1 Inclinez le moniteur vers l’arrière en le faisant pivoter sur l’axe
supérieur, comme illustré.
2 Relevez le moniteur en le faisant pivoter sur l’axe inférieur, comme
illustré. L
3 Replacez le moniteur face à vous en le faisant pivoter vers l’avant sur
l’axe supérieur. M
Spécifications
Poids : environ 5,2 kg (11 lb 7 oz)
/ Soft cloth / Chiffon doux
/ Monitor Stand /
Support d’écran
/ Decorative
cover / Couvercle décoratif
/ Attachment /
Accessoire
/ Parts number /
Numéro de pièce
A
H
C
D
E
F
G
223.4 (8
25
/32)
4-M5
/ Metallic
bottom panel /
Panneau inférieur
métallique
/ Attached
object / Objet assemblé
/ Decorative cover / Couvercle décoratif
/ 6 to 10 mm (
1
/4 to
13
/32 inch) /
6 à 10 mm (
1
/4 à
13
/32 pouces)
/ Position of the screws / Position des vis
/ View from the bottom of the
Monitor Stand / Vue de dessous du support d’écran
/ M5 screw /
Vis M5
/ Arm cover / Cache
165.1 (6
11
/32)
240.2 (9
15
/32)
52.2
(2
1
/
16
)
76.2
(3)
I
mm / Unit: mm (inches) / Unité: mm (pouces)
250.3 (9
27
/32)
64°
74°
/ Stand movable
range / Mobilité du support
M
1
K
English
The SU-558 is a Monitor Stand designed for use with the LMD-170W/230W
LCD Monitor. Attach it to the LCD monitor following the procedure given
below.
Attaching the Monitor Stand to the LCD
monitor
Before installing the Monitor Stand
• Disconnect the power cord and any connecting cables from the LCD
monitor.
• Prepare a large soft cloth.
• The illustration shows the LMD-170W LCD Monitor, but the procedure
explained is exactly the same as that required for attaching the LMD-
230W.
1 Spread a large soft cloth on a flat, stable surface, and gently place the
LCD monitor face-down on the cloth. A
2 Align the four screw holes on the back of the LCD monitor with the
corresponding screw holes on the Monitor Stand, and attach it securely
using the four screws supplied (M4×12).
B
3 Pushing in the four stoppers on the sides of the arm cover as shown in
the illustration, remove it by pulling it towards you. C
4 Reconnect the cables removed previously, and bundle them together
as shown in the illustration.
D
5 Align the arm cover with the Monitor Stand, and re-attach it by pushing
it in.
E
6 Aligning the prongs on the decorative cover (supplied) with the four
holes on the back of the LCD monitor, attach it by pushing it in firmly.
F
To prevent the monitor from toppling over
When the monitor is installed on a shelf, it may topple over or fall, causing
injury. Be sure to use the screw holes on the bottom of the stand to attach
the monitor securely to the monitor stand. There are four screw holes.
Confirm the location of these holes, and attach commercially available
screws from the bottom of any base you may place it on. G
Notes
• If the screws you use are too long, you may damage the Monitor Stand.
• Do not place the monitor in a location where it is subject to vibration or the
possibility of being struck.
If you use the monitor tilted forward as shown in the illustration, it may
topple over or fall, causing injury. Be sure to attach the supplied attachment
to the stand. H
1 Insert the lugs of the supplied attachment to the holes on the bottom of
the stand until they click. I J
Adjusting the angle or position of the LCD
monitor
Grasp the LCD monitor with both hands when
adjusting its angle or position.
To raise the position of the monitor
1 Grasp both sides of the monitor. K
2 1 Lean the monitor back by tilting it on the upper hinge, as shown.
2 Raise the monitor by tilting it on the lower hinge, as shown.
L
3 Face the monitor to the front by tilting it forward on the upper hinge. M
Specifications
Mass: Approx. 5.2 kg (11 lb 7 oz)
/ Screws (4) / Vis (4)
B
J
L
2
/
Attachment /
Accessoire
La page est en cours de chargement...
-
 1
1
-
 2
2


Sony SU-558 Manuel utilisateur
- Catégorie
- Accessoires pour écran plat
- Taper
- Manuel utilisateur
dans d''autres langues
- italiano: Sony SU-558 Manuale utente
- English: Sony SU-558 User manual
- español: Sony SU-558 Manual de usuario
- Deutsch: Sony SU-558 Benutzerhandbuch
- 日本語: Sony SU-558 ユーザーマニュアル
Documents connexes
Autres documents
-
Eizo FDX1501-A Le manuel du propriétaire
-
-
Eizo FDX1003T Le manuel du propriétaire
-
NEC MD205MG-1 Le manuel du propriétaire
-
NEC 医用ディスプレイ専用 Le manuel du propriétaire
-
-
Amazon Basics Bras de support Simple à fixation Manuel utilisateur