
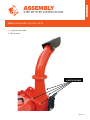
OPC505AE
5-INCH AUTO FEED CHIPPER
AUTO FEED • D.O.T. TOWABLE • KOHLER® ENGINE
ASSEMBLY GUIDE
PARTS AND SERVICE 702-331-5353 | WWW.DK2.COM
DK2 USA EAST
3750 SOUTH AVENUE,
NORTH UNIT TOLEDO, OHIO
43615 USA
DK2 CORPORATE HEAD OFFICE
5330 MAINWAY
BURLINGTON, ONTARIO
L7L6A4 CANADA
DK2 USA WEST
3311 MEADE AVENUE STE
E DOCK 13, LAS VEGAS, NEVADA
89102 USA

2 | OPC505AE man.
TABLE OF CONTENTS
SECTION I: ASSEMBLY
STEP 1: UNPACK ALL ITEMS ..............................................................................4
STEP 2: INSTALLING THE ROLLER VALVE ................................................................. 5
STEP 3: INSTALLING THE FEED ROLLER SPEED CONTROL ..................................................6
STEP 4: INSTALLING THE CHIP CHUTE ....................................................................7
STEP 5: INSTALLING THE TOW BAR ...................................................................... 8
SCHEMATICS .......................................................................................... 9
PARTS LIST ............................................................................................ 10
SECTION II: OPERATION
KOHLER INSTRUCTIONS ................................................................................12
BEFORE STARTING THE ENGINE .........................................................................13
IF YOUR UNIT WILL NOT START .......................................................................... 13
WARRANTY ....................................................................................... 15
ENGLISH

SECTION I
ASSEMBLY

4 | OPC505AE man.
ASSEMBLY
STEP BY STEP INSTRUCTIONS
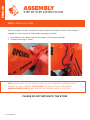
STEP 1: UNPACK ALL ITEMS
NOTE: UPON INSPECTION OF PARTS IF YOU FIND ANY DAMAGED OR MISSING PARTS
PLEASE CALL DK2 POWER AT 702-331-5353 OR CONTACT US VIA OUR WEBSITE
WWW.DK2POWER.COM WE WILL REPLACE ANY MISSING PARTS TO YOU FREE
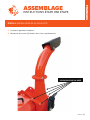
Open and unpack all items. Leave lots of working space and inspect all parts. Your chipper is
shipped in a crate, remove all sides before you begin assembly.
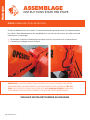
1. Assemble the main feed chute with the hinges and hardware provided.
2. Connect the wiring as shown.
PLEASE DO NOT RETURN TO THE STORE
ENGLISH

v.220511 | 5
ASSEMBLY
STEP BY STEP INSTRUCTIONS
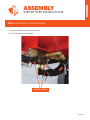
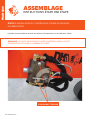
1. Install the roller valve under the chute.
2. Use 2 bolt hardware included.
STEP 2: INSTALLING THE ROLLER VALVE
2 BOLTS & NUTS
ENGLISH

6 | OPC505AE man.
ASSEMBLY
STEP BY STEP INSTRUCTIONS
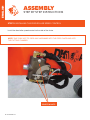
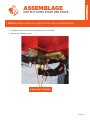
STEP 3: INSTALLING THE FEED ROLLER SPEED CONTROL
Install the feed roller speed control to the side of the chute.
2 BOLTS & NUTS
NOTE: TAKE CARE NOT TO DROP ANY HARDWARE INTO THE FEED CHUTE AND INTO
THE CUTTING CHAMBER.
ENGLISH

v.220511 | 7
ASSEMBLY
STEP BY STEP INSTRUCTIONS
STEP 4: INSTALLING THE CHIP CHUTE
1. Install the chip chute.
2. Bolt 4 places.
4 BOLTS ON BASE
ENGLISH

8 | OPC505AE man.
ASSEMBLY
STEP BY STEP INSTRUCTIONS
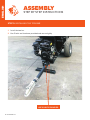
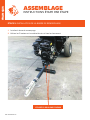
STEP 5: INSTALLING THE TOW BAR
1. Install the tow bar.
2. Use 2 bolts and hardware provided and secure tightly.
USE 2 BOLTS PROVIDED
ENGLISH

v.220511 | 9
ASSEMBLY
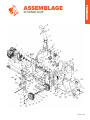
SCHEMATICS
ENGLISH

10 | OPC505AE man.
ASSEMBLY
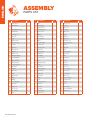
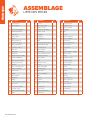
PARTS LIST
NO. DESCRIPTION QTY.
1 Penta-blade rod 1
2 Triangle blade 1
3
4 M10*25 thinhead screw 1
5 Bearing 1507 1
6 Pulley dia. 200 1
7 B-belt 940 1
8 Engine 1
9 Adjust plate 4-0 1
10 D Pin dia. 10*85 1
11 Tow bar 1
12 Belt cover 1
13 Pulley dia. 125 1
14 Washer 2-0 1
15 M8*25 screw 1
16 Bearing 6306-2RS 1
17 Lock nut M35*1-5 1
18 Blade push-plate 1
19 Key way 8*7*60 1
20 Longe blade spacer 1
21 Bearing base 1
22 Fan plate 1
23 Blade plate 1
24 Anvil 1
25 Bottom frame 1
26 Switch 1
27 Battery 1
28 Cover fixing plate 1
29 Rear frame 1
30 Rubber pad 1
31 Oil bean cover 1
32 Oil feed filter 1
33 Chain 1
NO. DESCRIPTION QTY.
34 Tank 1
35 Oil outlet filter 1
36 1.5 inch interface 1
37 Oil outlet interface 1
38 Pin dia. 3.5*40 1
39 Nut M24 1
40 dia. 25 washer 1
41 Wheel 16*8.0-7 1
42 Flange 1
43 Seal dia. 25*47*7 1
44 Bearing 6205 1
45 Wheel pipe axle 1
46 Battery box 1
47 Baseframe plate 1
48 Mouth frame 1
49 Feed rubber 1
50 Foot angle plate 1
50A Pipe 1
50B Supporting spring 1
50C Spring 1
51 Feed hopper 1
51A Emergency panel 1
51B Movable plate 1
52 Switch valve 1
53 Speed valve 1
54 Spring 1
55 Cover 1
56 Short blade spacer 1
57 Interfal rod 1
58 Main axle 1
59 Plate blade 1
60 Bearing FL206 1
61 Pulley A dia. 90 1
NO. DESCRIPTION QTY.
62 Belt A dia. 500 1
63 Pin 8*7*30 1
64 Rubber seal 1
64A Preforming 1
64B Pulling rivet 1
64C Spring 1
64D Switch box 1
64E Rubber seal 1
65 Emergency stop 1
66 Hopper block plate 1
67 Push bar 1
68 Pump joint 1
69 Pump 1
70 Pump fixing plate 1
71 Pump pulley 1
72 Motor 1
72A Ratchet rack 1
72B Ratchet 1
73 Top cover 1
74 Top body 1
75 Screw hook 1
76 Bottom discharge 1
77 Top discharge 1
78 Fasten handle 1
79 Reflect cover 1
80 Seal dia. 72*30*10 1
81 Protective plate 1
82 Stop bar 1
83 Oil seal 1
84 Tension pulley 1
85 Flower bolt M12*85 1
86 Adjustable feet 1
ENGLISH

SECTION II
OPERATION

12 | OPC505AE man.
OPERATION
PROPER USE GUIDELINES
KOHLER INSTRUCTIONS
YOUR UNIT HAS A COMMERCIAL KOHLER ENGINE WITH A 3 YEAR PARTS AND SERVICE
WARRANTY. FOR WARRANTY IN YOUR AREA, CONTACT YOUR NEAREST KOHLER DEALER.
VISIT WWW.KOHLERENGINES.COM FOR PARTS, SERVICE, MANUALS, AND DEALER LOCATIONS.
NOTE: READ THE KOHLER ENGINE MANUAL SUPPLIED WITH YOUR UNIT FOR FULL
ENGINE OPERATION, SAFETY, AND MAINTENANCE.
ENGLISH

v.220511 | 13
OPERATION
PROPER USE GUIDELINES
BEFORE STARTING ENGINE
IF YOUR UNIT WILL NOT START
CLEAR AREA OF ALL PEOPLE AND PROPERTY THAT COULD BE DAMAGED. THINK SAFETY. THIS
CHIPPER CAN CAUSE INJURY IF SAFETY IS NOT ENFORCED. ONLY ONE OPERATOR SHOULD
WORK ON THIS UNIT. NEVER HAVE ANOTHER PERSON IN THE AREA OR IN FRONT OF THE CHIP
EXPULSION CHUTE.
1. Check the oil level. Your engine has a low oil shuto protection and will not start if low on oil.
2. Make sure spark plug wire is seated.
3. Move the gas lever on to the right. Left position is o.
4. Use the choke if needed to start in cold weather.
5. Check your gas level.
• DO NOT WEAR LOOSE FITTING CLOTHES THAT COULD GET STUCK IN THE RAM.
• ONLY CHIP WOOD, NO METAL OR PLASTIC OR RUBBER. WOOD ONLY.
• CHILDREN SHOULD NOT RUN THIS EQUIPMENT.
• STAY ALERT OF YOUR SURROUNDINGS AND PERSONS THAT COULD APPEAR IN THE AREA
WHILE YOU ARE WORKING.
• LOAD TREES INTO FEED CHUTE. ADJUST FEED ROLLER TO SLOW FOR LARGER TREES
AND FASTER FOR SMALLER TREES. USE LEVER IN CENTER OF FEED CHUTE TO CONTROL
FORWARD/NEUTRAL/REVERSE OF FEED ROLLER.
• IF ENGINE SPEED IS REDUCED WHEN CHIPPING, ADJUST THE ROLLER SPEED.
• WEAR SAFETY GLASSES, GLOVES AND PROTECTIVE SHOES.
• OPERATE OUTDOORS ONLY - GAS FUMES ARE DEADLY INDOORS.
RUN ENGINE AT FULL RPM. ALLOW MACHINE TO REGAIN RPM BETWEEN CHIPPING AND NEVER
DISCONNECT SAFETY SWITCHES OR RUN WITH COVERS OPEN.
ENGLISH


v.220511 | 15
PLEASE DO NOT RETURN TO THE STORE
YOU HAVE A 1 YEAR WARRANTY AND DK2 WILL REPLACE A DEFECTIVE PART FOR FREE.
CALL US AT 1 (888) 277-6960 FOR FAST WARRANTY PARTS AND QUESTIONS.
WHAT IS COVERED – 3 YEAR ENGINE AND 1 YEAR COMMERCIAL WARRANTY INCLUDED
Detail K2 Inc. warrants to the original purchaser that product will be free and clear of manufacturing defects in
workmanship and materials under normal use and service fora period of one (1) year from the date of the original
purchase. If within one (1) year from the original date of purchase this product fails due to defect inmaterial or
workmanship, Detail K2 will repair, replace, or supply any covered defective part at ouroption. DK2 POWER is 1-year
parts only warranty no labor. Kohler 3 year warranty is PARTS and LABOR.
Upon expiry of one (1) year, Detail K2 will have no further liability related to theproduct. Detail K2 does not authorize
any party, including its authorized distributors ordealers, to oer any other warranty on behalf of Detail K2 Inc.
SERIAL NUMBERS MUST BE REGISTERED ONLINE AT WWW.DK2POWER.COM, WARRANTY NON-
TRANSFERABLE.
KOHLER ENGINES –KOHLER CH SERIES ENGINES COMMERCIAL 3 YR PARTS AND LABOR WARRANTY
KOHLER ENGINES –KOHLER SH SERIES ENGINES RESIDENTIAL 2 YR PARTS AND LABOR WARRANTY
see your Kohler manual for specific warranty.
DK2–1-Year parts only, no labor. 3-year commercial Kohler warranty.
THIS WARRANTY DOES NOT COVER OR APPLY TO:
(a) Damage to the product due to misuse, mishandling and abuse
(b) Improper installation, maintenance and storage
(c) Expendable parts such as nuts and bolts, pins and springs, wiring and switch components, hydraulic hoses and
fittings, cutting teeth, cutting chains, cutting blades, throttles, belts and tires.
(d) Normal wear and tear
(e) Consequential damage & incidental damages such as damage to persons or property
PROCEDURE FOR OUTDOOR POWER EQUIPMENT WARRANTY
Within the one (1) year warranty period, the purchaser of the product can CALL 1 (888) 277-6960 or contact us on
www.DK2Power.com. Notify us of the claimed defect and provide proof of original purchase.At this timethe validity
of the claim will be determined, and if approved replacement parts will be issued. No returned product will be
accepted underwarranty unless accompanied by an RGA# issued by Detail K2 Inc.
DAMAGED FREIGHT
Damage to your product caused by freight mishandling is NOT covered under warranty. If your freight arrives
damaged, REFUSE it. Inspect your product when it arrives, otherwise if you accept it, you will be responsible for
filing any freight claims with the delivery company. DK2 warranty excludes damage to product.
RETURNS BEFORE GAS AND OIL
Follow the return policy from the retailer you purchased the equipment from.
RESOLUTION FOR A DEFECTIVE PRODUCT AFTER GAS AND OIL HAS BEEN ADDED.
Call us at 1 (888) 277-6960 between 8am-4pm Monday to Friday EST.
WARRANTY
1 YEAR WARRANTY
ENGLISH

This page is left blank intentionally.

OPC505AE
DÉCHIQUETEUSE À ALIMENTATION AU-
TOMATIQUE DE 5 POUCES
ALIMENTATION AUTOMATIQUE • REMORQUABLE • MOTEUR KOHLER®
GUIDE DE MONTAGE
PIÈCES ET SERVICE 702-331-5353 | WWW.DK2.COM
DK2 USA EST
3750 AVENUE SUD,
UNITÉ NORD TOLEDO, OHIO
43615 ÉTATSUNIS
SIÈGE SOCIAL CORPORATIF DK2
5330 MAINWAY
BURLINGTON, ONTARIO
L7L6A4 CANADA
DK2 ÉTAT UNIS OUEST
3311 AVENUE MEADE STE
QUAI E 13, LAS VEGAS, NEVADA
89102 ÉTATS UNIS

18 | OPC505AE man.
TABLE DES MATIÈRES
SECTION I: MONTAGE
ÉTAPE 1: DÉBALLER TOUS LES ARTICLES ................................................................. 20
ÉTAPE 2: INSTALLATION DE LA VALVE DE ROULEAU D’ALIMENTATION .......................................21
ÉTAPE 3: INSTALLATION DU CONTRÔLE DE VITESSE DU ROULEAU D’ALIMENTATION ......................... 22
ÉTAPE 4: INSTALLATION DE LA GOULOTTE ...............................................................23
ÉTAPE 5: INSTALLATION DE LA BARRE DE REMORQUAGE .................................................. 24
SCHÉMATIQUE ......................................................................................... 25
LISTE DES PIÈCES ......................................................................................26
SECTION II: OPÉRATION
INSTRUCTIONS KOHLER ................................................................................28
AVANT DE DÉMARRER LE MOTEUR ......................................................................29
SI VOTRE UNITÉ NE DÉMARRE PAS ....................................................................... 29
GARANTIE ........................................................................................ 31
FRANÇAIS

SECTION I
ASSEMBLAGE

20 | OPC505AE man.
ASSEMBLAGE
INSTRUCTIONS ÉTAPE PAR ÉTAPE
ÉTAPE 1: DÉBALLER TOUS LES ARTICLES
REMARQUE: LORS DE L’INSPECTION DES PIÈCES SI VOUS TROUVEZ DES PIÈCES
ENDOMMAGÉES OU MANQUANTES, VEUILLEZ APPELER DK2 POWER AU 702-331-
5353 OU CONTACTEZ-NOUS VIA NOTRE SITE WEB WWW.DK2POWER.COM NOUS
VOUS REMPLACERONS GRATUITEMENT TOUTES LES PIÈCES MANQUANTES
Ouvrez et déballez tous les articles. Laissez beaucoup d’espace de travail et inspectez toutes
les pièces. Votre déchiqueteuse est expédiée dans une caisse, retirez tous les côtés avant de
commencer l’assemblage.
1. Assemblez la trémie d’alimentation principale avec les charnières et le matériel fournis.
2. Connectez le câblage comme indiqué.
VEUILLEZ NE PAS RETOURNER AU MAGASIN
FRANÇAIS
La page charge ...
La page charge ...
La page charge ...
La page charge ...
La page charge ...
La page charge ...
La page charge ...
La page charge ...
La page charge ...
La page charge ...
La page charge ...
-
 1
1
-
 2
2
-
 3
3
-
 4
4
-
 5
5
-
 6
6
-
 7
7
-
 8
8
-
 9
9
-
 10
10
-
 11
11
-
 12
12
-
 13
13
-
 14
14
-
 15
15
-
 16
16
-
 17
17
-
 18
18
-
 19
19
-
 20
20
-
 21
21
-
 22
22
-
 23
23
-
 24
24
-
 25
25
-
 26
26
-
 27
27
-
 28
28
-
 29
29
-
 30
30
-
 31
31


dans d''autres langues
- English: DK2 POWER OPC505AE User manual
Documents connexes
Autres documents
-
DK2 Detail K2 OPC503V 3-in 7 HP Gas-Powered 3-in-1 Cordless Towable ATV Shredder & Chipper Le manuel du propriétaire
-
DK2 PPS200 Manuel utilisateur
-
DK2 PPS100 Manuel utilisateur
-
-
Detail K2 Hitch Mounted Dual E-Bike Carrier Manuel utilisateur
-
Detail K2 AVAL8219 Manuel utilisateur
-
Detail K2 AVAL8826ELT Manuel utilisateur
-
-
-