
RDWL313P2000
Read before installing
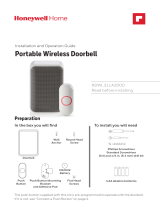
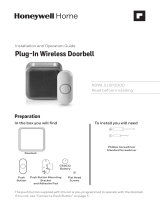
Installation and Operation Guide
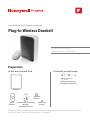
Plug-In Wireless Doorbell
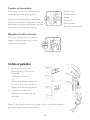
Preparation
Doorbell
Push
Button
Flat Head
Screws
Phillips Screwdriver
Standard Screwdriver
Push Button Mounting
Bracket
and Adhesive Pad
To install you will need
In the box you will find
The push button supplied with this kit is pre-programmed to operate with the doorbell.
If it is not, see “Connect a Push Button” on page 4.
CR2032
Battery

2
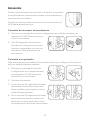
Overview
Just follow these simple steps:
1. Install the push button battery and plug in the doorbell.
2. Set up the doorbell and your preferences.
3. Install the push button.
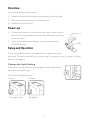
Power-up
1. Choose an outlet location that is not near a heat source,
where the doorbell will be easy to see and hear, and plug
in the doorbell.
2. Open the push button battery cover and install the
CR2032 battery.
Setup and Operation
Press the push button to test whether it is paired with the
doorbell. The doorbell will light up and ring. If it does not, see “Connect a Push
Button” on page 4.
+
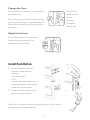
Change the Light Setting
when the doorbell rings.
Press the Sunlight button
1 time 2 times
Top lights only No lights.

3
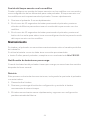
Change the Tune
Press the Music button to change the
doorbell tune.
Every time you press the Music button,
the tune will change. Stop pressing the
Music button when you hear the tune
you want:
Ding Dong
Westminster
Piano
Fantasy
Soft Alert
Smart Sax
Install Push Button
1. Mount the push button
bracket in the desired
location
Use the screws
Use the adhesive backing. If
using the adhesive backing,
clean the surface first.
2. Snap the push button onto
the mounting bracket.
–OR–
Note: If you need to remove the push button, use a small
screwdriver to release the tab.
Adjust the Volume
Press the Volume Up or Volume
Down buttons to adjust the
volume of the Doorbell.

4
Accessories
You can connect 4 accessories to your doorbell, including
other push buttons, window or door opening sensors, and
motion sensors.
If you try to connect more accessories than the max
number, the LED on the side blinks red.
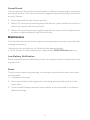
Connect a Motion Sensor
1. Press and hold the Setting button on the doorbell for three seconds.
The LED on the side turns on with an
amber color.
2. Within 20 seconds of pressing the
Setting button, wave or make some
other kind of motion in front of the
motion sensor.
Connect a Push Button
Follow these steps to change the ring and light settings for an existing
doorbell, too.
1. Press and hold the Setting button on
the doorbell for three seconds.
The LED on the side turns on with an
amber color.
2. Press the push button.
3. Within 12 seconds of pressing the
push button, press the Music button
to select the ring for that push
button.
4. Within 12 seconds of pressing the
doorbell, press the Sunlight button
to select light setting for that push
button.

5
Secret Knock
You can set up a Secret Knock that makes a different ring and light setting for
each push button. The Secret Knock is triggered by pressing the push button
quickly 3 times.
1. Press the push button 3 times quickly.
2. Within 12 seconds of pressing the push button, press the Music button to
select the ring for the Secret Knock
3. Within 12 seconds of pressing the push button, press the Sunlight button
to select a light setting for the Secret Knock.
Maintenance
Your doorbell and push button require no maintenance except to periodically
change the battery.
If using the correct battery, its life should be approximately:
• Up to 2 years for the push button; replace with CR2032 lithium battery
Low Battery Notification
When the push button batteries are low, two beep sounds are heard after the
normal tune.
Reset
This process removes all pairings, including the push button that came with
this doorbell:
1. Unplug the doorbell.
2. Press and hold the Setting button, and plug the doorbell back in at the
same time.
3. The doorbell will beep several times rapidly, and is returned to its factory
default settings.

6
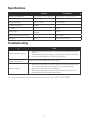
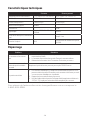
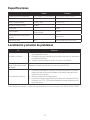
Specications
Doorbell Push Button
Operating Temperature
ActivLink™ 916.8 MHz 916.8 MHz
-
RF Power - <1.2W
300mA
-
Troubleshooting
If Then
1.
2.
3.
1.
2.
3.

7
FCC Regulations
This device complies with part 15 of the FCC Rules. Operation is subject to the following two conditions: (1) This
device may not cause harmful interference, and (2) this device must accept any interference received, including
interference that may cause undesired operation.
This equipment has been tested and found to comply with the limits for a Class B digital device, pursuant to part
15 of the FCC Rules. These limits are designed to provide reasonable protection against harmful interference
in a residential installation. This equipment generates, uses and can radiate radio frequency energy and, if not
installed and used in accordance with the instructions, may cause harmful interference to radio communications.
However, there is no guarantee that interference will not occur in a particular installation. If this equipment does
cause harmful interference to radio or television reception, which can be determined by turning the equipment off
and on, the user is encouraged to try to correct the interference by one or more of the following measures:
• Reorient or relocate the receiving antenna.
• Increase the separation between the equipment and receiver.
• Connect the equipment into an outlet on a circuit different from that to which the receiver is connected.
• Consult the dealer or an experienced radio/TV technician for help.
This transmitter must not be co-located or operating in conjunction with any other antenna or transmitter. This
equipment should be installed and operated with a minimum distance of 20 millimeters between the radiator and
your body.
IC Regulations
CAN ICES-3(B)/ NMB-3(B)
two conditions: (1) this device may not cause interference, and (2) this device must accept any interference,
including interference that may cause undesired operation of the device.
The device meets the exemption from the routine evaluation limits in section 2.5 of RSS 102 and compliance with
This transmitter must not be co-located or operating in conjunction with any other antenna or transmitter. This
equipment should be installed and operated with a minimum distance of 20 millimeters between the radiator and
your body.
The operation of this equipment is subject to the following two conditions: (1) this equipment or device may not
cause harmful interference, and (2) this equipment or device must accept any interference, including interference
that may cause undesired operation.

Resideo Inc., 1985 Douglas Drive North
Golden Valley, MN 55422
www.resideo.com
This product is manufactured by Resideo Technologies, Inc., Golden Valley, MN, 1-800-633-3991
© 2020 Resideo Technologies, Inc. The Honeywell Home trademark is used under license from Honeywell
International Inc.
All rights reserved.
33-00193EFS—05 M.S. Rev. 01-20 | Printed in United States
33-00193EFS-05
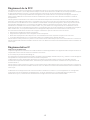
1-year limited warranty
Resideo warrants this product, excluding battery, to be free from defects in workmanship or materials, under
any time during the warranty period the product is determined to be defective due to workmanship or materials,
If the product is defective,
(i) return it, with a bill of sale or other dated proof of purchase, to the place from which you purchased it; or
MN 55422, or whether a replacement product can be sent to you.
This warranty does not cover removal or reinstallation costs. This warranty shall not apply if it is shown by Resideo
that the defect was caused by damage which occurred while the product was in the possession of a consumer.
SHALL NOT BE LIABLE FOR ANY LOSS OR DAMAGE OF ANY KIND, INCLUDING ANY INCIDENTAL OR
CONSEQUENTIAL DAMAGES RESULTING, DIRECTLY OR INDIRECTLY, FROM ANY BREACH OF ANY WARRANTY,
EXPRESS OR IMPLIED, OR ANY OTHER FAILURE OF THIS PRODUCT.
Some states do not allow the exclusion or limitation of incidental or consequential damages, so this limitation may
not apply to you.
THIS WARRANTY IS THE ONLY EXPRESS WARRANTY RESIDEO MAKES ON THIS PRODUCT. THE DURATION
OF ANY IMPLIED WARRANTIES, INCLUDING THE WARRANTIES OF MERCHANTABILITY AND FITNESS FOR A
PARTICULAR PURPOSE, IS HEREBY LIMITED TO THE ONE YEAR DURATION OF THIS WARRANTY. Some states
do not allow limitations on how long an implied warranty lasts, so the above limitation may not apply to you.

RDWL313P2000
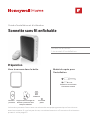
Lire avant d’installation.
Guide d’installation et d’utilisation
Sonnette sans l enchable
Préparation
Sonnette
Bouton-
poussoir
Vis à tête
plate
Tournevis cruciforme
Tournevis normal
Support de montage de
bouton-poussoir avec
tampon adhésif
Matériel requis pour
l’installation
Vous trouverez dans la boîte
Le bouton-poussoir fourni avec ce nécessaire est préprogrammé pour fonctionner
Pile
CR2032

10
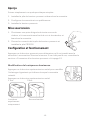
Aperçu
1.
2.
3.
Mise sous tension
1.
2.
Conguration et fonctionnement
section
+
Modification de la séquence lumineuse
retentit.
1 fois 2 fois
Lumières
supérieures
uniquement
Aucune lumière

11
Modification de la mélodie
bouton Musique, la mélodie change.
souhaitée.
Ding Dong
Westminster
Piano
Fantaisie
Alerte douce
Smart Sax
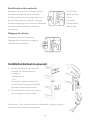
Installation du bouton-poussoir
1.
souhaité.
2.
sur le support de montage.
–OU–
tournevis pour libérer la languette.
Réglage du volume
réglage du volume pour régler le
volume de la sonnerie.

12
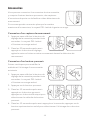
Accessoires
mouvement.
Connexion d’un capteur de mouvement
1.
réglage de la sonnette pendant trois
secondes. Le voyant DEL latéral
2. Dans les 20 secondes après avoir
appuyé sur le bouton de réglage,
mouvement.
Connexion d’un bouton-poussoir
existante.
1.
réglage de la sonnette pendant trois
secondes. Le voyant DEL latéral
2.
3. Dans les 12 secondes après avoir
appuyé sur le bouton-poussoir,
sélectionner la mélodie du bouton-
poussoir.
4.
poussoir.

13
Mélodie secrète
éclairage différents pour chaque bouton-poussoir. La mélodie secrète est
déclenchée en appuyant rapidement trois fois sur le bouton-poussoir.
1.
2.
sur le bouton Musique pour sélectionner la sonnerie de la mélodie secrète.
3.
mélodie secrète.
Entretien
La sonnette et le bouton-poussoir ne nécessitent aucun entretien, excepté le
remplacement périodique de la pile.
• CR2032
au lithium
Alerte de pile faible
Lorsque la pile du bouton-poussoir est faible, deux timbres sonores sont émis
après la mélodie normale.
Réinitialisation
Ce processus supprime tous les jumelages, y compris le bouton-poussoir
fourni avec cette sonnette :
1.
2.
sonnette simultanément.
3.

14
Caractéristiques techniques
Sonnette Bouton-poussoir
ActivLink™
-
-
300mA
-
Dépannage
Problème Résolution
1.
2.
3.
1.
2.
3.

15
Règlement de la FCC
toutes les interférences reçues, y compris celles pouvant causer un fonctionnement non souhaité.
Cet équipement a été testé et est conforme aux limites des dispositifs numériques de Classe B, conformément
les interférences nuisibles dans une installation résidentielle. Cet équipement génère, utilise et peut émettre de
radio et télévision, ce qui peut être déterminé en éteignant le dispositif et en le remettant en marche, il est
•
•
•
•
Cet équipement devrait être installé et actionné avec une distance minimum de 20 millimètres entre le radiateur et
votre corps.
Réglementation IC
CAN ICES-3(B)/NMB-3(B)
(1) il ne doit pas produire de brouillage et
susceptible de compromettre le fonctionnement du dispositif.
conformité de rf.
Cet équipement devrait être installé et actionné avec une distance minimum de 20 millimètres entre le radiateur et
votre corps.

Resideo Inc., 1985 Douglas Drive North
Golden Valley, MN 55422
www.resideo.com
33-00193EFS-05
33-00193EFS—05 M.S. Rev. 01-20 | Imprimé aux États-Unis
Ce produit est fabriqué par Resideo Technologies, Inc., Golden Valley, MN, 1-800-633-3991.
© 2020 Resideo Technologies, Inc. La marque de commerce Honeywell Home est utilisée sous licence avec
l’autorisation d’Honeywell International Inc.
Tous droits réservés.
Garantie
convenablement. En cas de défaillance ou de mauvais fonctionnement pendant la période de garantie, Resideo
Si le produit est défectueux
Golden Valley, MN 55422, ou si un produit de remplacement peut vous être expédié.
ou la restriction des dommages indirects ou accessoires et, par conséquent, la présente restriction peut ne pas
CETTE GARANTIE EST LA SEULE GARANTIE EXPRESSE FAITE PAR RESIDEO POUR CE PRODUIT. LA DURÉE
PRÉSENTE GARANTIE. Certaines provinces ne permettent pas de limiter la durée des garanties tacites et, par

RDWL313P2000
Leer antes de instalar
Instalación y guía del usuario
Timbre inalámbrico enchufable
Preparación
Timbre
Pulsador Tornillos
de cabeza
plana
Destornillador de estrella
Destornillador estándar
Soporte de montaje del
pulsador y almohadilla
adhesiva
Para instalar necesitará
En la caja, encontrará lo siguiente:
El pulsador que se suministra con este kit está preprogramado para funcionar con el
timbre. Si no lo está, consulte “Conexión a un pulsador” en la página 20.
Batería
CR2032

18
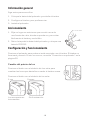
Información general
Siga estos pasos sencillos:
1. Coloque la batería del pulsador y enchufe el timbre.
2. Configure el timbre y sus preferencias.
3. Instale el pulsador.
Accionamiento
1. Elija un lugar en exteriores que no esté cerca de
una fuente de calor, donde se pueda ver y escuchar
fácilmente el timbre y enchúfelo.
2. Retire la tapa de la batería del pulsador y coloque una
batería CR2032.
Conguración y funcionamiento
Presione el pulsador para probar si está asociado con el timbre. El timbre se
iluminará y sonará. Si esto no ocurre, consulte “Conexión a un pulsador” en la
página 20.
+
Cambio del patrón de luz
cambiar las luces que destellan cuando el timbre suena.
Luces superiores
únicamente
Sin iluminación

19
Cambio de la melodía
Presione el botón de Música para
cambiar la melodía del timbre.
Música, la melodía cambiará. Deje de
presionar el botón de Música cuando
escuche la melodía que desea.
Ding Dong
Westminster
Piano
Fantasía
Alerta suave
Saxofón inteligente
Instale el pulsador
1. Monte el soporte del
pulsador en la ubicación
deseada.
Utilice los tornillos
Utilice el respaldo adhesivo.
Si usa el respaldo adhesivo,
limpie la superficie primero.
2. Coloque a presión el
pulsador en el soporte de
montaje.
–O–
Nota: Si necesita retirar el pulsador, utilice un destornillador
pequeño para liberar la pestaña.
Regulación del volumen
Presione los botones de subir o
bajar el volumen para ajustar el
volumen del timbre.

20
Accesorios
Puede conectar hasta 4 accesorios a su timbre, incluyendo
otros pulsadores, sensores de ventana o puerta abiertos y
sensores de movimiento.
Si trata de conectar más accesorios que los permitidos, el
LED lateral destella en rojo.
Conexión de un sensor de movimiento
1. Presione y sostenga el botón de configuración en el timbre durante tres
segundos. El LED lateral se activa
con un color ámbar.
2. A los 20 segundos de presionar
el botón de configuración, mueva
la mano o haga algún otro tipo de
movimiento frente al sensor de
movimiento.
Conexión a un pulsador
para un timbre existente también.
1. Presione y sostenga el botón de
configuración en el timbre durante
tres segundos. El LED lateral se
activa con un color ámbar.
2. Presione el pulsador.
3. En el curso de 12 segundos de haber
presionado el pulsador, presione el
botón de Música para seleccionar el
sonido de ese pulsador.
4. En el curso de 12 segundos de haber
presionado el pulsador, presione el
La page est en cours de chargement...
La page est en cours de chargement...
La page est en cours de chargement...
La page est en cours de chargement...
-
 1
1
-
 2
2
-
 3
3
-
 4
4
-
 5
5
-
 6
6
-
 7
7
-
 8
8
-
 9
9
-
 10
10
-
 11
11
-
 12
12
-
 13
13
-
 14
14
-
 15
15
-
 16
16
-
 17
17
-
 18
18
-
 19
19
-
 20
20
-
 21
21
-
 22
22
-
 23
23
-
 24
24


Honeywell Home RDWL313A2000/U Guide d'installation
- Taper
- Guide d'installation
- Ce manuel convient également à
dans d''autres langues
Documents connexes
-
Honeywell RDWL515A2000 Portable Wireless Doorbell Guide d'installation
-
Honeywell Home RPWL400W2000 Guide d'installation
-
-
 Honeywell Home RDWL311A2000/U Guide d'installation
-
 Honeywell Home RDWL515P2000 Plug-In Wireless Doorbell Mode d'emploi
-
Honeywell RDWL917AX2000/U Mode d'emploi
-
-
Honeywell Home RDWL917AX2 Guide d'installation
-
Honeywell Home RPWL4045A2 Manuel utilisateur
-

