FeraDyne Axe AX405 Crossbow Le manuel du propriétaire
- Taper
- Le manuel du propriétaire

OWNER’S MANUAL
WARNING! You must read and follow
all safety warnings and instructions in
this manual.
Retain instructions and safety manual
for future reference
PATENTS: www.feradyne.com/patents
WARRANTY: www.feradyne.com/warranties

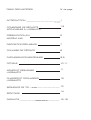
TABLE OF CONTENTS
INTRODUCTION
CROSSBOW SAFETY
AXE OVERVIEW
ADJUSTABLE FEATURES
TRIGGER SLIDE
BOLTS/NOCKS/VANES
OPTICS
COCKING/UNCOCKING
LOADING/UNLOADING
SHOOTING
SIGHTING IN
WARRANTY
1
1-5
6
7
8
8-9
10-11
11
12
13
14
15-18
PAGE #

INTRODUCTION
CROSSBOW SAFETY
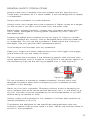
Thank you for the purchase of your new AXE® crossbow! With proper
care and maintenance, your AXE® crossbow will provide years of
trouble-free service. This crossbow has been designed, manufactured and
tested for safety and performance when used in accordance with the
instructional materials provided. Before you begin assembly or shooting,
read and understand the information contained in this manual thoroughly.
WITHOUT PROPER WORKING KNOWLEDGE OR UNDERSTANDING
OF YOUR CROSSBOW'S OPERATION, YOU COULD DAMAGE YOUR
CROSSBOW OR CAUSE SERIOUS INJURY TO YOURSELF OR
OTHERS. If any part of this manual is unclear,
contact a customer service representative at feradyne.com/contact for
assistance. After thoroughly reading and understanding this material,
save for future reference. Review the manual periodically, and at least
annually. Provide a copy to any other user of the crossbow and insist
that they read the manual in its entirety prior to use.
Crossbows are weapons that allow for projectiles to be fired at high
speeds. Errant or improperly shot bolts may seriously injure or kill any
person. Crossbows should be treated with the same care and safety as
firearms. The use of a crossbow requires considerable skill and should be
treated with caution to avoid injury to persons and/or property.
Crossbows should only be used by those who are properly trained in
safety or under the supervision of a qualified instructor. By nature of the
crossbow design, the bowstring can cause significant injury if it contacts
any part of the body during release. TO AVOID SERIOUS INJURY, IT IS
IMPERATIVE THAT USERS KEEP ALL PARTS OF THE BODY AWAY
FROM THE PATH OF THE BOWSTRING AT ALL TIMES. Keep your
front hand, fingers, and thumb on the forearm grip, below the travel
path of the bow string and cables. Safety glasses should be worn while
working with crossbows and archery equipment. Read, understand and
follow all assembly instructions, warnings and other information included
with the crossbow, bolts, hardware and accessory packages.
FAILURE TO UNDERSTAND AND FOLLOW ALL INSTRUCTIONS AND
WARNINGS MAY CAUSE SERIOUS INJURY OR DEATH TO
YOURSELF OR OTHERS.
POINTS OF SAFE SHOOTING
By nature of the crossbow design, the bowstring travels along the path
of the crossbow stock at high speeds. The bowstring is a high energy
device and moves with such force it can cause significant injury if it
contacts any part of the body during release. To avoid serious injury, the
user must keep all parts of the body away from the path of the bowstring
and cable paths at all times! PLACING YOUR HANDS, FINGERS,
THUMBS OR ANY OTHER BODY PARTS IN THE PATH OF THE
CROSSBOW STRING OR CABLES MAY CAUSE SERIOUS INJURY
INCLUDING AMPUTATION.
1.

Never place any part of your body in the travel path of the crossbow
string or cables. Keep your front hand, fingers, and thumb on the
forearm grip of the stock, below the travel path of the string and cables
when firing. Prior to shooting any bolt, users must read the instructions
and watch the videos at www.safearrow.com to learn how to safely use
their bolts and equipment, and to learn other safe hunting techniques.
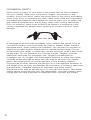
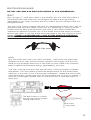
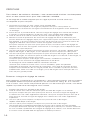
Prior to shooting, bolts must ALWAYS be flexed in a gradual arc and
visually inspected for delamination, splitting or impact marks or other
damage.
A damaged shaft could fail completely upon release and cause injury to
yourself or others, and must never be used or loaded. Never shoot a
damaged shaft. After loading the crossbow, do not point at yourself or
others to protect against inadvertent or accidental discharge. Do not
shoot unless the target is visible and you are aware of what is behind the
target area. Do not shoot at any unknown target. Targets must be
specifically designed for crossbow use. Targets not designed for
crossbow use, or targets with hard edges, plastics or metal can cause
ricochet and/or damage to bolts and may lead to serious injury and/or
death. Be conscious of any other persons in the shooting location.
Ensure that all other persons are behind you in the opposite direction of
the target prior to firing a crossbow. Be conscious of shooting technique
and sequence. Careless handling of crossbow and bolts and/or
distractions can lead to serious injury to yourself and others. Remember
safety begins and ends with you. Be responsible, use safe shooting tech-
niques and use safe practices to safeguard both yourself and others.
CROSSBOW SAFETY
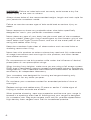
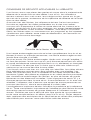
Bolt flex test
2.

Always treat your crossbow with the respect due any sporting arm.
Treat every crossbow as if it were loaded. It can be dangerous or deadly
if mishandled.
Always point crossbow in a safe direction.
Always know your target and what is beyond it. Never shoot at a target
on the horizon if you don't know what is on the other side.
Before each shooting session, inspect your crossbow equipment for
worn, loose, damaged or missing parts. Replace any worn, lost or
damaged parts.
Inspect the cables and crossbow string for signs of fraying or broken
strands. Replace any missing, lost or damaged parts that are observed
or suspected. Do not use the crossbow if these parts are missing or
damaged. Use only genuine AXE replacement parts.
Visit feradyne.com/contact with any questions.
Keep your fingers and other objects away from the trigger and trigger
guard area until you are ready to shoot.
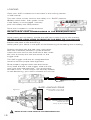
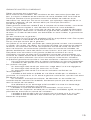
Do not shoot the crossbow if the bowstring section that the bolt nock
rests against/clips onto is frayed or missing (this is the center section of
the bowstring that has the serving wrapped over it. (see figure A).
Do not transport a cocked or loaded crossbow. Always use a well
designed crossbow case when transporting your crossbow to help
protect it from damage.
Never dry-fire your crossbow. Shooting without a bolt is damaging to
the crossbow and could cause serious personal injury. In the event of a
dry-fire, the bow must be inspected by an authorized dealer or by AXE
before being re-cocked or shot.
Always make sure crossbolt is fully seated in furthest back position to
reduce possibility of dry-fire.
Crossbows are designed to use specifically designed bolts that are
ordinarily heavier than arrows used in a bow. Never use ordinary bolts or
arrows in this crossbow.
GENERAL SAFETY PRECAUTIONS
3.
figure A.

Always treat your crossbow with the respect due any sporting arm.
Treat every crossbow as if it were loaded. It can be dangerous or deadly
if mishandled.
Always point crossbow in a safe direction.
Always know your target and what is beyond it. Never shoot at a target
on the horizon if you don't know what is on the other side.
Before each shooting session, inspect your crossbow equipment for
worn, loose, damaged or missing parts. Replace any worn, lost or
damaged parts.
Inspect the cables and crossbow string for signs of fraying or broken
strands. Replace any missing, lost or damaged parts that are observed
or suspected. Do not use the crossbow if these parts are missing or
damaged. Use only genuine AXE replacement parts.
Visit feradyne.com/contact with any questions.
Keep your fingers and other objects away from the trigger and trigger
guard area until you are ready to shoot.
Do not shoot the crossbow if the bowstring section that the bolt nock
rests against/clips onto is frayed or missing (this is the center section of
the bowstring that has the serving wrapped over it. (see figure A).
Do not transport a cocked or loaded crossbow. Always use a well
designed crossbow case when transporting your crossbow to help
protect it from damage.
Never dry-fire your crossbow. Shooting without a bolt is damaging to
the crossbow and could cause serious personal injury. In the event of a
dry-fire, the bow must be inspected by an authorized dealer or by AXE
before being re-cocked or shot.
Always make sure crossbolt is fully seated in furthest back position to
reduce possibility of dry-fire.
Crossbows are designed to use specifically designed bolts that are
ordinarily heavier than arrows used in a bow. Never use ordinary bolts or
arrows in this crossbow.
WARNING: Failure to index bolt nock correctly could cause a dry-fire
and/or injury to the user or others.
Always shoot bolts of the recommended weight, length and nock style for
your particular crossbow model.
Failure to use the correct type of bolt could lead to serious injury or
death.
Never attempt to shoot any projectile other than bolts specifically
designed for use in your particular crossbow model.
Never place any part of your body into the travel path of the crossbow
string or cables. Keep your front hand/fingers on the forearm grip of the
stock below the Finger/Thumb Guard, and out of the travel path of the
string and cables when firing.
Keep the crossbow limbs clear of obstructions such as tree limbs or
shooting rests when firing.
Never loan this product to others unless they read and fully understand
all usage instructions and warnings for this product, and have viewed
www.safearrow.com.
Do not attempt to use this product while under the influence of alcohol,
prescription or non-prescription drugs.
When hunting from heights, make sure you are using a fall arrest system
(FAS) that is certified to meet or exceed all applicable Industry Standards
recognized by TMA (Treestand Manufacturer's Association) as tested and
certified by an independent laboratory.
Your crossbow was designed for hunting and target shooting only.
Do not use it for any other purpose.
Do not leave your crossbow cocked for extended periods of time or
overnight.
Replace strings and cables every 2 years or earlier if visible signs of
fraying or broken strands are evident.
When practice shooting, wear eye protection and be sure your range is
located in a spacious area free of buildings and your target is designed
for crossbow use. Bag style targets work well for practice tipped bolts.
High-density foam targets work well for broadhead practice.
4.

RESPECT YOUR EQUIPMENT
It is essential to use equipment appropriate for the game you are hunting.
Many problems in the field are solved easily by a knowledgeable and
prepared crossbow hunter.
Ensure that your crossbow is properly fitted to you and meets the legal
and ethical requirements of the game you plan to hunt. Not all states
allow for crossbow hunting. Some states limit the use of crossbows.
Prior to hunting, make sure you know the legal requirements of the loca-
tion in which you plan to hunt.
Ensure that the crossbow is in good operating condition by following the
instructions contained within this instruction manual. Make a habit of
conducting a pre-use inspection of your equipment before each trip.
Purchase bolts that are designed for this crossbow. Improperly selected
bolts that do not match the crossbow correctly can lead to poor accura-
cy, damaged equipment, or serious injury or death.
Bolts must be properly fitted (i.e. length and weight) and have been prop-
erly inspected according to the instructions provided at
www.safearrow.com prior to using your crossbow.
Tune your crossbow to the equipment (such as broadheads) you will be
using for hunting.
Keep your crossbow dry, clean and well lubricated. Make a habit of
cleaning and caring for your crossbow after every use.
RESPECT YOUR HUNTING COMPANIONS
Crossbow hunting is a great experience to share with friends and
companions. There are four key ways to maintain friendships on a hunt.
Shared Values: Crossbow hunting companions must respect wildlife,
landowner relations, the rules of the game and other considerations. If
your hunting companions do not share your respect for crossbow
hunting, you would be wise to choose other partners.
Dependability: Hunting companions must be able to depend on one
another and trust each other's word. Agreements are important on such
things as the time to meet for the hunt, the time to stop hunting and
what hunting areas are assigned to each hunter.
Courtesy: Be considerate and thoughtful of others. Avoid wandering
around the hunting areas and walking up on your companions.
Communication: Thoroughly discuss all important aspects of the hunt.
Maintaining good communication with companions should eliminate most
problems.
5.

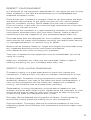
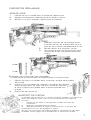
AXE Overview
Adjustable cheek rest
Adjustable stirrup
Tac rails
Cams
Integrated full control crank
Trigger box slide
Integrated quiver
Safety mechanism
Hand/Finger guard
Pistol grip
Fore grip
Reverse limbs
Bolt rest
6.

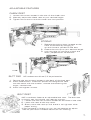
ADJUSTABLE FEATURES
CHEEK REST
1. Loosen the screw located in the slot of the cheek rest.
2. Manually adjust the cheek rest to your desired height.
3. Tighten the screw to lock the cheek rest into position.
STIRRUP
1. Release the locking lever located at the
front of the bow by swinging it
up and forward, parallel to the bow.
2. Extend the stirrup to your desired length.
3. Lock the lever by swinging it back and
down, perpendicular to the bow.
BUTT PAD AXE crossbows come with two 3/4” butt pad extensions.
1. Remove the two screws located in the back of the butt pad.
2. Insert extension(s). Extension pieces are designed to nest
into the stock with the smaller, rimmed side entering the
larger, cavitied side.
3. Insert and tighten screws.
BOLT REST
AXE crossbows feature an adjustable bolt rest. The bolt rest
is factory set, but should you need to re-tune...
1. Loosen the two hex screws located at the base of the slide.
2. Lower the rest all the way down.
3. Slowly move the rest up until there is no high tear while
paper tuning.
*If this language is foreign to you, do not attempt to adjust.
Take to your local crossbow technician for retuning.
7.

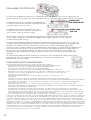
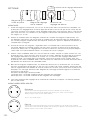
TRIGGER SLIDE
BOLTS/NOCKS/VANES
The AXE trigger slide box is a sophisticated mechanism maximizing
performance and accuracy while keeping you safe.
The Trigger is in SAFE position when the
switch is back over the green circle.
The trigger is in FIRE position when the
switch is forward over the red circle.
The trigger slide box automatically engages the safety while drawing back the
string. (the safety will not auto engage if the trigger slide box is not clipped
in and drawing the string)
The AXE trigger slide box contains the dry-fire inhibitor (DFI). The DFI
system is automatically activated when the trigger slide box is engaged with
the string. The DFI mechanism will only disengage when an AXE Micro
bolt is fully inserted into the trigger mechanism and the AXE aluminum nock or
stainless steel Lit Nock is clipped onto the bowstring. Flat, half-moon, slotted
moon or universal nocks will not activate the DFI and should not be used.
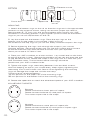
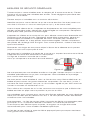
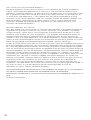
The AXE trigger slide box contains an integrated Bolt funnel (figure B).
This acts as a loading guide and ensures proper loading every time.
To minimize risk of serious injury the user must:
• Use only AXE bolts with AXE aluminum or stainless steel Lit Nocks.
• Do not use AXE bolts on any other crossbow.
• Confirm the nock is properly indexed with the fletching
• Fully engage the AXE nock with the bowstring. Doing so requires a bit of force.
You will hear and feel the nock “click” onto the bowstring.
• IF you intend to use a mechanical broadhead, ensure the broadhead is rated for
crossbow usage.
• Inspect carbon bolts shafts and nocks for hairline fractures or cracks.
Firing a damaged bolt can cause the bolt shaft to shatter, scattering
fragments. Firing a bolt with a damaged nock can cause the bow to dry-fire.
• Never use pliers or other metal tools to pull bolts out of targets.
• Inspect bolts for damage. Damaged bolts can fly in unintended directions.
• Do not use bolts with flat, half-moon, slotted moon or universal nocks.
• Inspect string and cables before each use. Immediately replace worn, fraying,
separated, or damaged string, cables or center serving.
• Do not fire your crossbow if the center serving is worn, damaged or separated.
• Damage to your AXE Crossbow caused by firing a damaged or unapproved bolt
is not covered by the warranty. Your AXE Crossbow is specifically engineered
to work with designs, dimensions, tolerances and materials of genuine AXE
components and accessories. USE OF NON-AXE COMPONENTS AND
ACCESSORIES, INCLUDING NON-AXE BOLTS AND NOCKS OR NON-AXE STRING AND
CABLES, MAY CAUSE THE SYSTEM TO NOT OPERATE AS DESIGNED, POTENTIALLY
RESULTING IN AN UNSAFE CONDITION THAT COULD LEAD TO SERIOUS INJURY OR
DEATH. AXE bolts with AXE nocks are specifically designed for use with the AXE
strings and cables. USE OF ANY BOLTS OR NOCKS NOT DESIGNED FOR USE WITH YOUR
AXE CROSSBOW MAY NOT HAVE THE SAME DESIGNS, DIMENSIONS, TOLERANCES OR
MATERIALS, WHICH COULD POTENTIALLY
INTERFERE WITH THE OPERATION OF YOUR CROSSBOW, INCLUDING BUT NOT LIMITED
TO THE ANTI-DRY-FIRE TRIGGER MECHANISM, AND LEAD TO SERIOUS INJURY OR
DEATH.
SAFE
FIRE
8.
figure B.

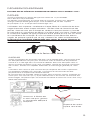
BOLTS/NOCKS/VANES
DO NOT USE NON-AXE BOLTS OR NOCKS IN AXE CROSSBOWS!
BOLT
Only use the 17” AXE Micro Bolt in the AX405, and 19” AXE Micro Bolt in
the AX440.Non-AXE bolts are not designed to absorb the high energy
generated by your AXE crossbow and will create a dry-fire condition that can
damage the bow.
NOCK
Only use AXE nocks with your AXE crossbow. AXE nocks are specifically
designed to work with the DFI system housed in the trigger slide and are
made of high strength aluminum or the AXE Lit Nock made from stainless
steel to absorb the extreme energy generated by your bow.
The user must visually inspect each bolt for damage before each use. Look for
damage to the nock and vanes. Check for any splintering or cracking to the
carbon shaft by flexing the bolt back and forth in your hand. Rotate and
repeat this inspection process four to five times around the entire circumfer-
ence of the shaft. If you find a bolt to be damaged in any way, discard it imme-
diately. FIRING A DAMAGED BOLT CAN CAUSE SERIOUS PERSONAL
INJURY AND DAMAGE TO YOUR AXE CROSSBOW.
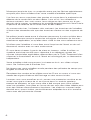
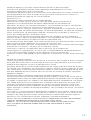
The user must be sure the nock and odd color vane are properly oriented
(see below). The nock opening should be perpendicular to the white (cock)
fletching. If the nock is not in the proper orientation, rotate the nock to the
required position. Inspect the nock to insure there are no chips or cracks. If
the nock is damaged, replace with an AXE aluminum or stainless steel Lit
Nock only.
The bolt funnel is a useful
tool to help ensure proper
loading every time.
Bolt flex test
9.
String.
Odd color
vane down.

5
c
l
i
c
k
s
=
1
/
2
”
@
2
0
y
a
r
d
s
U
P
5
c
l
i
c
k
s
=
1
/
2
”
@
2
0
y
a
r
d
s
L
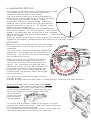
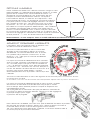
OPTICS
Speed dial
Elevation turret
Windage
turret
Focus dial
MOUNTING
1. Attach the bottom rings on the rail so that the rings are in the approximate
positions on the scope as shown, taking into account proper eye relief of
approximately 2”- 3” from your eye to the eyepiece when holding your AXE
Crossbow in a shooting position. Lightly tighten up the screws on the bottom
rings so you can still adjust them on the rail.
2. Lay the scope into the bottom rings. Place the top rings on the
bottom rings so the scope is surrounded. Lightly snug up
the screws on the top rings so you can still freely move the scope in the rings.
3. Before tightening the rings, look through the scope in your normal
shooting position. Adjust the scope until you find the furthest point forward
to ensure maximum eye relief (at least 2 inches from your eye) that
allows you to see a full field of view.
4. Place your AXE crossbow on a level surface. Lay a small level on the limbs
to ensure the bow is level. Remove the elevation turret cap and place the level
on the elevation turret. Rotate the scope in the rings until it is level with your
AXE Crossbow limbs. The horizontal reticle markings should be
parallel with your AXE crossbow limbs.
5. Tighten the upper rings, alternating between front and back screws,
while still keeping an eye on your scope levels. Keep slightly tightening and
alternating from front to back until secure. Over-tightening the mounting
rings will damage the scope and void the warranty!
Torque wrench recommendations:
15 inch pounds for the upper half of the mounting rings.
35 inch pounds for the bottom half of the mounting rings.
6. Rotate the speed dial to match the advertised speed of your AXE crossbow.
ADJUSTABLE TURRETS
Elevation
Windage
Rotate clockwise to lower point of impact.
Rotate counterclockwise to raise point of impact.
This moves impact like a rifle scope.
Rotate clockwise to move point of impact left.
Rotate counterclockwise to move point of impact right.
This moves impact like a rifle scope.
approximate
ring placement
approximate
ring placement
10.

30
40
50
60
70
80
90
100
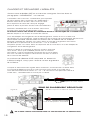
COCKING
Starting in the uncocked position with the trigger
box slide rolled up all the way to the rear of the
crossbow
Turn the crank counterclockwise to release the
trigger box. The trigger box will slide down to
the string. The DFI will click when the trigger
box contacts the string.
After the trigger box contacts the string,
manually push the trigger box onto the
string until the catch clicks and traps the
string. You must hear and feel the latch
catch the string. This will be a second click.
(The safety must be in the fire position to
make this work, and will automatically be
moved to the fire position when the trigger
box is slid down.)
Turn the crank clockwise to begin drawing
the string back.
(halfway through the draw the safety is automatically moved to the safe position.)
To uncock the crossbow, make sure trigger is in safe
position and remove the bolt. After you remove the bolt,
turn the crank counterclockwise.
*If uncocked without discharging the bolt, the trigger box
will remain attched to the string until next use.
When the trigger box hits the back wall, STOP
CRANKING. (The crank is designed to rest in
the same position every time when fully cocked)
*If the crank handle doesn't lay parallel with the
top of the stock or in the position you'd like,
remove the set
screw and seat
plate to adjust
handle position.
ILLUMINATED RETICLE
C
R
A
N
K
C
L
O
C
K
W
I
S
E
T
O
C
O
C
K
C
R
A
N
K
C
O
U
N
T
E
R
C
L
O
C
K
W
I
S
E
T
O
D
E
C
O
C
K
Your scope is equipped with a selectable red or green
illuminated reticle. The illumination rheostat is
located on the left side of the scope.
High brightness settings are recommended for
daytime use when ambient light is bright. At times
of low light such as dawn or dusk, a lower
brightness setting is recommended. The lower
settings may not be visible during bright daylight.
Reticles are black in the “R” or “G” position if the
battery is low or defective.
AXE illuminated scope models use a CR2032 coin
style lithium battery. To insert a battery, unscrew the
battery compartment cap on the top of the rheostat
adjustment turret and insert a new battery “+” side up/out
away from scope.
Warning: Always hold onto the lower half of the rheostat when loosening or
tightening the battery compartment cap to ensure no damage is done.
11.

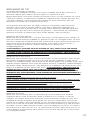
LOADING
BOLT HANDLING ZONE
NEVER PLACE YOUR HAND IN THE BOWSTRING PATH
Handle the bolt
firmly by the outsert.
Cock your AXE crossbow as instructed in the cocking section
of the manual.
The user must visually confirm the safety is in “SAFE” position.
(Safety switch back, over green circle)
If the safety is not engaged, manually
push the safety into safe position.
Point the crossbow in a safe direction
while loading and unloading.
NEVER PLACE YOUR HANDS/FINGERS IN THE BOWSTRING PATH!
Always keep your hands forward of the cams.
While loading and unloading, handle the AXE Micro bolt firmly by the outsert.
NEVER PLACE YOUR HAND IN FRONT OF THE BOLT TIP. (see figure C)
Load the crossbow by keeping your hands in the safe loading area
(beyond the path of the bowstring)
Never place your hands in the path of the bowstring while loading and unloading.
Position the bolt with the odd color vane down.
With the crossbow pointed in a safe direction,
insert the nock end on the AXE Micro bolt under
the riser archway and into the center of the
trigger slide.
The AXE trigger slide has an integrated bolt
funnel to ensure proper bolt alignment.
Once properly aligned within the bolt funnel,
firmly seat the bolt in the trigger slide until the
nock clips onto the bowsting. You should hear
and feel a click. If the nock is not securely seated
on the bowstring, your AXE crossbow will not fire.
SAFE LOADING ZONE
Always keep your hands
forward of the cams.
12.
SAFE
Figure C.
Odd color vane

SHOOTING
The Four Common Factors
Prior to shooting the crossbow, practice holding the crossbow in order to
learn the proper method to shoulder and hold the crossbow.
There are four factors that are common to all shooting positions that affect
your ability to hold the crossbow steady, maintain sight alignment, and control
the trigger. It is important to practice and become familiar with these common
factors for each shooting position.
The directions on the following pages are provided for right handed persons
in a standing shooting position but also apply to kneeling and to prone shooting
positions. Since the crossbow can be shot by both right-handed and left-handed
shooters, left-handed shooters should reverse hand and shoulder directions
as needed.
Placement of Left Hand
In all shooting positions, the left hand will be used to support the forward
weight of the crossbow at the location of the forearm grip. Grasp the bottom
of the forearm grip with the palm of the left hand and curl the fingers and
thumb around each side of the forearm grip. Ensure that the hand including
the fingers and thumb always remain below the finger/thumb guard.
WARNING! MAKE SURE YOU KEEP ALL FINGERS BELOW THE GUARDS AT
ALL TIMES AND OUT OF THE PATH OF THE BOWSTRING.
FAILURE TO DO SO WILL RESULT IN SERIOUS INJURY OR DEATH.
Placement of Right Hand
In all shooting positions the right hand is used to grasp and firmly grip
the pistol grip that is located immediately behind the trigger. The forefinger
is used to pull the trigger while the thumb and remaining fingers are wrapped
around the pistol grip. Relax your forefinger so it can be moved
independently and placed naturally on the trigger. Never place your finger on
the trigger unless you are ready to shoot. WARNING! MAKE SURE YOU
KEEP ALL FINGERS BELOW THE GUARDS AT ALL TIMES AND OUT OF
THE PATH OF THE BOWSTRING. FAILURE TO DO SO WILL RESULT IN SERIOUS
INJURY OR DEATH.
Butt Plate in the Pocket of the Shoulder
Raise the crossbow up and place the crossbow butt plate into the pocket
formed in the right shoulder. Apply firm rearward pressure to the pistol grip
in order to pull the crossbow butt plate into the pocket of your shoulder.
This helps steady the crossbow from slipping during firing.
The exact placement of the crossbow butt plate in the shoulder will change
between shooting positions however consistent placement of the butt plate
within each shooting position is essential to maintaining tight groups and
accuracy.
Placement of Cheek
In all shooting positions, the right cheek placement against the top of the rear
stock needs to be consistent from shot to shot. A firm contact between the
cheek and the stock enables the head and crossbow to recoil as a single unit
and keeps the eye centered in the rear sight opening of the scope. Find the
correct distance to position the cheek on the stock so the eye gets a clear
view through the scope to the target. Once this distance for a clear view
through the scope is found, continue to rest the cheek on the stock at this
exact position for all shots. Consistency of placement of your cheek on
the stock will depend on the amount of rearward pressure applied by the
right hand to the pistol grip.
13.

SIGHTING IN
For best results, it is recommended that a shooting bench or shooting
sticks are used to help stabilize the crossbow.
Sighting in your scope requires adjusting your point of aim to match
your point of impact.
1. Choose a safe place to shoot your AXE Crossbow.
Place a crossbow rated target at 10 yards and set up for your first shot.
*Be sure to read all cocking and loading instructions before sighting in.
2. Before taking the first shot, rotate the speed dial to match the
manufacturer’s advertised speed of your AXE Crossbow (405 or 440 fps)
3. Take a shot at the center of the target using the 20 yard aiming
point on the reticle.
4. Remove the protective cap from the windage and elevation adjustment
turrets to make suitable adjustments to bring the point of impact closer
to the point of aim. For example, if the point of impact is lower than the
point of aim, rotate the elevation adjustment dial counterclockwise.
If the point of impact is higher than the point of aim, rotate the elevation
adjustment dial clockwise. At 10 yards 5 clicks moves the point of
impact 1/4th of an inch.
5. Once the point of impact is the same as the point of aim at 10 yards,
repeat this process at 20 yards. At 20 yards 5 clicks moves the point
of impact 1/2 of an inch.
6. Once the point of impact is the same as the point of aim at 20 yards,
repeat this process at 40 yards using the 40 yard aiming point on the
reticle. At 40 yards 5 click moves the point of impact 1 inch.
When you are happy with the 40 yard point of impact, replace the
protective caps on the windage and elevation turrets.
You have now sighted in the scope to your AXE Crossbow.
*As with all weapons (rifles, bows and crossbows), after extended periods
of storage, travel and use, it is wise to check the point of impact before
attempting long range shots. To check the accuracy of your AXE
Crossbow first take a shot at 10 yards and then 20 yards before
attempting longer shots.
Calibrating speed dial
In order for the crossbow speed calibration to function properly, an
AXE Micro bolt is required for this AXE Crossbow, equipped with a
100gr field point or broadhead. If a heavier broadhead or field point is used
at any time you must repeat the zeroing in process of your scope.
1. Place a crossbow-rated target at 30 yards.
2. Take a shot at its center using the 30 yard aiming point on the reticle.
If the point of impact is higher than the point of aim, turn the speed dial
to a slightly lower number. If the point of impact is lower than the point
of aim, turn the speed dial to a slightly higher number.
3. Once the point of impact is the same as the point of aim at 30 yards,
repeat at 40 yards.
4. Once the point of impact is the same as the point of aim at 40 yards, the
scope is calibrated for your AXE Crossbow speed.
It is not necessary to adjust the speed dial for other distances. If the speed
dial is changed you will need to recalibrate your AXE Crossbow using this
process.
14.

LIMITED MANUFACTURER’S WARRANTY
What is Covered:
Subject to the terms, conditions and limitations outlined below, the stock, trigger
assembly, and limbs of your AXE crossbow (a subsidiary of FeraDyne Outdoors)
are guaranteed against defects in materials and workmanship not caused by
normal wear, misuse, or improper maintenance as determined by FeraDyne
Outdoors.
How Long Coverage Lasts:
This limited warranty lasts for 5 years from the purchase date; proof of
purchase is required prior to sending your crossbow back to FeraDyne Outdoors.
Without a sales receipt, the bow’s serial numbers will be used to determine the
manufacture date, and this date will determine whether a crossbow is still under
warranty. If either serial number has been removed or is illegible, the warranty is
void.
Who is Covered:
This warranty only covers AXE crossbows for the original owner. It is not
assignable or transferable to anyone else.
What is Not Covered:
Parts not covered by this warranty include, but are not limited to, string, cables,
flight rails, trigger slide box, cosmetic blemishes to parts or finishes, and normal
wear and tear. These parts are subject to a variety of conditions in normal use
and considered to be consumable parts. The string and cables must be replaced
at least every 2 years assuming normal wear and tear.
This Warranty is Void if Any of The Following Occur:
- The instructions in the owner’s manual are not followed.
- The crossbow or any other parts/accessories are damaged or modified from
their original position.
- Damage is caused by abuse or neglect.
- Damage is caused by dry-firing.
- Damage is caused by using non-recommended bolts.
- The crossbow is rented or loaned for use by a retailer, wholesaler, shooting
range, or other commercial business organization, whether or not a fee is
charged.
- Any user has attempted to alter, dismantle or change the standard
specifications of the crossbow, other than as stated in the owner’s manual.
- Failure or damage was caused by improper calibration or by abnormal use.
- The crossbow has not been maintained properly, including an annual inspection
by a qualified crossbow dealer as directed by the owners manual.
- The crossbow has been used for any purpose other than hunting or target
shooting.
- The crossbow is used in situations that might create potential injuries to life,
health, or public safely.
15.

What Will FeraDyne Outdoors Do:
FeraDyne Outdoors offers the exclusive remedy of repair on any crossbow that
it reasonably determines to be defective in materials or workmanship. FeraDyne
Outdoors reserves the right to determine whether an item is covered by the
manufacturer’s warranty upon receiving the product back for inspection. If a
product is determined to be defective, it will be repaired with available parts at
the sole discretion of the AXE repair department. If repair is not possible, the
product will be exchanged or replaced with the same product; if the same
product is no longer available, it will be replaced with the most similar product
available at the discretion of FeraDyne Outdoors.
How to Get Service:
To be eligible for service under this limited warranty, you MUST complete the
online warranty registration within 30 days of purchasing your crossbow. This
limited warranty becomes effective only if you complete the warranty registration
within 30 days of purchasing your crossbow. By submitting the warranty
registration, you expressly agree to all of the terms and conditions contained in
this limited warranty policy. If you believe you have purchased or received a
defective product, a Return Merchandise Authorization (RMA) number must be
obtained by submitting a warranty claim at
https://orgmyrange.com/feradyne/cgi-bin/customer_returns_start.cgi
All AXE crossbow warranty claims require a photo; claims submitted without
photos will be rejected and you will be asked to resubmit a claim and include a
photo. All accessory items must be removed from the crossbow prior to send-
ing it back to FeraDyne Outdoors for repair. FeraDyne Outdoors is not responsi-
ble for damage or loss of any accessory item left on the crossbow. Items sent
back without an RMA number will be refused and returned to the sender. You will
pay shipping costs to return the crossbow to FeraDyne Outdoors. If after exam-
ining a returned crossbow FeraDyne Outdoors determines that the product is
not subject to this limited warranty, you will be notified and the product will be
shipped back to you at FeraDyne Outdoors’ expense. There is no charge for
inspection. Product repairs that are not covered by this limited warranty, or any
product updates if desired, can be provided at then-current repair rates set by
FeraDyne Outdoors.
DO NOT RETURN YOUR PRODUCT TO A RETAIL STORE OR ONLINE SELLER
UNLESS DIRECTED TO DO SO BY FERADYNE OUTDOORS;
CONTACT FERADYNE OUTDOORS CUSTOMER SERVICE AT:
feradyne.com/contact/
16.

FeraDyne Outdoors will not be liable for any loss or damage to a crossbow once
it has been repaired and shipped out of our facility.
How State Law Applies:
This limited warranty gives you specific legal rights. You may also have other legal
rights that vary from state to state. This warranty is governed by the laws of
the state of Wisconsin, USA.
Limitation of Warranty Liabilities:
Your sole and exclusive remedy pursuant to this limited warranty is the repair or
replacement of defective parts or workmanship. In no event shall FeraDyne
Outdoors, its licensors, distributors, and suppliers be liable for any direct,
indirect, incidental, special, exemplary, or consequential damages, expenses, lost
profits, lost savings, business interruption, lost business information, property
damage, personal injuries (including death), emotional distress, pain and suffering,
or any other damage arising out of the use or inability to use the product, even if
FeraDyne Outdoors, its licensors, distributors, or suppliers were advised of the
possibility of such damages. You acknowledge that the purchase price paid for
the product reflects this allocation of risk and exclusion of damages. Some
states do not allow the exclusion or limitation of incidental or consequential
damages, so the above limitation may not apply to you. If the limitation of liability
is not applicable, in no event shall FeraDyne Outdoors’ liability for property
damage exceed the greater of $50,000 or the price paid for the product that
caused such damage.
Warranty Limitations Period:
All warranties implied by law shall be limited to the lesser of 2 years from the
date of original purchase or the limitation period applicable in the state in which
damage occurred, whichever period is shorter. Some states do not allow
limitations on how long an implied warranty lasts, so the above limitation may not
apply to you. Any action against FeraDyne Outdoors based on an alleged breach
of warranty must be filed in court within 1 year of the claimed breach.
Entire Obligation:
This document states the entire obligation of FeraDyne Outdoors with respect to
the product. If any part of this limited warranty (including the warranty
disclaimers and limitations of FeraDyne Outdoors’ liability) is determined to be
void, unenforceable or illegal, the invalid or unenforceable provision shall be
deemed to be superseded by a valid, enforceable provision that most closely
matches the intent of the original provision, and the remainder of the agreement
shall remain in full force and effect. FeraDyne Outdoors makes no other
warranty beyond the terms of this limited warranty. No agent, employee or
salesman of FeraDyne Outdoors, its licensors, distributors, or suppliers, nor any
person employed by the retail dealer or seller from whom you purchased this
product, is authorized to modify, extend, or waive the terms of this limited
warranty. Any statements, representations, or promises made by anyone else at
any time are unenforceable against FeraDyne Outdoors.
PRIOR TO USE, PLEASE READ AND FOLLOW ALL SAFETY INFORMATION AND
INSTRUCTIONS INCLUDED WITH YOUR PRODUCT. FAILURE TO DO SO MAY
CAUSE SERIOUS INJURY OR DAMAGE TO YOU OR YOUR CROSSBOW.
17.

For warranty service, claims can be submitted at
https://orgmyrange.com/feradyne/cgi-bin/customer_returns_start.cgi
Except as provided in this limited warranty AXE hunting products are
provided “as is”.
Send to:
Feradyne Outdoors
1230 Poplar Ave
Superior, WI 54880
Please print
Product model #/name
Date of purchase
Where purchased
Address (street, city, state, zip)
Purchaser’s name
Purchaser’s address (street, city, state, zip)
Serial numbers
Purchaser’s phone number
Purchaser’s email address
By signing and returning this warranty registration card, the user hereby
acknowledges that he or she has read and understands the warranty
information in the instructions. The user accepts said warranties and the
limitations thereon, as listed. User's signature on the warranty registration
card also acknowledges that the user has read and understands
the instructions and safety warnings in the manual and that the user
recognizes their importance.
Signature: Date:
18.
Register online at www.feradyne.com/axe-crossbow-registrations or
mail in this form to FeraDyne Outdoors at below address.
Riser # Trigger slide box#
La page est en cours de chargement...
La page est en cours de chargement...
La page est en cours de chargement...
La page est en cours de chargement...
La page est en cours de chargement...
La page est en cours de chargement...
La page est en cours de chargement...
La page est en cours de chargement...
La page est en cours de chargement...
La page est en cours de chargement...
La page est en cours de chargement...
La page est en cours de chargement...
La page est en cours de chargement...
La page est en cours de chargement...
La page est en cours de chargement...
La page est en cours de chargement...
La page est en cours de chargement...
La page est en cours de chargement...
La page est en cours de chargement...
La page est en cours de chargement...
-
 1
1
-
 2
2
-
 3
3
-
 4
4
-
 5
5
-
 6
6
-
 7
7
-
 8
8
-
 9
9
-
 10
10
-
 11
11
-
 12
12
-
 13
13
-
 14
14
-
 15
15
-
 16
16
-
 17
17
-
 18
18
-
 19
19
-
 20
20
-
 21
21
-
 22
22
-
 23
23
-
 24
24
-
 25
25
-
 26
26
-
 27
27
-
 28
28
-
 29
29
-
 30
30
-
 31
31
-
 32
32
-
 33
33
-
 34
34
-
 35
35
-
 36
36
-
 37
37
-
 38
38
-
 39
39
-
 40
40


FeraDyne Axe AX405 Crossbow Le manuel du propriétaire
- Taper
- Le manuel du propriétaire
dans d''autres langues
Autres documents
-
Nikon PROSTAFF P3 CROSSBOW Manuel utilisateur
-
-
Zeiss Terra 3X Riflescopes Manuel utilisateur
-
Bushnell 200 Manuel utilisateur
-
 Ranger design 15-1815 Guide d'installation
-
Weider WECCSY5393 Manuel utilisateur
-
-
Crosman AYC2926 (2015) Le manuel du propriétaire
-
-
Sharper Image Extreme Rubber Band Blaster Le manuel du propriétaire
