Bionaire BCM3600 Le manuel du propriétaire
- Catégorie
- Humidificateurs
- Taper
- Le manuel du propriétaire

Holmes Products (Europe) Ltd
1 Francis Grove
London SW19 4DT
England
Fax: +44 (0)20 8947 8272
Email: info-europe@theholmesgroup.com
UK - Filter Sales Order Line - 0870 759 9000
Website address: www.theholmesgroup.com/europe
UK - Free phone Customer Service Helpline – 0800 052 3615
Holmes Products France
1015, Rue du Maréchal Juin
Z.I Vaux - Le - Pénil
77000 Melun – France
Phone: +33 1 64 10 45 80
Fax: +33 1 64 10 02 32
FRANCE - SERVICE CONSOMMATEURS
Belgium +32 38 70 86 86
Czech Republic +420 48 513 03 03
Denmark +45 45 93 43 73
Finland +358 98 70 870
Greece +30 2 10 61 56 400
Hungary +36 72 482 017
Netherlands +31 793 41 77 71
Norway +47 51 66 99 00
Poland +48 22 847 8968
Russia +7 095 334 82 21
Spain +34 91 64 27 020
Sweden +46 31 29 09 80
0 825 85 85 82
BCM3600I/IUK04M1
INSTRUCTION MANUAL
MANUEL D’UTILISATION
BENUTZERHANDBUCH
MANUAL DE INSTRUCCIONES
HANDLEIDING
BRUKSANVISNING
KÄYTTÄJÄN OHJEKIRJA
BRUKSANVISNING
BRUGSANVISNING
INSTRUKCJA
ECVEIIDIO ODGCIXM VQGRGR
PYKOBOДCTBO
HASZNÁLATI UTASÍTÁS
NÁVOD K OBSLUZE
Cool Mist
Humidifier
BCM3600
BCM3600I/IUK04M1 Visual.qxd 6/18/04 16:10 Page 1

English 2
Français/French 6
Deutsch/German 11
Nederlands/Dutch 16
Suomi/Finnish 20
Norsk/Norwegian 24
Dansk/Danish 29
Svenska/Swedish 33
Español/Spanish 37
PYCCKNÑ/Russian 42
Magyar/Hungarian 47
"esky/Czech 52
EKKHNIKA/Greek 56
Polski/Polish 61
BCM3600
FIGURE 2
B
C
A
A
C
B
D
FIGURE 3
FIGURE 1
E
A
J
C
F
B
D
I
H
G
FIGURE 4
BCM3600I/IUK04M1 Visual.qxd 6/18/04 16:10 Page 4

PLEASE SAVE THESE INSTRUCTIONS
Please note that this is an electrical
appliance, and requires attention when
in use.
HOW YOUR COOL MIST HUMIDIFIER
WORKS
Your Bionaire™ Cool Mist humidifier draws dry
air through the rear air intake grill area. This air
is then passed through a moisture–laden wick
filter, which retains the minerals and deposits in
the water. The resulting moist air is directed back
into the room from the top air grill.
NOTE: This humidification system provides a
cool, invisible moisture output. It is normal not to
see the mist.
NOTE: A humidity level below 20% can be
unhealthy and uncomfortable.
The recommended humidity level is between
40%-50%.
PRE-OPERATING INSTRUCTIONS
1. Be sure the Control Knob is in the OFF position
and the unit is disconnected from the electrical
outlet.
2. Remove housing, filter and tanks.
3. TO PROVIDE ADDITIONAL MOBILITY AND
CONVENIENCE TO YOUR CONSOLE
HUMIDIFIER, install the wheels. Remove the
four wheels located in a small pouch in the box.
Turn the base upside down, and locate the holes
at each of the four corners on the underside.
NOTE: You will notice that there are two
different shaped wheels. Two of the 4 wheels
are stationary wheels and two are swivel type
wheels.
The stationary wheels are identified by a flat
top surface, while the swivel type are curved
and include a small plastic piece on the shaft.
See figure 2 for installation location for each
type of wheel. DO NOT use any tools to install
the wheel because tools may damage the base
of the unit. Return the base to the upright position.
4. Replace filter, housing and tanks.
5. Choose a location out of reach of children.
DO NOT place the humidifier on a finished
floor or near furniture which can be damaged
by moisture or water.
Filling the Water Tank
NOTE: This humidifier holds about 13 litres of
water in the tank and humidifier base. The humidifier
will produce up to 34 litres of moisture over a
24-hour period.
1. Remove the two tanks from the base of the
humidifier and bring each tank to the faucet.
Turn the tanks upside down and twist off the
tank caps by turning counter-clockwise.
Fill each tank with cool, fresh tap water.
Replace the cap on each tank FIRMLY.
2. When full, carry each tank to the humidifier and
place onto the base (use both hands when
carrying each tank). Each tank holds 6 litres
of water, and the base holds 0.9 litre of water.
3. Plug the power cord into the electrical outlet.
OPERATING INSTRUCTIONS
With housing placed properly onto the base, the
filter installed correctly, the tanks filled and the
plug correctly inserted in the outlet, you are now
ready to operate the humidifier.
NOTE: The BCM3600 produces clean, cool,
INVISIBLE moisture.It is normal not to see the
moisture.
1. Turn the Control Knob to the HI position and
turn the Humidistat to HI.
2. Allow up to 30 minutes for the filter to fully
absorb water and the unit to produce the
maximum moisture output.
3. Adjust the 3-speed Humidity Control Knob and
the Humidistat as desired.
4. The Automatic Humidistat Control is designed
to operate between 25% and 60% Relative
Humidity range. The recommended setting is
between 40% and 50%. When the humidity
level in the room is below the level you have
set, the humidifier will operate to produce
moisture. When the set humidity level in the
room is reached, the humidifier will stop.
When the humidity again drops below the set
level, the unit will automatically start and produce
moisture again.
NOTE: We recommend the use of the
hygrometer which reads the actual humidity
level in your room. A humidity level below
20% can be unhealthy and uncomfortable. The
recommended humidity level is between 40%
and 50%.
5. When the water level is low, the refill light will
illuminate to indicate the unit needs refilling.
Shut off and unplug the unit.
NOTE: THE FAN WILL CONTINUE TO RUN
TO ALLOW THE HUMIDIFIER TO DRY OUT
AND PREVENT ALGAE GROWTH.
6. Before refilling, follow Daily Maintenance
Instructions and check to see if the filter needs
replacing by comparing it to the Color-Coded
Filter Monitor (located on the side of the
humidifier housing) with the filter wear.
7. Refill water tanks.
8. Plug into the electrical outlet. Turn the Humidity
Control Knob to the HI ( III ), MED ( II ), or
LOW ( I ) setting.
NOTE: If moisture forms on the walls or
windows, turn off the humidifier.
3
2
CONGRATULATIONS
By choosing a Bionaire™ humidifier, you have chosen
one of the finest humidifiers on the market today.
PLEASE READ AND SAVE THESE
IMPORTANT INSTRUCTIONS.
NOTE: Before reading these instructions,
please refer to the corresponding illustrations
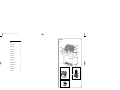
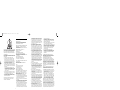
DESCRIPTIONS (SEE FIG 1)
A.Water Tanks
B.Humidistat
C.Refill Light
D.Moisture Exhaust Grills
E.Power Light
F. Filter Monitor™ Indicator
G.Air Intake Grills
H.Humidifier Base
I. Humidifier Housing
J. Control Knob
WHEEL INSTALLATION (FIG. 2)
A.Stationary Wheels
B.Swivel Wheels
C.Under-Side of Humidifier Base
FIG. 3
A.Circular Extended Life Filter
B.Circular Filter Support
C.Float Switch
D.Humidifier Base
SAFETY PRECAUTIONS
When using electrical appliances, basic safety
precautions should always be followed to reduce
the risk of fire, electric shock, and injury to persons,
including the following:
• Read all instructions before using the appliance.
•To avoid fire or shock hazard, plug the appliance
directly into an electrical outlet and fully insert
the plug.
• Keep the cord out of heavy traffic areas.
To avoid fire hazard, NEVER put the cord
under rugs, or near radiator, stoves, or heaters.
• DO NOT place humidifier near heat sources
such as stoves, radiators, and heaters.
Do locate your humidifier on an inside wall near
an electrical outlet. The humidifier should be
at least 10cm/4" away from the wall for best
results.
• WARNING: Do not attempt to refill humidifier
without first unplugging the unit from it's
electrical outlet. Be sure to pull by the plug
and not the cord.
• NEVER drop or insert any object into any
openings. DO NOT place hands, face, or body
directly over or near Moisture Outlet while unit
is in operation. DO NOT cover Moisture Outlet or
place anything over it while the unit is operating.
• DO NOT operate any appliance with a damaged
cord or plug, after the appliance malfunctions,
or if it has been dropped or damaged in any
manner. Return appliance to manufacturer for
examination, electrical or mechanical
adjustment, or repair.
• Use appliance only for intended household
use as described in this manual. Any other
use not recommended by the manufacturer
may cause fire, electric shock, or injury to
persons. The use of attachments not
recommended or sold by The Holmes Group,
may cause hazards.
• DO NOT use outdoors.
• Always place humidifier on a firm, flat, level
surface. A waterproof mat or pad is
recommended for under the humidifier.
NEVER place it on a surface that may
become damaged by exposure to water and
moisture (i.e. finished floor).
• DO NOT allow the Moisture Outlet to directly
face the wall. Moisture could cause damage,
particularly to wallpaper.
• Humidifier should be unplugged when not in use.
• NEVER tilt, move, or attempt to empty unit
while it is operating. Shut off and unplug before
removing the water tank and moving the unit.
DO NOT attempt to remove the water tank
within 15 minutes after the humidifier is turned
off and unplugged. Serious injury may result.
• This humidifier requires regular maintenance
to operate appropriately. Refer to cleaning
and maintenance procedures.
• NEVER use detergents, petrol, glass cleaner,
furniture polish, paint thinner, or other household
solvents to clean any part of the humidifier.
• Excessive humidity in a room can cause water
condensation on windows and some furniture.
If this happens, turn the humidifier OFF.
• Do not use humidifier in an area where
humidity level is in excess of 55%.
• DO NOT attempt to repair or adjust any
electrical or mechanical functions on this unit.
The inside of the unit contains no user
serviceable parts. All servicing should be
performed by qualified personnel only.
• If the supply cord is damaged, it must be
replaced by the manufacturer or its service
agent or a similarly qualified person.
U.K. and IRELAND
BCM3600I/IUK04M1 Visual.qxd 6/18/04 16:10 Page 7

USING THE HUMIDISTAT
The Humidistat feature allows you to set and
maintain the humidity level you wish for your room
to maintain. The Humidistat setting is designed to
operate between 25% and 65% relative humidity
range. The recommended setting is 40-50%.
Turn the Humidistat clockwise as far as it will turn
to achieve the highest setting. In this setting, the
humidifier will run constantly, and produce the
greatest amount of moisture.
To lower your desired humidity level, simply turn
the Humidistat counterclockwise to choose your
setting.
When the humidity in the room is less than the
level you have set, the humidifier will continue to
produce moisture. Once the set humidity level
has been achieved, the fan will turn off. When
the room humidity drops below your set level,
the unit will automatically begin producing
moisture again.
Depending on the size of your room and your
personal comfort, you will set your humidistat at
different levels. If condensation forms on your
windows or walls, or your measured room humidity
reads above 50% by use of a hygrometer, turn
off your humidifier, or lower your Humidistat level.
REPLACING THE FILTER
Through normal use, waterborne minerals and
sediment become trapped in the wick filter. The
harder your water, the greater the amount of
minerals in the water, and the more often you
will need to change your filter.
You will be able to monitor the life of the filter in
your humidifier by checking the Filter Monitor
Indicator. When the unit is off, the Filter Monitor
Indicator will read in the O position. After 60 minutes
of use, Filter Monitor Indicator (refer to fig. 4 for
close-up of indicator) will move from the O position
and indicate your filter condition.
A brand new filter will register in the blue section
reading OK filter. After frequent use of your
humidifier, the Filter Monitor Indicator will let
you know when the filter needs to be changed.
When the needle is in the red ( ) section, this
means the proper amount of moisture is not
getting into your air due to the excessive minerals
and sediment that have become trapped on your
filter. At this point, you should replace your filter.
It is important to change your filter as indicated
to obtain stated performance level.
To replace the filter, follow the steps
below.
1. Be sure the Control Knob is in the OFF position
and the unit is disconnected from the electrical
outlet.
2. Remove the tank and main housing to access
the base tray.
3. Discard the old filter and follow weekly cleaning
instructions.
4. Insert a new filter into the filter support in the
base.
5. Replace the main housing and then the tank.
6. Repeat Operating Instruction steps.
It will take about 30 minutes for the humidifier to
reach maximum output.
You can obtain a new filter by calling 0870 759 9000
(in UK). This humidifier takes model BWF75-I
replacement filter.
CLEANING AND MAINTENANCE
INSTRUCTIONS
Humidifiers provide comfort by adding moisture
to dry, heated indoor air.
To benefit most from the humidifier and avoid
product mis-use, follow all instructions carefully.
Please note that this is an electrical appliance
and requires attention when in use.
In addition, if you do not follow the recommended
care and maintenance guidelines, micro-organisms
may be able to grow in the water within the Water
Tank. You must routinely follow the cleaning
procedures that follow in order to ensure proper,
efficient operation of your humidifier. Proper
maintenance and cleaning is essential to the
continued performance of your unit and the
avoidance of algae or bacteria build-up.
DAILY MAINTENANCE
1. Before cleaning, turn the Control Knob off and
unplug the unit from the electrical outlet.
2. Remove the housing and the tanks from the
humidifier and place them in sink or tub.
3. Carry the base of the unit to the sink, remove
the wick filter, place in sink, drain any remaining
water and rinse thoroughly to remove any
sediment or dirt. Wipe clean, and dry with a
clean cloth or paper towel.
4. Drain the water from the tanks into the sink
and rinse each tank thoroughly. Wipe clean,
and dry with a clean cloth or paper towel.
5. Put filter back in the filter supports, replace
the housing, then refill the tanks with cool tap
water as instructed earlier in the Filling
Instructions. Do not overfill.
6. Follow Operating Instructions.
WEEKLY MAINTENANCE
To Remove Scale:
1. Repeat steps 1-4 above.
2. Partially fill the base with Bionaire™ Cleaning
Solution as instructed on bottle, or with two 8
oz. cups of undiluted white vinegar. Leave this
solution in the base for 20 minutes, while
cleaning all interior surfaces with a soft brush.
Remove base scale by wiping the base with a
cloth dampened with undiluted white vinegar.
3. Rinse with clean warm water to remove the
cleaning solution before disinfecting the tank.
To Disinfect Humidifier Base Tanks
1. Fill Humidifier Base with 2 gallons of water and
1/2 teaspoon of chlorine bleach.
2. Fill each tank 1/2 full with water and 1 teaspoon
of chlorine bleach.
3. Let the solution stand for 20 minutes, swishing
every few minutes. Wet all surfaces.
4. Carefully empty the Base and Tanks after 20
minutes, and rinse with water until you cannot
detect any bleach smell. Dry with a clean cloth
or paper towel.
5. Check the Filter Monitor Indicator to see if it is
time to replace the filter. Depending on the
water hardness in your area, it may be necessary
to change the filter every 1-2 months. Re-insert
the wick filter into the filter support.
6. Refill the water tanks as directed with cool tap
water, replace the humidifier housing, and turn
the Control Knob to ON.
If not available follow these instructions
1. Repeat steps 1-3 in the Maintenance section.
2. Clean the tray by partially filling the tray with
200ml of undiluted white vinegar. If the element
is heavily scaled, plug the humidifier into an
electrical socket and turn it ON for no longer
than 15 seconds. After this time turn the humidifier
OFF and unplug it from the electrical outlet.
Let solution stand 20 minutes, cleaning all interior
surfaces with a soft brush. Dampen a cloth with
undiluted white vinegar and wipe out entire tray
to remove scale.
3. Rinse with clean warm water to remove scale
and the white vinegar solution before beginning
to disinfect the tank.
4. Wipe the heating element clean with a soft cloth
after it has had a chance to cool.
Disinfect tank
1. Fill tank with 1 teaspoon of bleach and 3.5 litres
of water.
2. Let the solution stand for 20 minutes, swishing
every few minutes. Wet all surfaces.
3. Empty the tank after 20 minutes, and rinse well
with water until the bleach smell is gone.
Dry with some paper towel.
4. Refill the water tank with cool water; replace
the water tank. Repeat Operating Instructions.
STORAGE INSTRUCTIONS
When not using your humidifier for an extended
period of time:
1. Dispose of the filter. DO NOT leave in unit.
2. Clean, rinse and thoroughly dry the humidifier
as directed in weekly maintenance. DO NOT
leave any water in the unit when storing.
Leaving water in the unit may render the unit
in-operable for the following season.
3. Place the humidifier in the original carton and
store in a cool, dry place.
4. Order your Bionaire™ replacement filter
(BWF-75-I) for next year’s use.
SERVICE INSTRUCTIONS
1. Do NOT attempt to repair or adjust any electrical
or mechanical functions on this unit. Doing so
will void the warranty. The insides of the unit
contain no user serviceable parts. Only qualified
personnel should perform all servicing.
2. Should the unit stop working, first check the fuse
in the plug (UK only) or fuse/circuit breaker at
the distribution board is operating, before
contacting the manufacturer or service agent.
3. If you need to exchange the unit, please return
it in its original carton, with a sales receipt,
to the store where you purchased it.
4. Should your humidifier require service, please
contact your local dealer.
ACCESSORIES FOR MODEL BCM3600
• BWF75-I Wick filter.
• Bionaire™ Cleaning Solution
For U.K. and Ireland only:
If the plug is not suitable for the socket outlets in
your home, it can be removed and replaced by
a plug of the correct type. Please refer to
"Installation of a plug" below.
Installation of a plug
Applicable to U.K. and Ireland
The wires in the mains lead are coloured as such:
BROWN - LIVE
BLUE - NEUTRAL
Please note that the colour of these mains wires
may not correspond with the colour markings that
identify the terminals in your plug. Please proceed
as follows:
The BROWN coloured wire must be connected
to the terminal, which is marked with the letter
"L" or is coloured RED.
The BLUE coloured wire must be connected to
the terminal, which is marked with the letter "N"
or is coloured BLACK.
DO NOT CONNECT either of these wires to the
earth terminal in the plug. The earth terminal plug
is marked with the letter "E", or with the earth
symbol or coloured GREEN, or GREEN and
YELLOW.
54
BCM3600I/IUK04M1 Visual.qxd 6/18/04 16:10 Page 9

NOTE: If the terminals in the plug are not marked
or if you are unsure or in doubt about the installation
of the plug please contact a qualified electrician.
If a 13A 3-pin plug is fitted, it must be an ASTA
approved plug, conforming to BS1363 standard.
GUARANTEE
PLEASE KEEP YOUR RECEIPT AS THIS WILL
BE REQUIRED FOR ANY CLAIMS UNDER THIS
GUARANTEE.
• This product is guaranteed for 2 years.
• In the unlikely event of breakdown, please
take it back to the place of purchase, with
your till receipt and a copy of this guarantee.
• The rights and benefits under this guarantee
are additional to your statutory rights which
are not affected by this guarantee.
• Holmes Products Europe undertakes within the
specific period, to repair or replace free of charge,
any part of the appliance found to be defective
provided that:
• We are promptly informed of the defect.
• The appliance has not been altered in any way
or subjected to misuse or repair by a person
other than a person authorised by Holmes
Products Europe.
• No rights are given under this guarantee to a
person acquiring the appliance second hand
or for commercial or communal uses.
• Any repaired or replaced appliance will be
guaranteed on these terms for the remaining
portion of the guarantee.
THIS PRODUCT IS MANUFACTURED TO
COMPLY WITH THE E.E.C. DIRECTIVES
73/23/EEC and 89/336/EEC.
FÉLICITATIONS
En optant pour un humidificateur Bionaire™,
vous avez choisi l'un des humidificateurs les
plus perfectionnés du marché.
LIRE ET CONSERVER CES INSTRUCTIONS.
REMARQUE : Se référer aux illustrations
correspondantes avant de prendre connaissance
de ces instructions.
DESCRIPTIONS (VOIR FIG. 1)
A.RÉSERVOIRS D'EAU
B.HUMIDISTAT
C.TÉMOIN DE REMPLISSAGE
D.GRILLES DE SORTIE D'HUMIDITÉ
E.TÉMOIN DE MISE SOUS TENSION
F. INDICATEUR DE CHANGEMENT DE FILTRE
Filter Monitor™
G.GRILLES D'ENTRÉE D'AIR
H.BASE DE L'HUMIDIFICATEUR
I. CORPS DE L'HUMIDIFICATEUR
FIG. 2 INSTALLATION DES ROULETTES
A.Roulettes fixes
B.Roulettes pivotantes
C.Dessous de la base de l'humidificateur
FIG. 3
A.Filtre circulaire longue durée
B.Support de filtre circulaire
C.Contacteur à flotteur
D.Base de l'humidificateur
MESURES DE SÉCURITÉ
Lors de l'utilisation d'appareils électriques, il est
nécessaire de se conformer aux précautions
d'usage pour éviter tout risque d'incendie, de
décharge électrique et de se blesser. Celles-ci
comprennent notamment :
• Lire toutes les instructions avant emploi.
• Pour éviter un incendie ou risque d'électrocution,
brancher l'appareil directement dans une prise
électrique et bien enfoncer la fiche.
• Ne pas laisser traîner le fil dans des endroits
de passage.
Pour éviter tout risque d'incendie, ne JAMAIS
placer le fil sous des tapis ou près de radiateurs,
poêles ou autre appareil de chauffage.
• NE PAS placer l'humidificateur près d'une source
de chaleur telle qu'un poêle, un radiateur ou
autre appareil de chauffage. Placer votre
humidificateur le long d'une cloison interne,
près d'une prise électrique. Pour en améliorer
6 7
3 amp
FRANÇAIS
les performances, l'espace entre le mur et
l'humidificateur doit être au moins de 10cm/4"
• ATTENTION : Ne pas essayer de remplir
l'humidificateur sans l'avoir préalablement
débranché de la prise électrique. Bien s'assurer
de débrancher en maintenant la prise et non
pas en tirant sur le fil.
• NE JAMAIS laisser tomber ou insérer tout
objet dans l'une ou l'autre des ouvertures.
NE PAS placer les mains, le visage ou le corps
directement au-dessus ou proche de la sortie
d'air humide lorsque l'appareil est en marche.
NE PAS couvrir la sortie d'air humide ou placer
tout objet lorsque l'appareil est en marche.
• NE PAS utiliser l'appareil avec un cordon ou
une prise d'alimentation endommagé(e), après
une défaillance de l'appareil ou s'il a subi un choc
en tombant ou a été endommagé de quelque
façon que ce soit. Retourner l'appareil au
fabricant pour un contrôle, un réglage électrique
ou mécanique ou pour réparation.
• Se servir uniquement de l'appareil pour un usage
domestique, tel que décrit dans ce manuel.
Toute autre utilisation non recommandée par
le fabricant peut provoquer un incendie, un
choc électrique ou des blessures corporelles.
L'utilisation d'accessoires non recommandés
ou vendus par le Groupe Holmes peut être
dangereux.
• NE PAS utiliser à l'extérieur.
• Toujours placer l'humidificateur sur une surface
plane, lisse et ferme. Il est recommandé de
placer un revêtement ou support étanche sous
l'humidificateur. NE JAMAIS le placer sur une
surface susceptible d'être endommagée par
une exposition à l'eau et à l'humidité (c.-à-d.
des parquets vernis).
• NE PAS orienter la sortie d'air humide
directement face au mur. L'humidité pourrait
occasionner des dégâts, notamment au niveau
du papier peint.
• Toujours débrancher l'humidificateur lorsqu'il
ne fonctionne pas.
• NE JAMAIS incliner, déplacer ou vider l'appareil
lorsqu'il fonctionne. Eteindre et débrancher avant
de retirer le réservoir d'eau et de bouger l'appareil.
NE PAS essayer de retirer le réservoir d'eau juste
après avoir éteint et débranché l'humidificateur,
au risque de vous blesser sérieusement.
Attendre 15 minutes avant d'opérer
• Cet humidificateur nécessite un entretien
régulier pour fonctionner dans des conditions
optimales. Se référer aux procédures de
nettoyage et d'entretien.
• NE JAMAIS utiliser de détergents, d'essence,
de produit nettoyant pour vitres, lustrant pour
meubles, solvant pour peintures ou tout autre
produit d'entretien ménager pour nettoyer les
pièces de l'humidificateur.
• Une humidité excessive dans une pièce peut
provoquer une condensation d'eau sur les
vitres et certains meubles. Si cela se produit,
ETEINDRE l'humidificateur.
• Ne pas utiliser l'humidificateur dans un endroit
où le taux d'hygrométrie excède 55%.
• NE PAS essayer de réparer ou de régler toute
fonction électrique ou mécanique de cet appareil.
Celui-ci ne contient aucune pièce directement
réparable par l'utilisateur. Toutes les réparations
doivent être réalisées uniquement par un
personnel qualifié.
• En cas d'endommagement du cordon
d'alimentation, celui-ci doit être remplacé par
le fabricant ou son distributeur agréé ou tout
autre professionnel présentant les mêmes
qualifications.
CONSERVER CES INSTRUCTIONS
REMARQUE : cet appareil électrique nécessite
toute votre attention lorsqu'il est en marche.
FONCTIONNEMENT DE VOTRE
HUMIDIFICATEUR À BUÉE FROIDE
Votre humidificateur à buée froide Bionaire™
aspire l'air sec à travers la grille d'admission arrière.
L'air passe ensuite à travers un filtre à mèche
fortement chargé en eau qui en retient les minéraux
et les dépôts. L'air humide produit est expulsé
directement dans la pièce par la grille supérieure.
REMARQUE : Ce système d'humidification produit
une buée fraîche et invisible. Il est normal de ne
pas la voir.
NOTA : un degré d’humidité inférieur à 20%
peut être malsain et inconfortable. Le degré
d’humidité recommandé est de 45% à 55%.
CONSIGNES PRÉALABLES À L'EMPLOI
1. S'assurer que le bouton de commande est en
position OFF et que l'appareil est débranché
de la prise électrique.
2. Retirer le corps, le filtre et les réservoirs.
3. POUR OFFRIR PLUS DE MOBILITÉ ET DE
COMMODITÉ À VOTRE HUMIDIFICATEUR,
installer les roulettes. Retirer les quatre roulettes
de leur pochette d'emballage à l'intérieur du
carton. Retourner l'appareil et localiser les
trous aux quatre extrémités sous la base.
REMARQUE : Vous remarquez deux modèles
différents de roulettes. Deux d'entre-elles sont
fixes et les deux autres sont de type pivotant.
Les roulettes fixes sont identifiables par un dessus
plat tandis que les roulettes pivotantes sont
incurvées, avec une petite pièce en plastique sur la
tige. Voir figure 1 pour bien positionner chaque type
de roulette. NE PAS utiliser d'outils pour installer
les roulettes, ceux-ci pouvant endommager la base
de l'appareil. Remettre l'appareil tête en haut.
BCM3600I/IUK04M1 Visual.qxd 6/18/04 16:10 Page 11
-
 1
1
-
 2
2
-
 3
3
-
 4
4
-
 5
5


Bionaire BCM3600 Le manuel du propriétaire
- Catégorie
- Humidificateurs
- Taper
- Le manuel du propriétaire
dans d''autres langues
- English: Bionaire BCM3600 Owner's manual
Documents connexes
-
Bionaire BCM 3600 Manuel utilisateur
-
-
-
-
Bionaire BCM5555-CN Manuel utilisateur
-
-
-
-
-