
GB - User Manual
F - Manuel d'Utilisation
Assembled in PRC
Designed by LOTRONIC S.A.
Av. Z. Gramme 9
B - 1480 Saintes
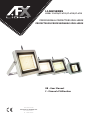
LF-NW SERIES
CODE: 17-4710/17-4711/17-4712/17-4713
PROFESSIONAL PROJECTORS IP65 4000K
PROJECTEURS PROFESSIONNELS IP65 4000K

EN 2
© Copyright LOTRONIC 2019
INSTALLATION INSTRUCTIONS
WARNING:
1. ENSURE ELECTRICITY IS SWITCHED OFF BEFORE INSTALLATION.
2. Please read following instructions before installing the unit.
3. Prepare all necessary accessories and spare parts (not provided) including a junction box .
4. The Floodlight must be earthed.
5. If the safety shield is damages, you must replace it immediately by tempered glass.
6. Cables and leads should be attached in such a way that only the manufacturer, his service agent
or similarly qualied person can replace them.
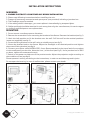
MOUNTING
1. Do not mount a surface prone to vibrations.
2. Remove the screw which is for mounting the bracket of the xture. Remove the bracket.(see g.1)
3. Mark the hole position to x the bracket onto the wall. Drill the wall at the marked positions
(screw not supplied) (see g.2).
4. Screw the xing bracket to the wall using a suitable screw (see g.3)
5. Mount the bracket back to the xture. Adjust the oodlight to the desired position and tighten
the screw of xing bracket (see g.4)
6. Connect your mains cable (H05RN-F3G1.0mm
2
Recommended) to the input lead of our product
via the waterproof junction box. Note the Line(-) of the lead (see g.5). Use a junction box of IP65
or above, tighten the waterproof screw)
7.Switch on the power to make sure if the product works. Adjust the projection angle according to
the condition of use (see g.6)
Please operate it strictly according to the instructions, in order to avoid damage and injuries.
Do not open the housing. In case of malfunction, please contact your dealer.

FR3
www.afx-light.com
INSTRUCTIONS D'INSTALLATION
AVERTISSEMENTS:
1. AVANT D'EFFECTUER L'INSTALLATATION, COUPEZ L'ELECTRICITE.
2. Lire attentivement les instruction avant de commencer l'installation.
3. Préparez tous les pièces et accessoires (non fournis) y compris un boîtier de jonction .
4. Le projecteur doit être relié à la terre.
5. Si le verre de sécurité est endommagé, il doit être remplacé immédiatement par du verre trempé.
6. Les câbles et cordons doivent être xés d'une manière à ce que personne d'autre que le fabricant,
un réparateur agréé ou un technicien qualié ne peuvent les remplacer.
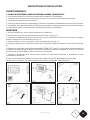
MONTAGE
1. Ne pas installer sur une surface exposée aux vibrations.
2. Retirez les vis de l'étrier de xation et retirez l'étrier (voir g. 1)
3. Marquez l'emplacement du trou sur le mur où vous voulez xer l'étrier. Percez le mur à l'empla-
cement marqué (vis non fournie) (voir g. 2).
4. Vissez l'étrier au mur au moyen d'une vis appropriée (voir g. 3).
5. Fixez le projecteur sur l'étrier et ajustez-le sur la position désirée. Serrez la vis de l'étrier (voir g.
4).
6. Branchez votre câble secteur (recommandé H05RN-F3G1.0mm
2
) sur le cordon d'alimentation du
projecteur en passant par un boîtier de jonction. Notez le conducteur négatif (-) (voir g. 5). Utilisez
un boîtier de jonction IP65 ou plus et serrez la vis étanche.
7. Mettez le projecteur sous tension pour vérier s'il fonctionne. Orientez le projecteur à votre
convenance (voir g. 6).
Suivez scrupuleusement toutes les instructions an d'éviter des dommages et blessures.
Ne pas ouvrir le boîtier. En das de dysfonctionnement, contactez votre revendeur.

© Copyright LOTRONIC 2019
This marking indicates that this product should not be disposed with other household wastes throughout the
EU. To prevent possible harm to the environment or human health from uncontrolled waste disposal, recycle it
responsibly to promote the sustainable reuse of material resources. To return your used device, please use the
return and collection systems or contact the retailer where the product was purchased. They can take this
product for environmental safe recycling.
Ce symbole signie que cet appareil ne doit être mis aux déchets ménagers dans aucun pays de la Communauté
européenne an d’éviter de nuire à l’environnement et à la santé humaine. Il convient d’en disposer d’une manière
responsable an de promouvoir la réutilisation des matériaux. Pour retourner votre appareil usagé, merci d’utiliser les
systèmes de retours et de ramassage mis en place ou de contacter votre revendeur chez qui vous avez acheté l’appareil.
Ils peuvent reprendre cet appareil pour un recyclage écologique.
SPECIFICATIONS / CARACTERISTIQUES TECHNIQUES
LF10-NW LF30-NW LF50-NW LF100-NW LF20-RGB LF30-RGB LF50-RGB LF100-RGB
Power supply 100-240Vac 50/60Hz
Input current 0.11A 0.33A 0.55A 1.1A 0.03A 0.05A 0.1A 0.15A
Output voltage DC40-70V DC90-120V
Output current 150mA 300mA 450mA 900mA
Cable H05RN-F 3G1,0mm²
CRI 70 NA
PF 0.9 0.8 0.9 0.9 0.9
Flicker <50% <50% <50% <30% <50%
IP rating IP65
Power 10 30 50 100 20W 30W 50W 100W
LM 900 2700 4500 9000
LED pcs 18 60 96 192 18 42 81 81
Dims (mm) 133*114*36 235*205*36 235*205*36 347*290*47 140*136*45 200*180*28 245*210*31 320*265*43
Weight 0.37KG 1.15KG 1.17KG 3.45KG 0.4kg 0.6kg 0.9kg 2.05kg
-
 1
1
-
 2
2
-
 3
3
-
 4
4


dans d''autres langues
- English: afx light LF30-NW User manual
Documents connexes

Autres documents
-
Perel LEDA4012RGB Manuel utilisateur
-
Brennenstuhl Halogen Light H 150 IP44 with PIR sensor 120W 2216lm black Manuel utilisateur
-
Perel LEDA3005CW-B Manuel utilisateur
-
EuroLite LED T500 Manuel utilisateur
-
Perel EWL513 Manuel utilisateur
-
 Ibiza Light 15-1509 Le manuel du propriétaire
-
Swann SOWHDFLOCAMW2PK Manuel utilisateur
-
Swann SWIFI-FLOCAM2BR Guide de démarrage rapide
-
 Thomson Lighting THOM62306-IMB Fiche technique
-
BorMann BLF1005 Black LED Headlight Manuel utilisateur

