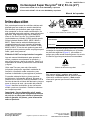
Toro 60V 21in Super Recycler Lawn Mower Manuel utilisateur
- Catégorie
- Tondeuses à gazon
- Taper
- Manuel utilisateur

FormNo.3445-772RevA
60V21inSuperRecycler®LawnMower
21388/T
CortacéspedSuperRecycler®60V,53cm(21”)
21388/T
TondeuseSuperRecycler®53cm(21po),60V
21388/T
www.T oro.com.
*3445-772*


FormNo.3445-769RevA
60V21inSuperRecycler
®
LawnMower
ModelNo.21388—SerialNo.409320000andUp
ModelNo.21388T—SerialNo.409320000andUp
Operator'sManual
Introduction
Thisrotary-blade,walk-behindlawnmowerisintended
tobeusedbyresidentialhomeowners.Itisdesigned
primarilyforcuttinggrassonwell-maintainedlawns
onresidentialproperties.Itisnotdesignedforcutting
brushorforagriculturaluses.Itisdesignedtouse
ToroFlex-Forcelithium-ionbatterypackModel88660
(providedwithModel21388);itcanalsousebattery
packModels88620,88625,88640,or88675.These
batterypacksaredesignedtobechargedonlyby
batterychargerModels88602(providedwithModel
21388),88605,or88610.Usingthisproductfor
purposesotherthanitsintendedusecouldprove
dangeroustoyouandbystanders.
Model21388Tdoesnotincludeabatteryora
charger.
Readthisinformationcarefullytolearnhowtooperate
andmaintainyourproductproperlyandtoavoid
injuryandproductdamage.Youareresponsiblefor
operatingtheproductproperlyandsafely.
Visitwww.Toro.comformoreinformation,including
safetytips,trainingmaterials,accessoryinformation,
helpndingadealer,ortoregisteryourproduct.
Wheneveryouneedservice,genuinethe
manufacturerparts,oradditionalinformation,contact
anAuthorizedServiceDealerorthemanufacturer
CustomerServiceandhavethemodelandserial
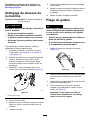
numbersofyourproductready.Figure1identies
thelocationofthemodelandserialnumbersonthe
product.Writethenumbersinthespaceprovided.
Important:Withyourmobiledevice,youcan
scantheQRcodeontheserialnumberdecal(if
equipped)toaccesswarranty,parts,andother
productinformation.
g275230
Figure1
1.Modelandserialnumberlocation
ModelNo.
SerialNo.
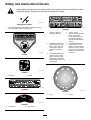
Thismanualidentiespotentialhazardsandhas
safetymessagesidentiedbythesafety-alertsymbol
(Figure2),whichsignalsahazardthatmaycause
seriousinjuryordeathifyoudonotfollowthe
recommendedprecautions.
g000502
Figure2
Safety-alertsymbol
Thismanualuses2wordstohighlightinformation.
Importantcallsattentiontospecialmechanical
informationandNoteemphasizesgeneralinformation
worthyofspecialattention.
WARNING
CALIFORNIA
Proposition65Warning
Thepowercordonthisproductcontains
lead,achemicalknowntotheState
ofCaliforniatocausebirthdefects
orotherreproductiveharm.Wash
handsafterhandling.
Useofthisproductmaycauseexposure
tochemicalsknowntotheStateof
Californiatocausecancer,birthdefects,
orotherreproductiveharm.
©2021—TheToro®Company
8111LyndaleAvenueSouth
Bloomington,MN55420Registeratwww.T oro.com.
OriginalInstructions(EN)
PrintedinMexico
AllRightsReserved
*3445-769*

Contents
Introduction...............................................................1
Safety.......................................................................2
SafetyandInstructionalDecals..........................5
Setup........................................................................6
1MountingtheBatteryCharger
(Optional)........................................................6
2UnfoldingtheHandle.......................................7
3AssemblingtheGrassBag...............................8
ProductOverview.....................................................9
Specications..................................................10
Operation.................................................................11
BeforeOperation..................................................11
InstallingtheBatteryPack.................................11
AdjustingtheHandleHeight..............................11
AdjustingtheCuttingHeight.............................12
DuringOperation.................................................13
StartingtheMachine.........................................13
UsingtheSelf-PropelDrive...............................13
AdjustingtheBladeSpeed................................13
ShuttingOfftheMachine..................................14
RecyclingtheClippings....................................14
BaggingtheClippings.......................................15
DischargingtheClippings.................................17
RemovingtheBatteryPackfromthe
Machine........................................................19
OperatingTips.................................................19
AfterOperation....................................................20
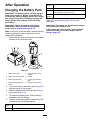
ChargingtheBatteryPack................................20
CleaningundertheMachine.............................21
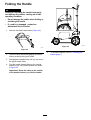
FoldingtheHandle...........................................22
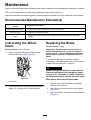
Maintenance...........................................................23
RecommendedMaintenanceSchedule(s)...........23
LubricatingtheWheelGears............................23
ReplacingtheBlade..........................................23
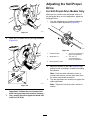
AdjustingtheSelf-PropelDrive.........................24
PreparingtheBatteryPackfor
Recycling......................................................25
Storage...................................................................25
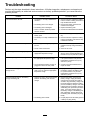
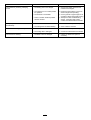
Troubleshooting......................................................26
Safety
IMPORTANTSAFETY
INSTRUCTIONS
WARNING—Whenusinganelectricmachine,always
readandfollowbasicsafetywarningsandinstructions
toreducetheriskofre,electricshock,orinjury,
includingthefollowing:
I.Training
1.Theoperatorofthemachineisresponsiblefor
anyaccidentsorhazardsoccurringtoothersor
theirproperty.
2.Donotallowchildrentouseorplaywiththe
machine,batterypack,orthebatterycharger;
localregulationsmayrestricttheageofthe
operator.
3.Keepbystandersandchildrenoutofthe
operatingarea.Donotallowchildrento
operatethemachine.Allowonlypeoplewho
areresponsible,trained,familiarwiththe
instructions,andphysicallycapabletooperate
themachine.
4.Beforeusingthemachine,batterypack,and
batterycharger,readalltheinstructionsand
cautionarymarkingsontheseproducts.
5.Becomefamiliarwiththecontrolsandproper
useofthemachine,batterypack,andbattery
charger.
II.Preparation
1.Keepbystanders,especiallychildrenandpets,
outoftheoperatingarea.
2.Donotoperatethemachinewithoutallguards
andsafetydevices,suchasdeectorsandgrass
catchers,inplaceandfunctioningproperlyon
themachine.
3.Inspecttheareawhereyouwillusethemachine
andremoveallobjectsthatcouldinterferewith
theoperationofthemachineorthatthemachine
couldthrow.
4.Beforeusingthemachine,ensurethattheblade,
bladebolt,andbladeassemblyarenotwornor
damaged.Replaceanydamagedorunreadable
labels.
5.UseonlythebatterypackspeciedbyT oro.
Usingotheraccessoriesandattachmentsmay
increasetheriskofinjuryandre.
6.Pluggingthebatterychargerintoanoutletthatis
not120Vcancauseareorelectricshock.Do
notplugthebatterychargerintoanoutletother
than120V.Foradifferentstyleofconnection,
2

useanattachmentplugadapteroftheproper
congurationforthepoweroutletifneeded.
7.Donotuseadamagedormodiedbattery
packorbatterycharger,whichmayexhibit
unpredictablebehaviorthatresultsinre,
explosion,orriskofinjury.
8.Ifthesupplycordtothebatterychargeris
damaged,contactanAuthorizedServiceDealer
toreplaceit.
9.Donotusenon-rechargeablebatteries.
10.Chargethebatterypackwithonlythebattery
chargerspeciedbyToro.Achargersuitablefor
1typeofbatterypackmaycreateariskofre
whenusedwithanotherbatterypack.
11.Chargethebatterypackinawell-ventilatedarea
only.
12.Donotexposeabatterypackorbatterycharger
toreortotemperatureshigherthan68°C
(154°F).
13.Followallcharginginstructionsanddo
notchargethebatterypackoutsideofthe
temperaturerangespeciedintheinstructions.
Otherwise,youmaydamagethebatterypack
andincreasetheriskofre.
14.Dressproperly—Wearappropriateclothing,
includingeyeprotection;longpants;substantial,
slip-resistantfootwear(notbarefootorwearing
sandals);andhearingprotection.Tiebacklong
hairanddonotwearloosejewelrythatcanget
caughtinmovingparts.Wearadustmaskin
dustyoperatingconditions.Useofrubbergloves
isrecommended.
III.Operation
1.Contactwiththemovingbladewillcauseserious
injury.Keepyourhandsorfeetawayfromthe
cuttingareaandallmovingpartsofthemachine.
Keepclearofanydischargeopening.
2.Usingthismachineforpurposesotheranits
intendedusecouldprovedangeroustoyouand
bystanders.
3.Disengagetheself-propeldrive(ifequipped)
beforestartingthemachine.
4.Donottilttheappliancewhenstartingthemotor.
5.Preventunintentionalstarting—Ensurethatthe
electric-startbuttonisremovedfromtheignition
beforeconnectingthebatterypackandhandling
themachine.
6.Useyourfullattentionwhileoperatingthe
machine.Donotengageinanyactivitythat
causesdistractions;otherwise,injuryorproperty
damagemayoccur.
7.Stopthemachine,removetheelectric-start
button,removethebatterypackfromthe
machine,andwaitforallmovementtostop
beforeadjusting,servicing,cleaning,orstoring
themachine.
8.Removethebatterypackandelectric-start
buttonfromthemachinewheneveryouleaveit
unattendedorbeforechangingaccessories.
9.Donotforcethemachine—Allowthemachineto
dothejobbetterandsaferattherateforwhichit
wasdesigned.
10.Stayalert—Watchwhatyouaredoinganduse
commonsensewhenoperatingthemachine.
Donotusethemachinewhileill,tired,orunder
theinuenceofalcoholordrugs.
11.Operatethemachineonlyingoodvisibilityand
appropriateweatherconditions.Donotoperate
themachinewhenthereistheriskoflightning.
12.Useextremecautionwhenreversingorpulling
themachinetowardyou.
13.Keepproperfootingandbalanceatalltimes,
especiallyonslopes.Mowacrosstheface
ofslopes,neverupanddown.Useextreme
cautionwhenchangingdirectionsonslopes.Do
notmowexceedinglysteepslopes.Walk,never
runwiththemachine.
14.Donotdirectthedischargematerialtoward
anyone.Avoiddischargingmaterialagainsta
wallorobstruction;materialmayricochettoward
you.Stoptheblade(s)whencrossinggravel
surfaces.
15.Watchforholes,ruts,bumps,rocks,orother
hiddenobjects.Uneventerraincouldcauseyou
toloseyourbalanceorfooting.
16.Wetgrassorleavescancauseseriousinjuryif
youslipandcontacttheblade.Avoidmowingin
wetconditionsorwhenitisraining.
17.Ifthemachinestrikesanobjectorstartsto
vibrate,immediatelyshutoffthemachine,
removetheelectric-startbutton,removethe
batterypack,andwaitforallmovementtostop
beforeexaminingthemachinefordamage.
Makeallnecessaryrepairsbeforeresuming
operation.
18.Stopthemachineandremovetheelectric-start
buttonbeforeloadingthemachineforhauling.
19.Underabusiveconditions,thebatterypackmay
ejectliquid;avoidcontact.Ifyouaccidently
comeintocontactwiththeliquid,ushwith
water.Iftheliquidcontactsyoureyes,seek
medicalhelp.Liquidejectedfromthebattery
packmaycauseirritationorburns.
3

IV.MaintenanceandStorage
1.Stopthemachine,removetheelectric-start
button,removethebatterypackfromthe
machine,andwaitforallmovementtostop
beforeadjusting,servicing,cleaning,orstoring
themachine.
2.Donotattempttorepairthemachineexceptas
indicatedintheinstructions.HaveanAuthorized
ServiceDealerperformserviceonthemachine
usingidenticalreplacementparts.
3.Wearglovesandeyeprotectionwhenservicing
themachine.
4.Sharpenadullbladeonbothsidestomaintain
balance.Cleanthebladeandensurethatitis
balanced.
5.Replacethebladeifitisbent,worn,orcracked.
Anunbalancedbladecausesvibration,which
coulddamagethemotororcausepersonal
injury.
6.Whenservicingtheblade,beawarethatthe
bladecanstillmoveeventhoughthepower
sourceisoff.
7.Checkthegrasscollectionbagfrequentlyfor
deteriorationorwear,andreplaceawornbag
withaT oro[replacement]bag.
8.Forbestperformance,useonlygenuineToro
replacementpartsandaccessories.Other
replacementpartsandaccessoriescouldbe
dangerous,andsuchusecouldvoidtheproduct
warranty.
9.Maintainthemachine—Keepcuttingedges
sharpandcleanforthebestandsafest
performance.Keephandlesdry,clean,andfree
fromoilandgrease.Keepguardsinplaceandin
workingorder.Keepbladessharp.Useidentical
replacementbladesonly.
10.Checkthemachinefordamagedparts—Ifthere
aredamagedguardsorotherparts,determine
whetherthemachinewilloperateproperly.
Checkformisalignedandbindingmovingparts,
brokenparts,mounting,andanyothercondition
thatmayaffectitsoperation.Unlessindicated
intheinstructions,haveanAuthorizedService
Dealerrepairorreplaceadamagedguardor
part.
11.Whenthebatterypackisnotinuse,keepit
awayfrommetalobjectssuchaspaperclips,
coins,keys,nails,andscrewsthatcanmakea
connectionfrom1terminaltoanother.Shorting
thebatteryterminalsmaycauseburnsorare.
12.Checkthebladeandmotormountingbolts
frequentlyfortightness.
13.Whenyouarenotusingthemachine,storeit
indoorsinadry,secureplaceoutofthereach
ofchildren.
14.CAUTION—Amistreatedbatterypackmay
presentariskofreorchemicalburn.Donot
disassemblethebatterypack.Donotheatthe
batterypackabove68°C(154°F)orincinerate
it.ReplacethebatterypackwithagenuineT oro
batterypackonly;usinganothertypeofbattery
packmaycauseareorexplosion.Keep
batterypacksoutofthereachofchildrenand
intheoriginalpackaginguntilyouarereadyto
usethem.
15.Donotdisposeofthebatteryinare.The
cellmayexplode.Checkwithlocalcodesfor
possiblespecialdisposalinstructions.
SAVETHESE
INSTRUCTIONS
4

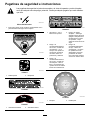
SafetyandInstructionalDecals
Safetydecalsandinstructionsareeasilyvisibletotheoperatorandarelocatednearanyarea
ofpotentialdanger.Replaceanydecalthatisdamagedormissing.
decaloemmarkt
Manufacturer'sMark
1.Thismarkindicatesthatthebladeisidentiedasapart
fromtheoriginalmachinemanufacturer.
decal94-8072
94-8072
decal115-8411
115-8411
1.Unlocked2.Locked
decal133-8062
133-8062
decal134-4691
134-4691
1.Autospeed2.Maxspeed
decal144-6368
144-6368
1.Warning—readthe
Operator'sManual.
4.Thrownobject
hazard—keepbystanders
away;shutoffthe
machinebeforeleaving
theoperatingposition;
pickupanydebrisbefore
mowing.
2.Cutting/dismemberment
hazardofhand,mower
blade—stayawayfrom
movingparts;keepall
guardsandshieldsin
place.
5.Cutting/dismemberment
hazardoffoot,mower
blade—donotoperateup
anddownslopes;operate
sidetosideonslopes;look
behindyouwhenmoving
inreverse.
3.Cutting/dismemberment
hazardofhand,mower
blade—removethekey
andreadtheOperator’s
Manualbeforeperforming
maintenance.
decal137-9196
137-9196
1.Lock2.Unlock
5

decal139-8986
139-8986
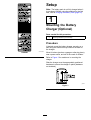
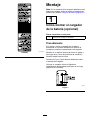
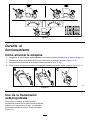
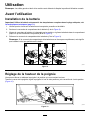
Setup
Note:Thebatterypackisnotfullychargedwhenit
ispurchased.Beforeusingthemachinefortherst
time,refertoChargingtheBatteryPack(page20).
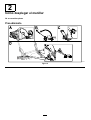
1
MountingtheBattery
Charger(Optional)
Partsneededforthisprocedure:
2
Mountinghardware(notincluded)
Procedure
Ifdesired,mountthebatterychargersecurelyona
wallusingthewall-mountkeyholesonthebackof
thecharger.
Mountitindoors(suchasagarageorotherdryplace),
nearapoweroutlet,andoutofthereachofchildren.
RefertoFigure3forassistanceinmountingthe
charger.
Slidethechargerovertheappropriatelypositioned
hardwaretosecurethechargerinplace(hardware
notincluded).
g290534
Figure3
6

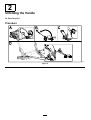
2
UnfoldingtheHandle
NoPartsRequired
Procedure
g333107
Figure4
7

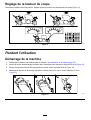
3
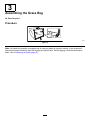
AssemblingtheGrassBag
NoPartsRequired
Procedure
g241560
Figure5
Note:Bydefaultthismachineisequippedwithaneconomybladeforimprovedruntime;italsoincludesan
optionalperformancebladeforimprovedbaggingandperformance.Beforebagging,installtheperformance
blade;refertoReplacingtheBlade(page23).
8

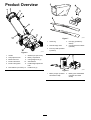
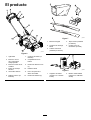
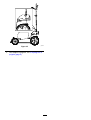
ProductOverview
g333108
Figure6
1.Handle
7.Washoutport(notshown)
2.Self-propeldrivebar
8.Batterycompartment
3.Blade-controlbar
9.Cutting-heightlever(4)
4.Electric-startbutton
10.Sidedeector
5.Electric-startignition11.Handle-heightadjustment
knob
6.Reardeector(notshown)12.Handlelever(2)
g337937
Figure7
1.Grassbag4.Rearplug(installedby
default)
2.Side-dischargechute5.Curvedperformanceblade
(included)
3.Economyblade(installed
bydefault)
g292995
Figure8
1.Batterycharger(included
withModel21388)
2.Batterypackmodel88660
(includedwithModel
21388)
9

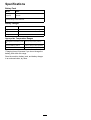
Specications
BatteryPack
Model88660
6.0Ah
Batterypack
capacity
324Wh
Batterymanufacturerrating=60Vmaximumand54Vnominal.
Actualvoltagevarieswithload.
BatteryCharger
Model88602
Type
60VMAXLithium-IonBatteryCharger
Input
120VAC50/60HzMax2.0A
Output60VMAXDC2.0A
AppropriateTemperatureRanges
Charge/storethebatterypack
at
5°C(41°F)to40°C(104°F)*
Usethebatterypackat
-30°C(-22°F)to49°C(120°F)*
Usethemachineat
0°C(32°F)to49°C(120°F)*
*Chargingtimewillincreaseifyoudonotchargethe
batterypackwithinthisrange.
Storethemachine,batterypack,andbatterycharger
inanenclosedclean,dryarea.
10

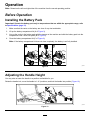
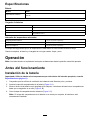
Operation
Note:Determinetheleftandrightsidesofthemachinefromthenormaloperatingposition.
BeforeOperation
InstallingtheBatteryPack
Important:Operatethebatterypackonlyintemperaturesthatarewithintheappropriaterange;refer
toSpecications(page10).
1.Makesurethattheventsonthebatteryareclearofanydustanddebris.
2.Liftupthebattery-compartmentlid(AofFigure9).
3.Lineupthecavityinthebatterypackwiththetongueonthemachineandslidethebatterypackintothe
compartmentuntilitlocksintoplace(BofFigure9).
4.Closethebattery-compartmentlid(CofFigure9).
Note:Ifthebattery-compartmentliddoesnotclosecompletely,thebatteryisnotfullyinstalled.
g251221
Figure9
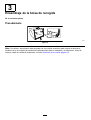
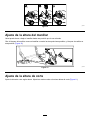
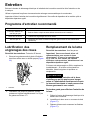
AdjustingtheHandleHeight
Youmayraiseorlowerthehandletoapositioncomfortableforyou.
Rotatethehandlelock,movethehandleto1of3positions,andlockthehandleintoposition(Figure10).
g333109
Figure10
11

AdjustingtheCuttingHeight
Adjustthecuttingheightasdesired.Setallwheelstothesamecuttingheight(Figure11).
g225876
Figure11
12

DuringOperation
StartingtheMachine
1.Ensurethatthebatterypackisinstalledinthemachine;refertoInstallingtheBatteryPack(page11).
2.Inserttheelectric-startbuttonintotheelectricstarterswitch(AofFigure12).
3.Squeezetheblade-controlbarandholdittothehandle(BofFigure12).
4.Presstheelectric-startbuttonandkeepitpresseduntilthemotorstarts(CofFigure12).
g331863
Figure12
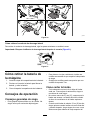
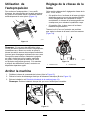
UsingtheSelf-PropelDrive
Tooperatetheself-propeldrive,simplywalkwithyour
handsontheupperhandleandyourelbowsatyour
sides,andthemachinewillautomaticallykeeppace
withyou(Figure13).
g233423
Figure13
Note:Ifthemachinedoesnotfreelyrollbackward
afterself-propelling,stopwalking,holdyourhands
inplace,andallowthemachinetorollacoupleof
centimeters(inches)forwardtodisengagethewheel
drive.Youcanalsotryreachingjustundertheupper
handletothemetalhandleandpushingthemachine
forwardacoupleofcentimeters(inches).Ifthe
machinestilldoesnotrollbackwardeasily,contactan
AuthorizedServiceDealer.
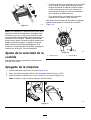
AdjustingtheBladeSpeed
Thismachinehas2blade-speedsettings:AUTOand
MAX.
•WhensettotheAUTOposition,thebladespeed
isadjustedautomaticallyforgreaterefciency;
changesincuttingconditionsaredetectedand
thebladespeedincreaseswhennecessaryto
maintainqualityofcut.
•WhensettotheMAXposition,thebladespeed
remainsatthehighestspeedatalltimes.
Turnthekeyinthekeyswitchtoeitherpositionto
adjustthebladespeedsetting(Figure14).
g337279
Figure14
1.AUTOposition2.MAXposition
13

ShuttingOfftheMachine
1.Releasetheblade-controlbar(AofFigure15).
2.Removetheelectric-startbuttonfromtheelectricstarter(BofFigure15).
3.Removethebatterypack;refertoRemovingtheBatteryPackfromtheMachine(page19).
Note:Wheneveryouarenotusingthemachine,removethebatterypack.
g251435
Figure15
RecyclingtheClippings
Yourmachinecomesfromthefactoryreadytorecyclethegrassandleafclippingsbackintothelawn.
Iftheside-dischargechuteisonthemachine,removeitandlocktheside-dischargedeector;refertoRemoving
theSide-DischargeChute(page18)beforerecyclingtheclippings.
Important:Ensurethattherearplugislockedinplace.Tolocktheplug,raisethereardeector(A
ofFigure16),rmlypushthepluginuntilitsnapsintoplacebehindthetabs,androtatetheleveron
theplugtotheleft(BofFigure16).
g239445
Figure16
Note:T ounlocktherearplug,rotatetheleverontheplugtotheright(Figure17).
14

BaggingtheClippings
Usethegrassbagwhenyouwanttocollectgrassandleafclippingsfromthelawn.
Iftheside-dischargechuteisonthemachine,removeitandlocktheside-dischargedeector;refertoRemoving
theSide-DischargeChute(page18).
Note:Bydefaultthismachineisequippedwithaneconomybladeforimprovedruntime;italsoincludesan
optionalperformancebladeforimprovedbaggingandperformance.Beforebagging,installtheperformance
blade;refertoReplacingtheBlade(page23).
InstallingtheGrassBag
1.Raiseandholdupthereardeectorandunlocktherearplug(AofFigure17).
2.Pullouttherearplug(BofFigure17).
3.Hangtheupperfrontedgeofthebagfromthegrass-bagpinsonthenotchesofthehandlebrackets
(CofFigure17).
4.Lowerthereardeector.
g240403
Figure17
15

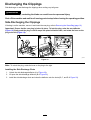
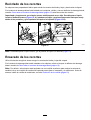
RemovingtheGrassBag
1.Raiseandholdupthereardeectorandliftthegrassbagupbythehandleoffthenotchesofthehandle
brackets(AofFigure18).
2.Installtherearplug(BofFigure18).
Important:Ensurethattherearplugislockedinplace.Tolocktheplug,rmlypushtheplugin
untilitsnapsintoplacebehindthetabs,androtatetheleverontheplugtotheleft(CofFigure18).
Note:Tounlocktheplug,rotatetheleverontheplugtotheright.
3.Lowerthereardeector.
g333110
Figure18
16

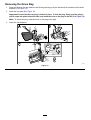
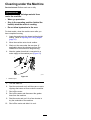
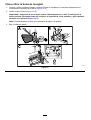
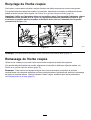
DischargingtheClippings
Side-dischargeorrear-dischargetheclippingswhencuttingverytallgrass.
WARNING
Thebladeissharp;contactingthebladecanresultinseriouspersonalinjury.
Shutoffthemachineandwaitforallmovingpartstostopbeforeleavingtheoperatingposition.
Side-DischargingtheClippings
Ifthebagisonthemachine,removeitandinserttherearplug;refertoRemovingtheGrassBag(page16).
Important:Ensurethattherearplugislockedinplace.Tolocktheplug,raisethereardeector
(Figure19),rmlypushthepluginuntilitsnapsintoplacebehindthetabs,androtatetheleveronthe
plugtotheleft(Figure19).
g231918
Figure19
Note:Tounlocktheplug,rotatetheleverontheplugtotheright.
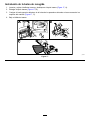
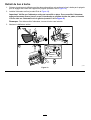
InstallingtheSide-DischargeChute
1.Unlocktheside-dischargedeector(AofFigure20).
2.Liftopentheside-dischargedeector(BofFigure20).
3.Installtheside-dischargechuteandclosethedeectorontothechute(B,C,andDofFigure20).
17

g231920
Figure20
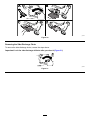
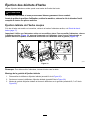
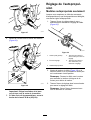
RemovingtheSide-DischargeChute
Toremovetheside-dischargechute,reversethestepsabove.
Important:Locktheside-dischargedeectorafteryoucloseit(Figure21).
g002593
Figure21
18
La page est en cours de chargement...
La page est en cours de chargement...
La page est en cours de chargement...
La page est en cours de chargement...
La page est en cours de chargement...
La page est en cours de chargement...
La page est en cours de chargement...
La page est en cours de chargement...
La page est en cours de chargement...
La page est en cours de chargement...
La page est en cours de chargement...
La page est en cours de chargement...
La page est en cours de chargement...
La page est en cours de chargement...
La page est en cours de chargement...
La page est en cours de chargement...
La page est en cours de chargement...
La page est en cours de chargement...
La page est en cours de chargement...
La page est en cours de chargement...
La page est en cours de chargement...
La page est en cours de chargement...
La page est en cours de chargement...
La page est en cours de chargement...
La page est en cours de chargement...
La page est en cours de chargement...
La page est en cours de chargement...
La page est en cours de chargement...
La page est en cours de chargement...
La page est en cours de chargement...
La page est en cours de chargement...
La page est en cours de chargement...
La page est en cours de chargement...
La page est en cours de chargement...
La page est en cours de chargement...
La page est en cours de chargement...
La page est en cours de chargement...
La page est en cours de chargement...
La page est en cours de chargement...
La page est en cours de chargement...
La page est en cours de chargement...
La page est en cours de chargement...
La page est en cours de chargement...
La page est en cours de chargement...
La page est en cours de chargement...
La page est en cours de chargement...
La page est en cours de chargement...
La page est en cours de chargement...
La page est en cours de chargement...
La page est en cours de chargement...
La page est en cours de chargement...
La page est en cours de chargement...
La page est en cours de chargement...
La page est en cours de chargement...
La page est en cours de chargement...
La page est en cours de chargement...
La page est en cours de chargement...
La page est en cours de chargement...
La page est en cours de chargement...
La page est en cours de chargement...
La page est en cours de chargement...
La page est en cours de chargement...
La page est en cours de chargement...
La page est en cours de chargement...
La page est en cours de chargement...
La page est en cours de chargement...
La page est en cours de chargement...
La page est en cours de chargement...
-
 1
1
-
 2
2
-
 3
3
-
 4
4
-
 5
5
-
 6
6
-
 7
7
-
 8
8
-
 9
9
-
 10
10
-
 11
11
-
 12
12
-
 13
13
-
 14
14
-
 15
15
-
 16
16
-
 17
17
-
 18
18
-
 19
19
-
 20
20
-
 21
21
-
 22
22
-
 23
23
-
 24
24
-
 25
25
-
 26
26
-
 27
27
-
 28
28
-
 29
29
-
 30
30
-
 31
31
-
 32
32
-
 33
33
-
 34
34
-
 35
35
-
 36
36
-
 37
37
-
 38
38
-
 39
39
-
 40
40
-
 41
41
-
 42
42
-
 43
43
-
 44
44
-
 45
45
-
 46
46
-
 47
47
-
 48
48
-
 49
49
-
 50
50
-
 51
51
-
 52
52
-
 53
53
-
 54
54
-
 55
55
-
 56
56
-
 57
57
-
 58
58
-
 59
59
-
 60
60
-
 61
61
-
 62
62
-
 63
63
-
 64
64
-
 65
65
-
 66
66
-
 67
67
-
 68
68
-
 69
69
-
 70
70
-
 71
71
-
 72
72
-
 73
73
-
 74
74
-
 75
75
-
 76
76
-
 77
77
-
 78
78
-
 79
79
-
 80
80
-
 81
81
-
 82
82
-
 83
83
-
 84
84
-
 85
85
-
 86
86
-
 87
87
-
 88
88


Toro 60V 21in Super Recycler Lawn Mower Manuel utilisateur
- Catégorie
- Tondeuses à gazon
- Taper
- Manuel utilisateur
dans d''autres langues
Documents connexes
-
Toro 60V 21in Super Recycler Lawn Mower Manuel utilisateur
-
-
-
Toro Flex-Force Power System 60V MAX 22in Recycler Lawn Mower Manuel utilisateur
-
-
-
-
-
-
Toro Heavy-Duty 60V 21in Recycler/Rear Bagger Lawn Mower Manuel utilisateur