Haier HUF138PA - ANNEXE 181 Manuel utilisateur
- Catégorie
- Congélateurs
- Taper
- Manuel utilisateur
Ce manuel convient également à

@ @ • @
Whaf The World Comes Home To"
_?r t st e
(Featares may vary by model)
ModW#"s
(Le_carad_ri_tlqae_ pevve.t
verier ea {on_:tlonda mod_Je)
(Las fandonespaerJen
varlar _egbn eJmorJeJo}
ModUles
PeteModWosde

S
Read all of #he instructions before using this appliance.
When using this appliance, al_ays e×erdse basic safety
precautions, indudin 9 the Following:
1. Use this appliance only for its intended purpose as described in this use
and care guide.
2. This appliance mustbe properly installed in accordance with the
installation instructions before it is used. See grounding instructions in the
installation section.
3. This appliance should not be recessedor built into an enclosed cabinet. It
is designed for freestanding installation only.
4. Never unplug your appliance by pulling on the power cord. Always
grasp the plug firmly and pull straight out from the outlet.
5_
6_
7_
8_
end.
of danger to children.
When your freezer is in operation, do not touch the cold surfaces in the
freezer compartment, particularly when hands are damp or wet. Skin
may adhere to these extremely cold surfaces.
reads:
'k_.You may safely refreeze frozen foods that have thawed if they
still contain ice crystals or if they are still cold - bdow 40°F7
"_..Thawedground meats,poultry, or fish that have any off-odor or
off-color should not be refrozen and should not be eaten. Thawed
ice cream should be discarded. If the odor or color of any food is
poor or questionable, discard it. The food may be dangerous to
eat."
much of their eating quality as you can."

9, Do not useany eUectricddevice or any sharp instrument to defrost your
freezen
10, UnpUugyour freezer before cleaning or before making any repdrs,
Note: if for any reason this product requires service,we strongUy
recommend that a certified technician perform the service,
11, Do not operate your freezer in the presence of explosive fumes,
Thank you for using our Haler
prducL This easy-to-use manual will
guide you in getting the best use of
your freezen
Remember to record the model and
serial numben They are on a label in
back of the freezen
Model number
Serial number
Date of purchase
Staple your receipt to your manual, You wiJJ need it to obtclin
warranty service°
2


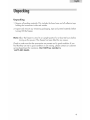
Unpacking
1. Remove aHpacking materials This includes the foam base and aJJadhesive tape
homing the accessories inside and outside_
2. Hnspectand remove any remaining packaging, tape and printed materiaJs before
turning ON the freezen
Note: AJJowthefreezerto stand in an upright positionfor at Jeast24 hoursbefore
turning on the power,if thefreezerhasbeentiJtd for any reason.
Checkto makesurethattheaccessoriesare presentand in good condition. Hfyou
find that theya_ not in good conditionor are missing,pJeasecontactour customer
servicedepartmentfor assistance.Our ToJJoFre÷numb÷r is
] o877o337o3639_

\
\
\
©
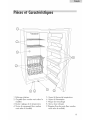
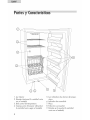
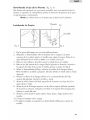
1. interior Light
2. Cabinet Wire Shelves (quantities vary
per model}
3, Temperature Control Dial
4. Storage Drawers (quantity" varies by
model}
5_ Temperature AJarm indicator Light
6. Power Indicator Light
7. Locking Hate
8. Lock (not shown}
9. Fixed Door SheJves(quantity varies
bymodel}

Proper Location
Toensure that your upright freezer works at the maximum efficiency it was designed
for, you should install it in a location where there is proper air circulation and
dectricd connections,
®Thefreezeris designedfor freestanding installationonly Htshouldnot be
buimtoino
® AJJowa minimum of 2 inch on each side and above the top of the freezer to ease
instaJJationand aJJowproper air circuJation_
Be sure to instaJJyour freezer on a floor that is strong enough to support the unit
when fuJJyJoacJecJ,

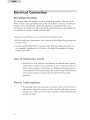
Grounding instructions
Forpersonalsafety,thisappliance mustbe properly grounded.In theeventof an
electricalshortcircuit, grounding reducesthe riskof electricshockby providing an
escapewire for theelectricalcurrent.Thisapplianceisequipped with a cord
containinga grounding wire with a grounding plug. Theplug mustbe insertedinto
an outletthat is properly installedand grounded.
®Improperuseof theplugmay resultin therisk of electricshock.
Do not, underany circumstances,cutor removethethird (grounding}prong from
thepower cord.
®Consulta qualified electricianor servicecenterif thegrounding instructionsare
notcompletelyunderstoodor if in doubt asto whethertheappliance hasbeen
properly grounded.
Use of Cords
®Avoid the use of an extension cord because of potential safety hazards
under certain conditions. If it is necessary to use an extension cord, use
only a 3-wire extension cord that has a 3-blade grounding plug and a
3-slot outlet that wiJJaccept the plug. The marked rating of the extension
cord must be equal to or greater than the electrical rating of the
appliance.
oIHterr Rtio s
®Occasionally, there may be power interruptions due to thunderstorms or
other causes. Remove the power cord from the AC outlet when a power
outage occurs. When power has been restored, re-plug the power cord
into the AC outlet.

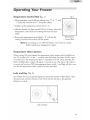
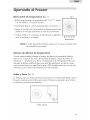
Temperature ¢ontroJ DiaJ (fig. 1)
®ThetemperaturecontroJdid hassettingsfrom "0" to "7" with
"1" being thewarmestand "7" being thecoMesL
fig. 1
hitiaJJy, setthe temperature controJdid at "4"_
®After thefreezerhasbeenturnedON for 24 hours,adjust the
temperaturecontroJdid to thesettingthat bestsuitsyour
needs_
®TurningthetemperaturecontroJdid to "0" wiJJstopthe
coding cyclebutwiJJnot shutOFFthe powen
Temperature
Control Did
Note: Hfyou unpJug or turn OFF the freezer, wait at Jeast4 minutes
before restarting or pJugging it in again.
Temperature AJarm System
When turningON your freezer,the temperatureaJarmsystemswitchshouMbe at
the"O" positiom Putit in the "-" position oncethefreezerhasbeenON for a peri-
od of 24 hours_ThetemperatureaJarmisactivatedat 15.8°E Onceactivated,the
buiJtgnaudibJeaJarmsystemwiJJsignaJa warning to you_Thealarm wiJJcontinue
to sounduntiJyou turn OFFthetemperaturealarm switch_A red JightwiJJaJsowarn
you thatthetemperatureaJarmsystemhasbeenactivated.
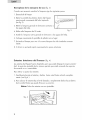
Lock and Key (fi% 2)
Yourfreezer hasa Jockand key featureto securethecontentsof thefreezendose
thedoor,pushand turn thekey to lock. Pushand turn thekey in theopposite
direction tounlock.
Lockand Key

RepJadngtheLightBulb(fig.3}
Whenreplacingthelightbdb,fallowthestepsbelow:
1_Unplugthefreezen
2.Removetheplasticlightshadelocatedinsidethe
freezerbylightlypressingtotheJeffside.
(seefig_3)
3.Removethelightbulbby"turningit
counter-clockwise.
fig_3
4_UseONLYappliancelightbulbwith25-wattsofpowen
5. installa newreplacementlight bulb by turningit clockwise.
& Replacethelight shadeto itsoriginal position.
7. Turnthefreezer powerON to seeif you haveinstalledthelight bulb correctly'.
8_Hfthelight bulb doesnot turnON, repeatthe stepsabove.
Freezer interior Shrives (fig. 4)
Theshelvesof thefreezerwere designedwith you in mind. TheiradiustabiJityin
positionallowsyou to personalizethestoragespacetoyour specificneeds.
Toremoveor adjusta fuji-width, dide-outshelf:
1.Gently tilt the shdfup and dide it towardsyou untiltheshelfhasbeencompJetdy
removed_(seefig_4)
2. Toreplacetheshdf, selectthedesiredsettingand gently dide theshdf back until
it restsin thelocking position.
blote: AJJshrivesare notadjustable.
fig. 4 i _s_i

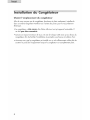
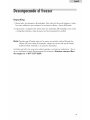
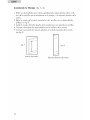
Reversing the Door (fig. 5 & 6)
This freezer is equipped with a reversible door for left/right opening, ff you prefer
to change the direction of door opening, fallow the steps below:
Note: The freezer comes with the door hinged to the right.
Installing the Door
Shim
Door Pin
fig_5
washer
1_ Fix thefreezerdoor in place with strongadhesivetape.
2. Dismantlethe hinge box coveron thetop of thefreezer door with a Phillips
screwdriverand removethe2 screwsfrom the hinge.Takeout thehinge by
pulling up vertically.Puttheseaside. (seefig. 5}
3. Removetheadhesivetapeon thefreezerdoor, lift and take thedoor
down.Carefullyput it aside_
4_ Removethedoor pin from thebracketof thelower hinge by turning it counter
cJockwise_Move thepinto theoppositehole and tighten_(see fig_6)
5. Removethe4 screwsfrom thelower hingewith a PhillipsscrewdrivenRemove
thewasher and shimfrom theright sideand installthemto theleft side_
6. Align theholesin thelower hingebrackettothe correspondingholeson the
opposite sideof thecabinekInsertand tighten screws.
7_ Align thebottomholeon thelower left sideof thedoorwith the pin of the lower
hingeand slideinto place.
8. Align thepin of thetop hinge with thetop hole on theleft sideof thedoor and
pushin place. Replacethe screwsin theupper hinge bracketbut do nottighten
aJJtheway.
9. Align thedoor fromtop to bottomand tightenthe 2 screwson thetop hinge.
10. Snapon thehinge box coven
11_On somemodelsyou needto screwthehinge box coverusinga phillips screw
driven
10

Installing the HandJ÷ (fig. 7 & 8)
1. Usea fJatheadscrewdriverto gently removetheplasticscrewhale coversfrom
thehandleand theplastichale plugsfrom thedoon
2. Removethedoor handleby unscrewingtheupper and lower screwswith a
Phillipsscrewdriven(seefig. 7}
3. Installthehandleon theright sideof thedoor with thescrewsprevioudy
removed_
4_Replacetheplasticscrewhole coversonto thedoor handJe,
5. Replacetheplasticdoor holeplugson thesideof thepreviouslyremoveddoor
handle.(seefig. 8}
fig. 7
fig, 8
Door handle
Door handle plugs
Normal ©Oer ting Sounds You He r
®Thefan circulatingair insidethe interiorof the unit maintainsthe
temperatureyou haveselected.
Boilingwater;gurgling soundsor slightvibrationsare theresultof the
refrigerantcirculating throughthecoolingcoils.
®Sizzling or popping soundsresultfrom frostmeltingduring the
automaticdefrostcycleand dripping onto thedefrostheaten
Thesoundof dripping water occursasice meltsfrom theevaporator
and flows into thedrip pan during thedefrostcyde_
®Crackingor popping soundsare causedby theexpansionand/or
contractionof thecoding coilsduring the defrostcycle.
Boththedefrosttimerand thethermostatcontrolswiJJdick whenthey
cycleON and QFR
H

Cleaning the E×_erior
Wipe the exterior of the freezer with a damp cloth and dry thoroughly. Use only
miid soapy water to clean the door gasket. Never use harsh cleansers or scouring
pads to dean any part of the freezer
For efficient operation, dirt and dust should be removed from the rear and bottom
of your freezer every 3 months.
® Turnthe temperature control dial to "0" and unplug the freezer before cleaning.
® Carefully slide the freezer aw'ay from the wail sJowlyto avoid damaging the floor
,, Wipe dust from the back of:the freezer and the outside of the compressor com-
partment with a clean dry cloth or use a vacuum cleaner with a brush attachment.
Note: Do not attempt to clean inside the compressor compartmenL
Cleaning the interior
Clean the inside of the freezer at [east twice a year. Turnthe temperature control
dial to "0", unplug the freezer and remove all frozen items from the sheives. Wash
the inside with a solution of warm water and baking soda (2 tablespoons of baking
soda to one quart of water}, then rinse and dry thoroughly. Do not use cJeaners
such as harsh detergents, scouring powder or sprays containing bleach, ammonia,
or other chemicals that may cause odors inside the freezer or damage the protective
coating on the evaporator shelves.
12

Fr@st Fr÷÷
Your freezer is frost-free. No defrosting is required as it is factory preset to
automatically defrost.
lxtended Ion-Use
For long vacations or absences, empty"food from the freezer, move the temperature
control did to the OFF position and disconnect the power cord from the wd[ outlet.
Clean the freezer and door gaskets according to the Proper Care and Cleaning
section. Prevent odors from forming by placing an open box of baking soda in the
freezer anc! propping the door open to allow air to circulate inside.
Movir_g the Freezer
When transporting the freezer, it should be kept in an upright position. If the
freezer is inadvertently tilted beyond 45 c_egreesor was [aid down horizontally for
any reason (e.g., shipping}, the unit must not be operated for at least 24 hours. It
must be placecl in the upright position for 24 hours to allow the internal oil and
refrigerant to stabilize in the system. Ignoring this precautionary measure may result
in damage to the sealed system and compressor
13

Freezer does not operate.
®Theunit maynot bepluggedin_
®Thecircuit breakermay havetrippedor thefusemay havebeenblown.
Compressor see_s to rua continuously or _ore o{tea than
necessary.
The door may have been Jeffopen or there may be a leak in the door
gasket_
®Frequent door openings dlow cold air to escape, thus forcing the
compressor to cycle ON more oflen_
" Air is not circulating freely around the appliance due to installation in
an area with little or no clearance. Slide the appliance out of the
confined area and vacuum around the rear and bottom to improve air
circulation.
Freezer compartment has an odor.
,, Foodswith strongodorsshouldbe tightlycovered.
" Checkfor spdJedfood.
®interior may requiredeaning_
®Keepan open boxof baking sodain thefreezerto absorbodorsand
repJace as needed,
Foods are not suffidentJy frozen,
,, The temperature setting is not high enough.
The door has been left open for an extended period of time or there
may be a leak in the door gasket.
®Overloaded shrives are preventing effective drcuJation of cdd ain
14

What is covered and for how
long?
This warranty covers all defects in work-
manship or materials for a period of:
] 2 months _abor
12 months parts
5 years sea_ed system
Thewarranty commences on the date
the item was purchased and the original
purchase receipt must be presented to
the authorized service center before
warranty repairs are rendered.
EXCEPTIONS: Commercial or
Renta_ Use warrant/
90 days ksbor (carry-in on_y)
90 days parts
Na other warranty app_i÷s
What is covered.
1_The mechanical and electrical parts,
which serve as a functional, purpose
of this appliance for a period of ] 2
months. TJnisincludes dI parts except
finish, and trim_
2. The components of the sealed system
e.g. hermetic compressor) condenser
and evaporator from manufacturing
defects for a period of 5 years from
the date of purchase Any damages
to such components caused by
mechanical abuse or improper
handling or shipping will not be
covered_
What wiH be dane?
1. We will repair or replace, at our dis-
cretion any mechanical or electrical
part which proves to be defective in
normal usage during the warranty
period so specified_
2. There will be no charge to the
purchaser for parts and labor on any
covered items during the initial 12
month period. Beyond this period
15
only parts are covered in the remain-
ing warranty. Labor is not provided
and must be paid by the customer.
3. Contact your nearest authorized
service center. For the name of the
nearest service center please call
1-877-337-3639
THiS WARRANTY COVERS
APPLIANCES WiTHiN THE
CONTINENTAL UNITED STATES,
PUERTO RICO AND CANADA.
JT DOES NOT COVER
THE FOLLOWING
Damages from improper installation.
Damages in shipping.
Defects other than manufacturing.
Damage from misuse, abuse, accident,
alteration, Jack of proper care and
maintenance or incorrect current or
voltage
Damage from other than househdd use.
Damage from service by other than an
authorized dealer or service center.
Decorative trims or replaceaNe
Iightbulbs_
Transportation and shipping.
Labor (after the initiaI ] 2 months}.
THIS LIMITEDWARRANTY IS GIVEN IN
LIEUOF ALL OTHERWARRANTIES,
EXPRESSEDOR, INCLUDING THE
WARRANTIES OF MERCHANTABILITY
AND FITNESSFOR A PARTICULAR
PURPOSE
The remedy provided in this warranty is
excJusiveand is granted in Jieuof aJJ
other remedies.
This warranty does not cover incidental
or consequential damages, so the above
Jimitations may not appty to you. Some
States do not dJow Jimitations on how
long an impJied warrant),- Jasts,so the
above Jimitations may not apply to you.
This warranty gives you specific Jegd
rights, and you may have other rights,
which vary, from state to state_
Haier America
New York, NY 10018

ip ,#
[isez attentive_en_ routes les instructions avant d'utilEser cet
apparei£ Lots de son u_itisation, suivez routes les mesure5
de s_curit_ _l_mentaires, y ¢ompris Jes mesures suivantes:
1. Utilisez cet appareil uniquement pour I'usage auqud il est destin_ comme
indiqu6 dans ce manuel d'utilisation et d'entretien.
2. Avant son utilisation, cet _quipement doit _tre install6 conform_ment aux
instructions d'instdlation. Voir les instructions de raisea la terre dans la
section Installation.
3. Cet _quipement ne doit pas _tre renferm6, encloisonn_ ni encastr_. II a 6t_
concu afin d%tre utilis_ sur pieds en rant qu'appareil autostaNe.
4. Ne d_branchez ]amais cet _quipement en tirant sur le cable d'dimenta-
tion. Saisissez fermement la fiche et tirez tout droit sur ceffe derni@e.
5.R@arez ou remplacez imm6diatement tout cordon ou cable 61ectrique
effiloch6 ou endommag_. Veillez a ne pas utiliser un c@blepr6sentant des
craqudures ou des abrasions au niveau du cordon, de la fiche ou de
Pextr@mit6du connecteun
6. Si vous n'utilisez plus votre ancien 6quipement, nous vous recommandons
de retirer lespones et de laisser bs @tag@resen place. Cda r6duira bs
risques d'accident pour bs enfants.
7. Apr@savoir mis en marche le cong61ateur,veillez a ne pas toucher les
surfaces froides du compartiment cong_lateur surtout si vos mains sont
humides ou mouill@es.La peau des mains risquent d'adh@er a ces
surfaces extr@mementfroides.
8. Ne recongdez pas lesaliments ayant _t6 compl@tementd_congd_s. Le
minist@e de I'agricdture am_ricain pr@conisedans le bulletin <<Home and
Garden >>(Maison et ardin) No. 69 : <<...Vous pouvez recongder sans
danger es a iments conge @sayant @t@d@conge_s si ces derniers
comportent encore des cristaux de glace ou si ces aliments demeurent
froids eta une temp@ature inf@rieurea 40°F (4,4°C) >>.
<<...Les viandes hach@esd_congd@es,la vdaille, et le poisson qui
pr@sententune odeur ou codeur anormde ne devraient pas recongd_s
ni consomm@s.La cr@meglac@eayant fondu doit @treiet@ea la poubdle.
Si I'odeur ou la codeur d'un aliment est douteuse, ietez I'artide en ques-
tion. En effet, vous courrez un danger a consommer cet article >>.

<q_.Lefdt ded6conge[eretderecongderm_meparfie[[ement[esail-
ments,r6du[t[aquaht6gustafivedecesdern[ers,etceciesttoutpart[c-
uh@emnetvra[pour[esfruits,[es[6gumeset[esplatspr@ar6s.Laqua[-
it6gustafivedesHandesrougesestmoinsaffect6e.Consommez[esail-
mentsreconge[@s[eplust6tpossibleafinquecesdern[ersconserventau
maximumburquaht@gustat[ve.>>
9. N'ut[[[sez pas d'appard[ 6[ectr[que ni d'oufi[s pdntus afin de d6g[vrer [e
cong@[ateun
10. D6branchez [e cong6[ateur avant de [e nettoyer et avant route r@arat[on.
Rem_que: Si pour une raison ou pour une autre, cet @qu[pement
doit @trer@par6,[[ est tortement recommand6 qu:un
r@parateuragr@6effectue [a r@parafion.
11. Ne iama[s ut[[[ser [econg_[ateur en pr@sencede gaz exp[osifs.
Cet _quipement present÷ ur_ riscjue d'er_ferrnernent pour Jes
enfants° Avant de veus d_barrasser de votre ancien ¢ong_Jao
teur, veuiJJez ÷nJever Jes port÷s. Laissez Jes _tag_res en pJace
afin ¢ju÷ J÷s ÷nfants n÷ puissent pas gripper a J'int_rieuro
Merci d'avoir fair ['achat de cet
_qu[pement Ha[en Cette notice facile
@consulter vous a[dera @uti[iser au
mieux votre cong@[ateun
N'oub[[ez pas d'enreg[strer [es
num@osde mod@[eet de s@ie.[Is se
trouvent sur une 6t[quette @['arr[@e
de votre cong_[ateun
Num6ro de moct_le
Num6ro de s6rie
Date d'achat
Veu[[[ez agrafer votre facture avec votre manuek Vous en aurez besoin
pour b_ficier de J_ g_r_ntie°
2


D_bdJ=ge du ¢ong_J=teur
1. Enlevez tous les mat6riaux d'embaJJage. CeJacomprend Jabase en mousse ainsi
que les bandes de ruban adh6sif servant _ maintenir en place Jesaccessdres
int6rieurs et ext6rieurs du cong6Jateur. GJissez la pi6ce de protection en pJastique
ou en mousse servant 6 prot6ger le compresseur Iors du transport contre les
vibrations et les chocs (cette pi6ce n'est pas pr6sente sur tous les mod6Jes)_
2. VeiJJez@cequ'iJne resteaucunepartie de J_embaJJage,aucun ruban adh_sifni
aucundocumentsurou dansJ'appardJavantde Jemettreen marche.
Re_arqu÷: Laissez Jecongdateur demeurer debout pendant au mdns 24 heures
avant de Jemettre en marche si ce dernier a @t@pench@ou indin6
pour une raison queJconque.
Assurez-vous qu'iJ ne manque aucun accessoire et qu'iJs sont tous en bon 6taL Si
Jesaccessdres s'av_rent manquants ou en mauvaise _tat, veuiJJezcontacter notre
service _ Jadient_Je. Notre num@o sans frals ÷st J÷ ] °877°337°3639°
La page est en cours de chargement...
La page est en cours de chargement...
La page est en cours de chargement...
La page est en cours de chargement...
La page est en cours de chargement...
La page est en cours de chargement...
La page est en cours de chargement...
La page est en cours de chargement...
La page est en cours de chargement...
La page est en cours de chargement...
La page est en cours de chargement...
La page est en cours de chargement...
La page est en cours de chargement...
La page est en cours de chargement...
La page est en cours de chargement...
La page est en cours de chargement...
La page est en cours de chargement...
La page est en cours de chargement...
La page est en cours de chargement...
La page est en cours de chargement...
La page est en cours de chargement...
La page est en cours de chargement...
La page est en cours de chargement...
La page est en cours de chargement...
La page est en cours de chargement...
La page est en cours de chargement...
La page est en cours de chargement...
La page est en cours de chargement...
-
 1
1
-
 2
2
-
 3
3
-
 4
4
-
 5
5
-
 6
6
-
 7
7
-
 8
8
-
 9
9
-
 10
10
-
 11
11
-
 12
12
-
 13
13
-
 14
14
-
 15
15
-
 16
16
-
 17
17
-
 18
18
-
 19
19
-
 20
20
-
 21
21
-
 22
22
-
 23
23
-
 24
24
-
 25
25
-
 26
26
-
 27
27
-
 28
28
-
 29
29
-
 30
30
-
 31
31
-
 32
32
-
 33
33
-
 34
34
-
 35
35
-
 36
36
-
 37
37
-
 38
38
-
 39
39
-
 40
40
-
 41
41
-
 42
42
-
 43
43
-
 44
44
-
 45
45
-
 46
46
-
 47
47
-
 48
48


Haier HUF138PA - ANNEXE 181 Manuel utilisateur
- Catégorie
- Congélateurs
- Taper
- Manuel utilisateur
- Ce manuel convient également à