Twin-Star International 48TI3560 Assembly Manual
- Taper
- Assembly Manual

1
INSTRUCTION MANUAL ENCLOSED
MANUEL D’INSTRUCTION À L’INTÉRIEUR
MANUAL DE INSTRUCCIONES ADJUNTO
INSTRUCTION MANUAL ENCLOSED
MANUEL D’INSTRUCTION À L’INTÉRIEUR
MANUAL DE INSTRUCCIONES ADJUNTO
ATTENTION
IF YOU HAVE ANY PROBLEMS OR QUESTIONS, EMAIL
OR CALL CUSTOMER SERVICE BEFORE YOU RETURN
THIS PRODUCT TO THE STORE WHERE IT WAS PURCHASED.
For Customer Service:
www.twinstarhome.com
in English Call: 866-661-1218
ATTENTION
SI VOUS AVEZ DES PROBLÈMES OU QUESTIONS,
ENVOYEZ UN COURRIEL AU SERVICE À LA CLIENTÈLE OU
APPELEZ LE SERVICE À LA CLIENTÈLE AVANT DE RETOURNER
CE PRODUIT OÙ VOUS L’AVEZ ACHETÉ.
Pour le service à la clientèle:
www.twinstarhome.com
pour le service en français: 866-661-1219
ATENCIÓN
SI TIENE ALGÚN PROBLEMA O PREGUNTAS, ENVÍE UN
MENSAJE DE CORREO ELECTRÓNICO O LLAME AL SERVICIO
DE ATENCIÓN AL CLIENTE ANTES DE DEVOLVER ESTE
PRODUCTO A LA TIENDA EN LA QUE LO COMPRÓ.
Servicio de atención al cliente:
www.twinstarhome.com
Línea para llamadas en español: 866-661-1219
STOP
ARRÊT
PARE
STOP
ARRÊT
PARE

1
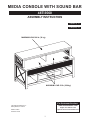
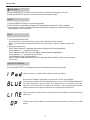
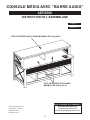
MEDIA CONSOLE WITH SOUND BAR
48TI3560
ASSEMBLY INSTRUCTION
Españo p. 11
Français p. 21
Twin-Star International, Inc.
Delray Beach, FL 33445
Made in China
Printed in China
www.twinstarhome.com
English Call: 866-661-1218
Spanish /French Call: 866-661-1219
For Customer Service:
MAXIMUM LOAD 50 lb. (22.6kg)
MAXIMUM LOAD 80 lb. (36 kg)

2
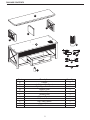
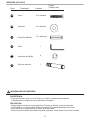
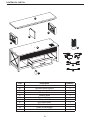
PACKAGE CONTENTS
Part Description Quantity
A Cabinet 1
B Left Upper Side Panel 1
C Right Upper Side Panel 1
D Support Panel 1
E Media Top 1
F Leveling Foot 1
J Remote Control 1
K RAC Audio Cables 1
L RAC Video Cables 1
M Power Cables 1
N DC Transformer 1
B
A
F
E
C
D
J
K
M
N
L

3
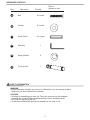
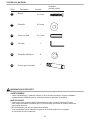
HARDWARE CONTENTS
Part
Description
Bolt
Washer
Wood Dowel
Spring Washer
Allen Key
8+1 extra
8+1 extra
12+1 extra
8
1
Quantity
Picture
(Shown to size)
BB
CC
DD
EE
AA
SAFETY INFORMATION
WARNING
•Beforeassembly,carefullyusescissorsorutilityknifetocutandunwrapallparts.
Makesureyoudonotdiscardthehardware.
CAUTION
•Usecareinassemblingyournewunit.Takeyourtimeandusethehardware
provided and a quality Phillips head screwdriver. Never overtighten bolts.
•Donotsitonanypartoftheunit.
•Allpanelsarelabeledleftandrightasviewedfromthefrontofunit.
Touch-up Pen
1
ZZ

4
ASSEMBLY INSTRUCTIONS
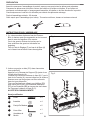
PREPARATION
Beforebeginningassemblyofproduct,makesureallpartsarepresent.Comparepartswith
packagecontentslistanddiagramabove.Ifanypartismissingordamaged,donotattemptto
assemble, install or operate the product. Contact customer service for replacement parts.
Estimated Assembly Time: 60 Minutes
ToolsRequiredforAssembly(notincluded):Phillipsheadscrewdriver,scissorsandutilityknife
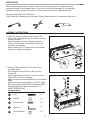
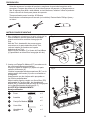
1. There are levelers located on the bottom of the
Wood Feet, the height can be increased by twisting
counter-clockwise.
Open the drawer, unscrew the bolts located on
the front of the drawer, re-install the Pulls on the
front face of the drawer.
Attach leveling foot (F) to the bottom of the hearth/
base(A)bytwistingitclockwise.
2. Insert one Wood Dowel (CC) into each of the
pre-drilled holes .
Push Support Panel (D) snug to the top of the
Cabinet (A).
Locate upper side panels (B, C) on the top of the
Cabinet (A), as shown in diagram.
Makesurethatdowelsareseatedintothepre-drilled
holes.
Attach these panels using Allen Key (DD) to tighten
Bolts (AA), Spring Washer (EE) and washers (BB)
through holes in the upper side panels (B, C).
HAND TIGHTEN ONLY.
B
A
F
Fig. 2
Fig. 1
CC
CC
C
D
AA
DD
EE
BB
Hardware Used
BB
EE
AA
CC
Bolt x 4
Washer
Spring Washer
x 4
x 4
Wood Dowel
x 6
x 1
DD
Allen Key
Unscrew
Install

5
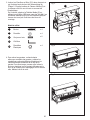
Fig. 3
Fig. 4
Fig. 5
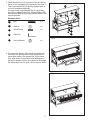
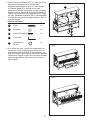
4. To remove the drawer, fully extend the drawer out
andlocatetheblackplasticleverslocatedonthe
metalglidetracksofthedrawerbox.Atthesame
time, push down on the plastic lever while gently
pulling the drawer out from the cabinet to disengage
the drawer box from the glide. Set the drawer aside.
Hardware Used
BB
AA
CC
Bolt x 4
Washer x 4
Wood Dowel
x 6
AA
E
DD
EE
BB
CC
CC
3. Insert Wood dowel (CC) into each of the pre-drilled
holes on the top edges of the assembly from step 2.
ThenlocateMediaTop(E)andlaynishedsideup
on top of completed assembly.
From the inside, attach Media Top (E) using Allen
Key (DD) to tighten Bolts (AA) ,Spring Washer (EE)
and washers (BB) through the pre-drilled holes in the
mountingblocks.
DD
Allen Key
EE
Spring Washer x 4

6
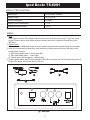
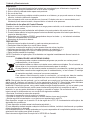
PRODUCT SPECIFICATIONS
WIRING
Adapter Input AC100-240V, 50/60Hz
Adapter Output DC15V 4.0A
Power Consumption 60 Watts
Standby Power Consumption < 1 W
PeakMusicPowerOutput 300 W
OPTICAL
VIDEO
R
L
DC 15V
OUTPUT
AUDIO
INPUT
INPUT
+
-
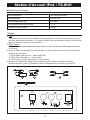
Fig.1 Back Panel
1. RCA:
Your console includes RCA cables to stream audio from an external source (i.e.TV) to the sound
system.ThereisalsoavideocablewhichwillstreamvideofromadockediPhone/iPodtoyour
television.
2. Optical Cable:
You also have the additional option to stream audio using a standard Optical Cable (not included).
3.Insertthecorrespondingcablesfromyourtelevisionorothersourcedeviceintothebackofthe
sound system console.
1). RCA audio cables (part K – audio input R/L)
2). RCA video cable (part L – video input)
3). Optical cable (sold separately – optical input)
4. Plug the power cable (part M) into a standard 100-240V outlet and into the DC transformer (part N).
Plug the DC power source into the DC 15V port.
Ipod Dock: TS-ID01
J
M
N
Fig.1 Back Panel
Ipod Dock: TS-ID01
K
L

7
POWER
The POWER button supplies power to all of the functions of the sound system. The POWER button will put the
sound system in a standby mode.
CHARGING
1. Insert the iPod or iPhone to the dock connector.
2. The docked iPod of iPhone will charge. The charging current is DC one ampere.
3. Note: Certain irregular shaped or large phone covers may need to be removed for use with
the docking station.
CLOCK
1. Automatic Time Set:
The console will read and sync the clock to the time of your docked iPhone or iPod.
Note: Automatic time sync will not work with some older model iPods.
2. Manual Time Set:
Hold "clock" for 3 seconds until the hour digits ashes.
Press the "+ / -" buttons to set the hour.
Press "clock" again. The minute digits will ash.
Press the "+ / -" buttons to set the minutes.
Press "clock" to conrm.
Note:The clock will fade out after 30 seconds. Press"clock" again to view the time.
3. The clock display will fade after 10 seconds. Press "CLOCK" to continously display the time.
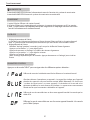
INPUT SETTING
Press the "INPUT" button to scroll through the dierent input options:
OPERATION
Will stream sound and/or video from your docked iPod or iPhone device.
Will search for other smartphones and devices. The blue ashing light
indicates the unit is searching for devices with a WPAN (Bluetooth) function
activated.Selecting "sound system" from your device will link it to the console
and allow to stream sound from up to 10 meters away. The light will stay
continuously lit once a connection has been made to the device.
Will stream sound from your television or other device connected to the console by
RCA cables.
Will stream sound from your television or other device connected to the console by
Optical Cable.

8
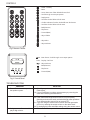
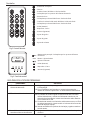
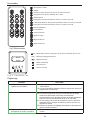
CONTROLS
Fig.2 Remote Control
Fig.3 Control Panel
- Power / Standby
- Mute
- Access the menu of the docked iPhone/ iPod
- Scroll through source input options
- Display time
- Scroll the docked iPhone/ iPod menu
- Conrm selection from the docked iPhone/ iPod menu
- Scroll the docked iPhone/ iPod menu
- Back(Previous)
- Play/Pause
- Forward(Next)
- Adjust Treble
- Adjust Bass
- Adjust Volume
- Main Power / Scroll through source input options
- Display / Set Time
- Adjust Volume
- Back(Previous)
- Play/Pause
- Forward(Next)
CLOCK
INPUT
TROUBLESHOOTING
PROBLEM SOLUTION
1. iPhone/iPod does not respond to
thespeakersystem.
1a.Checkforanyobstructionsbetweentheconnectorandthe
iPhone/iPod.
1b. If your iPod/iPhone is using a case accessory,try removing the
caseandre-dockingtheiPhone/iPod.
2. Sound is distorted. 2a. Decrease the volume.
2b. If the iPhone/iPod original sound source is of poor quality,
distortionandnoiseareeasilynoticedwithhigh-powerspeakers.
Try a different audio source such as a music CD.
2c.Ifyouareusinganexternalsoundsourcelikeoldergeneration
of iPod, try reducing the output volume on the device itself.
2d.Try changing the bass and treble settings using the remote control.
3. Unit gets warm after extended
play at high volume.
3a. Turn the unit off for a period of time or lower the volume.

9
When the remote control stops operating or its range seems reduced, it is time to replace the battery
with a new one.
1.Thebatterycompartmentislocatedonthebackendoftheremote.
2. Press and slide the battery door open and remove the old battery.
3.Insert1pcCR2025battery,checkingthatthe+and-sidesofthebatterymatchinsidethe
battery compartment.
4. Replace the battery compartment door.
CAUTION:
•Alwayspurchasethecorrectsizeandgradeofbatterymostsuitablefortheintendeduse.
•Replaceallbatteriesofasetatthesametime.
•Cleanthebatterycontactsandalsothoseofthedevicepriortobatteryinstallation.
•Ensurethebatteriesareinstalledcorrectlywithregardtopolarity(+and-).
•Removebatteriesfromequipmentwhichisnottobeusedforanextendedperiodoftime.
•Removeusedbatteriespromptly.
Note:
Caution do not ingest batteries. If batteries are swallowed immediately call poison control.
Replacing the Remote Control Battery
Disposal of Used Batteries
Battery may contain hazardous substances which could be endangering to enviroment
and human health.
Thissymbolmarkedonthebatteryand/orpackagingindicatesthatusedbatteryshallnot
be treated as municipal waste. Instead it shall be left at the appropriate collection point for
recycling.
By ensuring the used batteries are disposed of correctly, you will help preventing potential
negative consequences for the environment and human health. The recycling of materials
will help to converse natural resources.
For more information about collection and recycling of used batteries, please contact your
local municipality, your waste disposal service or the point of sale where you purchased
this point.
CARE AND MAINTENANCE
NOTE: This equipment has been tested and found to comply with the limits for Class B digital device,
pursuant to part 15 of the FCC Rules. These limits are designed to provide reasonable protection against
harmful interference in a residential installation. This equipment generates,uses, and can radiate radio
frequency energy and, if not installed and used in accordance with the instructions, may cause harmful
interference to radio or television reception. Interference can be determined by turning the equipment off
and on. The user is encouraged to try to correct the interference by trying one or more of the following
measures:
•Reorientorrelocatethereceivingantenna.
•Increasetheseparationbetweentheequipmentandthereceiver.
•Connecttheequipmentintoanoutletonacircuitdifferentfromthattowhichthereceiverisconnected.
•Consultthedealeroranexperiencedradio/TVtechnicianforhelp.
This device complies with Part 15 of the FCC Rules. Operation is subject to the following two conditions:
(1) This device may not cause harmful interference and
(2) This device must accept any interference received, including interference that may cause
undesired operation. Modifcations not approved by the party responsible for compliance could void
user’s authority to operate the equipment.
This Class B digital apparatus complies with Canadian ICES-003.
Warning:
1. If the supply cord is damaged it must be replaced by the manufacturer, it’s service agent or
similarlyqualiedpersonsinordertoavoidahazard.
2.Onlyaqualiedservicepersonshouldrepairthisproduct.
3. Do not use outdoors.
4.Donotinsertorallowforeignobjectstoenterthesystemasthismaycauseanelectricshock,re,or
damage to the appliance.
5. Use this appliance only as described in the manual. Any other use not recommended by the
manufacturermaycausere,electricshockorinjurytopersons.

10
The manufacturer warrants that your new Media Console with Sound Bar is free from manufacturing
and material defects for a period of one year from date of purchase, subject to the following
conditions and limitations.
1. Install and operate this Media Console with Sound Bar in accordance with the installation
and operating instructions furnished with the product at all times. Any unauthorized repair,
alteration, willful abuse, accident, or misuse of the product shall nullify this warranty.
2. This warranty is non-transferable, and is made to the original owner, provided that
the purchase was made through an authorized supplier of the product.
3. The warranty is limited to the repair or replacement of part(s) found to be defective in
materialorworkmanship,providedthatsuchpart(s)havebeensubjectedtonormal
conditionsofuseandservice,aftersaiddefectisconrmedbythemanufacturer’s
inspection.
4. The manufacturer may, at its discretion, fully discharge all obligations with respect to
this warranty by refunding the wholesale price of the defective part(s).
5. Any installation, labor, construction, transportation, or other related costs/expenses
arising from defective part(s), repair, replacement, or otherwise of same, will not be
covered by this warranty, or shall the manufacturer assume responsibility for same.
6. Theowner/userassumesallotherrisks,ifany,includingtheriskofanydirect,indirect
or consequential loss or damage arising out of the use, or inability to use the product,
except as provided by law.
7. All other warranties – expressed or implied –with respect to the product, its
components and accessories, or any obligations/liabilities on the part of the
manufacturer are hereby expressly excluded.
8. The manufacturer neither assumes, nor authorizes any third party to assume on its
behalf, any other liabilities with respect to the sale of the product.
9. The warranties as outlined within this document do not apply to non accessories
used in conjunction with the installation of this product.
10. Thiswarrantygivesyouspeciclegalrights,andyoumayalsohaveotherrights
which vary from state to state.
This warranty is void if:
a. The Media Console with Sound Bar is subjected to prolonged periods of dampness or
condensation.
b. Any unauthorized alteration, willful abuse, accident, or misuse of the product.
c. You do not have the original receipt of purchase.
If warranty service is needed contact the manufacturer by calling customer service department at
1-866-661-1218,8:30a.m.-5:30p.m.,EST,Monday-Friday.Makesureyouhaveyourwarranty,your
sales receipt, location of purchase and the model/serial number of your product.
1-YEAR LIMITED WARRANTY

11
CONSOLA MEDIA CON BARRA DE SONIDO
48TI3560
English. 1
Français p. 21
INSTRUCCIÓN DE MONTAJE
Twin-Star International, Inc.
Delray Beach, FL 33445
Fabricado en China
Impreso en China
www.twinstarhome.com
Inglés llamadas:: 866-661-1218
Español /Français llamadas: 866-661-1219
Servicio de atención al cliente:
CARGA MÁXIMA: 50 LIBRAS (22.6 KILOS)
CARGA MÁXIMA: 80 LIBRAS (36 KILOS)

12
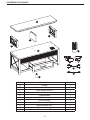
CONTENIDO DEL PAQUETE
Part Description Quantity
A Armario 1
B Panel Lateral Izquierdo 1
C Panel Lateral Derecho 1
D Panel de Soporte 1
E Cubierta Media 1
F Pie Nivelador 1
J Control Remoto 1
K Cables de Audio RAC 1
L Cables de Video RAC 1
M Cables de Enchufe 1
N Transformador DC 1
B
F
A
E
C
D
J
K
M
N
L

13
Perno
Perno
Stylo de retouche
Arandela
Clavija De Madera
INFORMACIÓN DE SEGURIDAD
HERRAJES INCLUIDOS
Parte
Descripción Cantidad
Imagen
(Tamaño real)
Arandelas de Muelle
8+1 adicional
8+1 adicional
12+1 adicional
8
1
BB
CC
DD
EE
AA
1
ZZ
ADVERTENCIA
•Antesdelmontaje,corteconunastijerasounbisturíydesenvuelvalaspiezas
cuidadosamente. Asegúrese de no desechar los herrajes.
PRECAUCIÓN
•Tengacuidadoalarmarsunuevachimenea.Tómesesutiempoyuseloselementos
suministrados y un destornillador Phillips de calidad. No apriete demasiado los pernos.
•Nosesienteenningunapartedelarepisadelachimenea.
•Todoslospanelesestánetiquetadosizquierdayderecha,vistosdesdeelfrentedelaunidad.

14
PREPARACIÓN
Antes de empezar el montaje del producto, asegúrese de que todas las partes estén
presentes. Compare las piezas con la lista de empaque del paquete y el diagrama de ar-
riba.Sialgunapiezafaltaoestádañada,notratedearmar,instalaroutilizarelproducto.
Llame a servicio al cliente para piezas de repuesto.
Tiempo estimado para el montaje: 60 Minutos
Herramientas necesarias para el armado (no incluidas): Destornillador Phillips, tijeras y
unbisturí.
2. Inserte una Espiga De Madera (CC) en cada uno de
losoriciospreviamenteperforados.
Empuje el Panel de Soporte (D) ajuste a la parte
superior del Armario (A).
Localice los paneles laterales superiores (B,C) en la
parte superior del Armario (A) como se muestra en
el diagrama.
Asegúrese de que las clavijas estén apoyadas en
losoriciospreperforados.
Adjunte estos paneles usando una Llave Allen (DD)
para apretar los Tornillos (AA), las Arandelas de
Muelle (EE) y arandelas (BB) a través de los agujeros
en los paneles laterales superiores (B, C).
AJUSTE SÓLO MANUALMENTE.
1. Hay niveladores colocados en la parte inferior de los
Pies de Madera, la altura puede ser aumentada
girando en dirección contraria a las agujas del
reloj.
Abra las Tiroir, desatornille los pernos que se
encuentran en la parte delantera de las Tiroir,
vuelva a instalar los tiradores en la parte
delantera de las Tiroir.
Adjunte el pie nivelador (F) al fondo del Suelo/Base
(A)apretándoloendirecciónalasagujasdelreloj.
INSTRUCCIONES DE MONTAJE
Herrajes utilizados
B
C
CC
CC
D
DD
AA
BB
EE
Fig. 2
Fig. 1
Perno
Arandela
Clavija De Madera
BB
AA
CC
DD
EE
x 4
x 4
Llave Allen
Arandelas de
Muelle
x 6
x 1
x 4
A
F
Desatornille
Instale

15
Fig. 3
Fig. 4
E
BB
EE
AA
DD
CC
CC
Fig. 5
3. Inserte Toneles de Madera (CC) en cada uno de los
agujeros pre-agujereados en las esquinas
superiores del montaje del paso 2. Luego localice
la Cubierta Media (E) y coloque con la cada
acabada hacia arriba encima del montaje completo.
Desde el interior, adjunte la Cubierta Multimedia (E)
usando una Llave Allen (DD) para apretar los Tornil
los (AA), Arandelas de Muelle (EE) y arandelas (BB)
a través de los agujeros pre-agujereados en los blo
ques montantes.
4. Pour retirer les tiroirs, ouvrez-les complètement et
repérez les leviers en plastique noir situés sur les
glissières en métal des tiroirs. Al mismo tiempo, em
pujehaciaabajolosniveladoresdeplásticomientras
suavemente empuja el cajón hacia fuera del Armario
paradesengancharelcajóndesuguía.Pongael
cajón a parte.
Herrajes utilizados
Perno
Arandela
Clavija De Madera
BB
AA
CC
FF
x 4
x 4
Llave Allen
x 6
EE
Arandelas de
Muelle
x 4

16
Especicaciones de Producto
WIRING
Entrada de Adaptador AC100-240V,50/60Hz
Salida de Adaptador DC15V 4.0A
Consumo Eléctrico 60 Watts
Consumo Eléctrico en Espera < 1 W
Pico de Salida de Encendido de la Música 300 W
OPTICAL
VIDEO
R
L
DC 15V
OUTPUT
AUDIO
INPUT
INPUT
+
-
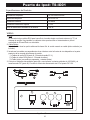
Fig.1 Panel Trasero
1. RCA:
SuconsolaincluyecablesRCAparahaceruirelsonidodesdeunafuenteexterna(ej.TV)al
sistemadesonido.Haytambiénuncabledevideoqueharáuirelvideodesdeunpuerto
enchufado de iPhone/iPod a su televisión.
2. Cable Óptico:
Ustedtambiéntienelaopciónadicionaldehaceruirelsonidousandouncableópticoestándar(no
incluido).
3. Introduzca los cables correspondientes de su televisor o de la fuente de otro dispositivo a la parte
posterior de la consola del sistema de sonido.
1.) Cables de audio RCA (parte K - Entrada de audio R / L)
2.)CabledevídeoRCA(parteL-Entradadevídeo)
3.) Cable óptico (se vende por separado - entrada óptica)
3.Conecteelcabledealimentación(parteM)aunatomadecorrienteestándarde100-240Vyal
transformador DC (parte N). Conecte la fuente de alimentación de CC al puerto DC 15V.
Ipod Dock: TS-ID01
J
M
N
Puerto de Ipod: TS-ID01
K
L

17
Encendido
El botón de ENCENDIDO suministra corriente a todas las funciones del equipo de sonido.
El botón de ENCENDIDO pondrá el sistema de sonido en modo de espera.
CARGA
1. Inserte el iPod o el iPhone a un puerto conector.
2. El iPod o iPhone enchufado se cargará. El cargador de corriente DC es de 1 amperio.
3. Nota: Algunas fundas de teléfono grandes o con formas irregulares quizá tienen que ser
quitadas para usar este puerto.
RELOJ
1. Ajuste Automático del Reloj:
La consola leerá i sincronizará el reloj a la hora de su iPhone o iPod enchufado.
Nota: La sincronización automática de la hora no funcionará con algunos modelos antiguos de
iPod.
2. Ajuste Manual del Reloj:
Pulse "clock" durante 3 segundos hasta que los dígitos de la hora parpadeen.
Pulse el botón "+ / -" para ajustar la hora.
Pulse el botón "clock" de nuevo. Los dígitos de los minutos parpadearán.
Pulse el botón "+ / -" para ajustar los minutos.
Pulse el botón "clock" para conrmar.
Nota: El reloj desaparecerá después de 30 segundos. Pulse el botón "clock" de nuevo para
ver la hora.
AJSUTES DE ENTRADA
Pulse el botón "INPUT" para desplazarse por las diferentes opciones de entrada:
Operación
Fluirá el sonido y / o video desde su iPod o dispositivo iPhone.
Buscará otros teléfonos inteligentes y dispositivos. Si la luz azul parpadea
indica que la unidad está buscando dispositivos con una función WPAN (Bluetooth)
activada. Seleccionar "sound system" en su dispositivo y lo vinculará a la consola,
deje fluir el sonido de hasta 10 metros de distancia. La luz permanecerá iluminada
continuamente una vez que una conexión se ha hecho para el dispositivo.
Fluirá el sonido desde el televisor u otro dispositivo conectado a la consola mediante
cables RCA.
Fluirá sonido desde el televisor u otro dispositivo conectado a la consola por cable
óptico.

18
Controles
Fig.2 Control Remoto
Fig.3 Panel de control
- Encendido / En espera
- Silencio
- Accede al menú del iPhone / iPod enchufado
- Se desplaza por las opciones de la fuente de entrada
- Muestra la hora
- Se Desplaza por el menú del iPhone / iPod enchufado
- Conrma la selección del menú del iPhone / iPod enchufado
- Se Desplaza por el menú del iPhone / iPod enchufado
- Volver (Anterior)
- Reproducir / Pausa
- Avanzar (Siguiente)
- Ajuste de agudos
- Ajuste de graves
- Ajustar el volumen
- Alimentación principal / Se desplaza por las opciones de fuente
de entrada
- Mostrar / Ajuste de Hora
- Ajustar el volumen
- Volver (Anterior)
- Reproducir / Pausa
- Avanzar (Siguiente)
CLOCK
INPUT
GUÍA PARA SOLUCIÓN DE PROBLEMAS
PROBLEMAS SOLUCIÓN
1. iPhone/iPod no responde al
sistema de altavoces.
1a. Compruebe que no haya ninguna obstrucción entre el conector y
el iPhone/iPod.
1b.SisuiPod/iPhoneestáusandounaccesoriodeprotección,
intente de remover la protección i re-enchufando el iPhone/iPod.
2.Elsonidoestádeteriorado. 2a. Disminuya el volumen.
2b. Si la fuente de sonido original del iPhone/iPod tiene una mala
calidad,distorsionesysonidosonfácilmentenotoriosconlos
altavoces de alta-potencia. Intente otra fuente de audio diferente
como música de un CD.
2c. Si usted esta usando una fuente de sonido externa como un iPod
de antigua generación, intente reducir el volumen de la fuente de
salida en el propio equipo.
2d. Intente cambiando las opciones de los bajos y agudos usando el
control remoto.
3. La unidad se calienta después de
escuchar música a volumen alto.
3a. Apague la unidad durante un periodo de tiempo o disminuya el
volumen.

19
Cuando el control remoto deja de funcionar o su rango parece reducido, es el momento de cambiar las
bateríasporunasnuevas.
1.Elcompartimientoparalasbateríasestáubicadoenlaparteposteriordelcontrolremoto.
2.Presionehaciaadentrolalengüetapequeñamientrasdeslizalapuertadelabateríaparaabrirlay
saquelasbateríasviejas.
3.Reemplacecon(1)bateríasCR2025,asegurándosedequeloslados+y-delabateríacoincidan
dentrodelcompartimientodelabatería.
4.Reemplacelapuertadelabatería.
PRECAUCIÓN:
•Siemprecomprelaspilasdetamañoygradocorrectosparaesteuso.
•Reemplacetodaslaspilasdeunsetalmismotiempo.
•Limpieloscontactosdelaspilasylosdelaparatoantesdecolocarlaspilas.
•Asegúresequelaspilasesténbiencolocadasrespectoalapolaridad(+y-).
•Retirelaspilasdelequiposinosevaautilizarporuntiempoprolongado.
•Retirelaspilasusadasdeinmediato.
NOTA:Precauciónnoingierapilas.SIlasbateríassontragadasinmediatamentellamealcontrolde
intoxicación.
Sustitución de las pilas del Control Remoto
ELIMINACIÓN DE LAS BATERÍAS USADAS
Lasbateríaspuedencontenersustanciaspeligrosasquepuedensernocivasparael
medioambiente y el ser humano.
Lasbateríasusadasnodebensertratadascomoresiduosmunicipales.Porelcontrario,se
deben dejar en los puntos de recolección adecuados para el reciclaje.
Alasegurarsedequelasbateríasusadassedesechencorrectamente,ayudaráaevitarlas
potenciales consecuencias negativas para el medioambiente y el ser humano. El reciclaje
dematerialesayudaráaconservarlosrecursosnaturales.
Paraobtenermásinformaciónsobrelarecolecciónyelreciclajedebateríasusadas,
comuníqueseconsumunicipalidadlocalosuserviciodeeliminacióndedesechos.
Cuidado y Mantenimiento
NOTA:
Esteequipohasidoprobadoysehavericadoquecumpleconloslímitesparaundispositivo
digitalclaseB,conformealasección15delasregulacionesdelaFCC.Estoslímitesestándiseñados
para proporcionar protección razonable contra interferencia perjudicial en una instalación
residencial.Esteequipogenera,usaypuedeirradiarenergíaderadiofrecuenciay,sinoseinstalayusa
de acuerdo con las instrucciones, puede causar interferencia perjudicial a la recepción de radio o
televisión, lo que se puede determinar al apagar y encender el equipo. Se recomienda al usuario que
intentecorregirlainterferenciaconunaomásdelassiguientesmedidas:
•Reorientaroreubicarlaantenaderecepción.
•Aumentarlaseparaciónentreelequipoyelreceptor.
•Conectarelequipoauntomacorrientedeuncircuitodistintoalqueusaelreceptor.
•Solicitarayudaalconcesionariooauntécnicoconexperienciaenradio/TV.
Estedispositivocumpleconlasección15delasreglasdelaFCC.Elfuncionamientoestásujetoalas
siguientes dos condiciones:
(1) este dispositivo no debe causar interferencia perjudicial, y
(2)estedispositivodeberáaceptarcualquierinterferenciarecibida,incluidalainterferenciaquepudiese
causar la operación no deseada.
Lasmodicacionesquenoesténaprobadasporlaparteresponsabledelcumplimientopodríananularla
autorización del usuario para utilizar el equipo.
EsteinstrumentodigitalclaseBcumpleconelICES-003deCanadá.
Advertencia:
1.Sielcabledealimentaciónestádañado,deberáserreemplazadoporelfabricante,elagentede
serviciooporpersonalcualicadoconelndeevitarunpeligro.
2.Sólountécnicocalicadodeberepararesteproducto.
3. No use al aire libre.
4. No inserte ni permita que objetos extraños penetren en el sistema, ya que puede causar un choque
eléctrico, incendio o daños en el aparato.
5. Use este aparato sólo como se describe en el manual. Cualquier otro uso no recomendado por el
fabricante puede causar incendio, choque eléctrico o lesiones a las personas.
La page est en cours de chargement...
La page est en cours de chargement...
La page est en cours de chargement...
La page est en cours de chargement...
La page est en cours de chargement...
La page est en cours de chargement...
La page est en cours de chargement...
La page est en cours de chargement...
La page est en cours de chargement...
La page est en cours de chargement...
La page est en cours de chargement...
-
 1
1
-
 2
2
-
 3
3
-
 4
4
-
 5
5
-
 6
6
-
 7
7
-
 8
8
-
 9
9
-
 10
10
-
 11
11
-
 12
12
-
 13
13
-
 14
14
-
 15
15
-
 16
16
-
 17
17
-
 18
18
-
 19
19
-
 20
20
-
 21
21
-
 22
22
-
 23
23
-
 24
24
-
 25
25
-
 26
26
-
 27
27
-
 28
28
-
 29
29
-
 30
30
-
 31
31


Twin-Star International 48TI3560 Assembly Manual
- Taper
- Assembly Manual
dans d''autres langues
- English: Twin-Star International 48TI3560
- español: Twin-Star International 48TI3560
Autres documents
-
ClassicFlame 26MMS9726 Manuel utilisateur
-
iLive ITP180B Manuel utilisateur
-
TEAC SR-80i Manuel utilisateur
-
Akai ADI-19K Manuel utilisateur
-
Thomson DS401 Operating Instructions Manual
-
Logic3 WIP025 Fiche technique
-
Pioneer X-HM50-S Le manuel du propriétaire
-
TEAC SR-100I Le manuel du propriétaire
-
Logitech AUDIOSTATION EXPRESS FOR IPOD Le manuel du propriétaire
-