for Living NOMA Self-Sanitizing Le manuel du propriétaire
- Catégorie
- Humidificateurs
- Taper
- Le manuel du propriétaire

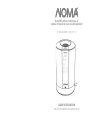
Digital Self Sanitizing
Warm Mist Humidifier
PRODUCT NO. 04301710
USER MANUAL
READ AND SAVE THESE INSTRUCTIONS

TABLE OF CONTENTS
01. KNOW YOUR HUMIDIFIER
02. OPERATING INSTRUCTIONS
03. REPLACE THE ABSORPTION SLEEVE
04. CLEANING INSTRUCTIONS
05. PRODUCT SPECIFICATIONS
06. FAQs
07. SAFETY / CAUTIONS
08. WARRANTY AND DISPOSAL
3
7
13
15
17
18
19
21
2
1

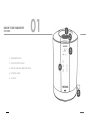
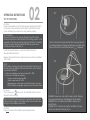
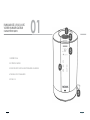
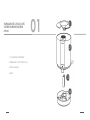
KNOW YOUR HUMIDIFIER
FEATURES 01
1. WATER INPUT INLET
2. VAPOUR OUTPUT OUTLET
3. DISPLAY AND LIGHT BAR INDICATOR
4. CONTROL PANEL
5. AC PLUG
4
3

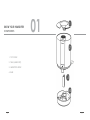
KNOW YOUR HUMIDIFIER
COMPONENTS 01
1. TOP COVER
2. TANK (MAIN BODY)
3. ABSORPTION FILTER
4. BASE
6
5

WARNING: Never pour water into the vapour outlet. Doing so
may cause personal injury and damage to the humidifier.
WARNING: Do not overfill your humidifier to reduce risk of
electric shock.
WARNING: Do not attempt to plug the humidifier in with wet
hands, as an electric shock may occur.
03
02
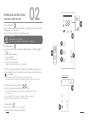
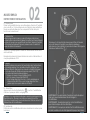
OPERATING INSTRUCTIONS
SET UP DIRECTIONS
01. Place
Place your humidifier on a flat, moistureproof surface at least 39" (1
m) away from the wall. Remove the tape that attaches the tank
cover and floating components so they operate properly.
02. Check Filter
Remove the tank from the base by lifting the tank off the base.
Locate the absorption filter attached to the heating element on the
underside of tank. Be sure the filter is tightly attached to the heating
element. A loosely attached absorption filter may produce less
humidity and cause malfunctions.
CAUTION: Never attempt to use this humidifier without the
absorption filter attached.
Replace the tank to the base. Plug the power cord into a polarized
120 V outlet.
03. Fill
Fill the tank by pouring cool water into water inlet in the top cover.
For best results use distilled or filtered water. Do not use hot water or
any chemical additives.
• Water level is displayed on the front panel (20 – 99%).
• The colour of the light bar indicates:
Orange—water level less than 20%
.
Green—water level is 20 – 80%
.
Flashing orange and a beep—when filling the tank more than
80%, the flashing orange light will guide you until the tank is filled.
04. Power
Touch the power ( ) key once. The humidifier will turn on and
default to the low setting.
Note: In the first fill or after replacing the absorption filter. Wait one
minute to allow the filter to fully absorb water from the base before
turning on the humidifier power button.
05. Relax
Enjoy your warm mist humidifier in quiet, peaceful, bliss.
02
8
7
Note: It is important to make sure the filter is very tight around
the heating element for the best performance. Incorrect instal
lation will result in the Check Filter indicator ( ) displayed.

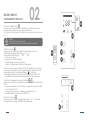
high
low
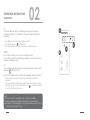
01. Power Button
Touch once to turn on the humidifier. Comforting, visible warm mist
will begin in 2 – 4 minutes.
To turn off the humidifier, touch the key once.
02. Speed Button
Touch to set high or low speed. The digital display will display ( )
or ( ).
Your humidifier displays:
• Green light bar
• Digital humidity level
• Speed key backlight:
bright—high setting; dim— low setting
When the water level is less than 20%,the humidifier will continue to
run for another 3 hours, the light bar will turn yellow and the fill icon
( ) will display
• Fill the water tank for continuous operation. OR
• The humidifier will switch to sanitizing mode and then shut off.
03. Humidity level setting buttons
Touch to set desired humidity level (35 – 75%).
• Touch the key briefly to adjust the humidity level in 5%
increments.
• Touch and hold the key to adjust in 1% increments.
Your humidifier is operating in AUTO MODE.
04. Timer Button
Touch to set timer (1, 2, 3, …12 hours).
Humidity and timer display alternately.
02
10
9
OPERATING INSTRUCTIONS
CONTROLS AND SETTING
CAUTION:
Be careful of hot steam.
Do not touch the mist outlet with your hands.

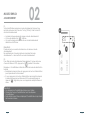
OPERATING INSTRUCTIONS
SANITIZING
01.
Your humidifier will switch to sanitizing mode when tank water
remaining is about 7 fl oz (200 mL). This will provide 20 minutes of
sanitizing.
• The light bar will turn red in sanitizing mode.
• The sanitizing icon ( ) comes on.
• The display will countdown 20 minutes sanitizing mode.
NOTE:
Do not remove tank or top cover in sanitizing mode.
Do not fill water into the tank during sanitizing mode—this will termi
nate the sanitizing mode.
02.
To use sanitizing mode manually: when water level is less than 10%,
depress ( ) for 5 seconds.
Note: The humidifier will turn off after the Sanitizing mode is complete.
• Fill the tank with water and press power button to resume
operation
• If you press the power button without filling the tank, The yellow
light bar will go on and the fill tank icon ( ) will flash to remind
you to fill the tank with water.
NOTE:
• Do not move the humidifier when using the humidifier.
• Always unplug the humidifier before moving the humidifier.
• Be careful of the leakage in moving the humidifier when there is
water remaining in the base.
02
12
11

REPLACE THE
ABSORPTION SLEEVE
01.
Your humidifier will monitor its performance. When the effect is less
than expected, the change filter light comes on to remind you
change the absorption filter. Please replace your filter. Failure to
properly maintain your absorption filter can result in poor
performance and possible malfunction of your humidifier. For best
results, use distilled or filtered water.
02.
The absorption filter is a vital part of your humidifier. Do not attempt
to use your humidifier without this sleeve. Do not alter or attempt to
repair any absorption filter. Be sure to use only NOMA® absorption fil
ters with your humidifier. Using anything other than a NOMA®
absorption filter may cause damage to the humidifier, create a
safety hazard, and void the warranty.
CAUTION: Unplug and make sure the humidifier has cooled
sufficiently before handling the humidifier.
03.
Remove the tank from the base. Remove the absorption filter from
the heating element, found on the underside of the mist chamber.
With a soft cloth or soft toothbrush, wipe away any buildup from
the heating element.
04.
Attach a new absorption filter to the heating element. Pull the filter
tightly around the heating element and secure it with the attached
hookandloop fastener.
Note: It is important to make sure the filter is very tight around the
heating element for the best performance.
Incorrect installation will result in the Check Filter indicator ( )
displayed. Unplug the humidifier, and repeat steps 03 and 04 above
to reinstall the absorption filter
03
14
13

Daily Maintenance
01. Your NOMA® warm mist humidifier will sanitize the interior of tank
and base when the water in the tank is used up. You do not
need to clean the tank daily.
02. Wipe down the outside of the humidifier with a damp, soft cloth.
Do not use harsh, abrasive cleaners on this humidifier. Never
submerse the mist chamber in liquid or pour liquid in or on the
mist chamber. Doing so may damage the unit and may cause
injuries.
Weekly Maintenance
01. It is recommended that you clean your humidifier at least once a
week, or more frequently if you:
Have hard water.
Notice a buildup of impurities.
Notice an unpleasant odour.
02. Always turn off and unplug the humidifier before cleaning. Be sure
to wait until the heating element has cooled sufficiently.
03. Clean Base
Mineral deposits will accumulate in the base of the humidifier from
time to time. When this occurs, the base should be cleaned.
Remove the tank. The base can be put in the dishwasher or
cleaned with a damp, soft cloth.
CAUTION: Only the base is dishwasher safe. Do not attempt to put
the tank (main body) or absorption sleeve in the dishwasher. Doing
so may damage the humidifier and create a safety hazard.
04
CLEANING INSTRUCTIONS
CARE AND MAINTENANCE
Monthly Disinfecting Base and Water Tank
01. Clean the base following step 3 in Weekly Maintenance.
02. Cleaning Tank
Put 1/2 teaspoon (2.5mL) of chlorine bleach and 1/2 gallon(2.3L)
of water in the tank. Let solution stand for 20 minutes, swishing
every few minutes. Empty tank and rinse well with water until
bleach smell is gone.
03.Wipe the water tank and base with a cloth or towel to remove
any calcification or white dust deposits and replace the hot
plate cover. Do not clean the base with any abrasive materials.
Endofseason Care and Storage
Empty the tank and base of all water.
Clean all surfaces with a damp, soft cloth.
Clean the base by putting it in the dishwasher or wiping it with a
damp, soft cloth.
Remove the absorption filter and replace with a new and dry
sleeve.
NOTE: Before storing your humidifier for the season, or for any
extended period of time, be sure the absorption filter is
completely dry to help prevent mould and mildew. Air dry only.
Do not put in dryer.
Store the unit in its original carton, in a cool, dry location.
Remember to clean and inspect your humidifier before using
it the next season.
16
15
WARNING: Do not clean humidifier without unplugging the unit. Failure
to heed this warning may cause personal injury.

Product Name
Absorption Filter Used NOMA® Temperature Resistant
Humidifier Filter Sleeve
Water Tank Capacity 6 L (203 fl oz)
Run Time (on low setting) 28 hours
Mist Temperature Warm (185oF/850C at
vapour outlet)
Number of Mist Output
Settings 2
Auto Shut Off Yes (when finished sanitizing)
cETL us Listed Yes
120 V AC, 60 Hz
Product No. 04301710
Input Voltage
NOMA® Digital Self Sanitizing
Warm Mist Humidifier
PRODUCT SPECIFICATIONS
OVERVIEW 05 06
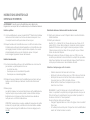
FAQs
FREQUENTLY ASKED QUESTIONS
Q: How does my humidifier work?
A: Water flows from the tank into the base. The water is then absorbed
up by the absorption filter where it is heated, purified and converted
into a warm mist. The warm mist then rises up through the mist
chamber, dispensing comfortable, soothing, visible moisture into the
air. During this process, unwanted minerals are trapped within the
absorption filter material.
Q: Will my settings be saved if I turn off my humidifier?
A: Yes, if kept plugged in, the humidifier will return to the last settings it
was on before being turned off. If unplugged, the unit will return to
the default lowest settings when turned back on.
Q: Mist output is minimal or none.
A: Be sure humidifier is plugged into the outlet.
Check absorption filter for mineral buildup. (See REPLACE THE
ABSORPTION FILTER.)
Q: What happens when the tank runs out of water?
A: When the tank is empty, your humidifier will turn to sanitizing mode for
20 minutes. The light bar will become red, ( )comes on, and the
digital display will count down the remaining time from 20 to 0.
Q: Why is my humidifier turned off and displayed ( )?
A: Please unplug your humidifier.
Check and make sure the absorption filter is installed properly.
(See REPLACE THE ABSORPTION FILTER on page 13.)
Plug your humidifier and touch power button ( ) to restart it.
18
17

SAFETY / CAUTIONS
SAFETY CONCERNS
READ AND SAVE THESE SAFETY INSTRUCTIONS BEFORE
USING THIS HUMIDIFIER
When using electrical appliances, basic precautions should
always be followed to reduce the risk of fire, electrical shock
and injury to people, including the following:
• To avoid fire or shock hazard, plug the humidifier directly into a
120 V AC electrical outlet.
• Do not run the cord under rugs, carpets, runners, or similar
coverings. Do not route the cord under furniture or appliances.
Place the cord away from heavytraffic areas where it will not be
a tripping hazard.
• Do not place humidifier near heat sources such as stoves,
radiators, and heaters. Do locate your humidifier on an inside
wall near an electrical outlet.
• Do not allow children to handle the humidifier. Supervision
required when placed in a room with children.
• Keep materials such as bedding, papers, clothes and curtains
away from the unit. Do not cover the unit with any items which
can block the air inlet and outlet.
• Do not operate the humidifier if there is damage to the power
cord, or if the humidifier has been dropped or damaged or
malfunctions. Return the humidifier to an authorized service
facility.
• Use humidifier only for intended household use as described in
this manual. Any other use not recommended by the
manufacturer may cause fire, electric shock, or injury to persons.
The use of attachments not recommended or sold by the
manufacturer may cause hazards.
• Do not use outdoors.
• Always place humidifier on a firm, flat, level surface. A
waterproof mat may be useful as the unit can produce large
amounts of moisture. Always use caution when placing on
finished floors and carpets.
• Never drop or insert any object into any openings.
• Do not allow the mist outlet to directly face the wall. Mist could
cause damage, particularly to wallpaper.
• Humidifier should be unplugged when not in use.
• Never tilt, move, or attempt to empty unit while it is operating.
Shut off and unplug before removing the water tank and moving
the unit.
• This humidifier requires daily and weekly maintenance to operate
efficiently. Refer to daily and weekly cleaning procedures. Use
only cleaners and additives recommended by the
manufacturer.
• Never use detergents, gasoline, glass cleaner, furniture polish,
paint thinner, or other household solvents to clean any part of
the humidifier.
• Do not attempt to repair or adjust any electrical or mechanical
functions on this unit. Doing so will void your warranty. The inside
of the unit contains no user serviceable parts.
• Never clean the humidifier while it is plugged in. Do not immerse
the humidifier in water.
• Do not plug in the cord with wet hands: electric shock could
result.
• Do not pour water in any openings other than the water tank.
• To prevent damage to surfaces, do not place humidifier under
overhanging surfaces.
• Never operate humidifier without water in the tank.
• Changes or modifications of this product is not expressly
approved by the party responsible for compliance could void
the user's authority to operate the equipment.
07
20
19

Imported by
NOMA Canada. Toronto. Canada M4S 2B8
Made in China
18668274985
1 YEAR LIMITED WARRANTY
This NOMA® product carries a ONE (1) year warranty against defects in
workmanship and materials. At its discretion, NOMA Canada agrees to have any
defective part(s) replaced free of charge within the stated warranty period, when
returned with proof of purchase.
WARRANTY AND DISPOSAL
ENVIRONMENTALLY FRIENDLY 08
You can help protect the environment!
Please remember to respect local regulations. Dispose of
the nonworking electrical unit to an appropriate waste
disposal centre.
22
21

Humidificateur numérique à
vapeur chaude à autoassainissement
Nº DE MODÈLE : 04301710
GUIDE D’UTILISATION
LISEZ ET CONSERVEZ CES INSTRUCTIONS

TABLE DES MATIÈRES
01. FAMILIARISEZVOUS AVEC VOTRE
HUMIDIFICATEUR
02. MODE D’EMPLOI
03. REMPLACER LE FILTREMANCHON
04. INSTRUCTIONS DE NETTOYAGE
05. FICHE TECHNIQUE
06. FOIRE AUX QUESTIONS
07. SÉCURITÉ / MISES EN GARDE
08. GARANTIE ET ÉLIMINATION
3
7
13
15
17
18
19
21
2
1

FAMILIARISEZVOUS AVEC
VOTRE HUMIDIFICATEUR
CARACTÉRISTIQUES 01
1. ENTRÉE D’EAU
2. SORTIE DE VAPEUR
3. INDICATEUR D’AFFICHAGE ET DE BARRE LUMINEUSE
4. PANNEAU DE COMMANDE
5. FICHE CA
4
3

FAMILIARISEZVOUS AVEC
VOTRE HUMIDIFICATEUR
PIÈCES 01
1. COUVERTURE SUPÉRIEURE
2. RÉSERVOIR (CORPS PRINCIPAL)
3. FILTRE À MÈCHE
4. BASE
6
5

AVERTISSEMENT : Ne versez jamais d’eau dans la sortie de vapeur.
Cela peut causer des blessures et des dommages à
l’humidificateur.
AVERTISSEMENT : Ne remplissez pas trop votre humidificateur
pour réduire le risque de choc électrique.
AVERTISSEMENT : N’essayez pas de brancher l’humidificateur avec
les mains mouillées, car une décharge électrique peut se produire.
03
02
MODE D’EMPLOI
INSTRUCTIONS D’INSTALLATION
01. Emplacement
Placez votre humidificateur sur une surface plane, étanche à l’humidité,
à au moins 39 po (1 m) de distance du mur. Retirez le ruban adhésif qui
fixe le couvercle du réservoir et les composants flottants afin qu'ils
fonctionnent correctement.
02. Vérifier le filtre
Retirez le réservoir de la base en soulevant le réservoir de la base.
Localisez le filtre à mèche fixé à l’élément chauffant sur la face inférieure
du réservoir. Assurezvous que le filtre est bien fixé à l’élément chauffant.
Un filtre à mèche lâchement fixé peut produire moins d’humidité et
causer des dysfonctionnements.
ATTENTION : N’essayez jamais d’utiliser cet humidificateur sans le filtre à
mèche attaché.
Remplacez le réservoir à la base. Branchez le cordon d’alimentation à
une prise polarisée de 120 V.
03. Remplir
Remplissez le réservoir en versant de l’eau fraîche dans l’entrée d’eau
du couvercle supérieur. Pour de meilleurs résultats, utilisez de l’eau
distillée ou filtrée. N’utilisez pas d’eau chaude ni d’additifs chimiques.
• Le niveau d’eau est affiché sur le panneau avant (20 à 99 %).
• La couleur de la barre lumineuse indique :
– Orange — le niveau d’eau est inférieur à 20 %.
– Vert — le niveau d’eau est de 20 à 80 %.
– Voyant orange clignotant et un bip — lors du remplissage du
réservoir à plus de 80 %, le voyant orange clignotant vous
guidera jusqu’à ce que le réservoir soit rempli.
04. Alimentation
Appuyez sur la touche d’alimentation ( ) une fois. L’humidificateur
s’allume et passe par défaut au réglage bas.
Remarque : lors du premier remplissage ou après le remplacement du
filtre d'absorption. Attendez une minute pour permettre au filtre
d'absorber complètement l'eau de la base avant d'allumer le bouton
d'alimentation de l'humidificateur.
05. Se détendre
Profitez de votre humidificateur de brume chaud dans le calme, la paix,
le bonheur.
02
8
7
Remarque : Il est important de s'assurer que le filtre est très serré
autour de l'élément chauffant pour obtenir les meilleures
performances. Une installation incorrecte entraînera l'affichage de
l'indicateur Vérifier le filtre ( ).

high
low
MODE D’EMPLOI
COMMANDES ET RÉGLAGE
01. Bouton d’alimentation
Touchez une fois pour allumer l’humidificateur. Une brume chaude
réconfortante et visible commencera à se diffuser en
2 à 4 minutes. Pour éteindre l’humidificateur, appuyez sur la touche une
fois.
02. Bouton Vitesse
Appuyez sur ce bouton pour régler la vitesse élevée ou basse.
L’affichage numérique affichera ( ) ou ( ).
Votre humidificateur affiche :
• Barre de voyant vert
• Niveau d’humidité numérique
• Rétroéclairage de la touche Vitesse :
brillant — réglage élevé; atténué— réglage bas
Lorsque le niveau d'eau est inférieur à 20 %, l'humidificateur continuera
de fonctionner pendant 3 heures supplémentaires, la barre lumineuse
deviendra jaune et l'icône de remplissage ( ) s'affichera.
• Remplissez le réservoir d'eau pour un fonctionnement continu. OU
• L'humidificateur passera en mode de désinfection puis s'éteindra.
03. Boutons de réglage du niveau d’humidité
Appuyez sur ces boutons pour régler le niveau d’humidité souhaité (35 à
75 %).
• Appuyez brièvement sur la touche pour ajuster le niveau d’humidité
par incréments de 5 %.
• Appuyez sur la touche pour ajuster par incréments de 1 %.
Votre humidificateur fonctionne en MODE AUTO.
04. Bouton Minuterie
Appuyez sur ce bouton pour régler la minuterie (1, 2, 3, ... 12 heures).
L’humidité et la minuterie s’affichent alternativement.
02
10
9
AVERTIR:
Attention à la vapeur chaude.
Ne touchez pas la sortie de brouillard avec vos mains.

MODE D’EMPLOI
ASSAINISSEMENT
01.
Votre humidificateur passera en mode Assainissement lorsque l’eau
restante du réservoir est d’environ 7 oz liq. (200 mL). Cela fournira 20
minutes d’assainissement
• La barre lumineuse deviendra rouge en mode Assainissement.
• L'icône de désinfection ( ) s'allume.
• Un compte à rebours de 20 minutes en mode Assainissement
débutera sur l’afficheur.
REMARQUE :
N’enlevez pas le couvercle du réservoir ou du dessus en mode
Assainissement.
Ne remplissez pas d’eau dans le réservoir pendant le mode
Assainissement — cela mettra fin au mode Assainissement.
02.
Pour utiliser le mode Assainissement manuellement : lorsque le niveau
d’eau est inférieur à 10 %, appuyez sur ( ) pendant 5 secondes.
Remarque : L'humidificateur s'éteindra une fois le mode de désinfection
terminé.
• Remplissez le réservoir d'eau et appuyez sur le bouton d'alimentation
pour reprendre le fonctionnement
• Si vous appuyez sur le bouton d'alimentation sans remplir le réservoir,
la barre lumineuse jaune s'allumera et l'icône de remplissage du
réservoir ( ) clignotera pour vous rappeler de remplir le réservoir
d'eau.
REMARQUE :
• Ne déplacez pas l'humidificateur lorsque vous l'utilisez.
• Débranchez toujours l'humidificateur avant de déplacer
l'humidificateur.
• Faites attention aux fuites en déplaçant l'humidificateur lorsqu'il reste
de l'eau dans la base.
02
12
11

REMPLACER LE
FILTREMANCHON
01.
Votre humidificateur surveillera ses performances. Lorsque l’effet est
inférieur aux attentes, le témoin de notification de changement de filtre
s’allume pour vous rappeler de changer le filtre à mèche. Veuillez
remplacer votre filtre. Le fait de ne pas entretenir correctement votre
filtre à mèche peut entraîner de mauvaises performances et un
dysfonctionnement possible de votre humidificateur. Pour de meilleurs
résultats, utilisez de l’eau distillée ou filtrée.
02.
Le filtre à mèche est une partie essentielle de votre humidificateur.
N’essayez pas d’utiliser votre humidificateur sans ce manchon. Ne
modifiez pas et ne tentez pas de réparer un filtre à mèche. Assurezvous
d’utiliser uniquement des filtres à mèche NOMAMD avec votre
humidificateur. L’utilisation de quoi que ce soit d’autre qu’un filtre à
mèche NOMAMD peut endommager l’humidificateur, créer un danger
pour la sécurité et annuler la garantie.
ATTENTION : Débranchez et assurezvous que l'humidificateur a
suffisamment refroidi avant de manipuler l'humidificateur.
03.
Retirez le réservoir de la base. Retirez le filtre à mèche de l’élément
chauffant, trouvé sur la face inférieure de la chambre à vapeur.
Avec un chiffon doux ou une brosse à dents douce, essuyez toute
accumulation de peluche sur l’élément chauffant.
04.
Fixez un nouveau filtre à mèche à l’élément chauffant. Tirez le filtre
étroitement autour de l’élément chauffant et fixezle avec la fermeture
autoagrippante.
REMARQUE : Il est important de s’assurer que le filtre est très serré
autour de l’élément chauffant pour de meilleures performances.
Une installation incorrecte entraînera l'affichage de l'indicateur
Vérifier le filtre ( ). Débranchez l'humidificateur et répétez les
étapes 03 et 04 cidessus pour réinstaller le filtre d'absorption
INCORRECT
CORRECT
03
14
13
La page est en cours de chargement...
La page est en cours de chargement...
La page est en cours de chargement...
La page est en cours de chargement...
-
 1
1
-
 2
2
-
 3
3
-
 4
4
-
 5
5
-
 6
6
-
 7
7
-
 8
8
-
 9
9
-
 10
10
-
 11
11
-
 12
12
-
 13
13
-
 14
14
-
 15
15
-
 16
16
-
 17
17
-
 18
18
-
 19
19
-
 20
20
-
 21
21
-
 22
22
-
 23
23
-
 24
24


for Living NOMA Self-Sanitizing Le manuel du propriétaire
- Catégorie
- Humidificateurs
- Taper
- Le manuel du propriétaire
Documents connexes
Autres documents
-
 BLAUFOSS BLACKLINE 61683 Guide d'installation
-
Honeywell HCM-300T Manuel utilisateur
-
Bionaire BCM5555-CN Manuel utilisateur
-
Bionaire BCM1745C05EFM1 Manuel utilisateur
-
-
Holmes HM5305 Manuel utilisateur
-
-
-
-
Sunbeam SCM631-CN Manuel utilisateur
