Nextar Q4 Series Manuel utilisateur
- Catégorie
- Navigateurs
- Taper
- Manuel utilisateur


1
Thank you for choosing our product as your in-car navigator.
Read the Quick Start Guide first and start using your device
right away. This document is the detailed description of the
navigation software. You can easily discover your device while
you are using it; however, we still recommend that you read this
manual to fully understand the screens and the features of your
software.

2
Table of contents
1 Warnings and Safety information....................................................5
2 Getting started..................................................................................6
2.1 Startup screen: the Navigation menu........................................10
2.2 Buttons and other controls on the screen .................................12
2.2.1 Using keyboards..............................................................14
2.2.2 Beyond single screen tap ................................................15
2.3 Map screen...............................................................................18
2.3.1 Navigating on the map.....................................................18
2.3.2 Position markers..............................................................21
2.3.2.1 Vehimarker and Lock-on-Road...............................21
2.3.2.2 Selected location (Cursor) in Find on Map..............21
2.3.3 Objects on the map .........................................................22
2.3.3.1 Streets and roads...................................................22
2.3.3.2 Turn Preview and next street..................................22
2.3.3.3 Lane information and Signposts .............................24
2.3.3.4 3D object types ......................................................25
2.3.3.5 Elements of the active route...................................26
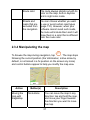
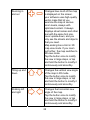
2.3.4 Manipulating the map ......................................................27
2.3.5 Quick menu .....................................................................29
2.3.6 Checking the details of the current position (Where Am I?)
...................................................................................................33
3 Navigating.......................................................................................35
3.1 Selecting the destination of a route...........................................35
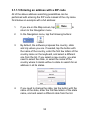
3.1.1 Entering an address or part of an address.......................36
3.1.1.1 Entering an address ...............................................36
3.1.1.2 Entering the midpoint of a street as the destination41
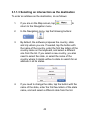
3.1.1.3 Selecting an intersection as the destination............45
3.1.1.4 Selecting a city/town center as the destination.......49
3.1.1.5 Entering an address with a ZIP code......................52

3
3.1.1.6 Tips on entering addresses quickly ........................56
3.1.2 Selecting the destination from the Places of Interest .......57
3.1.2.1 Selecting the destination from the Places of Interest
with Quick search ..................................................................57
3.1.2.2 Selecting the destination from other Places of Interest
by name ................................................................................61
3.1.2.3 Selecting the destination from other Places of Interest
by category............................................................................66
3.1.2.4 Selecting nearby assistance from 'Where Am I?'....71
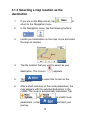
3.1.3 Selecting a map location as the destination.....................74
3.1.4 Selecting the destination from your Favorites..................75
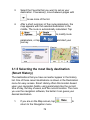
3.1.5 Selecting the most likely destination (Smart History) .......76
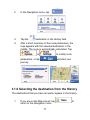
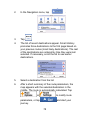
3.1.6 Selecting the destination from the History........................77
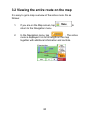
3.2 Viewing the entire route on the map .........................................80
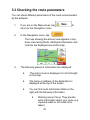
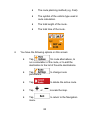
3.3 Checking the route parameters.................................................81
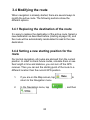
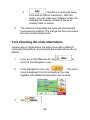
3.4 Modifying the route...................................................................83
3.4.1 Replacing the destination of the route .............................83
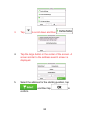
3.4.2 Setting a new starting position for the route.....................83
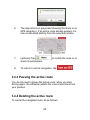
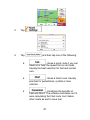
3.4.3 Pausing the active route..................................................85
3.4.4 Deleting the active route..................................................85
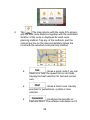
3.4.5 Changing the route planning method...............................86
3.4.6 Checking the route alternatives .......................................88
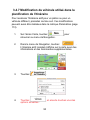
3.4.7 Changing the vehicle used in route planning ...................90
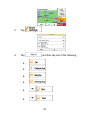
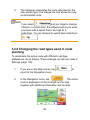
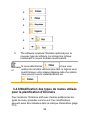
3.4.8 Changing the road types used in route planning..............92
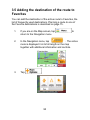
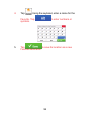
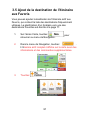
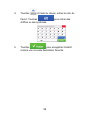
3.5 Adding the destination of the route to Favorites........................95
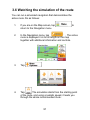
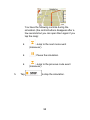
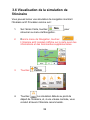
3.6 Watching the simulation of the route.........................................97
4 Reference Guide.............................................................................99
4.1 Concepts ..................................................................................99
4.1.1 Smart Zoom.....................................................................99
4.1.2 Daytime and night color themes ......................................99
4.1.3 Color theme in tunnels...................................................100
4.1.4 Route calculation and reca
lculation ...............................100

4
4.1.5 Road Safety Cameras ...................................................102
4.1.5.1 Camera types.......................................................102
4.1.5.2 Camera directions ................................................104
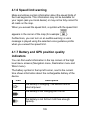
4.1.6 Speed limit warning .......................................................105
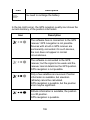
4.1.7 Battery and GPS position quality indicators...................105
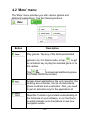
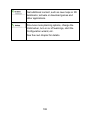
4.2 'More' menu............................................................................107
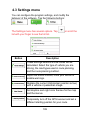
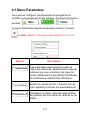
4.3 Settings menu.........................................................................109
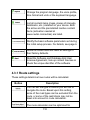
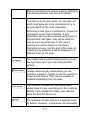
4.3.1 Route settings ...............................................................110
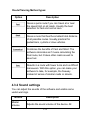
4.3.2 Sound settings...............................................................113
4.3.3 3D vehicle gallery ..........................................................115
4.3.4 Color themes.................................................................116
4.3.5 Set starting position.......................................................117
4.3.6 Regional settings...........................................................117
4.3.7 Content..........................................................................119
5 Glossary........................................................................................120
6 Copyright note..............................................................................123

5
1 Warnings and Safety information
This software is a navigation system that helps you find your
way to your destination with the built-in GPS receiver. The
software does not transmit your GPS position; others cannot
track you.
It is important that you look at the display only when it is safe to
do so. If you are the driver of the vehicle, we recommend that
you operate your software before you start your journey. Plan
the route before your departure and stop if you need to change
the route.
You must obey the traffic signs and follow the road geometry. If
you deviate from the recommended route, your software
changes the instructions accordingly.
Never place your device where it obstructs the driver's view,
where it is in the deployment zone of an airbag or where it might
cause injuries in an accident.

6
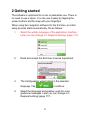
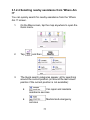
2 Getting started
The software is optimized for in-car or pedestrian use. There is
no need to use a stylus. You can use it easily by tapping the
screen buttons and the map with your fingertips.
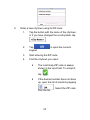
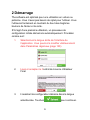
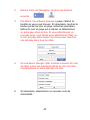
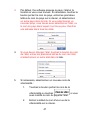
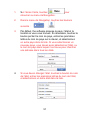
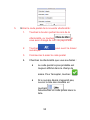
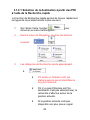
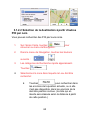
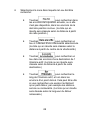
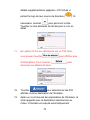
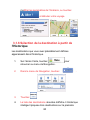
When using the navigation software for the first time, an initial
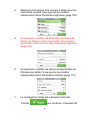
setup process starts automatically. Do as follows:
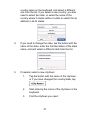
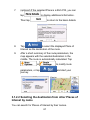
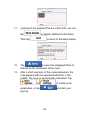
1. Select the written language of the application interface.
Later you can change it in Regional settings (page 117).
2. Read and accept the End User License Agreement.
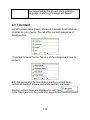
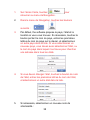
3. The Configuration wizard starts in the selected
language. Tap
to continue.
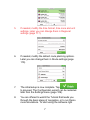
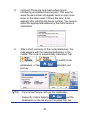
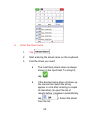
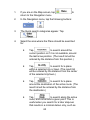
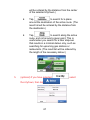
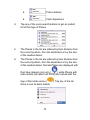
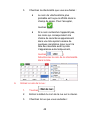
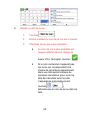
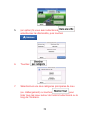
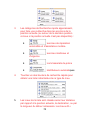
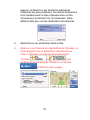
4. Select the language and speaker used for voice
guidance messages. Later you can change it in
Regional settings (page 117).

7
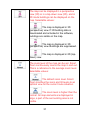
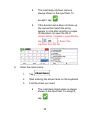
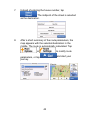
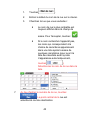
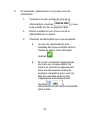
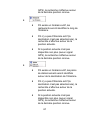
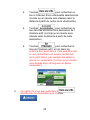
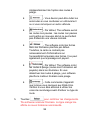
5. If needed, modify the time format, time zone and unit
settings. Later you can change them in Regional
settings (page 117).
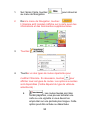
6. If needed, modify the default route planning options.
Later you can change them in Route settings (page
110).
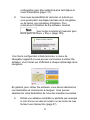
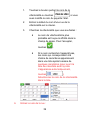
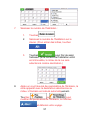
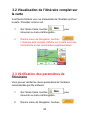
7. The initial setup is now complete. Tap
to proceed. The Configuration wizard can be restarted
later from the Settings menu (page 109).
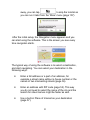
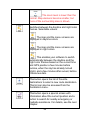
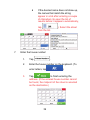
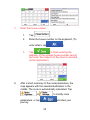
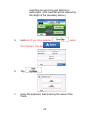
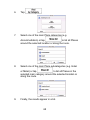
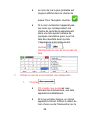
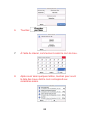
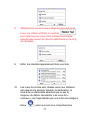
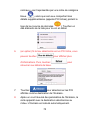
8. You are offered to watch the Tutorial that leads you
through the basic steps of navigation, or to run Demo
route simulations. To start using the software right

8
away, you can tap to skip the tutorial as
you can run it later from the 'More' menu (page 107).
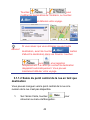
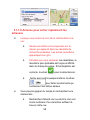
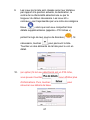
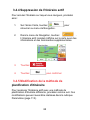
After the initial setup, the Navigation menu appears and you
can start using the software. This is the screen you see every
time navigation starts.
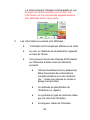
The typical way of using the software is to select a destination,
and start navigating. You can select your destination in the
following ways:
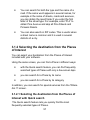
• Enter a full address or a part of an address, for
example a street name without a house number or the
names of two intersecting streets (page 36).
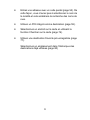
• Enter an address with ZIP code (page 52). This way
you do not need to select the name of the city and the
search for street names might be faster as well.
• Use a built-in Place of Interest as your destination
(page 57).

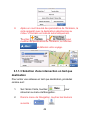
9
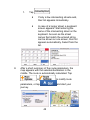
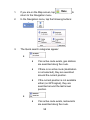
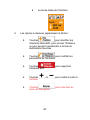
•
Select a location on the map with the Find on Map
feature (page 74).
• Use a previously saved Favorite destination (page 75).
Select a location from the History of previously used
destinations (page 77).

10
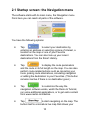
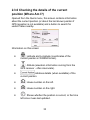
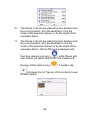
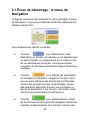
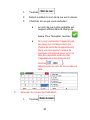
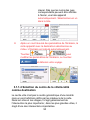
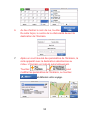
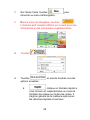
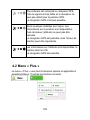
2.1 Startup screen: the Navigation menu
The software starts with its main menu, the Navigation menu.
From here you can reach all parts of the software.
You have the following options:
• Tap to select your destination by
entering an address or selecting a place of interest, a
location on the map or one of your Favorite
destinations. You can also look up your recent
destinations from the Smart History.
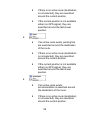
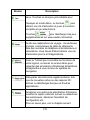
• Tap to display the route parameters
and the route in its full length on the map. You can also
perform route-related actions such as canceling your
route, picking route alternatives, simulating navigation
or adding the destination to your Favorites. (This button
remains inactive if there is no destination given.)
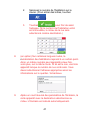
• Tap to customize the way the
navigation software works, watch the Demo & Tutorial,
run some additional applications, or to get extra content
from www.nextar.com/extras.
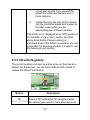
• Tap to start navigating on the map. The
button itself is a miniature live map that shows your

11
current position, the recommended route and the
surrounding map area. Tap the button to enlarge the
map to the full screen.
• Tap to stop navigation and exit the
software.

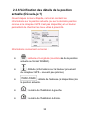
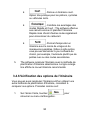
12
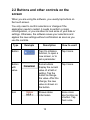
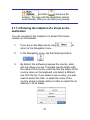
2.2 Buttons and other controls on the
screen
When you are using the software, you usually tap buttons on
the touch screen.
You only need to confirm selections or changes if the
application needs to restart, it needs to perform a major
reconfiguration, or you are about to lose some of your data or
settings. Otherwise, the software saves your selections and
applies the new settings without confirmation as soon as you
use the controls.
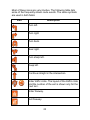
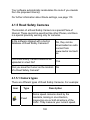
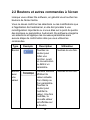
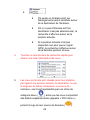
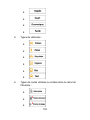
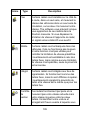
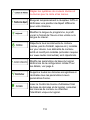
Type Example Description How to use it
Button
Tap it to initiate a
function, to open a
new screen, or to
set a parameter.
Tap it once.
Button
with
value
Some buttons
display the current
value of a field or
setting. Tap the
button to change
the value. After the
change, the new
value is shown on
the button.
Tap it once.
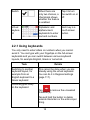
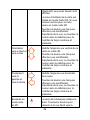
Icon
Shows status
information.
Some icons
also function as
a button. Tap
them once.

13
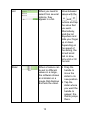
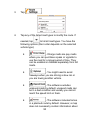
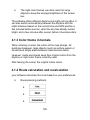
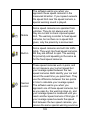
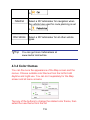
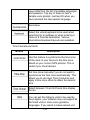
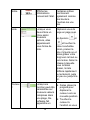
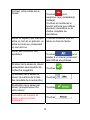
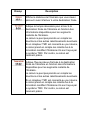
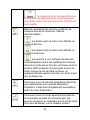
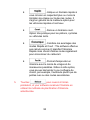
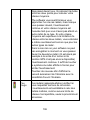
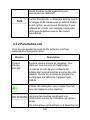
List
When you need to
select from several
options, they
appear in a list.
Move between
pages with the
and
buttons and tap
the value that
you want.
Alternatively,
grab the list
anywhere and
slide your finger
up or down.
Depending on
the speed of
the sliding, the
list will scroll
fast or slow,
only a bit or till
the end.
Slider
When a feature can
be set to different
values in a range,
the software shows
an indicator on a
gauge that displays
and sets the value.
• Drag the
handle to
move the
slider to its
new position.
• Tap the
slider where
you want the
handle to
appear; the
thumb jumps
there.

14
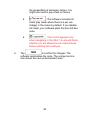
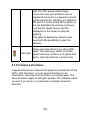
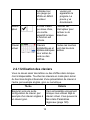
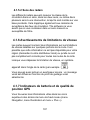
Switch
When there are
only two choices, a
checkmark shows
whether the feature
is enabled.
Tap it to turn
the switch on or
off.
Virtual
keyboa
rd
Alphabetic and
alphanumeric
keyboards to enter
text and numbers.
Each key is a
touch screen
button.
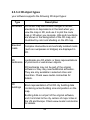
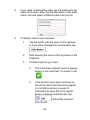
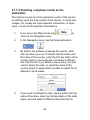
2.2.1 Using keyboards
You only need to enter letters or numbers when you cannot
avoid it. You can type with your fingertips on the full-screen
keyboards and you can switch between various keyboard
layouts, for example English, Greek or numerical.
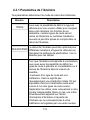
Task Details
Switching to another
keyboard layout, for
example from an
English keyboard to a
Greek keyboard
This cannot be done when you are
already using the virtual keyboard.
You can do it in Regional settings
(page 117).
Correcting your entry
on the keyboard
Tap
to remove the unneeded
character(s).
Tap and hold the button to delete
several characters or the entire input
string.

15
Entering a space, for
example between a first
name and a family
name or in multi-word
street names
Tap the empty button at the bottom
center of the screen.
Entering numbers and
symbols
Tap
to switch to a
keyboard offering numeric and
symbol characters.
Finalising the keyboard
entry (accepting the
suggested search
result)
Tap
.
Finalising the keyboard
entry (opening the list of
search results)
Tap
.
Finalising the keyboard
entry (saving your
input)
Tap
.
Canceling the keyboard
entry (returning to the
previous screen)
Tap
.
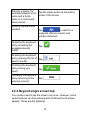
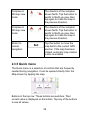
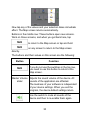
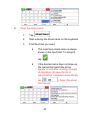
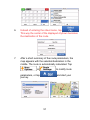
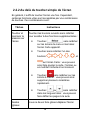
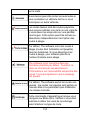
2.2.2 Beyond single screen tap
You usually need to tap the screen only once. However, some
useful features can be accessed with combined touch screen
tapping. Those are the following:

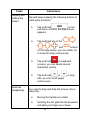
16
Tasks Instructions
Tapping and
holding the
screen
Tap and keep pressing the following buttons to
reach extra functions:
• Tap and hold on list
and menu screens: the Map screen
appears.
• Tap and hold any of the , ,
, , , and buttons
on the Map screen: you can rotate, tilt
or scale the map continuously.
• Tap and hold on keyboard
screens: you can delete several
characters quickly.
• Tap and hold or in long
lists: you can scroll pages
continuously.
Gestures
(drag&drop)
You need to drag and drop the screen only in
cases like:
• Moving the handle on a slider.
• Scrolling the list: grab the list anywhere
and slide your finger up or down.

17
Depending on the speed of the sliding,
the list will scroll fast or slow, only a bit
or till the end.
• Moving the map in map browsing
mode: grab the map, and move it in
the desired direction.
• Shortcut to open the Map screen: slide
your finger from the bottom right corner
to the bottom left corner on any
screen.
• Shortcut to open the Navigation menu:
slide your finger from the top left
corner to the bottom left corner on any
screen.

18
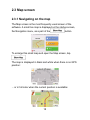
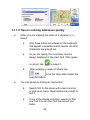
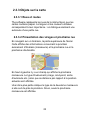
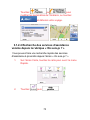
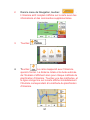
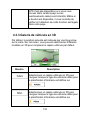
2.3 Map screen
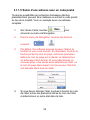
2.3.1 Navigating on the map
The Map screen is the most frequently used screen of the
software. A small live map is displayed on the startup screen,
the Navigation menu, as a part of the
button.
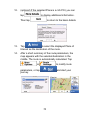
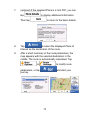
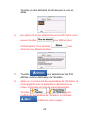
To enlarge this small map and open the Map screen, tap
.
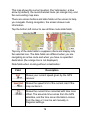
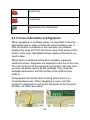
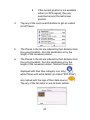
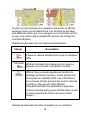
The map is displayed in black and white when there is no GPS
position:
... or in full color when the current position is available:

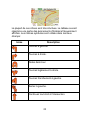
19
This map shows the current position (the Vehimarker, a blue
arrow by default), the recommended route (an orange line), and
the surrounding map area.
There are screen buttons and data fields on the screen to help
you navigate. During navigation, the screen shows route
information.
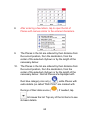
Tap the bottom left corner to see all three route data fields.
Tap any of the data fields to suppress others and display only
the selected one. The data fields are different when you are
navigating an active route and when you have no specified
destination (the orange line is not displayed).
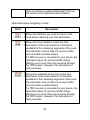
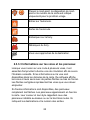
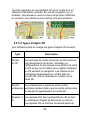
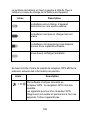
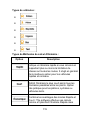
Data fields when cruising without a destination:
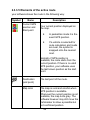
Field Description
Shows your current speed given by the GPS
receiver.
Shows the speed limit of the current road if the
map contains it.
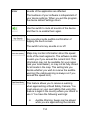
Shows the current time corrected with time zone
offset. The accurate time comes from the GPS
satellites, and the time zone information comes
from the map or it can be set manually in
Regional settings.
La page est en cours de chargement...
La page est en cours de chargement...
La page est en cours de chargement...
La page est en cours de chargement...
La page est en cours de chargement...
La page est en cours de chargement...
La page est en cours de chargement...
La page est en cours de chargement...
La page est en cours de chargement...
La page est en cours de chargement...
La page est en cours de chargement...
La page est en cours de chargement...
La page est en cours de chargement...
La page est en cours de chargement...
La page est en cours de chargement...
La page est en cours de chargement...
La page est en cours de chargement...
La page est en cours de chargement...
La page est en cours de chargement...
La page est en cours de chargement...
La page est en cours de chargement...
La page est en cours de chargement...
La page est en cours de chargement...
La page est en cours de chargement...
La page est en cours de chargement...
La page est en cours de chargement...
La page est en cours de chargement...
La page est en cours de chargement...
La page est en cours de chargement...
La page est en cours de chargement...
La page est en cours de chargement...
La page est en cours de chargement...
La page est en cours de chargement...
La page est en cours de chargement...
La page est en cours de chargement...
La page est en cours de chargement...
La page est en cours de chargement...
La page est en cours de chargement...
La page est en cours de chargement...
La page est en cours de chargement...
La page est en cours de chargement...
La page est en cours de chargement...
La page est en cours de chargement...
La page est en cours de chargement...
La page est en cours de chargement...
La page est en cours de chargement...
La page est en cours de chargement...
La page est en cours de chargement...
La page est en cours de chargement...
La page est en cours de chargement...
La page est en cours de chargement...
La page est en cours de chargement...
La page est en cours de chargement...
La page est en cours de chargement...
La page est en cours de chargement...
La page est en cours de chargement...
La page est en cours de chargement...
La page est en cours de chargement...
La page est en cours de chargement...
La page est en cours de chargement...
La page est en cours de chargement...
La page est en cours de chargement...
La page est en cours de chargement...
La page est en cours de chargement...
La page est en cours de chargement...
La page est en cours de chargement...
La page est en cours de chargement...
La page est en cours de chargement...
La page est en cours de chargement...
La page est en cours de chargement...
La page est en cours de chargement...
La page est en cours de chargement...
La page est en cours de chargement...
La page est en cours de chargement...
La page est en cours de chargement...
La page est en cours de chargement...
La page est en cours de chargement...
La page est en cours de chargement...
La page est en cours de chargement...
La page est en cours de chargement...
La page est en cours de chargement...
La page est en cours de chargement...
La page est en cours de chargement...
La page est en cours de chargement...
La page est en cours de chargement...
La page est en cours de chargement...
La page est en cours de chargement...
La page est en cours de chargement...
La page est en cours de chargement...
La page est en cours de chargement...
La page est en cours de chargement...
La page est en cours de chargement...
La page est en cours de chargement...
La page est en cours de chargement...
La page est en cours de chargement...
La page est en cours de chargement...
La page est en cours de chargement...
La page est en cours de chargement...
La page est en cours de chargement...
La page est en cours de chargement...
La page est en cours de chargement...
La page est en cours de chargement...
La page est en cours de chargement...
La page est en cours de chargement...
La page est en cours de chargement...
La page est en cours de chargement...
La page est en cours de chargement...
La page est en cours de chargement...
La page est en cours de chargement...
La page est en cours de chargement...
La page est en cours de chargement...
La page est en cours de chargement...
La page est en cours de chargement...
La page est en cours de chargement...
La page est en cours de chargement...
La page est en cours de chargement...
La page est en cours de chargement...
La page est en cours de chargement...
La page est en cours de chargement...
La page est en cours de chargement...
La page est en cours de chargement...
La page est en cours de chargement...
La page est en cours de chargement...
La page est en cours de chargement...
La page est en cours de chargement...
La page est en cours de chargement...
La page est en cours de chargement...
La page est en cours de chargement...
La page est en cours de chargement...
La page est en cours de chargement...
La page est en cours de chargement...
La page est en cours de chargement...
La page est en cours de chargement...
La page est en cours de chargement...
La page est en cours de chargement...
La page est en cours de chargement...
La page est en cours de chargement...
La page est en cours de chargement...
La page est en cours de chargement...
La page est en cours de chargement...
La page est en cours de chargement...
La page est en cours de chargement...
La page est en cours de chargement...
La page est en cours de chargement...
La page est en cours de chargement...
La page est en cours de chargement...
La page est en cours de chargement...
La page est en cours de chargement...
La page est en cours de chargement...
La page est en cours de chargement...
La page est en cours de chargement...
La page est en cours de chargement...
La page est en cours de chargement...
La page est en cours de chargement...
La page est en cours de chargement...
La page est en cours de chargement...
La page est en cours de chargement...
La page est en cours de chargement...
La page est en cours de chargement...
La page est en cours de chargement...
La page est en cours de chargement...
La page est en cours de chargement...
La page est en cours de chargement...
La page est en cours de chargement...
La page est en cours de chargement...
La page est en cours de chargement...
La page est en cours de chargement...
La page est en cours de chargement...
La page est en cours de chargement...
La page est en cours de chargement...
La page est en cours de chargement...
La page est en cours de chargement...
La page est en cours de chargement...
La page est en cours de chargement...
La page est en cours de chargement...
La page est en cours de chargement...
La page est en cours de chargement...
La page est en cours de chargement...
La page est en cours de chargement...
La page est en cours de chargement...
La page est en cours de chargement...
La page est en cours de chargement...
La page est en cours de chargement...
La page est en cours de chargement...
La page est en cours de chargement...
La page est en cours de chargement...
La page est en cours de chargement...
La page est en cours de chargement...
La page est en cours de chargement...
La page est en cours de chargement...
La page est en cours de chargement...
La page est en cours de chargement...
La page est en cours de chargement...
La page est en cours de chargement...
La page est en cours de chargement...
La page est en cours de chargement...
La page est en cours de chargement...
La page est en cours de chargement...
La page est en cours de chargement...
La page est en cours de chargement...
La page est en cours de chargement...
La page est en cours de chargement...
La page est en cours de chargement...
La page est en cours de chargement...
La page est en cours de chargement...
La page est en cours de chargement...
La page est en cours de chargement...
La page est en cours de chargement...
La page est en cours de chargement...
La page est en cours de chargement...
La page est en cours de chargement...
La page est en cours de chargement...
La page est en cours de chargement...
La page est en cours de chargement...
La page est en cours de chargement...
La page est en cours de chargement...
La page est en cours de chargement...
La page est en cours de chargement...
La page est en cours de chargement...
La page est en cours de chargement...
La page est en cours de chargement...
La page est en cours de chargement...
La page est en cours de chargement...
La page est en cours de chargement...
La page est en cours de chargement...
La page est en cours de chargement...
La page est en cours de chargement...
La page est en cours de chargement...
La page est en cours de chargement...
La page est en cours de chargement...
La page est en cours de chargement...
La page est en cours de chargement...
-
 1
1
-
 2
2
-
 3
3
-
 4
4
-
 5
5
-
 6
6
-
 7
7
-
 8
8
-
 9
9
-
 10
10
-
 11
11
-
 12
12
-
 13
13
-
 14
14
-
 15
15
-
 16
16
-
 17
17
-
 18
18
-
 19
19
-
 20
20
-
 21
21
-
 22
22
-
 23
23
-
 24
24
-
 25
25
-
 26
26
-
 27
27
-
 28
28
-
 29
29
-
 30
30
-
 31
31
-
 32
32
-
 33
33
-
 34
34
-
 35
35
-
 36
36
-
 37
37
-
 38
38
-
 39
39
-
 40
40
-
 41
41
-
 42
42
-
 43
43
-
 44
44
-
 45
45
-
 46
46
-
 47
47
-
 48
48
-
 49
49
-
 50
50
-
 51
51
-
 52
52
-
 53
53
-
 54
54
-
 55
55
-
 56
56
-
 57
57
-
 58
58
-
 59
59
-
 60
60
-
 61
61
-
 62
62
-
 63
63
-
 64
64
-
 65
65
-
 66
66
-
 67
67
-
 68
68
-
 69
69
-
 70
70
-
 71
71
-
 72
72
-
 73
73
-
 74
74
-
 75
75
-
 76
76
-
 77
77
-
 78
78
-
 79
79
-
 80
80
-
 81
81
-
 82
82
-
 83
83
-
 84
84
-
 85
85
-
 86
86
-
 87
87
-
 88
88
-
 89
89
-
 90
90
-
 91
91
-
 92
92
-
 93
93
-
 94
94
-
 95
95
-
 96
96
-
 97
97
-
 98
98
-
 99
99
-
 100
100
-
 101
101
-
 102
102
-
 103
103
-
 104
104
-
 105
105
-
 106
106
-
 107
107
-
 108
108
-
 109
109
-
 110
110
-
 111
111
-
 112
112
-
 113
113
-
 114
114
-
 115
115
-
 116
116
-
 117
117
-
 118
118
-
 119
119
-
 120
120
-
 121
121
-
 122
122
-
 123
123
-
 124
124
-
 125
125
-
 126
126
-
 127
127
-
 128
128
-
 129
129
-
 130
130
-
 131
131
-
 132
132
-
 133
133
-
 134
134
-
 135
135
-
 136
136
-
 137
137
-
 138
138
-
 139
139
-
 140
140
-
 141
141
-
 142
142
-
 143
143
-
 144
144
-
 145
145
-
 146
146
-
 147
147
-
 148
148
-
 149
149
-
 150
150
-
 151
151
-
 152
152
-
 153
153
-
 154
154
-
 155
155
-
 156
156
-
 157
157
-
 158
158
-
 159
159
-
 160
160
-
 161
161
-
 162
162
-
 163
163
-
 164
164
-
 165
165
-
 166
166
-
 167
167
-
 168
168
-
 169
169
-
 170
170
-
 171
171
-
 172
172
-
 173
173
-
 174
174
-
 175
175
-
 176
176
-
 177
177
-
 178
178
-
 179
179
-
 180
180
-
 181
181
-
 182
182
-
 183
183
-
 184
184
-
 185
185
-
 186
186
-
 187
187
-
 188
188
-
 189
189
-
 190
190
-
 191
191
-
 192
192
-
 193
193
-
 194
194
-
 195
195
-
 196
196
-
 197
197
-
 198
198
-
 199
199
-
 200
200
-
 201
201
-
 202
202
-
 203
203
-
 204
204
-
 205
205
-
 206
206
-
 207
207
-
 208
208
-
 209
209
-
 210
210
-
 211
211
-
 212
212
-
 213
213
-
 214
214
-
 215
215
-
 216
216
-
 217
217
-
 218
218
-
 219
219
-
 220
220
-
 221
221
-
 222
222
-
 223
223
-
 224
224
-
 225
225
-
 226
226
-
 227
227
-
 228
228
-
 229
229
-
 230
230
-
 231
231
-
 232
232
-
 233
233
-
 234
234
-
 235
235
-
 236
236
-
 237
237
-
 238
238
-
 239
239
-
 240
240
-
 241
241
-
 242
242
-
 243
243
-
 244
244
-
 245
245
-
 246
246
-
 247
247
-
 248
248
-
 249
249
-
 250
250
-
 251
251
-
 252
252


Nextar Q4 Series Manuel utilisateur
- Catégorie
- Navigateurs
- Taper
- Manuel utilisateur
dans d''autres langues
- English: Nextar Q4 Series User manual
Documents connexes
-
Nextar MN2707 Mode d'emploi
-
-
-
-
-
-
-
-
Autres documents
-
Alpine INE-Z928HD Le manuel du propriétaire
-
Clarion NX700 Manuel utilisateur
-
Alpine X009-GM Le manuel du propriétaire
-
 Mode Mini 305 Manuel utilisateur
-
Volvo V90 Cross Country Manuel utilisateur
-
-
Volvo 2021 Late Manuel utilisateur
-
Audiovox GMNAV2 Manuel utilisateur
-
Caliber MCD-263 Manuel utilisateur
-
Magellan CrossoverGPS Guide de démarrage rapide
