
0
INSTALLATION AND OPERATION MANUAL.
MANUEL D’INSTALLATION ET D’UTILISATION.
INSTALLATIONS UND BEDIENUNGSANLEITUNG.

1
English / CONTENTS.
Page
Safety information 2
Safety guidelines 2
Warning symbols 3
Liability 3
Foreword 3
General information 3
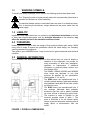
Mixer dimensions. Figure 1 3
Technical information. Table 1 4
Installation 4
Unpacking and handling 4
Location 5
Electrical installation 5
Electrical connection 6
Commissioning and operating instructions 6
Operation 6
Using for the first time 6
Mixer component identification. Figure 2 6
Using the bowl scraper 7
General bowl scraper use 7
Operating with the bowl scraper 8
Cleaning the bowl scraper 8
When mixing has finished 8
Using the attachment facility 9
Attachment safety instructions 9
Fitting an attachment 9
Safety instructions 9
Never 10
Always 10
Mixing capacity chart 11
Mixing chart-kitchen capacities HSM30 / NCM300. Table 2 11
Mixing chart-bakery capacities HSM30 / NCM300. Table 3. 11
Mixing chart-kitchen capacities HSM40 / NCM400. Table 4. 12
Mixing chart-bakery capacities HSM40 / NCM400. Table 5 12
Mixing chart-kitchen capacities 20 litre bowl. Table 6. 12
Mixing chart-bakery capacities 20 litre bowl. Table 7. 12
Mixer agitators 13
Cleaning 14
Cleaning before initial use 14
Cleaning after use 14
Guard removal and cleaning 14
Mixer maintenance 15
Fault finding 16
Recommended spares 17
Notes 18
Service information and addresses 19

2
1.0 SAFETY INFORMATION.
The procedures and precautions contained in this manual are understood to apply to the
machinery only when it is used in the prescribed manner.
If the machinery is used other than in the recommended manner, the operator will be
responsible for his/her own safety and for the safety of the other persons who may be
involved.
The information in this manual has been prepared to assist the operator to understand,
maintain, and operate the mixer. In order to prevent accidents, read, understand and
follow all the precautions and warnings contained in this manual before installation or
operating for the first time. This manual must be studied to obtain a clear understanding of
the mixer and its capabilities.
1.1 SAFETY GUIDELINES.
Ensure sufficient precautions are observed during manually handling of the mixer
particularly when moving into position on installation. Reference must be made to manual
handling regulations. The mixer weights are given in table 1.
· Do not hose or pressure clean this appliance. It is vital to adhere to the cleaning
instructions detailed in section 9 of this manual.
· Do not remove any covers or loosen any fittings whilst the machine is operating.
· Ensure this manual is kept in an easily accessible place for future reference near the
mixer.
· All operators must be trained in the safe operation of the mixer and attachments.
· Ensure the electrical supply has been isolated before attempting to service or move
the mixer.
· Rotating machinery and electricity are potentially hazardous and may cause injury if
sufficient precautions are not taken prior to operating or servicing the machine.
· Always have your mixer and attachments regularly serviced; at least twice a year,
depending on frequency of use.
· Important! When using reduced size equipment only the following bowls detailed in
section 12 must be used. Do not operate a mixer with any other reduced size bowl
combinations. Reduced sizes are 30 or 20 litre bowls on an HSM40 / NCM400 or 20
litre bowl on an HSM30 / NCM300. The recommended spares table in section 12
details the respective bowl and agitator part numbers.

3
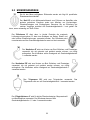
1.2 WARNING SYMBOLS.
To identify the safety messages in this manual, the following symbols have been used
The " Warning" symbol is found primarily where the corresponding information is
important for the safe use of the machinery.
The electrical hazard symbol is used when there are risks of an electrical nature.
Prior to servicing the machinery, always disconnect the power cable from the
mains supply.
1.3 LIABILITY.
Installations and repairs which are not carried out by Authorised technicians or the use
of other than original spare parts, and any technical alterations to the machine, may
affect the warranty set out in the standard conditions of sale.
2.0 FOREWORD.
Hobart reserves the right to alter the design of their products without prior notice. Whilst
every effort is made to ensure this publication reflects the latest design, the Company
cannot guarantee full compliance.
Take pride in your HSM/NCM mixer - keep it clean and in good mechanical and electrical
condition.
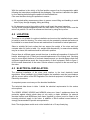
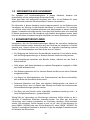
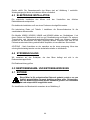
3.0 GENERAL INFORMATION
The information and instructions contained in this manual may not cover all details or
variations in the equipment, nor provide for
every eventuality to arise with installation,
operation, or maintenance. If additional
information is required please contact your
local Hobart office.
The HSM30, HSM40, NCM300 and NCM400
mixer range are designed to mix food
products as detailed on the specification
charts (tables 2, 3, 4 and 5).
The HSM mixers are manufactured from 2
mettalic painted castings, fabricated stainless
steel pedestal, back panel & feet, with a lastic
moulded top cover
The NCM mixers are manufactured from 2
iron castings, fabricated steel pedestal,
aluminium cast feet, with a plastic moulded
top cover all with a Hobart grey paint finish.
The machine is rated to operate on the
electrical supplies shown in table 1. The
mixer is fitted with a ‘no volt release’ safety
feature to prevent automatic restarting after a
supply failure or disconnection from the
mains.
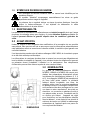
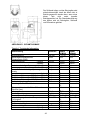
FIGURE 1. OVERALL DIMENSIONS.

4
The bowl support and the guard are interlocked so that when either are not in their correct
operating positions, the mixer will not work. The standard mixer is delivered with guard,
bowl and agitators.
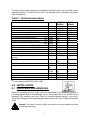
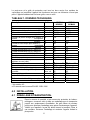
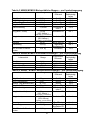
Table 1. Technical information.
Description Units HSM30
NCM300
HSM40
NCM400
Motor power kW (hp) 1.1 (1.5) 1.1 (1.5)
Maximum speed of rotating part (50Hz) rpm 1425 1425
Nominal electrical supply 1 ph Volts/Hz 230/50 230/50
3 ph 400/50 400/50
Full load current at above voltage 1 ph Amps 7.4 7.4
3 ph Amps 2.8 2.8
Locked rotor current at above voltage 1ph Amps 44 16
3 ph Amps 16 16
Recommended fuse size 230v/1 ph/50hz amps 20 20
Recommended fuse size 230v/3 ph/50hz amps 16 16
Recommended fuse size 400v/3 ph/50hz amps 10 10
Maximum ambient temperature
o
C40 40
Attachment hub drive size -- Number 12 Number 12
Mixer weight including agitator and bowl
(empty)
Kg (Lbs) 241 (531) 246 (542)
Noise level dB (A)
##
less than
70
##
less than
70
Shipping weight kg (Lbs) 255 (562) 260 (573)
Shipping dimensions (carton) LxWxH
cm
99x81x155 99x81x155
Storage conditions. Temperature and humidity.
o
C,
% RH
+5 to +38,
85
+5 to +38,
85
Class of appliance
#
Class I
#
Class I
Enclosure IP rating IP44 IP44
Wiring terminal size; single phase/3 phase mm
2
1.5/1.0 1.5/1.0
#
Refer to section 4.3.
##
In accordance with EN-ISO 12001:1996.
4.0 INSTALLATION.
4.1 UNPACKING AND HANDLING.
Where ever possible the food mixer should be transported to the installation position in
the packaging provided to avoid damage. Do not use a sharp knife to cut into the box as
damage to the machine may occur. Check for possible shipping damage. If the unit is
found to be damaged, save the packaging material and contact your nearest Hobart sales
office.
Caution: The mixer is a heavy object and must be correctly handled and lifted
to avoid personal injury.

5
With the machine in the vicinity of its final position remove from the transportation pallet
following the instructions provided with the packaging. The machine is affixed to the pallet
by four retaining bolts through the pallet into the threaded feet.
Care must be taken during this operation to ensure: -
a) All required safety measures are taken to ensure correct lifting and handling to avoid
risk of injury through dropping, falling and tilting.
b) No damage occurs to the machine, which could impair the normal operation.
The top cover is packed separately within the main carton. Only fit the top cover once the
mixer is in position. Do not lift or manoeuvre the mixer by using the top cover.
4.2 LOCATION.
The mixer is not suitable for outdoor installation and must not be installed where a water
jet could be used for cleaning. The mixer must only be operated by trained staff and must
be installed in an area where the use and maintenance is restricted to trained personnel.
Select a suitable flat level surface that can support the weight of the mixer and bowl
contents when full (refer to table 1 for weights and dimensions). In areas where stability
may be an issue, the machine should be secured in position.
Ensure there is sufficient space around the mixer to enable safe operation of the bowl lift
handle, attachment hub (if fitted) and removal/replacement of the mixing bowl. Servicing
may be more difficult because of reduced clearances and you should always check that
equipment specifications permit the close proximity of other equipment. Refer to figure 1
for the overall dimensions of the mixer. Service access is required to the rear and top of
the mixer.
4.3 ELECTRICAL INSTALLATION.
The electrical installation of the mixer must conform to the local electricity board
regulations. When installed in the United Kingdom the installation must be in accordance
with the current edition of the IEE Regulations for electrical equipment in buildings and the
Electricity at work act.
A competent person must carry out the electrical installation.
The technical data shown in table 1 details the electrical requirements for the various
mixer options.
The HSM30, HSM40, NCM300 and NCM400 mixers are ‘class I’ appliances where the
protection against electric shock does not rely solely on basic insulation. An external
electrical isolator and MCB/fuses (both items supplied by others) must be fitted to the
incoming electrical supply to the mixer. In addition a 30mA residual current device is
strongly recommended to provide extra protection.
Note: The single-phase model must not be installed via a 13 amp fused plug.

6
2
1
3
4
5
6
11
7
8
9
10
4.4 ELECTRICAL CONNECTION.
Refer to the wiring diagram supplied with the mixer and enclosed in the document
envelope.
Check direction of rotation.
5.0 COMMISSIONING AND OPERATING INSTRUCTIONS.
5.1 OPERATION
This food mixer is only for professional use by suitably trained persons.
Ensure operators have read and understood this manual and have
received adequate training.
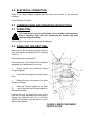
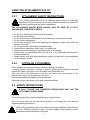
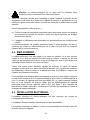
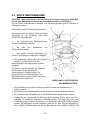
Refer to figure 2 for the mixer component identification.
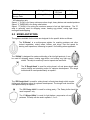
5.2 USING FOR THE FIRST TIME.
Before use for the first time thoroughly clean the
bowl and agitator as described in the cleaning
section 9.
Ensure the mixer is switched off.
Ensure the cover (10) is fitted to the hub (where
applicable) if an attachment is not in use.
· Always remove any attachment before
using the agitator.
· Lower the bowl support by using the hand
lever.
· Rotate the front of the guard (5) to allow
access to the bowl.
· Place the required agitator in the bowl
(7), and fit the bowl onto the bowl support in
the lowered position.
Position the bowl by aligning the back of the
bowl with the stop situated on the bowl support.
Engage the alignment pins (6) on the bowl
support into the bowl ‘ears’,and secure in place
with the bowl clamps.
FIGURE 2. MIXER COMPONENT
IDENTIFICATION.

7
· Important! When using reduced size equipment only the following bowls detailed in
section 12 must be used. Do not operate a mixer with any other reduced size bowl
combinations. Reduced sizes are 30 or 20 litre bowls on an HSM40 / NCM400 or 20
litre bowl on an HSM30 / NCM300. The recommended spares table in section 12
details the respective bowl and agitator part numbers.
Slide the agitators on the shaft turning to engage the drive pin in the "L" slot.
· Add ingredients to the bowl and raise the bowl by hand lever.
· Rotate the front of the guard (5) to the operating (closed) position.
(NOTE. An electrical interlock is fitted to the bowl support to prevent accidental starting
when bowl is in the down position and an electrical interlock is also fitted to the guard to
prevent accidental starting when in the open position).
Select the desired speed (4) and set timer setting (1) if fitted.
· Setting the Timer .
a) Non-timed operation - Adjust the timer to the “HOLD” position.
b) Timed Operation – Turn timer past the desired position and then rotate back to
the desired time
· Start the machine by pressing start button (2). Note the mixer speed must not be
changed while the machine is operating. Stop (3) the mixer before changing speed.
If machine fails to operate, please check that the bowl support is in the up position and the
guard is in the operating position.
5.3 USING THE BOWL SCRAPER.
5.3.1 GENERAL BOWL SCRAPER USE.
The mixer bowl scraper attachment continually scrapes the sides of the bowl as the
agitator turns causing material around the sides and bottom of the bowl to be constantly
re-introduced into the mixture. Manual scraping is not required when using the bowl
scraper. The bowl scraper should only be used with stainless steel bowls.
Always use the correct size sleeve with the scraper arm. Be careful not to mix sleeves and
arms if you have multiple sizes of scrapers. Always ensure the correct scraper is used with
the right sized bowl.

1
4th July 2006
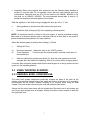
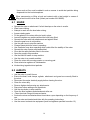
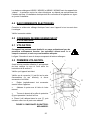
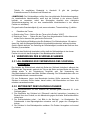
HSM30/40 bowl height adjustment.
Fit the beater and raise the
bowl to the ‘up’ position.
Isolate the electricity supply to
the mixer. Rotate the beater to
an accessible position.
Using a gauge of the
correct thickness (1.5 mm)
check the clearance
between the beater and
bowl.
Rotate the lock nut anti-clockwise to
reduce the clearance and clockwise
to increase the clearance.
The height of the bowl support on
the guide rods determines the bowl
to beater clearance. If the
clearance is incorrect adjust the
lock nut to alter the height.
Lock nut
Bowl
support
19mm
socket.
1.
2.
3.
4.
5.

8
5.3.2 OPERATING WITH THE BOWL SCRAPER.
1. Place the bowl scraper in the bowl before lifting into position as described in section
5.1.
2. Lubricate the surface of the bowl with vegetable oil or shortening, especially in the
area above the product where the sleeve may rub against the bare surface of the
bowl.
3. The bowl scraper rotates clockwise as you look into the bowl. Insert the scraper
shaft into the bayonet housing and rotate 90
o
anti-clockwise.
4. Raise the bowl to its operating position. Add the ingredients and mix normally.
5. After mixing lower the bowl and rotate the bowl scraper clockwise and lower to
remove.
Note:
¨ Only use speeds 1 and 2.
¨ Products, which can be mixed, whilst using the bowl scraper are: mashed potato,
waffle batter, cake batter, icing, creaming shortening/sugar, creaming eggs/sugar, and
mayonnaise.
¨ The bowl scraper should only be used with a wire whip or flat beater only. Do not use
when mixing dough products.
¨ Never raise a bowl of stiff product (i.e. cream cheese, shortening, unmashed potatoes)
with the scraper arm located in the housing. The scraper arm can be permanently bent
and become damaged by rotating agitators. Load the bowl with ingredient after it is
raised.
5.3.3 CLEANING THE BOWL SCRAPER.
Remove the plastic sleeve from the stainless steel arm. Tapping the sleeve against the
edge of a table will aid its removal. Clean both parts in a sink with hot water and detergent
solution. Rinse with clean water and dry.
Slide the sleeve onto the arm so the bevelled edge is the leading edge. Use water as a
lubricant. The end of the sleeve must be flush with the end of the arm.
Note: Do not use aggressive chemicals to clean the sleeve since they may degrade the
plastic material.
5.4 WHEN MIXING HAS FINISHED.
· When mixing is complete stop the machine using the stop button (3).
· Rotate the front of the guard (5) to the open position.
· Lower the bowl support and remove agitator from shaft (8).
· If fitted remove the bowl scraper from the bayonet housing by rotating anti-
clockwise.
· Remove bowl (7) and agitator from mixer to empty .

9
USING THE ATTACHMENT FACILITY.
5.5.1 ATTACHMENT SAFETY INSTRUCTIONS.
The following instructions must be observed when using the mixer with
attachments. Please also refer to the safety instructions detailed in section 6.0
and the instructions provided with the attachment.
THE ATTACHMENT AND/OR MIXER SHOULD ONLY BE USED BY A FULLY
TRAINED AND COMPETENT PERSON.
· Do not fit an attachment while the mixer is operating.
· Do not wear loose clothing.
· Do not use the mixer or attachment if a fault develops or the machine is unsafe.
· Do not access rotating parts.
· Do not use excessive force when operating the attachment, which could affect the
stability of the mixer.
· Do not operate the mixer if parts are disassembled.
· Always use the attachment and/or mixer in a well-lit area.
· Always ensure the attachment is operating at the correct speed.
· Always clean the attachments after use and refer to the attachment manufacturer’s
cleaning instructions.
· Always service your mixer and attachments regularly; at least twice a year depending
on the frequency of use.
5.5.2 FITTING AN ATTACHMENT.
When installing the attachment ensure the electricity supply is isolated.
Loosen the thumb screw (item 12 shown on figure 2) situated on the attachment hub and
remove the plastic cover and put in a safe place to be refitted after use.
Offer the shaft of the attachment to the hub and ensure the square shank of the
attachment locates in the square drive of the mixer
Secure the attachment by tightening the thumbscrew.
Select the correct mixer speed for the type of attachment fitted.
6.0 SAFETY INSTRUCTIONS.
A FULLY TRAINED AND COMPETENT PERSON MUST ONLY USE THE
ATTACHMENT AND/OR MIXER.
The following instructions must be observed when using the mixer.
Note: The mixer must only be used for the purpose it was design and inline with the
supplied operating instructions.
When mixing ingredients care must be taken to avoid the inhalation of dust particles
e.g. flour. Reference should be made to product supplier’s data sheets to ensure
adequate precautions/protections are taken.

10
Items such as flour must be added in such a manner to avoid dust particles being
dispersed into the local atmosphere.
When manoeuvring or lifting a bowl and contents with a total weight in excess of
25kg a bowl truck must be used (Hobart part number M-L108865).
6.1 NEVER
· Operate the mixer or attachment if a fault develops or the mixer is unsafe.
· Wear loose clothing.
· Attempt to reach into the bowl when mixing.
· Access rotating parts.
· Fit the agitator to the mixer without a bowl in place.
· Leave the agitator on machine without the bowl being fitted.
· Operate the mixer with both attachments and agitator fitted.
· Leave the gear lever in mid position.
· Use the gear lever to stop the machine.
· Change speed whilst the mixer is operating.
· Use excessive force when operating which could affect the stability of the mixer.
· Operate the mixer if parts are disassembled.
· Over ride the safety switches fitted to the mixer.
· Open the guard to stop machine.
· Use the bowl lift handle to stop machine.
· Use the mixer in an unsafe condition.
· Clean the mixer with scouring powder or a scouring pad.
· Clean aluminium agitators in a dishwasher.
· Inhale mixing ingredient dust particles.
6.2 ALWAYS
· Use the mixer in a well-lit area.
· Ensure the bowl, bowl clamps, agitator, attachment and guard are correctly fitted to
the mixer.
· Disconnect the mains electricity supply before cleaning the mixer.
· Clean the mixer daily.
· Remove Agitator before using any attachments.
· Stop mixer before adding more ingredients.
· Use the stop button to stop machine.
· Clean the bowl, agitators and attachments after use.
· Clean the mixer using mild soap and water.
· Service the mixer and attachments at least twice a year depending on the frequency of
use.
· Use the mixer as intended and inline with the operating instructions.
· Use the correct reduced size equipment (bowl and agitators specified in section 12).

11
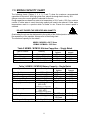
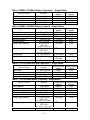
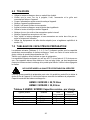
7.0 MIXING CAPACITY CHART
The following charts (Tables 2, 3, 4, 5, 6 and 7) show the maximum recommended
capacities for the mixer. With high gluten flour reduce the dough batch size by 10%.
Always ensure the correct agitator is selected for the mix.
Dough capacities are based on water at a temperature of 21
o
C and a 12% flour moisture
content. If colder water is used, the mixing capacity will need to be reduced. Colder water
temperatures result in a product which is harder to mix. Ensure the correct speed is
selected.
DO NOT EXCEED THE SPECIFIED MIX QUANTITY
Overloading the mix can be detrimental to the quality of the finished product and affect the
life expectancy of the machine. Always refer to the mixing chart
The maximum capacity for the mixers: -
HSM30 / NCM300 = 28.75 litres
HSM40 / NCM400 = 38.5 litres
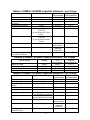
Table 2 HSM30 / NCM300 Kitchen Capacities - Single Batch
Type of Product Quantity
Recommended
Agitator
Recommended
speeds
Egg Whites 1.7 litres (3 pints) Whip 1/2/3
Mashed Potatoes 10.4 kg (23 Lbs) B Beater 1
Mayonnaise (Oil) 13.6 litres (24 pints) Whip 2 / 3
Whipped Cream 17.0 litres (30 pints) Whip 1/2/3
Table 3 HSM30 / NCM300 Bakery Capacity - Single Batch
Type of Product Quantity Recommended
Agitator
Recommended
Speeds
Cake, Madeira 13.5 kg (30 Lbs) B Beater 1/2/3
Cake , Pound 12.7 kg (28 Lbs) B Beater 1/2/3
Light Batter (Sponge Cake) 9.1 kg (20 Lbs) B Beater 1/2/3
Steamed pudding 13.5 kg (30 Lbs) E or EB 1/2/3
Yorkshire batter 13.6 litres (24 pints) B or C whip 2 or 3
Dough (light -medium) 13.5 kg (30 Lbs)
(65% A/R)
(8.8kg flour 4.7 litre water)
ED Hook 1 only
Dough (heavy) 10.9 kg (24 Lbs)
(50% A/R)
(7.3 kg flour 3.6 litre water)
ED Hook 1 only
Pizza dough 6.8 kg (15Lbs) E or ED only 1 only
Pie Pastry 10.9 kg (24 Lbs) Pastry Knife
ED Hook
1 only
Fat & Sugar for Sponge Cake 10.9 kg (24 Lbs) Whip 1/2/3

12
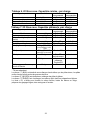
Table 4 HSM40 / NCM400 Kitchen Capacities - Single Batch
Type of Product Quantity
Recommended
Agitator
Recommended
speeds
Egg Whites 2 litres (3.5 pints) Whip 1/2/3
Mashed Potatoes 12.7 kg (28 Lbs) B Beater 1
Mayonnaise (Oil) 17 litres (30 pints) Whip 2 / 3
Whipped Cream 22.6 litres (40 pints) Whip 1/2/3
Table 5 HSM40 / NCM400 Bakery Capacity - Single Batch
Type of Product Quantity Recommended
Agitator
Recommended
Speeds
Cake, Madeira 18 kg (40 Lbs) B Beater 1/2/3
Cake , Pound 16 kg (35 Lbs) B Beater 1/2/3
Light Batter (Sponge Cake) 12.7 kg (28 Lbs) B Beater 1/2/3
Steamed pudding 18 kg (40 Lbs) E or EB 1/2/3
Yorkshire batter 17 litres (30 pints) B or C whip 2 or 3
Dough (light-medium) 18 kg (40 Lbs)
(65% A/R
(11 kg flour 7 litre water)
ED Hook 1 only
Dough (heavy) 13.5 kg (30 Lbs)
(50% A/R)
(9 kg flour 4.5 litre water)
ED Hook 1 only
Pizza dough 9.1 kg (20 Lbs) E or ED only 1 only
Pie Pastry 13.5 kg (30 Lbs) Pastry Knife
ED Hook
1 only
Fat & Sugar for Sponge Cake 13.5 kg (30 Lbs) Whip 1/2/3
Table 6. 20 Litre bowl Kitchen Capacities - Single Batch
Type of Product Quantity
Recommended
Agitator
Recommended
speeds
Egg Whites 1.1 litres (2 pints) Whip 1/2/3
Mashed Potatoes 6.8 kg (15 Lbs) B Beater 1
Mayonnaise (Oil) 11.4 litres (20 pints) Whip 2 / 3
Whipped Cream 11.4 litres (20 pints) Whip 1/2/3
Table 7. 20 Litre bowl Bakery Capacity - Single Batch
Type of Product Quantity Recommended
Agitator
Recommended
Speeds
Cake, Madeira 9 kg (20 Lbs) B Beater 1/2/3
Cake , Pound 9 kg (20 Lbs) B Beater 1/2/3
Light Batter (Sponge Cake) 6.4 kg (14 Lbs) B Beater 1/2/3
Steamed pudding 9 kg (20 Lbs) E or EB 1/2/3
Yorkshire batter 9.1 litres (16 pints) B or C whip 2 or 3
Dough (light-medium) 9.1 kg (20 Lbs)
(65% A/R)
(5.6 kg flour 3.5 litre water)
ED Hook 1 only
Dough (heavy) 5.8 kg (13 Lbs)
(50% A/R)
(3.9 kg flour 1.9 litre water)
ED Hook 1 only
Pizza dough 5.0 kg (10 Lbs) E or ED only 1 only

13
Pie Pastry 7.3 kg (16 Lbs) Pastry Knife
ED Hook
1 only
Fat & Sugar for
Sponge Cake
6.8 kg (15 Lbs) Whip 1/2/3
* A/R absorption ratio.
Speed “1” (LOW) is for Heavy mixtures such as dough, heavy batters and mashed potatoes
Speed “2” (MEDIUM) is for mixing cake batters
Speed “3” (HIGH) is for mixing the maximum amount of air into light batches. The “D”
whip is generally used for whipping cream, beating egg whites, mixing light icings,
meringues and whipping.
8.0 MIXER AGITATORS.
The agitators available for the mixer are designed for the specific duties as follows:
The ‘B Beater’ is a multi-purpose agitator for mashing potatoes and other
cooked vegetables, mixing cakes, batters, and icings. Use first speed for
starting most operations, increasing to speed 2 for finishing where applicable.
The ‘D Whip’ is designed for maximum blending of air into light products. It can
be used for whipping cream, beating egg whites, and mixing very light egg
whites. The whip is commonly used on speeds two and three.
The ‘E Dough Hook’ is used for mixing bread, roll and pizza dough which
require folding and stretching action for optimum development. The dough
hook should be used predominantly on speed 1.
The ‘ED Dough Hook’ is used for mixing bread, roll and pizza dough which require
folding and stretching action for optimum development. The dough hook should be
used predominantly on speed 1.
The ‘PK Pastry Knife’ is used for mixing pastry. The Pastry knife should be
used in speed 1 only.
The ‘C Winged Whip’ is used for light batters, mayonnaise oil and mashed
potatoes. The whip can be used in speeds 1, 2 or 3.

14
9.0 CLEANING.
DO NOT HOSE OR PRESSURE CLEAN THIS MIXER
DO NOT USE ANY ABRASIVE CLEANERS
Ensure that the machine is disconnected from the main electrical power supply prior to
cleaning
9.1 CLEANING BEFORE INITIAL USE.
Before using for the first time, thoroughly wash new mixer bowls, agitators and attachments.
Wash in hot water and a mild detergent solution. This procedure should also be followed for
bowls and agitators before whipping egg whites or whole eggs.
9.2 CLEANING AFTER USE.
After use, clean the mixing bowl, agitators and attachments with hot water, using a
suitable non-abrasive detergent and soft bristle brush. (Flushing the bowl with hot water
immediately after use will ease the cleaning).
Note: Do not clean the aluminium agitators in a dishwasher
Clean the mixer with a hot damp cloth; thoroughly wipe the bowl support arms and all
exterior surfaces. The guard should be cleaned as follows.
9.3 GUARD REMOVAL & CLEANING.
The guard assembly has been designed to be removed easily for machine washing.
To remove the guard assembly.
· Ensure that the bowl support is in the lowered position.
· Remove the agitator and bowl.
· Withdraw the interlock plunger and rotate the guard deflector assembly in an anti-
clockwise direction until the unit disengages from the sprung retainers. At this point
care should be taken, as the guard will now be able to drop freely from the machine.
· Carefully lower the guard assembly and remove.
Cleaning the guard.
The guard should be cleaned at the end of each day.
Once the guard is removed it can be cleaned with hot water, using a suitable non-
abrasive detergent and soft bristle brush. Alternatively the guard can be cleaned in a
commercial dishwasher.
To refit guard assembly to the machine.
· Orientate the guard with the deflector to the back of the mixer and push on to the
mixer.
· Rotate the guard deflector clockwise so it is fully engaged onto the sprung retainers.
When in position the guard will come to a dead stop.

15
10.0 MIXER MAINTENANCE.
A HOBART TRAINED AND COMPETENT PERSON SHOULD CARRY OUT
SERVICING.
Do not remove any covers or loosen any fittings while the mixer is operating.
Ensure the electrical supply has been isolated before attempting to service or
move the mixer. The motor and transmission are packed with special grease,
which will last for several years. When replacement is needed, contact your
local service centre.
The bowl support guide rods should be lubricated occasionally with a small amount of
food grade grease applied with the fingertip, to prevent corrosion and ensure smooth
operation
It is recommended that the mixer is serviced regularly (recommended twice yearly)
A spare parts Manual (ple200459) is available on request from Hobart National Parts
Distribution Centre. For continued safe and reliable operation of this mixer, it is
recommended that servicing is only carried out by Hobart trained service personnel.

16
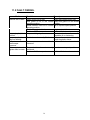
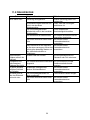
11.0 FAULT FINDING.
Fault Possible cause Remedy
Blown control circuit fuse Check and replace faulty fuse
Bowl guard is not in the correct
operating position
Check that guard is in the closed
position
Speed selection lever not in correct
operating position
Set to required speed position
Electrical supply isolated Plug in and switch on.
Machine fails to start.
Machine still fails to operate Call local Hobart service centre.
Scraper (option) binds
on bowl.
Scraper rubbing dry Lubricate bowl surface with
vegetable oil or shortening
Scraper (option) bevel
edge not leading.
Plastic sleeve incorrectly fitted Remove the arm and correctly
install the plastic sleeve.
Excessive
bowl/scraper
clearance
Bent scraper arm or incorrect bowl
clearance
Call local Hobart service centre
Gear selection lever incorrectly
positioned.
Move to correct speed position.Motor starts but
agitator fails to rotate.
Machine still fails to operate Call local Hobart service centre

17
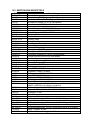
12.0 RECOMMENDED SPARES
Part Number Description
PLE200459 Catalogue of replacement parts
144452-1 Motor 1 phase. 230/50/1 (as appropriate for model)
138725 Capacitor, start (160-200 µF) (as appropriate for model)
138724 Capacitor, run (15 µF) (as appropriate for model)
144453-1 Motor 3 phase. 400/50/3(as appropriate for model)
00-737986 Drive belt
00-737991-4 Top cover, timer NCM300, NCM400
00-737991-3 Top cover, no timer NCM300, NCM400
00-737991-9 Top cover, timer HSM30, HSM40
141932 Switch, gear change
EPM-E-16-14 Switch Start,
EPM-E-16-15 Switch Stop,
SS-E-18-11 Timer, 30 min
140807 Reed switch, guard.
144358 Switch, bowl support
00-738163 Guard. HSM30 / NCM 300
00-738164 Guard. HSM40 / NCM400
142403-10 Thermal overload, 230/50/1(as appropriate for model)
142403-8 Thermal overload, 400/50/3 (as appropriate for model)
141440-1 Contactor
140869-10 Fuse, control 315mA
140869-19 Fuse, control 2A
140908-3 Transformer 400/50/3
OSM-E-1-12 Oil seal
R-9440-E Beater, HSM30 / NCM300
R-9443-E Whip, HSM30 / NCM300
141721 ED hook, HSM30 / NCM300
53572 Beater, HSM40 / NCM400
53577 Whip, HSM40 / NCM400
140688 ED hook, HSM40 / NCM400
SU-E-3-4 Light food grade oil
00-738662 20 litre bowl to suit HSM30, HSM40, NCM300 and NCM400. Adaptor
required for HSM40 / NCM400
00-738664 30 litre bowl to suit HSM40 / NCM400
53600 Adaptor to suit 30 litre bowl for HSM40 / NCM400
10470-E D Whip, 20 litre (half size)
10469-E Beater, 20 litre (half size)
51831 E flat hook 20 litre (half size)
ML-109241 Bowl scraper assembly 20 litre including blade and housing
737458-2 Blade-scraper 20 litre
ML-109242 Bowl scraper assembly 30 litre including blade and housing
737458-3 Blade-scraper 30 litre
ML-109243 Bowl scraper assembly 40 litre including blade and housing
737458-4 Blade-scraper 40 litre
00-738071 Housing-bowl scraper (all capacities)

18
NOTES:
La page est en cours de chargement...
La page est en cours de chargement...
La page est en cours de chargement...
La page est en cours de chargement...
La page est en cours de chargement...
La page est en cours de chargement...
La page est en cours de chargement...
La page est en cours de chargement...
La page est en cours de chargement...
La page est en cours de chargement...
La page est en cours de chargement...
La page est en cours de chargement...
La page est en cours de chargement...
La page est en cours de chargement...
La page est en cours de chargement...
La page est en cours de chargement...
La page est en cours de chargement...
La page est en cours de chargement...
La page est en cours de chargement...
La page est en cours de chargement...
La page est en cours de chargement...
La page est en cours de chargement...
La page est en cours de chargement...
La page est en cours de chargement...
La page est en cours de chargement...
La page est en cours de chargement...
La page est en cours de chargement...
La page est en cours de chargement...
La page est en cours de chargement...
La page est en cours de chargement...
La page est en cours de chargement...
La page est en cours de chargement...
La page est en cours de chargement...
La page est en cours de chargement...
La page est en cours de chargement...
La page est en cours de chargement...
La page est en cours de chargement...
La page est en cours de chargement...
La page est en cours de chargement...
La page est en cours de chargement...
La page est en cours de chargement...
-
 1
1
-
 2
2
-
 3
3
-
 4
4
-
 5
5
-
 6
6
-
 7
7
-
 8
8
-
 9
9
-
 10
10
-
 11
11
-
 12
12
-
 13
13
-
 14
14
-
 15
15
-
 16
16
-
 17
17
-
 18
18
-
 19
19
-
 20
20
-
 21
21
-
 22
22
-
 23
23
-
 24
24
-
 25
25
-
 26
26
-
 27
27
-
 28
28
-
 29
29
-
 30
30
-
 31
31
-
 32
32
-
 33
33
-
 34
34
-
 35
35
-
 36
36
-
 37
37
-
 38
38
-
 39
39
-
 40
40
-
 41
41
-
 42
42
-
 43
43
-
 44
44
-
 45
45
-
 46
46
-
 47
47
-
 48
48
-
 49
49
-
 50
50
-
 51
51
-
 52
52
-
 53
53
-
 54
54
-
 55
55
-
 56
56
-
 57
57
-
 58
58
-
 59
59
-
 60
60
-
 61
61


Hobart HSM30 Mode d'emploi
- Catégorie
- Mélangeurs
- Taper
- Mode d'emploi
dans d''autres langues
- English: Hobart HSM30 Operating instructions
- Deutsch: Hobart HSM30 Bedienungsanleitung
Documents connexes
-
Hobart H-600 Mode d'emploi
-
Hobart HL1400N Mode d'emploi
-
-
-
-
-
-
Hobart HSM10 Installation & Operation Manual
-
-
Autres documents
-
Varimixer RN20 VL-2 Mode d'emploi
-
-
Elta HM211 Manuel utilisateur
-
-
-
Maxima 09361906 Le manuel du propriétaire
-
Vollrath Mixer Manuel utilisateur
-
Hamilton Beach HMD300-UK Le manuel du propriétaire
-
Cloer 700 Operating Instructions Manual
-
 MaxPro 330015 Manuel utilisateur
