Kolcraft JL027 Manuel utilisateur
- Catégorie
- Poussettes
- Taper
- Manuel utilisateur
Ce manuel convient également à

©2007 Kolcraft
®
Enterprises, Inc.
S45J-T 5/07
Jeep
®
Liberty 3-Wheel Stroller
Instruction Sheet
Instrucciones para carriola de 3 ruedas
Jeep
®
Liberty
Feuillet d'Instructions pour Poussette
à Trois Roues pour Jeep
®
Liberty

2
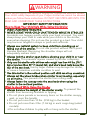
Avoid serious injury from falling or sliding out. Always use Restraint System.
Your child's safety depends on you. Proper stroller use cannot be assured
unless you follow these instructions. DO NOT USE STROLLER UNTIL YOU
READ AND UNDERSTAND THESE INSTRUCTIONS.
IMPORTANT SAFETY INFORMATION:
How to Keep Your Child Safe While Using this Stroller
•
Adult Assembly Required.
• NEVER LEAVE YOUR CHILD UNATTENDED WHILE IN STROLLER.
Accidents can happen quickly while your back is turned. You must
always keep your child in view while your child is in the stroller,
even when sleeping. Do not use this product as a bed. Your child
may become tangled in straps or pads and suffocate.
• Always use restraint system to keep child from standing up or
falling out of the stroller. Do not use product without full 5-point
Harness Restraint. Removing the shoulder straps will not
adequately restrain child.
• Always lock the stroller open before allowing your child in or near
the stroller. This prevents injuries caused by stroller collapsing.
•
Only use this stroller with children who weigh less than 40 lbs. (18.1
kg) or are less than 40” (1 meter) tall, and who’s head rests below the
top of the seat back. Use by larger children may damage the stroller,
or cause a hazardous unstable condition to exist.
•
Use this stroller in the reclined position until child can sit up unassisted.
• Always set the wheel brakes when stroller is not moving, especially
on an incline. This prevents the stroller from rolling away.
• Always fasten the canopy onto the seat back when using the
stroller in the reclined position.
What to Avoid While Using this Stroller
• Always balance the weight of the stroller evenly. To prevent the
stroller from becoming unstable or tipping:
• Do not place parcels or accessory items on the stroller canopy,
seat, or over the handle.
• Do not put more than 10 lbs. (4.54 kg) in the basket.
• Do not put more than 3 lbs. (1.36 kg) in each cargo bag (select
models).
• Do not allow children to play with or hang onto the stroller.
WARNING
Continued on next page

• Never use this stroller on stairways or escalators.
• DO NOT lift by tray or toys.
• Make sure children are clear of any moving parts if you adjust the
stroller, otherwise they may be injured.
• THIS IS NOT AN EXERCISE STROLLER! Do not use this product
while running, jogging, in-line skating or participating in other
athletic activities.
• DO NOT put child in basket.
• DO NOT use any infant car seats with this stroller. Serious injury
could occur.
• Take care when folding and unfolding to prevent finger pinching.
• Product may become unstable if a parcel bag, other than the one
recommended by the manufacturer is used.
• DO NOT allow children to climb into stroller unassisted. Stroller
may tip over and injure child.
• Keep wheels at a recommended tire pressure of 35 p.s.i. (241 kPa)
(select models).
• Only use replacement parts supplied by the manufacturer. If you
have a flat tire, you may use a standard bicycle tire repair kit or
take it to a bicycle shop to be repaired.
3
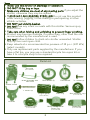
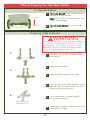
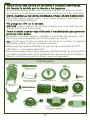
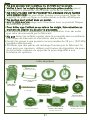
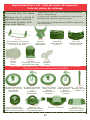
Parts List
Stroller Frame
Front WheelRear Wheels (2)
Music On The Move
®
Parent Tray
(Select Models)
Footrest
½” Screws (2)
Air Pump
(Select Models)
Brake Assembly with
Rear Axle
Front Tray
Electronic Toys
(Select Models)
Non Electronic Toys
(Select Models)
Parent Tray
(Select Models)
1” Screws (2)
Cargo Bags (2)
(Select Models)

4
5
6
4
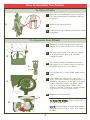
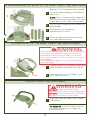
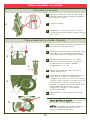
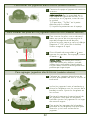
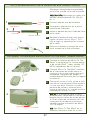
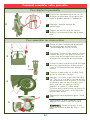
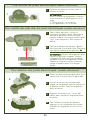
How to Assemble Your Stroller
To Open Stroller
Remove any cardboard inserts or plastic
ties used to protect the product during
shipment.
Release the locking latch.
Unfold, making sure both side locks snap
into place.
2
3
2
1
To Assemble Rear Wheels
Remove and discard protective plastic
sleeve from ends of rear axle assembly.
Position rear brake assembly as shown,
with brake levers pointing towards
stroller handle.
Push both brake assemblies onto rear
leg tubes at the same time until spring
loaded buttons click into place.
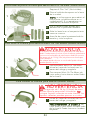
Lay stroller on its side. Slide wheel onto
axle.
Push down on wheel until you hear a
click. Pull up on wheel to make sure it is
properly secured. If wheel pulls off, push
wheel onto axle again but push metal
clip in at the same time. Make sure
wheel is secure. Failure to secure wheels
may result in injury to your child.
Repeat for second side.
TO REMOVE WHEEL. Press metal clip in
and pull wheel off.
NOTE: Keep wheels at a recommended
tire pressure of 35 p.s.i. (241 kPa) (select
models).
2
3
1
2
3
4
5

5
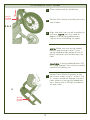
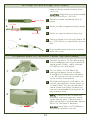
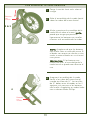
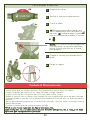
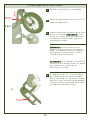
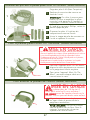
To Assemble Front Wheel
1
Place stroller back on handle bar.
Position front wheel assembly over front
frame tubes.
Align and push front wheel assembly on
to frame. NOTE: You may need to
depress the spring loaded buttons
slightly while assembling the tubes.
NOTE: Make sure that spring loaded
buttons pop through frame. If your
spring loaded button becomes out of
place, take pliers and feed button into
hole.
CAUTION: If spring loaded buttons DO
NOT pop through, front wheel assembly
could fall off during use.
Secure Front Wheel Assembly to the
front frame tubes using ½” screws. The
½” screws should be aligned into the 2
holes closest to the spring loaded but-
tons. Secure with a Phillips screwdriver
on both sides.
2
2 & 3
3
Spring
Loaded
Buttons
4
4
Spring
Loaded
Buttons

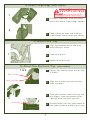
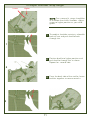
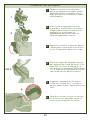
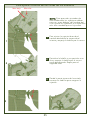
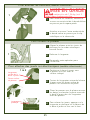
To Attach Footrest
1
2
3
4
4 & 5
5
6
6
6
Fold stroller (Stroller needs to be in fold
position to properly install footrest. See
page 13 for instructions on how to fold).
Align and place footrest against stroller
frame as shown making sure notch in
footrest snaps over plastic spacers
between seat support tubes.
Return stroller to open position. Lay
entire stroller back onto handle. Footrest
should remain on.
Align bosses on footrest to the two
holes on the metal frame. If bosses DO
NOT line up, the footrest is not correctly
installed. Repeat steps 1-3. If you are still
having trouble, call customer service for
assistance.
Secure footrest through bosses to
frame with 1” screws using a Phillips
screwdriver. Repeat for second side.
Feed straps of basket through slots in
footrest as shown and secure Velcro
straps.
2
1

7
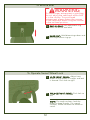
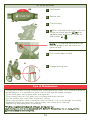
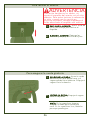
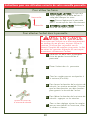
To Attach Cargo Bags
(select models)
To attach cargo bags, feed and secure
one end of Velcro strap through footrest.
Feed and secure other end of Velcro
strap through metal clip on oval tubing.
1
2
1
2
WARNING
DO NOT put more than 3 lbs.
(1.36 kg) in each cargo bag.
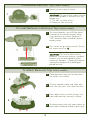
To Attach Non Electronic Toys
(select models)
1
2
Position toy steering wheel on front tray
as shown.
Align rear toy tabs with rear tray slots.
Hook into place.
Place your thumbs underneath tray and
with fingers, snap front portion of toy
steering wheel into front tray slots.
To remove toys from tray, press down on
front tabs to release and pull up on toys.
Rear Toy Tabs
Rear Tray Slots
Plastic Tab
3
1 & 2
3
To Attach Front Tray
Align tray between plastic tabs onto
metal tubing as shown.
Snap tab in place.
Repeat for second side.
1
2
1
3
4

To insert batteries, use a Phillips head
screwdriver to unfasten battery cover.
Insert batteries as shown. Requires 2
“AA” batteries (Not Included). Secure
battery cover.
Turn switch on ‘I’ to play sounds. To turn
off, move switch to ‘O’.
CAUTION: Do not mix old and new
batteries. Do not mix alkaline, standard
(carbon-zinc) or rechargeable (nickel
cadmium). Remove battery(ies) before
storing this product for a prolonged
period of time.
1
To Install Batteries in Electronic Toys (select models)
2
1
Place electronic toys so that they face
the child in the stroller.
Tilt toys toward stroller and align tabs
with rear tray slots. Lock tabs into slots.
Press down firmly on front of toys until
front tabs lock toys securely in place.
To remove toys from tray, press down on
front tabs to release and pull up on toys.
1
To Attach Electronic Toys (select models)
2
2
3
4
3
8
Attach mirror to toy as shown.
CAUTION: For your childs safety, remove
the following labels if found on this toy,
before use:
1) “Try Me” on front of unit
2) Protective film on mirror.
1
1
To Assemble Electronic Toys (select models)

9
To Install Batteries into
Music On The Move
®
Parent Tray (select models)
Requires 4 “AA” Batteries (Not Included).
Lift up the foam padding in the bottom
of the unit.
NOTE: Foam is used to reduce skipping &
eliminate sliding of your portable unit. If your
player does not fit inside, remove foam.
Use a Phillips screwdriver to remove the
battery door.
Place batteries in the battery
compartment as shown.
Screw the battery door back onto the
unit and replace the foam.
1
2
1
2
3
4
To Attach
Music On The Move
®
Parent Tray (select models)
To attach
Music On The Move
®
, align tray
holes with posts on handle and snap on.
To remove
Music On The Move
®
, pull
each side up and out.
1
WARNING
• Loud volume can damage your child’s hearing. When
turning on music, gradually adjust the volume to a
comfortable listening level so child is not startled.
• Do not place more than 3 lbs. (1.36 kg) in this tray to
avoid tipping!
• Do not place hot liquids in this tray. Hot liquids can
burn your child.
2
1
Posts
To Attach Parent Tray (select models)
Align tray holes with posts near handle
and snap on.
TO REMOVE, pull each side up and out.
For cleaning, parent tray is top rack
dishwasher safe.
1
WARNING
DO NOT place more than 3 lbs.
(1.36 kg) in this tray to avoid tipping!
DO NOT place hot liquids in this tray.
Hot liquids can burn your child.

How to Properly Use Your New Stroller
10
WARNING
Avoid serious injury from falling or sliding
out. Always use restraint system. Do not
use product without full 5-point Harness
Restraint. Removing the shoulder straps
will not adequately restrain child.
Adjust Restraint
System Harness
To Secure Child In Stroller
Lock both foot brakes to keep stroller
from rolling.
Place child in stroller.
Hook shoulder straps to waist belt.
To fasten restraint system buckles - push
together. Be sure both buckles are fas-
tened to secure child safely.
To unsnap restraint system buckles -
press tabs to release.
For proper fit, adjust shoulder straps and
waist band as shown.
1
3
2
3
4
5
6
4
6
To Operate Brakes
1
TO LOCK BRAKE: Push 1-Touch brake
bar down to lock wheels.
TEST: Push stroller slightly to make sure
brakes are engaged.
TO UNLOCK BRAKE: Lift up on brake
bar.
2
Unlock
Lock

11
NOTE: For a secure fit, straps should be
at or below the child's shoulder. Adjust
straps to higher position as your child
grows.
To readjust shoulder restraints, unbuckle
back of seat and push buckle back
through slot.
Position buckle to higher position and
push buckle through slot as shown.
Repeat for second side.
From the back side of the stroller, fasten
buckles together to secure restraint.
1
2
To Adjust Shoulder Strap Height
1
2
3
Lower Higher
3

12
To Operate Swivel Wheel Lock
1
LOCK FRONT SWIVEL: Adjust front
wheel so that wheel is straight and lock
is forward. Push lock to right.
UNLOCK FRONT SWIVEL: Push lock to
left.
NOTE: On rough surfaces, lock the
wheel to keep straight. On smooth
surfaces, unlock to allow the wheel to
swivel.
To Recline Seat
RECLINE SEAT: Pull adjustment ring
down to recline seat back.
RAISE SEAT: Hold drawstrings down and
push adjustment ring up.
1
2
WARNING
To avoid finger entrapment or pinching,
do not adjust the seat back while child
is in the stroller. To avoid head
entrapment, always fasten the canopy
to the seat back when using the stroller
in the reclined position.
2

13
To Operate Music On The Move
®
Parent Tray (select models)
1
Connect the
Music On The Move
®
plug
to the headphone jack of your personal
sound system (iPod
®**
, radio, cassette,
CD, MP3 or mini disk player).
Turn on
Music On The Move
®
by
locating the power switch as shown.
A red light will indicate that the power
is on. Be sure to turn off unit after use
so not to drain the batteries.
To avoid startling your child, adjust vol-
ume on your personal sound system to
its lowest level. Turn on your personal
sound system and slowly increase vol-
ume to a comfortable listening level for
you and your child.
NOTE: If sound cuts out or becomes
distorted, check your personal sound
system battery level. If battery level is
okay and sound is still distorted, replace
Music On The Move’s
®
batteries.
DO NOT leave
Music On The Move
®
in
a hot car or outside in the rain.
2
3
1
2
Off
On
Air Tube
Air Pump Use and Storage (select models)
1
Keep air pump stored in basket when
not in use.
CAUTION:
Keep wheels at a recommended
tire pressure of 35 p.s.i. (241 kPa).
Remove air tube completely from air
pump.
Screw air tube to opposite end of pump.
Attach air tube to wheel valve on tire.
Pump air pump until tires are filled to 35
p.s.i. (241 kPa) or as specified on the tire
wall.
Disassemble pump and store in basket
when not in use.
2
3
1
4
5
2
Air Tube
Attach
Air Pump
4

14
To Fold Stroller
1
Lock brakes.
Recline seat.
Close canopy.
(A) Push and hold red button to left with
thumb to unlock position (B) then
squeeze large red lever on handle to
fold stroller.
NOTE: If 1-Hand fold feature does not
operate properly, pull up latches on
frame to fold.
Push stroller down to fold.
Engage locking latch.
2
3
4
5
6
4a
4b
6
Care & Maintenance
•
To keep your stroller running smoothly and avoid squeaking wheels use a silicone or graphite
based lubricant. It is important to get it into the axle and the wheel assembly.
• Clean metal parts with a damp cloth and wipe dry.
• Clean woven fabric or vinyl parts with mild soap and water solution.
• Dry wet stroller with a soft cloth to prevent rusting.
• When storing stroller, never stack other items on top of it; this may damage the stroller.
• Periodically check for worn parts, loose screws, torn materials or stitching.
• Replace any damaged parts immediately.
**iPod is a registered trademark of Apple Computer, Inc.
Apple Computer, Inc. is not associated with Kolcraft
®
Enterprises, Inc. or Jeep
®
and no
approval by them is to be implied.

15
Personal Record Card
Once in a while, we are less than perfect and one of our products reaches a customer with
a problem. In most cases, we can solve your problem with replacement parts. Please
contact us before you return one of our products to the store. Once a product is returned,
it cannot be resold. The materials and the energy used to make it are wasted.
Please fill in the information in the space provided and attach a copy of your purchase
receipt. You will need this information to obtain warranty service.
You can find the Model Number and Date of Manufacture on a sticker located on the rear
stroller leg, or sewn on the back of the seat.
Please direct any comments, questions or replacement part requests to:
Kolcraft
®
Enterprises, Inc. Consumer Service Department
10832 NC Highway 211East
Aberdeen, NC 28315
1-800-453-7673 in U.S. & Canada, 1-910-944-9345 outside U.S. & Canada
Eastern Standard Time, 8 am-6:45 pm Monday - Thursday, 8 am-3:30 pm Friday
fax: 910-944-3490
e-mail: [email protected]
Model / Style Number: _________________________
Date of Manufacture:___________________________
Date of Purchase: ______________________________
Jeep
®
is a registered trademark of DaimlerChrysler Company LLC, and is used under license
by Kolcraft
®
. © DaimlerChrysler Company LLC 2007.
Kolcraft
®
warrants this product to be free of defects in materials and workmanship, as follows:
For a period of ONE YEAR from the date of purchase, Kolcraft will repair or replace, at its
option, the defective product. If you have a problem or are not satisfied with this product,
please contact the Consumer Service Department at Kolcraft.
REPAIR OR REPLACEMENT AS PROVIDED UNDER THIS WARRANTY IS THE EXCLUSIVE
REMEDY OF THE CONSUMER. KOLCRAFT SHALL NOT BE LIABLE FOR ANY INCIDENTAL
OR CONSEQUENTIAL DAMAGES FOR BREACH OF ANY EXPRESS OR IMPLIED WARRAN-
TY ON THIS PRODUCT, EXCEPT TO THE EXTENT REQUIRED BY APPLICABLE LAW. ANY
IMPLIED WARRANTY OF MERCHANTABILITY OR FITNESS FOR A PARTICULAR PURPOSE
ON THIS PRODUCT IS LIMITED TO THE DURATION OF THIS WARRANTY.
Some states do not allow the exclusion or limitation of warranties set forth above, so the
above exclusions may not apply to you. This warranty gives you specific legal rights, and you
may also have other rights which vary from state to state. We sincerely thank you for your
purchase of this Kolcraft product.
To obtain warranty service, please call Kolcraft’s Consumer Service Department at
1-800-453-7673 in U.S. and Canada, 1-910-944-9345 outside U.S. and Canada or contact us
via email at [email protected]
If the product is returned to Kolcraft’s Consumer Service Department for repair or
replacement, it must be shipped prepaid and adequately insured.
For further information visit www.kolcraft.com
Recall WEBSITE
: HELP KEEP YOUR CHILD SAFE. Check www.recall.gov to see if any
products you use with your child or any of your child's toys have been recalled.
Limited Warranty
Turn to page 45 to see a list of
replacement parts

16
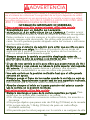
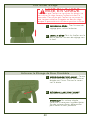
Evite daños serios causados por caídas o al deslizarse del asiento. Siempre
use el sistema de cinturones. La seguridad de su hijo/a depende de usted.
No se puede asegurar un uso apropiado de la carriola a menos que usted
siga estas instrucciones. NO USE LA CARRIOLA HASTA QUE USTED HAYA
LEÍDO Y COMPRENDIDO ÉSTAS INSTRUCCIONES.
INFORMACIÓN IMPORTANTE DE SEGURIDAD:
Cómo mantener a su hijo seguro mientras utiliza ésta carriola
•
Ensamblado por un Adulto es necesario.
•
NUNCA DEJE A SU NIÑO SOLO EN LA CARRIOLA. Pueden ocurrir
accidentes repentinamente mientras usted se encuentra de espaldas.
Debe mantener a su niño siempre a la vista minetras esté en la
carriola, aunque esté durmiendo. No utilice esté producto como
cama. Su niño pudiera quedar atrapado entre las correas o sofocarse
con los colchoncitos.
• Siempre use el sistema de sujeción para evitar que su niño se pare
en la carriola o se caiga. No utilice el producto sin un arnés de
sujección de 5 puntos. Si remueve los ajustes de los hombros, el
niño no estará adecuadamente sujeto.
• Siempre asegure la carriola en posición desplegada antes de
permitir que su niño se acerque o se monte en ella. Esto evitará
que se cierre súbitamente y cause lesión al niño.
• El uso de esta carriola es sólo para niños que pesen menos de 18,1
kg (40 libras) y cuya cabeza no rebase la parte superior del respaldo
del asiento.
La carriola puede dañarse o producir una situación
peligrosa de inestabilidad si se usa con niños más pesados.
• Use esta carriola en la posicion reclinable hast que el niño pueda
sentarse sin ayuda.
• Siempre ponga el freno de las ruedas cuando la carriola no esté en
movimiento, especialmente cuando está en una superficie inclinada.
Esto evitará que la carriola ruede accidentalmente.
• Abroche siempre el toldo en la parte posterior del asiento cuando
use la carriola en la posición reclinada.
Qué evitar mientras utiliza ésta carriola
• Siempre mantenga el peso de la carriola repartido por igual. Para
evitar que la carriola esté inestable o se voltée:
• No coloque paquetes ni accesorios sobre el toldo, los asientos o
la manija.
•
No ponga objetos que pesen más de 4.54 kg (10 libras) en la canasta.
• No ponga más de 1.36 kg (3 libras) de peso en cada alforja
(modelos selectos).
•
No permita que los niños jueguen con la carriola o se cuelguen de ella.
ADVERTENCIA
Continuación en la página siguiente

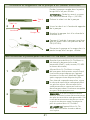
Lista de partes
17
• Nunca utilice esta carriola en escalones o escaleras automáticas.
• No levante la carriola por la charola o los juguetes.
•
Si necesitara ajustar la carriola, asegúrese de que los niños no estén
en contacto con las piezas móviles, de lo contrario podrían lesionarse.
• ¡ESTA CARRIOLA NO ESTÁ DISEÑADA PARA HACER EJERCICIO!
No utilize este producto para correr, trotar, patinar o participar en
otras actividades atléticas!
• No ponga su niño en la canasta.
• NO USE ningún asiento de automóvil para niños con esta carriola.
Puede ocurrir una lesion seria.
• Tome cuidado cuando este doblando o desdoblando para prevenir
pellizcos a los dedos.
• El producto puede hacerse inestable si una bolsa de paquete, otra
de la que es recomedada por el fabricante es usada.
• No permita que el niño se suba por sí solo en la carriola. La carriola
se puede voltear y el niño puede lesionarse.
• Mantenga las ruedas infladas a la presión recomendada de 241
kPa (35 p.s.i.) (modelos selectos).
• Use únicamente piezas de reemplazo del fabricante. Si se le poncha
una llanta, puede usar un kit estándar de reparación de bicicletas o
llevarlo a una tienda de bicicletas a que sea reparado.
Estructura de la
carriola
Rueda
delantera
Ruedas traseras (2)
Charola para adultos con
Music On The Move
®
(Modelos selectos)
Apoyapiés
½” Tornillos (2)
Pompa de aire
(Modelos selectos)
Montaje de freno
con eje trasero
Charola delantera
Juguetes electrónicos
(Modelos selectos)
Juguetes no
electrónicos
(Modelos selectos)
Charola para adultos
(Modelos selectos)
1” Tornillos (2)
Bolsas de carga (2)
(Modelos selectos)

18
4
5
6
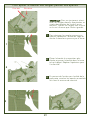
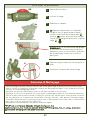
Cómo ensamblar su carriola
Para abrir la carriola
Remueva cualquier inserción de cartón o
plástico puesto para proteger el produc-
to durante el envío.
Suelte el seguro.
Despliegue la carriola como se indica.
Cerciórese de que ambos seguros entren
en su sitio.
2
3
2
1
Para ensamblar las ruedas traseras
Quite y deseche el plástico protector de
los extremos del eje trasero.
Coloque
el eje trasero en la posición que
se muestra, con las palancas del freno
orientadas hacia el mango de la carriola.
Coloque ambos frenos en los tubos
traseros simultáneamente, hasta que
los botones con resortes queden
asegurados en su sitio.
Ponga la carriola de lado. Deslize la
rueda sobre el eje.
Haga presión sobre la rueda hasta oir un
click. Jale la rueda hacia arriba para
asegurar que está en su sitio. Si la rueda
se zafa, vuelva a poner la rueda en el eje
empujando el clip de metal al mismo
tiempo. Cerciórese de que la rueda esté
bien asegurada en su sitio. De no
asegurar las ruedas, el niño puede
resultar lesionado.
Repita estos mismos pasos en el otro
lado.
PARA QUITAR LA RUEDA. Apriete el clip
de metal y jale la rueda hacia afuera.
NOTA: Mantenga las ruedas infladas a la
presión recomendada de 241kPa
(35p.s.i.) (modelos selectos).
2
3
1
2
3
4
5

19
Para ensamblar la rueda delantera
1
Ponga la carriola hacia atrás sobre el
mango.
Sitúe el ensamblaje de la rueda frontal
sobre los tubos del marco frontal.
Alinée y presione el ensamblaje de la
rueda frontal sobre el marco. NOTA:
puede que tenga que presionar
ligeramente los botones con muelles
mientras está ensamblando los tubos.
NOTA: Asegúrese de que los botones
con muelle salen a través del marco. Si
el botón con resorte se sale de su sitio,
vuelva a meter el botón en su sitio con
unas pinzas.
PRECAUCIÓN: Si los botones con
muelle No salen, el ensamblaje de la
rueda frontal se puede caer durante el
uso.
Asegure el ensamblaje de la rueda
frontal a los tubos del marco frontal
usando tornilloes de ½”. Los tornillos
de ½” deben estar alineados en los 2
agujeros más cercanos a los botones
con muelle. Asegúrelos en ambos lados
con un destornillador Phillips.
2
2 & 3
3
Botones
con
muelle
4
4
Botones
con
muelle

20
Instalación del apoyapiés
1
2
3
4
4 & 5
5
6
6
Pliegue la carriola (la carriola tiene
que estar plegada para poder instalar
adecuadamente el apoyapiés. Vea la
página 26 para las instrucciones sobre
cómo plegarla).
Aliee y sitúe el apoyapiés contra el
marco de la carriola como se muestra,
asegurándose de que la ranura en el
apoyapiés se ajusta sobre los
espaciadores de plástico entre los
tubos de soporte del asiento.
Regrese la carriola a la posición abierta.
Coloca toda la trasera de la carriola en
la asa. El apoyapiés debe estar unido.
Alinée los topes del apoyapiés con los
dos agujeros del marco de metal. Si los
topes NO se alinea, el apoyapiés no
esta puesta correctamente. Repita pasos
1-3. Si toda via tiene problemas llame al
servicio de clientes para assistencia.
Asegure el apoyapiés en los toes al
marco con tornillos de 1” usando un
destornillador Phillips. Repita por el otro
lado.
Pase las cintas por la cesta a través de
las ranuras en el apoyapiés, como se
muestra, para asegurar con Velcro.
2
1
La page est en cours de chargement...
La page est en cours de chargement...
La page est en cours de chargement...
La page est en cours de chargement...
La page est en cours de chargement...
La page est en cours de chargement...
La page est en cours de chargement...
La page est en cours de chargement...
La page est en cours de chargement...
La page est en cours de chargement...
La page est en cours de chargement...
La page est en cours de chargement...
La page est en cours de chargement...
La page est en cours de chargement...
La page est en cours de chargement...
La page est en cours de chargement...
La page est en cours de chargement...
La page est en cours de chargement...
La page est en cours de chargement...
La page est en cours de chargement...
La page est en cours de chargement...
La page est en cours de chargement...
La page est en cours de chargement...
La page est en cours de chargement...
La page est en cours de chargement...
-
 1
1
-
 2
2
-
 3
3
-
 4
4
-
 5
5
-
 6
6
-
 7
7
-
 8
8
-
 9
9
-
 10
10
-
 11
11
-
 12
12
-
 13
13
-
 14
14
-
 15
15
-
 16
16
-
 17
17
-
 18
18
-
 19
19
-
 20
20
-
 21
21
-
 22
22
-
 23
23
-
 24
24
-
 25
25
-
 26
26
-
 27
27
-
 28
28
-
 29
29
-
 30
30
-
 31
31
-
 32
32
-
 33
33
-
 34
34
-
 35
35
-
 36
36
-
 37
37
-
 38
38
-
 39
39
-
 40
40
-
 41
41
-
 42
42
-
 43
43
-
 44
44
-
 45
45


Kolcraft JL027 Manuel utilisateur
- Catégorie
- Poussettes
- Taper
- Manuel utilisateur
- Ce manuel convient également à
dans d''autres langues
- español: Kolcraft JL027 Manual de usuario