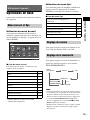
Sony ICF-CL70 Mode d'emploi
- Catégorie
- Cadres photo numériques
- Taper
- Mode d'emploi
Ce manuel convient également à

4-154-584-25(1)
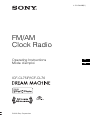
FM/AM
Clock Radio
Operating Instructions
Mode d’emploi
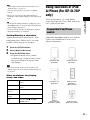
ICF-CL75iP/ICF-CL70
©2009 Sony Corporation
US
FR

2
US
Owner’s Record
The model number and the serial number are located
on the bottom.
Record the serial number in the space provided below.
Refer to them whenever you call upon your Sony
dealer regarding this product.
Model No. ICF-CL75iP/ICF-CL70
Serial No. ________________________________
To reduce the risk of fire or electric
shock, do not expose this apparatus to
rain or moisture.
To reduce the risk of fire, do not cover the ventilation
of the apparatus with newspapers, tablecloths, curtains,
etc. And do not place lighted candles on the apparatus.
To reduce the risk of fire or electric shock, do not
expose this apparatus to dripping or splashing, and do
not place objects filled with liquids, such as vases, on
the apparatus.
As the main plug is used to disconnect the unit from the
mains, connect the unit to an easily accessible AC
outlet. Should you notice an abnormality in the unit,
disconnect the main plug from the AC outlet
immediately.
The unit is not disconnected from the AC power source
(mains) as long as it is connected to the wall outlet,
even if the unit itself has been turned off.
Do not install the appliance in a confined space, such
as a bookcase or built-in cabinet.
Do not expose the batteries (battery pack or batteries
installed) to excessive heat such as sunshine, fire or the
like for a long time.
The nameplate and important information concerning
safety are located on the bottom exterior.
CAUTION
Danger of explosion if battery is incorrectly replaced.
Replace only with the same type.
For customers who purchased this product in the
USA
Please register this product on line at
http://www.sony.com/productregistration.
Proper registration will enable us to send you
periodic mailings about new products, services,
and other important announcements. Registering
your product will also allow us to contact you in
the unlikely event that the product needs
adjustment or modification. Thank you.
WARNING

3
US
For the state of california, USA only
Perchlorate Material –special handling may apply, See
www.dtsc.ca.gov/hazardouswaste/perchlorate
Perchlorate Material: Lithium battery contains
perchlorate.
Notes on LCD screen
• The displayed image on the screen is not identical in
picture quality and colors with the printed image
because phosphor methods or profiles differ. Please
regard the displayed image as just a reference.
• Do not press against the LCD screen. The screen may
be discolored and that may cause a malfunction.
• Exposing the LCD screen to direct sunlight for long
periods may cause malfunctions.
• The LCD screen is manufactured using extremely
high-precision technology, so over 99.99% of the
pixels are operational for effective use. However,
there may be some tiny black points and/or bright
points (white, red, blue or green in color) that
constantly appear on the LCD screen. These points
are normal in the manufacturing process and do not
affect the printing in any way.
• Images may trail across on the LCD screen in a cold
location. This is not a malfunction.
US

4
US
• The example illustrations and images are of
the ICF-CL75iP, therefore may appear
different from illustrations, images and screen
indicators that actually appear on your clock
radio.
• “Note” indicates cautions and limitations
relevant to the correct operation of this unit.
• “Tip” indicates information that is useful to
know.
• The figures in parentheses indicate the
reference page for details on operation.
• The language used for on-screen displays are
English for all countries and regions.
• In this Operating Instructions, iPod is used as
a general reference to functions of iPod on
iPod or iPhone, unless otherwise specified by
the text or illustrations (ICF-CL75iP only).
• Design and specifications of this unit and
accessories are subject to change without
notice.
About this Operating
Instructions

5
US
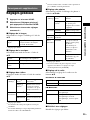
Table of Contents
Features............................................ 6
Identifying the parts ........................ 8
Screen indicators .......................................10
Getting started
Checking the supplied items........ 11
Connecting the AM antenna and
AC power cord (mains lead) ... 11
Setting the clock............................ 12
Using this unit
Basic operations............................ 14
Home and Option menu ............................14
Adjusting the volume ................................14
Adjusting the brightness............................14
Changing the clock display type ...............15
Listening to the radio.................... 15
Presetting a station.....................................15
Using the timer function ............... 16
Setting an alarm.........................................16
Fun Wake-up.............................................18
Using the sleep timer.................................19
Enjoying music, video and
photos....................................... 19
Importing files...........................................19
Playing back music, video and setting the
background photo (wallpaper) ...........20
Using functions of iPod & iPhone
(For ICF-CL75iP only) .............. 21
Compatible iPod/iPhone models ...............21
Playing iPod ..............................................22
Additional information
General Settings............................ 24
Troubleshooting ............................ 25
About the memory cards .............. 26
“Memory Stick” media..............................26
SD memory card........................................28
Precautions.................................... 29
Specifications ................................ 31

6
US
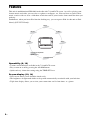
Features
This unit is multifunctional FM/AM clock radio with 7.0 inch LCD screen. As well as playing your
favorite music and video, you can also set a photo as wallpaper, etc. You can listen to your favorite
music, watch a video or view a slideshow at bed time and set your favorite alarm sound for when you
wake up.
Furthermore, when you insert iPod into the docking tray, you can operate iPod via this unit or iPod
directly (ICF-CL75iP only).
Operability (8, 16)
• Various useful functions available in the 7.0 inch LCD screen.
• Easy to turn on or off by pressing the ALARM button.
• Quick and easy alarm time setting using the TIME SET lever.
Screen-display (10, 14)
• LCD screen allows you to check the clock easily.
• The brightness of night mode shifts to sleep mode automatically to coincide with your bed time.
• Triple time display allows you to view your current time and 2 alarm times, at a glance.
Clock
Radio
Alarm
Sleep
iPod & iPhone
Background photos
(Wallpaper)
Video
Music

7
US
Playback function (19, 20)
• iPod, iPhone, memory card, internal memory, or USB device can be used to play back music and
video (functions of iPod & iPhone are only for ICF-CL75iP).
• You can listen to music with album artwork on the screen.
• 1 W × 1 W front speakers can be used to listen to sounds.
• You can save contents into the 1 GB internal memory.
Note
• You cannot display the album artwork of iPod or iPhone on this unit.
• You cannot display the cover photo for WMA content.
Background photos (20)
• Photos can be displayed as wallpaper on the screen, similar to a photo frame.
• Photo images can be played back as a slideshow.
Alarm/Sleep timer function (16)
• Using Fun Wake-up, you can wake up to your favorite recorded voice and photo.
• Nature Sound for relaxed listening and a good night’s sleep.
• No Power No Problem alarm system to keep the clock and the alarm operating during a power
interruption with a CR2032 battery installed.
Functions of iPod & iPhone (ICF-CL75iP only) (21)
• You can operate iPod or iPhone connected to the dock, and the connected iPod or iPhone will be
charged automatically.
• You can enjoy music from iPod or iPhone and video from iPod or iPhone by connecting to this unit.

8
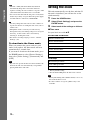
US
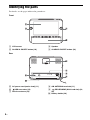
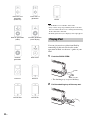
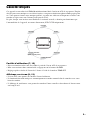
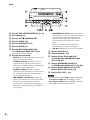
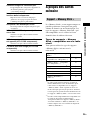
Identifying the parts
For details, see the pages indicated in parentheses.
Front
A LCD screen
B ALARM A ON/OFF button (16)
C Speaker
D ALARM B ON/OFF button (16)
Rear
E AC power cord (mains lead) (11)
F USB connector (19)
G FM wire antenna (16)
H AM ANTENNA terminals (11)
I PRO/SD/MMC (Multi card slot) (19,
26)
J Battery holder (29)

9
US
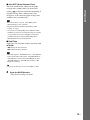
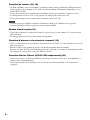
Top
K SNOOZE/BRIGHTNESS button (14, 17)
L Microphone (18)
M OFF x ALARM RESET button
N SLEEP button (19)
O ALARM SET button (16)
P HOME button (14)
Q BACK/iPod MENU button (ICF-CL75iP)/
BACK button (ICF-CL70)
• Return to the previous menu screen.
R Control button
• ENTER: You can select and fix menu items or
setting values.
• TUNING+/v (Up): You can set the tuning to
plus and tune into a station by its frequency. You
can select the relevant menu items.
• TUNING–/V (Down): You can set the tuning
to minus and tune into a station by its frequency.
You can select the relevant menu items.
• . PRESET–/b (Left): You can set the
tuning to plus and tune into a station by its
preset. You can select the relevant menu items.
Press and hold to rewind.
• > PRESET+/B (Right): You can set the
tuning to minus and tune into a station by its
preset. You can select the relevant menu items.
Press and hold to fast forward.
• Operation procedure indicates with v/V/b/B
on the control button in this manual.
S OPTION button (14)
T DISPLAY button (15)
U iPod & iPhone u button (ICF-CL75iP)/
USB/MEMORY u button (ICF-CL70)
(23)
V USB/MEMORY u button (ICF-
CL75iP)/BAND button (ICF-CL70) (21)
W RADIO BAND button (ICF-CL75iP)/
RADIO button (ICF-CL70) (15)
X VOL+/VOL– button (14)
Note
• The iPod & iPhone u button (ICF-CL75iP)/ USB/
MEMORY u button (ICF-CL70) U, the USB/
MEMORY u button (ICF-CL75iP) V and the
VOL+ button X have a tactile dot.

10
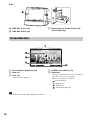
US
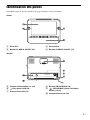
Side
Y TIME SET A lever (16)
Z TIME SET B lever (16)
wj Docking tray for iPod & iPhone (22)
(ICF-CL75iP only)
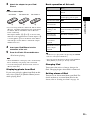
A Alarm A/Alarm B indicator (16)
B Date (13)
C Time (13)
• Time is always displayed.
D SLEEP timer indicator (19)
E Status bar
• Displays the file name, the source, and elapsed
time of the music or movie playing.
• Memory icon indicates as follows:
: Internal memory
: Memory card
: USB device
: iPod (ICF-CL75iP only)
Note
• The displayed screen may differ depending on the area.
Screen indicators

11
US
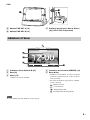
Getting started
Checking the supplied
items
Make sure that the following items are supplied:
• FM/AM Clock Radio (1)
• AM loop antenna (1)
• Operating Instructions (this manual) (1)
• Warranty (1) (In some countries or regions, the
warranty is not supplied.)
• Universal dock adaptor for iPhone (1) / iPhone
3G & iPhone 3GS (1) / iPhone 4 (1) (ICF-
CL75iP only)
• Sony CR2032 lithium battery (1) (In some
countries or regions, the lithium battery is
already set in the unit.)
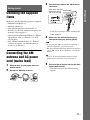
Connecting the AM
antenna and AC power
cord (mains lead)
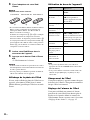
1 Remove only the loop part from the
plastic stand.
2 Set up the AM loop antenna.
3 Connect the cords to the AM antenna
terminals.
• Cord (A) or cord (B) can be connected to
either terminal.
4 Make sure the AM loop antenna is
connected firmly by pulling gently.
Note
• Do not place the AM loop antenna near the unit or
other AV equipment, as noise may result.
• The shape and the length of the antenna is designed to
receive AM signals. Do not dismantle or roll up the
antenna.
Ti
p
• See page 16 about determining the place for the
antenna and its orientation for good reception.
5 Connect the AC power cord to the wall
outlet (wall socket).
• The clock screen in the default setting
appears.
Getting started
Push down and hold
the terminal clamp
and insert the cord.

12
US
Getting started
Note
• The unit’s ATS (Automatic Time Set) function
automatically keeps the correct time and never
requires resetting. In some countries or regions, ATS
(Automatic Time Set) function is not available.
• You can use this unit and the AC power cord (mains
lead) in any country or region where the power supply
is within 100 V to 240 V AC, 50 Hz/60 Hz.
Ti
p
• You may change the time zone in some countries or
regions. For details on setting the time zone, refer to
“Time zone.”
• Though the clock is correctly set at the factory,
discrepancies may arise during transport or storage. If
necessary, set the clock to the correct time by
referring to “Setting the clock.”
• For details on setting language, refer to “General
Settings” (24).
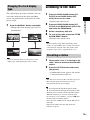
To deactivate the Demo mode
When you connect the power cord to a wall
outlet (wall socket), the demo mode will start
automatically 5 seconds later.
If you want to deactivate the demo mode, press
the HOME button to select [General Settings],
then select [Video Setting], [Demo mode] and
[OFF].
Note
• If you do not operate the unit for about 1 minute, the
demo mode will start automatically, except when
playing back music and video.
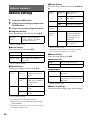
Setting the clock
This unit automatically sets the date and time. If
this unit is initialized, you will need to set the
clock manually.
1 Press the HOME button.
2 Select [Clock Settings] and press the
ENTER button.
3 Select each of the settings as follows:
x Time zone
Set your local area with v/V .
For the USA and Canada
For Europe
* Factory default setting
** For the United Kingdom, the time zone is fixed.
Note
• When [Auto DST] (Auto Summer Time) is set to on,
the clock advances 1 hour.
• In some countries or regions, [Time zone] is not
available.
Atlantic Standard Time
Eastern Standard Time
*
Central Standard Time
Mountain Standard Time
Pacific Standard Time
Yukon Standard Time
Hawaiian Standard Time
Western European Time
**
Central European Time
*
Eastern European Time

13
US
Getting started
x Auto DST (Auto Summer Time)
This unit automatically adjusts for daylight
savings time (summer time) by the default
setting. [ ] is displayed from the beginning of
daylight savings time (summer time) and
disappears at the end of daylight savings time
(summer time) automatically.
Note
• In some country or region, [Auto DST] (Auto
Summer Time) is not available.
• Displayed menu item differs depending on the
country or region.
• You can be set [Auto DST] (Auto Summer Time)
manually as necessary. Customers living in a country
or region that does not use daylight savings time
(summer time) must cancel [Auto DST] (Auto
Summer Time) before using the unit.
x Date/Time
Adjust the date and time display manually with
v/V/b/B.
• b/B: Select the date and time.
v/V: Adjust the date and time.
Note
• This unit displays “Month/Date/Year” and 12H time
format in the USA and Canada, “Date/Month/Year”
and 12H time format in the United Kingdom, and
“Date/Month/Year” and 24H time format in other
European countries.
Ti
p
• You can set the range of year from 2009 to 2099.
4 Press the ENTER button.
• The desired settings are made.

14
US
Basic operations
This section describes basic operations of the
unit.
Using the Home menu
You can perform the various functions, such as
playing music, changing a settings, etc., easily
by pressing the HOME button.
x Home menu list
For details, see the pages indicated in parentheses.
* [iPod & iPhone] is available on ICF-CL75iP only.
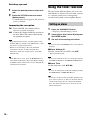
Using the Option menu
This function is useful for changing the current
setting easily while using any function by
pressing the OPTION button.
x Option menu list
You can adjust the volume level from 0 to 30
using the VOL+ or VOL– buttons.
The brightness level is changed by pressing the
SNOOZE/BRIGHTNESS button repeatedly.
Ti
p
• When night mode is set with no operation on this unit,
the night mode is switches to the sleep mode 5
seconds later. If you want to return the clock screen,
press the SNOOZE/BRIGHTNESS button (High
brightness) or press the OFF x ALARM RESET
button (Night brightness).
• When the sleep mode is activated, the current photo
disappears and the background photo (wallpaper) is
black.
Using this unit
Home and Option menu
Music (20)
Video (20)
Background Photos (20)
Radio (15)
iPod & iPhone
*
(21)
Import (19)
Fun Wake-up (18)
Alarm Settings (16)
Clock Settings (12)
General Settings (24)
Set preset/Delete preset (15)
Select background photo (21)
Begin slide show/Stop slide show (21)
Select music (20)
Select video (20)
Set current device to Alarm (A/B) (17)
Adjusting the volume
Adjusting the brightness
High (default) Middle Low
Night mode
Sleep mode
5 sec.
(Press the OFF x
ALARM RESET
button)

Using this unit
15
US
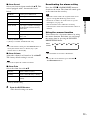
The clock display has four variations. You can
select the clock screen, the clock and photo
screen, the photo frame, or the music or radio
player screen.
1 Press the DISPLAY button repeatedly.
• Changes the clock display type cycles as
shown below.
Note
• You can select the music or radio player screen
display type, while playing the radio or music.
Listening to the radio
1 Press the RADIO BAND button (ICF-
CL75iP) or the RADIO button (ICF-
CL70) to turn on the radio.
• Displays the radio screen.
2 Press the RADIO BAND button (ICF-
CL75iP) or the BAND button (ICF-CL70)
and select the FM/AM band.
3 Select a frequency with v/V.
4 To turn off the radio, press the OFF x
ALARM RESET button.
• Returns to the clock screen.
Note
• Radio frequency range differs depending on the
country or region. Make sure to match your current
location before using the radio. For details on the
frequency range, refer to “Specifications” (31).
1 Follow steps 1 to 3 in “Listening to the
radio” above to select the desired radio
station.
2 Press the OPTION button and select
[Set preset].
• Confirmation screen appears, the station
is stored into the new preset.
Note
• This unit stores stations in the order they are preset.
• The radio presetting data will not be lost by
disconnecting the AC power supply.
Ti
p
• v : Scans upward through the frequency bands.
V : Scans downwards through the frequency bands.
• Scanning starts from the currently tuned frequency.
When the frequency is received, scanning stops.
• To search for a preset number, you press b/B until
the desired preset number appears.
• You can preset 20 FM stations and 10 AM stations
manually.
• If the preset number becomes full, delete the
unnecessary preset.
Changing the clock display
type
Presetting a station

16
US
Deleting a preset
1 Select the desired preset number with
b/B.
2 Press the OPTION button and select
[Delete preset].
• Confirmation screen appears, the selected
preset is deleted.
Improving the reception
FM: Extend the FM wire antenna fully to
increase reception sensitivity.
AM: Connect the supplied AM loop antenna to
the unit. Rotate the antenna horizontally
for optimum reception.
Note
• Keep digital music players or mobile phones away
from the AM loop antenna or the FM antenna, as this
may lead to reception interference.
• When you are listening to the radio with iPod
connected to the unit or while charging iPod,
interference with radio reception may occur (ICF-
CL75iP only).
Ti
p
• If the FM radio is noisy, press the HOME button to
select [General Settings], then select [Radio Setting]
and [Mono]. The radio becomes clearer although the
sound becomes monaural.
Using the timer function
The dual alarm function allows you to use two
individually set alarms. For each alarm, you can
set a favorite sound, or use an originally
recorded sound with a selected photo display.
1 Press the ALARM SET button.
• Displays [Alarm Settings] screen.
2 Select [Alarm A] or [Alarm B] and press
the ENTER button.
3 Set each of the settings as follows:
Note
• You can also press the HOME button to select [Alarm
Settings].
x Alarm A/Alarm B
Turn the alarm [ON] or [OFF]
*
with v/V.
* Factory default setting
Note
• You can also turn the alarm on or off by pressing the
ALARM A ON/OFF or ALARM B ON/OFF button.
x Alarm Time
Set the alarm time with v/V/b/B.
Note
• You can also change the alarm time setting by turning
the TIME SET A or TIME SET B lever.
Ti
p
• To increase or decrease the alarm time, push the lever
up or down to increase or decrease the alarm time by
1 minute-increments. If you continuously hold the
lever, the alarm time increases or decreases by 10
minute-increments.
Setting an alarm

Using this unit
17
US
x Alarm Sound
Select your favorite alarm sound with v/V. This
unit is equipped with 7 alarm modes listed
below.
* Factory default setting
** [iPod] is available on ICF-CL75iP only.
Ti
p
• To set the current sound, press the OPTION button to
select [Set current device to Alarm (A)] or [Set
current device to Alarm (B)].
x Alarm Volume
Adjust the volume level from 0 to 30 with v /V.
The factory default setting is set to 8.
Note
• You cannot adjust the volume for buzzer.
x Alarm Date
Select the alarm date with v/V.
* Factory default setting
4 Press the ENTER button.
• The desired settings are made.
Deactivating the alarm setting
Press the OFF x ALARM RESET button to
deactivate the alarm. The alarm will sound again
at the same time the next day.
Note
• When the alarm sounds, the original alarm screen
appears except [Fun Wake-up] alarm screen.
• For details on what to do in the event of a power
interruption, see page 30.
• If an alarm time comes while files are being
transferred, the alarm will sound after the transfer is
finished.
Using the snooze function
You can doze for a few more minutes by using
the snooze function. Each time you can change
the snooze time by pressing the SNOOZE/
BRIGHTNESS button.
Note
• The maximum snooze time is 60 minutes.
Ti
p
• To stop the snooze function, press the OFF x
ALARM RESET button.
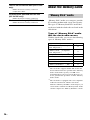
FM Radio Sets the preset FM station.
AM Radio Sets the preset AM station.
Buzzer Sets the buzzer.
Music Sets the desired music.
Nature Sound
*
Sets 5 types of nature sounds pre-
installed in the internal memory
on this unit.
iPod
**
Sets the music from iPod.
Fun Wake-up Sets your original voice and
photo (18).
Everyday Alarm sounds everyday.
Weekday
*
Alarm sounds Monday to Friday.
Weekend Alarm sounds Saturday or
Sunday.
Alarm
sounds
10 6020 30 40 50

18
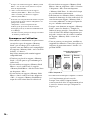
US
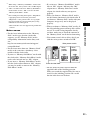
You can wake up by your original voice and a
photo as an alarm. If you want to set an alarm to
“Fun Wake-up”, refer to “Setting an alarm” on
page 16.
1 Press the HOME button.
2 Select [Fun Wake-up].
3 Select the desired , , N setting
from [Fun-Wake up 1] to [Fun-Wake up
3] with b/B.
4 Set each of the settings as follows:
x To select a photo
A Select and press the ENTER
button.
• Confirmation screen appears.
B Select the desired media with b/B and
press the ENTER button.
C Select the desired photo from the
thumbnail with v/V/b/B and press the
ENTER button.
• Selected photo appears in full screen.
D Select the desired photo by pressing b/
B and press the ENTER button.
• Confirmation screen appears.
E Select [Yes] with b/B and press the
ENTER button.
• The selected photo is set as the
background photo (wallpaper).
x To record voice
A Select and press the ENTER button.
• Confirmation screen appears.
B Select [Yes] with b/B and press the
ENTER button.
• When recording starts, record into the
microphone.
Note
• Maximum recording time is 10 seconds. If you want
to stop during recording, select x.
• If you want to confirm the recorded voice, select N
and press the ENTER button.
Fun Wake-up
Good morning!
12
:
00AM

Using this unit
19
US
You can easily set the sleep timer by pressing
the SLEEP button repeatedly.
Each time you press the SLEEP button, the
duration (in minutes) changes as follows:
Ti
p
• [SLEEP] appears on the screen when the sleep timer
is set.
Nature Sound for a good night’s
sleep
Pre-installed nature sound gives you relaxation
and a good night’s sleep.
1 Press the HOME button.
2 Select [Music] and press the ENTER
button.
3 Select [Internal memory] and press the
ENTER button.
4 Select the desired nature sound files
and press the ENTER button.
5 Press the SLEEP button.
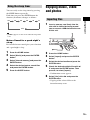
Enjoying music, video
and photos
1 Insert a memory card firmly into the
slot with its label side facing toward
you or connect a USB device to the rear
of this unit.
2 Press the HOME button.
3 Select [Import] and press the ENTER
button.
4 Select the desired media and press the
ENTER button.
5 Check the desired multiple files with v/
V and press the ENTER button. Then
press B, to select [Import].
• Confirmation screen appears.
6 Select [Yes] with b/B and press the
ENTER button.
• Copying of the selected files to the
internal memory starts.
Using the sleep timer
120 90 60 30 20 10
OFF
Importing files

20
US
Note
• For details on memory cards you can use with this
unit, see “About the memory cards” (26).
• Do not disconnect the AC power cord (mains lead)
from the wall outlet (wall socket) during the
operation. The file may be damaged.
• Remove a memory card from the slot or disconnect
the USB device from the USB connector in the
opposite direction from which it was inserted.
Deleting files
1 Press the HOME button.
2 Select [General Settings] and select
[Delete files], then press the ENTER
button.
3 Select the internal memory and press
the ENTER button.
4 Check the desired multiple files with v/
V and press the ENTER button. Then
press B to select [Delete].
• Confirmation screen appears.
5 Select [Yes] with b/B and press the
ENTER button.
• The selected files are deleted from the
internal memory.
Note
• This unit cannot use data that has been encrypted or
compressed using, for instance, fingerprint
authentication or a password.
• Refer also to the connected device’s manual.
• Compatibility with all external devices are not
guaranteed.
• While playing or pausing music or video, you cannot
copy or delete files.
1 Press the HOME button.
2 Select [Music] or [Video] and
[Background Photos] and press the
ENTER button.
3 Select the desired media and press the
ENTER button.
4 Select the desired file and press the
ENTER button.
• Plays the selected file for music and
video.
Ti
p
• You can also play directly music or video by pressing
the USB/MEMORY u button.
• To set the background photo (wallpaper)
as follows:
5 Select the desired photo and press the
ENTER button.
• Confirmation screen appears.
Ti
p
• You can display the next or previous photo by
pressing b/B.
• To change the music or video, press the OPTION
button to bring up [Option] menu, then select [Select
music] or [Select video].
• For details on changing each setting of music, video
and photo, refer to “General Settings” (24).
6 Select [Yes] with b/B and press the
ENTER button.
• The selected photo is set as the
background photo (wallpaper).
Playing back music, video and
setting the background photo
(wallpaper)
La page est en cours de chargement...
La page est en cours de chargement...
La page est en cours de chargement...
La page est en cours de chargement...
La page est en cours de chargement...
La page est en cours de chargement...
La page est en cours de chargement...
La page est en cours de chargement...
La page est en cours de chargement...
La page est en cours de chargement...
La page est en cours de chargement...
La page est en cours de chargement...
La page est en cours de chargement...
La page est en cours de chargement...
La page est en cours de chargement...
La page est en cours de chargement...
La page est en cours de chargement...
La page est en cours de chargement...
La page est en cours de chargement...
La page est en cours de chargement...
La page est en cours de chargement...
La page est en cours de chargement...
La page est en cours de chargement...
La page est en cours de chargement...
La page est en cours de chargement...
La page est en cours de chargement...
La page est en cours de chargement...
La page est en cours de chargement...
La page est en cours de chargement...
La page est en cours de chargement...
La page est en cours de chargement...
La page est en cours de chargement...
La page est en cours de chargement...
La page est en cours de chargement...
La page est en cours de chargement...
La page est en cours de chargement...
La page est en cours de chargement...
La page est en cours de chargement...
La page est en cours de chargement...
La page est en cours de chargement...
La page est en cours de chargement...
La page est en cours de chargement...
La page est en cours de chargement...
La page est en cours de chargement...
-
 1
1
-
 2
2
-
 3
3
-
 4
4
-
 5
5
-
 6
6
-
 7
7
-
 8
8
-
 9
9
-
 10
10
-
 11
11
-
 12
12
-
 13
13
-
 14
14
-
 15
15
-
 16
16
-
 17
17
-
 18
18
-
 19
19
-
 20
20
-
 21
21
-
 22
22
-
 23
23
-
 24
24
-
 25
25
-
 26
26
-
 27
27
-
 28
28
-
 29
29
-
 30
30
-
 31
31
-
 32
32
-
 33
33
-
 34
34
-
 35
35
-
 36
36
-
 37
37
-
 38
38
-
 39
39
-
 40
40
-
 41
41
-
 42
42
-
 43
43
-
 44
44
-
 45
45
-
 46
46
-
 47
47
-
 48
48
-
 49
49
-
 50
50
-
 51
51
-
 52
52
-
 53
53
-
 54
54
-
 55
55
-
 56
56
-
 57
57
-
 58
58
-
 59
59
-
 60
60
-
 61
61
-
 62
62
-
 63
63
-
 64
64


Sony ICF-CL70 Mode d'emploi
- Catégorie
- Cadres photo numériques
- Taper
- Mode d'emploi
- Ce manuel convient également à
dans d''autres langues
- English: Sony ICF-CL70 Operating instructions
Documents connexes
-
Sony Dream Machine ICF-CL70 Le manuel du propriétaire
-
Sony ICFCL75IP Le manuel du propriétaire
-
Sony ICF-C7IP Mode d'emploi
-
Sony ICF-C05iP Mode d'emploi
-
Sony SRS-GU10iP Guide de démarrage rapide
-
Sony ICF-C707 Mode d'emploi
-
Sony ICF-C1IP Mode d'emploi
-
Sony ICF-C318W Manuel utilisateur
-
Sony ICF-C218 Le manuel du propriétaire
-
Autres documents
-
Boston Acoustics Duo-i plus Le manuel du propriétaire
-
Philips AJL303 Manuel utilisateur
-
RCA RC66I Manuel utilisateur
-
Insignia NS-CLIP02 Guide d'installation rapide
-
Boston Horizon Duo-i Le manuel du propriétaire
-
Lenco IPT-6 G Le manuel du propriétaire
-
COBY electronic CSMP120 Manuel utilisateur
-
-
Philips AJL303/37 Manuel utilisateur
-