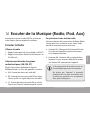
Coby CSMP120 Manuel utilisateur
- Catégorie
- Haut-parleurs d'amarrage
- Taper
- Manuel utilisateur
Ce manuel convient également à

EN
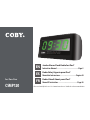
Jumbo Alarm Clock Radio for iPod®
Instruction Manual ............................................Page 2
ES
Radio Reloj Gigante para iPod®
Manual de Instrucciones ................................Pagina 24
FR
Radio-Réveil Géant pour iPod®
Manuel D’instruction .......................................Page 48
Please read carefully before use • Léa el manual antes de usar • Veuillez lire ce livret avant utilisation
For / Para / Pour
CSMP120

Page 2 Table Of Contents
English
Table of Contents Â
THANK YOU .....................................................................................................................................4
Package Contents ..........................................................................................................................4
Features ............................................................................................................................................4
UNIT AT A GLANCE .........................................................................................................................5
GETTING STARTED ...........................................................................................................................7
AC Power .........................................................................................................................................7
Battery Backup ................................................................................................................................7
Setting the Clock Time....................................................................................................................8
Listening to Music ............................................................................................................................8
Adjusting the Volume Level ...........................................................................................................8
LISTENING TO MUSIC (RADIO, IPOD, AUX) ...................................................................................9
Listening to the Radio .....................................................................................................................9
Turn the radio on ..................................................................................................................9
Select the radio band (AM, FM, ST) ...................................................................................9
Tune to a radio station .........................................................................................................9

Page 3 Table Of Contents
English
Listening to iPod® ..........................................................................................................................10
Connect your iPod .............................................................................................................10
Turn iPod mode on ............................................................................................................. 11
Using your iPod ................................................................................................................... 11
Listening to an Auxiliary Device .................................................................................................. 11
Connect your device ........................................................................................................ 11
Turn Aux mode on .............................................................................................................. 11
Using your Aux device ....................................................................................................... 11
USING THE ALARM TIMER ............................................................................................................. 12
Set the Alarm Time ........................................................................................................................12
Turn the Alarm Timer On or Off ....................................................................................................12
Wake to Buzzer Option ......................................................................................................12
Wake to Music Option .......................................................................................................12
When the Alarm Sounds ...............................................................................................................13
USING THE SLEEP TIMER ................................................................................................................14
SAFETY NOTICES ........................................................................................................................... 15
TROUBLESHOOTING & SUPPORT ...................................................................................................21
SPECIFICATIONS ...........................................................................................................................23

Page 4 Thank You
English
Thank You Â
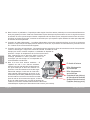
Congratulations on your purchase of a Coby alarm clock. This manual is designed to help you easily set up and
begin using your new alarm clock right away. Please read this manual carefully and retain it for future reference.
Package Contents
Coby alarm clock
Power adapter
Instruction manual
If any of the above items are missing, please contact
the dealer from whom you purchased this product.
This package may contain plastic bags or
other materials that pose a hazard to chil-
dren. Be sure to safely dispose of all pack-
ing materials after opening.
Features
Jumbo ” LED digital clock
Two-level dimmable display
Universal dock for iPod charges and plays your
favorite iPod music
AM/FM stereo radio
Alarm clock with sleep/snooze timers
Wake to music or buzzer
. mm audio input for use with any portable
audio device
Clock backup maintains the time in case of
power failure (V battery required)

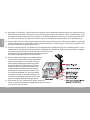
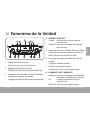
Page 5 Unit At A Glance
English
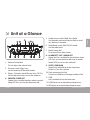
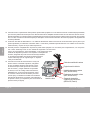
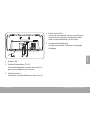
Unit at a Glance Â
Volume Control dial 1.
Turn to adjust the volume level.
Dimmer switch (High, Low) 2.
Set the intensity of the clock display.
Power / Function switch (Buzzer, Auto, O, On) 3.
Set the alarm function, or turn the audio on.
SNOOZE / SLEEP OFF 4.
Snooze: Press to delay the alarm when it sounds.
Sleep O: Press to turn the sleep timer o.
Audio Source switch (iPod, Aux, Radio) 5.
Set the audio source to listen to iPod, an auxil-
iary device, or the radio.
Radio Band switch (AM, FM, FM stereo) 6.
Set the radio band.
Radio Tuning dial 7.
Turn to tune to a radio station.
ALARM SET / OFF / RADIO OFF 8.
Alarm Set: Press and hold to set the alarm timer.
O: Press to turn the alarm o when it sounds.
Radio O: Press to turn the radio o.
SLEEP / RADIO ON9.
Sleep: Press and hold to set the sleep timer.
Radio On: Turn the radio on.
Dock connector for iPod 10.
Connect an iPod here to charge and play iPod.
TIME 11.
Press and hold to set the clock time.
HOUR (press to set clock/alarm/sleep hours).12.
MIN (press to set clock/alarm/sleep minutes).13.

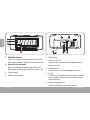
Page 6 Unit At A Glance
English
AM/PM indicator 1.
When lit, indicates that the current time is PM.
When dark, indicates that the current time is AM.
Alarm Set On indicator2.
When lit, indicates that the alarm timer is on.
When dark, indicates that the alarm timer is o.
Clock display3.
Radio Tuning display4.
1 52
3
4
FM antenna1.
Power In (DC 9V) 2.
Connect the included power adapter here to
power the unit.
Headphone In 3.
Connect a pair of 3.5mm headphones here.
Aux In 4.
Connect an audio device here to play it over the
unit’s speakers (optional 3.5mm male-to-male
cable required).
Battery compartment 5.
Load one 9V battery for clock backup.

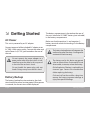
Page 7 Getting Started
English
Getting Started Â
AC Power
This unit is powered by an AC adapter.
Connect one end of the included AC adapter to an
AC V / Hz mains outlet. Connect the other end
to the Power In (DC V) jack located on the rear of
the unit.
Do not connect the power adapter to a
power outlet other than that which is indi-
cated here or on the label as this may result
in the risk of re or electric shock.
Do not handle the power plug with wet
hands. Doing so may cause electric shock.
Battery Backup
The battery backup function maintains the clock
time should the power be interrupted. When power
is restored, the correct time will be displayed.
The battery compartment is located on the rear of
the unit. Install one V “P” battery (not included)
in the battery compartment.
Make sure that the positive (+) and negative (-)
battery terminals match the markings in the battery
compartment.
The battery backup feature will not power the
radio nor any other functions. It is designed to
maintain the clock time only.
The battery used in this device may present
a re or chemical burn if mistreated. Do not
disassemble, incinerate, or heat the battery.
Risk of explosion if battery is replaced by an
incorrect type. Contact the manufacturer
before replacing the battery.
If the unit will not be used for a long time,
remove the battery to prevent damage or
injury from possible leakage.

Page 8 Getting Started
English
Setting the Clock Time
Press and hold the TIME button. While holding the
TIME button:
Press the HOUR button to set the clock hour.
Press the MINUTE button to set the clock minutes.
The PM indicator will light for PM hours and
darken for AM hours.
Listening to Music
Set the Power / Function switch (Buzzer, Auto, 1.
O, On) to ON.
Use the Audio Source switch (iPod, Aux, Radio) .
to select an audio source.
Set the Audio Source switch (iPod, Aux,
Radio) to iPod to listen to iPod.
Set the switch to Aux to listen to an auxiliary
audio device; the device must be connected
to the Aux In jack on the rear of the unit.
Set the switch to Radio to listen to the radio.
Adjusting the Volume Level
Turn the Volume dial clockwise to lower the
volume level.
Turn the Volume dial counter-clockwise to raise
the volume level.

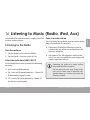
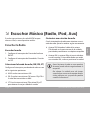
Page 9 Listening To Music (radio, Ipod, Aux)
English
Listening to Music (Radio, iPod, Aux) Â
Listen to AM/FM radio broadcasts, or play your iPod
or other auxiliary device.
Listening to the Radio
Turn the radio on
Set the Audio Source switch to RADIO.1.
Set the Power / Function switch to ON.2.
Select the radio band (AM, FM, ST)
Set the Radio Band switch to one of the following
positions.
AM: Listen to AM broadcasts.
FM: Listen to FM mono broadcasts. Choose FM
if the broadcast signal is weak.
ST: Listen to FM stereo broadcasts. Choose ST
for the best sound quality.
Tune to a radio station
Turn the Radio Tuning dial to tune to a radio station.
Adjust the antennas as necessary.
FM antenna: Extend the FM antenna wire lo-
cated on the rear of the unit and position it for
optimum reception.
AM antenna: The AM antenna is built into the
unit. If you are having diculty receiving an AM
station, reposition the unit.
Operating the radio on a metal surface
may adversely aect reception.
Do not place the unit near strong mag-
nets such as those used in television sets,
speaker boxes, etc. as these may cause the
frequency to drift.

Page 10 Listening To Music (radio, Ipod, Aux)
English
Listening to iPod®
If you have an iPod, you can play and charge it with the integrated dock connector for iPod.
This unit supports the following iPod models.
Made for:
iPod touch (2nd generation)
iPod touch (1st generation)
iPod nano (4th generation)
iPod nano (3rd generation)
iPod nano (2nd generation)
iPod nano (1st generation)
iPod classic
iPod (5th generation)
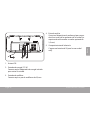
Connect your iPod
iPod doesn’t come in just one size or shape. The Universal Dock provides a single, elegant way to connect
any iPod with dock connector to your iPod accessory. iPod ts into the Universal Dock through the use of
interchangeable inserts called Dock Adapters.
If you have a Dock Adapter, gently press the adapter into the recessed Dock Connector bay. (Dock 1.
Adapters are provided by Apple with their recent iPod models.)
Gently plug your iPod into the Dock Connector. When your iPod is properly connected, the Power icon 2.
on your iPod screen should indicate that it is plugged in and charging.

Page 11 Listening To Music (radio, Ipod, Aux)
English
Turn iPod mode on
Set the Audio Source switch to iPod.1.
Set the Power / Function switch to ON.2.
Using your iPod
Use the controls available on your iPod (e.g.,
play/pause, skip next/previous, browse menus).
Turn the Volume Control dial of the CSMP to
adjust the volume level.
Listening to an Auxiliary Device
If you have a device with a .mm headphone jack
(e.g., CD player, MP player), you can play it through
the speakers of this unit.
You will need a 3.5mm male-to-male audio
cable (optional) to use this function.
Connect your device
Using a .mm male-to-male audio cable (optional),
connect the Headphone Out jack of the device to
the Aux In jack located on the rear of the CSMP.
Turn Aux mode on
Set the Audio Source switch to AUX.1.
Set the Power / Function switch to ON.2.
Use the controls of the Aux device to turn it on.3.
Using your Aux device
Use the controls available on your Aux device
(e.g., play/pause, skip next/previous, browse
menus).
If possible, set the volume level of the Aux
device to approximately %, then turn the
Volume Control dial of the CSMP to further
adjust the volume level.

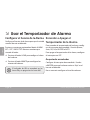
Page 12 Using The Alarm Timer
English
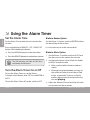
Using the Alarm Timer Â
Set the Alarm Time
Set the Alarm Time to have the unit sound at the
set time.
Press and hold the ALARM SET / OFF / RADIO OFF
button. While holding the button:
Press the HOUR button to set the alarm hour.
Press the MINUTE button to set the alarm minutes.
The PM indicator will light for PM hours
and darken for AM hours.
Turn the Alarm Timer On or O
To turn the Alarm Timer on, set the Power /
Function switch (Buzzer, Auto, O, On) to BUZZER or
AUTO.
To turn the Alarm Timer o, set the switch to OFF.
Wake to Buzzer Option
Set the Power / Function switch to BUZZER to have
the alarm beep at the set time.
It is not necessary to set the volume level.
Wake to Music Option
Set the Power / Function switch to AUTO have 1.
the alarm turn on the radio at the set time.
Set the Audio Source switch (iPod, Aux, Radio) 2.
to RADIO to wake to radio.
Make sure the radio has been tuned to a
station.
Although not recommended, you may set
the switch to iPod or Aux to wake to iPod
or Aux, respectively. To do so, an iPod or
auxiliary device must be connected to the
unit and playing.
Adjust the Volume Dial to a level that will wake 3.
you up when the alarm sounds.

Page 13 Using The Alarm Timer
English
When the Alarm Sounds
When the alarm timer sounds at the set time:
Press the Snooze button to delay the timer temporarily. The alarm will sound again after approximately
minutes.
Press the Alarm Set / O / Radio O button to turn o the alarm for the day. (The alarm will sound
again the next day.)
Set the Power / Function switch to OFF to turn the alarm o completely.

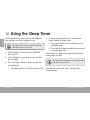
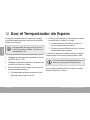
Page 14 Using The Sleep Timer
English
Using the Sleep Timer Â
Set the Sleep Timer to turn the unit o automati-
cally, to allow you to fall asleep to music.
The sleep timer will not work if the Power /
Function switch is set to ON.
Set the Power / Function switch to BUZZER, 1.
AUTO, or OFF.
Set the Audio Source switch to listen to iPod, 2.
Aux, or Radio.
Press the Sleep / Radio On button to activate 3.
the sleep timer.
The default timer is set for minutes (:).
To adjust the sleep timer, press and hold the 4.
Sleep / Radio On button, then:
Press the HOUR button to add one hour to
the sleep timer.
Press the MIN button to subtract one minute
from the sleep timer.
The unit will turn o automatically when the timer
counts down to “:”.
The maximum timer count is one hour and
fty nine minutes (1:59).
To cancel the sleep timer, press the Sleep O /
Snooze button.

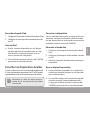
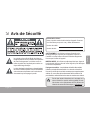
Page 15 Safety Notices
English
Safety Notices Â
The lightning ash with arrowhead symbol within an
equilateral triangle is intended to alert the user to the
presence of uninsulated “dangerous voltage” within
the product’s enclosure that may be of sufcient
magnitude to constitute a risk of electric shock.
The exclamation point within an equilateral triangle
is intended to alert the user to the presence of
important operation and servicing instructions in the
literature accompanying the appliance.
For Customer Use:
Enter below the serial number that is located on the rear of the
unit. Retain this information for future reference.
Model No.
Serial No.
WARNING: To prevent re or shock hazard, do not expose this
device to rain or moisture. Dangerous high voltage is present inside
the enclosure. Do not open the cabinet.
CAUTION: To prevent electric shock, match wide blade of plug to
wide slot of outlet and fully insert.
Protect your hearing: Hearing experts advise against the constant use
of personal stereos played at high volume. Constant exposure to high
volumes can lead to hearing loss. If you should experience ringing in
the ears or hearing loss, discontinue use and seek medical advice.
For recycling or disposal information about this
product, please contact your local authorities or the
Electronics Industries Alliance: www.eiae.org.

Page 16 Safety Notices
English
FCC Statement:
This device complies with Part 15 of the FCC Rules. Operation is subject to the following two conditions:
(1) This device may not cause harmful interference, and
(2) This device must accept any interference received, including interference that may cause undesired operation.
Note: This equipment has been tested and found to comply with the limits for Class B digital devices, pursuant to Part 15 of the FCC rules.
These limits are designed to provide reasonable protection against harmful interference in a residential installation. This equipment generates,
uses and can radiate radio frequency energy and, if not installed and used in accordance with the instructions, may cause harmful interference
to radio communications. However, there is no guarantee that interference will not occur in a particular installation. If this equipment does cause
harmful interference to radio or television reception, which can be determined by turning the equipment off and on, the user is encouraged to
try to correct the interference by one or more of the following measures:
Reorient or relocate the receiving antenna.•
Increase the separation between the equipment and receiver.•
Connect the equipment into an outlet on a circuit different from that to which the receiver is connected.•
Consult the dealer or an experienced radio/TV technician for help•
Use of shielded cable is required to comply with Class B limits in Subpart B of Part 15 of the FCC rules.
Do not make any changes or modications to the equipment unless otherwise specied in the manual. If such changes or modications should
be made, you could be required to stop operation of the equipment.

Page 17 Safety Notices
English
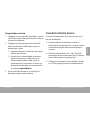
Important Safety Instructions
Read Instructions: All the safety and operating instructions should be read before the product is operated.1.
Retain Instructions: The safety and operating instructions should be retained for future reference.2.
Heed Warnings: All warnings on the product and in the operating instructions should be adhered to.3.
Follow Instructions: All operating and usage instructions should be followed.4.
Cleaning: Unplug this product from the wall outlet before cleaning. Do not use liquid cleaners or aerosol cleaners. 5.
Use a damp cloth for cleaning.
Attachments: Use only attachments recommended by the manufacturer. Use of other attachments may be hazardous.6.
Water and Moisture: Do not use this product near water (e.g., near a bath tub, washbowl, kitchen sink, laundry tub, 7.
in wet basements, or near a swimming pool and the like).
Accessories: Do not place this product on an unstable cart, stand, tripod, bracket, or table. Use only 8.
with carts, stands, tripods, brackets, or tables recommended by the manufacturer or sold with the
product. Any mounting of the product should follow the manufacturer’s instructions and should
use a mounting accessory recommended by the manufacturer.
A product and cart combination should be moved with care. Quick stops, excessive force, and 9.
uneven surfaces may cause the product and cart combination to overturn.
Ventilation: Slots and openings in the cabinet are provided for ventilation to ensure reliable operation 10.
of the product and to protect it from overheating. These openings should never be blocked by placing the product
on a bed, sofa, rug, or other similar surface. This product should not be placed in a built-in installation such as a
bookcase or rack unless proper ventilation is provided or the manufacturer instructions have been adhered to.
Power Sources: This product should be operated only from the type of power source indicated on the rating label. 11.
If you are not sure of the type of power supply to your home, consult your product dealer or local power company.
For products intended to operate from battery power or other sources, refer to the operating instructions.

Page 18 Safety Notices
English
Grounding or Polarization: This product may be equipped with a polarized alternating-current line plug that has one 12.
blade wider than the other. This plug will only t into the power outlet in one direction. This is a safety feature. If you
are unable to insert the plug fully into the outlet, try reversing the direction of the plug. If the plug should still fail to
t, contact an electrician to replace the obsolete outlet. Do not defeat the safety purpose of the polarized plug.
Power-Cord Protection: Power supply cords should be routed so that they are not likely to be walked on or pinched 13.
by items placed upon or against them, paying particular attention to cords at plugs, convenience receptacles, and
at the point which they exit from the product.
Protective Attachment Plug: The product may be equipped with an attachment plug with overload protection. This is 14.
a safety feature. See the operating instructions for replacement or directions to reset the protective device. If replace-
ment of the plug is required, be sure the service technician has used
a replacement plug that has the same overload protection as
the original plug as specied by the manufacturer.
Outdoor Antenna Grounding: If an outside antenna 15.
is connected to the product, be sure the antenna
system is grounded so as to provide some pro-
tection against voltage surges and built-up static
charges. Article 810 of the National Electrical
Code, ANS/NFPA 70 provides information with
regard to proper grounding of the mast and sup-
porting structure, grounding of the lead-in wire
to an antenna-discharge unit, size of grounding
conductors, location of antenna-discharge unit,
connection to grounding electrodes, and require-
ments for the grounding electrode (see gure).
Overloading: Do not overload wall outlets, extension 16.
cords, or integral convenience receptacles as this can result in
a risk of re or electric shock.

Page 19 Safety Notices
English
Object and Liquid Entry: Never push objects of any kind into this product through openings as they may touch 17.
dangerous voltage points or shout-out parts that could result in a re or electric shock. Never spill liquid of any kind
on the product.
Servicing: Do not attempt to service this product yourself as opening or removing covers may expose you to dan-18.
gerous voltage or other hazards. Refer all servicing to qualied service personnel.
Damage Requiring Service: Unplug this product from the wall outlet and refer servicing to qualied service person-19.
nel under the following conditions: a) when the power-supply or plug is damaged; b) if liquid has been spilled or if
objects have fallen into the product; c) if the product has been exposed to rain or water; d) if the product does not
operate normally by following the operating instructions. Adjust only those controls that are covered by the operating
instructions as improper adjustment of other controls may result in damage and will often require extensive work by
a qualied technician to restore the product to its normal operation; e) if the product has been dropped or damaged
in any way; f) when the product exhibits a distinct change in performance—this indicates a need for service.
Replacement Parts: When replacement parts are required, be sure that your service technician has used replace-20.
ment parts specied by the manufacturer or have the same characteristics as the original part. Unauthorized
substitutions may result in re, electric shock, or other hazards.
Safety Check: Upon completion of any service or repairs to this product, ask the service technician to perform 21.
safety checks to ensure that the product is in proper operating condition.
Wall or Ceiling Mounting: The product should be mounted to a wall or ceiling only as recommended by the manu-22.
facturer.
Heat: The product should be situated away from heat sources such as radiators, heat registers, stoves, or other 23.
products (including ampliers) that produce heat.

Page 20 Safety Notices
English
Legal and Trademark Notices
“Made for iPod” means that an electronic accessory has been designed to connect specically to iPod and has been certied by the developer
to meet Apple performance standards.
Apple is not responsible for the operation of this device or its compliance with safety and regulatory standards.
Coby is a registered trademark of Coby Electronics Corporation. iPod is a trademark of Apple Inc., registered in the U.S. and other countries.
All other trademarks and logos are property of their respective owners unless indicated otherwise.
La page est en cours de chargement...
La page est en cours de chargement...
La page est en cours de chargement...
La page est en cours de chargement...
La page est en cours de chargement...
La page est en cours de chargement...
La page est en cours de chargement...
La page est en cours de chargement...
La page est en cours de chargement...
La page est en cours de chargement...
La page est en cours de chargement...
La page est en cours de chargement...
La page est en cours de chargement...
La page est en cours de chargement...
La page est en cours de chargement...
La page est en cours de chargement...
La page est en cours de chargement...
La page est en cours de chargement...
La page est en cours de chargement...
La page est en cours de chargement...
La page est en cours de chargement...
La page est en cours de chargement...
La page est en cours de chargement...
La page est en cours de chargement...
La page est en cours de chargement...
La page est en cours de chargement...
La page est en cours de chargement...
La page est en cours de chargement...
La page est en cours de chargement...
La page est en cours de chargement...
La page est en cours de chargement...
La page est en cours de chargement...
La page est en cours de chargement...
La page est en cours de chargement...
La page est en cours de chargement...
La page est en cours de chargement...
La page est en cours de chargement...
La page est en cours de chargement...
La page est en cours de chargement...
La page est en cours de chargement...
La page est en cours de chargement...
La page est en cours de chargement...
La page est en cours de chargement...
La page est en cours de chargement...
La page est en cours de chargement...
La page est en cours de chargement...
La page est en cours de chargement...
La page est en cours de chargement...
La page est en cours de chargement...
La page est en cours de chargement...
La page est en cours de chargement...
La page est en cours de chargement...
-
 1
1
-
 2
2
-
 3
3
-
 4
4
-
 5
5
-
 6
6
-
 7
7
-
 8
8
-
 9
9
-
 10
10
-
 11
11
-
 12
12
-
 13
13
-
 14
14
-
 15
15
-
 16
16
-
 17
17
-
 18
18
-
 19
19
-
 20
20
-
 21
21
-
 22
22
-
 23
23
-
 24
24
-
 25
25
-
 26
26
-
 27
27
-
 28
28
-
 29
29
-
 30
30
-
 31
31
-
 32
32
-
 33
33
-
 34
34
-
 35
35
-
 36
36
-
 37
37
-
 38
38
-
 39
39
-
 40
40
-
 41
41
-
 42
42
-
 43
43
-
 44
44
-
 45
45
-
 46
46
-
 47
47
-
 48
48
-
 49
49
-
 50
50
-
 51
51
-
 52
52
-
 53
53
-
 54
54
-
 55
55
-
 56
56
-
 57
57
-
 58
58
-
 59
59
-
 60
60
-
 61
61
-
 62
62
-
 63
63
-
 64
64
-
 65
65
-
 66
66
-
 67
67
-
 68
68
-
 69
69
-
 70
70
-
 71
71
-
 72
72


Coby CSMP120 Manuel utilisateur
- Catégorie
- Haut-parleurs d'amarrage
- Taper
- Manuel utilisateur
- Ce manuel convient également à
dans d''autres langues
- English: Coby CSMP120 User manual
- español: Coby CSMP120 Manual de usuario
Documents connexes
-
COBY electronic CRA59 - Clock Radio - Mirror Manuel utilisateur
-
COBY electronic CSMP162BLK Manuel utilisateur
-
Coby CDRA147 Manuel utilisateur
-
Coby COBY KCD150 Manuel utilisateur
-
-
Coby CRA79 Manuel utilisateur
-
-
COBY electronic CSMP142BLK Manuel utilisateur
-
-
Guangzhou Panyu Juda Car Audio Equipment ESXCSBT22 Manuel utilisateur
Autres documents
-
TEAC SR-LUXi Le manuel du propriétaire
-
Audiovox CE710CR Manuel utilisateur
-
-
Sony ICF-CL70 Mode d'emploi
-
Sony Dream Machine ICF-CL70 Le manuel du propriétaire
-
Sony ICFCL75IP Le manuel du propriétaire
-
Sony ICF-C7IP Mode d'emploi
-
Sunbeam 89019 Manuel utilisateur
-
jWIN JL-334 Manuel utilisateur
-
DreamGEAR DGIPOD-1533 Le manuel du propriétaire