LG MH6384BACS Le manuel du propriétaire
- Catégorie
- Micro-ondes
- Taper
- Le manuel du propriétaire

www.lg.com
OWNER’S MANUAL
MICROWAVE OVEN
PLEASE READ THIS OWNER’S MANUAL THOROUGHLY BEFORE OPERATING.
MFL67710502
(optional, please check model specification)
MH638
***

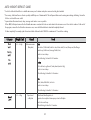
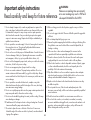
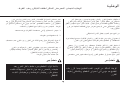
You cannot operate your oven with the door open due to the safety interlocks
built into the door mechanism. These safety interlocks automatically switch off
any cooking activity when the door is opened; which in the case of a
microwave oven could result in harmful exposure to microwave energy.
It is important not to tamper with the safety interlocks.
Do not place any object between the oven front face and the door or allow
food or cleaner residue to accumulate on sealing surfaces.
Do not operate your oven if it is damaged. It is particularly important that the
oven door closes properly and that there is no damage to the: (1) door(bent),
(2) hinges and latches (broken or loosened), (3) door seals and sealing
surfaces.
Your oven should not be adjusted or repaired by anyone except qualified
service personnel.
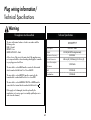
Warning
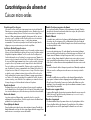
Precautions to avoid possible exposure to excessive microwave energy.
Precautions
When heating liquids, e.g. soups, sauces and beverages in your microwave
oven, delayed eruptive boiling can occur without evidence of bubbling. This
could result in a sudden boil over of the hot liquid. To prevent this possibility
the following steps should be taken:
1 Avoid using straight sided containers with narrow necks.
2 Do not overheat.
3 Stir the liquid before placing the container in the oven and again halfway
through the heating time.
4 After heating, allow to stand in the oven for a short time, stir or shake
them(especially the contents of feeding bottles and baby food jars) again
carefully and check the temperature of them before consumption to avoid
burns (especially, contents of feeding bottles and baby food jars).
Be careful when handling the container.
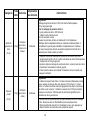
Warning
Always allow food to stand after being cooked by
microwaves and check the temperature of them
before consumption. Especially contents of feeding
bottles and baby food jars.
Please ensure cooking times are correctly set as
over cooking may result in the FOOD catching fire
and subsequent damage to your oven.
2

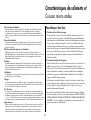
How the Microwave Oven Works
Microwaves are a form of energy similar to radio and television waves and
ordinary daylight. Normally, microwaves spread outwards as they travel
through the atmosphere and disappear without effect. Microwave ovens,
however, have a magnetron which is designed to make use of the energy in
microwaves. Electricity, supplied to the magnetron tube, is used to created
microwave energy.
These microwaves enter the cooking area through openings inside the oven.
A turntable or tray is located at the bottom of the oven. Microwaves cannot
pass through metal walls of the oven, but they can penetrate such materials
as glass, porcelain and paper, the materials out of which microwave-safe
cooking dishes are constructed.
Microwaves do not heat cookware, though cooking vessels will eventually get
hot from the heat generated by the food.
A very safe appliance
Contents
Your microwave oven is one of the safest of all home
appliances. When the door is opened, the oven
automatically stops producing microwaves. Microwave
energy is converted completely to heat when it enters
food, leaving no “left over” energy to harm you when
you eat your food.
3
Precautions
Contents
Unpacking & Installing
Setting the Clock
Child
Micro Power Cooking
Micro Power Level
Two Stage Cooking
Quick Start
Grill Cooking
Combination Cooking
Continental Menu
Auto Defrost
Quick Defrost
Keep Warming
Energy Saving
Important safety instructions
Microwave - safe Utensils
Food characteristics & Microwave cooking
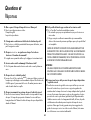
Questions & Answers
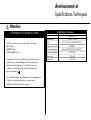
Plug Wiring Information/Technical Specifications
2
3
4~ 5
9
8
7
6
10
11
12
13
14 ~ 17
18 ~ 21
30 ~ 31
32 ~ 33
34
35
36 ~ 37
38
39 ~ 40
41
42
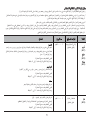
European Menu
Arabic Menu
22 ~ 25
26 ~ 29
Oriental Menu
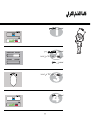
Lock

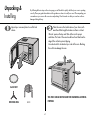
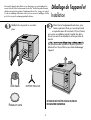
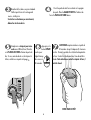
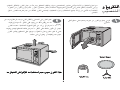
Place the oven in the level location of your choice with
more than 85cm height but make sure there is at least
30cm of space on the top and 10cm at the rear for proper
ventilation. The front of the oven should be at least 8cm from the
edge of the surface to prevent tipping.
An exhaust outlet is located on top or side of the oven. Blocking
the outlet can damage the oven.
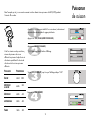
Unpack your oven and place it on a flat level
surface.
By following the basic steps on these two pages you will be able to quickly check that your oven is operating
correctly. Please pay particular attention to the guidance on where to install your oven. When unpacking your
oven make sure you remove all accessories and packing. Check to make sure that your oven has not been
damaged during delivery.
THIS OVEN SHOULD NOT BE USED FOR COMMERCIAL CATERING
PURPOSES
ROTATING RING
Unpacking &
Installing
GLASS TRAY
RACK
4

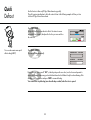
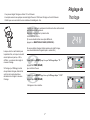
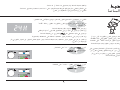
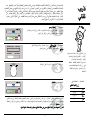
The DISPLAY will count down from 30 seconds
When it reaches 0, BEEP sounds. Open the
oven door and test the temperature of the water. If your
oven is operating the water should be warm. Be careful
when removing the container it may be hot.
YOUR OVEN IS NOW INSTALLED
Fill a microwave safe container with
300 ml (1/2 pint) of water. Place on
the GLASS TRAY and close the oven door. If you
have any doubts about what type of container to
use please refer to page
38
Press the START
button once
to set
30 seconds
of cooking
time.
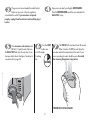
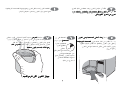
Open your oven door by pulling the DOOR HANDLE.
Place the inside the oven and place the
GLASS TRAY on top.
Plug your oven into a standard household socket.
Make sure your oven is the only appliance
connected to the socket. If your oven does not operate
properly, unplug it from the electrical socket and then plug it
back in.
0,18 726
Seconds
5
ROTATING RING

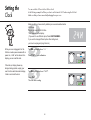
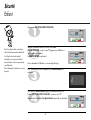
When your oven is plugged in for the
first time or when power resumes after a
power cut, a ‘24H’ will be shown in the
display; you can reset the clock.
If the clock (or display) shows any
strange looking symbols, unplug your
oven from the electrical socket and plug
it back in and reset the clock.
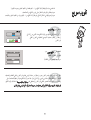
Make sure that you have correctly installed your oven as described earlier
in this book.
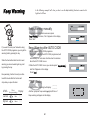
(If you want to use different option,Press KEEP WARMING
If you want to change different option after setting clock,
you have to unplug and plug it back in.)
Plug in your oven for the first time.
"24H" appears on the display.
You can set either 12 hour clock or 24 hour clock.
In the following example I will show you how to set the time for 14:35 when using the 24 clock.
Make sure that you have removed all packaging from your oven.
Setting the
Clock
6
Turn DIAL until display shows
h v
Press START for hour confirmation.
Turn DIAL until display shows “14:35”.
Press STRAT.
The clock starts counting.

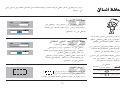
Child
Lock
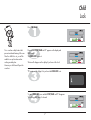
Press and hold STOP/CLEAR until “L” appears on the display and
BEEP sounds.
The CHILD LOCK is now set.
The time will disappear on the display if you have set the clock.
“L” remains on the display to let you know that CHILD LOCK is set.
To cancel CHILD LOCK press and hold STOP/CLEAR until “L” disappears.
You will hear BEEP when it’s released.
Your oven has a safety feature that
prevents accidental running of the oven.
Once the child lock is set, you will be
unable to use any functions and no
cooking can take place.
However your child can still open the
oven door.
Press STOP/CLEAR.
7

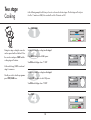
Micro Power
Cooking
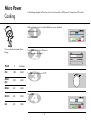
Make sure that you have correctly installed your oven as described
earlier in this book.
Press STOP/CLEAR.
Press START.
In the following example I will show you how to cook some food on 80% power for 5 minutes and 30 seconds.
Your oven has five microwave Power
settings.
POWER
HIGH
MEDIUM
HIGH
MEDIUM
M
EDIUM LOW
LOW
%
100%
80%
60%
40%
20%
Power Output
800W
640W
480W
320W
160W
Press MICRO twice to select 640 power.
“640” appears on the display.
8
Turn DIAL until display shows “5:30”.
COMBI.
GRILLMICRO
KEEP WARMING

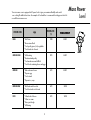
Micro Power
Level
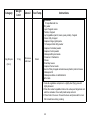
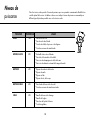
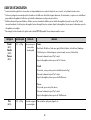
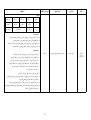
Your microwave oven is equipped with 5 power levels to give you maximum flexibility and control
over cooking
The table below shows the examples of food and their recommended cooking power levels for
use with this
microwave oven.
POWER LEVEL
POWER LEVEL
(%)
HIGH * Boil Water
* Brown minced beef
* Cook poultry pieces, fish, vegetables
* Cook tender cuts of meat
MEDIUM HIGH * All reheating
* Roast meat and poultry
* Cook mushrooms and shellfish
* Cook foods containing cheese and eggs
MEDIUM * Bake cakes and scones
* Prepare eggs
* Cook custard
* Prepare rice, soup
* All thawing
MEDIUM LOW
* Melt butter and chocolate
* Cook less tender cuts of meat
LOW * Soften butter & cheese
20% 160W
* Soften ice cream
* Raise yeast dough
USE
POW ER OUTPUT
100%
80%
60%
40%
800W
640W
480W
320W
9

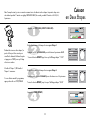
Two stage
Cooking
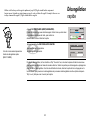
Press STOP/CLEAR.
Set the power and the cooking time for stage1.
Press MICRO once to select HIGH power.
Set the power and the cooking time for stage2.
Press MICRO four times to select power.
Press START.
During two stage cooking the oven door
can be opened and food checked. Close
the oven door and press START and the
cooking stage will continue.
At the end of stage1, BEEP sounds and
stage 2 commences.
Should you wish to clear the programme
press STOP/CLEAR twice.
In the following example I will show you how to cook some food in two stages. The first stages will cook your
food for 11 minutes on HIGH; the second will cook for 35 minutes on .
1
0
320
320
COMBI.
GRILLMICRO
KEEP WARMING
COMBI.
GRILLMICRO
KEEP WARMING
until display shows “11:00”. DIAL Turn
until display shows “35:00”. DIAL Turn

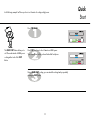
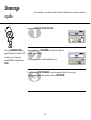
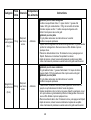
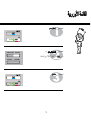
Quick
Start
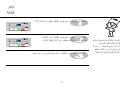
In the following example I will show you how to set 2 minutes of cooking on high power.
Press STOP/CLEAR .
Press START four times to select 2 minutes on HIGH power.
Your oven will start before you have finished the fourth press.
During QUICK START cooking, you can extend the cooking time by repeatedly
pressing the START button.
The QUICK START feature allows you to
set 30 seconds intervals of HIGH power
cooking with a touch of the START
button.
11

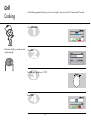
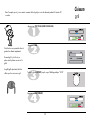
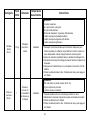
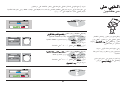
Grill
Cooking
Press STOP/CLEAR.
This feature will allow you to brown and
crisp food quickly.
In the following example I will show you how to use the grill to cook some food for 12 minutes and 30 seconds.
Press START.
Press GRILL.
1
2
Turn DIAL until display shows “12:30”.
COMBI.
GRILLMICRO
KEEP WARMING

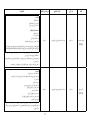
Press STOP/CLEAR .
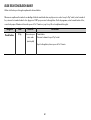
Your oven has a combination cooking
feature which allows you to cook food
with heater and microwave at the same
time or alternately. This generally means
it takes less time to cook your food.
The sheath heater grills the surface of
the food while microwave heats inside.
Moreover, preheating your oven is not
necessary.
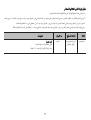
Combination Cooking Mode
CATEGORY MICRO POWER (%) HEATER POWER (%)
Co-1 20 80
Co-2 40 60
Co-3 60 40
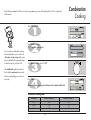
Press START.
Be careful when removing your food because the container will be hot!
In the following example I will show you how to programme your oven with combi mode Co-3 for a cooking time
of 25 minutes.
Combination
Cooking
Press Combi three times.
“Co-3” appears on the display.
1
3
Turn DIAL until display shows “25:00”.
COMBI.
GRILLMICRO
KEEP WARMING

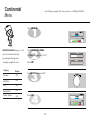
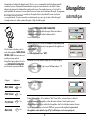
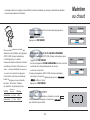
Press STOP/CLEAR .
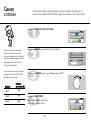
Press
CONTINENTAL MENU.
Press START.
1
4
Turn DIAL until display shows “0.4”.
QUICK DEFROSTAUTO DEFROST
CONTINENTAL MENU GLOBAL MENU
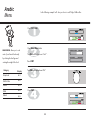
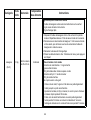
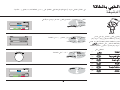
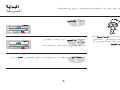
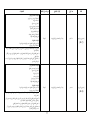
Continental
Menu
Turn DIAL until display shows “Cc-2” .
Press START.
In the fo llowing exa mple I wi ll sh ow y ou how to cook 0.4 kg of Jollof Rice.
CONTINENTAL MENU allows you to cook
most of your favorite food easily
by selecting the food type and
entering the weight of the food.
Category
Display
Cc-1
Cc-2
Cc-3
Cc-4
Cc-5
Couscous
Fufu
Chicken Tagine
Jollof Rice
Potato Gratin

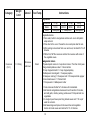
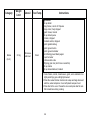
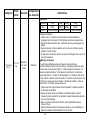
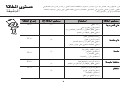
Category
Weight
Limit
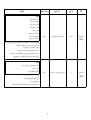
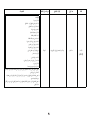
Utensil Food Temp Instructions
Couscous 0.1~0.4kg
Microwave-
safe bowl
Room
Ingredients
Couscous 0.1 kg 0.2 kg 0.3 kg 0.4 kg
Water 120 ml 240 ml 360 ml 480 ml
butter 1 Tablespoon 2 Tablespoons 3 tablespoons
Vegetable mixture
1. Pour water, butter in a large bowl and mix well. cover with plastic
wrap and vent.
2. Place food in the oven. Choose the menu and press start to cook.
3. After cooking remove bowl from oven and cover, let stand for 15~20
minutes.
4. With a fork, fluff the couscous and mix the couscous with some of
the vegetable sauce.
Vegetable mixture
15 pealed pearl onions or 2 cups sliced onions \ 15oz Can chick peas
2 large boiled potatoes cubed \ 1 sliced carrots
1/2 cup chopped cilantro \ 1/4 cup chopped parsley
2 tablespoons minced garlic \ 1 teaspoon paprika
1/4 teaspoon nutmeg \ 1/2 teaspoon salt \ 1/2 teaspoon black pepper
2 cans tomato sauce \ 1 Chicken broth
1 1/2 cups water \ 2 tablespoons butter
1. Cook onions and butter for 5 minutes until caramelized.
2. Add carrots and garbanzo beans and cook for another 5 minutes,
and add garlic, cilantro, parsley, potatoes and 1/2 tsp salt and mix
vegetables.
3. In a large 4 quart sauce pan bring tomato sauce and 1 1/2 cup of
water to a simmer.
4. Add seasonings and spices to the sauce then add vegetable
mixture to tomato sauce and simmer for 10~12 minutes.
15
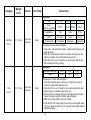
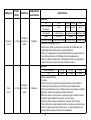
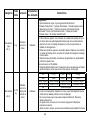
(Cc-1)

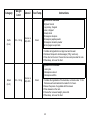
Category
Weight
Limit
Utensil Food Temp Instructions
Jollof Rice 0.1~0.4 kg
Microwave-
safe bowl
Room
Ingredients
Rice 0.1 kg 0.2 kg 0.3 kg 0.4 kg
Stock
(meat or vegetable)
150 ml 300 ml 450 ml 600 ml
Vegetable oil 1 Tbs 2 Tbs 3 Tbs
Onion 1/2 onion 1 onion 2 onion
Tomato paste
1 1/2 teaspoon
3 teaspoon 6 teaspoon
some green chili, seeded and chopped
1. Cook onion, chili and tomato paste in a lightly oiled frying pan until
lightly browned.
2. Place the cooked tomato mixture into a deep and large bowl and
add rice and water. Cover with plastic wrap and vent.
3.
Place food in the oven. Choose the menu and press start to cook.
Stir at least twice during cooking.
Fufu 0.5~1.0 kg
Microwave-
safe bowl
Room
Ingredients
Cassava or white yam 0.5 kg 0.75 kg 1.0 kg
Water 1 cup 1 cup 2 cup
2 tablespoons of butter Salt and pepper
1. Place the unpeeled yams or cassava in a large bowl, and pour
water. cover with plastic wrap and vent.
2. Place food in the oven. Choose the menu and press start to cook.
3. Drain the yams or cassava and let them cool.
4. Peel the yams or cassava, chop them into large pieces and place
them into a large bowl with the butter, salt and pepper.
5. Mash with a potato masher until very smooth.
6. Place the fufu into a large serving bowl. Wet your hands with water,
form into a large ball and serve. You can also make smaller balls for
individual servings.
16
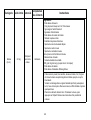
(Cc-2)
(Cc-3)

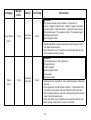
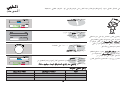
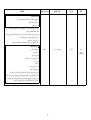
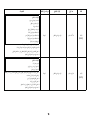
Category
Weight
Limit
Utensil Food Temp Instructions
Potato Gratin 2.0 kg
Microwave-
safe baking
dish on the
rack
Room
Ingredients
Potato mixture \ 250ml heavy cream
350g grated Gruyere cheese
For Potato mixture :
1kg potatoes \ 400ml milk \ 1 1/2 teaspoons salt
Pinch ground nutmeg
Slice potatoes into 3mm thickness. Combine all ingredients in
a saucepan and simmer over medium heat until milk boils and
thickness. Keep stirring potatoes and scraping bottom of pan
regularly to prevent sticking.
1. Place half of the potato mixture into a greased 25*25cm baking
dish, pour half of heavy cream and sprinkle 100g Gruyere cheese.
2. Add the rest of potato mixture, pour remaining cream and finally
sprinkle top with remaining Gruyere cheese.
3. Place baking dish on the rack. Choose the menu and weight, press start.
Chicken
Tagine
1.0 kg
Microwave-
safe bowl
Room
Ingredients
2 tablespoons olive oil \ 8 skinless boneless chicken thighs ,
halved if large \ 150ml water \ 1 onion , chopped \ 2 teaspoons
grated fresh root ginger \ pinch saffron or tumeric \ 1
tablespoon honey \ 300g carrots , cut into sticks \ small bunch
parsley , roughly chopped \ lemon wedges, to serve
1. Add all ingredients in a deep and large bowl and mix well. Cover
with plastic wrap and vent.
2. Place food in the oven. Choose the menu and press start to cook.
Stir at least twice during cooking.
17
(Cc-4)
(Cc-5)

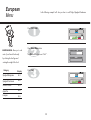
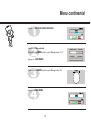
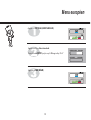
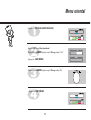
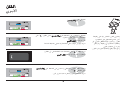
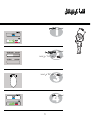
Press STOP/CLEAR.
Press
Global Menu once.
Press START.
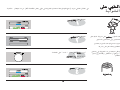
European
Menu
Spaghetti Carbonara.In the fo llowing exa mple I wi ll sh ow y ou how to cook 0.4 kg of
Turn DIAL until display shows “Sc-2” .
EUROPEAN MENU allows you to cook
most of your favorite food easily
by selecting the food type and
entering the weight of the food.
Category
Spaghetti Bolognese
Stuffed Tomato
Lasagna
Spaghetti Carbonara
Apple Pie
QUICK DEFROSTAUTO DEFROST
CONTINENTAL MENU GLOBAL MENU
Display
Sc-1
Sc-2
Sc-3
Sc-4
Sc-5
18

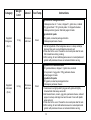
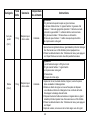
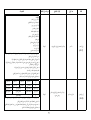
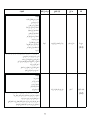
Category
Weight
Limit
Utensil Food Temp Instructions
Spaghetti
Bolognese
1.0 kg
Microwave-
safe bowl
Room
Ingredients for bolognaise sauce
1 tablespoon olive oil \ 1 onion, chopped \ 1 garlic clove, crushed
400 g ground beef \ 100 g tomato paste \ 2 chopped tomatoes
1 tablespoon dried greens \ Salt and pepper to taste
Ingredients for pasta
150 g pasta, cooked as package direction
1 tablespoon parmesan cheese
1. Add all ingredients of the bolognaise sauce in a deep and large
bowl and mix well. cover with plastic wrap and vent.
2. Place food in the oven. Choose the menu and press start to cook.
Stir at least twice during cooking.
3. After cooking, stir and add bolognaise sauce to cooked pasta and
garnish with parmesan cheese or as desired before serving.
Spaghetti
carbonara
0.4 kg
Microwave-
safe bowl
Room
Ingredients for carbonara sauce
100 g smoked bacon, chopped \ 1 garlic clove, crushed
1/2 cup cream \ 4 egg yolks \ 100 g parmesan cheese
Salt and pepper to taste
Ingredients for pasta
150 g pasta, cooked as package direction
1 tablespoon parmesan cheese
1. Cook bacon in a lightly oiled frying pan with garlic until lightly
browned and drain away excess fat.
2. Add cooked bacon, cream, egg yolks, parmesan cheese, salt and
pepper in a deep and large bowl and mix well. Cover with plastic
wrap and vent.
3. Place food in the oven. Choose the menu and press start to cook.
4. After cooking, stir and add carbonara sauce to cooked pasta and
garnish with parmesan cheese or as desired before serving.
(Sc-1)
(Sc-2)
19

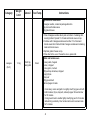
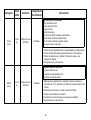
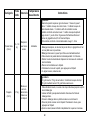
Category
Weight
Limit
Utensil Food Temp Instructions
1.2 kg
Microwave-
safe dish
Room
Ingredients
4 medium tomatoes
Salt and pepper to taste
400g ground beef
1/2 cup bread crumbs
2 garlic cloves, crushed
1 tablespoon Dijon mustard
1 tablespoon dried greens
1 tablespoon parmesan cheese
1. Cut tops off tomatoes to form hats and remove seeds, taking care
not to pierce flesh or skin. Then sprinkle each tomatoes with salt
and pepper.
2. Add the rest of the ingredients in a bowl, mix well.
3. Stuff tomatoes with beef mixture and replace hat.
4. Place stuffed tomatoes on a dish and cover with plastic wrap.
5. Place food in the oven. Choose the menu and press start to cook.
Apple pie 1
21cm Heat-
proof glass
dish on the
rack
Room
Ingredients
baked pastry (baked on 21cm baking dish)
50g apple jam
1 apples (sliced)
1. Put baked pastry on a glass shallow dish.
2. Spread jam and sliced apples on the pastry.
3. Place food on the rack.
4. Place food in the oven. Choose the menu, press start.
(Sc-4)
Stuffed
Tomato
(Sc-3)
20
La page est en cours de chargement...
La page est en cours de chargement...
La page est en cours de chargement...
La page est en cours de chargement...
La page est en cours de chargement...
La page est en cours de chargement...
La page est en cours de chargement...
La page est en cours de chargement...
La page est en cours de chargement...
La page est en cours de chargement...
La page est en cours de chargement...
La page est en cours de chargement...
La page est en cours de chargement...
La page est en cours de chargement...
La page est en cours de chargement...
La page est en cours de chargement...
La page est en cours de chargement...
La page est en cours de chargement...
La page est en cours de chargement...
La page est en cours de chargement...
La page est en cours de chargement...
La page est en cours de chargement...
La page est en cours de chargement...
La page est en cours de chargement...
La page est en cours de chargement...
La page est en cours de chargement...
La page est en cours de chargement...
La page est en cours de chargement...
La page est en cours de chargement...
La page est en cours de chargement...
La page est en cours de chargement...
La page est en cours de chargement...
La page est en cours de chargement...
La page est en cours de chargement...
La page est en cours de chargement...
La page est en cours de chargement...
La page est en cours de chargement...
La page est en cours de chargement...
La page est en cours de chargement...
La page est en cours de chargement...
La page est en cours de chargement...
La page est en cours de chargement...
La page est en cours de chargement...
La page est en cours de chargement...
La page est en cours de chargement...
La page est en cours de chargement...
La page est en cours de chargement...
La page est en cours de chargement...
La page est en cours de chargement...
La page est en cours de chargement...
La page est en cours de chargement...
La page est en cours de chargement...
La page est en cours de chargement...
La page est en cours de chargement...
La page est en cours de chargement...
La page est en cours de chargement...
La page est en cours de chargement...
La page est en cours de chargement...
La page est en cours de chargement...
La page est en cours de chargement...
La page est en cours de chargement...
La page est en cours de chargement...
La page est en cours de chargement...
La page est en cours de chargement...
La page est en cours de chargement...
La page est en cours de chargement...
La page est en cours de chargement...
La page est en cours de chargement...
La page est en cours de chargement...
La page est en cours de chargement...
La page est en cours de chargement...
La page est en cours de chargement...
La page est en cours de chargement...
La page est en cours de chargement...
La page est en cours de chargement...
La page est en cours de chargement...
La page est en cours de chargement...
La page est en cours de chargement...
La page est en cours de chargement...
La page est en cours de chargement...
La page est en cours de chargement...
La page est en cours de chargement...
La page est en cours de chargement...
La page est en cours de chargement...
La page est en cours de chargement...
La page est en cours de chargement...
La page est en cours de chargement...
La page est en cours de chargement...
La page est en cours de chargement...
La page est en cours de chargement...
La page est en cours de chargement...
La page est en cours de chargement...
La page est en cours de chargement...
La page est en cours de chargement...
La page est en cours de chargement...
La page est en cours de chargement...
La page est en cours de chargement...
La page est en cours de chargement...
La page est en cours de chargement...
La page est en cours de chargement...
La page est en cours de chargement...
La page est en cours de chargement...
La page est en cours de chargement...
La page est en cours de chargement...
La page est en cours de chargement...
La page est en cours de chargement...
La page est en cours de chargement...
-
 1
1
-
 2
2
-
 3
3
-
 4
4
-
 5
5
-
 6
6
-
 7
7
-
 8
8
-
 9
9
-
 10
10
-
 11
11
-
 12
12
-
 13
13
-
 14
14
-
 15
15
-
 16
16
-
 17
17
-
 18
18
-
 19
19
-
 20
20
-
 21
21
-
 22
22
-
 23
23
-
 24
24
-
 25
25
-
 26
26
-
 27
27
-
 28
28
-
 29
29
-
 30
30
-
 31
31
-
 32
32
-
 33
33
-
 34
34
-
 35
35
-
 36
36
-
 37
37
-
 38
38
-
 39
39
-
 40
40
-
 41
41
-
 42
42
-
 43
43
-
 44
44
-
 45
45
-
 46
46
-
 47
47
-
 48
48
-
 49
49
-
 50
50
-
 51
51
-
 52
52
-
 53
53
-
 54
54
-
 55
55
-
 56
56
-
 57
57
-
 58
58
-
 59
59
-
 60
60
-
 61
61
-
 62
62
-
 63
63
-
 64
64
-
 65
65
-
 66
66
-
 67
67
-
 68
68
-
 69
69
-
 70
70
-
 71
71
-
 72
72
-
 73
73
-
 74
74
-
 75
75
-
 76
76
-
 77
77
-
 78
78
-
 79
79
-
 80
80
-
 81
81
-
 82
82
-
 83
83
-
 84
84
-
 85
85
-
 86
86
-
 87
87
-
 88
88
-
 89
89
-
 90
90
-
 91
91
-
 92
92
-
 93
93
-
 94
94
-
 95
95
-
 96
96
-
 97
97
-
 98
98
-
 99
99
-
 100
100
-
 101
101
-
 102
102
-
 103
103
-
 104
104
-
 105
105
-
 106
106
-
 107
107
-
 108
108
-
 109
109
-
 110
110
-
 111
111
-
 112
112
-
 113
113
-
 114
114
-
 115
115
-
 116
116
-
 117
117
-
 118
118
-
 119
119
-
 120
120
-
 121
121
-
 122
122
-
 123
123
-
 124
124
-
 125
125
-
 126
126
-
 127
127


LG MH6384BACS Le manuel du propriétaire
- Catégorie
- Micro-ondes
- Taper
- Le manuel du propriétaire
dans d''autres langues
- English: LG MH6384BACS Owner's manual
Documents connexes
-
LG MS2344DMW Le manuel du propriétaire
-
-
LG MS3044GMW Le manuel du propriétaire
-
-
LG MS2043H Le manuel du propriétaire
-
LG MS2535GIS Le manuel du propriétaire
-
LG MC7887AS Le manuel du propriétaire
-
LG MH6342B Le manuel du propriétaire
-
LG MS2342D Manuel utilisateur
-
LG MH6043HAK Le manuel du propriétaire