STIHL FS-KM Manuel utilisateur
- Catégorie
- Coupe-herbe
- Taper
- Manuel utilisateur

STIHL FS-KM
Instruction Manual
Notice d’emploi


Original Instruction ManualPrinted on chlorine-free paper
Printing inks contain vegetable oils, paper can be recycled.
© ANDREAS STIHL AG & Co. KG, 2020
0458-407-8221-B. VA4.J20.
0000006945_009_GB
FS-KM
English
1
This instruction manual is protected by copyright. All rights reserved, especially the rights to reproduce, translate and process
with electronic systems.
Contents
Dear Customer,
Thank you for choosing a quality
engineered STIHL product.
It has been built using modern
production techniques and
comprehensive quality assurance.
Every effort has been made to ensure
your satisfaction and trouble-free use of
the product.
Please contact your dealer or our sales
company if you have any queries
concerning this product.
Your
Dr. Nikolas Stihl
KombiSystem 2
Guide to Using this Manual 2
Safety Precautions and Working
Techniques 2
Approved KombiEngines 10
Approved Combinations of Cutting
Attachment, Deflector, Handle and
Harness 11
Mounting the KombiTool 13
Mounting the Deflector 13
Mounting the Cutting Attachment 14
Fitting the Harness 17
Balancing the Machine 18
Starting / Stopping the Engine 19
Transporting the Unit 19
Lubricating the Gearbox 22
Storing the Machine 22
Sharpening Metal Cutting Blades 23
Maintaining the Mowing Head 23
Maintenance and Care 25
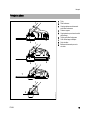
Main Parts 26
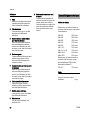
Specifications 27
Maintenance and Repairs 28
Disposal 28

FS-KM
English
2
In the STIHL KombiSystem a number of
different KombiEngines and KombiTools
can be combined to produce a power
tool. In this instruction manual the
functional unit formed by the
KombiEngine and KombiTool is referred
to as the power tool.
Therefore, the separate instruction
manuals for the KombiEngine and
KombiTool should be used together for
the power tool.
Always read and and make sure you
understand both instruction manuals
before using your power tool for the first
time and keep them in a safe place for
future reference.
Pictograms
All the pictograms attached to the
machine are shown and explained in this
manual.
Symbols in text
WARNING
Warning where there is a risk of an
accident or personal injury or serious
damage to property.
NOTICE
Caution where there is a risk of
damaging the machine or its individual
components.
Engineering improvements
STIHL's philosophy is to continually
improve all of its products. For this
reason we may modify the design,
engineering and appearance of our
products periodically.
Therefore, some changes, modifications
and improvements may not be covered
in this manual.
Lend or rent your machine only to
persons who are familiar with this model
and its operation – do not lend or rent
your machine without the KombiEngine
and KombiTool user manuals.
Depending on the cutting attachment
fitted, use your power tool only for
cutting grass, wild growth, shrubs,
scrub, bushes, small diameter trees and
similar materials.
The machine must not be used for any
other purposes – risk of accidents!
Only use cutting attachments and
accessories that are explicitly approved
for this power tool model by STIHL or
KombiSystem Guide to Using this Manual Safety Precautions and
Working Techniques
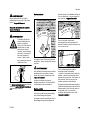
Some special safety pre
-
cautions must be
observed to reduce the
risk of personal injury
when operating this
power tool because of the
very high speed and
sharpness of its cutting
attachment.
Always read and and
make sure you under
-
stand both user manuals
(KombiEngine and
KombiTool) before using
your power tool for the
first time and keep them
in a safe place for future
reference. Non-compli
-
ance with the user
manuals may cause seri
-
ous or even fatal injury.

FS-KM
English
3
are technically identical. If you have any
questions in this respect, consult your
dealer.
Use only high quality parts and
accessories. in order to avoid the risk of
accidents and damage to the machine.
STIHL recommends the use of original
STIHL tools, cutting attachments and
accessories. They are specifically
designed to match the product and meet
your performance requirements.
The guard provided with your machine
may not protect the operator from all
foreign objects (gravel, glass, wire etc.)
ejected by the revolving cutting
attachment. Ejected objects may also
ricochet and strike the operator.
Never attempt to modify your power tool
in any way since this may increase the
risk of personal injury. STIHL excludes
all liability for personal injury and
damage to property caused while using
unauthorized attachments.
Do not use a high-pressure washer to
clean the power tool. The solid jet of
water may damage parts of the unit.
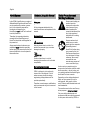
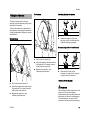
Clothing and equipment
Wear proper protective clothing and
equipment.
Do not wear clothing which could
become trapped in wood, brush or
moving parts of the machine. Do not
wear a scarf, necktie or jewelry. Tie up
and confine long hair above your
shoulders.
Sturdy shoes with non-slip shoes are
permissible only when using mowing
heads.
WARNING
Wear face protection and make sure it is
a good fit. Face protection alone is not
sufficient to protect the eyes.
Wear "personal" sound protection, e.g.
ear defenders.
Always wear a hard hat during thinning
work, in high brush, and whenever there
is a risk of injury due to falling objects.
STIHL can supply a comprehensive
range of personal protective equipment.
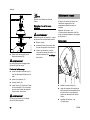
Transporting the machine
Always stop the engine.
Carry the machine hanging on the
harness or by the shaft so that it is
balanced.
To reduce the risk of cut injuries, fit
transport guard on the cutting
attachment, even when carrying the tool
for short distances – see also
"Transporting the Unit".
By vehicle: When transporting in a
vehicle, properly secure your machine to
prevent turnover, damage and fuel
spillage.
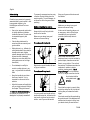
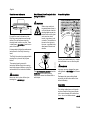
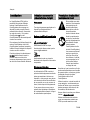
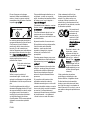
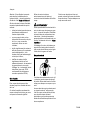
Clothing must be sturdy
but allow complete free
-
dom of movement. Wear
close-fitting clothes such
as a boiler suit, not a
loose jacket.
Wear safety boots with
steel toe caps and non-
slip soles.
To reduce the risk of eye
injuries, wear close-fit
-
ting safety glasses in
accordance with Euro
-
pean Standard EN 166.
Make sure the safety
glasses are a snug fit.
Wear sturdy protective
gloves made of a resist
-
ant material (e. g.
leather).
Avoid touching hot parts
of the machine and gear
-
box – risk of burns!
002BA079 KN

FS-KM
English
4
Before starting
Check that your power tool is properly
assembled and in good condition – refer
to appropriate chapters in the
KombiEngine and KombiTool user
manuals.
– Use only an approved combination
of cutting attachment, deflector,
handle and harness. All parts must
be assembled properly and
securely
– Check cutting attachment for
correct and secure assembly and
good condition
– Safety devices (e. g., deflector for
cutting attachments, rider plate) for
damage and/or wear. Always
replace damaged parts. Do not use
the machine with a damaged
deflector or worn rider plate (if the
writing and arrows are no longer
discernible)
– Do not attempt to modify the
controls or safety devices in any
way – only work with the deflector
fitted
– Keep the handles dry and clean –
free from oil and dirt – this is
important for safe control of the
machine
– Adjust the harness and handle(s) to
suit your height and reach Observe
the chapter "Fitting the Harness"
To reduce the risk of personal injury, do
not operate your power tool if it is
damaged or not properly assembled!
To prepare for emergencies when using
a harness: Practice setting down the
machine quickly. To avoid damage, do
not throw the unit to the ground when
practicing.
Holding and guiding the machine
Always hold the unit firmly with both
hands on the handles.
Make sure you always have good
balance and secure footing.
For versions with bike handle
Right hand on control handle, left hand
on grip on handlebar.
For versions with loop handle
For versions with loop handle and loop
handle with barrier bar, left hand on the
loop handle, right hand on the control
handle – even if you are left-handed.
Wrap your fingers and thumbs around
the handles.
While working
Make sure you always have good
balance and secure footing.
In the event of impending danger or in
an emergency, switch off the engine
immediately by moving the slide
control/stop switch/stop button to
0 or STOP.
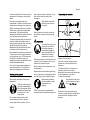
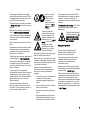
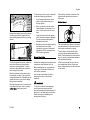
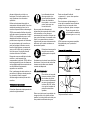
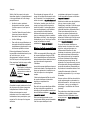
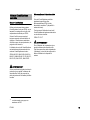
Within a wide area around the
workplace, there is a risk of accident by
ejected objects, therefore ensure that
there is no-one within a 15 m radius of
the machine. This distance must also be
maintained in relation to objects
(vehicles, window panes) – risk of
property damage! Even at a distance
over 15 m, danger cannot be ruled out.
Check that the engine is properly idling
so that the cutting tool will not continue
rotating after you release the throttle
trigger.
Check and correct the idle speed setting
at regular intervals. If the attachment still
rotates when the engine is idling, have
your dealer check your machine and
002BA055 KN
002BA080 KN
Avoid contact with the
cutting attachment – risk
of injury!
15m (50ft)

FS-KM
English
5
make proper adjustments or repairs –
see KombiEngine user manual. STIHL
recommends you have this work done
by a STIHL servicing dealer.
Take special care in slippery conditions
– damp, snow, ice, on slopes or uneven
ground.
Watch out for obstacles: tree stumps,
roots – risk of tripping or stumbling!
Only work while standing on the ground,
never on a ladder or mobile elevated
work platform.
Never operate your power tool with one
hand.
Be particularly alert and cautious when
wearing hearing protection because
your ability to hear warnings (shouts,
alarms, etc.) is restricted.
Take breaks when you start getting tired
or feeling fatigue – risk of accidents!
Work calmly and carefully – in daylight
conditions and only when visibility is
good. Proceed with caution, do not put
others in danger.
If your power tool is subjected to
unusually high loads for which it was not
designed (e.g. heavy impact or a fall),
always check that it is in good condition
before continuing work – see also
"Before Starting".
Make sure the safety devices are
working properly. Never use a power
tool that is no longer safe to operate. In
case of doubt, contact a dealer.
Be particularly careful when working on
difficult, densely grown terrain.
When mowing in high shrubbery, under
shrubbery and hedges: Hold the cutting
tool at a working height of at least 15 cm
– avoid risks to animals.
Examine the cutting attachment
periodically at short intervals and as
soon as you note any noticeable
changes:
– Turn off the engine, hold the device
securely, press the cutting
attachment against the ground to
stop it
– Check condition and secure fitting;
watch out for cracks
– Ensure that the cutting blades are
sharp
– Replace damaged or blunt cutting
attachments immediately, even in
the event of minor hairline cracks
Clean grass and plant residue off the
cutting attachment mounting at regular
intervals – remove any build up of
material from the cutting attachment and
deflector.
To reduce the risk of injury, shut off the
engine before replacing the cutting
attachment.
Using mowing heads
Enhance the cutting attachment
deflector with the attached parts
specified in the User Manual.
Only use the protection with properly
mounted blade to ensure that the
mowing line is restricted to the
permissible length.
Always switch off the engine to adjust
the mowing line for manually adjustable
mowing heads – risk of injury!
Misuse with mowing lines that are too
long reduces the working speed of the
engine. The constant slipping of the
clutch causes overheating and damage
to important components (e. g. clutch,
plastic housing parts) – e. g. due to the
cutting attachment rotating during idling
– risk of injury!
Never work with
-
out protection
suitable for the
respective
machine and cut
-
ting tool – risk of
injury by ejected
objects!
Check the work site –
rocks, metal objects etc.
may be caught up and
ejected – possibly over a
distance of 15 m – risk of
injury! – They can also
damage the cutting
attachment and other
property (e. g. parking
vehicles, windows).
The gear head becomes
hot during operation. To
reduce the risk of burn
injury, do not touch the
gear housing!

FS-KM
English
6
When using metal cutting attachments
STIHL recommends the use of original
STIHL metal cutting attachments. These
have been optimized for the machine
and the user’s requirements.
Metal cutting attachments rotate very
fast, generating forces acting on the
attachments and on the cuttings.
Metal cutting attachments must be
sharpened in regular intervals in
accordance with the instructions.
Unevenly sharpened metal cutting
attachments generate an imbalance
which may cause extreme loads on the
machine – risk of breakage!
Dull or improperly sharpened cutting
edges can put a higher load on the
cutting attachment and increase the risk
of injuryfrom cracked or broken parts.
After each contact of the metal cutting
attachment with hard objects (e.g.
stones, rocks, metal parts), check it for
damage (e.g. tears and deformation).
Burrs and other visible material
accumulations must be removed since
they may come loose at any time while
the machine is running and then be
ejected – risk of injury!
If a rotating metal cutting attachment
touches a rock or another hard object,
sparks may be generated which may
possibly ignite combustible materials.
Also dried-out plants and brushwood are
combustible, above all in hot and dry
weather. If there is a risk of fire, do not
use metal cutting attachments in the
vicinity of combustible materials, dried-
out plants or brushwood. It is mandatory
that you ask the responsible forestry
office about the current fire hazard.
Do not continue using or attempt to
repair damaged or cracked cutting
attachments by welding, straightening or
modifying the shape (out of balance).
Particles or pieces may come off and hit
the operator or a bystander at a high
speed – risk of most severe injuries!
To reduce the above-named risks
involved in operating a metal cutting
attachment, ensure that the diameter of
your metal cutting attachment is not too
big. Also, the attachment must not be
too heavy. It must be made of high-
quality materials and have a suitable
geometry (shape, thickness).
To reduce the risk of injury, a metal
cutting attachment not manufactured by
STIHL must not be heavier, thicker,
have a different shape or a diameter
larger than the largest metal cutting
attachment approved by STIHL for this
power tool model.
After finishing work
After finishing work or before leaving the
power tool unattended: Shut off the
engine.
Clean the cutting attachment regularly
after finishing work to remove dust, dirt,
soil and plant debris – wear gloves – risk
of injury!
Do not use any grease solvents when
cleaning.
After cleaning it thoroughly, coat the
surface of metal cutting attachments
with a corrosion-proofing agent.
Maintenance and Repairs
Service the machine regularly. Do not
attempt any maintenance or repair work
not described in the KombiTool and
KombiEngine instruction manuals. Have
all other work performed by a servicing
dealer.
STIHL recommends that you have
servicing and repair work carried out
exclusively by an authorized STIHL
servicing dealer. STIHL dealers are
regularly given the opportunity to attend
training courses and are supplied with
the necessary technical information.
Only use high-quality replacement parts
in order to avoid the risk of accidents
and damage to the machine. If you have
any questions in this respect, consult a
servicing dealer.
STIHL recommends the use of genuine
STIHL replacement parts. They are
specifically designed to match your
model and meet your performance
requirements.
To reduce the risk of injury, always shut
off the engine before carrying out any
maintenance or repairs or cleaning the
machine.
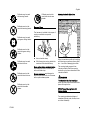
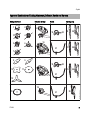
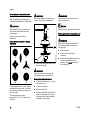
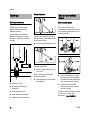
Symbols on Deflectors
An arrow on the deflector shows the
correct direction of rotation of the cutting
attachments.
Some of the following symbols are
applied to the outside of the deflector to
indicate the approved combination of
cutting attachment and deflector.

FS-KM
English
7
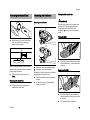
Harness / Strap
The harness is included in the scope of
supply or available as a special
accessory.
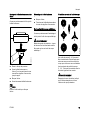
N Use a shoulder strap.
N With the engine running, attach the
machine to the shoulder strap.
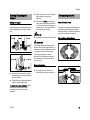
Grass cutting blades and brush knives
must always be used in combination
with a shoulder strap.
Circular saw blades must always be
used in combination with a full harness
with a quick-release system.
Mowing Head with Nylon Line
Nylon line achieves a soft cut for edging
and trimming around trees, fence posts,
etc. – less risk of damaging tree bark.
The mowing head comes with an
instruction leaflet. Refill the mowing
head with nylon line as described in the
instruction leaflet.
WARNING
To reduce the risk of serious injury,
never use wire or metal-reinforced line in
place of the nylon line.
STIHL Polycut Mowing Head with
Polymer Blades
For mowing unobstructed edges of
meadows (without posts, fences, trees
or similar obstacles).
Deflector may be used
with mowing heads.
Deflector must not be
used with mowing heads.
Deflector may be used
with grass cutting blades.
Deflector must not be
used with grass cutting
blades.
Deflector may be used
with brush knives.
Deflector must not be
used with brush knives.
Deflector must not be
used with shredder
blades.
Deflector must not be
used with circular saw
blades.
000BA015 KN

FS-KM
English
8
Check the wear limit marks!
If one of the wear limit marks on the
PolyCut mowing head is worn through
(arrow): Do not continue using the
mowing head. Install a new one. There
is otherwise a risk of injury from thrown
parts of the head.
It is important to follow the maintenance
instructions for the PolyCut mowing
head.
The PolyCut can also be equipped with
mowing line in place of the polymer
blades.
The mowing head comes with
instruction leaflets. Equip the mowing
head with polymers blades or nylon line
as described in the instruction leaflets.
WARNING
Never use wire in place of the nylon
mowing line – risk of injury.
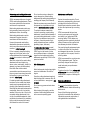
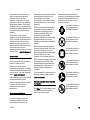
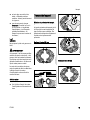
Risk of Kickout (Blade Thrust) with Metal
Cutting Attachments
WARNING
The risk of kickout is greatest when the
black area of the rotating cutting
attachment comes into contact with a
solid object.
Grass Cutting Blade
Use for grass and weeds only – sweep
the brushcutter in an arc like a scythe.
WARNING
Improper use may damage the grass
cutting blade – risk of injury from thrown
parts.
Resharpen the grass cutting blade
according to instructions when it has
dulled noticeably.
Brush Knife
For cutting matted grass, wild growth
and scrub and thinning young stands
with a stem diameter of no more than
2 cm – do not cut thicker stems – risk of
accidents.
002BA049 KN
When using metal cut
-
ting attachments there is
a risk of kickout when the
rotating blade comes into
contact with a solid object
such as a tree trunk,
branch, tree stump, rock
or similar. The machine is
thrown to the right or to
the rear – opposite to the
attachment's direction of
rotation.
002BA135 KN
000BA020 KN

FS-KM
English
9
Use the brushcutter like a scythe (sweep
it to the right and left) at ground level
when cutting grass and thinning young
stands.
To cut wild growth and scrub, lower the
brush knife down onto the growth to
achieve a shredding effect – always
keep the cutting attachment below hip
level during this process.
Exercise extreme caution when using
this method of cutting. The higher the
cutting attachment is off the ground, the
greater the risk of injury from cuttings
being thrown sideways.
Warning! Improper use of a brush knife
may cause it to crack, chip or shatter –
risk of injury from thrown parts.
To reduce the risk of injury it is essential
to take the following precautions:
– Avoid contact with stones, rocks,
pieces of metal and other solid
foreign objects.
– Never cut wood or shrubs with a
stem diameter of more than 2 cm –
use a circular saw blade for such
work.
– Inspect the brush knife at regular
short intervals for signs of damage.
Do not continue working with a
damaged brush knife.
– Resharpen the brush knife regularly
and whenever it has dulled
noticeably, and have it balanced if
necessary (STIHL recommends a
STIHL servicing dealer).
Circular Saw Blade
Suitable for cutting shrubs and trees with
a maximum stem diameter of 4 cm.
Before starting the cut, accelerate the
engine up to full throttle. Perform cut
with uniform pressure.
Use circular saw blades only with a
matching limit stop of the correct
diameter.
WARNING
To reduce the risk of blade damage,
avoid contact with stones and the
ground. Resharpen the blade properly in
good time – dull teeth may result in the
blade cracking and shattering and
causing serious injury.
When felling, maintain a distance of at
least two tree lengths from the next
felling site.
Risk of kickout
The risk of kickout is highest in the black
area of the blade: Do not use this area of
the circular saw blade for cutting.
There is also a risk of kickout when
using the lighter shaded areas of the
blade: These areas of the blade should
only be used by experienced operators
with specialized training.
STIHL recommends that you use the
non-shaded area of the circular saw
blade. Always start the cut with this area
of the blade.
002BA355 KN
002BA509 KN
002BA068 KN

FS-KM
English
10
KombiEngines
Only use KombiEngines supplied or
explicitly approved by STIHL for use with
the attachment.
Depending on the cutting attachment
used, always observe the chapter
“Permissible combinations of cutting
attachment, deflector, grip and
harness”.
This KombiTool may be operated only in
combination with the following
KombiEngines:
STIHL KM 55 R, KM 56 R, KM 85 R
1)
,
KM 91 R, KM 94 R, KM 111 R, KM 131,
KM 131 R, KMA 130 R, KMA 135 R
WARNING
Loop-handled machines must be
equipped with a barrier bar.
Brushcutters with split shaft
The KombiTool can also be fitted to
STIHL brushcutters with a split shaft (T-
models) (basic power tools).
This KombiTool can therefore also be
used on the following machine:
STIHL FR 131 T
WARNING
Refer to the user manual of the power
tool for use of the barrier bar.
Approved KombiEngines
1)
Only outside EU

FS-KM
English
11
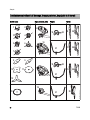
Approved Combinations of Cutting Attachment, Deflector, Handle and Harness
Cutting attachment Deflector, limit stop Handle Carrying strap
18
17
16
15
14
24
22
23
24
24
23
25
21
21
20
19
21
20
19
13
0000-GXX-0371-A2
8
11
10
9
12
1
2
3
4
5 6
7

FS-KM
English
12
Permissible combinations
Choose the correct combination from
the table depending on the cutting tool!
WARNING
For safety reasons only the cutting
attachments, deflector, handle and
harness versions within one line of the
table may be combined with one
another. No other combinations are
permitted because of the risk of
accidents!
WARNING
Loop-handled machines must be
equipped with a barrier bar.
Cutting attachments
Mowing heads
1 STIHL SuperCut 20
-
2
2 STIHL AutoCut C 25-2
3 STIHL AutoCut 25-2
4 STIHL AutoCut C 26-2
5 STIHL AutoCut 36-2
6 STIHL PolyCut 20-3
3)
7 STIHL DuroCut 20-2
Metal cutting tools
8 Grass cutting blade 230-2
(Ø 230 mm)
9 Grass cutting blade 260-2
(Ø 260 mm)
10 Grass cutting blade 230-4
(Ø 230 mm)
11 Grass cutting blade 230-8
(Ø 230 mm)
12 Brush knife 250-3
1)
(Ø 250 mm)
13 Circular saw blade 200-22 chisel
tooth
1)2)
(Ø 200 mm), circular saw
blade 200-22 HP chisel tooth
1)2)
(Ø 200 mm)
WARNING
Grass cutting blades, brush knives and
circular saw blades of other, non-metal
materials must not be used.
Deflectors, limit stop
14 Deflector for mowing heads
15 Deflector with
16 Skirt and blade for mowing heads
17 Deflector without skirt and blade for
metal cutting attachments,
items 8 to 13
18 Limit stop for circular saw blades
Handles
19 Loop handlewith
20 Barrier bar
21 Bike handle
Shoulder straps
22 Shoulder strap can be used
23 Shoulder strap must be used
24 Full harness can be used
25 Full harness must be used
1)
Not approved for KM 55 R, FS 56 R
2)
Not approved for FR 131 T,
KM 55 R, KM 56 R, KM 85 R,
KM 94 R, KM 111 R, KM 131 R,
KMA 130 R, KMA 135 R
1)
Not approved for KMA 135 R

FS-KM
English
13
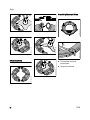
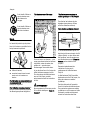
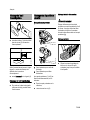
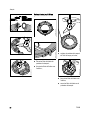
N Push the lug (1) on the drive tube
into the slot (2) in the coupling
sleeve as far as stop.
When correctly installed, the red line (3)
(arrow point) must be flush with the end
of the coupling sleeve.
N Tighten down the star knob (4)
firmly.
Removing the KombiTool
N Reverse the above sequence to
remove the drive tube.
Mounting the Deflector
1 Deflector for mowing attachments
2 Deflector for mowing heads
Deflectors (1 and 2) are both mounted to
the gearbox in the same way.
N Place the deflector on the gearbox
flange.
N Insert the screws (3) and tighten
them down firmly.
Fitting the Skirt and Blade
WARNING
Risk of injury from thrown objects and
contact with the cutting attachment.
These parts must be fitted to the
deflector (1) when you use a mowing
head.
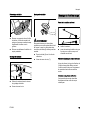
Fitting the Skirt
N Slide the lower guide slot of the skirt
onto the deflector – it must snap into
position.
Removing the Skirt
N Insert the stop pin into the hole in
the skirt and use it to push the skirt
to the left.
N Pull the skirt off the deflector.
Mounting the KombiTool
1
002BA326 KN
2
3
002BA327 KN
4
Mounting the Deflector
002BA636 KN
2
1
3
3
002BA637 KN
1.
2.
002BA646 KN

FS-KM
English
14
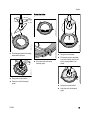
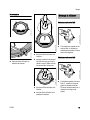
Mounting the Blade
N Slide the line limiting blade into the
guide on the skirt.
N Insert the screw and tighten it down
firmly.
Mounting the Limit Stop
WARNING
Risk of injury from thrown objects and
contact with the cutting attachment.
Always fit the limit stop (6) when you use
a circular saw blade.
N Position the limit stop (6) on the
gearbox flange.
N Insert the screws (7) and tighten
them down firmly.
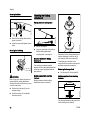
Placing power tool on the ground
N Shut off the engine.
N Lay your power tool on its back so
that the cutting attachment
mounting face is pointing up.
Mounting Hardware for Cutting
Attachments
The mounting hardware supplied
depends on the cutting attachment that
comes as original equipment with the
new machine.
Machine supplied with mounting
hardware
Mowing heads and metal cutting
attachments may be mounted.
Depending on the cutting attachment, it
may be necessary to use the nut (3),
rider plate (4) and thrust washer (5).
These parts are included in a kit
supplied with the machine and are also
available as special accessories.
Removing the transport lock
N Pull the hose (1) off the shaft (2).
Machine supplied without mounting
hardware
Only mowing heads may be used which
mount directly to the shaft (2).
002BA638 KN
7
002BA639 KN
6
Mounting the Cutting
Attachment
002BA104 KN
2
002BA164 KN
1
3
4
5
2
002BA266 KN

FS-KM
English
15
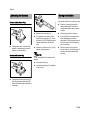
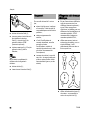
Blocking the Shaft
The output shaft (2) must be blocked
with the stop pin (6) or screwdriver (6) to
mount or remove cutting attachments.
These parts come standard with the
machine or are available as special
accessories.
N Insert the stop pin (6) or
screwdriver (6) in the hole (7) in the
gearbox as far as stop – and apply
slight pressure.
N Rotate shaft, nut or cutting
attachment until the stop pin slips
into position and blocks the shaft.
Removing the Mounting Hardware
N Block the shaft.
N Use the combination wrench (1) to
loosen and remove the nut (2)
clockwise (left-hand thread).
N Take the thrust washer (3) off the
shaft (4). Do not remove the thrust
plate (5).
Mounting the Cutting Attachment
WARNING
Use a deflector that matches the cutting
attachment – see "Mounting the
Deflector".
Fitting the mowing head with screw
mounting
Keep the supplement sheet for the
mowing head in a safe place.
N Fit the thrust plate
N Turn the mowing head
anticlockwise on the shaft (1) as far
as it will go
N Retain the shaft
N Tighten the mowing head
NOTICE
Remove the tool that was used to block
the shaft.
Removing the Mowing Head
N Retain the shaft
N Turn the mowing head clockwise
6
7
2
002BA330 KN
6
3
4
2
271BA057 KN
1
5
1
002BA385 KN

FS-KM
English
16
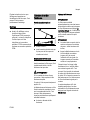
Mounting Metal Cutting Attachments
Keep the leaflet and packaging of the
metal cutting attachment in a safe place.
WARNING
Wear protective gloves to reduce the
risk of direct contact with the sharp
cutting edges.
Mount only one metal cutting
attachment.
Check direction of rotation of cutting
attachment
Cutting attachments 2, 4 and 5 may be
mounted either way round – they must
be turned over regularly to help avoid
one-sided wear.
The cutting edges of cutting
attachments 1, 3, 6 and 7 must point
clockwise.
WARNING
Direction of rotation is indicated by an
arrow on the inside of the deflector.
N Place the cutting attachment (8) on
the thrust plate (9).
WARNING
Collar (see arrow) must engage the
cutting attachment's mounting hole.
Securing the cutting attachment
N Fit the thrust washer (10) – convex
side must face up.
N Fit the rider plate (11).
N Block the shaft (12).
N Use the combination wrench (14) to
screw the mounting nut (13) on to
the output shaft counterclockwise
and tighten it down firmly.
WARNING
If the mounting nut has become too
loose, fit a new one.
NOTICE
Remove the tool used to block the shaft.
Removing the Metal Cutting Attachment
WARNING
Wear protective gloves to reduce the
risk of direct contact with the sharp
cutting edges.
N Block the shaft.
N Unscrew the mounting nut
clockwise.
N Remove cutting attachment and its
mounting hardware from the
gearbox – but do not remove the
thrust plate (9).
3
1
4
6
7
5
681BA042 KN
2
10
8
9
11
12
13
14
681BA161 KN

FS-KM
English
17
The type and style of the harness,
carrying ring and carabiner (spring hook)
depend on the market.
The use of the harness is described in
the chapter on "Approved Combinations
of Cutting Attachment, Deflector, Handle
and Harness".
Shoulder strap
N Put on the shoulder strap (1).
N Adjust the length of the strap so that
the carabiner (2) is about a hand’s
width below your right hip.
N Balance the machine – see
"Balancing the Machine".
Full Harness
N Put on the full harness (1).
N Adjust the length of the strap so that
the carabiner (2) is about a hand’s
width below your right hip.
N Balance the machine – see
"Balancing the Machine".
Attaching Machine to Harness
N Attach the carabiner (1) to the
carrying ring (2) on the drive tube –
hold the carrying ring steady.
Disconnecting Machine from Harness
N Press down the bar on the
carabiner (1) and pull the carrying
ring (2) out of the carabiner.
Throwing Off the Machine
WARNING
The machine must be quickly thrown off
in the event of imminent danger.
Practice removing and putting down the
machine as you would in an emergency.
To avoid damage, do not throw the
machine to the ground when practicing.
Fitting the Harness
1
002BA374 KN
2
1
002BA375 KN
2
1
002BA308 KN
2
1
2
1
002BA310 KN
2
1
2

FS-KM
English
18
Practice quickly detaching the power
tool from the carabiner as described
under "Disconnecting Machine from
Harness".
If you are using a shoulder strap:
Practice slipping the strap off your
shoulder.
If you are using a full harness: Practice
quickly opening the locking plate and
slipping the harness straps off your
shoulders.
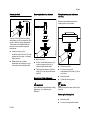
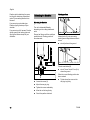
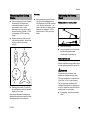
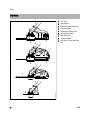
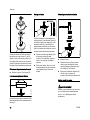
Balancing the Machine
The unit is balanced differently
depending on the cutting attachment
used.
Proceed as follows until the conditions
specified under "Floating positions"
have been met:
N Loosen the screw (3).
N Adjust the carrying ring.
N Tighten the screw moderately.
N Allow the unit to hang freely.
N Check the position obtained.
Floating positions
Mowing tools (A) such as mowing
heads, grass cutting blades and brush
knives
N should just touch the ground.
Circular saw blades (B)
N should "hover" about 20 cm (8 in)
above the ground.
When the correct floating position has
been reached:
N Tighten down the screw on the
carrying ring firmly.
Balancing the Machine
002BA309 KN
3
A
002BA034 KN
B
002BA035 KN
La page est en cours de chargement...
La page est en cours de chargement...
La page est en cours de chargement...
La page est en cours de chargement...
La page est en cours de chargement...
La page est en cours de chargement...
La page est en cours de chargement...
La page est en cours de chargement...
La page est en cours de chargement...
La page est en cours de chargement...
La page est en cours de chargement...
La page est en cours de chargement...
La page est en cours de chargement...
La page est en cours de chargement...
La page est en cours de chargement...
La page est en cours de chargement...
La page est en cours de chargement...
La page est en cours de chargement...
La page est en cours de chargement...
La page est en cours de chargement...
La page est en cours de chargement...
La page est en cours de chargement...
La page est en cours de chargement...
La page est en cours de chargement...
La page est en cours de chargement...
La page est en cours de chargement...
La page est en cours de chargement...
La page est en cours de chargement...
La page est en cours de chargement...
La page est en cours de chargement...
La page est en cours de chargement...
La page est en cours de chargement...
La page est en cours de chargement...
La page est en cours de chargement...
La page est en cours de chargement...
La page est en cours de chargement...
La page est en cours de chargement...
La page est en cours de chargement...
La page est en cours de chargement...
La page est en cours de chargement...
-
 1
1
-
 2
2
-
 3
3
-
 4
4
-
 5
5
-
 6
6
-
 7
7
-
 8
8
-
 9
9
-
 10
10
-
 11
11
-
 12
12
-
 13
13
-
 14
14
-
 15
15
-
 16
16
-
 17
17
-
 18
18
-
 19
19
-
 20
20
-
 21
21
-
 22
22
-
 23
23
-
 24
24
-
 25
25
-
 26
26
-
 27
27
-
 28
28
-
 29
29
-
 30
30
-
 31
31
-
 32
32
-
 33
33
-
 34
34
-
 35
35
-
 36
36
-
 37
37
-
 38
38
-
 39
39
-
 40
40
-
 41
41
-
 42
42
-
 43
43
-
 44
44
-
 45
45
-
 46
46
-
 47
47
-
 48
48
-
 49
49
-
 50
50
-
 51
51
-
 52
52
-
 53
53
-
 54
54
-
 55
55
-
 56
56
-
 57
57
-
 58
58
-
 59
59
-
 60
60


STIHL FS-KM Manuel utilisateur
- Catégorie
- Coupe-herbe
- Taper
- Manuel utilisateur
dans d''autres langues
- English: STIHL FS-KM User manual
Documents connexes
-
STIHL FS 55 Manuel utilisateur
-
-
-
-
STIHL BG-KM Manuel utilisateur
-
STIHL FH-KM Manuel utilisateur
-
-
-
-