Breville the Tea Maker Compact Manuel utilisateur
- Catégorie
- Bouilloires électriques
- Taper
- Manuel utilisateur

the Tea Maker
™
Compact
Instruction Book - BTM700

2
BREVILLE
RECOMMENDS
SAFETY FIRST
At Breville
®
we are very
safety conscious. We design
and manufacture consumer
products with the safety of you,
our valued customer, foremost
in mind. In addition we ask
that you exercise a degree of
care when using any electrical
appliance and adhere to the
following precautions.
IMPORTANT
SAFEGUARDS
READ ALL INSTRUCTIONS
BEFORE USE AND SAVE
FOR FUTURE REFERENCE
• Before using for the first time
please ensure that your
electricity
supply is the same as shown on
the rating abel on the underside
of the appliance. If you have any
concerns please contact your
local electricity company.
• Appliances can be used by persons
with reduced physical, sensory or
mental capabilities or lack of
experience and knowledge if they
have been given supervision or
instruction concerning the use of
the appliance in a safe way and
understand the hazards involved.
• Children shall not play with the
appliance. Close supervision is
necessary when any appliance is
used by or near children.
• Remove and safely discard any
packaging material and
promotional labels before using
the appliance for the first time.
• To eliminate a choking hazard for
young children, remove and safely
discard the protective cover fitted
to the power plug of this appliance.
• This appliance has been designed
specifically for the purpose of
heating and boiling quality
drinking water and tea only. Under
no circumstances should this
product be used to heat or boil any
other liquids or foodstuffs.
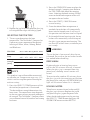
• Do not place the appliance near
the edge of a bench or table during
2 Breville Recommends
Safety First
6 Components
8 Functions
10 Tips
11 Care & Cleaning
13 Troubleshooting
Contents

3
operation. Ensure that the surface
is level, clean and free of water
and other substances.
• Do not operate the appliance on
a sink drain board.
• Do not place the appliance on
or near a hot gas burner, electric
element or where it could touch
a heated oven.
• Keep the appliance clear of walls,
curtains and other heat or steam
sensitive materials. Minimum
20cm distance.
• Always ensure the appliance is
properly assembled before use.
Follow the instructions provided
in this book.
• The appliance must be used only
with the power base supplied.
• This appliance is not intended
to be operated by means of an
external timer or separate remote
control system.
• Do not touch hot surfaces. Use
the handle for lifting and carrying
the appliance.
• Do not place anything on top
of the lid.
• To disconnect, turn any control
to "off," then remove plug from
wall outlet.
• Remove the plug from the power
outlet before attempting to move
the appliance, when the
appliance is not in use and before
cleaning and storing.
• Use caution when pouring water
from the glass jug, as boiling water
and steam will scald. Do not pour
water too quickly.
• To protect against electric shock,
do not immerse the glass jug base,
power base, power cord or power
plug in water or allow moisture to
come in contact with these parts.
• Do not wash jug exterior under
running water.
• Do not open the lid during
operation.
• Do not overfill the glass jug past
the maximum water level mark. If
the glass jug is overfilled, boiling
water may be ejected.
• Keep the appliance clean. Follow
the cleaning instructions provided
in this book.
• Do not spill water onto the
connector.
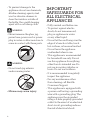
WARNING
• Do not operate the appliance on an
inclined surface. Do not move the
appliance while it is switched on.
• The heating element surface is
subjected to residual heat after use.
• Do not remove the outer lid
during and after operation.
This may result in boiling water
splashing from the glass jug. Pour
out all the hot water from the glass
jug before opening the lid to refill.

4
• To prevent damage to the
appliance do not use chemicals,
alkaline cleaning agents, steel
wool or abrasive cleaners to
clean the inside or outside of
the kettle. Use a mild cleaning
agent with a soft damp cloth.
WARNING
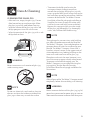
• Never immerse the glass jug,
power base, power cord or power
plug in water or allow moisture to
come in contact with these parts.
WARNING
• Do not wash jug exterior
under running water.
• Misuse may cause injury.
IMPORTANT
SAFEGUARDS FOR
ALL ELECTRICAL
APPLIANCES
• Fully unwind cord before use.
• To protect against electric
shock, do not immersecord,
plug or appliance in water
or any other liquid.
• Do not let the cord hang over the
edge of a bench or table, touch
hot surfaces, or become knotted.
• Do not leave the appliance
unattended when in use.
• This appliance is recommended
for household use only. Do not
use this appliance for anything
other than its intended use. Do
not use in moving vehicles or
boats. Do not use outdoors.
• It is recommended to regularly
inspect the appliance.
• For any maintenance other
than cleaning, call Breville
Consumer Support.
• This appliance is equipped with
a power cord having a grounding
wire with a grounding plug. The
appliance must be grounded
using a 3-hole properly grounded
outlet. In the event of an electrical
short circuit, grounding reduces
the risk of electrical shock.

5
• If the appliance is of
the grounded type, the
extension cord should be a
grounding 3-wire cord.
• If the power outlet is a standard
2-prong wall outlet, it is your
personal responsibility and
obligation to have it replaced
with a properly grounded
3-prong wall outlet.
• The use of accessory
attachments not recommended
by the appliance manufacturer
may result in fire, electric
shock or injury to persons.
• Do not, under any circumstances,
cut or remove the third
(ground) prong from the power
cord or use an adapter.
• Consult a qualified electrician if
the grounding instructions are
not completely understood, or
if doubt exists as to whether the
appliance is properly grounded.
FOR HOUSEHOLD USE ONLY
SAVE THESE INSTRUCTIONS
SHORT CORD
INSTRUCTIONS
• A short power-supply cord
is provided to reduce risks
resulting from becoming
entangled in or tripping
over a longer cord.
• Longer extension cords are
available and may be used if
care is exercised in their use.
• If a long extension cord is used:
(1) The marked electrical rating
of the extension cord should be
at least as great as the electrical
rating of the appliance; (2)
The extension cord should be
a grounding-type 3-wire cord;
and (3) The longer cord should
be arranged so that it will not
drape over the counter top or
table top where it can be pulled
on by children or tripped over.
WARNING
Do not operate any appliance with
a damaged cord or plug or after
the appliance malfunctions, or has
been damaged in any manner.
Return appliance to the nearest
authorized service facility for
examination, repair or adjustment.

6
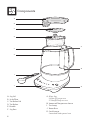
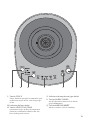
Components
A. Jug Lid
B. Scale Filter
C. Tea Basket Lid
D. Tea Basket
E. Handle
F. Jug Post
G. Glass Jug
34 fl.oz (1L) water max.
27 fl.oz (800ml) tea max.
H. Immersed Temperature Sensor
I. Tea Scoop
J. Power Base
K. Cord Storage
Concealed under power base.
E
H
K
A
B
C
D
F
G
I
J

7
185º
175
º
195º
205º
212º
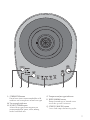
ML QN O P
L. STRENGTH button
Preset brew times recommended for mild,
medium and strong brews of each tea type.
M. Tea strength indicator
N. SELECT/TEMP button
Select the tea type/brew temperature
recommended for green, white, oolong,
herbal and black teas.
O. Temperature/tea type indicator
P. KEEP WARM button
Keeps brewed tea or heated water
warm for up to 60 minutes.
Q. START/CANCEL button
Starts and stops the heating cycle.

8
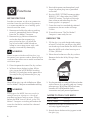
Functions
BEFORE FIRST USE
In order to remove any dust or protective
residues from the manufacturing process,
it is recommended to run a boiling cycle
then discard the water.
1. Remove and safely discard any packing
material, promotional labels and tape
from the Tea Maker™ Compact.
2. Remove the jug lid then remove the
tea basket from the magnetic jug
post within the glass jug. Wash the
jug lid, tea basket, basket lid and tea
scoop in warm soapy water with a soft
sponge; rinse and dry thoroughly.
WARNING
Never immerse the base of the glass jug,
the power base, power cord or power plug in
water or allow moisture to come into contact
with these parts.
3. Place the power base on a flat, dry surface.
4. Without the tea basket in place, fill the
glass jug to the WATER MAX marking
(34 fl.oz / 1L) and place on the power base.
Securely fit the jug lid onto the glass jug.
WARNING
Never fill the glass jug with chilled water. Allow
the Tea Maker™ Compact to cool before refilling.
WARNING
Filling past the MAX line may result in
serious burns or injuries as a result of
overflowing hot or boiling water. Filling
below the MIN line will result in the Tea
Maker™ Compact switching off before the
water has boiled or reached the selected
temperature.
5. Unwind the power cord completely and
insert the power plug into a grounded
wall outlet.
6. Use the SELECT/TEMP button to select
BLACK / 212°, then select the START/
CANCEL button. The light will change
from white to red indicating that the
heating cycle is in progress.
7. Once the water has reached the selected
temperature, the tea maker will beep
3 times.
8. Discard the water. The Tea Maker™
Compact is now ready for use.
BREWING TEA
1. Fill the glass jug with the desired amount
of water. Ensure that you fill past the MIN
mark and equal to or below the MAX mark.
Note the MAX mark when brewing tea is
27 fl.oz / 800ml.
2. Place the tea basket on a flat, dry surface.
Remove the basket lid by lifting it from
the sides.
3. Use the provided tea scoop to fill the tea basket
with tea leaves. As a general guide, use 1 scoop
of tea per cup / 8 (½) fl.oz (250ml) of water;
however, this will depend on the tea
instructions and your personal preference.
WATER TO TEA SCOOP RATIO
17 fl.oz / 500ml 2 scoops
25 fl.oz / 750ml 3 scoops
4. Replace the basket lid and ensure it is
securely clipped into place.
5. Attach the tea basket to the jug post inside
the glass jug.

9
6. Replace the jug lid securely onto the glass jug,
ensuring the filter aligns with the jug spout.
SELECTING THE TEA TYPE
1. The tea type determines the brew
temperature. The Tea Maker™ Compact has
5 preset tea types recommend for optimal
brewing of Green, White, Oolong, Herbal
and Black teas.
TEA TYPE
Green White Oolong Herbal Black
Preset Brew
Temp
175°F
80°C
185°F
85°C
195°F
90°C
205°F
95°C
212°F
100°C
Strength
(mins)
Mild
2 3 3 4 3
Medium
3 4 4 5 4
Strong
4 5 5 6 5
NOTE
This product is not calibrated for commercial
or scientific use. Temperatures may vary -+3°C,
which is within range for optimal brewing for
each tea variety.
2. Press the SELECT / TEMP button until the
desired tea/temperature is illuminated.
The desired brew strength determines the
brew times. The correct brew time depends
on the tea type and your personal preference
of strength. The Tea Maker™ Compact allows
you to choose from mild, medium and strong
tea brews.
3. Press the STRENGTH button to select the
desired strength / steeping time. Refer to
the TEA TYPE table above for steeping
times. Selecting the kettle setting will boil
water to the desired temperature but will
not operate the tea basket.
4. Press the START / CANCEL button
to start heating.
5. Once the selected brew temperature is
reached, the tea basket will automatically
lower into the heated water. It will stay in
this position until the brew time has lapsed.
6. At the end of the tea brewing cycle, the tea
basket will automatically rise to the top of
the glass jug to prevent over-brewing. The
tea alert will sound 3 times, to indicate your
tea is ready.
WARNING
The tea basket is hot to touch after the tea
is brewed. Ensure that the tea basket handle
has cooled before handling.
KEEP WARM
If selected prior to heating, keep warm
will last for 60 minutes after tea is brewed.
When the glass jug is removed from the
power base, the keep warm function will
cancel.
To reactivate for another 60 minutes place
the glass jug with the remaining tea back on
the power base and press KEEP WARM, the
light will illuminate when this is selected.
BOILING WATER
To boil water, remove the tea basket and fill
the glass jug with water. Replace the jug lid
and place the glass jug on the power base.
Select the desired temperature by pressing
the SELECT / TEMP button then press the
STRENGTH button to select KETTLE.

10
Tips
TEA TYPES
There are four main types of tea from the
tea plant camellia sinensis. The picking
and processing methods determine the
type of tea finally produced.
Black Tea
Black tea is the most common type of tea
worldwide. It is made by fermenting the
harvested leaves for a couple of hours before
heating or drying. This oxidation darkens
the leaves and increases the amount of caffeine.
Of all the teas, black tea has the strongest
color and flavor.
White Tea
White tea is the rarest and the most exclusive
tea. White tea consists of the whitish buds of
the tea plant which are steamed then left to dry
naturally. This tea is low in caffeine and has
a slightly sweet flavor.
Green Tea
Green tea makes up approximately ten percent
of the world’s tea. The leaves are picked, rolled
and dried before they can go brown. Green
tea has a distinctive aroma and has a slight
astringent taste.
Oolong Tea
Oolong Tea is semi fermented, which means
leaves are processed immediately after picking.
They only have a short period of oxidation
which turns the leaves from green to red/
brown. Its leaves have a floral, fruity quality
and hence have a delicate fruity taste. It is
recommended not to drink Oolong tea with
milk, sugar or lemon.
Herbal Infusions or Tisanes
Herbal infused teas are not produced from
the tea plant, but from flowers, leaves, roots
or seeds. Common herbal beverages are
chamomile, peppermint, fennel, rose hip,
and lemon verbena.
Herbal infusions that do not contain tea will
generally not become bitter with extended
brews. These can often be brewed with boiling
water 3 times without jeopardising the taste.
Blends
Tea producers make blends by combining
different types of teas, often in order to achieve
flavor consistency from one season to the next.
Common black tea blends include English
Breakfast, Earl Grey, Irish Breakfast, and
Russian Caravan.
TEA STORAGE
• Teas stored inside a vacuum sealed bag can
be stored for up to two years, depending on
the quality and grade of tea. Once opened, tea
should be stored in an airtight container and
kept in a dry and dark place.
• Once opened, black teas will last longer than
green and oolong teas but all tea needs to be
stored in ideal conditions.
• You can tell when tea is past its best if it has
lost its aroma and will create either a bitter or
dull tasting cup.
TIPS FOR OPTIMAL TEA BREWING
• Water quality affects taste. For best results,
use filtered water.
• Finer tea particles and leaves will infuse
more quickly than whole leaves. As a result,
finer tea particles often release too much
tannin too quickly, creating a harsher taste.
Adjust the steeping time until desired
strength is achieved.
• Use roughly one teaspoon of tea per cup/
8 (½) fl.oz (250ml) of water.

11
Care & Cleaning
CLEANING THE GLASS JUG
• After each use, empty the glass jug. Do not
allow brewed tea to stand overnight. Allow
the glass jug to fully cool before cleaning.
• Wipe the interior of the glass jug with a soft
damp sponge or rinse with warm water.
• Wipe the exterior of the glass jug with a soft
damp cloth to clean.
WARNING
Never immerse or wash exterior of glass jug
under running water.
NOTE
Do not use chemicals, steel wool, or abrasive
cleaners to clean the inside or outside of the
glass jug as these may scratch the surface.
• To remove the build-up of tannin; the
astringent chemical constituent of tea,
remove the tea basket, fill the glass jug with
water up to the MAX mark, bring water to the
boil and allow to cool for one minute. Add the
contents of the Breville Tea Maker Cleaner
(available at Breville web page) and allow to
stand for 5 minutes. Empty tea maker, refill
with fresh water and bring water to the boil.
Repeat this step again then rinse the inside
of the glass jug thoroughly. Dry thoroughly
with a soft, lint-free cloth before using.
NOTE
Through regular use over time, scale build-up
can affect the performance and the life of the
Tea Maker™ Compact. Lime and phosphate are
common forms of scale that can damage your
Breville Tea Maker™ Compact. Lime scale, a
harmless mineral, comes in the appearance of
white-colored or rusty looking build up on the
inner walls and inner base of the glass jug.
Phosphate scale can’t be seen; however it can
cause the water to appear cloudy when heated.
To prevent scale from damaging your Tea
Maker™ Compact, ensure to descale the glass
jug regularly. Use the Breville Descaler
(available at Breville web page) and follow the
instructions.
NOTE
Allow all parts of the Tea Maker™ Compact to cool
completely before disassembling and cleaning.
WARNING
Never immerse the base of the glass jug, jug lid,
power base, power cord or power plug in water or
allow moisture to come in contact with these parts.

12
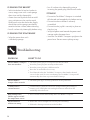
Troubleshooting
PROBLEM WHAT TO DO
The Tea Maker™ Compact
does not switch on
•
Check the power plug is securely inserted into the outlet.
•
Insert the power plug into an independent outlet.
•
Insert the power plug into a different outlet.
•
Reset the circuit breaker if necessary.
•
For additional safety the Tea Maker™ Compact is fitted with a thermal
cut out. In the event of severe overheating, the Tea Maker™ Compact will
automatically shut down to prevent further damage
The Tea Maker™
Compact does not work
•
Check the glass jug is securely positioned on the power base.
I cannot select a
certain function
•
Certain features cannot be selected or changed during the heating or
brewing cycle. LED lights surrounding the buttons will indicate the
availability of the functions.
After boiling water,
bubbles appear around
the temperature sensor
•
This is normal for the functionality of the Tea Maker™ Compact.
My tea tastes too
weak or too strong
•
Ensure the correct strength was selected prior to brewing.
•
Follow the cleaning instructions in this booklet.
CLEANING THE BASKET
• Wash the basket lid and tea basket in
warm, soapy water with a soft sponge,
then rinse and dry thoroughly.
• A non-abrasive liquid cleanser or mild
spray solution may be used to avoid
build-up of stains on the basket. Apply
the cleaner to the sponge, not directly
onto the basket surface, before cleaning.
• Let all surfaces dry thoroughly before using.
CLEANING THE POWER BASE
• Wipe the power base with
a soft-damp sponge.
• Let all surfaces dry thoroughly prior to
inserting the power plug into the wall outlet.
STORAGE
• Ensure the Tea Maker™ Compact is switched
off, cleaned and completely dry before storing.
• Ensure that the tea basket is correctly
assembled.
• Ensure that the jug lid is securely in place on
the glass jug.
• Wrap the power cord around the power cord
storage under the power base.
• Store the Tea Maker™ Compact upright on the
power base. Do not store anything on top.

the Tea Maker
™
Compact
Manuel d'instructions - BTM700

14
BREVILLE VOUS
RECOMMANDE
LA SÉCURITÉ
AVANT TOUT
Chez Breville, la sécurité
occupe une place de choix.
Nous concevons et fabriquons
des produits de consommation
sans jamais perdre de vue la
sécurité de notre précieuse
clientèle. De plus, nous
vous demandons d'être très
vigilant lorsque vous utilisez
un appareil électrique et de
respecter les mesures de
sécurité qui suivent.
IMPORTANTES
MESURES DE
SÉCURITÉ
LISEZ TOUTES LES
INSTRUCTIONS AVANT
USAGE ET CONSERVEZ-LES À
TITRE DE RÉFÉRENCE
• Avant la première utilisation,
assurez-vous que l'alimentation
électrique est la même que celle
indiquée sur l'étiquette logée sous
l'appareil. Pour toute information,
veuillez contacter la compagnie
d'électricité qui vous dessert.
• L'appareil peut être utilisé par
des personnes avec capacités
physiques, sensorielles ou
mentales réduites ou manque
d'expérience et de connaissances
si elles ont reçu une supervision
ou des instructions concernant
l'utilisation de l'appareil de
manière sûre et en comprennent
les risques encourus.
• Les enfants ne doivent pas jouer
avec l'appareil. Une surveillance
étroite est requise lorsqu'un
appareil est utilisé par ou près des
enfants.
• Retirez et jetez en lieu sur toute la
matériel d'emballage et les
étiquettes promotionnelles avant
d'utiliser l'appareil pour la
première fois.
• Pour éviter que les jeunes enfants
s'étouffent, retirez et jeter en lieu
sûr le capuchon protecteur
recouvrant la fiche de l'appareil.
14 Breville vous recommande
la sécurité avant tout
18 Composants
20 Fonctions
22 Trucs
23 Entretien et nettoyage
24 Guide de dépannage
Table des matières

15
• Cet appareil a été conçu
spécifiquement dans le but de
chauffer et faire bouillir l'eau
potable et le thé seulement. Ce
produit ne doit en aucun cas être
utilisé pour chauffer ou faire
bouillir d'autres liquides ou
denrées alimentaires.
• Ne mettez pas cet appareil sur le
bord d'un comptoir ou d'une
table lorsqu'il est en fonction.
Assurez-vous que la surface est
de niveau, propre et exempte
d'eau ou toute autre substance.
• Ne mettez aucun objet sur le
dessus du couvercle.
• Avant de déconnecter l'appareil,
appuyez sur la touche ARRÊT,
puis débranchez-le de la prise
électrique.
• Débranchez l'appareil avant de
tenter de le déplacer, le nettoyer,
le ranger, ou lorsqu'il n'est pas
utilisé.
• Soyez prudent lorsque vous
videz la carafe, car l'eau
bouillante et la vapeur peuvent
vous brûler. Ne videz pas l'eau
trop rapidement.
• Pour vous protéger contre le
risque d'électrocution,
n'immergez pas la carafe en
verre, le socle d'alimentation ou
la fiche dans l'eau et ne laissez
pas l'humidité entrer en contact
avec ces pièces.
• Ne lavez pas l'extérieur de la
carafe sous l'eau courante.,
• N'ouvrez pas le couvercle durant
l'opération.
• Ne remplissez pas la carafe
au-delà du niveau maximal
indiqué. Si la carafe est trop
remplie, l'eau bouillante peut s'en
éjecter.
• Gardez l'appareil propre. Suivez
les consignes de nettoyage
fournies dans ce manuel.
• Ne renversez pas d'eau sur le
connecteur.
AVERTISSEMENT
• N'utilisez pas l'appareil sur une
surface inclinée et ne le déplacez
pas lorsqu'il est en marche.
• La surface de l'élément chauffant
est soumise à la chaleur
résiduelle après utilisation.
• Ne retirez pas le couvercle
externe pendant et après
l'opération, car de l'eau bouillante
pourrait s'éclabousser de la
carafe. Versez toute l'eau chaude
de la carafe avant d'ouvrir le
couvercle et de la remplir.
• Pour ne pas endommager
l'appareil, n'utilisez pas de
produits chimiques ou nettoyants
alcalins, laine d'acier ou
nettoyants abrasifs pour nettoyer
l'intérieur ou l'extérieur de

16
l'appareil. Utilisez plutôt un agent
nettoyant doux et un chiffon
humide.
AVERTISSEMENT
• N'immergez jamais la carafe de
verre, le socle d'alimentation,
le cordon ou la fiche
d'alimentation dans l'eau et ne
laissez pas l'humidité entrer
en contact avec ces pièces.
AVERTISSEMENT
• Ne lavez pas l'extérieur de la carafe
en verre sous l'eau courante.
• Une mauvaise utilisation
peut causer des blessures.
IMPORTANTES
MESURES DE
SÉCURITÉ POUR
TOUT APPAREIL
ÉLECTRIQUE
• Déroulez complètement le
cordon avant usage.
• Pour vous protéger contre le
risque d'électrocution,
n'immergez pas le cordon, la fiche
ou l'appareil dans l'eau ou tout
autre liquide.
• Ne laissez pas le cordon pendre
d'un comptoir ou d'une table,
toucher des surfaces chaudes ou
se nouer.
• Ne laissez pas l'appareil sans
surveillance lorsqu'il est en
opération.
• Cet appareil est recommandé
pour un usage domestique
seulement. Ne l'utilisez pas à
d'autres fins que celles prévues.
Ne le faites pas fonctionner dans
un véhicule ou un bateau en
mouvement ni à l'extérieur.
• Il est recommandé de vérifier
régulièrement l'appareil.
• Pour tout entretien autre que le
nettoyage, appelez l'équipe de
soutien aux consommateurs de
Breville.

17
• Cet appareil est équipé d'un
cordon d'alimentation avec fil et
fiche reliés à la terre. L'appareil
doit être relié à la terre à l'aide
d'une prise électrique à 3 orifices
correctement reliée à la terre. En
cas d'un court-circuit, la mise à la
terre réduit le risque
d'électrocution.
• Si la prise électrique est standard
à 2 orifices, il est de votre
responsabilité et obligation de la
remplacer par une prise
électrique à 3 orifices
correctement reliée à la terre.
• L'utilisation d'accessoires non
recommandés par le fabriquant
de l'appareil peut causer un
risque d'incendie, d'électrocution
ou de blessures.
• Ne coupez ou retirez en aucune
circonstance la troisième broche
(mise à la terre) du cordon
d'alimentation et n'utilisez pas
d'adaptateur.
• Consultez un électricien qualifié
si les instructions de mise à la
terre ne sont pas complètement
comprises ou si un doute
persiste quant à la mise à la terre
adéquate de l'appareil.
USAGE DOMESTIQUE SEULEMENT
CONSERVEZ CES INSTRUCTIONS
INSTRUCTIONS
SUR LE COURT
CORDON
• Un court cordon d'alimentation est
fourni afin de réduire les risques de
trébucher ou s'enchevêtrer dans un
cordon plus long.
• Les rallonges plus longues sont
disponibles et peuvent être
utilisées avec précaution.
• Si vous utilisez une rallonge :
(1) la puissance nominale inscrite
sur la rallonge doit être au moins
équivalent ou supérieure à la
puissance nominale de l'appareil;
(2) la rallonge doit être reliée à la
terre et munie d'un triple fil; et (3) la
rallonge ne doit pas pendre d'un
comptoir ou d'une table où des
enfants pourraient s'y suspendre
ou trébucher.
AVERTISSEMENT
Ne faites pas fonctionner l'appareil
avec un cordon ou une fiche
endommagés ou après un
dysfonctionnement de l'appareil, ou
s'il a été endommagé de quelque
façon que ce soit. Rapportez
l'appareil chez un réparateur
autorisé près de chez vous pour le
faire vérifier, réparer ou ajuster.

18
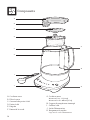
Composants
A. Carafe en verre
B. Filtre à tartre
C. Couvercle du panier à thé
D. Panier à thé
E. Poignée
F. Poteau de la carafe
G. Carafe en verre
Maximum d'eau : 1 L (34 oz)
Maximum de thé : 800 ml (27 oz)
H. Capteur de température immergé
I. Cuillère à thé
J. Socle d'alimentation
K. Rangement du cordon
Logé sous le socle d'alimentation.
E
H
K
A
B
C
D
F
G
I
J

19
185º
175
º
195º
205º
212º
ML QN O P
L. Touche FORCE
Temps d'infusion préréglés recommandés pour
un thé doux, moyen ou fort, selon chaque type
de thé.
M. Indicateur de force de thé
N. Touche SÉLECTION/TEMP.
Sélectionner le type de thé et la température
d'infusion recommandée allant de thés vert,
blanc Oolong, tisane ou noir.
O. Indicateur de température/type de thé
P. Touche GARDE CHAUD
Garde le thé infusé chaud ou l'eau chaude
jusqu'à 670 minutes.
Q. Touche MARCHE/ARRÊT
Débute et arrête le cycle de chauffage.

20
Fonctions
AVANT LA PREMIÈRE UTILISATION
Afin d'éliminer la poussière et les résidus
protecteurs laissés lors de la fabrication, il
est recommandé d'effectuer un cycle
d'ébullition et de jeter l'eau.
1. Retirez et jetez en lieu sûr le
matériel d'emballage, les étiquettes
promotionnelles et les rubans adhésifs
inclus avec la Tea Maker
TM
Compact.
2. Retirez le couvercle externe, puis retirez
le panier à thé du poteau magnétique
à l'intérieur de la carafe en verre. Lavez
le couvercle, le panier à thé et son
couvercle et la cuillère à thé à l'eau
chaude savonneuse à l'aide d'une éponge
douce; rincez et séchez soigneusement.
AVERTISSEMENT
N'immergez jamais le dessous de la carafe
en verre, le socle d'alimentation, le cordon
ou la fiche dans l'eau et ne les laissez pas
entrer en contact avec l'humidité.
3. Placez le socle d'alimentation sur une
surface plane et sèche.
4. Remplissez la carafe d'eau, sans le panier à
thé, jusqu'à la ligne MAX (1 L/34 oz) et
placez-la sur le socle d'alimentation.
Sécurisez bien le couvercle sur la carafe.
AVERTISSEMENT
Ne jamais remplir la carafe d'eau glacée. Laissez
la théière Tea Maker
TM
Compact refroidir avant
de la remplir.
AVERTISSEMENT
Le fait de remplir la carafe au-delà de la
marque MAX peut entraîner de graves
brûlures ou blessures dues au débordement
d'eau chaude ou bouillante. Le remplissage
en dessous de la ligne MIN entraînera l'arrêt
de la théière avant que l'eau n'ait bouilli à la
température sélectionnée.
5. Déroulez complètement le cordon
d'alimentation et branchez-le dans une
prise électrique.
6. Utilisez la touche SÉLECTION/TEMP. pour
sélectionner NOIR / 100°C, puis appuyez
sur la touche MARCHE/ARRÊT. Le voyant
lumineux passera du blanc au rouge,
indiquant que le cycle de chauffage
est activé.
7. Dès que l'eau aura atteint la température
sélectionnée, la théière bipera 3 fois.
8. Jetez l'eau. La Tea Maker
TM
Compact
est maintenant prête à être utilisée.
INFUSER LE THÉ
1. Remplissez la carafe de la quantité d'eau
désirée. Assurez-vous de la remplir au
moins jusqu'à la marque MIN et au niveau
ou sous la marque MAX. Notez que la
marque MAX durant l'infusion indique
800 ml / 27 oz.
2. Placez la théière sur une surface plane et
sèche. Retirez le couvercle du panier en le
soulevant de chaque côté.
3. Utilisez la cuillère à thé fournie pour remplir le
panier de feuilles de thé. Généralement, le ratio
est de 1 cuillère à thé par tasse d'eau / 250 ml
(8½ oz); cependant, cela dépendra des
instructions sur la boîte et de vos préférences
personnelles.
RATIO EAU/CUILLÈRES
500 ml / 17 oz 2 cuillères
750 ml / 25 oz 3 cuillères
Replacez le couvercle du panier et
assurez-vous de bien le sécuriser.
Assemblez le panier à thé au poteau
à l'intérieur de la carafe.
La page charge ...
La page charge ...
La page charge ...
La page charge ...
La page charge ...
La page charge ...
La page charge ...
La page charge ...
-
 1
1
-
 2
2
-
 3
3
-
 4
4
-
 5
5
-
 6
6
-
 7
7
-
 8
8
-
 9
9
-
 10
10
-
 11
11
-
 12
12
-
 13
13
-
 14
14
-
 15
15
-
 16
16
-
 17
17
-
 18
18
-
 19
19
-
 20
20
-
 21
21
-
 22
22
-
 23
23
-
 24
24
-
 25
25
-
 26
26
-
 27
27
-
 28
28


Breville the Tea Maker Compact Manuel utilisateur
- Catégorie
- Bouilloires électriques
- Taper
- Manuel utilisateur
dans d''autres langues
Documents connexes
-
Breville the Breville Smart Tea Infuser Compact Manuel utilisateur
-
Breville BTM800XL Manuel utilisateur
-
-
-
-
-
-
-
-