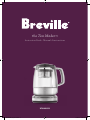
Breville the Tea Maker Manuel utilisateur
- Taper
- Manuel utilisateur

BTM800XL
the Tea Maker
™
Instruction Book - Manuel d’instructions
BTM800XL_IB_H13.indd 2 17/09/13 4:48 PM

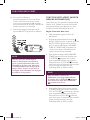
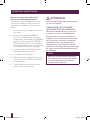
CONGRATULATIONS
on the purchase of your Breville product
*Registering is not a substitute for proof of purchase when submitting a Warranty Claim.
USA Consumers: www.brevilleusa.com
Canadian Consumers: www.breville.ca
Register online for product support
and exclusive offers.
*
BTM800XL_IB_H13.indd 2 17/09/13 4:48 PM

3
CONTENTS
4 Breville recommends safety first
7 Know your Breville product
10 Before first use
11 Tea types
11 Tea storage
12 Tips for optimal tea brewing
12 Preparing the tea maker for use
14 Operating your Breville product
15 Use as a tea maker for brewing tea
15 Selecting the Tea Type
16 Selecting the Tea Strength
17 Selecting the 'Keep Warm' Feature
18 Selecting the 'Basket Cycle' Feature
19 Use as a variable temperature kettle
20 Additional features
21 Customizing brew temperature
21 Customizing brew time
22 Auto Start feature
23 A note on standby mode
23 Moving the tea basket after the
brewing cycle
24 A note on temperature conversion
(°F to °C)
26 Care and cleaning
27 Cleaning the Jug Lid and
Integrated Scale Filter
27 Cleaning the Glass Jug
28 Removing Tannin Stains with Revive
Organic Tea Cleaner
29 Removing Tannin Stains without
Revive Organic Tea Cleaner
29 Cleaning the Basket Lid, Basket,
and Tea Scoop
29 Cleaning the Power Base
29 Storage
30 Troubleshooting
BTM800XL_IB_H13.indd 3 17/09/13 4:48 PM

4
BREVILLE RECOMMENDS SAFETY FIRST
We at Breville are very safety conscious. We design and manufacture consumer products
with the safety of you, our valued customer, foremost in mind. In addition, we ask that
you exercise a degree of care when using any electrical appliance and adhere to the
following precautions:
READ ALL INSTRUCTIONS
• Carefully read all instructions before
operation and save for future reference.
• Remove and safely discard any
packaging material and promotional
labels before using the appliance for the
first time.
• To eliminate a choking hazard for young
children, remove and safely discard the
protective cover fitted to the power plug
of this appliance.
• This appliance has been designed
specifically for the purpose of heating
and boiling quality drinking water and
tea only. Under no circumstances should
this product be used to heat or boil any
other liquids or foodstuffs.
• Do not place the appliance near the
edge of a bench or table during
operation. Ensure that the surface is
level, clean and free of water.
• Do not place the appliance on or near a
hot gas burner, electric element or where
it could touch a heated oven.
• Keep the appliance clear of walls,
curtains and other heat or steam sensitive
materials. Keep a minimum 8” (20cm) of
space on both sides of the appliance.
• Do not operate the appliance on a sink
drain board.
• Always ensure the appliance is properly
assembled before connecting to a
power outlet and operating. Follow the
instructions provided in this book.
• The Glass Jug must be used only with
the Power Base supplied. Do not use on
a range top.
• The appliance is not intended to be
operated by means of an external timer
or separate remote control system.
• Do not touch hot surfaces. Use the
handle for lifting and carrying the
Glass Jug.
• Attach the Jug Lid securely to the Glass
Jug before operation.
• Do not place anything on top of the
Jug Lid.
• Do not open the Jug Lid during
operation as scalding may occur.
• Extreme caution must be used when
moving the Glass Jug containing
hot liquid.
• Use caution when pouring water from
the Glass Jug as boiling water and
steam will scald. Do not pour the water
too quickly.
• To avoid scalding, never fill the Glass
Jug past the ‘WATER MAX’ (when
heating water) or ‘TEA MAX’ (when
brewing tea) line markings.
• Do not operate the appliance without
water. Always fill the Glass Jug to at
least the ‘MIN’ marking. Should it be
operated without water, the boil-dry
protection will shut the power off
automatically. Allow the appliance to
cool before refilling.
• To protect against electric shock, do not
immerse the Glass Jug base, Power Base,
power cord or power plug in water or
allow moisture to come in contact with
these parts.
IMPORTANT SAFEGUARDS
BTM800XL_IB_H13.indd 4 17/09/13 4:48 PM

5
BREVILLE RECOMMENDS SAFETY FIRST
5
• Do not remove the Glass Jug from the
Power Base during heating or when
the basket is in operation. Ensure the
appliance has completed the water heating
or tea brewing cycle before removing the
Glass Jug from the Power Base.
• The use of accessory attachments not
recommended by Breville may result in
fire, electric shock or injury to persons.
• To turn OFF the appliance, press the
TEA|Cancel button (when brewing tea)
or the HOT WATER|Cancel button
(when heating water) on the Power Base.
The appliance is OFF when the button
surround illumination goes out.
• To disconnect from the wall outlet, first
turn OFF the appliance then remove the
power plug from the wall outlet.
• When the appliance is not in use or
when left unattended, disconnect the
power cord from the wall outlet.
• Before attempting to move the appliance
or before assembling or disassembling
parts, cleaning or storing, turn OFF the
appliance, allow to cool and disconnect
from the wall outlet.
• Strictly follow the Care and Cleaning
instructions.
• Do not use harsh abrasives or caustic
cleaners when cleaning this appliance.
• This appliance is equipped with a
power cord having a grounding wire
with a grounding plug. The appliance
must be grounded using a 3-hole
properly grounded outlet. In the event
of an electrical short circuit, grounding
reduces the risk of electrical shock.
• If the power outlet is a standard
2-prong wall outlet, it is your personal
responsibility and obligation to have
it replaced with a properly grounded
3-prong wall outlet.
• Do not, under any circumstances, cut or
remove the third (ground) prong from
the power cord or use an adapter.
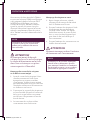
WARNING
Never immerse the Glass Jug, Power
Base, power cord or power plug in
water or allow moisture to come in
contact with these parts.
FOR ALL ELECTRICAL
APPLIANCES
• This appliance is for household use only.
• Unwind the power cord fully before use.
• Do not let the cord hang over the edge of
a table or counter, or touch hot surfaces.
• Do not use the appliance for anything
other than its intended purpose as
described in this booklet. Do not use
outdoors. Do not use in moving vehicles
or boats.
• Close supervision is necessary when any
appliance is used by or near children.
• Regularly inspect the supply cord, plug
and actual appliance for any damage.
Do not operate if damaged in any way
or after the appliance malfunctions.
Immediately cease use of the appliance
and call Breville Consumer Support.
• For any maintenance other than
cleaning, call Breville Consumer
Support.
• Consult a qualified electrician if
the grounding instructions are not
completely understood, or if doubt
exists as to whether the appliance is
properly grounded.
WARNING
Do not operate the appliance on an
inclined surface. Do not move the
appliance while it is switched on.
BTM800XL_IB_H13.indd 5 17/09/13 4:48 PM

6
BREVILLE RECOMMENDS SAFETY FIRST
BREVILLE ASSIST™ PLUG
Your Breville appliance comes with a unique
Assist™ Plug, conveniently designed with a
finger hole to ease removal from the power
outlet.
SHORT CORD INSTRUCTIONS
Your Breville appliance is fitted with a short
power cord to reduce personal injury or
property damage resulting from pulling,
tripping or becoming entangled with a
longer cord. Longer detachable power cords
or extension cords are available and may be
used if care is exercised. If an extension cord
is used, (1) the marked electrical rating of
the cord set or extension cord should be at
least as great as the electrical rating of the
appliance, (2) the cord should be arranged
so that it will not drape over the
counter-top or table where it can be
pulled on by children or tripped over
unintentionally and (3) the extension cord
must include a 3-prong grounding plug.
CALIFORNIA PROPOSITION 65:
(Applicable to California residents only).
This product contains chemicals known to
the State of California to cause cancer, birth
defects or other reproductive harm.
FOR HOUSEHOLD USE ONLY
SAVE THESE INSTRUCTIONS
BTM800XL_IB_H13.indd 6 17/09/13 4:48 PM

KNOW
your Breville product
BTM800XL_IB_H13.indd 7 17/09/13 4:48 PM

8
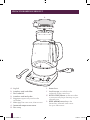
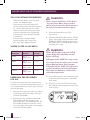
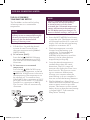
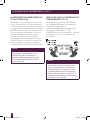
KNOW YOUR BREVILLE PRODUCT
A. Jug lid
B. Stainless steel scale filter
C. Tea basket lid
D. Stainless steel tea basket
E. Jug post magnetically attaches the
tea basket.
F. Glass jug 51oz water max, 41oz tea max.
G. Immersed temperature sensor
H. Tea scoop
A
B
C
D
E
F
H
J
I
G
I. Power base
J. Cord Storage concealed on the
underside of the power base.
K. AUTO START button set the tea maker
to automatically begin brewing at a pre-
selected time.
L. KEEP WARM button keeps the
brewed tea or heated water warm
for up to 60 minutes.
BTM800XL_IB_H13.indd 8 17/09/13 4:48 PM

9
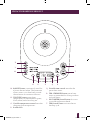
KNOW YOUR BREVILLE PRODUCT
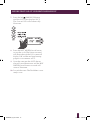
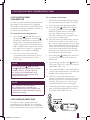
K
N O P Q R
M
T
L
S
M. BASKET button continuously auto lifts
& lowers the tea basket. The movement
allows water to circulate freely around
the tea leaves for maximum infusion.
N. TEA TYPE button preset brew
temperatures recommended for green,
black, white, herbal & oolong tea.
O. Variable temperature control overrides
the preset brew temperatures.
P. Backlit LCD
Q. Variable time control overrides the
preset brew times.
R. TEA STRENGTH button preset brew
times recommended for strong, medium
and mild brews.
S. HOT WATER|Cancel button for use as
a variable temperature kettle.
T. TEA|Cancel button activates the tea
brewing cycle.
BTM800XL_IB_H13.indd 9 17/09/13 4:48 PM

BEFORE FIRST USE
of your Breville product
BTM800XL_IB_H13.indd 10 17/09/13 4:48 PM

11
BEFORE FIRST USE OF YOUR BREVILLE PRODUCT
TEA TYPES
There are four main types of teas from the
tea plant camellia sinensis. The picking and
processing methods determine the type of
tea finally produced.
Black Tea
1. Black tea is the most common type of tea
worldwide. It is made by fermenting the
harvested leaves for a couple of hours
before heating or drying. This oxidation
darkens the leaves and increases the
amount of caffeine. Of all the teas, black
tea has the strongest color and flavor.
White Tea
2. White tea is the rarest and the most
exclusive tea. White tea consists of the
whitish buds of the tea plant which are
steamed then left to dry naturally. This
tea is low in caffeine and has a slightly
sweet flavor.
Green Tea
3. Green tea makes up approximately
ten percent of the world’s tea. The
leaves are picked, rolled and dried
before they can go brown. Green tea
has a distinctive aroma and has a slight
astringent taste.
Oolong Tea
4. Oolong Tea is semi fermented, which
means leaves are processed immediately
after picking. They only have a short
period of oxidation which turns the
leaves from green to red/brown. Its
leaves have a floral, fruity quality and
hence have a delicate fruity taste. It is
recommended not to drink Oolong tea
with milk, sugar or lemon.
Herbal infusions or Tisanes
5. Herbal infused teas are not produced
from the tea plant, but from flowers,
leaves, roots or seeds. Common herbal
beverages are chamomile, peppermint,
fennel, rose hip, and lemon verbena.
Herbal infusions that do not contain
tea will generally not become bitter
with extended brews. These can often
be brewed with boiling water 3 times
without jeopardizing the taste.
Blends
6. Tea producers make blends by
combining different types of teas, often
in order to achieve flavor consistency
from one season to the next. Common
black tea blends include English
Breakfast, Earl Grey, Irish Breakfast, and
Russian Caravan.
TIP
Brewed tea leaves make an ideal
garden fertilizer and help condition
the soil.
TEA STORAGE
• Teas stored inside a vacuum sealed
bag can be stored for up to two years,
depending on the quality and grade of
tea. Once opened, tea should be stored
in an airtight container and kept in a dry
and dark place.
• Once opened, black teas will last longer
than green and oolong teas but all tea
needs to be stored in ideal conditions.
• You can tell when tea is past its best if it
has lost its aroma and will create either
a bitter or dull tasting cup.
BTM800XL_IB_H13.indd 11 17/09/13 4:48 PM

12
BEFORE FIRST USE OF YOUR BREVILLE PRODUCT
TIPS FOR OPTIMAL TEA BREWING
• Water quality affects taste. For best
results, use filtered water.
• Finer tea particles and leaves will
infuse more quickly than whole leaves.
As a result, finer tea particles often
release too much tannin too quickly,
creating a harsher taste. Adjust the
brewing time until desired strength
is achieved.
• Using the tea scoop provided,
spoon roughly one scoop of tea
per cup / 8oz / 250ml of water.
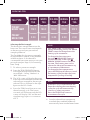
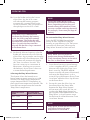
WATER TO TEA SCOOP RATIO
GLASS JUG
MARKING
CUPS /
OUNCES
TEA
SCOOPS
500mL Approx.
2 Cups / 16oz
2 Scoops
750mL Approx.
3 Cups / 24oz
3 Scoops
1000mL Approx.
4 Cups / 32oz
4 Scoops
1200mL Approx.
5 Cups / 40oz
5 Scoops
PREPARING THE TEA MAKER
FOR USE
In order to remove any dust or protective
residues from the manufacturing process, it
is recommended to run a boiling cycle then
discard the water.
1. Remove and safely discard any packing
material, promotional labels and tape
from the Tea Maker.
2. Remove the Jug Lid then remove the
Tea Basket from the magnetic post
within the Glass Jug. Wash the Jug Lid,
Tea Basket, Basket Lid and Tea Scoop
in warm soapy water with a soft sponge,
rinse and dry thoroughly.
WARNING
Never immerse the base of the Glass
Jug, the Power Base, power cord or
power plug in water or allow moisture
to come in contact with these parts.
3. Place the Power Base on a flat,
dry surface.
4. Without the Tea Basket in place, fill the
Glass Jug to the water maximum mark
(1500mL WATER MAX) and place on
the Power Base. Securely fit the Jug Lid
onto the Glass Jug.
WARNING
Never fill the glass jug with chilled
water. Allow the tea maker to cool
before refilling.
Filling past the ‘MAX’ line may result
in serious burns or injuries as a result
of overflowing hot or boiling water.
Filling below the ‘MIN’ line will result
in the tea maker switching off before
the water has boiled or reached the
selected temperature
5. Unwind the power cord completely and
insert the power plug into a grounded
wall outlet.
6. The LCD screen will illuminate with
the default brew temperature and brew
time display.
BTM800XL_IB_H13.indd 12 17/09/13 4:48 PM

13
BEFORE FIRST USE OF YOUR BREVILLE PRODUCT
7. Press the left ARROW UP button
until the LCD screen displays 212°F.
The ‘Custom’ LED will automatically
illuminate.
8. Press the HOT WATER|Cancel button
to start the cycle. The button surround
will illuminate and the LCD screen will
display ‘ON’ and the real-time heating
progress in increments of 5°F.
9. Once the water reaches 212°F, the tea
alert will sound three times and the HOT
WATER|Cancel button surround will
cease to illuminate.
10. Discard the water. The Tea Maker is now
ready to use.
BTM800XL_IB_H13.indd 13 17/09/13 4:48 PM

OPERATING
your Breville product
BTM800XL_IB_H13.indd 14 17/09/13 4:48 PM

15
BREWING TEA
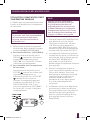
USE AS A TEA MAKER FOR
BREWING TEA
1. Remove the Glass Jug from the Power
Base and remove Jug Lid. When
brewing tea, fill with desired amount of
water. Ensure you do not fill past the tea
maximum mark (1200mL TEA MAX).
WARNING
Filling past the ‘MAX’ line may result
in serious burns or injuries as a result
of overflowing hot or boiling water.
Filling below the ‘MIN’ line will result
in the tea maker switching off before
the water has boiled or reached the
selected temperature.
2. Place the Basket on a flat, dry surface.
Remove Basket Lid by lifting from
the sides.
3. Use the provided Tea Scoop to fill
the Basket with tea leaves. As a
general guide, use 1 scoop of tea
leaves per cup / 8oz / 250ml of water,
however this will depend on the
instructions on tea packaging and
your personal preference (See Page 12,
Water to Tea Scoop Ratio).
4. Replace the Basket Lid on top of the
Basket. Ensure lid is securely in place.
5. Slide the assembled Basket on to the
magnetic post located within the Glass
Jug. The assembled Basket will attach
itself to the top of the magnetic post.
Replace Jug Lid.
Selecting the Tea Type
The tea type determines brew temperature.
The Tea Maker has 5 preset tea types
recommended for optimal brewing of
Green, Black, White, Herbal or Oolong
Tea. It also features a customizable tea type
temperature setting for other tea varieties
or to suit your personal taste (see Page 21,
Customizing Brew Temperature).
6. To select a preset tea type:
a) Press the TEA TYPE button and
toggle through until the desired tea
– ‘Green’, ‘Black’, ‘White’, ‘Herbal’ or
‘Oolong’ illuminates.
b) The LCD screen will display the preset
brew temperature recommended for
optimal brewing of the selected tea type.
This is displayed as the left figure on the
LCD screen.
BTM800XL_IB_H13.indd 15 17/09/13 4:48 PM

16
BREWING TEA
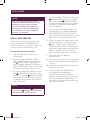
TEA TYPE
PRESET
BREW TEMP
PRESET
BREW TIME
GREEN
TEA
WHITE
TEA
OOLONG
TEA
HERBAL
TEA
BLACK
TEA
3:00
185˚F175˚F
3:00
195˚F
3:00
212˚F
4:00
212˚F
2:00
Selecting the Tea Strength
The desired tea strength determines the
brew time. The correct brew time depends
on the tea type and your personal tea
strength preference.
The Tea Maker has 3 preset tea strengths
recommended to achieve Strong, Medium
or Mild tea brews. It also features a
customizable brew time setting to suit your
personal taste (see Page 21, Customizing
Brew Time).
7. To select a preset tea strength:
a) Press the TEA STRENGTH button
and toggle through until the desired
tea strength – ‘Strong’, ‘Medium’ or
‘Mild’ illuminates.
b) The LCD screen will display the preset
brew time recommended to achieve the
selected brew strength for the tea type
selected. This is displayed as the right
figure on the LCD screen.
8. Press the TEA|Cancel button to start
the tea brewing cycle. The button
surround will illuminate and the LCD
screen will display ‘ON’ and the real-
time heating progress in increments
of 5°F.
NOTE
The ‘BREW TIME’ can be adjusted
during the heating process but ‘BREW
TEMP’ cannot be changed once the
heating cycle commences.
To change the brew time press
the right
ARROW UP button to
increase the time, or the right
ARROW DOWN button to decrease
the time. The brewing time can be
adjusted in 30 second increments up
to a maximum of 10 minutes.
To change the brew temperature,
press the TEA|Cancel button to cancel
the heating cycle. Re-select the brew
temperature (
see Page 15 and 21).
NOTE
If the Glass Jug is removed from the
Power Base during the water heating
cycle, the cycle will automatically
cancel as a safety precaution.
Press the TEA|Cancel button to
recommence the cycle.
9. Once the selected brew temperature
is reached the assembled Basket will
automatically lower into the heated water.
BTM800XL_IB_H13.indd 16 17/09/13 4:48 PM

17
BREWING TEA
10. Once the Basket reaches the bottom
of the Glass Jug, the LCD screen
will indicate the brewing progress,
automatically counting down in one
second increments. This is displayed as
the right figure on the LCD screen.
NOTE
If the Glass Jug is removed from
the Power Base during the brewing
cycle, the LCD screen will continue
to count down. The Tea Basket will
automatically return to the top of the
Glass Jug once the brew time has
elapsed and the Glass Jug is returned
to the Power Base.
11. At the end of the tea brewing cycle, the
Basket will automatically rise to the top
of the Glass Jug to prevent over-brewing.
The tea alert will sound three times. The
LCD screen will automatically display
the ‘Time Since Brew’ function. This
function counts up to a maximum of
60 minutes, allowing you to monitor
the freshness of your brew. It does not
activate the heating elements.
Selecting the ‘Keep Warm’ Feature
This feature allows the brewed tea or
heated water to remain warm for up to 60
minutes. The ‘Keep Warm’ temperature
ranges between 120-175°F depending on
the original brew temperature selected. The
lower the brew temperature, the lower the
‘Keep Warm’ temperature.
ORIGINAL BREW
TEMP.
APPROXIMATE
KEEP WARM TEMP.
120˚F - 150˚F 120˚F
155˚F - 175˚F 155˚F
185˚F 165˚F
195˚F - 212˚F 175˚F
NOTE
During the ‘Keep Warm’ cycle,
brewed tea will continue to develop
flavor. Depending on how long you
intend to keep the brewed tea warm,
you may consider reducing the initial
tea strength / brew time (see Page 16
and 21).
To activate the ‘Keep Warm’ feature:
Press the KEEP WARM button before,
during or after completion of the tea
brewing or water heating cycle. The button
surround will illuminate, indicating the
‘Keep Warm’ feature has been selected.
NOTE
‘Keep Warm’ will only maintain
temperature during the 60 minute
‘Time Since Brew’ feature at the end of
the ‘Tea’ or ‘Hot Water’ function.
1. Once the tea brewing or water heating
cycle is complete, the LCD screen will
automatically display the ‘Time Since
Brew’ count-up. The KEEP WARM
button surround will remain illuminated,
indicating the ‘Keep Warm’ cycle is
active for up to 60 minutes during ‘Time
Since Brew’ while the Glass Jug remains
on the Power Base.
2. During this time, the Glass Jug can
be removed from the Power Base,
however the ‘Keep Warm’ feature
will automatically switch off. You can
re-select the ‘Keep Warm’ feature by
pressing the KEEP WARM button. The
‘Keep Warm’ cycle will remain active
for the duration of the 60 minute ‘Time
Since Brew’ feature.
NOTE
‘Keep Warm’ feature will not activate
and will not function if water
temperature is below 120°F.
BTM800XL_IB_H13.indd 17 17/09/13 4:48 PM

18
BREWING TEA
Selecting the ‘Basket Cycle’ Feature
This feature continuously auto lifts and
lowers the Basket during the tea brewing
cycle. This movement loosens the tea leaves
within the Basket, allowing the heated water
to circulate freely around the tea leaves for
maximum infusion.
NOTE
The ‘Basket Cycle’ can significantly
increase the rate of infusion and affect
the tea strength. You may consider
reducing the initial tea strength /
brew time (see Page 16 and 21) when
using the ‘Basket Cycle’ feature.
NOTE
It is recommended that this feature
is used only when making between
1000mL (approx. 4 cups/32oz.) to
1200mL (approx. 5 cups/40oz.).
1. To activate the ‘Basket Cycle’ feature,
press the BASKET button once. The
button surround will illuminate and the
LCD screen will display BASKET CYCLE.
2. During the brewing cycle, the BASKET
button surround will flash while the
Basket slowly lifts and lowers within the
heated water.
3. The ‘Basket Cycle’ feature can be
canceled anytime during the tea brewing
cycle. Press the BASKET button once. The
button surround will cease to illuminate
and the LCD screen will no longer display
BASKET CYCLE. The Basket will return
to the bottom of the Glass Jug for the
remaining brewing time.
BTM800XL_IB_H13.indd 18 17/09/13 4:48 PM

19
BOILING OR HEATING WATER
USE AS A VARIABLE
TEMPERATURE KETTLE
The Tea Maker can be used for boiling
or heating water to a customizable
temperature.
NOTE
If you have used the Glass Jug for
making tea we recommend thoroughly
cleaning the interior of the Jug and
removing the Tea Basket before
boiling or heating water.
1. Fill the Glass Jug with the desired
amount of water. Do not fill over
the water maximum mark (1500mL
WATER MAX).
a) To boil water (212°F):
Press the left
ARROW UP button
to increase the temperature to 212°F.
The ‘Custom’ LED will automatically
illuminate.
b) To heat water to a customized
temperature:
Press the left
ARROW UP button
to increase the temperature, or the left
ARROW DOWN button to decrease
the temperature. The temperature can
be adjusted in 5°F increments from
120 to 205°F, then a maximum of 212°F
(or in the Celsius mode, 5°C increments
from 50°C to a maximum of 100°C).
The ‘Custom’ LED will automatically
illuminate.
NOTE
Once a customized temperature has
been selected and one tea making
or water heating cycle has been
activated, the customized temperature
setting will remain in the memory of
the Tea Maker until you change it. To
return to default settings, see Page 32.
2. Press the HOT WATER|Cancel button
to start the cycle. The button surround
will illuminate and the LCD screen will
display ‘ON’ and the real-time heating
progress in increments of 5°F.
3. The brew temperature cannot be
changed once the heating cycle
commences. To change the brew
temperature, press the HOT
WATER|Cancel button to cancel the
heating cycle. Re-select the brew
temperature (see Page 15).
4. Once the selected temperature is
reached, the tea alert will sound
three times. The LCD screen will
automatically display the ‘Time Since
Brew’ function. This function counts
up to a maximum of 60 minutes,
allowing you to monitor when the
water heating cycle was complete. It
does not activate the heating elements.
5. The Tea Maker has a ‘Keep Warm’
Feature that allows brewed tea or heated
water to remain warm for up to 60
minutes. This feature can be activated
before, during or after the water heating
cycle (see Page 17, To Activate the
‘Keep Warm’ Feature).
BTM800XL_IB_H13.indd 19 17/09/13 4:48 PM

ADDITIONAL FEATURES
BTM800XL_IB_H13.indd 20 17/09/13 4:48 PM
La page charge ...
La page charge ...
La page charge ...
La page charge ...
La page charge ...
La page charge ...
La page charge ...
La page charge ...
La page charge ...
La page charge ...
La page charge ...
La page charge ...
La page charge ...
La page charge ...
La page charge ...
La page charge ...
La page charge ...
La page charge ...
La page charge ...
La page charge ...
La page charge ...
La page charge ...
La page charge ...
La page charge ...
La page charge ...
La page charge ...
La page charge ...
La page charge ...
La page charge ...
La page charge ...
La page charge ...
La page charge ...
La page charge ...
La page charge ...
La page charge ...
La page charge ...
La page charge ...
La page charge ...
La page charge ...
La page charge ...
La page charge ...
La page charge ...
La page charge ...
La page charge ...
La page charge ...
La page charge ...
La page charge ...
La page charge ...
-
 1
1
-
 2
2
-
 3
3
-
 4
4
-
 5
5
-
 6
6
-
 7
7
-
 8
8
-
 9
9
-
 10
10
-
 11
11
-
 12
12
-
 13
13
-
 14
14
-
 15
15
-
 16
16
-
 17
17
-
 18
18
-
 19
19
-
 20
20
-
 21
21
-
 22
22
-
 23
23
-
 24
24
-
 25
25
-
 26
26
-
 27
27
-
 28
28
-
 29
29
-
 30
30
-
 31
31
-
 32
32
-
 33
33
-
 34
34
-
 35
35
-
 36
36
-
 37
37
-
 38
38
-
 39
39
-
 40
40
-
 41
41
-
 42
42
-
 43
43
-
 44
44
-
 45
45
-
 46
46
-
 47
47
-
 48
48
-
 49
49
-
 50
50
-
 51
51
-
 52
52
-
 53
53
-
 54
54
-
 55
55
-
 56
56
-
 57
57
-
 58
58
-
 59
59
-
 60
60
-
 61
61
-
 62
62
-
 63
63
-
 64
64
-
 65
65
-
 66
66
-
 67
67
-
 68
68


Breville the Tea Maker Manuel utilisateur
- Taper
- Manuel utilisateur
dans d''autres langues
- English: Breville the Tea Maker User manual
Documents connexes
-
Breville BTM800XL Mode d'emploi
-
-
-
Breville the Tea Maker Compact Manuel utilisateur
-
-
-
-
-
-
Autres documents
-
Midea MEK17GTE8 Le manuel du propriétaire
-
Tefal BJ800DKR Manuel utilisateur
-
-
Brandt TH1700EV Manuel utilisateur
-
Philips CRP227/01 Product Datasheet
-
-
Proline KTEA Le manuel du propriétaire
-
-
Hamilton Beach 40911 Le manuel du propriétaire
-