Yamaha NS-PA41 Le manuel du propriétaire
- Catégorie
- Équipement musical supplémentaire
- Taper
- Le manuel du propriétaire

SPEAKER PACKAGE
U
(NS-F40 + NS-C40 + NS-B40 + NS-SW050)
PACKAGE ENCEINTES
FR
EN
OWNER’S MANUAL
MODE D’EMPLOI

i En
The above warning is located on the rear of the unit.
This applies only to products distributed by YAMAHA
CORPORATION OF AMERICA.
1. Read these instructions.
2. Keep these instructions.
3. Heed all warnings.
4. Follow all instructions.
5. Do not use this apparatus near water.
6. Clean only with dry cloth.
7. Do not block any ventilation openings. Install in
accordance with the manufacturer’s instructions.
8. Do not install near any heat sources such as radiators,
heat registers, stoves, or other apparatus (including
amplifiers) that produce heat.
9. Do not defeat the safety purpose of the polarized or
grounding-type plug. A polarized plug has two blades
with one wider than the other. A grounding type plug
has two blades and a third grounding prong. The wide
blade or the third prong are provided for your safety. If
the provided plug does not fit into your outlet, consult
an electrician for replacement of the obsolete outlet.
10.
Protect the power cord from being walked on or pinched
particularly at plugs, convenience receptacles, and the
point where they exit from the apparatus.
11. Only use attachments/accessories specified by the
manufacturer.
12.
Use only with the cart, stand, tripod,
bracket, or table specified by the
manufacturer, or sold with the apparatus.
When a cart is used, use caution when
moving the cart/apparatus combination to
avoid injury from tip-over.
13. Unplug this apparatus during lightning storms or when
unused for long periods of time.
14.
Refer all servicing to qualified service personnel. Servicing is
required when the apparatus has been damaged in any way,
such as power-supply cord or plug is damaged, liquid has been
spilled or objects have fallen into the apparatus, the apparatus
has been exposed to rain or moisture, does not operate
normally, or has been dropped.
IMPORTANT SAFETY INSTRUCTIONS
CAUTION
RISK OF ELECTRIC SHOCK
DO NOT OPEN
CAUTION: TO REDUCE THE RISK OF ELECTRIC
SHOCK, DO NOT REMOVE COVER (OR BACK).
NO USER-SERVICEABLE PARTS INSIDE. REFER
SERVICING TO QUALIFIED SERVICE PERSONNEL.
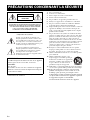
• Explanation of Graphical Symbols
The lightning flash with arrowhead symbol,
within an equilateral triangle, is intended to
alert you to the presence of uninsulated
“dangerous voltage” within the product’s
enclosure that may be of sufficient magnitude
to constitute a risk of electric shock to
persons.
The exclamation point within an equilateral
triangle is intended to alert you to the presence
of important operating and maintenance
(servicing) instructions in the literature
accompanying the appliance.
IMPORTANT
Please record the serial number of this unit in the space
below.
MODEL:
Serial No.:
The serial number is located on the rear of the unit. Retain this
Owner’s Manual in a safe place for future reference.

ii En
English
Precautions
PLEASE READ CAREFULLY
BEFORE USE.
BE SURE TO FOLLOW THESE
INSTRUCTIONS.
The precautions listed below are to prevent
risk of harm to the user and others, as well
as to prevent property damage, and to help
the user use this unit properly and safely.
Be sure to follow these instructions.
After reading this manual, be sure to keep it in a safe place where
it can be referenced at any time.
WARNING
This content indicates “risk of serious injury or
death.”
Power supply/power cord
• Do not do anything that could damage the power cord.
– Do not place it near a heater.
– Do not bend it excessively or alter it.
– Do not scratch it.
– Do not place it under a heavy object.
Using the power cord with the core of the cord exposed could
cause electric shocks or a fire.
• Do not touch the power plug or cord if there is a chance of
lightning. Failure to observe this may cause electric shocks.
• Use this unit with the power supply voltage printed on it.
Failure to connect to an appropriate AC outlet may cause a
fire, electric shocks, or malfunctions.
• Check the electric plug periodically and remove any dirt or
dust which may have accumulated on it. Failure to observe
this may cause a fire or electric shocks.
• When setting up the unit, make sure that the AC outlet you are
using is easily accessible. If some trouble or malfunction
occurs, immediately turn off the power switch and disconnect
the plug from the AC outlet. Even when the power switch is
turned off, as long as the power cord is not unplugged from
the wall AC outlet, the unit will not be disconnected from the
power source.
• If you hear thunder or suspect approaching lightning, quickly
turn off the power switch and pull the power plug from the
AC outlet. Failure to observe this may cause a fire or
malfunctions.
• If not using the unit for long periods of time, be sure to pull
the power plug from the AC outlet. Failure to observe this
may cause a fire or malfunctions.
Do not disassemble
• Do not disassemble or modify this unit. Failure to observe this
may cause a fire, electric shocks, injury, or malfunctions. If
you notice any irregularities, be sure to request an inspection
or repair from the dealer where you purchased the unit or from
qualified Yamaha service personnel.
Water warning
• Do not expose the unit to rain, use it near water or in damp or
wet conditions, or place on it any containers (such as vases,
bottles or glasses) containing liquids which might spill into
any openings or places where water may drop. A liquid such
as water getting into the unit may cause a fire, electric shocks,
or malfunctions. If any liquid such as water seeps into the
device, turn off the power immediately and unplug the power
cord from the AC outlet. Then, request an inspection from the
dealer where you purchased the unit or from qualified Yamaha
service personnel.
• Never insert or remove an electric plug with wet hands. Do
not handle this unit with wet hands. Failure to observe this
may cause electric shocks or malfunctions.
Fire warning
• Do not place any burning items or open flames near the unit,
since they may cause a fire.
Installation
• Assemble and install in the manner instructed in the manual.
Falling or toppling may result in injury or damage.
• Confirm that the finished installation is safe and secure. Also,
carry out safety inspections periodically. Failure to observe
this may cause devices to fall and result in injury.
• Always fix the speaker cable to a wall or similar. If you catch
your feet or hands on the cable, the speakers may fall or
overturn, causing malfunctions or injuries.
Maintenance and care
• Do not use aerosols or spray-type chemicals that contain
combustible gas for cleaning or lubrication. The combustible
gas will remain inside the unit, which may cause explosion or
fire.
If you notice any abnormality
• If any of the following abnormalities occur, immediately turn
off the power and disconnect the power plug.
– The power cord/plug is damaged.
– An unusual smell or smoke is emitted from the unit.
– Foreign material gets into the interior of the unit.
– There is a loss of sound during use.
– There is a crack or damage in the unit.
Continued use could cause electric shocks, a fire, or
malfunctions. Immediately request an inspection or repair
from the dealer where you purchased the unit or from qualified
Yamaha service personnel.
• Be careful not to drop or apply strong impact to this unit. If
you suspect the unit may have been damaged due to dropping
or impact, immediately turn off the power and pull the power
plug from the AC outlet. Failure to observe this may cause
electric shocks, a fire, or malfunctions. Immediately request
an inspection from the dealer where you purchased the unit or
from qualified Yamaha service personnel.
CAUTION
This content indicates “risk of injury.”
Power supply/power cord
• Do not use an AC outlet where the power plug fits loosely
when inserted. Failure to observe this may cause a fire,
electric shocks, or burns.
• When removing the electric plug from the unit or an AC
outlet, always hold the plug itself and not the cord. Pulling by
the cord can damage it and cause electric shocks or a fire.
• Insert the power plug firmly all the way into the AC outlet.
Using the unit when it is not plugged in sufficiently can cause
dust to accumulate on the plug, causing a fire or burns.
• Be sure to request inspections or repairs from the dealer
where you purchased the unit or from qualified Yamaha
service personnel.
• Yamaha cannot be held responsible for injury to you or
damage of the products caused by improper use or
modifications to the unit.
• This product is for ordinary homes. Do not use for
applications requiring high reliability, such as managing
lives, health care or high-value assets.

iii En
Precautions
Installation
• Do not place the unit in an unstable position where it might
accidentally drop or fall over and cause injuries.
• When installing this unit:
– Do not cover it with any cloth.
– Do not install it on a carpet or rug.
– Make sure the top surface faces up; do not install on its sides
or upside down.
– Do not use the device in a confined, poorly-ventilated
location.
Failure to observe the above may trap heat inside the unit,
causing a fire or malfunctions. Ensure that there is adequate
space around the unit: at least 20 cm (8 in) on top, 20 cm (8 in)
on the sides, and 20 cm (8 in) on the rear.
• Ensure that the top is facing upwards. Failure to observe this
may cause malfunctions or for the unit to fall and cause injury.
• Do not install the unit in places where it may come into
contact with corrosive gases or salt air or places that have
excessive smoke or steam. Doing so may result in
malfunction.
• Avoid being near the unit during a disaster, such as an
earthquake. Since the unit may turn over or fall and cause
injury, quickly move away from the unit and go to a safe
place.
• Before moving this unit, be sure to turn off the power switch and
disconnect all connection cables. Failure to observe this may
damage the cables or cause you or someone else to trip and fall.
Hearing loss
• Do not use the unit/speakers for a long period of time at a high
or uncomfortable volume level, since this can cause
permanent hearing loss. If you experience any hearing loss or
ringing in the ears, consult a physician.
• Before connecting the unit to other devices, turn off the power
for all devices. Also, before turning the power of all devices
on or off, make sure that all volume levels are set to the
minimum. Failing to do so may result in hearing loss, electric
shock, or device damage.
Maintenance
• Remove the power plug from the AC outlet before cleaning
the unit. Failure to observe this may cause electric shocks.
Handling caution
• Do not insert your hand or fingers into the bass reflex port of
the subwoofer. Failure to observe this may cause injury.
• Do not insert foreign materials such as metal or paper into the
bass reflex port of the subwoofer. Failure to observe this may
cause a fire, electric shocks, or malfunctions. If foreign
material gets into the unit, immediately shut off the power and
pull the power plug from the AC outlet and request an
inspection from the dealer where you purchased the unit or
from qualified Yamaha service personnel.
• Keep small parts out of the reach of infants. Your children
may accidentally swallow them.
• Do not do the following:
– stand on or sit on the equipment.
– put heavy items on top of the equipment.
– place the equipment in a stack.
– apply unreasonable force to buttons, switches, input/output
terminals, etc.
– lean against the equipment.
• Avoid pulling the connected cables to prevent injuries or
damage to the unit by causing it to fall.
• Do not operate the unit if the sound is distorting. Prolonged
use in this condition could cause overheating and result in
fire.
• When selecting an amplifier or a receiver to use with this unit,
check that the output level on the amplifier or receiver is
within this unit’s permitted input level (see page 10). If the
output power is higher than the power capacity, malfunction
or fire may occur.
Notice
Indicates points that you must observe in order to
prevent product failure, damage or malfunction and
data loss.
Power supply/power cord
• If not using the unit for a long period of time, be sure to pull
the power plug from the outlet.
Installation
• Do not use this unit in the vicinity of other electronic
equipment, such as a TV, radio, or mobile phone. Failure to
observe this may cause this unit or the TV or radio to produce
noise.
• Do not use this unit in a location that is exposed to direct
sunlight that becomes extremely hot, such as near a heater, or
extremely cold, or that is subject to excessive dust or
vibration. Failure to observe this may cause the unit's panel to
become deformed, the internal components to malfunction, or
for operation to become unstable.
Connections
• If connecting external units, be sure to thoroughly read the
manual for each unit and connect them in accordance with the
instructions.
Failure to properly handle a unit in accordance with the
instructions could cause malfunctions.
Handling
• Do not place vinyl, plastic, or rubber products on this unit.
Failure to observe this may cause discoloration or
deformation in the panel of this unit.
• If the ambient temperature changes drastically (such as during
unit transportation or under rapid heating or cooling) and
there is a chance condensation may have formed in the unit,
leave the unit for several hours without turning on the power
until it is completely dry before use. Using the unit while
there is condensation can cause malfunctions.
Maintenance
• If the temperature or humidity changes drastically, water
droplets (condensation) may form on the unit surface. If water
droplets form, immediately wipe them off with a soft cloth. If
water droplets are left on the unit, they may be absorbed into
the wooden parts, causing deformation.
• When cleaning the unit, use a dry, soft cloth. Using chemicals
such as benzine or thinner, cleaning agents, or chemical
scrubbing cloths can cause discoloration or deformation.
Speakers
• When connecting speakers in parallel, be sure to observe the
amplifier's specified load impedance range. (Refer to page
10.) Failure to observe this may cause malfunctions in the
amplifier.
• Do not touch the speaker units. Failure to observe this may
damage the speaker units.

iv En
Precautions
English
Information
About functions and data included in the
unit
• The speakers do not have a distinction between left and right.
• Air may be blown out from the bass reflex port. This is not a
malfunction. This occurs particularly often when outputting
music with heavy bass.
About content in this manual
• The illustrations and screens in this manual are for
instructional purposes only.
(can_b_02)
If this product doesn’t work as expected, look for a possible cause in the troubleshooting section on page 9. If the issue
you are experiencing is not listed, or you cannot resolve it after reading through these instructions, disconnect the power
cable and contact an authorized Yamaha dealer or service center.
WARNING
TO REDUCE THE RISK OF FIRE OR ELECTRIC SHOCK,
DO NOT EXPOSE THIS APPLIANCE TO RAIN OR
MOISTURE.
CAN ICES-3 (B)/NMB-3(B)
This unit’s speakers use magnets. Do not place items that are
sensitive to magnetism, such as CRT-type TVs, clocks, credit
cards, floppy disks, etc., on or beside this unit.
Caution
The speaker is constructed with
the majority of the weight located
in its upper portion, and is thus
susceptible to falling over if
proper care is not taken to ensure
its stability. If the speaker tips
over, the speaker or other
personal property may be
damaged or an individual may be
injured (possibly even fatally
injured).
For safe and proper use of the speaker:
• Position the speaker in a location that is solid, level,
smooth, and low (with respect to the floor).
• Do not push or apply pressure to the side of the
speaker when moving, or lean objects against the
side of the speaker.
• Do not sit on or set objects on top of the speaker.
Vibrations or jolts associated with earthquakes and other
phenomena or activities may cause the speaker to fall over.
For safety reasons, using commercially-available products
that increase stability of the speaker is recommended (metal
fittings or chains, etc.).
Contents
Package contents................................................1
Assembling the front speakers ........................1
Installing the speakers.......................................3
Installing the front, center, and surround speakers ...3
Installing the subwoofer.................................................3
Wall-mounting the speakers.........................................4
Connecting the speakers...................................5
Connection diagram........................................................5
Connecting the power cables ......................................6
Using the Subwoofer......................................... 7
Adjusting the subwoofer before use .........................7
ADVANCED YAMAHA ACTIVE SERVO
TECHNOLOGY II .................................................. 8
TWISTED FLARE PORT ....................................... 8
Troubleshooting................................................. 9
Specifications....................................................10

1 En
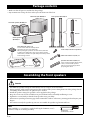
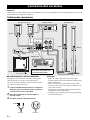
• Make sure that all parts are included in the package.
• Pay attention not to drop the bases when you take them out of the box.
Package contents
Speaker cable 24.5 m (80 ft.) x1
To be cut into 5 lengths for the front,
center, and surround speakers.
Take care to prevent injury when
preparing the cables.
Subwoofer cable 5 m (16 ft.) x1
Subwoofer (NS-SW050) x1
Surround speaker (NS-B40) x2
Center speaker
(NS-C40) x1
Top
Bottom
Base
Screw x10 (For the front speakers)
Front speaker (NS-F40) x2
Non-skid pad
Non-skid pads (24 pcs.) x1
For the center and surround speakers.
(Including 12 spare non-skid pads.)
When placing the speakers on a flat surface, affix the
included non-skid pads to the corners of the speaker
undersides, as shown. The pads will prevent the speaker
from moving around.
Assembling the front speakers
• Assemble the speakers on top of soft material, such as a carpet, on a level surface.
• Do not grab the grilles on the front panel of the speakers while you are taking them out of the package box or
assembling them. Otherwise, the grilles may be crushed.
• Install the speakers using the specified screws supplied in the package.
• Keep the screws out of reach of children to prevent them from accidentally swallowing a screw.
• Tighten the screws firmly so that the front speaker never gets shaky.
• Do not insert your fingers into any gaps between movable surfaces. Otherwise, you may pinch and injure your
fingers.
• You cannot use only the speaker top. Be sure to assemble the speaker top, bottom and base.
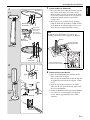
Caution
Shaft length
80 mm (3-1/8") or more
Note
Have a Phillips (+) screwdriver (with a shaft length of 80 mm (3-1/8")
or more) ready to use during assembly.

2 En
Assembling the front speakers
English
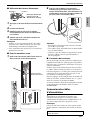
1 Attach the Base to the Bottom.
1 Insert the three projections on the Base into the
three holes on the lower end surface of the
Bottom. Make sure that the notch on the Base
faces in the same direction as the rear panel of
the Bottom, which includes a groove for a
speaker cable.
2 Insert four screws (included in the package)
from the underside of the Base to affix the base
to the Bottom. First finger-tighten each screw
alternately, then tighten them all securely.
2 Attach the Top to the Bottom.
1 Place the assembled Bottom and Base on the
floor as shown in the figure.
Place the Top on the Bottom so that the Top will
sit slightly toward the front (by approx. 15 mm
(5/8")).
2 Slide the Top slowly toward the rear until it
stops and the rear panel of the Top aligns with
the rear of the Bottom.
3 Attach the Bottom to the Top by using a Phillips
screw driver to securely tighten the supplied
screws. Rotate approximately twelve times
clockwise.
1
2
3
Approx. 15 mm (5/8")
Top
Bottom
(Front
side)
Front
Rear
Top
(Front
side)
Rear
Front
Bottom
Approx.
12 rotations
1
2
This notch
must face in
the same
direction as
the rear panel.
Base
Bottom
(Front side)
Projection
Base
Bottom
(Front side)
Bottom
(Front side)
Bottom
(Front side)
Base
Base
1
2
Base
Invert the Bottom and
insert it into this opening.
Top part of packing
polystyrene foam
Bottom
Hint
As shown in the illustration, you can use the
packing polystyrene foam to support the Bottom.

3 En
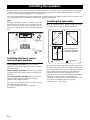
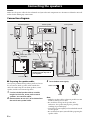
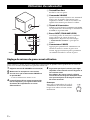
Before you connect the speakers, place each speaker in its respective location. Speaker positioning is very important
as it affects the overall sound quality of the system. Place the speakers in locations that will optimize the sound
quality at your listening position. Refer to the illustration.
The position of the subwoofer is not as critical as the position of the other speakers because sub-bass sounds are not
very directional. Refer to “Installing the subwoofer” for more information.
Note
Placing the speakers too close to a CRT-type TV may
impair the picture color or cause a buzzing noise. In
this case, move the speakers at least 20 cm (8") away
from the TV. This is not an issue with LCD and plasma
TVs.
Installing the front, center,
and surround speakers
Front speakers (NS-F40): Place the two front
speakers on the left and right sides of the TV facing
directly forward.
Center speaker (NS-C40): Place the center speaker
centrally between the front speakers, facing directly
forward.
Surround speakers (NS-B40): Place the left and
right surround speakers behind your listening
position, facing slightly inward.
The center and surround speakers can be placed on a
flat surface or wall- mounted.
See “Wall-mounting the speakers” for more
information.
Installing the subwoofer
Place the subwoofer on the outside of either the right
or the left front speaker, as shown in A and B.
The placement shown in C is also possible, however, if
the subwoofer is placed directly facing a wall and your
listening position is in the center of the room, you may
not be able to obtain enough bass sound from the
subwoofer. This is because “standing waves” are
forming between the two parallel walls and cancelling
out the bass sounds. In this case, position the
subwoofer at an angle to the wall. It may be necessary
to break up parallel wall surfaces by placing
bookshelves, etc., along them.
Installing the speakers
Center
Front right
Subwoofer
Surround
left
Front left
Surround
right
Subwoofer Front speaker
AB
C
Note: Standing waves
may make it difficult to
hear bass sounds here.

4 En
Installing the speakers
English
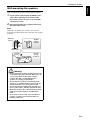
Wall-mounting the speakers
You can mount the speakers on the wall as follows.
1 Install screws (commercially available) into a
solid wall or wall support as shown in the
illustration. Use 3.5 to 4 mm (1/8") diameter
self-tapping screws.
2 Hang each speaker by its keyhole slots onto
the protruding screws.
Note
Make sure the shaft of the screw is seated in the
narrow part of the keyhole slot. Otherwise, the speaker
may fall.
• Do not mount the speakers on thin plywood or on
a wall with a soft surface material. Otherwise, the
screws may pull out of the surface and the
speakers may fall, possibly damaging the
speakers or causing personal injury.
• Do not affix the speakers to a wall using nails,
adhesives, or unstable hardware. Long-term use
and vibration may cause the speakers to fall.
• To avoid accidents resulting from tripping over
loose speaker cables, affix the cables to the wall.
• Mount the speakers in a wall location that will be
unlikely to result in injury to an individual’s
head.
• If you are not sure of a safe way to install these
speakers, consult a professional installer or a
building contractor.
Wall/wall
support
6 mm
(1/4")
Minimum
20 mm (3/4")
NS-B40
0.59 kg
(1.30 lbs.)
NS-C40
0.73 kg
(1.61 lbs.)
150 mm
(5-7/8")
Warning

5 En
Caution
Make sure the power cables for the subwoofer and your other AV components are disconnected from the AC wall
outlets before making any connections.
Connection diagram
■ Preparing the speaker cables
Once you’ve positioned the speakers, you’ll need to cut
the 24.5-meter (80 ft.) speaker cable to make five
cables for connecting the two front speakers, center
speaker, and the two surround speakers.
1 Cut the included speaker cable to suitable
lengths for the front, center, and surround
speakers. You need five cables.
2 Remove about 10 mm (3/8") of insulation from
the end of each speaker cable.
3 Twist the bare wires tightly.
Note
• Make the speaker cables as short as possible. Do not
bundle or roll up excess cable.
• Be careful not to trip on the speaker cable.
Otherwise, the speaker may tip over, possibly
resulting in personal injury.
• Twist the bare wires tightly so the individual strands
are not splayed.
• Be careful not to injure yourself while preparing the
speaker cables.
Connecting the speakers
SPEAKERS
CENTER
SURROUND
FRONT
SUBWOOFER
CENTER
SURROUND
FRONT
SUBWOOFER
SPEAKERS
To AC wall outlet
Center speaker
Subwoofer
Amplifier
Front speakers
Right
Left
Surround speakers
Right Left
Note: The exact layout of the
speaker terminals depends on
your amplifier.
Subwoofer cable
(Included)
Good No Good
10 mm (3/8")

6 En
Connecting the speakers
English
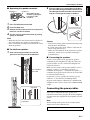
■ Operating the speaker terminals
1 Press and hold the terminal tab.
2 Insert the bare wire.
3 Release the tab so that it closes securely on the
bare wire, not the insulation.
4 Test the security of the connection by pulling
gently on the cable.
Note
• Make sure the bare wires do not touch each other, as
this could damage the speaker or the amplifier.
• If the connections are faulty, you will hear no sound
from the speakers.
■ For the front speakers
1 After connecting the cable, fit it into the
groove on the rear panel of each Bottom.
2
After the cable is fit in place down to the Base,
pass the cable through the hole in the Base. Pull
the cable gently from the underside of the Base
and pass it through the notch on the Base.
Caution
• To move the front speaker to another location, grasp
both the Base and Bottom.
• If a cable comes off a notch, affix the cable into the
notch using adhesive tape.
• Make sure that children do not lean on the speaker.
Otherwise, it may tip over, possibly resulting in
personal injury.
■ Connecting the speakers
Connect each speaker to the appropriate speaker
terminals on your amplifier by using the cables you
prepared earlier. See the “Connection diagram” on
page 5 for reference.
Make sure you connect the speakers with the correct
polarity—positive (+) terminals to positive (+)
terminals, and negative (–) terminals to negative (–)
terminals. If you get them crossed over, the sound will
be unnatural and lack bass.
In your AV receiver’s speaker size settings, specify
small (or “S”) for all of the NS-PA40 speakers.
If you’re connecting the subwoofer to a Yamaha DSP
amplifier or AV receiver, connect to its SUBWOOFER
output.
Connecting the power cables
Once you’ve completed all of the speaker and
subwoofer connections, plug the subwoofer, amplifier,
and your other AV components into suitable AC wall
outlets.
Note
When turning on the power in your audio system,
always turn on the subwoofer last.
2
3
3
1
1
Positive (+)
Negative (–)
Note: Make sure the
terminal is gripping the
bare wire, not the
insulation.
Front speaker’s
rear panel
Pass the cable behind the four
projections.
Projection
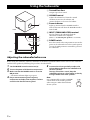
Remove all protective sheet from the unit before use.

7 En
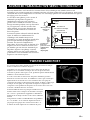
1 Twisted Flare Port
Outputs super-bass sound.
2 VOLUME control
Adjusts the volume level. Turn the control
clockwise to increase the volume, and
counterclockwise to decrease the volume.
3 Power indicator
Lights up Green when the POWER switch is
turned ON; turns off when the POWER switch is
turned OFF.
4 INPUT (FROM AMPLIFIER) terminal
Used to connect the subwoofer with the
subwoofer terminal of the amplifier.
(Refer to “Connecting the speakers” for details.)
5 POWER switch
Press this switch to the ON position to turn on the
power to the subwoofer. Press this switch again to
set it to the OFF position to turn off the power of
the subwoofer.
Adjusting the subwoofer before use
Before using the subwoofer, adjust the subwoofer to obtain the optimum volume balance between the subwoofer
and the front speakers by following the procedure described below.
1 Set the VOLUME control to minimum (0).
2 Turn on the power of all the other components.
3 Make sure that the POWER switch is set to the
ON position.
* The Power indicator lights up in green.
4 Play a source containing low-frequency
components and adjust the amplifier’s volume
control to the desired listening level.
5 Increase the volume gradually to adjust the
volume balance between the subwoofer and
the front speakers.
To enjoy natural bass sound, keep the
subwoofer volume at a level where it is barely
distinguishable from other speakers.
Note
It is recommended to set the VOLUME
control about in the middle position
when using in a multi channel home
theater system.
Using the Subwoofer
1
2
5
3
4
Front
Rear

8 En
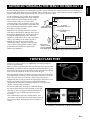
English
In 1988, Yamaha brought to the marketplace speaker systems utilizing YST (Yamaha Active Servo Technology) to
give powerful, high quality bass reproduction. This technique uses a direct connection between the amplifier and
speaker, allowing accurate signal transmission and precise speaker control.
As this technology uses speaker units controlled
by the negative impedance drive of the amplifier
and resonance generated between the speaker
cabinet volume and port, it creates more
resonant energy (the “air woofer” concept) than
the standard bass reflex method. This allows for
bass reproduction from much smaller cabinets
than was previously possible.
Yamaha’s newly developed Advanced YST II
adds many refinements to Yamaha Active Servo
Technology, allowing better control of the forces
driving the amplifier and speaker. From the
amplifier’s point of view, the speaker impedance
changes depending on the sound frequency.
Yamaha developed a new circuit design
combining negative-impedance and constant-
current drives, which provides a more stable
performance and clear bass reproduction,
without any murkiness.
Today’s bass reflex speakers use a Helmholtz resonator to improve
their bass reproduction.
However when reproducing bass that is in the frequency region of this
Helmholtz resonator, air moves violently in and out through the port
between the interior and exterior of the speaker, sometimes producing
noise due to the turbulent air flow at the end of the port.
The port and the cabinet resonate at a frequency that is determined by
their dimensions and shape. On the other hand, turbulence in the air
flow at the end of the port contains a broad range of frequency
components that are not present in the input signal. This noise occurs
because the broad range of frequency components includes
components that match the resonant frequencies of the port and
cabinet, causing strong resonance.
The Twisted Flare Port developed by Yamaha changes
the way in which the port widens toward its end, and
also adds a “twist” to suppress airflow turbulence at
each end of the port and thus prevent noise from
occurring.
This substantially reduces the “muddy sound” and
“wind noise” that until now have been characteristic of
bass reflex speakers, allowing bass to be reproduced
clearly.
ADVANCED YAMAHA ACTIVE SERVO TECHNOLOGY II
TWISTED FLARE PORT
High-amplitude
heavy bass sound
Port
Cabinet
Advanced impedance
Converter
Active Servo
Processing
Amplifier
(Inaudible) signals of ultra-low amplitude
Air woofer
(Helmholtz resonator)
Signals
Bass sound
(audible sound
pressure radiated
from diaphragm)
Conventional Port
Air turbulence on both ends of the port creates noise
Air turbulence is
produced.
Turbulence is
diffused, air flow
becomes smooth.
Twisted Flare Port

9 En
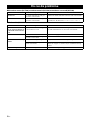
■ Front speakers (NS-F40), center speaker (NS-C40) and surround speakers (NS-B40)
■ Subwoofer (NS-SW050)
Troubleshooting
Issue Possible cause Remedy
There’s no sound. The speaker cables are not
connected properly.
Make sure the speaker cables are connected properly.
The sound is very quiet. The speaker cables are not
connected properly.
Make sure the speaker cables are connected properly:
L (left) to L, R (right) to R, “+” to “+” and “–” to “–”.
Issue Possible cause Remedy
The POWER switch is set
to ON but the subwoofer
doesn’t work.
The power cable is not connected
properly.
Set the POWER switch to OFF, then make sure the power
cable is connected properly.
There’s no sound. The VOLUME control is set to 0. Turn up the VOLUME control.
The subwoofer cable is not
connected properly.
Make sure the subwoofer cable is connected properly.
Sound level is too low. The source material doesn’t
contain much bass.
Try playing source material that contains more bass.
Bass sounds are being cancelled
out by standing waves.
Reposition the subwoofer, or break up parallel wall surfaces
by placing bookshelves or other large objects along the wall.
The sound is interrupted. The volume is too loud. Since the output is excessive, reduce the volume level.

10 En
English
■ Front speakers (NS-F40),
center speaker (NS-C40) and
surround speakers (NS-B40)
Type
NS-F40 ............................................................2way bass reflex
non magnetic shielding type
NS-C40...................................Full range acoustic suspension
non magnetic shielding type
NS-B40................................................... Full range bass reflex
non magnetic shielding type
Driver
NS-F40
Woofer...................................... 7 cm (2-3/4") cone type x2
Tweeter............................. 2.5 cm (1") balanced dome type
NS-C40............................................. 7 cm (2-3/4") cone type
NS-B40............................................. 7 cm (2-3/4") cone type
Nominal input power ....................................................... 30 W
Maximum input power .................................................. 100 W
Impedance ............................................................................. 6 Ω
Frequency response
NS-F40 .............................................. 67 Hz–30 kHz (–10 dB)
–100 kHz (–30 dB)
NS-C40.............................................. 70 Hz–25 kHz (–10 dB)
–45 kHz (–30 dB)
NS-B40.............................................. 50 Hz–25 kHz (–10 dB)
–45 kHz (–30 dB)
Sensitivity
NS-F40 .........................................................85 dB/2.83 V, 1 m
NS-C40.........................................................84 dB/2.83 V, 1 m
NS-B40.........................................................83 dB/2.83 V, 1 m
Dimensions (W x H x D)
NS-F40 .................. 230 x 1000 x 230 mm (9" x 39-3/8" x 9")
(with base)
NS-C40......276 x 111 x 118 mm (10-7/8" x 4-3/8" x 4-5/8")
NS-B40......112 x 176 x 116 mm (4-3/8" x 6-7/8" x 4-5/8")
Wei ght
NS-F40 ......................................................... 2.8 kg (6.2 lbs.)
NS-C40.........................................................0.73 kg (1.61 lbs.)
NS-B40.........................................................0.59 kg (1.30 lbs.)
■ Subwoofer (NS-SW050)
Type...............Advanced Yamaha Active Servo Technology II
Driver ................................................... 20 cm (8") cone woofer
non magnetic shielding type
Amp output power (100 Hz, 5 Ω, 10% T.H.D) ............ 50 W
Dynamic power ....................................................... 100 W, 5 Ω
Frequency response ...........................................28 Hz–200 Hz
Power supply ...................................................AC 120 V, 60 Hz
Power Consumption.......................................................... 40W
Dimensions (W x H x D) ........................291 x 292 x 341 mm
(11-1/2" x 11-1/2" x 13-3/8")
Wei ght .............................................................. 8.5 kg (18.7 lbs.)
* The contents of this manual apply to the latest
specifications as of the publishing date. To obtain the latest
manual, access the Yamaha website then download the
manual file.
Specifications

i Fr
L’avertissement ci-dessus est situé sur l’arrière de l’unité.
Ceci ne s’applique qu’aux produits distribués par YAMAHA
CORPORATION OF AMERICA.
1. Lire ces instructions.
2. Conserver ces instructions.
3. Tenir compte de tous les avertissements.
4. Suivre toutes les instructions.
5. Ne pas utiliser cet appareil à proximité de l’eau.
6. Nettoyer cet appareil avec un chiffon sec seulement.
7. Ne pas recouvrir les ailettes de ventilation. Installer
l’appareil selon les instructions du fabricant.
8. Ne pas installer près d’une source de chaleur, comme un
appareil de chauffage, une résistance électrique, un
poêle, ou tout autre appareil (amplificateurs compris)
produisant de la chaleur.
9. Ne pas désamorcer le système de sécurité d’une fiche
polarisée ou d’une fiche avec mise à la terre. Une fiche
polarisée est munie de deux lames, dont l’une est plus
large que l’autre. Une fiche avec mise à la terre est
munie de deux lames et d’une broche de terre. La lame
la plus large ou la troisième broche sont reliées à la terre
pour des raisons de sécurité. Si la fiche fournie ne
s’insère pas dans la prise, s’adresser à un électricien
pour faire remplacer la prise obsolète.
10. Protéger le cordon d’alimentation de sorte qu’il ne
risque pas d’être piétiné ou coincé, surtout au niveau
des fiches, des prises et de sa sortie de l’appareil.
11. Utiliser seulement les fixations et accessoires spécifiés
par le fabricant.
12. Utiliser seulement le chariot, socle,
trépied, support ou meuble spécifié par
le fabricant ou vendu avec l’appareil. Si
un chariot est utilisé, faire attention de
ne pas se blesser ou de le renverser
pendant le transport de l’appareil.
13. Débrancher cet appareil pendant les orages électriques,
ou s’il ne doit pas être utilisé pendant un certain temps.
14 Pour toute inspection s’adresser à un personnel
qualifié. Une inspection est nécessaire en cas de
dommage, quel qu’il soit, par exemple cordon
d’alimentation ou fiche endommagé, liquide répandu
ou objet tombé à l’intérieur de l’appareil, exposition
de l’appareil à la pluie ou à l’humidité,
fonctionnement anormal ou chute de l’appareil.
PRÉCAUTIONS CONCERNANT LA SÉCURITÉ
CAUTION
RISK OF ELECTRIC SHOCK
DO NOT OPEN
ATTENTION : POUR RÉDUIRE LES RISQUES
D’INCENDIE ET DE DÉCHARGE ELECTRIQUE, NE PAS
RETIRER LE COUVERCLE (OU LE PANNEAU ARRIÈRE).
AUCUNE PIÈCE INTERNE NE PEUT ÊTRE CHANGÉE
PAR L’UTILISATEUR. POUR L’ENTRETIEN,
S’ADRESSER À UN PERSONNEL QUALIFIÉ.
• Explication des symboles
L’éclair avec une flèche à l’intérieur d’un
triangle équilatéral est destiné à attirer l’atten-
tion de l’utilisateur sur la présence d’une « ten-
sion dangereuse » non isolée à l’intérieur du
produit, pouvant être suffisamment élevée pour
constituer un risque d’électrocution.
Le point d’exclamation à l’intérieur d’un
triangle équilatéral est destiné à attirer l’atten-
tion de l’utilisateur sur la présence d’instruc-
tions importantes sur l’emploi ou de la
maintenance (réparation) de l’appareil dans la
documentation fournie.
IMPORTANT
Veuillez enregistrer le numéro de série de cet appareil
dans l’espace réservé à cet effet, ci-dessous.
MODÈLE :
No. de série :
Le numéro de série se trouve à l’arrière de l’appareil.
Prière de conserver le mode d’emploi en lieu sûr pour
toute référence future.

ii Fr
Français
PRÉCAUTIONS
D’USAGE
LISEZ ATTENTIVEMENT AVANT
DE PROCÉDER À TOUTE
UTILISATION.
VEILLEZ À SUIVRE CES
INSTRUCTIONS.
Les mises en garde énumérées ci-dessous sont
destinées à prévenir les risques pour
l’utilisateur et les tiers, à éviter les dommages
matériels et à aider l’utilisateur à se servir de
l’appareil correctement et en toute sécurité.
Assurez-vous de suivre ces instructions.
Après avoir consulté ce manuel, conservez-le dans un endroit sûr de
façon à pouvoir vous y reporter facilement.
AVERTISSEMENT
Ce contenu indique « un risque de blessures graves
ou de mort ».
Alimentation/cordon d’alimentation
• Ne faites rien qui pourrait endommager le cordon d’alimentation.
– Ne le placez pas à proximité d’un radiateur.
– Évitez de le plier excessivement ou de le modifier.
– Évitez de l’érafler.
– Ne placez pas dessus d’objets lourds.
L’utilisation du cordon d’alimentation en ayant le conducteur
du cordon exposé pourrait provoquer des chocs électriques ou
un incendie.
• En cas de risque d’impact de foudre à proximité de l’appareil,
évitez de toucher la fiche d’alimentation. Le non-respect de cette
consigne peut entraîner des chocs électriques.
• Assurez-vous d’utiliser l’appareil avec la tension d’alimentation
appropriée, telle qu’imprimée sur l’unité. L’absence de
raccordement à une prise secteur appropriée pourrait provoquer un
incendie, des chocs électriques ou des dysfonctionnements.
• Vérifiez périodiquement l’état de la prise électrique, dépoussiérez-
la et nettoyez-la en prenant soin de retirer toutes les impuretés qui
pourraient s’y accumuler. Le non-respect de cette consigne peut
entraîner un incendie ou des chocs électriques.
• Lors de l’installation de l’appareil, assurez-vous que la prise
secteur que vous utilisez est facilement accessible. En cas de
problème ou de dysfonctionnement, désactivez immédiatement
l’interrupteur d’alimentation et retirez la fiche de la prise secteur.
Même lorsque l’interrupteur d’alimentation est en position
désactivée, l’appareil n’est pas déconnecté de la source
d’électricité tant que le cordon d’alimentation reste branché à la
prise murale.
• Si vous entendez le tonnerre gronder ou suspectez l’imminence
d’un éclair, mettez immédiatement l’appareil hors tension et
débranchez la fiche d’alimentation de la prise secteur. Le non-
respect de cette consigne peut entraîner un incendie ou des
dysfonctionnements.
• Si vous prévoyez de ne pas utiliser l’appareil pendant une longue
période de temps, assurez-vous de retirer la fiche d’alimentation
de la prise secteur. Le non-respect de cette consigne peut entraîner
un incendie ou des dysfonctionnements.
Démontage interdit
• Ne tentez pas de démonter ou de modifier l’appareil. Le non-
respect de cette procédure risque d’entraîner un incendie, des
chocs électriques, des blessures ou des dysfonctionnements. En
cas d’anomalie, veillez à faire inspecter ou réparer l’appareil par
le revendeur auprès duquel vous l’avez acheté ou par un
technicien Yamaha qualifié.
Avertissement relatif à la présence d’eau
• N’exposez pas l’appareil à la pluie, ne l’utilisez pas près d’une
source d’eau ou dans un milieu humide et ne déposez pas dessus
des récipients (tels que des vases, des bouteilles ou des verres)
contenant des liquides qui risqueraient de s’infiltrer par les
ouvertures ou de dégouliner. Toute infiltration de liquide tel que
de l’eau à l’intérieur de l’appareil risque de provoquer un
incendie, des chocs électriques ou des dysfonctionnements. Si un
liquide, tel que de l’eau, pénètre à l’intérieur de l’appareil, mettez
immédiatement ce dernier hors tension et débranchez le cordon
d’alimentation de la prise secteur. Faites ensuite inspecter
l’appareil par le revendeur auprès duquel vous l’avez acheté ou
par un technicien Yamaha qualifié.
• N’essayez jamais de retirer ou d’insérer une fiche électrique avec
les mains mouillées. Ne manipulez pas l’appareil en ayant les
mains mouillées. Le non-respect de cette procédure risque
d’entraîner des chocs électriques ou des dysfonctionnements.
Prévention contre les incendies
• Ne placez pas d’objets brûlants ou de flammes nues à proximité de
l’appareil, au risque de provoquer un incendie.
Installation
• Assemblez le produit et installez-le selon les instructions fournies
dans le manuel. La chute ou le renversement du produit peut
entraîner des blessures ou des dommages matériels.
• Assurez-vous que l’installation entière est correctement en place
et fixée. Veillez aussi à effectuer régulièrement des contrôles de
sécurité. Le non-respect de cette précaution pourrait provoquer la
chute des appareils et causer des blessures.
• Fixez toujours le câble du haut-parleur sur un mur ou un
emplacement similaire. Si vous vous prenez les pieds ou les mains
dans le câble, les haut-parleurs risquent de tomber ou de se
renverser et de provoquer des dysfonctionnements ou des
blessures.
Entretien et soins
• N’utilisez pas des aérosols ou des produits chimiques de type
pulvérisateur contenant des gaz combustibles pour le besoins de
nettoyage et de lubrification. Le cas échéant, le gaz combustible
s’accumule à l’intérieur du produit, ce qui pourrait provoquer une
explosion ou un incendie.
En cas d’anomalie
• Si l’un des problèmes suivants se produit, coupez immédiatement
l’alimentation et retirez la fiche d’alimentation.
– Le cordon/la fiche d’alimentation est endommagé(e).
– Une odeur inhabituelle ou de la fumée se dégage de l’appareil.
– Un corps étranger a pénétré à l’intérieur de l’appareil.
– Une brusque perte de son est survenue durant l’utilisation de
l’appareil.
– L’appareil est fissuré ou endommagé.
En continuant d’utiliser l’appareil dans ces conditions, vous
risquez de provoquer des chocs électriques, un incendie ou des
dysfonctionnements. Faites immédiatement inspecter ou
réparer l’appareil par le revendeur auprès duquel vous l’avez
acheté ou par un technicien Yamaha qualifié.
• Veillez à ne pas faire tomber l’appareil et à ne pas lui appliquer
une pression excessive. Si vous suspectez que l’appareil a pu être
endommagé à la suite d’une chute ou d’un impact, coupez
immédiatement l’alimentation et retirez la fiche de la prise
secteur. Le non-respect de cette procédure risque d’entraîner des
chocs électriques, un incendie ou des dysfonctionnements. Faites
immédiatement inspecter l’appareil par le revendeur auprès
duquel vous l’avez acheté ou par un technicien Yamaha qualifié.
• Veillez à faire inspecter ou réparer l’appareil par le revendeur
auprès duquel vous l’avez acheté ou par un technicien Yamaha
qualifié.
• Yamaha ne peut être tenu responsable des dommages corporels
et matériels causés par une mauvaise manipulation de
l’instrument ou par des modifications apportées à l’unité.
• Ce produit est conçu pour un usage courant dans les résidences
standard. Ne l’utilisez pas pour des applications nécessitant une
haute fiabilité, telles que la gestion des gestes essentiels à la vie,
des soins de santé ou des biens de grande valeur.

iii Fr
PRÉCAUTIONS D’USAGE
ATTENTION
Ce contenu indique « un risque de blessures ».
Alimentation/cordon d’alimentation
• N’utilisez pas une prise secteur dans laquelle la fiche
d’alimentation ne peut pas s’insérer fermement. Le non-respect de
cette consigne peut entraîner un incendie, des chocs électriques ou
des brûlures.
• Veillez à toujours saisir la fiche elle-même, et non le câble, pour la
retirer de l’appareil ou de la prise secteur. Si vous tirez sur le
cordon, vous risquez de l’endommager et de provoquer des chocs
électriques ou un incendie.
• Introduisez complètement la fiche d’alimentation dans la prise
secteur. L’utilisation de l’appareil alors que la fiche d’alimentation
n’est pas complètement insérée dans la prise peut entraîner une
accumulation de poussière sur la fiche et provoquer un incendie
ou des brûlures.
Installation
• Ne placez pas l’appareil dans une position instable afin d’éviter
qu’il ne tombe ou se renverse accidentellement et ne provoque des
blessures.
• Lors de l’installation de l’appareil :
– Évitez de couvrir l’appareil avec un tissu.
– N’installez pas l’appareil sur une moquette ou un tapis.
– Assurez-vous de disposer l’appareil en orientant sa face
supérieure vers le haut; ne le placez pas sur le côté ou à l’envers.
– N’utilisez pas l’appareil dans un lieu clos, mal aéré.
Le non-respect de ce qui précède risque d’entraîner une
rétention de chaleur à l’intérieur de l’appareil, susceptible de
provoquer un incendie ou des dysfonctionnements. Veillez à
laisser suffisamment d’espace libre autour de l’unité : au moins
20 cm à la surface, 20 cm sur les côtés et 20 cm à l’arrière.
• Assurez-vous que la face supérieure est orientée vers le haut. Le
non-respect de cette consigne risque d’entraîner des
dysfonctionnements ou la chute de l’appareil, ce qui provoquerait
des blessures.
• Ne disposez pas l’appareil dans un emplacement où il pourrait
entrer en contact avec des gaz corrosifs ou de l’air à haute teneur
en sel ou être exposé à des fumées ou à des vapeurs excessives.
Cela pourrait provoquer des dysfonctionnements.
• Évitez d’être à proximité de l’appareil lors de la survenue d’une
catastrophe naturelle telle qu’un tremblement de terre. Compte
tenu du risque de renversement ou de chute de l’appareil pouvant
entraîner des blessures, pensez à vous éloigner rapidement de
l’appareil et à vous réfugier dans un lieu sûr.
• Avant de déplacer l’appareil, veillez à désactiver l’interrupteur
d’alimentation et à déconnecter tous les câbles de connexion. Le
non-respect de cette consigne peut entraîner l’endommagement
des câbles ou provoquer le trébuchement et la chute de
l’utilisateur, s’il s’agit de vous-même ou d’autres personnes.
Perte de capacités auditives
• N’utilisez pas l’appareil de manière prolongée à un niveau sonore
trop élevé ou inconfortable pour l’oreille, au risque
d’endommager irrémédiablement votre ouïe. Si vous constatez
une baisse d’acuité auditive ou que vous entendez des sifflements,
consultez un médecin.
• Avant de raccorder l’appareil à d’autres dispositifs, mettez toutes
les unités concernées hors tension. Et, avant de mettre tous les
appareils sous/hors tension, vérifiez que tous les niveaux de
volume sont réglés sur la position minimale. Le non-respect de ces
mesures peut provoquer une perte d’acuité auditive, entraîner un
risque d’électrocution ou endommager l’équipement.
Entretien
• Retirez la fiche d’alimentation de la prise secteur avant de
procéder au nettoyage de l’appareil. Le non-respect de cette
consigne peut entraîner des chocs électriques.
Précautions d’utilisation
• N’insérez pas la main ni les doigts dans le port bass-reflex du
subwoofer.Le non-respect de cette consigne peut provoquer des
blessures.
• N’insérez aucun corps étranger tel que du métal ou du papier dans
le port bass-reflex du subwoofer. Le non-respect de cette
procédure risque d’entraîner un incendie, des chocs électriques ou
des dysfonctionnements. En cas de pénétration de corps étrangers
à l’intérieur de l’appareil, coupez immédiatement l’alimentation et
retirez la fiche d’alimentation de la prise secteur et faites inspecter
l’appareil par le revendeur auprès duquel vous l’avez acheté ou
par un technicien Yamaha qualifié.
• Assurez-vous de conserver les petits composants hors de portée
des jeunes enfants, qui pourraient les avaler accidentellement.
• Évitez de faire ce qui suit:
– Ne vous asseyez pas sur le produit et ne le piétinez pas.
– Ne placez pas d’objets lourds sur le produit.
– Ne disposez pas le produit en pile.
– N’appliquez pas de force excessive sur les touches, les
commutateurs, les bornes d’entrée/sortie, etc.
– Ne vous appuyez pas contre le produit.
• Évitez de débrancher les câbles connectés afin de ne pas causer de
blessures ou de dommages matériels qui pourraient résulter de la
chute de l’appareil.
• N’utilisez pas l’appareil en cas de distorsion du son. Une
utilisation prolongée dans cet état peut provoquer une surchauffe,
voire un incendie.
• Lorsque vous sélectionnez un amplificateur ou un récepteur à
utiliser avec cet appareil, vérifiez que le niveau de sortie de
l’amplificateur ou du récepteur est compris dans la plage de
valeurs autorisées pour le niveau d’entrée de l’unité (reportez-
vous à la page 10). Si la puissance de sortie est supérieure à la
capacité de puissance autorisée, un dysfonctionnement ou un
incendie pourra se produire.
Avis
Indique des points qui doivent être observés pour
éviter un dysfonctionnement ou endommagement du
produit et une perte des données.
Alimentation/cordon d’alimentation
• Si vous prévoyez de ne pas utiliser l’unité pendant une longue
période, veillez à retirer le cordon d’alimentation de la prise
secteur.
Installation
• N’utilisez pas l’appareil à proximité d’autres équipements
électroniques, tels qu’un téléviseur, une radio ou un téléphone
mobile. Le non-respect de cette précaution pourrait entraîner la
production de bruit sur cette unité, le téléviseur ou la radio.
• N’utilisez pas l’unité dans un emplacement exposé à la lumière
directe du soleil et à une température très élevée (à proximité d’un
appareil de chauffage) ou très basse, à un dépôt de poussière
excessif ou à de fortes vibrations. Le non-respect de cette
précaution pourrait entraîner la déformation du panneau de
l’unité, le dysfonctionnement de ses composants internes ou
l’instabilité de son fonctionnement.
Raccordements
• En cas de connexion d’unités externes, assurez-vous de lire
attentivement le mode d’emploi de l’appareil concerné et reliez-le
conformément aux instructions fournies.
Le non-respect des consignes de manipulation peut provoquer des
dysfonctionnements de l’unité.
Manipulation
• Ne placez pas de produits en vinyle, en plastique ou en
caoutchouc sur l’appareil. Le non-respect de cette précaution
pourrait décolorer ou déformer son panneau.
• Si la température ambiante change radicalement (comme pendant
le transport de l’unité ou dans des conditions de surchauffe ou de
refroidissement rapides) et que de la condensation se forme dans
l’unité, laissez l’appareil hors tension pendant plusieurs heures
jusqu’à ce qu’il soit complètement sec avant de le réutiliser.
L’utilisation de l’unité en cas de formation de condensation peut
entraîner des dysfonctionnements.

iv Fr
PRÉCAUTIONS D’USAGE
Français
Entretien
• Lors de variations importantes de la température ou du degré
d’humidité, de la condensation peut se former et des gouttelettes
d’eau risquent de s’accumuler sur la surface de l’appareil. Le cas
échéant, prenez soin de les essuyer immédiatement à l’aide d’un
chiffon doux. Si des gouttelettes d’eau restent suspendues à la
surface de l’unité, elles pourront être absorbées par les parties en
bois et provoquer la déformation de ces dernières.
• Utilisez un chiffon doux et sec pour le nettoyage de l’appareil.
L’utilisation de produits chimiques tels que de la benzène ou du
diluant, de produits d’entretien ou de chiffons de lavage chimique
peut causer la décoloration ou la déformation de l’appareil.
Haut-parleurs
• Lors du raccordement des haut-parleurs en parallèle, veillez à
respecter l’impédance de charge nominale de l’amplificateur.
(Reportez-vous à la page 10.) Le non-respect de cette consigne
peut provoquer des dysfonctionnements de l’amplificateur.
• Ne touchez pas les unités de haut-parleur, Le non-respect de cette
consigne peut endommager les unités de haut-parleur.
Informations
À propos des fonctions et données inté-
grées au produit
• Il n’y a aucune distinction entre les haut-parleurs de gauche et de
droite.
• L’air peut être soufflé à partir du port bass reflex. Il ne s’agit pas
d’un dysfonctionnement de l’instrument. Cela se produit
particulièrement souvent en cas d’émission de musique aux
accents marqués de basses.
À propos du contenu de ce manuel
• Les illustrations et les captures d’écran figurant dans ce manuel
servent uniquement à expliciter les instructions.
(can_b_02)
Si ce produit ne fonctionne pas selon vos attentes, voyez les causes possibles dans la section “En cas de problème” à la
page 9. Si vous ne trouvez pas la description de votre problème ou si les solutions préconisées ne permettent pas de le
résoudre, débranchez le câble d’alimentation et contactez un revendeur ou un centre de service après-vente agréé par
Yamaha.
AVERTISSEMENT
POUR ÉVITER TOUT RISQUE D’INCENDIE OU
D’ÉLECTROCUTION, N’EXPOSEZ PAS CET APPAREIL À
LA PLUIE OU À L’HUMIDITÉ.
CAN ICES-3 (B)/NMB-3(B)
Les haut-parleurs de cet appareil utilisent des aimants. Ne placez
pas d’objets sensibles au magnétisme comme un téléviseur à écran
cathodique, une horloge, des cartes de crédit, des disquettes etc. au-
dessus ou près de cet appareil.
Attention
L’enceinte est conçue de telle sorte
que la majeure partie de son poids est
située dans la partie supérieure, ce
qui la rend potentiellement instable si
elle est mal installée. Si l’enceinte
devait se renverser, l’enceinte ou des
biens personnels pourraient être
endommagés ou une personne
blessée (voire gravement).
Pour utiliser l’enceinte correctement et sans danger:
• Placez-la sur une surface plane, solide, nivelée et basse (par
rapport au niveau du sol).
• N’appuyez pas sur l’enceinte et n’appliquez aucune force
excessive sur la partie latérale lorsque vous la déplacez; veillez
en outre à ne laisser aucun objet appuyé contre l’enceinte.
• Ne vous asseyez pas sur l’enceinte et ne posez aucun objet
dessus.
Les vibrations et les secousses dues aux tremblements de terre ou
autres phénomènes naturels peuvent faire tomber l’enceinte. Pour
des raisons de sécurité, il est recommandé d’utiliser des dispositifs
améliorant la stabilité (disponibles dans le commerce), comme des
attaches en métal, des chaînes, etc.
Sommaire
Contenu de l’emballage.....................................1
Assemblage des enceintes avant.....................1
Installation des enceintes .................................3
Installation des enceintes avant, de l’enceinte
centrale et des enceintes surround ............................3
Installation du subwoofer..............................................3
Suspension murale des enceintes...............................4
Connexion des enceintes ..................................5
Schéma des connexions.................................................5
Connexion des câbles d’alimentation .......................6
Utilisation du subwoofer .................................. 7
Réglage du caisson de graves avant utilisation.....7
ADVANCED YAMAHA ACTIVE SERVO
TECHNOLOGY II .................................................. 8
TWISTED FLARE PORT ....................................... 8
En cas de problème............................................ 9
Fiche technique ................................................10

1 Fr
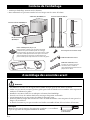
• Vérifiez que l’emballage contient tous les éléments.
• Faites attention de ne pas laisser tomber les bases lorsque vous les sortez de la boîte.
Contenu de l’emballage
Câble d’enceinte 24,5 m x1
À couper en 5 parties pour les
enceintes avant, centrale et
surround. Èvitez de vous blesser en
préparant les câbles.
Câble du subwoofer 5 m x1
Patins antidérapants (24 pcs.) x1
Pour l’enceinte centrale et les enceintes surround
(comprend 12 patins antidérapants de rechange)
Si vous posez les enceintes sur une surface plane, collez
les patins antidérapants fournis aux quatre coins de la
surface inférieure de l’enceinte, comme illustré. Les
patins antidérapants empêchent les enceintes de glisser.
Patin
antidérapant
Subwoofer (NS-SW050) x1
Enceinte surround (NS-B40) x2
Enceinte centrale
(NS-C40) x1
Haut
Bas
Base
Vis x10 (pour les enceintes avant)
Enceinte avant (NS-F40) x2
Assemblage des enceintes avant
• Assemblez les enceintes sur un support doux (comme un tapis) posé sur une surface de niveau.
• Veillez à ne pas saisir les enceintes par leurs grilles quand vous les déballez et les assemblez. Cela risquerait de
renfoncer ou déformer les grilles.
• Installez les enceintes à l’aide des vis indiquées et fournies dans l’emballage.
• Tenez les vis à l’écart des enfants afin d’éviter tout risque d’ingestion accidentelle.
• Serrez fermement les vis pour assurer la stabilité de l’enceinte avant.
• N’insérez jamais les doigts dans un interstice entre des éléments mobiles. Vous risqueriez de vous pincer les
doigts et de vous blesser.
• Le haut de l’enceinte ne peut pas être utilisé seul. Veillez à assembler le haut, le bas et la base de l’enceinte.
Attention
Longueur de la tige
80 mm minimum
Remarque
Munissez-vous pour le montage d’un tournevis cruciforme (+) (en veillant à
ce que sa tige soit d’une longueur minimum de 80 mm).
La page est en cours de chargement...
La page est en cours de chargement...
La page est en cours de chargement...
La page est en cours de chargement...
La page est en cours de chargement...
La page est en cours de chargement...
La page est en cours de chargement...
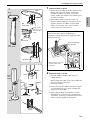
La page est en cours de chargement...
La page est en cours de chargement...
La page est en cours de chargement...
-
 1
1
-
 2
2
-
 3
3
-
 4
4
-
 5
5
-
 6
6
-
 7
7
-
 8
8
-
 9
9
-
 10
10
-
 11
11
-
 12
12
-
 13
13
-
 14
14
-
 15
15
-
 16
16
-
 17
17
-
 18
18
-
 19
19
-
 20
20
-
 21
21
-
 22
22
-
 23
23
-
 24
24
-
 25
25
-
 26
26
-
 27
27
-
 28
28
-
 29
29
-
 30
30


Yamaha NS-PA41 Le manuel du propriétaire
- Catégorie
- Équipement musical supplémentaire
- Taper
- Le manuel du propriétaire
dans d''autres langues
- English: Yamaha NS-PA41 Owner's manual
Documents connexes
-
Yamaha NS-P41 Le manuel du propriétaire
-
-
Yamaha NS-SW100 Le manuel du propriétaire
-
-
-
Yamaha NS-P40 Le manuel du propriétaire
-
-
-
Yamaha NS-SW280 Le manuel du propriétaire
-