La page est en cours de chargement...

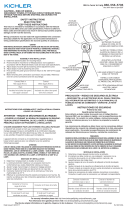
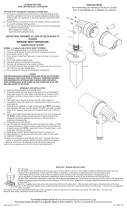
1. Loosen screw holding cowl in place and remove cowl.
2. Carefully place new colored or textured lens into cowl. The lens
mustbelyingatonthelenssupportribs,seegure1.
NOTE:Forlenses,partnumbersGreen,16071GRNand
16072GRN,Amber16071AMBand16072AMB,HolidayGreen,
16071HGNand16072HGNandRed,16071RDand16072RD,
the side with the small piece of removable tape should be facing
up to ensure the coated side of the lens is facing down. For the
FrostedLenses,partnumbers16071FROand16072FROthe
smooth side should be facing down with the etched side facing up
inthexture.(Seegure1.)
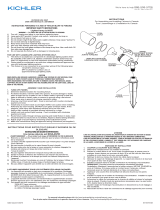
3. Inspectxturegaskettoensureitisfreeofwater,dirtorresidue.
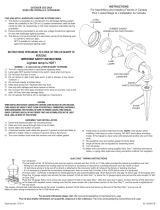
4. Reassemblecowltoxturemakingsurethatthecowlisfully
engagedonthexture.Makesurethecowl,surfaceA,makes
completecontactwithxturesurfaceB.(SeeFigure2.)
5. Securecowlinplacebytighteningscrew.
6. RemovetapepiecefromAmber,Green,HolidayGreenandRed
lenses where applicable.
DateIssued:10/20/17 IS-16072-CB
Instructions for Adding Colored and Textured Lenses to LED Accent Lights
Instructions d’ajout des lentilles colorées et texturées à des éclairages d’accentuation LED
GASKET
JOINT
COWL
CAPOT
SCREW
VIS
FIGURE 1
COWLSURFACEA
CAPOTLASURFACEA
FIGURE 2
FIXTURESURFACEB
SURFACEBDU
LUMINAIRE
LENSSUPPORT
RIBS
NERVURESDE
SUPPORTDE
LENTILLE
LENSACCESSORY
L’ACCESSOIREDELENTILLES
TAPEONGREEN,AMBER,
HOLIDAYGREENANDREDLENSONLY
FACEUP
RUBANVERT,AMBRE,VACANCESVERTETLEN-
TILLEROUGESEULEMENT
FACEVERSLEHAUT
For warranty information please visit: http://www.landscapelighting.com/portal/warranty_page
Pour de plus amples informations sur la garantie, cliquez sur le lien ci-dessous : http://www.landscapelighting.com/portal/warranty_page
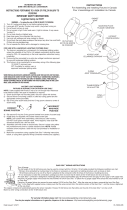
OUTDOOR USE ONLY
DOM ETRE INSTALLE A L’EXTERIEUR
INSTRUCTIONS
For Assembling and Installing Fixtures in Canada
Pour L’assemblage et L’installation Au Canada
1. Desserrerlavisretenantlecapotetenleverlecapot.
2. Placersoigneusementlesnouvelleslentillescoloréesou
texturéesdanslecapot.Leslentillesdoiventêtreposéesàplat
surlesnervuresdesupportdelentille(voirlaFigure1).
REMARQUE :Pourleslentilles,lesréférencesGreen,
16071GRNet16072GRN,Amber16071AMBet16072AMB,
VertdeVacances,16071HGNet16072HGNetRed,16071RDet
16072RD,lecôtédotéderubanamovibledoitêtredirigéversle
hautandegarantirquelecôtérevêtudelalentilleestdirigévers
lebas.Pourleslentillesgivrées,réf.16071FROet16072FRO,
lecôtélissedoitêtreorientéverslebasaveclecôtégravéorienté
verslehautdansleluminaire.(VoirlaFigure1.)
3. Inspecterlejointduluminairepourdétecterlaprésenced’eau,
d’impuretéouderésidus.
4. Réinstallerlecapotsurleluminaireenprenantsoindebien
enclencherlecapotdessus.S’assurerquelecapot,lasurface
AsontsolidementencontactaveclasurfaceBduluminaire.
Voir la Figure 2.
5. Bloquerlecapotenserrantlavis.
6. Retirezlemorceauderubandeslentillesjaune,vert,vertde
vacances et rouge.
We’reheretohelp866-558-5706
Hrs:M-F9amto5pmEST
1/2