
Model: HCFTALOAK
853159---0802H
United States Stove Company
227 Industrial Park Road South Pittsburg, TN 37380 www.usstove.com
FOR TECHNICAL ASSISTANCE: PHONE: (800) 750-2723

-2-
Safety Information
Please read and understand this entire manual before attempting to assemble, operate or install this appliance.
This appliance has been tested to and complies with ANS Z21.97 • CSA 2.41-(2014), Outdoor Decorative Gas
Appliances. The installation must conform to local codes or in the absence of local codes, to the National Fuel Gas
Code, ANSIZ223.1. This manual contains important information about the assembly, operation, and maintenance
of this re pit. General safety in formation is presented in the rst few pages and is also located throughout this
manual. Keep this manual for future reference and to educate new users of this appliance. This manual should be
read in conjunction with the labeling on the appliance. Safety precautions are essential when any mechanical or
propane fueled equipments is involved. These precautions are necessary when using, storing, and servicing. Using
this appliance with the respect and caution demanded will reduce the possibilities of personal injury or property
damage. The following symbols are used extensively throughout this manual. Always heed the precautions, as
they are essential when using any mechanical or propane fueled equipment.
DANGER:
Danger indicates an imminently hazardous situation
which if not avoided, will result in death or serious injury.
DANGER:
Failure to comply with the precautions and instructions
provided with this re pit can result in death, serious
bodily injury and property loss or damage from
hazards of re, explosion, burn asphyxiation, and/or
carbon monoxide poisoning. Only persons who can
understand and follow the instructions should use or
service this re pit.
DANGER:
EXPLOSION-FIRE HAZARD
• Keep solid combustibles, such as building
materials, paper, or cardboard a safe distance
away from the re pit as recommended by the
instructions.
• Provide adequate clearances around air
openings into combustion chamber.
• Never use the re pit in spaces which do or may
contain volatile or airborne combustibles or
products such as gasoline, solvents, paint thinner,
dust particles or unknown chemicals.
• During operation, this appliance can be a source
of ignition. Keep the re pit area free and clear
from combustible materials, gasoline, paint
thinner, cleaning solvent, and other ammable
vapors and liquids. Do not use the re pit in areas
with high dust content.
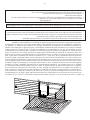
• Minimum re pit clearances from combustible
materials: 2 feet or 24 inches from sides, 2 feet or
24 inches from rear and 6 feet or 72 inches from
ceiling.
DANGER:
EXPLOSION-FIRE HAZARD
• Never store propane near high heat, open
ames, pilot lights, direct sunlight, other ignition
sources or where temperatures exceed 120
degrees F (49 degrees C).
• Propane vapors are heavier than air and can
accumulate in low places. If you smell gas, leave
the area immediately.
• Never install or remove the propane cylinder
while the re pit is lit, near ame, pilot lights or
other ignition source or while the re pit is hot to
the touch.
• This re pit is red hot during use and can ignite
ammables too close to the burner. Keep
ammables at least 2 feet (24 inches) from the
sides and rear, 6 feet (72 inches) from the ceiling.
Keep gasoline and other ammable liquids and
vapors well away from the re pit.
• Store the propane cylinder outdoors in a well
ventilated space out of the reach of children.
Never store the propane cylinder in an enclosed
area (house, garage, etc). If the re pit is to be
stored indoors, disconnect the propane cylinder.
DANGER:
Solid fuels shall not be burned with this appliance.
DANGER:
FOR YOUR SAFETY:
If you smell gas:
1. Shut off gas to the appliance.
2. Extinguish any open ame.
3. If odor continues, keep away from the appliance
and immediately call your gas supplier or re
department.

-3-
DANGER:
CARBON MONOXIDE HAZARD
• This re pit is a combustion appliance. All
combustion appliances produce carbon
monoxide (CO) during the combustion process.
This product is designed to produce extremely
minute, non-hazardous amounts of CO if used
and maintained in accordance with all warnings
and instructions. Do not block the air ow into or
out of the re pit.
• Carbon Monoxide (CO) poisoning produces u-
like symptoms, watery eyes, headaches, dizziness,
fatigue and possibly death. You can’t see it and
you can’t smell it. It is an invisible killer. If these
symptoms are present during operation of this
product, get fresh air immediately!
• For outdoor use only.
• Never use inside a house or other unventilated or
enclosed areas.
• This re pit consumes air (oxygen). To avoid
endangering your life, do not use in unventilated
or enclosed areas.
WARNING:
We cannot foresee every use which may be made of
our re pit. Check with your local re safety authority
if you have questions about the re pit use. Other
standards govern the use of fuel gases and heat
producing products for specic uses. Your local
authorities can advise you about these. If no local
codes exist, follow National Fuel Gas Code, ANSI
223.1. In Canada, installation must conform to local
codes. If no local codes exist, follow the current
National standards of CANADA CAN/CGA-B 149.2.
WARNING:
Do not store or use gasoline or other ammable
vapors and liquids in the vicinity of this or any other
appliance. An LP-cylinder not connected for use
shall not be stored in the vicinity of this or any other
appliance.
WARNING:
FOR OUTDOOR USE ONLY
CARBON MONOXIDE HAZARD
This appliance can produce carbon monoxide which
has no odor. Using it in an enclosed space can kill
you. Never use this appliance in an enclosed space
such as a camper, tent or home.
WARNING:
Improper installation, adjustment, alteration, service
or maintenance can cause property danger, injury
or death. Read the installation, operation and
maintenance instructions thoroughly before installing
or servicing this equipment.
WARNING:
CALIFORNIA PROPOSITION 65
Combustion by-products produced when using this
product contain carbon monoxide, a chemical
know to the State of California to cause birth defects
(or other reproductive harm), and other chemicals
known to cause cancer.
WARNING:
BURN HAZARD
• Never leave the re pit unattended while hot or in
use.
• Keep out of reach of children.
WARNING:
• This product is fueled by propane gas. Propane
gas is invisible, orderless, and ammable. An
odorant is normally added to help detect leaks
and can be described as having a “rotten egg”
smell. The odorant can fade over time so leaking
gas is not always detected by smell alone.
• Propane gas is heavier than air and leaking
propane will sink to the lowest level possible. It
can ignite by ignition sources including matches,
lighters, sparks, or open ames of any kind
many feet away from the original leak. Use only
propane gas set up for vapor withdrawal.
• Store or use propane gas in compliance with
local ordinances and codes or with ANSI/NFPA
58. Turn off propane when not in use.
WARNING:
Certain materials or items, when stored under the
re pit, will be subject to radiant heat and could be
seriously damaged.
CAUTION:
SERVICE SAFETY
• Keep all connections and ttings clean. Make
sure propane cylinder valve outlet is clean.
• During set-up, check all connections and ttings
for leaks using soapy water. Never use a ame to
check for leaks.
• Use as a heating appliance only. Never alter in
any way to use with any device.

-4-
WARNING:
• Non-rechargeable batteries are not to be
recharged. Do not mix different types of batteries
such as alkaline, carbon-zinc, or rechargeable
batteries. Do not mix old and new batteries.
Batteries are to be inserted with the correct
polarity. Exhausted batteries are to be removed
from the product.
• 1AA 1.5V battery 1pc
• DO NOT DISPOSE OF BATTERIES IN FIRE. BATTERIES
MAY EXPLODE OR LEAK
WARNING:
• Alert children and adults to the hazards of high
surface temperatures. Stay away from these
surfaces to avoid burning skin or igniting clothing.
• Carefully supervise young children when in the
vicinity of the re pit.
• Do not hang clothing or any other ammable
materials from the re pit, or place near the re
pit.
• Replace any guard or protective device
removed for servicing the appliance prior to
placing back in service.
• Installation and repair should be done by a
qualied service person. The re pit should be
inspected before use and annually by a qualied
service person. More frequent cleaning may be
required as necessary. It is imperative that the
control compartment, burners, and circulating air
passageway of the appliance be kept clean.
Operation Checklist
For a safe and pleasurable heating experience, perform this check before each use.
BEFORE OPERATING
1. Be familiar with the entire owner’s manual and understand all precautions noted.
2. All components are properly assembled, intact and operable.
3. No alterations have been made.
4. All gas connections are secure and do not leak.
5. Wind velocity is below 10 mph.
6. Unit will operate at reduced efciency below 40° F / 4° C.
7. Fire pit is outdoors (outside any enclosure).
8. There is adequate fresh air ventilation. Do not use this appliance if any part has been under water. Immediately
call a qualied service technician to inspect the appliance and to replace any part of the control system
and gas control which has been under water.
9. Fire pit is away from gasoline or other ammable liquids or vapors.
10. Fire pit is away from window, air intake openings, sprinklers and other water sources.
11. Fire pit is at least 24 inches on rear and sides from combustible materials and 72 inches from ceiling.
12. Fire pit is on a hard and level surface.
13. There are no signs of spiders or insects.
14. All burner passages are clear.
15. All air circulation passages are clear.
16. Children and adults should be alerted to hazards of high surface temperature and should stay away to
avoid burns or clothing ignition.
17. Young children should be carefully supervised when they are in the area of the re pit.
18. Clothing or other protective material should not be hung from the re pit, or placed on or near the re pit.
19. Any guard or other protective device removed for servicing the re pit must be replaced prior to operating
the re pit.
20. Installation and repair should be done by a qualied service person. The re pit should be inspected before
use and at least annually by a qualied service person.
21. More frequent cleaning may be required as necessary. It is imperative that the control compartment, burner,
and circulating air passage ways of the re pit be kept clean.
AFTER OPERATION
1. Gas control is in “OFF” position.
2. Gas tank valve is “OFF”.
3. Gas line has been disconnected.
4. After each use, replace the cap on the gas tank.

-5-
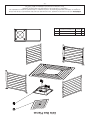
Assembly
Before beginning assembly of product, make sure all parts are present. If any part is missing or damaged, do not
attempt to assemble the product. Contact customer service for replacement parts.
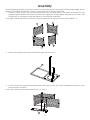
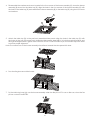
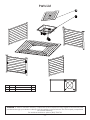
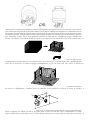
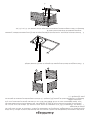
1. Locate 3 panels (C/E/F) and the door panel with door (H). Align holes in all panels and insert M6 X 20
bolts through M6 washer, then insert bolt/washer through holes. Loosely tighten with wrench. DO NOT OVER
TIGHTEN as you will need to adjust the panels to ensure proper alignment.
Note: Right and left panels (E/F) marked 1, 2 should match the door panel with door (H) marked 1, 2.
2. Attach the propane tank strap to the bottom plate (G) as shown.
3. Turn the door knob, open the door and attach the bottom plate (G) to the assembled side panels / door
panel using M6 X 30 bolts.
Note: Match panels and bottom plate as 3-3, 4-4, 5-5, 6-6.
H
E
C
F
G
G

-6-
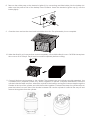
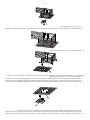
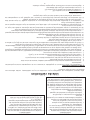
4. Disassemble the washers and screws located in the four corners of the burner assembly (B), lower the burner
assembly (B) down into the table top (D). Align the holes in the four corners of the burner assembly (B) with
the holes in the table top (D) and assemble the burner assembly (B) to the table top (D) using the four screws
and washers.
5. Attach the table top (D) to the previously assembled side panels. Align the holes in the table top (D) with
the holes at the top of the previously assembled side panels. Insert M8 X 16 bolts through MB washer and
through the aligned holes. Tighten with a wrench. DO NOT OVER TIGHTEN as you will need to adjust the holes
to ensure proper alignment.
Note: The control box on the burner assembly should face towards the door panel with door.
6. Pour the re glass around the burner.
7. Put the table top insert (A) over the burner assembly when the re pit is NOT in use or after use, when the re
pit has cooled COMPLETELY.
D
A
B
D

-7-
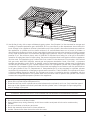
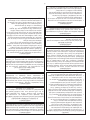
8. Remove the rubber cap on the electronic igniter (L) by unscrewing and slide battery into the battery slot.
Make sure the positive side of the battery faces outwards. Screw the electronic igniter cap (L) over the
battery tightly.
9. Close the door and turn the door knob to hold the door shut. Fire pit assembly is now complete!
10. When the re pit is not in use and has cooled completely, cover with the re pit cover. CAUTION: Never place
the cover on a HOT re pit. Fire pit must be cooled completely before covering.
11. Connect the hose and regulator to the cylinder. The propane gas and cylinder are sold separately. Use
a standard 20 lb. propane cylinder only. Attach regulator to cylinder. Complete attachment. Place the
cylinder inside the table as shown. Attach the cylinder to the base by running the tie down strap through the
handles at the top of the cylinder and click the buckles together. To release the straps for cylinder removal,
press the buttons on each side of the buckle to release. Be sure the cylinder is turned all the way off and
remove the regulator from the cylinder.
L

-8-
WARNING:
• Do not sit or stand on this re pit table.
• Keep children away during assembly, as this item contains small parts which can be swallowed by
children.
• Do not use indoors or inside any enclosure.
• Retain the assembly instructions for future reference.
• Installer- Please leave these instructions with the owner.
• Do not store a spare LP-gas cylinder under or near this appliance;
• Never ll the cylinder beyond 80 percent full;
• Place the dust cap on the cylinder valve outlet whenever the cylinder is not in use. Only install the type of
dust cap on the cylinder valve that is provided with the cylinder valve. Other type of caps or plugs may
result in leakage of propane.
ATTENTION: THIS PRODUCT IS NOT FOR COMMERCIAL USE INTENDED FOR RESIDENTIAL USE ONLY.
12. Use this re pit only with a vapor withdrawal supply system. See Chapter 5 of the standard for storage and
handling of liqueed petroleum gas, ANSI/NFPA 58. Your local library or re department should have this
book. Storage of an appliance indoors is permissible only if the cylinder is disconnected and removed from
the appliance. A cylinder must be stored outdoors in a well-ventilated area out of reach of children. A
disconnected cylinder must have all dust caps tightly installed and must not be stored in a building, garage
or any other enclosed area. The maximum inlet gas supply pressure: 250 psi. The minimum inlet gas supply
pressure: 5 psi. The minimum hourly rate of 10000 Btu is required input rating for a re pit for automatic
operation at rating less than full input rating. The pressure regulator and hose supplied with the appliance
must be used. The installation must conrm with local codes or in the absence of local codes, with national
fuel gas code, ANSI Z223.1/NFPA54, natural gas and propane Installation Code, CSA 8149.1, or propane
storage and handling code, 8149.2. A dented, rusted or damaged propane cylinder may be hazardous
and should be checked by your cylinder supplier. Never use a propane cylinder with a damaged valve
connection. The propane cylinder must be constructed and marked in accordance with the specications
for LP gas cylinders of the U.S. Department of Transportation(DOT) or the standard for cylinders, spheres
and tubes for transportation of dangerous goods and commission, CAN/CSA-B339. The cylinder must have
a listed overlling prevention device. The cylinder must have a connection device compatible with the
connection for the appliance. The cylinder used must include a collar to protect the cylinder valve. Never
connect an unregulated propane cylinder to the appliance.

-9-
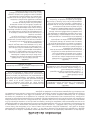
LEAK TEST
WARNING:
• Perform all tests outdoors.
• Extinguish all open ames.
• NEVER leak test when smoking.
• Do not use the re pit until all connections have been leak tested and do not leak.
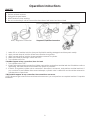
Operation Instructions
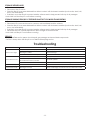
1. Make 2-3 oz. of leak test solution (one part liquid dish-washing detergent and three parts water).
2. Apply several drops of solution where hose attaches to regulator.
3. Apply several drops of solution where regulator connects to cylinder.
4. Make sure all re pit and light valves are “OFF”.
5. Turn cylinder valve ON.
If bubbles appear at any connection, there is a leak.
1. Turn cylinder valve “OFF”.
2. If leak is at hose/regulator connection: tighten connection and perform another leak test. If bubbles continue
appearing, the hose should be returned to the place of purchase.
3. If leak is at regulator/cylinder valve connection: disconnect, reconnect, and perform another leak test. If
you continue to see bubbles after several attempts, cylinder valve is defective and should be returned to
cylinder place of purchase.
If NO bubbles appear at any connection, the connections are secure.
NOTE: Whenever gas connections are loosened or removed, you must perform a complete leak test. Complete
installation.
Hose / Regulator Connection Regulator / Cylinder Connection

-10-
DANGER:
CARBON MONOXIDE HAZARD
For outdoor use only. Never use inside a house, or
other unventilated or enclosed area. This re pit
consumes air (oxygen). To avoid endangering your
life, do not use in an unventilated or enclosed area.
WARNING:
VERY HOT WHILE IN OPERATION
Never lean over the re pit while in use. Do not touch
surfaces while the re pit is in operation. Wait until the
re pit has completely cooled down after use. Failure
to comply with these instructions may result in serious
bodily injury.
Caution: Do not attempt to operate until you have read and understand all General Safety Information in this
manual and all assembly is complete and leak checks have been performed.
BEFORE TURNING GAS SUPPLY ON
1. Your re pit was designed and approved for outdoor use only. Do NOT use it inside a building, garage, or
any other enclosed area.
2. Make sure surrounding areas are free of combustible materials, gasoline, and other ammable vapors or
liquids.
3. Ensure that there is no obstruction to air ventilation. Be sure all gas connections are tight and there are no
leaks.
4. Be sure the cylinder cover is clear of debris. Be sure any component removed during assembly or servicing is
replaced and fastened prior to starting.
BEFORE LIGHTING
1. Fire pit should be thoroughly inspected before each use, and by a qualied service person at least annually.
If relighting a hot re pit, always wait at least 5 minutes.
2. Inspect the hose assembly for evidence of excessive abrasion, cuts, or wear. Suspected areas should be leak
tested. If the hose leaks, it must be replaced prior to operation. Only use the replacement hose assembly
specied by manufacturer. The burner must be replaced prior to the appliance being put into operation if
it is evident that the burner is damaged. The replacement burner should be specied by the manufacturer.
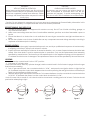
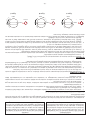
LIGHTING
1. Make sure the control knob is in the “OFF” position.
2. Fully open LP cylinder valve.
Note: For initial start or after any cylinder change, hold the control knob in for 2 minutes to purge air from the gas
lines before proceeding.
3. Push in gas control knob, turn counterclockwise to “LOW”, and press the red ignitor button to light the re
pit. If needed, keep the control knob depressed and continue pressing the red ignitor button until the re pit
lights (you should hear a clicking sound).
4. After the re pit lights, release the control knob. To increase the ame, turn the control knob counterclockwise
to "HIGH". To decrease the ame, turn the control knob clockwise to “LOW”.
Note: If burner fails to remain lit, all valves should be closed and a waiting period of at least 5 minutes should
pass before attempting to light.
Figure A Figure B Figure C
IGNITOR IGNITOR IGNITOR IGNITOR
P
U
S
H
T
O
T
U
R
N
H
I
G
H
OFF
LOW
H
I
G
H
H
I
G
H
OFF
LOW
P
U
S
H
T
O
T
U
R
N
OFF
LOW
P
U
S
H
T
O
T
U
R
N

-11-
WHEN FIRE PIT IS ON
Burner will display tongues of blue and yellow ame. These ames should not be yellow or produce thick black
smoke, which would indicate an obstruction of airow through the burner. The ame should be blue with straight
yellow tops. If excessive yellow ame is detected, turn off the re pit and consult the troubleshooting section of
this manual.
RE-LIGHTING
1. Turn control knob to “OFF”.
2. Repeat the relighting steps provided in this manual.
SHUT DOWN
1. To extinguish burner depress control knob and continue to turn it clockwise to “OFF”.
2. Turn cylinder valve clockwise to “OFF” and disconnect the regulator when the re pit is not in use.
WARNING:
FOR YOUR SAFETY
Fire pit will be hot after use. Handle with extreme care.
WARNING:
FOR YOUR SAFETY
Be careful when attempting to manually ignite this re pit. Holding in the control knob for more than 10 seconds
before igniting the gas will cause a ball of ame upon ignition.
WARNING:
FOR YOUR SAFETY
Do not touch or move the re pit for at least 45 minutes after use. The re pit is hot to the touch. Allow the re
pit to cool before touching.
Care And Maintenance
To enjoy years of outstanding performance from your re pit, make sure you perform the following maintenance
activities on a regular basis, keep the exterior surfaces clean:
1. Use warm soapy water for cleaning. Never use ammable or corrosive cleaning agents.
2. While cleaning your unit, be sure to keep the area around the burner dry at all times. Do not submerge the
control valve assembly. If the gas control is submerged in water, do NOT use it. It must be replaced.
a. Keep the appliance area clear and free from combustible materials, gasoline, and other ammable
vapors and liquids.
b. Do not obstruct the ow of combustion and ventilation air.
c. Keep the ventilation opening of the cylinder enclosure free and clear from debris.
3. Air ow must be unobstructed. Keep controls, burner, and circulating air passage ways clean. Signs of
possible blockage include:
• Gas odor with extreme yellow tipping of ame.
• Fire pit does NOT reach the desired temperature.
• Fire pit glow is excessively uneven.
• Fire pit makes popping noises.
• Spiders and insects can nest in burner or orices. This dangerous condition can damage the re pit and
render it unsafe for use. Clean the burner holes by using a heavy-duty pipe cleaner. Compressed air
may help clear away smaller particles.
• Carbon deposits may create a re hazard. Clean the burner with warm soapy water if any carbon
deposits develop.
Note: In a salt-air environment (such as near an ocean), corrosion occurs more quickly than normal. Frequently
check for corroded areas and repair them promptly.

-12-
STORAGE BETWEEN USES
• Turn the control knob off.
• Disconnect the LP source.
• Store the re pit in an area sheltered from direct contact with inclement weather (such as rain, sleet, hail,
snow, dust and debris).
• If desired, cover the re pit to protect exterior surfaces and to help prevent build-up in air passages.
Note: Wait until the re pit is cool before covering.
STORAGE DURING PERIODS OF EXTENDED INACTIVITY OR WHEN TRANSPORTING
• Turn the control knob off.
• Disconnect LP source and move to a secure, well-ventilated location outdoor.
• Store the re pit in an area sheltered from direct contact with inclement weather (such as rain, sleet, hall,
snow, dust and debris).
• If desired, cover the re pit to protect exterior surfaces and to help prevent build-up in air passages.
• Never leave the LP cylinder exposed to direct sunlight or excessive heat.
Note: Wait until re pit is cool before covering.
SERVICE
Only a qualied service person should repair gas passages and associated components.
Caution: Always allow the re pit to cool before attempting service.
PROBLEM POSSIBLE CAUSE CORRECTIVE ACTION
Burner won’t light
Propane cylinder is empty Replace propane cylinder
Blockage in orice Clear blockage
Control knob is not in “ON” position Turn control knob to “ON”
Burner ame is low
Gas pressure is low Turn cylinder valve off and re-ll the cylinder
Outdoor temperature is less than 40°F
and tank is less than 1/4 % full
Use a full cylinder
Control knob fully on Check burner and orices for blockage
Carbon build-up Dirt or lm on burner Clean burner
Thick black smoke Blockage in burner Remove blockage and clean burner inside and outside
Troubleshooting

-13-
Parts List
Key Part No Description Qty.
A 892957 Table Top Insert 1
B 81297 Burner Assembly 1
ATTENTION: In order to maintain warranty, components must be replaced using original manufacturers parts
purchased through your dealer or directly from the appliance manufacturer. Use of third party components
will void the warranty.
For technical assistance: phone: (800) 750-2723

-14-
Notes

-15-
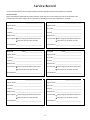
Service 01 Date:________________________
Engineer Name:_____________________________________
Company:__________________________________________
Telephone No.:______________________________________
Unit Inspected:
Check Gas Lines For Wear Or Leaks
Check Integrity Of Orifice And Gas Ports
Items Replaced:____________________________________
It is recommended that this unit is serviced regularly and that the appropriate Service Interval Record is completed.
Service Provider:
Before completing the appropriate Service Record below, please ensure you have carried out the service as described in the
manufacturer’s instructions. Always use the manufacturer's specified spare part when replacement is necessary.
License No.:________________________________________
Service 03 Date:________________________
Engineer Name:_____________________________________
Company:__________________________________________
Telephone No.:______________________________________
Unit Inspected:
Check Gas Lines For Wear Or Leaks
Check Integrity Of Orifice And Gas Ports
Items Replaced:____________________________________
License No.:________________________________________
Service 05 Date:________________________
Engineer Name:_____________________________________
Company:__________________________________________
Telephone No.:______________________________________
Unit Inspected:
Check Gas Lines For Wear Or Leaks
Check Integrity Of Orifice And Gas Ports
Items Replaced:____________________________________
License No.:________________________________________
Service 02 Date:________________________
Engineer Name:_____________________________________
Company:__________________________________________
Telephone No.:______________________________________
Unit Inspected:
Check Gas Lines For Wear Or Leaks
Check Integrity Of Orifice And Gas Ports
Items Replaced:____________________________________
License No.:________________________________________
Service 04 Date:________________________
Engineer Name:_____________________________________
Company:__________________________________________
Telephone No.:______________________________________
Unit Inspected:
Check Gas Lines For Wear Or Leaks
Check Integrity Of Orifice And Gas Ports
Items Replaced:____________________________________
License No.:________________________________________
Service 06 Date:________________________
Engineer Name:_____________________________________
Company:__________________________________________
Telephone No.:______________________________________
Unit Inspected:
Check Gas Lines For Wear Or Leaks
Check Integrity Of Orifice And Gas Ports
Items Replaced:____________________________________
License No.:________________________________________
Service Record

Distributed By:
United States Stove Company
227 Industrial Park Rd
South Pittsburg, TN 37380
www.usstove.com
(800) 750-2723
1 year limited warranty - Customers in the Continental US
All components are warranted for a period of 1 year after date of purchase by the original owner against defects
in materials and workmanship under normal use. This warranty does not cover normal wear and weathering,
assembly and \or maintenance or use in commercial application if model is not designated as a commercial
mode. At USSC’s sole discretion, products under warranty will be repaired and \or replaced at no charge to
the customer. Any returns sent back to USSC must be sent via prepaid freight and in the original retail packaging.
For warranty service contact USSC at the address, Phone number or web site listed in this owner’s manual. Be sure
to have your sales receipt, date of purchase and catalogue/model number available when calling. All warranty
service will be coordinated by the USSC service center.
This warranty is extended only to the original purchaser. Proof of purchase will be required before warranty
service is rendered. The sales receipt is the only valid proof of purchase. This warranty only covers failures due
to defects in materials or workmanship which occur during normal use. Failures and\or damage which result
from accident, negligence, misuse, abuse, neglect, mishandling alteration or modication, failure to maintain,
improper assembly or maintenance, service by unauthorized agency or use of unauthorized components or
damage that is attributable to acts of god are not covered.
***THERE ARE NO EXPRESS WARRANTIES EXCEPT AS LISTED ABOVE***
***PURCHASER ASSUMES ALL RISK IN THE ASSEMBLY AND OPERATION OF THIS UNIT***
***FAILURE TO FOLLOW WARNINGS AND OPERATIONAL INSTRUCTIONS CONTAINED IN THIS MANUAL CAN RESULT
IN SEVERE PROPERTY DAMAGE AND\OR PERSONAL INJURY***
IN NO EVENT WILL USSC OR ITS DIRECTORS, OFFICERS OR AGENTS BE LIABLE TO THE PURCHASER OR ANY THIRD PARTY,
WHETHER IN CONTRACT, IN TORT, OR ON ANY OTHER BASIS , FOR ANY INDIRECT, SPECIAL, PUNITIVE, EXEMPLARY,
CONSEQUENTIAL, OR INCIDENTAL LOSS, COST, OR DAMAGE ARISING OUT OF OR IN CONNECTION WITH THE SALE,
MAINTENANCE, USE, OR INABILITY TO USE THE PRODUCT, EVEN IF USSC OR ITS DIRECTORS, OFFICERS OR AGENTS
HAVE BEEN ADVISED OF THE POSSIBILITY OF SUCH LOSSES, COSTS OR DAMAGES, OR IF SUCH LOSSES, COSTS, OR
DAMAGES ARE FORESEEABLE. IN NO EVENT WILL USSC, OR ITS OFFICER, DIRECTORS, OR AGENTS BE LIABLE FOR ANY
DIRECT LOSSES, COSTS OR DAMAGES THAT EXCEED THE PURCHASE PRICE OF THE PRODUCT.
SOME JURISDICTIONS DO NOT ALLOW THE EXCLUSION OR LIMITATION OF INCIDENTAL OR CONSEQUENTIAL
DAMAGES, SO THE ABOVE LIMITATION OR EXCLUSION MAY NOT APPLY TO THE PURCHASER.;
This limited warranty gives you specic legal rights and you may also have other rights which vary from jurisdiction
to jurisdiction. The provisions of the United Nations Convention on Contracts for the sales of goods shall not apply
to this limited warranty or the sale of products covered by this limited warranty.
***IMPORTANT NOTICE***
-DO NOT return to place of purchase-
For customer service and warranty issues contact customer service

Distribué par :
United States Stove Company
227 Industrial Park Rd
South Pittsburg, TN 37380
Site Web www.usstove.com
(800) 750-2723
Garantie limitée d'un an - Clients dans la zone continentale des États-Unis
Tous les composants sont garantis pendant 1 an après la date d’achat par le propriétaire original contre les
défauts des matériaux et de fabrication sous une utilisation normale. Cette garantie ne couvre pas l’usure
normale, le vieillissement naturel, l’assemblage et/ou l’entretien ou l’utilisation commerciale si le modèle n’est
pas désigné comme un modèle commercial. À la seule discrétion de l'USSC, les produits sous garantie seront
réparés et / ou remplacés sans frais pour le client. Tous les retours à USSC doivent être effectués par transport
prépayé et dans l’emballage original.
Pour un service sur garantie, contactez USSC à l’adresse, le numéro de téléphone ou le site Web inscrit dans le
manuel du propriétaire. Assurez-vous d’avoir en main votre reçu de vente, la date de l’achat et le numéro de
catalogue/modèle lors de votre appel. Tout service sur garantie sera coordonné par le centre de service USSC.
Cette garantie n’est destinée qu’à l’acheteur original. La preuve d’achat sera requise avant que le service sous
garantie ne soit effectué. Le reçu de vente est la seule preuve d’achat valide. Cette garantie ne couvre que
les défaillances en raison des défauts des matériaux ou de la fabrication survenant pendant un usage normal.
Les défaillances et/ou dommages résultant d’un accident, une négligence, une mauvaise utilisation, l’abus, la
négligence, une altération ou des modications sans précautions, le défaut d’entretenir, un mauvais assemblage
ou entretien, une réparation par une agence non autorisée ou l’utilisation de composants non autorisés ou des
dommages attribuables à une force majeur, ne sont pas couverts.
***IL N’Y A AUCUNE GARANTIE EXPRESSE, SAUF COMME IL EST INDIQUÉ CI-DESSOUS***
***L'ACHETEUR ASSUME TOUS LES RISQUES DE L'ASSEMBLAGE ET DU FONCTIONNEMENT DE CETTE UNITÉ***
***NE PAS RESPECTER LES AVERTISSEMENTS ET DIRECTIVES DE FONCTIONNEMENT CONTENUES DANS CE MANUEL
PEUT CAUSER DE SÉVÈRES DOMMAGES À LA PROPRIÉTÉ ET/OU CAUSER DES BLESSURES PERSONNELLES***
EN AUCUN CAS, USSC OU SES DIRIGEANTS, OFFICIERS OU AGENTS, NE SERONT RESPONSABLES DEVANT L’ACHETEUR
OU TOUT AUTRE TIERS, S’IL SURVENAIT DANS LE CONTRAT, UN ACTE DÉLICTUEL, OU SURVENAIT SUR TOUTE AUTRE
BASE, DES PERTES, DES COÛTS OU DES DOMMAGES INDIRECTS, SPÉCIAUX, PUNITIFS, EXEMPLAIRES, CONSÉCUTIFS,
OU FORTUITS, OU RELATIFS À LA VENTE, L’ENTRETIEN, L’UTILISATION, OU L’INCAPACITÉ À UTILISER LE PRODUIT, MÊME
SI USSC, OU SES DIRIGEANTS, OFFICIERS OU AGENTS SONT PRÉVENUS DE LA POSSIBILITÉ DE CES PERTES, COÛTS OU
DOMMAGES, OU SI CES PERTES, COÛTS OU DOMMAGES SONT PRÉVISIBLES. EN AUCUN CAS USSC, OU SES OFFICIERS,
DIRIGEANTS, OU AGENTS NE SERONT RESPONSABLES DE TOUTES PERTES DIRECTES, COÛTS OU DOMMAGES EXCÉDANT
LE PRIX D’ACHAT DU PRODUIT.
CERTAINES JURIDICTIONS N’AUTORISENT PAS L’EXCLUSION OU LA LIMITATION DES DOMMAGES FORTUITS OU
CONSÉCUTIFS, ET LES PRÉCÉDENTES RESTRICTIONS, OU EXCLUSIONS POURRAIENT NE PAS S’APPLIQUER À L’ACHETEUR.
Cette garantie limitée vous donne des droits légaux spéciques et vous pourriez avoir d’autres droits qui varieront d’une
juridiction à l’autre. Les dispositions de la Convention des Nations Unies sur les contrats de vente de marchandises ne
s'appliquent pas à cette garantie limitée ou à la vente de produits couverts par cette garantie limitée.
***AVIS IMPORTANT***
- NE PAS retourner à l’endroit de l’achat -
Pour le service client et les problèmes de garantie, contactez le service client

-15-
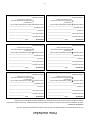
Entreen 01 Date :________________________
Nom de l'ingénieur :__________________________________
Entreprise :_________________________________________
N° de téléphone :____________________________________
Unité inspectée :
Contrôlez les conduites de gaz pour
leur usure ou leurs fuites
Vérifier l'intégrité des orifices et des
ports de gaz
Produits remplacés :________________________________
Il est recommandé d'effectuer l'entretien régulier de cette unité et de compléter le Registre des intervalles de service.
Fournisseur de services :
Avant de compléter la Fiche de service ci-dessous, veuillez vous assurer d'avoir effectué l’entretien tel que décrit dans les instructions
du fabricant. Utilisez toujours les pièces de rechange spécifiées par le fabricant lorsque le remplacement est nécessaire.
Numéro de licence :__________________________________
Entreen 03 Date :________________________
Nom de l'ingénieur :__________________________________
Entreprise :_________________________________________
N° de téléphone :____________________________________
Unité inspectée :
Contrôlez les conduites de gaz pour
leur usure ou leurs fuites
Vérifier l'intégrité des orifices et des
ports de gaz
Produits remplacés :________________________________
Numéro de licence :__________________________________
Entreen 05 Date :________________________
Nom de l'ingénieur :__________________________________
Entreprise :_________________________________________
N° de téléphone :____________________________________
Unité inspectée :
Contrôlez les conduites de gaz pour
leur usure ou leurs fuites
Vérifier l'intégrité des orifices et des
ports de gaz
Produits remplacés :________________________________
Numéro de licence :__________________________________
Entreen 02 Date :________________________
Nom de l'ingénieur :__________________________________
Entreprise :_________________________________________
N° de téléphone :____________________________________
Unité inspectée :
Contrôlez les conduites de gaz pour
leur usure ou leurs fuites
Vérifier l'intégrité des orifices et des
ports de gaz
Produits remplacés :________________________________
Numéro de licence :__________________________________
Entreen 04 Date :________________________
Nom de l'ingénieur :__________________________________
Entreprise :________________________________________
N° de téléphone :____________________________________
Unité inspectée :
Contrôlez les conduites de gaz pour
leur usure ou leurs fuites
Vérifier l'intégrité des orifices et des
ports de gaz
Produits remplacés :________________________________
Numéro de licence :__________________________________
Entreen 06 Date :________________________
Nom de l'ingénieur :__________________________________
Entreprise :_________________________________________
N° de téléphone :____________________________________
Unité inspectée :
Contrôlez les conduites de gaz pour
leur usure ou leurs fuites
Vérifier l'intégrité des orifices et des
ports de gaz
Produits remplacés :________________________________
Numéro de licence :__________________________________
Fiche d'entretien

-14-
Remarque

-13-
Liste Des Pieces
Clé Partie Description Qté.
A 892957 Insert De Table 1
B 81297 Ssemblage Du Brûleur 1
ATTENTION: An de conserver la garantie, les composants doivent être remplacés à l’aide des pièces
d’origine du fabricant achetées auprès de votre revendeur ou directement auprès du fabricant de
l’appareil. L’utilisation de composants tiers annulera la garantie.
Pour l’assistance technique: téléphone: (800) 750-2723
La page est en cours de chargement...
La page est en cours de chargement...
La page est en cours de chargement...
La page est en cours de chargement...
La page est en cours de chargement...
La page est en cours de chargement...
La page est en cours de chargement...
La page est en cours de chargement...
La page est en cours de chargement...
La page est en cours de chargement...
La page est en cours de chargement...
La page est en cours de chargement...
-
 1
1
-
 2
2
-
 3
3
-
 4
4
-
 5
5
-
 6
6
-
 7
7
-
 8
8
-
 9
9
-
 10
10
-
 11
11
-
 12
12
-
 13
13
-
 14
14
-
 15
15
-
 16
16
-
 17
17
-
 18
18
-
 19
19
-
 20
20
-
 21
21
-
 22
22
-
 23
23
-
 24
24
-
 25
25
-
 26
26
-
 27
27
-
 28
28
-
 29
29
-
 30
30
-
 31
31
-
 32
32


dans d''autres langues
- English: HomComfort HCFTALOAK User manual
Documents connexes
Autres documents
-
 OVE Decors 15PC1R-THOR03-GRY Mode d'emploi
-
Camp Chef FP40 Mode d'emploi
-
-
-
-
Endless Summer GAD19102ES Le manuel du propriétaire
-
Pleasant Hearth OFG466TA Manuel utilisateur
-
Cosco 88-533DBTE Manuel utilisateur
-
 Red Mountain Valley 8922643 Le manuel du propriétaire
-
OVE Decors 15PFP-SOLA40-CHD Mode d'emploi

