WM7891W (WHITE), WM7891G (GRAY), WM7891 (MOCHA),
WM7891B (BLACK)
B34WM789100 - 136832
Date of Purchase
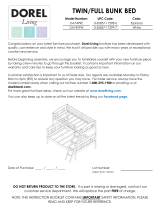
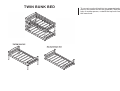
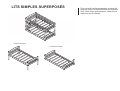
TWIN
Bunk Bed
EFN. – 09/19/2023
Lot Number (TAKEN FROM CARTON)
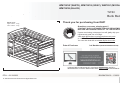
Thank you for purchasing from DHP!
THIS INSTRUCTION BOOKLET CONTAINS IMPORTANT SAFETY
INFORMATION. PLEASE READ AND KEEP FOR FUTURE REFERENCE.
© 2023 Dorel Home Products All Rights Reserved
Weight Limit:
Questions, concerns, missing parts?
CONTACT OUR CUSTOMER SERVICE DEPARTMENT
BEFORE RETURNING PRODUCT TO THE RETAILER.
If parts are missing or damaged, we will gladly ship your
replacement parts free of charge.
Visit www.dhpfurniture.com/eng/replacement-parts
or call Toll-Free 1-800-267-1739.
You can also chat with us atwww.dhpfurniture.com
1
Upper: 165 lbs - 75 Kg
Lower: 165 lbs - 75 Kg

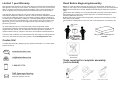
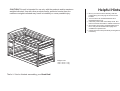
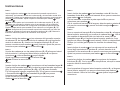
Read Before BeginningAssembly
Work in a spacious area and near where the unit will beused, preferably on a
carpet, or use a piece of the cardboard packaging to protect your floor and product.
Make sure all parts are included. Mostparts are labeled or stamped on the raw
edge.
Read each step carefully. It is very important that each step of the instructions is
performed in the correct order. If these steps are not followed insequence,
assembly difficulties will occur.
This product may contain small components. Please ensure that they are kept
away from small children.
This product is designed for home use and is not intended for commercial use.
Limited 1 year Warranty
DHP warrants this product to be free from defects in material and workmanship
and agrees to remedy any such defect. This warranty covers one year from the
date of original purchasefrom authorized retailers. This is solely limited to the
repair or replacement of defective parts and assembly labor is not included.
This warranty does not apply to any product which has been improperly
assembled, subjected to misuse or abuse or which has been altered or repaired
in any way.The warranty does not cover wearing, tearing, fading or splitting of
the fabric (where applicable). Liability for consequential damages is excluded to
the extent exclusion is permittedby law. This warranty gives you specific legal
rights and you may also have other rights which vary from state to state or
province to province.
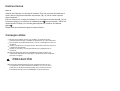
To obtain warranty service, purchaser must present original bill of sale.
Components repaired or replaced are warranted through the remainder of the
original warranty period only. The defective components will be repaired or
replaced without charge, subject to the terms and conditions described above.
The terms and conditions of the limited warranty are subject to change without
notice. For the latest warranty policy, please visit www.dhpfurniture.com.
Contact Us!
For help with assembly, identifying parts, product information or to order parts,
please contact us:
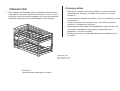
Do NOTuse
powertools
Tools required to complete assembly
(not included)
Phillips headscrewdriver
Hammer Flat headscrewdriver
DHP Consumer Services
12345 Albert Hudon, Suite 100,
Montreal, Quebec H1G 3L1
1-800-267-1739
www.dhpfurniture.com
with us!
Chat
1hour
This product is packaged in
1 carton
2

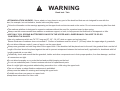
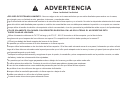
STRANGULATION HAZARD - Never attach or hang items to any part of the bunk bed that are not designed for use with the
bed, for example, but not limited to, hooks, belts and jump ropes.
Follow the information on the warnings appearing on the upper bunk end structure and on the carton. Do not remove warning label from bed.
The mattress platform is designed to support a mattress without the need for a posture board or box spring.
Use only mattresses which are 74"-75" long and 37 1/2" - 38 1/2" wide on upper and on lower bed.
Ensure thickness of mattress does not exceed 6". Surface of mattress must be at lest 5" (127mm) below the upper edge of guardrails.
Do not allow childrean under 6 years of age to use the upper bunk.
Always use guardrails on both long sides of the upper bunk. If the bunk bed will be placed next to the wall. the guardrail that runs the full
length of the bed should be placed against the wall to prevent entrapment between the bed and wall ( applicable for bunk beds with full
Periodically check and ensure that the guardrail, ladder and other components are in their proper position, free from damage, and that
Do not allow horseplay on or under the bed and prohibit jumping on the bed.
Do not use substitute parts. Contact customer service for replacement parts.
Use of a night light may provide added safety precaution for a child using the upper bunk.
The use of water or sleep flotation mattresses is prohibited.
Always use the ladder for entering and leaving the upper bunk.
Prohibit more than one person on upper bunk.
Keep these instructions for future use.
all connectors are tight.
length guardrails on one side).
Always use the recommended size mattress or mattress support, or both, to help prevent the likelihood of entrapment or falls.
USE ONLY COIL SPRING MATTRESSES ON BOTH THE UPPER AND LOWER BUNKS. FAILURE TO DO SO
CAN RESULT IN INJURY.
WARNING
!
Bunk bed : Twin
3

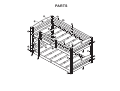
PARTS
4

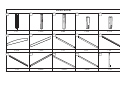
PARTSLIST
TOP POST
HEADBOARD TOP CROSS
BOTTOM BACK SIDE RAIL
TOP POST
HEADBOARD BOTTOM CROSS
SLAT WITHOUT WOOD DOWEL LONG GUARD RAIL
TOP POST
TOP FRONT SIDE RAIL BOTTOM FRONT SIDE RAIL
SHORT GUARD RAIL
BACK SIDE RAIL
LEFT LADDER END
BOTTOM POST BOTTOM POSTTOP POST
1
4
1
2
4
12 2
1
1
2
1
1
2 21PC
PCS
PC
PCS
PCS
PCS PCS
PC
PC 1 PC
PCS
PC
PC
PCS PCSPC
ABC D E
F
K
G
L
H
M
I
N
J
O
5

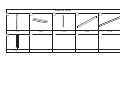
PARTS LIST
RIGHT LADDER END
GUARD RAIL POST
LADDER STEP GUARDRAIL LEG
HEADBOARD CENTER CROSS
SLAT WITH WOOD DOWEL
1
1
34 42PC
PC
PCS PCS PCS PCS
PQR S T
U
6

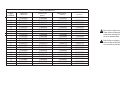
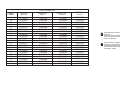
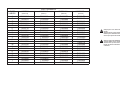
PART
LABELS WM7891 WM7891W
WM7891G
(MOCHA)
(WHITE)
(GREY)
AT1033660 T1033280 T1033870
T1033800 T1033410 T1034000
T1033730 T1033350 T1033940
T1033670 T1033290 T1033880
T1033810 T1033420 T1034010
T1033740 T1033360 T1033950
T1033680 T1033300 T1033890
T1033820 T1033430 T1034020
T1033750 T1033370 T1033960
T1033970
T1033690 T1033310 T1033900
T1033830 T1033440 T1034030
T1034040
T1034050
T1033760 T1033380
T1033700 T1033320 T1033910
T1033840 T1033450
T1033770 T1033770 T1033770
T1033710 T1033330 T1033920
T1033850 T1033850 T1033850
T1033780 T1033390 T1033980
T1033720 T1033340 T1033930
T1033860 T1033460
T1033790 T1033400 T1033990
K
B
L
C
M
D
N
U
E
O
F
P
G
Q
H
R
I
S
J
T
Each part has a unique part number.
Please reference the appropriate part
number when contacting customer
service for replacement parts.
Before throwing any packaging, please
verify all contents and make sure you
have received all the parts listed above!
7
PART
NUMBERS
WM7891B
(BLACK)
T1033470
T1034600
T1033540
T1033480
T1034610
T1033550
T1033490
T1034620
T1033560
T1033570
T1033500
T1034630
T1034640
T1033510
T1033520
T1033850
T1033580
T1033530
T1033590
T1033650
T1033770

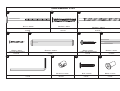
HARDWARE LIST
1
JOINT CONNECTOR (4mm HEX HEAD)
WOOD JOINT CONNECTOR (4mm HEX HEAD) WOOD JOINT CONNECTOR (4mm HEX HEAD)
ALLEN KEY
WOOD DOWEL
16 PCS 10 PCS 24 PCS
1 PCS
4 PCS
Ø1/4" x 100mm Ø6.5mm x 48mm Ø6.5mm x 100mm
Ø15mm x 100mm
123
4 5
11
10
8
2
8
FLAT HEAD WOOD SCREW
24 PCS
Ø4mm x 35mm
HEX CAP
2 PCS
Ø9mm x 17mm
6 7
FLANG HEAD WOOD SCREW
6 PCS
Ø4mm x 35mm
HEX SOCKET HEAD BOLT
2 PCS
Ø1/4" x 32mm
8
WOOD DOWEL
54 PCS
Ø10mm x 50mm
TUERCAS BARRILETE
16 PCS
Ø11.8mm x 15mm
9

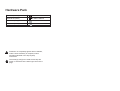
Please do not completely tighten all the hardware,
until the entire assembly is complete, unless
otherwise indicated in the step-by-step
instructions.
The screw(s), bolt(s) to be used at eachstep are
shown in actualsize in the lower right corner of the
page.
Hardware Pack
WM7891 (Mocha) 0-65857-18615-4
9
WM7891W (White)
WM7891G (Gray)
0-65857-18665-9
0-65857-19665-8
WM7891B (Black) 0-65857-19899-7

3
7
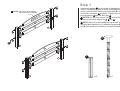
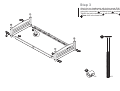
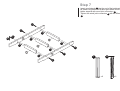
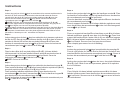
Insert wood dowels into the ends of headboard top
cross , headboard bottom cross and headboardF G
center cross . Attach them to top posts ( & ) usingS A B
wood joint connectors as shown. Tighten the wood
joint connectors with the Allen key .
NOTES: Do not fully secure bolt until all the
dowels are properly aligned for F, S and G.
x 20 x 8
Step 1
10
7
3
38
!
!
!
!
C
A
B
B
F
F
S
S
G
G
3
3
3
3
7
7
7
7
7
7
7
7
7
7
7
7
3
3
3
3
NOTE: Label must face towards
the inside of the assembly
8
3
NOTE: FBe sure to use headboard top cross with
warning label attached to it is between top posts A
and . See the above illustration for label orientation.B
!!

7
7
7
7
7
7
7
7
7
7
7
7
7
7
7
7
3
7
x 20 x 08
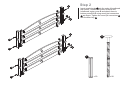
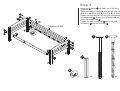
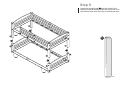
Insert wood dowels into the ends of headboard
top cross , headboard bottom cross andF G
headboard center cross and attach them toS
bottom posts & using wood joint connectorsD E
as shown. Tighten the wood joit connectors
with the Allen key .
D
D
E
E
3
3
F
F
S
S
G
G
8
8
3
3
3
3
3
3
11
7
3
8
3
Step 2

x 8 x 8
1
9
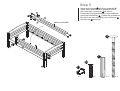
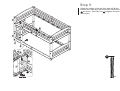
Attach the two headboards with bottom posts ( & )D E
to bottom front side rail and bottom back side railI K
using joint connectors and barrel nuts as shown.
Tighten the joint connectors with the Allen key .
this is the lower bunk.Note:
K
Step 3
1
1
1
1
9
9
9
8
1
19
8
!!
12

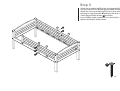
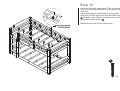
Insert wood dowels into each end of the long
guardrails .M
Attach two long guardrails and two top side railsM
( & ) to top posts ( & ) and ( & ) as shown.H J A B C B
Fasten top side rails ( & ) with joint connectorsH J
and barrel nuts . Fasten long guardrails withM
wood joint connectors .
Tighten the joint connectors and wood joint
connectors with the Allen key .
x 8
13
x 4
7
x 4
x 8
9
J
Step 4
7
9
1
1
3
38
1
1
1
1
3
3
3
3
7
7
M
M
9
9
9
8
13
Holes on this side

Insert wood dowels into short guardrails .N
Attach short guardrails to guardrail postN U
with wood joint connectors as shown.
Fasten the short guardrails to top post withN B
wood joint connectors . Fasten the guardrail post
to top front side rail with joint connectorsU H
and hex cap as shown.
3
11
10
x 4
x 2 x 2
7
x 4
Step 5
7
7
7
7
3
3
8
3
3
11
10
7
11
10
3
3
14
Holes on this side

Attach the guardrail leg to the short guardrailsR N
and top front side rail with flanged head screws .H
Attach the other guardrail leg (on the other side ofR
the bed) to long guardrails and top back side railM
with flanged head screws as shown.J
Use a Phillips head screwdriver (not included) to
tighten the flanged head screws.
6
x 6
J
Step 6
6
6
6
M
R
R
N
H
6
6
6
6
15

Insert wood dowels into the end of the ladder steps
. Attach left ladder end and right ladder end toQ O P
ladder steps with wood joint connectors .Q
Tighten the wood joint connectors with the Allen key
.
72
x 6 x 6
7
7
7
7
7
7
2
2
2
2
2
2
8
7
2
2
8
Step 7
16

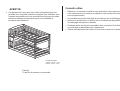
Insert the wood dowel into the holes in the
bottom posts ( and ). Stack the top bunk ontoD E
the bottom bunk with the help of another person.
5
x 4
17
5
5
5
5
5
Step 8

Attach the ladder to the top front side rail andH
bottom front side rail with wood joint connectorsI
as shown. Use Allen key to tighten the joint
connectors.
2
x 4
H
I
2 8
2
2
2
2
2
28
Step 9
18

4
x 24
Insert two slats with wood dowel into the centerT
slots of the top side rails ( & ) of the upper bunkH J
as shown.
Attach slats without wood dowel onto top sideL
rails ( & ) of the upper bunk with flat head screwsH J
as shown. Use Phillips screwdriver (not included)
to tighten flat head screws .
Repeat this process for the bottom bunk.
J
J
19
Step 10
4
4
4
4
4
4
4
4
4
4
4
4
4
4

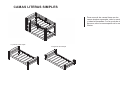
To convert your bunk bed into two separate beds,
remove the ladder and all the guardrails. With the
help of another person, unstack the top bunk from
the lower bunk.
TWIN BUNK BED
20
La page est en cours de chargement...
La page est en cours de chargement...
La page est en cours de chargement...
La page est en cours de chargement...
La page est en cours de chargement...
La page est en cours de chargement...
La page est en cours de chargement...
La page est en cours de chargement...
La page est en cours de chargement...
La page est en cours de chargement...
La page est en cours de chargement...
La page est en cours de chargement...
La page est en cours de chargement...
La page est en cours de chargement...
La page est en cours de chargement...
La page est en cours de chargement...
La page est en cours de chargement...
-
 1
1
-
 2
2
-
 3
3
-
 4
4
-
 5
5
-
 6
6
-
 7
7
-
 8
8
-
 9
9
-
 10
10
-
 11
11
-
 12
12
-
 13
13
-
 14
14
-
 15
15
-
 16
16
-
 17
17
-
 18
18
-
 19
19
-
 20
20
-
 21
21
-
 22
22
-
 23
23
-
 24
24
-
 25
25
-
 26
26
-
 27
27
-
 28
28
-
 29
29
-
 30
30
-
 31
31
-
 32
32
-
 33
33
-
 34
34
-
 35
35
-
 36
36
-
 37
37


Dorel Home WM7891B Assembly Manual
- Taper
- Assembly Manual
dans d''autres langues
- English: Dorel Home WM7891B
- español: Dorel Home WM7891B