
Dimensions
Width -77.6in
th - 56.3in
Height - 36in
IMPORTANT: You must Keep your original retail receipt as proof of purchase.
1
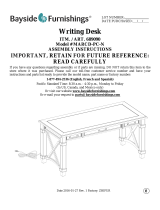
L-SHAPE GAMING DESK
VENDOR CODE: ABAY
²jÇحب׃ׇׇׁׅׅ׀غ׃ׇׁׅׅ׀ׁغ׃ׇׁׅׅ׀׃

H
Ex1
2
TM
Ax1
Fx1 Gx1 Hx1
Bx1 Cx1 Dx1
Ix1
Qx1 Rx1
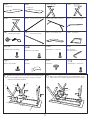
Jx1 Kx1 Lx3
1
DC
B
A
J
F
M
MM
M
M
T
E
M
M
N
N
N
MG
2
1
Mx12
M6x30 (30+-1 thread)
Table top Table top
Right Leg
Hind leg
Left Leg
Inside Cross bar Rightside cross bar Middle Cross Bar
Outside cross bar
Wireless charger Small Desk Top Brackets
Nx8
M6x12 (7+-1 thread)
Ox6
M6x20 (15 +-1 thread)
Px1
Allen Wrench
M6x4x85x30mm
Screw for Hooks Hooks
Install the Levelers on the bottom of the table leg,
attach the legs and cross bars to the table tops
by using allen bolt and allen wrench. Please
tighten the bolts to 80%.
Attach the right side cross bar and middle cross
bar to the Table Tops by using Allen Bolt and
Allen Wrench. Please tighten the bolts to 80%.
Sx6
Levelers
S
Tx3
M6x35 (34 +-1 thread)
T

I
3 4
5
7
6
3
N
H
N
N
N
K
L
Di
Wid
Dept
Heig
WKH00 -0
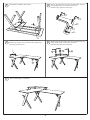
Please fully tighten the bolts. Attach the brackets to the Small Desk Top by
using Allen Bolt and Allen Wrench.
Please fully tighten the bolts.
Please Push the wireless charger into the
table top. Attach the hooks to the table top
by using hook screw.
Attach the Small Desk Top to the table top by
using Allen Bolt and Allen Wrench.
Please fully tighten the bolts.
Then Assembly is finished.
Di
Wid
Dept
Heig
WKH00 -0
Di
diW
t
Heig
0
Di
diW
t
Heig
0
x2 x2
x2

mensions
h - 56.3in
ht - 36in
mensions
h - 56.3in
ht - 36in
mensions
h -
h - 56.3in
h
1
mensions
h -
h - 56.3in
h
1
Dimensions
ni6.77-h
th - 56.3in
Height - 36in
10219
Dimensions
ni6.77-h
th - 56.3in
Height - 36in
10219
.esahcrupfofoorpsatpiecerliaterlanigiroruo ypeeKtsumuoY:TNATROPMI
4
To turn the LED Lights onThe control button of the light strip
needs to be long pressed for three seconds to turn it on):
1. Plug the USB cord into the Qi Charger USB port on the top
of the desk
2. Plug the Qi Charger into the wall using the power supply cord.
For additional details, please refer to the Qi Charging Manual
included in the box
Caution:ÀǘƵɐȺƵȲǞȺƧƊɐɈǞȌȁƵƮɈǘƊɈƧǘƊȁǐƵȺȌȲǿȌƮǞ˛ƧƊɈǞȌȁȺȁȌɈƵɮȯȲƵȺȺǶɯƊȯȯȲȌɨƵƮƦɯɈǘƵȯƊȲɈɯȲƵȺȯȌȁȺǞ-
ble for compliance could void the user's authority to operate the equipment.
FCC NOTE: This equipment has been tested and found to comply with the limits for a Class B digital device,
pursuant to Part 15 of the FCC Rules. These limits are designed to provide reasonable protection against
harmful interference in a residential installation. This equipment generates, uses and can radiate radio
frequency energy and, if not installed and used in accordance with the instructions, may cause harmful
interference to radio communications. However, there is no guarantee that interference will not occur in a
particular installation. If this equipment does cause harmful interference to radio or television reception,
which can be determined by turning the equipment off and on, the user is encouraged to try to correct the
interference by one or more of the following measures:
– Reorient or relocate the receiving antenna.
– Increase the separation between the equipment and receiver.
– Connect the equipment into an outlet on a circuit different from that to which the receiver is connected.
– Consult the dealer or an experienced radio/TV technician for help.
-
 1
1
-
 2
2
-
 3
3
-
 4
4


ROOMS TO GO 37851501 Assembly Instructions
- Taper
- Assembly Instructions
dans d''autres langues
- English: ROOMS TO GO 37851501
Autres documents
-
 Whalen 689090 / MARCD-PC-N Manuel utilisateur
-
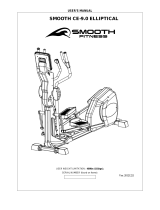 Smooth Fitness SMOOTH CE-9.0 ELLIPTICAL Manuel utilisateur
-
Genie 3560 - (Sears) Manuel utilisateur
-
Extron MTP/HDMI U T A D Manuel utilisateur
-
 Tempur-Pedic CA King Le manuel du propriétaire
-
Extron DVI 201 Manuel utilisateur
-
 Baby Lock Crown Jewel III BLCJ18-3 Instruction And Reference Manual
-
Anthro Elevate II Adjusta Assembly Instructions Manual
-
Fellowes LEVADO Le manuel du propriétaire
-
Laguna Tools F3 Fusion Le manuel du propriétaire


