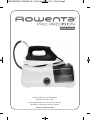
Rowenta Steam Station Centrale Vapeur Manuel utilisateur
- Catégorie
- Fers
- Taper
- Manuel utilisateur

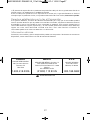
Groupe SEB USA, 2121 Eden Road
Millville, NJ 08332 - USA
Groupe SEB Canada Inc, 345 Passmore Avenue
M1V 3N8, Scarborough, Ontario, Canada
www.rowenta.com
TM
S T E A M S T A T I O N
C ENT R A L E V A P E U R
1800122525/01 DG8430 U0_110x154mm 03/11/14 12:04 Page2

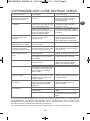
16c
16d
16
16a
16b
15
1
2
3
4
5
10
8
6
7
9
11
12
13
14
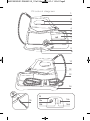
Product diagram
1800122525/01 DG8430 U0_110x154mm 03/11/14 12:04 Page3

1/4
1
2
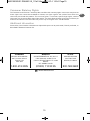
fig.11 fig.12 fig.13 fig.14
fig.1 fig.4
fig.3
fig.2
fig.6 fig.7 fig.8
fig.9 fig.10
SET UP PREPARATION • PREPARACIÓN
USE UTILISATION •UTILIZACIÓN
USE CALC AWAY SYSTEM ENTRETIEN • MANTENIMIENTO
fig.5
1
2
1/4
fig.15 fig.16
1800122525/01 DG8430 U0_110x154mm 03/11/14 12:04 Page4

1
fig.18
STORAGE RANGEMENT •ALMACENAMIENTO
fig.17
WELCOME TO
THE ROWENTA WORLD!
Congratulations on choosing the ROWENTA Pro Precision steam sta-
tion to care for your garments!
Founded in Germany in 1884, Rowenta has a long history of innovation.
We create high-performance household appliances with graceful des-
igns that can be found all around the world.
The ROWENTA Pro Precision steam station enables you to get profes-
sional results at home in no time. Its powerful steam output ensures
perfect steam penetration deeply into fabrics, while the stainless steel
soleplate dries them instantly in just one pass leaving impeccable re-
sults. Unlimited ironing is provided with the permanent refill water tank,
and the exclusive scale collector guarantees long-lasting performance .
With the ROWENTA Pro Precision steam station, you do not have to be
an expert anymore to get great results!
OUR ADVICE:
To enjoy and discover how to use your Pro Precision steam station, we
advise you to read through the product instructions before first use.
1800122525/01 DG8430 U0_110x154mm 03/11/14 12:04 Page1

2
EN
IMPORTANT SAFETY
INSTRUCTIONS
When using your appliance, basic safety precautions should always be
followed, including the following:
READ ALL INSTRUCTIONS
BEFORE USING
1. Use appliance only for its inten-
ded use.
2. To protect against a risk of electric
shock, do not immerse the ap-
pliance in water or other liquids.
3. The appliance should always be
turned off before plugging or un-
plugging from outlet. Never yank
the cord to disconnect from out-
let, instead grasp plug and pull to
disconnect.
4. Do not let the power cord touch
hot surfaces. Let the steam sta-
tion cool completely before put-
ting it away. Wind up the power
cord and attach it with the Velcro.
5. Always disconnect appliance
from electrical outlet when filling
or emptying when not in use.
6. Do not operate appliance with a
damaged cord or if appliance has
been dropped or damaged.
7. To avoid the risk of electric shock,
do not disassemble the ap-
pliance. Contact Rowenta Consu-
mer Services or take it to a
qualified service person for exa-
mination and repair. Incorrect
reassembly can cause a risk of
electric shock when the appliance
is used.
8. Close supervision is required for
any appliance used by or near
children. Do not leave the iron
unattended while the appliance is
connected or on an ironing
board.
9. Burns can occur from touching
hot metal parts, hot water or
steam. Use caution when you
turn a Pro Precision steam station
upside down. There may be hot
water in the reservoir.
10. This is a 1800 watts appliance.
To avoid a circuit overload, do
not operate a Pro Precision
steam station on the same cir-
cuit with another high wattage
appliance.
11. If an extension cord is absolutely
necessary, a cord with 15A or
greater shall be used. A cord
rated for less amperage can re-
sult in a risk of fire or electric
shock due to overheating. Care
shall be taken to arrange the
cord so that it cannot be pulled
or be tripped over.
1800122525/01 DG8430 U0_110x154mm 03/11/14 12:04 Page2

3
SAVE THESE INSTRUCTIONS
Any commercial use, inappropriate
use or failure to comply with the
instructions, the manufacturer ac-
cepts no responsibility and the
guarantee will not apply.
For your safety, this appliance
conforms to the applicable stan-
dards and regulations (Low Vol-
tage, Electomagnetic Compatibility,
Environmental Directives, as appli-
cable…).
Your Pro Precision steam station is
an electrical appliance: it must be
used in normal conditions of use.
It is fitted with 2 safety systems:
- A pressure release valve which,
in the event of a malfunction,
releases any excess steam.
- A thermal fuse to prevent the
appliance from overheating.
Always plug your Pro Precision
steam station into:
- An electrical installation with
voltage 120V.
Connecting to the wrong voltage
may cause irreparable damage to
the appliance and will invalidate
your guarantee.
- The appliance must not be left
unattended while it is connected to
the outlet.
- The plug must be removed from
the outlet before the water
reservoir is filled with water.
- The appliance must be used and
rested on a stable surface.
- When placing the appliance on its
stand, ensure that the surface on
which the stand is placed is stable.
- The appliance is not to be used if
it has been dropped, if there are
visible signs of damage or if it is
leaking.
- If the supply cord is damaged, it
must be replaced by the
manufacturer, its service agent or
similarly qualified person in order
to avoid a hazard.
- This appliance is not intended for
use by persons (including
children) with reduced physical,
sensory or mental capabilities, or
lack of experience and knowledge,
unless they have been given
supervision or instruction
concerning use of the appliance by
a person responsible for their
safety.
- Children should be supervised to
ensure that they do not play with
the appliance.
- Do not direct steam at people,
animals or iron clothes while they
are being worn.
- “Calc Away-System”: Always
wait before rinsing the collector
until the steam station has cooled
down and has been unplugged for
at least 2 hours before unscrewing
the collector.
If you lose or damage the scale
collector, have it replaced by
calling Rowenta Consumer
Services.
- Never attempt to unscrew the
scale collector while the appliance
is in use. The strong steam
pressure could results in burns.
Only unscrew the collector when
the appliance is cold (2 hours) or
there is no more pressure in the
boiler.
1800122525/01 DG8430 U0_110x154mm 03/11/14 12:04 Page3

4
EN
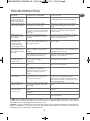
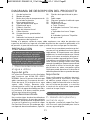
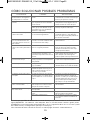
DESCRIPTION OF PRODUCT DIAGRAM
1. Iron handle
2. Steam trigger
3. Temperature control dial for iron
soleplate
4. Iron rest
5. Water tank cover
6. Water tank
7. Boiler (inside)
8. Scale collector cover
9. Power cord
10. Power cord storage (velcro)
11. Iron temperature control light
12. Iron positioning shoulder
13. Steam cord
14. Steam cord storage clip
15. Calc scale collector
16. Control panel
a. “Restart” button
b. “Calc away system” light
c. “Steam ready” light
d. ”Water tank empty” light
Due to the powerful steam output, a mesh top ironing board (vs. a perforated top
ironing board) must be used to allow any excess steam to escape and to avoid steam
venting sideways.
BEFORE USE
1 • Water recommendations
Tap water
Rowenta irons are designed to be used
with REGULAR TAP WATER (up to 12
grains per gallon of hardness – contact
your local water company). If your water
is harder than this, Rowenta
recommends mixing half tap water with
half distilled water which reduces the
hardness; or just use inexpensive bottled
spring water.
Softened water
There are many types of household
water softeners and the water from many
of them is perfectly acceptable for use in
the Pro Precision steam station.
However, some types of softeners,
particularly those that use chemicals
such as salt, can cause the appliance to
leak or spit during use. If you experience
this type of problem, we recommend that
you try using inexpensive bottled spring
water or untreated tap water.
Once you have changed water it will take
several uses to correct the problem.
Rowenta recommends trying the steam
function for the first time on an old towel
or cloth that can be discarded to avoid
potentially damaging your clothes.
Always remember :
Water containing additives (such as
starch, perfume or fabric conditioner)
will not be used. Such additives can
affect the properties of the steam and at
high temperatures can form deposits in
the steam chamber which may mark the
laundry when they are emitted through
the steam vents.
2 • Filling the Pro Precision
steam station
The Pro Precision steam station is
designed to operate using tap water.
While unplugged, place the Pro Precision
steam station on a stable, heat resistant
surface.
Open the water tank cover. Fill the tank
with a maximum of 33oz./1L of water,
taking care not to overfill (fig. 1). Close
the water tank cover. Completely unwind
the power cord and remove the steam
cord from its housing. (fig. 2)
Please read all of the instructions for
use and the Important Safeguards
carefully.Remove all packaging from
the product. It is normal for a small
amount of smoke and a light odor to
be produced the first time it is
used.This will quickly disappear.
Descaling liquids/agents should not be
used.
1800122525/01 DG8430 U0_110x154mm 03/11/14 12:04 Page4

5
USE
3 • Turning on and off
Plug the Pro Precision steam station into
a 120 volt electric outlet (Fig. 3) and it will
automatically turn on.
The iron light will turn on and the steam
ready light will flash (fig. 4). When the Pro
Precision steam station is in use, the
electric pump will make a humming noise
as it pulls water into the boiler to produce
steam. This noise is normal. The Pro
Precision steam station is ready to use
when the steam ready indicator light
stops flashing, (approximately 3
minutes).
During ironing the temperature indicator
light for the iron will turn on and off. This
is normal as the temperature is being
regulated. The unit is still on when this
light goes out.
4 • Operating the control
panel
• Flashing green light: the water is
heating up in the boiler (fig.4)
• Continuous green light: steam is ready
for use (fig.6)
• Continuous red light: the water tank is
empty (fig.9).
• Orange « Calc-Away System » light
flashes you must rinse your scale
collector (fig.11).
5 • Using your Pro Precision
steam station
Place the iron’s temperature control
(fig.5) to the type of fabric to be ironed -
see table below. The iron temperature
control light turns on.
While ironing, the light on top of the iron
will turn on and off, as the temperature is
maintained without interrupting ironing.
To obtain steam, press on the steam
trigger beneath the iron handle and keep
it pressed (fig.7). The steam will stop
when you release the trigger.
If using starch always spray it on the
reverse side of the fabric to be ironed.
Table 1
6 • Vertical steam ironing
Set the iron temperature control to the
maximum position. Hang the garment on
a coat hanger and hold the fabric slightly
taut with one hand. Pull repeatedly the
steam trigger (beneath the iron handle)
moving the iron from top to bottom (fig.8).
The water tank can be filled at any time
during use. When refilling take care not
to overfill the tank.
Iron temperature control setting: Start
with fabrics to be ironed at a low
temperature and finish with those
which need higher temperatures. Each
time you change fabrics, wait for the
light to turn off. Mixed fiber fabrics: set
the ironing temperature to the setting
for the most delicate fabric. Woollen
garments: pull repeatedly the steam
control trigger to obtain short bursts of
steam, while holding the iron one inch
from the garment. This will avoid
making the fabric shiny. For delicate
fabrics, pull the steam trigger (under
the handle of the iron) intermittently to
avoid possible water droplets appearing
with the steam.
Recommendations: To prime the
steam circuit, either before using the
iron for the first time, or if you have
not used the steam function for a few
minutes, press the steam trigger
several times in a row, holding the iron
away from your clothes.
TYPE OF FABRIC SETTING
TEMPERATURE CONTROL
SYNTHETICS (Polyester, Acetate,
Acrylic, Polyamide) •
SILK / WOOL • •
COTTON / LINEN
• • •
Do not place the iron on a metal
support. Always place the iron on the
iron rest of the unit. It is equipped with
non-slip pads and has been designed to
withstand high temperatures.
1800122525/01 DG8430 U0_110x154mm 03/11/14 12:04 Page5

6
EN
7 • Dry ironing
Do not pull the steam trigger.
8 • Fill the water tank again
When there is no more steam and
the”Water tank empty” light flashes:
water tank is empty (fig.9). Unplug the
unit from outlet. Open the water tank
cover and fill with maximum 33 oz/1L of
water (fig.1).
Take care not to overfill the tank.
Close the water tank cover. The “water
tank empty” light will be flashing. Press
the “Restart” button (fig.10) on the rear
of the unit. The Pro Precision steam
station is ready to iron when the steam
ready indicator light is steady green and
the iron temperature control dial light
has gone out.
9 • Storing your Pro Precision
steam station
Unplug the unit from outlet. Place the
iron on the iron rest. Fold the steam cord
tuck it in its housing (fig.17).
Wind up the power cord and secure it
with the velcro (fig.18). Allow the iron to
cool down for 1 hour before storing it in
a cupboard or confined space.
MAINTENANCE AND
CLEANING
10 • Cleaning the Pro Precision
steam station
The Iron soleplate:
In normal use a coating may build up on
the soleplate (starch, detergent buildup,
or burnt synthetic fibers). This can be
easily removed by using the Rowenta
Soleplate Cleaning Kit or a quality hot
iron soleplate cleaner available at many
stores and on line.
To prevent scratching the soleplate, do
not iron over sharp objects (zippers, etc.).
Do not place the iron on rough surfaces,
e.g. metal iron support, which may
scratch the soleplate.
Always put the iron with the soleplate
down on the iron rest, never place on its
heel, on the iron rest
The Base Unit:
Clean the plastic parts of the appliance
occasionally with a soft cloth.
11 • Easy descaling of the
Pro Precision steam station
To extend the life of your Pro Precision
steam station and avoid scale in your iron,
your product is equipped with a built-in
scale collector. In geographies with hard
water, a scale of calcium may build up
inside the boiler. That can effect
preformance of the Pro Precision steam
station and may deposit white substances
on garments. This scale collector, located
in the boiler, automatically collects the
scale that forms inside.
As steam is very hot: never attempt to
remove creases from a garment
while it is being worn, always hang
garments on a coat hanger. For fabrics
other than linen or cotton, hold the iron
a few inches from the garment to avoid
burning the fabric.
Do not use any descaling substances
(vinegar, industrial descaling products,
etc.) when rinsing the scale collector :
they could damage it. Before descaling,
ensure that the appliance is unplugged
and that the soleplate and the iron rest
have cooled down for at least 2 hours,
in order to avoid any risk of scalding.
If this occurs, remove the excess water
by tipping the unit.
1800122525/01 DG8430 U0_110x154mm 03/11/14 12:04 Page6

7
Operation:
An orange “Calc-Away System” light
located on the control panel starts
flashing to tell you that the scale collector
needs rinsing fig.11.
Once the Pro Precision steam station has
cooled completely, remove the scale
collector cover by giving a ¼ turn to the
left - fig.12.
Unscrew the scale collector valve and
remove it from the housing; it contains
the scale (i.e. calc or calcium) that has
built up in the boiler - fig.13.
To clean the collector properly, just rinse
it under running water to remove the
scale it contains - fig.14.
Put the collector back into its housing
and screw it in completely to keep it
watertight - fig.15.
Put the scale collector cover back on with
a 1/4 turn to the right - fig.16.
Environment protection first !
iYour appliance contains valuable
materials which can be recovered or
recycled.
‹Leave it at a civic waste disposal
center or call your local
municipality to learn where to
properly dispose of the product.
IMPORTANT! This operation must not
be carried out unless the Pro Precision
steam station has been unplugged for
at least two hours and has cooled
down completely.
To carry out this operation, the product
must be close to a sink as water may
come out of the tank when it is opened.
The next time you use your Pro
Precision steam station, press the
“Restart” button on the control panel to
turn off the orange “Calc-Away
System” light - fig.10.
1800122525/01 DG8430 U0_110x154mm 03/11/14 12:04 Page7

8
EN
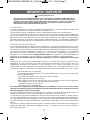
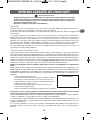
Issues Possible causes Solutions
The unit does not
come on and the iron
temperature control
light is not illuminated
The appliance does not have power. Check that your appliance is correctly plugged
in. While plugged in, it automatically turns on.
Water runs through the
holes in the soleplate. You are using the steam trigger
before the iron is hot enough.
Water has condensed in the hose
because you are using steam for the
first time or you have not used it for
some time.
Wait for the iron temperature control light to
go out before activating the steam control
trigger.
Pull the steam trigger while holding the iron
away from your ironing board until the iron
produces steam.
White streaks come
through the holes in
the soleplate.
The boiler has a build-up of scale
because it has not been rinsed out
regularly.
Rinse the scale collector when the «Calc-Away
System» light flashes If your water is very
hard, increase the frequency.
You have already
rinsed the scale
collector and the
orange «Calc-away
system» light is still on.
The Pro Precision steam station
needs to be restarted after the Calc-
away light is actived.
Press the “R estart” button to turn off the
indicator light.
Brown streaks come
through the holes in
the soleplate and stain
the fabric.
You are using chemical descaling
agents or additives in the water for
ironing.
Your fabric is not rinsed sufficiently
after washing or you have ironed a
new garment before washing it.
Never add this type of product in the water
tank or in the boiler (see our recommendations
regarding water to be used).
Ensure fabric is rinsed thoroughly after
washing to remove any soap deposits or
chemicals on new garments.
The soleplate is dirty
or brown and may
stain the linen.
There is a build up of burnt fiber
from ironing at too high a
temperature
See prior recommendations in setting
temperature controls (Table 1).
There is no steam. The water tank is empty (red light
on). Fill the water tank and press the “Restart”
button on the control panel.
Little steam is visible. The soleplate temperature is set to
the maximum. The appliance is
working but steam is very hot and
dry. As a consequence, it is less
visible.
Reduce iron temperature.
Water streaks appear
on the fabric. Your ironing board is saturated with
water because it is not suitable for
use with a steam station.
Check that your ironing board is suitable.
A mesh top ironing board rather than a
perforated top ironing board must be used to
allow any excess steam to escape and to avoid
steam venting sideways.
The red «water tank
empty» light is on. The Pro Precision steam station need
to be restarted after the water tank
runs empty.
Press the “Restart” button on the control
panel.
Steam escapes from
around the scale
collector cover.
The scale collector valve is not
tighter.
The seal of the scale collector is
damaged.
The product is faulty
Remove the scale collector. Tighten the scale
collector.
Contact Rowenta Consumer Services*.
Stop using the product and contact Rowenta
Consumer Services*.
TROUBLESHOOTING
* USA : If this troubleshooting does not resolve the issue, before consulting the retailer or returning the
product, please telephone Rowenta Consumer Services at 1-800-769-3682. Further hints ans tips are
obtainable from our homepage www.rowentausa.com
Canada : If you are unable to trace the cause of the fault, contact an official Rowenta Customer Service
Center. The addresses are shown in the enclosed service center address list. Further hints and tips are
obtainable from our homepage: www.rowenta.ca
1800122525/01 DG8430 U0_110x154mm 03/11/14 12:04 Page8

9
ROWENTA MANUFACTURER'S WARRANTY
: www.rowenta.com
With a strong commitment to the environment, most of Rowenta products are repairable during and after
the warranty period. Before returning any defective products to the point of purchase, please call Rowenta
consumer service directly at the phone number below for repair options.
Your help to sustain the environment is appreciated!
The Warranty
This product is guaranteed by Rowenta for 1 year against any manufacturing defect in materials or
workmanship, starting from the initial date of purchase.
The manufacturer's warranty by Rowenta is an extra benefit which does not affect consumer's
Statutory Rights.
The Rowenta warranty covers all costs related to restoring the proven defective product so that it
conforms to its original specifications, through the repair or replacement of any defective part and
the necessary labor. At Rowenta’s choice, a replacement product may be provided instead of
repairing a defective product. Rowenta’s sole obligation and your exclusive resolution under this
warranty are limited to such repair or replacement.
Conditions & Exclusions
The Rowenta warranty only applies within USA, Canada & Mexico, and is valid only on presentation
of a proof of purchase. The product can be taken directly in person to an authorized service centre
or must be adequately packaged and returned, by recorded delivery (or equivalent method of
postage), to a Rowenta authorized service centre. Full address details for each country’s authorized
service centre are listed on the Rowenta website (www.rowenta.com) or by calling the appropriate
telephone number listed below to request the appropriate postal address.
Rowenta shall not be obligated to repair or replace any product which is not accompanied by a valid proof of
purchase.
This warranty will not cover any damage which could occur as a result of misuse, negligence, failure
to follow Rowenta instructions, use on current or voltage other than as stamped on the product, or
a modification or unauthorized repair of the product. It also does not cover normal tear and wear,
maintenance or replacement of consumable parts, and the following:
-using the wrong type of water
-scaling (any de-scaling must be carried out according to the instructions for use);
-ingress of water, dust or insects into the product;
-mechanical damages, overloading
-damages or bad results due to wrong voltage or frequency
-accidents including fire, flood, lightning, etc
-professional or commercial use
-damage to any glass or porcelain ware in the product
This warranty does not apply to any product that has been tampered with, or to damages incurred through improper
use and care, faulty packaging by the owner or mishandling by any carrier.
The Rowenta manufacturer's warranty applies only for products purchased and used in USA, Canada
& Mexico. Where a product purchased in one country and then used in another one:
a) The Rowenta guarantee duration is the one in the country of usage of the product, even if the
product was purchased in another listed country with different guarantee duration.
b) The Rowenta guarantee does not apply in case of non conformity of the purchased product with
the local standards, such as voltage, frequency, power plugs, or other local technical specifications
c) The repair process for products purchased outside the country of use may require a longer time
if the product is not locally sold by Rowenta
d)In cases where the product is not repairable in the new country, the Rowenta guarantee is limited
to a replacement by a similar product or an alternative product at similar cost, where possible.
1800122525/01 DG8430 U0_110x154mm 03/11/14 12:04 Page9

10
EN
Consumer Statutory Rights
This Rowenta manufacturer's warranty does not affect the statutory rights a consumer may have or
those rights that cannot be excluded or limited, nor rights against the retailer from which the
consumer purchased the product. This warranty gives a consumer specific legal rights, and the
consumer may also have other legal rights which vary from State to State or Country to Country or
Province to Province. The consumer may assert any such rights at his sole discretion.
Additional information
Accessories, Consumables and end-user replaceable parts can be purchased, if locally available, as
described in Rowenta internet site.
: www.rowenta.com
MEXICO
GROUPE SEB MÉXICO, S.A. de C.V.
Calle Goldsmith 38 401 Piso 4
Polanco, Distrito Federal C.P. 11560
México.
RFC GSM8211123P5
(01800) 112 83 25
U.S.A.
GROUPE SEB USA
2121 Eden Road
Millville, NJ 08332
800-769-3682
CANADA
GROUPE SEB CANADA
345 Passmore Avenue
Toronto, ON
M1V 3N8
1-800-418-3325
1800122525/01 DG8430 U0_110x154mm 03/11/14 12:04 Page10

11
POUR VOTRE SÉCURITÉ
Lisez attentivement le mode d’emploi avant
la première utilisation de votre appareil : une
utilisation non conforme au mode d’emploi
dégagerait la marque de toute
responsabilité.
Pour votre sécurité, cet appareil est
conforme aux normes et réglementations
applicables (Directives Basse Tension,
Compatibilité Electromagnétique,
Environnement …).
Votre centrale vapeur est un appareil
électrique : elle doit être utilisée dans des
conditions normales d’utilisation. Elle est
prévue pour un usage domestique
uniquement.
Elle est équipée de 2 systèmes de sécurité :
- une soupape évitant toute surpression, qui
en cas de dysfonctionnement, laisse
échapper le surplus de vapeur ;
- un fusible thermique pour éviter toute
surchauffe.
Branchez toujours votre centrale vapeur :
- sur une installation électrique dont la
tension est de 120 V ;
Si vous utilisez une rallonge, vérifiez que la
prise est bien de type 15 A.
Toute erreur de branchement peut causer un
dommage irréversible et annule la garantie.
Déroulez complètement le cordon électrique
avant de le brancher sur une prise électrique.
Si le cordon d’alimentation électrique ou le
cordon vapeur est endommagé, il doit être
impérativement remplacé par un Centre
Service Agréé afin d’éviter un danger.
Ne débranchez pas l’appareil en tirant sur le
cordon. Débranchez toujours votre appareil :
- avant de remplir le réservoir ou de rincer la
chaudière ;
- avant de le nettoyer ;
- après chaque utilisation.
L’appareil doit être utilisé et posé sur une
surface stable. Lorsque vous posez le fer sur
le repose-fer, assurez-vous que la surface sur
laquelle vous le reposez est stable.
Cet appareil n’est pas prévu pour être utilisé
par des personnes (y compris les enfants)
dont les capacités physiques, sensorielles ou
mentales sont réduites, ou des personnes
dénuées d’expérience ou de connaissance,
sauf si elles ont pu bénéficier, par
l’intermédiaire d’une personne responsable
de leur sécurité, d’une surveillance ou
d’instructions préalables concernant
l’utilisation de l’appareil.
Il convient de surveiller les enfants pour
s’assurer qu’ils ne jouent pas avec l’appareil.
Avant le remplissage, vérifiez que votre
appareil est débranché et froid.
Ne laissez jamais l’appareil sans
surveillance :
- lorsqu’il est raccordé à l’alimentation
électrique ;
- tant qu’il n’a pas refroidi environ 1 heure.
La semelle de votre fer et la plaque repose-
fer du boîtier peuvent atteindre des
températures très élevées, et peuvent
occasionner des brûlures : ne les touchez
pas. Ne touchez jamais les cordons
électriques avec la semelle du fer à repasser.
Votre appareil émet de la vapeur qui peut
occasionner des brûlures. Manipulez le fer
avec précaution, surtout en repassage
vertical. Ne dirigez jamais la vapeur sur des
personnes ou des animaux.
Avant de détartrer la cuve, attendez toujours
que la centrale vapeur soit froide et
débranchée depuis plus de 2 heures pour
dévisser le collecteur.
Lors du rinçage de la chaudière, ne la
remplissez jamais directement sous le
robinet.
Si vous perdez ou abîmez le collecteur,
faites-le remplacer dans un Centre Service
Agréé.
Ne plongez jamais votre centrale vapeur
dans l’eau ou tout autre liquide. Ne la passez
jamais sous l’eau du robinet.
L’appareil ne doit pas être utilisé s’il a chuté,
s’il présente des dommages apparents, s’il
fuit ou présente des anomalies de
fonctionnement. Ne démontez jamais votre
appareil : faites-le examiner dans un Centre
Service Agréé, afin d’éviter un danger.
Conservez ces instructions
1800122525/01 DG8430 U0_110x154mm 03/11/14 12:04 Page11

12
FR
PRÉPARATION
1 • Quelle eau utiliser ?
L’eau du robinet
Votre appareil a été conçu pour
fonctionner avec l’eau du robinet. Si
votre eau est très calcaire, mélangez
50% d’eau du robinet et 50% d’eau
déminéralisée du commerce.
Adoucisseur
Il y a plusieurs types d’adoucisseurs et
l’eau de la plupart d’entre eux peut être
utilisée dans la centrale vapeur.
Cependant, certains adoucisseurs et
particulièrement ceux qui utilisent des
produits chimiques comme le sel,
peuvent provoquer des coulures
blanches ou brunes. Si vous rencontrez
ce type de problème, nous vous
recommandons d’essayer d’utiliser de
l’eau en bouteille ou de l’eau du robinet
non traitée.
Une fois l’eau changée, plusieurs
utilisations seront nécessaires pour
résoudre le problème. Rowenta
recommande d’essayer la fonction
vapeur pour la première fois sur une
vieille serviette ou un vieux vêtement
qui peuvent être jetés afin d’éviter
d’endommager vos vêtements.
Souvenez-vous :
Les eaux contenant des additifs (comme
l’amidon, le parfum ou l’eau des
appareils ménagers) ne peuvent pas être
utilisées. De tels additifs peuvent affecter
les propriétés de la vapeur et à haute
température peuvent former des dépôts
dans la chambre à vapeur ce qui pourra
tacher votre linge.
2 • Préparez votre centrale
vapeur
Placez la centrale vapeur sur un
emplacement stable et horizontal ne
craignant pas la chaleur.
Ouvrez la trappe du réservoir.
Utilisez une carafe d’eau et remplissez-la
d’un litre d’eau maximum puis versez
l’eau dans le réservoir en prenant soin de
ne pas faire déborder (fig.1). Refermez le
réservoir.
DESCRIPTION
1. Poignée du fer
2. Commande vapeur
3. Bouton de réglage de température
de la semelle
4. Plaque repose-fer
5. Trappe d’ouverture du réservoir
6. Réservoir
7. Cuve (intérieur)
8. Cache collecteur de tartre
9. Cordon électrique
10. Rangement du cordon électrique
(Velcro)
11. Voyant du fer
12. Calage positionnement du fer
13. Cordon vapeur
14. Clip de rangement
du cordon vapeur
15. Collecteur de tartre
16. Tableau de bord
a. Touche «Restart»
b. Voyant «Calc-away system»
c. Voyant «vapeur prête»
d. Voyant «Réservoir vide»
En raison d’un puissant débit de vapeur, une table adaptée doit être utilisée avec un
plateau grillagé qui permet de laisser la vapeur s’échapper sans se condenser.
Lisez attentivement le mode d’emploi et
les consignes de sécurité. Retirez tout
l’emballage de la centrale vapeur. Durant
la première utilisation, il peut se produire
un dégagement de fumée et une odeur
sans nocivité, ceci est normal. Ce
phénomène sans conséquence pour
l’utilisation de l’appareil disparaitra
rapidemment
Liquides et agents détrartants ne
doivent pas être utilisés.
1800122525/01 DG8430 U0_110x154mm 03/11/14 12:04 Page12

Déroulez complètement le cordon
électrique et sortez le cordon vapeur de
son rangement (fig.2).
UTILISATION
3 • Mettez votre centrale
vapeur en marche
Branchez votre centrale vapeur sur une
prise électrique en 120V (fig.3). Le voyant
du fer s’allume et le voyant vapeur prête
clignote (fig.4).
Après une minute environ, et
régulièrement à l’usage, la pompe
électrique équipant votre appareil injecte
de l’eau dans la cuve . Cela génère un
bruit qui est normal.
La centrale vapeur et le fer sont prêts à
repasser quand le voyant vapeur est
allumé et le voyant du fer éteint.
4 • Fonctionnement du
tableau de bord
• Voyant vert clignote (fig.4) : la cuve
chauffe.
• Voyant vert allumé (fig.6) : la vapeur est
prête.
• Voyant rouge allumé (fig.9) : le réservoir
est vide.
• Voyant orange «Calc-Away System»
clignote (fig.11) : vous devez rincer votre
collecteur de tartre.
5 • Repassez à la vapeur
Placez le thermostat (fig.5) sur le type de
tissu à repasser - voir tableau ci-après.
Le voyant du fer s’allume.
Pendant le repassage, le voyant situé sur
le fer s’allume et s’éteint selon les
besoins de chauffe, sans incidence sur
l’utilisation.
Pour obtenir de la vapeur, appuyez sur la
commande vapeur située sous la
poignée du fer (fig.7). La vapeur s’arrête
en relâchant la commande.
Si vous utilisez de l’amidon, pulvérisez-le
à l’envers de la face à repasser.
Recommandation : Lors de la première
utilisation ou si vous n’avez pas utilisé la
vapeur depuis quelques minutes,
appuyez plusieurs fois de suite sur la
commande vapeur en dehors de votre
linge. Cela permettra d’éliminer l’eau
froide du circuit de vapeur.
Réglage de la température du fer :
Votre fer chauffe vite, commencez
d’abord par les tissus qui se repassent à
basse température, puis terminez par
ceux qui demandent une température
plus élevée. A chaque changement de
textile, attendez que le voyant du fer
s’éteigne. Si vous repassez des tissus en
fibres mélangées, réglez la température
de repassage sur la fibre la plus fragile.
Si vous repassez des vêtements en laine,
appuyez juste sur la commande vapeur
du fer par impulsions, sans poser le fer
sur le vêtement. Vous éviterez ainsi de le
lustrer.
Pour les tissus délicats (•), actionnez très
modérément la commande vapeur pour
éviter des coulures éventuelles.
Pendant les pauses de repassage, ne
posez jamais le fer sur un repose-fer
métallique, ce qui pourrait l’abîmer
mais plutôt sur la plaque repose-fer du
boîtier : elle est équipée de patins anti-
dérapants et a été conçue pour résister
à des températures élevées.
Durant la première utilisation, il peut se
produire un dégagement de fumée et une
odeur sans nocivité. Ce phénomène sans
conséquence sur l’utilisation de l’appareil
disparaîtra rapidement.
TISSUS POSITION
DU THERMOSTAT
SYNTHÉTIQUES (Polyester, Acétate,
Acrylique, Polyamide) •
SOIE / LAINE • •
LIN / COTON
• • •
En cas de débordement, éliminez le
surplus.
13
1800122525/01 DG8430 U0_110x154mm 03/11/14 12:04 Page13

14
FR
6 • Défroissez verticalement
Réglez le bouton de température du fer sur
la position maxi.
Suspendez le vêtement sur un cintre et
tendez légèrement le tissu d’une main.
Appuyez sur la commande vapeur par
intermittence en effectuant un mouvement
de haut en bas (fig.8).
7 • Repassez à sec
N’appuyez pas sur la commande vapeur.
8 • Remplissez à nouveau le
réservoir
Vous n’avez plus de vapeur et le voyant
“réservoir vide” s’allume (fig.9) : le
réservoir d’eau est vide. Débranchez
l’appareil. Ouvrez la trappe du réservoir.
Utilisez une carafe d’eau et remplissez-la
d’un litre d’eau maximum puis versez
l’eau dans le réservoir en prenant soin de
ne pas faire déborder (fig.1).
Refermez la trappe du réservoir.
Rebranchez l’appareil. Appuyez sur la
touche Restart (fig.10).
La centrale vapeur et le fer sont prêts à
repasser quand le voyant vapeur est
allumé et le voyant du fer éteint.
9 • Rangez la centrale
vapeur
Débranchez la centrale vapeur. Posez le
fer sur la plaque repose-fer de la centrale
vapeur. Saisissez le cordon, pliez-le en
deux. Rangez le cordon vapeur dans son
logement (fig.17).
Enroulez le cordon électrique et attachez-
le à l’aide du Velcro (fig.18).
Laissez refroidir la centrale vapeur au
moins une heure avant de la ranger si
vous devez la stocker dans un placard ou
un espace étroit. Vous pouvez ranger
votre centrale vapeur en toute sécurité.
ENTRETIEN ET
NETTOYAGE
10 • Nettoyez la centrale
vapeur
La semelle : nettoyez la semelle refroidie
de votre fer avec un chiffon humide ou
une éponge non métallique.
Le boîtier : nettoyez de temps en temps
les parties plastiques de l’appareil à
l’aide d’un chiffon doux.
11 • Détartrez facilement
votre centrale vapeur
Pour prolonger la durée de vie de votre
centrale vapeur et éviter les rejets de
tartre, elle a été équipée d’un collecteur
de tartre intégré. Ce collecteur, placé
dans la cuve, récupère automatiquement
le tartre qui se forme à l’intérieur.
N‘introduisez pas de produits
détartrants (vinaigre, détartants
industriels...) pour rincer la chaudière :
ils pourraient l’endommager.
Ne passez jamais le fer ou le boîtier
sous l’eau du robinet.
N’utilisez aucun produit d’entretien ou
de détartrage pour nettoyer la semelle
ou le boîtier.
Avant de procéder au détartrage de
votre centrale vapeur, il est impératif
de l’arrêter, la débrancher et la laisser
refroidir pendant plus de 2 heures,
pour éviter tout risque de brûlure.
La vapeur produite étant très chaude,
ne défroissez jamais un vêtement sur
une personne, mais toujours sur un
cintre.
Pour les tissus autres que le lin ou le
coton, maintenez le fer à quelques
centimètres afin de ne pas brûler le
tissu.
En cas de débordement, éliminez le
surplus.
1800122525/01 DG8430 U0_110x154mm 03/11/14 12:04 Page14

15
Principe de fontionnement :
Un voyant orange “Calc-Away System”
clignote - fig.11 au tableau de bord pour
vous indiquer qu’il faut rincer le
collecteur de tartre.
Une fois la centrale vapeur
complètement refroidie, retirez le cache
collecteur de tartre en faisant 1/4 de tour
vers la gauche - fig.12.
Dévissez complètement le collecteur et
retirez-le du boîtier, il contient le tartre
accumulé dans la cuve - fig.13.
Pour bien nettoyer le collecteur il suffit
de le rincer à l’eau courante pour
éliminer le tartre qu’il contient - fig.14.
Remettez le collecteur dans son
logement en le revissant complètement,
pour assurer l’étanchéité - fig.15.
Remettez le cache collecteur de tartre en
place - fig.16.
Participons à la
protection de
l’environnement !
iVotre appareil contient de nombreux
matériaux valorisables ou recyclables.
‹Confiez celui-ci dans un point de col-
lecte ou à défaut dans un centre ser-
vice agrééw pour que son traitement
soit effectué.
Lors de la prochaine utilisation appuyez
sur la touche «Restart» pour éteindre le
voyant orange - fig.10
Attention ! Cette opération ne doit pas
être effectuée tant que la centrale vapeur
n’est pas débranchée depuis plus de
deux heures et n’est pas complètement
froide. Pour effectuer cette opération, la
centrale vapeur doit se trouver près d’un
évier car de l’eau peut couler de la cuve
lors de l’ouverture.
1800122525/01 DG8430 U0_110x154mm 03/11/14 12:04 Page15

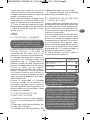
16
Problèmes Causes Solutions
La centrale vapeur ne s’al-
lume pas ou le voyant du
fer n’est pas allumé.
L’appareil n’est pas sous
tension. Vérifiez que l’appareil est bien
branché sur une prise. Une fois
branché l’appareil s’allume
automatiquement.
L’eau coule par les trous de
la semelle. Vous utilisez la commande
vapeur alors que votre fer n’est
pas suffisamment chaud.
L’eau s’est condensée dans les
tuyaux car vous utilisez la
vapeur pour la première fois ou
vous ne l’avez pas utilisée
depuis quelques temps.
Attendez que le voyant du fer
soit éteint avant d’actionner la
commande vapeur.
Appuyez sur la commande vapeur
en dehors de votre table à repas-
ser, jusqu’à ce que le fer émette de
la vapeur.
Des coulures blanches
sortent des trous de la
semelle.
Votre cuve rejette du tartre
car elle n’est pas rincée
régulièrement.
Rincez le collecteur lorsque le
voyant «Calc-Away System» cli-
gnote. Si votre eau est très cal-
caire, augmentez les fréquences.
Le voyant orange «Calc-
Away System» est allumé. Vous n’avez pas appuyé sur la
touche “Restart”. Appuyez sur la touche “Restart”.
Des coulures brunes
sortent des trous de la
semelle et tachent le linge.
Vous utilisez des produits chi-
miques détartrants ou des addi-
tifs dans l’eau de repassage.
N’ajoutez jamais aucun produit
dans le réservoir d’eau ou dans la
cuve (voir § 1).
La semelle est sale ou
brune et peut tacher le
linge.
Vous utilisez une température
trop importante.
Votre linge n’est pas suffisam-
ment bien rincé si vous utilisez
de l’amidon.
Reportez-vous à nos conseils sur le
réglage des températures (voir § 5).
Pulvérisez toujours l’amidon sur
l’envers de la face à repasser.
Il n’y a plus de vapeur. Le réservoir d’eau est vide
(voyant allumé). Remplissez le réservoir d’eau et
appuyez sur la touche “Restart”
située sur le tableau de bord.
Il y a peu de vapeur. La température de la semelle
est réglée au maximum. L’appa-
reil marche mais la vapeur est
très chaude et sèche donc
moins visible.
Réduisez la température du fer.
Des traces d’eau apparais-
sent sur le linge. Votre housse de table est
saturée en eau car elle n’est pas
adaptée à la puissance d’une
centrale vapeur.
Assurez-vous d’avoir une table
adaptée (plateau grillagé qui évite
la condensation).
Le voyant «réservoir vide»
est allumé. Vous n’avez pas appuyé sur la
touche “Restart” de redémar-
rage après remplissage du
réservoir.
Appuyez sur la touche “Restart”
de redémarrage située sur le
tableau de bord.
De la vapeur sort autour
du collecteur. Le collecteur est mal serré.
Le joint du bouchon est
endommagé.
L’appareil est déféctueux.
Resserez le collecteur.
Contactez un centre de service
agréé.
N’utilisez plus la centrale vapeur
et contactez un centre de service
agréé.
UN PROBLÈME AVEC VOTRE CENTRALE VAPEUR
S’il n’est pas possible de déterminer la cause d’une panne, adressez-vous à un Centre Service
Agréé ROWENTA. Les adresses sont indiquées dans la liste de centres services agréés jointe.
ROWENTA assure une garantie contractuelle de 1 an sur l’appareil et de 2 ans sur la cuve à partir
de la date d’achat, sauf législation spécifique à votre pays.
Vous trouverez d’autres conseils & astuces sur notre pages d’accueil : www.rowenta.ca
FR
1800122525/01 DG8430 U0_110x154mm 03/11/14 12:04 Page16

17
ROWENTA* GARANTIE
: www.rowenta.com
Dans le cadre de notre engagement puissant envers l’environnement, la plupart des produits Rowenta sont
réparables durant la période de garantie et par la suite. Avant de retourner des produits défectueux à
l’endroit où vous l’avez acheté, veuillez communiquer directement avec le service à la clientèle de
Rowenta au numéro de téléphone mentionné ci-dessous, pour connaître les options de réparation.
Votre aide pour soutenir l’environnement est appréciée!
La garantie
Ce produit est garanti par Rowenta pendant une période d’un an, contre tout défaut de fabrication
ou de main-d’œuvre et ce, à partir de la date initiale de l'achat.
Cette garantie du fabricant Rowenta vient en complément des droits des consommateurs.
La garantie du fabricant couvre tous les coûts de remise en état d'un produit reconnu défectueux
pour qu’il se conforme à ses spécifications d'origine, par la réparation ou le remplacement de pièces
défectueuses et la main-d'œuvre nécessaire. Au choix de Rowenta, un produit de remplacement
peut être proposé à la place de la réparation du produit défectueux. Les obligations de Rowenta
dans le cadre de cette garantie, se limitent exclusivement à cette réparation ou ce remplacement.
Conditions et exclusions
La garantie de Rowenta ne s'applique qu’aux États-Unis, au Canada et au Mexique et n'est valable
que sur présentation d'une preuve d'achat. Le produit peut être déposé directement en personne, à
un centre de service autorisé ou peut être adéquatement emballé et retourné par courrier enregistré
(ou d’autres méthodes d’expédition similaires), à un centre de service autorisé. La liste complète
des centres de service autorisés de chaque pays, ainsi que leurs coordonnées complètes, est
disponible sur le site de Rowenta (www.rowenta.com) ou en appelant au numéro de téléphone
approprié, tel que précisé sur la liste ci-dessous, pour obtenir l’adresse postale appropriée.
Rowenta ne sera pas obligée de réparer ou d'échanger un produit qui ne serait pas accompagné d'une preuve d'achat
valide.
Cette garantie ne couvre pas les dommages encourus à la suite d'une mauvaise utilisation, d'une
négligence, du non-respect des instructions d'utilisation et d’entretien, de l'utilisation avec une
alimentation électrique non conforme à celle spécifiée sur la plaque signalétique ou d'une
modification ou d'une réparation non autorisée du produit. Elle n'inclut également pas l'usure
normale du produit, ni l’entretien ou le remplacement de pièces consommables, ni les cas suivants
:
-utilisation d'une eau non adaptée
- entartrage (tout détartrage doit être réalisé conformément aux instructions précisées
dans le mode d'emploi)
- infiltration d'eau, de poussière, d'insectes, dans le produit
- dommages mécaniques ou surcharge
- dommages ou mauvais résultats dus à un mauvais voltage ou une mauvaise fréquence
- tous accidents liés à un feu, une inondation, la foudre, etc.
- usage professionnel ou commercial
- verre ou céramique endommagé
Cette garantie ne s'applique pas aux produits trafiqués ou aux dommages encourus à la suite d’une mauvaise
utilisation ou d’un mauvais entretien, aux problèmes au niveau de l'emballage effectué par son propriétaire ou d’une
manutention inadéquate de la part du transporteur.
La garantie du fabricant Rowenta ne s’applique qu’aux produits achetés et utilisés aux États-Unis, au
Canada et au Mexique. En cas d'utilisation dans un autre pays que celui de l'achat :
a) La durée de la garantie de Rowenta est celle du pays d'utilisation du produit, y compris dans le
cas où le produit aurait été acquis dans l’un des pays listés, avec une durée de garantie différente.
b) La garantie de Rowenta ne s'applique pas en cas de non-conformité du produit aux normes locales,
tels que le voltage, la fréquence électrique, le type de prise électrique ou toute autre spécification
locale.
c) Le processus de réparation du produit acheté à l’extérieur du pays d’utilisation, pourrait exiger une
période de réparation supérieure aux conditions locales, si le produit n'est pas vendu par Rowenta
dans le pays d'emploi
1800122525/01 DG8430 U0_110x154mm 03/11/14 12:04 Page17
La page est en cours de chargement...
La page est en cours de chargement...
La page est en cours de chargement...
La page est en cours de chargement...
La page est en cours de chargement...
La page est en cours de chargement...
La page est en cours de chargement...
La page est en cours de chargement...
La page est en cours de chargement...
La page est en cours de chargement...
La page est en cours de chargement...
-
 1
1
-
 2
2
-
 3
3
-
 4
4
-
 5
5
-
 6
6
-
 7
7
-
 8
8
-
 9
9
-
 10
10
-
 11
11
-
 12
12
-
 13
13
-
 14
14
-
 15
15
-
 16
16
-
 17
17
-
 18
18
-
 19
19
-
 20
20
-
 21
21
-
 22
22
-
 23
23
-
 24
24
-
 25
25
-
 26
26
-
 27
27
-
 28
28
-
 29
29
-
 30
30
-
 31
31


Rowenta Steam Station Centrale Vapeur Manuel utilisateur
- Catégorie
- Fers
- Taper
- Manuel utilisateur
dans d''autres langues
Documents connexes
-
Rowenta 1830005299 Manuel utilisateur
-
-
-
-
Rowenta DW95X Manuel utilisateur
-
-
Rowenta DG8030 EXPERT PRESSURE IRON STEAMER Le manuel du propriétaire
-