TRUSTMASTER NOMAD PACK WIRELESS 2 Le manuel du propriétaire
- Taper
- Le manuel du propriétaire

5075071
Thrustmaster is a division
of the Guillemot Corporation group
USER MANUAL
MANUEL DE L’UTILISATEUR
BENUTZERHANDBUCH
HANDLEIDING
MANUALE D’USO
MANUAL DEL USUARIO
MANUAL DO UTILIZADOR
© 2005 Guillemot Corporation S.A., rue du Chêne Héleuc, 56910 Carentoir, France (414 196 758 R.C.S. Rennes)
couv_QI_nomad_wireless.indd 11/12/03, 12:071

1/6
User Manual
WARNING: this product contains chemicals, including lead, known to the State of California to cause birth
defects or other reproductive harm. Wash hands after handling.
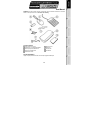
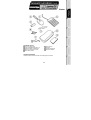
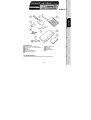
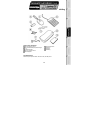
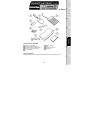
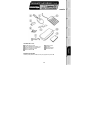
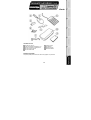
PACKAGE CONTENTS
Optical cordless mini-mouse
2 Ni-MH AAA 1.2V rechargeable batteries
Radio frequency transmitter/receiver
Mini-mouse recharging cable
USB extension cable
Numeric keypad
Earphones
Carrying case
User Manual
SYSTEM REQUIREMENTS
Laptop computer (Windows 98 SE, Me, 2000 and XP) equipped with USB ports

2/6
RECOMMENDED USE
For your security, please take care to respect the following precautionary measures:
- Never open up your Nomads’ Wireless Pack accessories, as you risk damaging the internal
components.
- Place your Nomads’ Wireless Pack on a flat surface to avoid the risk of it falling.
- Do not pull on or twist the cable(s).
- Never recharge your mini-mouse with a recharging cable other than the one provided with your
Nomads’ Wireless Pack.
- Do not bother removing the batteries when you are not using the mini-mouse, as it is equipped with a
battery-saving system.
- Disconnect your Nomads’ Wireless Pack and remove the batteries from the mini-mouse before cleaning.
Do not use liquid or aerosol cleaners. Use a damp cloth for cleaning.
If you have to change the rechargeable batteries in your Nomads’ Wireless Pack
mini-mouse, replace them with Ni-MH AAA 1.2V 600mA rechargeable batteries exclusively.
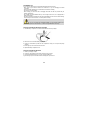
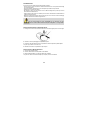
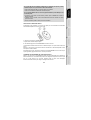
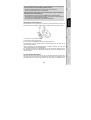
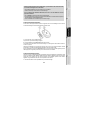
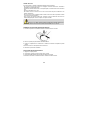
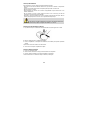
INSTALLING THE WIRELESS MINI-MOUSE’S BATTERIES
1. Slide the battery compartment cover off by applying light pressure with your fingers.
2. Remove the cover to reveal the battery compartment.
3. Insert the 2 AAA batteries provided into the compartment, making sure to respect the polarity
indicated.
A red LED lights up on the underside of the mini-mouse.
4. Replace the battery compartment cover.
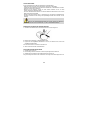
INSTALLING THE WIRELESS MINI-MOUSE
1. Switch on your laptop computer.
2. If necessary, disconnect the mouse already connected to your computer.
3. Connect the transmitter/receiver to one of your computer’s USB ports.
A green LED lights up on the transmitter/receiver, indicating that it is powered on.

3/6
If your computer’s USB ports are too close together for you to insert the transmitter/receiver,
you can use the USB extension cable:
- Connect the USB extension cable to one of your computer’s USB ports.
- Connect the other end of the cable to the transmitter/receiver.
If you have Windows 98 SE installed on your computer, you must also install the USB drivers
for your new device:
- Using your laptop’s pointing device, click on Next in the dialog box that appears.
- If prompted by Windows to do so, insert the Windows 98 SE CD-ROM into your computer’s
CD-ROM drive in order to install the required system files.
- Follow the on-screen instructions to complete the installation.
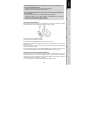
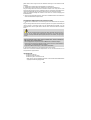
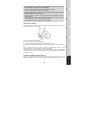
USING THE WIRELESS MINI-MOUSE
If the mini-mouse does not respond once you have started up your computer, you will have to establish
communication between the transmitter/receiver and the mini-mouse. To do this:
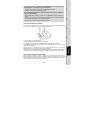
1. Press the + button on the transmitter/receiver.
The green LED on the transmitter/receiver flashes.
2. Without delay, press the ID Connect button on the back of the mini-mouse.
Communication is established between the mini-mouse and the transmitter/receiver. You can now use the
wireless mini-mouse.
Note: your mini-mouse has a battery life of approximately 100 hours and automatically switches to standby
mode after 10 minutes of inactivity.
To switch off the mini-mouse: press and hold the ID Connect button on the back of the mini-mouse for
three seconds (the red LED flashes). Press this button again to switch the mini-mouse back on.
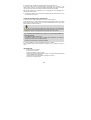
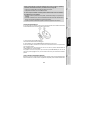
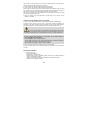
CHARGING AND RECHARGING THE WIRELESS MINI-MOUSE
Even though your mini-mouse has already been charged so that it is functional when you open up your
Nomads’ Wireless Pack, you will still have to charge it completely. Once this has been done, the green
LED on the mini-mouse’s left-hand side will flash when the batteries need recharging. Follow the
instructions below to charge or recharge your mini-mouse:
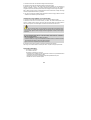
1. Connect the shorter connector on the recharging cable to the transmitter/receiver.

4/6
2. Connect the longer connector on the recharging cable to the port on the mini-mouse.
A green LED on the mini-mouse’s left-hand side lights up, indicating that it is powered on. The
mini-mouse begins to charge. Your mini-mouse remains functional while it is being charged or recharged.
The green LED on the mini-mouse’s left-hand side switches off when charging is complete.
Note: the initial charging time is approximately 7 hours. Subsequently, the normal recharging time is
approximately 2 hours 30 minutes.
3. Once charging is complete, you may disconnect the recharging cable and use the wireless mini-mouse
at a distance from your computer.
CONNECTING THE NUMERIC KEYPAD AND EARPHONES
1. Connect the numeric keypad’s USB connector to one of your laptop’s USB ports.
A green LED lights up on the numeric keypad; the keypad is locked numerically by default. Your numeric
keypad features two USB ports which you can use to connect USB peripherals such as a printer, digital
camera, webcam, external audio module, etc.
As the numeric keypad is not powered by an external power source, it may happen that
the keypad will not accept certain USB peripherals which require a great deal of power, such as some
vibrating game controllers for example (gamepad or racing wheel) or even some printers.
If you have Windows 98 SE installed on your computer, you must also install the USB drivers
for the numeric keypad:
- Click on Next in the dialog box that appears.
- If prompted by Windows to do so, insert the Windows 98 SE CD-ROM into your computer’s
CD-ROM drive in order to install the required system files.
- Follow the on-screen instructions to complete the installation.
2. Connect the earphones’ connector to the headphone plug on your computer.
Give the retractable earphone cable a sharp little tug to release it or lock it in place at the length you
require.
TROUBLESHOOTING
1) The mini-mouse does not switch on.
The mini-mouse is not detected.
The mini-mouse switches on but does not work.
- Make sure that you have inserted the batteries correctly, in accordance with the polarity indicated
on the inside of the battery compartment.
- Make sure that you have closed the battery compartment cover properly.
- Move closer to your laptop computer.

5/6
- Verify all connections. If necessary, disconnect and then reconnect all cables. Verify in particular
that you have connected the longer connector on the recharging cable to the port on the
mini-mouse.
- Establish communication between the mini-mouse and the transmitter/receiver: press the + button
on the transmitter/receiver and then the ID Connect button on the back of the mini-mouse.
- Under Windows 98 SE: make sure that you have properly installed the USB drivers required for
your mini-mouse to function.
- Make sure that your laptop computer’s USB port is working properly, for example by reconnecting
your old mouse or another USB peripheral.
- Recharge or change the batteries.
- Restart your computer.
- Repeat the installation procedure.
2) The transmitter/receiver does not switch on.
- Verify all connections. If necessary, disconnect and then reconnect all cables.
- Establish communication between the mini-mouse and the transmitter/receiver: press the + button
on the transmitter/receiver and then the ID Connect button on the back of the mini-mouse.
- Repeat the installation procedure.
3) The numeric keypad does not switch on.
The numeric keypad is not detected.
The numeric keypad switches on but does not work.
The USB peripheral I have connected to the numeric keypad does not work.
- Verify the connection. If necessary, disconnect and then reconnect the numeric keypad’s USB
connector.
- Under Windows 98 SE: make sure that you have properly installed the USB drivers required for
your numeric keypad to function.
- Make sure that your laptop computer’s USB port is working properly, for example by reconnecting
your old mouse or another USB peripheral.
- Repeat the installation procedure.
- As the numeric keypad is not powered by an external power source, it may happen that the keypad
will not accept certain USB peripherals which require a great deal of power, such as some vibrating
game controllers for example (gamepad or racing wheel) or even some printers.
TECHNICAL SUPPORT
If you encounter a problem with your product, please go to http://ts.thrustmaster.com and click Technical Support. From
there you will be able to access various utilities (Frequently Asked Questions (FAQ), the latest versions of drivers and
software) that may help to resolve your problem. If the problem persists, you can contact the Thrustmaster products technical
support service (“Technical Support”):
By email:
In order to take advantage of technical support by email, you must first register online. The information you provide will help
the agents to resolve your problem more quickly. Click Registration on the left-hand side of the Technical Support page and
follow the on-screen instructions. If you have already registered, fill in the Username and Password fields and then click
Login.

6/6
By telephone:
United Kingdom
0207 216 0047
price of a national phone call, Monday to Friday
from 12PM to 4PM and from 5PM to 10PM
United States /
Canada
514-279-9911
price of a long distance phone call, Monday to Friday
from 7AM to 11AM and from 12PM to 5PM (Eastern time)
Denmark 82 33 28 58
price of a national phone call, Monday to Friday
from 1PM to 5PM and from 6PM to 11PM
Finland 09 81 71 01 54
price of a national phone call, Monday to Friday
from 2PM to 6PM and from 7PM to 12AM
Netherlands 0900 2026765
€0.30/min, Monday to Friday
from 1PM to 5PM and from 6PM to 11PM
Norway 23 50 01 16
price of a national phone call, Monday to Friday
from 1PM to 5PM and from 6PM to 11PM
Sweden 08-51992032
price of a national phone call, Monday to Friday
from 1PM to 5PM and from 6PM to 11PM
Warranty information
Worldwide, Guillemot Corporation S.A. (“Guillemot”) warrants to the consumer that this Thrustmaster product will be free
from material defects and manufacturing flaws for a period of two (2) years from the original date of purchase. Should the
product appear to be defective during the warranty period, immediately contact Technical Support, who will indicate the
procedure to follow. If the defect is confirmed, the product must be returned to its place of purchase (or any other location
indicated by Technical Support).
Within the context of this warranty, the consumer’s defective product will, at Technical Support’s option, be either repaired
or replaced. Where authorized by applicable law, the full liability of Guillemot and its subsidiaries (including for indirect
damages) is limited to the repair or replacement of the Thrustmaster product. The consumer’s legal rights with respect to
legislation applicable to the sale of consumer goods are not affected by this warranty.
This warranty shall not apply: (1) if the product has been modified, opened, altered, or has suffered damage as a result of
inappropriate or abusive use, negligence, an accident, normal wear, or any other cause not related to a material defect or
manufacturing flaw; (2) in the event of failure to comply with the instructions provided by Technical Support; (3) to software
not published by Guillemot, said software being subject to a specific warranty provided by its publisher.
Additional warranty provisions
In the United States of America and in Canada, this warranty is limited to the product’s internal mechanism and external
housing. Any applicable implied warranties, including warranties of merchantability and fitness for a particular purpose, are
hereby limited to two (2) years from the date of purchase and are subject to the conditions set forth in this limited warranty.
In no event shall Guillemot Corporation S.A. or its affiliates be liable for consequential or incidental damage resulting from
the breach of any express or implied warranties. Some States/Provinces do not allow limitation on how long an implied
warranty lasts or exclusion or limitation of incidental/consequential damages, so the above limitation may not apply to you.
This warranty gives you specific legal rights, and you may also have other legal rights which vary from State to State or
Province to Province.
ENVIRONMENTAL PROTECTION RECOMMENDATION
At the end of its working life, this product should not be disposed of with standard household waste, but
rather dropped off at a collection point for the disposal of Waste Electrical and Electronic Equipment
(WEEE) for recycling.
This is confirmed by the symbol found on the product, user manual or packaging. Depending on their
characteristics, the materials may be recycled. Through recycling and other forms of processing Waste
Electrical and Electronic Equipment, you can make a significant contribution towards helping to protect
the environment. Please contact your local authorities for information on the collection point nearest you.
COPYRIGHT
© 2005 Guillemot Corporation S.A. All rights reserved. Thrustmaster® is a registered trademark of Guillemot Corporation S.A. Microsoft®
Windows® 98 SE, Me, 2000 and XP are either registered trademarks or trademarks of Microsoft Corporation in the United States and/or other
countries. All other trademarks and brand names are hereby acknowledged and are property of their respective owners. Illustrations not binding.
Contents, designs and specifications are subject to change without notice and may vary from one country to another.
FAQs, tips and drivers available at www.thrustmaster.com

1/6
Manuel de l’utilisateur
CONTENU DE LA BOÎTE
Mini-souris optique sans fil
2 piles rechargeables Ni-MH AAA 1,2 V
Émetteur/récepteur à radiofréquence
Câble pour recharger la mini-souris
Câble d’extension USB
Pavé numérique
Écouteurs
Pochette de rangement
Manuel de l’utilisateur
CONFIGURATION REQUISE
Ordinateur portable (Windows 98 SE, Me, 2000 et XP) équipé de ports USB

2/6
RECOMMANDATIONS
Par mesure de sécurité, veuillez respecter les précautions suivantes :
- N’ouvrez en aucun cas les accessoires de votre Nomads’ Wireless Pack, vous risqueriez d’endommager
les composants internes.
- Placez votre Nomads’ Wireless Pack sur une surface plane pour éviter tout risque de chute.
- Évitez de tirer ou de tordre le(s) câble(s).
- Ne rechargez en aucun cas votre mini-souris avec un câble de recharge autre que celui qui se trouve
dans votre Nomads’ Wireless Pack.
- Inutile de retirer les piles lorsque vous n’utilisez pas la mini-souris. Cette dernière est en effet dotée d’un
système d’économie des piles.
- Débranchez votre Nomads’ Wireless Pack et retirez les piles de la mini-souris avant tout nettoyage.
Utilisez un chiffon humecté et évitez l’usage d’aérosols.
Si vous devez changer les piles rechargeables de la mini-souris de votre
Nomads’ Wireless Pack, veillez à utiliser exclusivement des piles rechargeables 1,2 V de type Ni-MH
AAA 600 mA.
INSTALLATION DES PILES DE LA MINI-SOURIS SANS FIL
1. Faites glisser le couvercle du compartiment des piles en exerçant une légère pression avec les doigts.
2. Soulevez le couvercle pour dégager le compartiment des piles.
3. Insérez les 2 piles AAA fournies dans leur compartiment en veillant à respecter la polarité indiquée.
Un voyant rouge s’allume sous la mini-souris.
4. Remettez le couvercle du compartiment des piles en place.
INSTALLATION DE LA MINI-SOURIS SANS FIL
1. Allumez votre ordinateur portable.
2. Si besoin, débranchez la souris déjà reliée à votre ordinateur.
3. Reliez l’émetteur/récepteur à l’un des ports USB de votre ordinateur.
Un voyant vert s’allume sur l’émetteur/récepteur pour indiquer que celui-ci est alimenté.

3/6
Si les ports USB de votre ordinateur portable sont trop rapprochés pour pouvoir y insérer
l’émetteur/récepteur, vous pouvez utiliser le câble d’extension USB :
- Reliez le câble d’extension USB à l’un des ports USB de votre ordinateur.
- Reliez la seconde extrémité du câble USB à l’émetteur/récepteur.
Si vous possédez Windows 98 SE, vous devez également installer les pilotes USB pour votre
nouveau dispositif :
- En utilisant la surface tactile de votre ordinateur portable, cliquez sur Suivant dans la boîte de
dialogue qui apparaît.
- Si Windows vous le demande, insérez le CD-ROM Windows 98 SE afin d’installer les fichiers
système nécessaires.
- Suivez les instructions portées à l’écran pour terminer l’installation.
UTILISATION DE LA MINI-SOURIS SANS FIL
Au démarrage de votre ordinateur, si la mini-souris ne répond pas, vous devez établir la communication
entre l’émetteur/récepteur et la mini-souris. Pour ce faire :
1. Appuyez sur le bouton + de l’émetteur/récepteur.
Le voyant vert de l’émetteur/récepteur clignote.
2. Sans attendre, appuyez sur le bouton ID Connect au dos de la mini-souris.
La communication est établie entre la mini-souris et l’émetteur/récepteur. Vous pouvez utiliser la mini-souris
sans fil.
Remarque : votre mini-souris a une autonomie d’environ 100 heures et se met automatiquement en mode
veille après 10 minutes d’inactivité.
Pour éteindre la mini-souris : appuyez trois secondes sur le bouton ID Connect au dos de la mini-souris (le
voyant rouge flashe). Appuyez de nouveau sur ce bouton pour l’allumer.
CHARGEMENT ET RECHARGEMENT DE LA MINI-SOURIS SANS FIL
Même si votre mini-souris a été préalablement chargée pour être fonctionnelle dès le déballage du
Nomads’ Wireless Pack, il est nécessaire de procéder à son chargement complet. Par la suite, le voyant
vert sur le côté gauche de la mini-souris clignotera lorsque les piles seront déchargées.
Suivez les instructions ci-dessous pour charger ou recharger votre mini-souris :

4/6
1. Reliez la prise la plus courte du câble de recharge à l’émetteur/récepteur.
2. Reliez la prise la plus longue du câble de recharge au port de la mini-souris.
Un voyant vert s’allume sur le côté gauche de la mini-souris pour indiquer que celle-ci est alimentée. Le
chargement de la mini-souris débute. Votre mini-souris reste fonctionnelle pendant le chargement ou
rechargement. Le voyant vert sur le côté gauche de la mini-souris s’éteint lorsque celle-ci est rechargée.
Remarque : le temps de charge initial est d’environ 7 heures. Par la suite, le temps de charge normal est
d’environ 2 h 30.
3. Une fois votre mini-souris rechargée, vous pouvez débrancher le câble de recharge et utiliser la
mini-souris sans fil à distance.
CONNEXION DU PAVÉ NUMÉRIQUE ET DES ÉCOUTEURS
1. Reliez la prise USB du pavé numérique à l’un des ports USB de votre ordinateur portable.
Un voyant vert s’allume sur le pavé numérique ; il est par défaut verrouillé numériquement.
Votre pavé numérique dispose de deux ports USB pour relier d’autres périphériques USB comme une
imprimante, un appareil photo, une webcam, un boîtier audio…
Le pavé numérique n’étant pas alimenté par une source d’alimentation externe, il peut
arriver que celui-ci n’accepte pas certains périphériques USB qui requièrent une forte puissance
comme par exemple un contrôleur de jeu vibrant (manette ou volant) ou bien certaines imprimantes.
Si vous possédez Windows 98 SE, vous devez également installer les pilotes USB pour le
pavé numérique :
- Cliquez sur Suivant dans la boîte de dialogue qui apparaît.
- Si Windows vous le demande, insérez le CD-ROM Windows 98 SE afin d’installer les fichiers
système nécessaires.
- Suivez les instructions portées à l’écran pour terminer l’installation.
2. Reliez la prise casque des écouteurs au port casque de votre ordinateur.
Donnez de petits coups secs pour bloquer ou débloquer le câble enrouleur des écouteurs à la longueur
de fil voulue.
EN CAS DE PROBLÈME
1) La mini-souris ne s’allume pas.
La mini-souris n’est pas détectée.
La mini-souris est allumée mais ne fonctionne pas.
- Assurez-vous d’avoir correctement inséré les piles selon la polarité indiquée à l’intérieur du
compartiment des piles.
- Assurez-vous d’avoir correctement refermé le couvercle du compartiment des piles.
- Rapprochez-vous de votre ordinateur portable.

5/6
- Vérifiez l’intégralité de vos branchements. Si besoin, débranchez puis rebranchez tous les câbles.
Vérifiez tout spécifiquement que vous avez bien relié la prise la plus longue du câble de recharge
au port de la mini-souris.
- Établissez une communication entre la mini-souris et l’émetteur/récepteur : appuyez sur le bouton
+ de l’émetteur/récepteur et sur le bouton ID Connect au dos de la mini-souris.
- Sous Windows 98 SE : assurez-vous d’avoir correctement installé les pilotes USB indispensables
au fonctionnement de votre mini-souris.
- Assurez-vous que le port USB de votre ordinateur portable fonctionne correctement, en
rebranchant votre ancienne souris ou un autre périphérique USB par exemple.
- Rechargez ou changez les piles.
- Redémarrez votre ordinateur.
- Procédez à une nouvelle installation.
2) L’émetteur/récepteur ne s’allume pas.
- Vérifiez l’intégralité de vos branchements. Si besoin, débranchez puis rebranchez tous les câbles.
- Établissez une communication entre la mini-souris et l’émetteur/récepteur : appuyez sur le bouton
+ de l’émetteur/récepteur et sur le bouton ID Connect au dos de la mini-souris.
- Procédez à une nouvelle installation.
3) Le pavé numérique ne s’allume pas.
Le pavé numérique n’est pas détecté.
Le pavé numérique est allumé mais ne fonctionne pas.
Le périphérique USB que j’ai relié au pavé numérique ne fonctionne pas.
- Vérifiez votre branchement. Si besoin, débranchez puis rebranchez la prise USB du pavé
numérique.
- Sous Windows 98 SE : assurez-vous d’avoir correctement installé les pilotes USB indispensables
au fonctionnement de votre pavé numérique.
- Assurez-vous que le port USB de votre ordinateur portable fonctionne correctement, en
rebranchant votre ancienne souris ou un autre périphérique USB par exemple.
- Procédez à une nouvelle installation.
- Le pavé numérique n’étant pas alimenté par une source d’alimentation externe, il peut arriver que
celui-ci n’accepte pas certains périphériques USB qui requièrent une forte puissance comme par
exemple un contrôleur de jeu vibrant (manette ou volant) ou bien certaines imprimantes.
COPYRIGHT
© 2005 Guillemot Corporation S.A. Tous droits réservés. Thrustmaster® est une marque déposée de
Guillemot Corporation S.A. Microsoft® Windows® 98 SE, Me, 2000 et XP sont des marques déposées ou
des marques de Microsoft Corporation aux États-Unis et/ou dans d’autres pays. Toutes les autres marques
déposées et noms commerciaux sont reconnus par les présentes et sont la propriété de leurs propriétaires
respectifs. Illustrations non contractuelles. Le contenu, la conception et les spécifications sont susceptibles
de changer sans préavis et de varier selon les pays.
FAQ, astuces et pilotes sur www.thrustmaster.com

6/6
SUPPORT TECHNIQUE
Si vous rencontrez un problème avec votre produit, rendez-vous sur le site http://ts.thrustmaster.com
et cliquez sur
Support Technique. Vous aurez alors accès à différents services (Foire Aux Questions (FAQ), dernières versions
des pilotes et logiciels) susceptibles de résoudre votre problème. Si le problème persiste, vous pouvez contacter le
support technique des produits Thrustmaster (« Support Technique ») :
Par e-mail :
Pour bénéficier du support technique par e-mail, vous devez d’abord vous enregistrer en ligne. Les informations
fournies vont permettre aux techniciens de résoudre plus rapidement votre problème. Cliquez sur Enregistrement à
gauche de la page Support technique et suivez les instructions à l’écran. Si vous êtes déjà enregistré, renseignez les
champs Nom d’utilisateur et Mot de passe puis cliquez sur Connexion.
Par téléphone :
Informations relatives à la garantie
Dans le monde entier, Guillemot Corporation S.A. (« Guillemot ») garantit au consommateur que le présent produit
Thrustmaster est exempt de défauts matériels et de vices de fabrication, et ce, pour une période de deux (2) ans à compter
de la date d’achat d’origine. Si, au cours de la période de garantie, le produit semble défectueux, contactez immédiatement le
Support Technique qui vous indiquera la procédure à suivre. Si le défaut est confirmé, le produit devra être retourné à son lieu
d’achat (ou tout autre lieu indiqué par le Support Technique).
Dans le cadre de la garantie, le consommateur bénéficiera, au choix du Support Technique, du remplacement ou de la
réparation du produit défectueux. Lorsque la loi applicable l’autorise, toute responsabilité de Guillemot et ses filiales (y
compris pour les dommages indirects) se limite à la réparation ou au remplacement du produit Thrustmaster. Les droits
légaux du consommateur au titre de la législation applicable à la vente de biens de consommation ne sont pas affectés par la
présente garantie.
Cette garantie ne s’appliquera pas : (1) si le produit a été modifié, ouvert, altéré, ou a subi des dommages résultant d’une
utilisation inappropriée ou abusive, d’une négligence, d’un accident, de l’usure normale, ou de toute autre cause non liée à un
défaut matériel ou à un vice de fabrication ; (2) en cas de non-respect des instructions du Support Technique ; (3) aux
logiciels non-édités par Guillemot, lesdits logiciels faisant l’objet d’une garantie spécifique accordée par leurs éditeurs.
Stipulations additionnelles à la garantie
Aux États-Unis d’Amérique et au Canada, cette garantie est limitée au mécanisme interne et au boîtier externe du produit.
Toute garantie implicite applicable, incluant les garanties de qualité marchande ou d’adaptation à un usage particulier, est
limitée à deux (2) ans à compter de la date d’achat et soumise aux conditions de la présente garantie limitée. En aucun cas,
Guillemot Corporation S.A. ou ses sociétés affiliées ne sauraient être tenues responsables envers qui que ce soit de tous
dommages indirects ou dommages accessoires résultant du non-respect des garanties expresses ou implicites. Certains
États/Provinces n’autorisent pas la limitation sur la durée d’une garantie implicite, ou l’exclusion ou la limitation de
responsabilité pour les dommages indirects ou accessoires, de sorte que les limitations ou exclusions ci-dessus peuvent ne
pas vous être applicables. Cette garantie vous confère des droits spécifiques ; vous pouvez également bénéficier d’autres droits qui
peuvent différer d’un État/Province à l’autre.
RECOMMANDATION RELATIVE À LA PROTECTION DE L’ENVIRONNEMENT
En fin de vie, ce produit ne doit pas être éliminé avec les déchets ménagers normaux mais déposé à un point de
collecte des déchets d'équipements électriques et électroniques en vue de son recyclage.
Ceci est confirmé par le symbole figurant sur le produit, le manuel utilisateur ou l’emballage.
En fonction de leurs caractéristiques, les matériaux peuvent être recyclés. Par le recyclage et par les autres
formes de valorisation des déchets d'équipements électriques et électroniques, vous contribuez de manière
significative à la protection de l’environnement.
Veuillez consulter les autorités locales qui vous indiqueront le point de collecte concerné.
France 0892 690 024
0,34 €/min, du lundi au vendredi de 13h à 17h et de 18h à 22h
Belgique 02 / 732 55 77
prix d’un appel national, du lundi au vendredi de 9h à 12h30 et de
14h à 17h30
Suisse 22 567 51 20
prix d’un appel national, du lundi au vendredi de 13h à 22h
Canada 514-279-9911
prix d’un appel longue distance, du lundi au vendredi de 7h à 17h
(heure de l’Est)

1/6
Benutzerhandbuch
PACKUNGSINHALT
Optische schnurlose Mini-Mouse
2 Ni-MH AAA 1,2 V wiederaufladbare
Batterien
Funkeinheit
Ladekabel für die Mini-Mouse
USB Verlängerungskabel
Numerisches Keypad
Kopfhörer
Tragetasche
Benutzerhandbuch
SYSTEMANFORDERUNGEN
Laptop-Computer (Windows 98 SE, Me, 2000 und XP) mit USB-Anschlüssen

2/6
VORSICHTSMAßNAHMEN
Zu Ihrer Sicherheit befolgen Sie bitte die nachfolgenden Vorsichtsmaßnahmen:
- Öffnen Sie niemals Ihr Nomads’ Wireless Pack Zubehör, Sie könnten es beschädigen.
- Legen Sie Ihr Nomads’ Wireless Pack auf einer ebenen Oberfläche ab, um Herunterfallen zu vermeiden.
- Ziehen oder verdrehen Sie die Kabel nicht.
- Benutzen Sie Ihre Mini-Mouse niemals mit einem anderen Ladekabel als dem mit Ihrem
Nomads’ Wireless Pack mitgelieferten Kabel.
- Sie müssen die Batterien nicht entfernen, wenn Sie Ihre Mini-Mouse nicht benutzen. Sie ist mit einem
Battery-Saving System ausgestattet.
- Stecken Sie Ihr Nomads’ Wireless Pack vor der Reinigung ab, und entfernen Sie die Batterien Ihrer
Mini-Mouse. Verwenden Sie keine Flüssig- oder Sprüh-Reiniger. Benutzen Sie ein feuchtes Tuch zur
Reinigung.
Wenn Sie Ihre wiederaufladbaren Batterien Ihrer Nomads’ Wireless Pack Mini-Mouse
wechseln, ersetzen Sie sie nur durch Ni-MH AAA 1,2 V 600 mA wiederaufladbare Batterien.
EINSETZEN DER BATTERIEN IN DIE WIRELESS MINI-MOUSE
1. Schieben Sie das Batteriefach durch Ausübung leichten Drucks mit Ihren Fingern auf.
2. Entfernen Sie die Abdeckung, um das Batteriefach zu öffnen.
3. Legen Sie die zwei mitgelieferten AAA Batterien in das Fach, und stellen Sie sicher, dass Sie die
angegebene Polarität beachten.
Eine rote LED leuchtet an der Unterseite der Mini-Mouse auf.
4. Setzen sie den Deckel wieder auf das Batteriefach.
INSTALLIEREN DER WIRELESS MINI-MOUSE
1. Schalten Sie Ihren Laptop ein.
2. Falls notwendig, stecken Sie eine bereits an Ihrem Computer angeschlossene Mouse ab.
3. Schließen Sie die Funkeinheit an einen USB-Anschluss Ihres Computers an.
Eine grüne Anzeige-LED leuchtet bei der Funkeinheit auf, die anzeigt, dass die Einheit angeschlossen ist.

3/6
Wenn die USB-Anschlüsse Ihres Computers zu eng beieinander liegen, um die Funkeinheit
anzustecken, können Sie das USB-Verlängerungskabel verwenden:
- Schließen Sie die USB-Verlängerung an einen USB-Anschluss Ihres Computers an.
- Stecken Sie das andere Ende des Kabels in die Funkeinheit.
Sollten Sie Windows 98 SE auf Ihrem Computer installiert haben, müssen Sie ebenfalls die
USB-Treiber für Ihr neues Gerät installieren:
- Mit dem Zeigegerät Ihres Computers klicken Sie auf Weiter in der erscheinenden Dialogbox.
- Sollte Windows die Windows 98 SE CD-ROM verlangen, legen Sie diese in das CD-ROM-Laufwerk
Ihres Computers, um die benötigten Dateien zu installieren.
- Folgen Sie den Bildschirmanweisungen, um die Installation abzuschließen.
VERWENDEN DER WIRELESS MINI-MOUSE
Sollte die Mini-Mouse einmal nicht reagieren, wenn Sie Ihren Computer gestartet haben, müssen Sie die
Kommunikation zwischen Funkeinheit und Mini-Mouse manuell herstellen. Gehen Sie dabei wie folgt vor:
1. Drücken Sie den + Knopf auf der Funkeinheit.
Die grüne Anzeige-LED der Funkeinheit blinkt.
2. Drücken Sie sofort den ID Connect Knopf auf der Rückseite der Mini-Mouse.
Die Kommunikation zwischen der Mini-Mouse und der Funkeinheit funktioniert nun. Jetzt können Sie die
Wireless Mini-Mouse verwenden.
Hinweis: Ihre Mini-Mouse hat eine Batterielebensdauer von ungefähr 100 Stunden und schaltet nach
10 Minuten Inaktivität automatisch in den StandBy-Modus.
Zum ausschalten der Mini-Maus den ID Connect Knopf auf der Unterseite der Mini-Mouse für drei
Sekunden gedrückt halten (die rote Anzeige-LED blinkt). Drücken Sie den Knopf erneut um die Mini-Mouse
wieder einzuschalten.
AUFLADEN DER WIRELESS MINI-MOUSE
Obwohl Ihre Mini-Mouse bereits geladen ist, damit Sie nach dem Öffnen Ihres Nomads’ Wireless Pack
sofort starten können, müssen Sie sie dennoch vollständig laden. Wurde dies einmal durchgeführt, wird die
grüne Anzeige-LED auf der linken Seite der Mini-Mouse immer dann blinken, wenn die Batterien erneut

4/6
geladen werden müssen. Folgen Sie den unten stehenden Anweisungen, um Ihre Mini-Mouse wieder
aufzuladen:
1. Schließen Sie den kleineren Stecker des Ladekabels an die Funkeinheit an.
2. Schließen Sie den längeren Stecker des Ladekabels an den Anschluss der Mini-Mouse an.
Eine grüne Anzeige-LED auf der linken Seite der Mini-Mouse leuchtet auf, die anzeigt, dass sie an die
Stromversorgung angeschlossen wurde. Die Mini-Mouse lädt nun. Ihre Mini-Mouse bleibt während eines
Ladevorgangs funktionsfähig. Die grüne Anzeige-LED erlischt, wenn der Ladevorgang beendet ist.
Hinweis: Die Erstladezeit beträgt etwa 7 Stunden. Danach dauert ein normaler Ladevorgang etwa
zweieinhalb Stunden.
3. Wenn der Ladevorgang abgeschlossen ist, können Sie das Ladekabel abstecken und die Mini-Mouse
wieder ohne Kabel mit Ihrem Computer nutzen.
ANSCHLIEßEN DES NUMERISCHEN KEYPADS UND DER KOPFHÖRER
1. Schließen Sie den USB-Stecker des numerischen Keypads an einen USB-Anschluss Ihres Computers
an.
Eine grüne Anzeige-LED leuchtet auf dem numerischen Keypad auf; Das Keypad ist standardmäßig auf
„NumLock“ gestellt. Ihr numersiches Keypad ist mit zwei USB-Anschlüssen ausgestattet, an der Sie
Peripheriegeräte wie Drucker, digitale Kamera, Webcam, externe Audiomodule, ähnliches anschließen
können...
Da das numerische Keypad nicht durch eine externe Stromquelle versorgt wird, kann es
passieren, dass das Keypad gewisse USB-Geräte nicht betreibt, die eine erhöhte Stromzufuhr
benötigen, zum Beispiel vibrierende Spielsteuergeräte (Gamepads oder Lenkräder) oder sogar einige
Drucker.
Sollten Sie Windows 98 SE auf Ihrem Computer installiert haben, müssen Sie ebenfalls die
USB-Treiber für Ihr neues Gerät installieren:
- Mit dem Zeigegerät Ihres Computers klicken Sie auf Weiter in der erscheinenden Dialogbox.
- Sollte Windows die Windows 98 SE CD-ROM verlangen, legen Sie diese in das CD-ROM-Laufwerk
Ihres Computers, um die benötigten Dateien zu installieren.
- Folgen Sie den Bildschirmanweisungen, um die Installation abzuschließen.
2. Stecken Sie den Kopfhörerstecker in den Kopfhöreranschluss Ihres Computers.
Ziehen Sie kurz und schnell am einziehbaren Kopfhörerkabel, um es aus- oder einzurollen oder in der von
Ihnen gewünschten Länge festzustellen.
TROUBLESHOOTING
1) Die Mini-Mouse geht nicht.
Die Mini-Mouse wird nicht erkannt.
Die Mini-Mouse geht an, funktioniert aber nicht.
- Stellen Sie sicher, dass Sie die Batterien gemäß der an der Innenseite des Batteriefachdeckels
angezeigten Polarität richtig eingelegt haben.

5/6
- Stellen Sie sicher, dass Sie das Batteriefach richtig geschlossen haben.
- Verringern Sie den Abstand zu Ihrem Laptop.
- Überprüfen Sie alle Verbindungen. Falls notwendig, stecken Sie alle Kabel ab und wieder an.
Versichern Sie sich im besonderen, dass Sie den längeren Stecker des Ladekabels in den
Anschluss der Mini-Mouse eingesteckt haben.
- Stellen Sie die Verbindung zwischen die Mini-Mouse und der Funkeinheit her: Drücken Sie den
+ Knopf des Empfängers und dann den ID Connect Knopf auf der Rückseite der Mini-Mouse.
- Windows 98 SE-Benutzer müssen sicher stellen, dass sie die USB-Treiber, die für die Mini-Mouse
notwendig sind, richtig installiert haben.
- Stellen Sie sicher, dass die USB-Anschlüsse Ihres Computers richtig funktionieren, zum Beispiel
indem Sie Ihre alte Mouse oder ein anderes USB-Gerät anschließen.
- Laden oder wechseln Sie die Batterien.
- Starten Sie Ihr Computer neu.
- Wiederholen Sie den Installationsvorgang.
2) Die Funkeinheit geht nicht.
- Überprüfen Sie alle Verbindungen. Falls notwendig, stecken Sie alle Kabel ab und wieder an.
- Stellen Sie die Verbindung zwischen die Mini-Mouse und der Funkeinheit her: Drücken Sie den
+ Knopf des Empfängers und dann den ID Connect Knopf auf der Rückseite der Mini-Mouse.
- Wiederholen Sie den Installationsvorgang.
3) Das numerische Keypad geht nicht.
Das numerische Keypad wurde nicht erkannt.
Das numerische Keypad geht an, funktioniert aber nicht.
Das USB-Gerät, das ich mit dem numerischen Keypad verbunden habe, funktioniert nicht.
- Überprüfen Sie alle Verbindungen. Falls notwendig, stecken Sie das Kabel des numerischen
Keypads ab und wieder an.
- Windows 98 SE-Benutzer müssen sicher stellen, dass sie die USB-Treiber, die für das numerische
Keypad notwendig sind, richtig installiert haben.
- Stellen Sie sicher, dass die USB-Anschlüsse Ihres Computers richtig funktionieren, zum Beispiel
indem Sie Ihre alte Mouse oder ein anderes USB-Gerät anschließen.
- Wiederholen Sie den Installationsvorgang.
- Da das numerische Keypad nicht durch eine externe Stromquelle versorgt wird, kann es passieren,
dass das Keypad gewisse USB-Geräte nicht betreibt, die eine erhöhte Stromzufuhr benötigen, zum
Beispiel vibrierende Spielsteuergeräte (Gamepads oder Lenkräder) oder sogar einige Drucker.
COPYRIGHT
© 2005 Guillemot Corporation S.A. Alle Rechte vorbehalten. Thrustmaster® ist ein eingetragenes
Warenzeichen der Guillemot Corporation S.A. Microsoft® Windows® 98 SE, Me, 2000 und XP sind
eingetragene Warenzeichen oder Warenzeichen der Microsoft Corporation in den Vereinigten Staaten von
Amerika und/oder anderen Ländern. Alle anderen Warenzeichen und Markennamen werden hiermit
anerkannt und sind Eigentum ihrer jeweiligen Eigentümer. Fotos und Abbildungen nicht bindend. Inhalt,
Design und Eigenschaften des Produkts können ohne Bekanntmachung geändert werden und variieren von
Land zu Land.
FAQs, Tips und Treiber erhalten Sie auf www.thrustmaster.com

6/6
TECHNISCHER SUPPORT
Sollten Sie mit Ihrem Produkt ein Problem haben, besuchen Sie bitte die Seite http://ts.thrustmaster.com
und klicken Sie auf Technischer Support. Von dort aus können Sie auf verschiedene Hilfen zugreifen
(Fragen und Antworten (FAQ), die neuesten Versionen von Treibern und Software), die Ihnen bei der
Lösung Ihres Problems helfen könnten. Falls das Problem weiterhin besteht, können Sie mit dem
technischen Support für Thrustmaster Produkte in Kontakt treten („Technischer Support“):
Per Email:
Um den technischen Supports per Email in Anspruch nehmen zu können, müssen Sie sich zunächst
online registrieren. Mit den Informationen, die Sie uns so zukommen lassen, können die Mitarbeiter Ihr
Problem schneller lösen. Klicken Sie bitte auf Registrierung links auf der Seite des technischen Supports
und folgen Sie den Anweisungen auf dem Bildschirm. Falls Sie bereits registriert sind, füllen Sie die
Textfelder Anwendername und Paßwort aus und klicken dann auf Login.
Per Telefon:
Deutschland 0180/5824763
0,12 €/Minute, Montag bis Freitag
von 15 bis 18 Uhr und 19 bis 22 Uhr
Schweiz 22 567 51 20
Zum Preis eines landesweiten Telefongesprächs,
Montag bis Freitag von 13 bis 22 Uhr
GEWÄHRLEISTUNGSINFORMATION
Guillemot Corporation S.A. („Guillemot“) bietet dem Kunden ab dem Kaufdatum weltweit eine 2-jährige Garantie auf
Materialschäden und Herstellungsmängel. Sollte das Produkt dennoch während dieser zwei Jahre Schäden oder Mängel
aufweisen, kontaktieren Sie bitte unverzüglich den technischen Support, der Ihnen die weitere Verfahrensweise mitteilen
wird. Im Falle eines technischen Defektes können Sie da Produkt dort, wo Sie es gekauft haben, zurückgeben (oder an die
vom Technischen Support angegebene Adresse).
Im Rahmen dieser Garantie wird das defekte Produkt nach Ermessen des technischen Supports entweder repariert oder
ersetzt. Überall wo es geltendes Recht zulässt, wird die Haftung von Guillemot und seinen Niederlassungen für das
jeweilige Produkt(einschließlich für indirekte Beschädigungen), nur soweit übernommen, als das eine Reparatur
durchgeführt wird oder Ersatz geleistet wird. Die Rechte des Käufers gemäß dem geltenden Recht des jeweiligen Landes
werden durch diese Garantie nicht beeinflusst.
Diese Garantie tritt unter folgenden Umständen nicht in Kraft :
(1) Falls am Produkt etwas verändert wurde oder es geöffnet wurde, ein Schaden durch unangebrachte Nutzung,
Fahrlässigkeit, einen Unfall, Verschleiß oder irgendeinen anderen Grund verursacht wurde, der nicht im Zusammenhang
mit einem Materialdefekt oder Herstellungsmangel aufgetreten ist.
(2) Im Falle der Nichtbeachtung der durch den technischen Support erteilten Anweisungen.
(3) Software, die nicht von Guillemot herausgegeben wurde, unterliegt der speziellen Garantie des jeweiligen
Softwareherstellers.
Hinweise zum Umweltschutz
Dieses Produkt darf am Ende seiner Lebensdauer nicht über den normalen Haushaltsabfall entsorgt
werden, sondern muss an einem Sammelpunkt für das Recycling von elektrischen und elektronischen
Geräten abgegeben werden.
Das Symbol auf dem Produkt, der Gebrauchsanleitung oder der Verpackung weist darauf hin.
Die Werkstoffe sind gemäß ihrer Kennzeichnung wiederverwertbar. Mit der Wiederverwendung, der
stofflichen Verwertung oder anderen Formen der Verwertung von Altgeräten leisten Sie einen wichtigen
Beitrag zum Schutze unserer Umwelt.
Bitte erfragen Sie bei der Gemeindeverwaltung die zuständige Entsorgungsstelle.

1/6
Handleiding
INHOUD VAN DE VERPAKKING
Optische draadloze minimuis
Twee oplaadbare batterijen (Ni-MH AAA type,
1,2 V)
RF-zender/ontvanger
Kabel voor opladen minimuis
USB-verlengkabel
Numeriek toetsenblok
Oortelefoon
Draagtasje
Handleiding
SYSTEEMVEREISTEN
Notebookcomputer (Windows 98 SE, Me, 2000 en XP) met USB-poorten
La page est en cours de chargement...
La page est en cours de chargement...
La page est en cours de chargement...
La page est en cours de chargement...
La page est en cours de chargement...
La page est en cours de chargement...
La page est en cours de chargement...
La page est en cours de chargement...
La page est en cours de chargement...
La page est en cours de chargement...
La page est en cours de chargement...
La page est en cours de chargement...
La page est en cours de chargement...
La page est en cours de chargement...
La page est en cours de chargement...
La page est en cours de chargement...
La page est en cours de chargement...
La page est en cours de chargement...
La page est en cours de chargement...
La page est en cours de chargement...
La page est en cours de chargement...
La page est en cours de chargement...
La page est en cours de chargement...
-
 1
1
-
 2
2
-
 3
3
-
 4
4
-
 5
5
-
 6
6
-
 7
7
-
 8
8
-
 9
9
-
 10
10
-
 11
11
-
 12
12
-
 13
13
-
 14
14
-
 15
15
-
 16
16
-
 17
17
-
 18
18
-
 19
19
-
 20
20
-
 21
21
-
 22
22
-
 23
23
-
 24
24
-
 25
25
-
 26
26
-
 27
27
-
 28
28
-
 29
29
-
 30
30
-
 31
31
-
 32
32
-
 33
33
-
 34
34
-
 35
35
-
 36
36
-
 37
37
-
 38
38
-
 39
39
-
 40
40
-
 41
41
-
 42
42
-
 43
43


TRUSTMASTER NOMAD PACK WIRELESS 2 Le manuel du propriétaire
- Taper
- Le manuel du propriétaire
dans d''autres langues
- italiano: TRUSTMASTER NOMAD PACK WIRELESS 2 Manuale del proprietario
- English: TRUSTMASTER NOMAD PACK WIRELESS 2 Owner's manual
- español: TRUSTMASTER NOMAD PACK WIRELESS 2 El manual del propietario
- Deutsch: TRUSTMASTER NOMAD PACK WIRELESS 2 Bedienungsanleitung
- Nederlands: TRUSTMASTER NOMAD PACK WIRELESS 2 de handleiding
- português: TRUSTMASTER NOMAD PACK WIRELESS 2 Manual do proprietário
Documents connexes
-
TRUSTMASTER INTERNETPHONEVIDEOKIT Le manuel du propriétaire
-
-
TRUSTMASTER DUAL TRIGGER WIRELESS RECHARGEABLE Le manuel du propriétaire
-
-
Autres documents
-
RocketFish RF-NBKPD Manuel utilisateur
-
Thrustmaster T-WIRELESS 3 IN 1 RUMBLE FORCE Le manuel du propriétaire
-
-
-
-
-
-
Belkin MINI SOURIS OPTIQUE USB #F8E836VEAUSB Le manuel du propriétaire
-
Targus AKM10EU Le manuel du propriétaire