Oracle T5140 Guide d'installation
- Catégorie
- Les serveurs
- Taper
- Guide d'installation
Ce manuel convient également à

Sun SPARC Enterprise T5140 and T5240 Servers
Installation Guide
Part No. 820-3315-14
December 2010, Revision A

Copyright © 2008, 2010 , Oracle and/or its affiliates. All rights reserved.
FUJITSU LIMITED provided technical input and review on portions of this material.
Oracle and/or its affiliates and Fujitsu Limited each own or control intellectual property rights relating to products and technology described in this
document, and such products, technology and this document are protected by copyright laws, patents, and other intellectual property laws and
international treaties.
This document and the product and technology to which it pertains are distributed under licenses restricting their use, copying, distribution, and
decompilation. No part of such product or technology, or of this document, may be reproduced in any form by any means without prior written
authorization of Oracle and/or its affiliates and Fujitsu Limited, and their applicable licensors, if any. The furnishings of this document to you does not
give you any rights or licenses, express or implied, with respect to the product or technology to which it pertains, and this document does not contain or
represent any commitment of any kind on the part of Oracle or Fujitsu Limited, or any affiliate of either of them.
This document and the product and technology described in this document may incorporate third-party intellectual property copyrighted by and/or
licensed from the suppliers to Oracle and/or its affiliates and Fujitsu Limited, including software and font technology.
Per the terms of the GPL or LGPL, a copy of the source code governed by the GPL or LGPL, as applicable, is available upon request by the End User. Please
contact Oracle and/or its affiliates or Fujitsu Limited.
This distribution may include materials developed by third parties.
Parts of the product may be derived from Berkeley BSD systems, licensed from the University of California. UNIX is a registered trademark in the U.S. and
in other countries, exclusively licensed through X/Open Company, Ltd.
Oracle and Java are registered trademarks of Oracle and/or its affiliates. Fujitsu and the Fujitsu logo are registered trademarks of Fujitsu Limited.
All SPARC trademarks are used under license and are registered trademarks of SPARC International, Inc. in the U.S. and other countries. Products bearing
SPARC trademarks are based upon architectures developed by Oracle and/or its affiliates. SPARC64 is a trademark of SPARC International, Inc., used
under license by Fujitsu Microelectronics, Inc. and Fujitsu Limited. Other names may be trademarks of their respective owners.
United States Government Rights - Commercial use. U.S. Government users are subject to the standard government user license agreements of Oracle
and/or its affiliates and Fujitsu Limited and the applicable provisions of the FAR and its supplements.
Disclaimer: The only warranties granted by Oracle and Fujitsu Limited, and/or any affiliate of either of them in connection with this document or any
product or technology described herein are those expressly set forth in the license agreement pursuant to which the product or technology is provided.
EXCEPT AS EXPRESSLY SET FORTH IN SUCH AGREEMENT, ORACLE OR FUJITSU LIMITED, AND/OR THEIR AFFILIATES MAKE NO
REPRESENTATIONS OR WARRANTIES OF ANY KIND (EXPRESS OR IMPLIED) REGARDING SUCH PRODUCT OR TECHNOLOGY OR THIS
DOCUMENT, WHICH ARE ALL PROVIDED AS IS, AND ALL EXPRESS OR IMPLIED CONDITIONS, REPRESENTATIONS AND WARRANTIES,
INCLUDING WITHOUT LIMITATION ANY IMPLIED WARRANTY OF MERCHANTABILITY, FITNESS FOR A PARTICULAR PURPOSE OR NON-
INFRINGEMENT, ARE DISCLAIMED, EXCEPT TO THE EXTENT THAT SUCH DISCLAIMERS ARE HELD TO BE LEGALLY INVALID. Unless
otherwise expressly set forth in such agreement, to the extent allowed by applicable law, in no event shall Oracle or Fujitsu Limited, and/or any of their
affiliates have any liability to any third party under any legal theory for any loss of revenues or profits, loss of use or data, or business interruptions, or for
any indirect, special, incidental or consequential damages, even if advised of the possibility of such damages.
DOCUMENTATION IS PROVIDED “AS IS” AND ALL EXPRESS OR IMPLIED CONDITIONS, REPRESENTATIONS AND WARRANTIES,
INCLUDING ANY IMPLIED WARRANTY OF MERCHANTABILITY, FITNESS FOR A PARTICULAR PURPOSE OR NON-INFRINGEMENT, ARE
DISCLAIMED, EXCEPT TO THE EXTENT THAT SUCH DISCLAIMERS ARE HELD TO BE LEGALLY INVALID.

Copyright © 2008, 2010, Oracle et/ou ses sociétés affiliées. Tous droits réservés.
FUJITSU LIMITED a fourni et vérifié des données techniques de certaines parties de ce composant.
Oracle et/ou ses sociétés affiliées et Fujitsu Limited détiennent et contrôlent chacune des droits de propriété intellectuelle relatifs aux produitset
technologies décrits dans ce document. De même, ces produits, technologies et ce document sont protégés par des lois sur le copyright, des brevets,
d’autres lois sur la propriété intellectuelle et des traités internationaux.
Ce document, le produit et les technologies afférents sont exclusivement distribués avec des licences qui en restreignent l’utilisation, la copie, la
distribution et la décompilation. Aucune partie de ce produit, de ces technologies ou de ce document ne peut être reproduite sous quelque forme que ce
soit, par quelque moyen que ce soit, sans l’autorisation écrite préalable d’Oracle et/ou ses sociétés affiliées et de Fujitsu Limited, et de leurs éventuels
bailleurs de licence. Ce document, bien qu’il vous ait été fourni, ne vous confère aucun droit et aucune licence, expresses ou tacites, concernant le produit
ou la technologie auxquels il se rapporte. Par ailleurs, il ne contient ni ne représente aucun engagement, de quelque type que ce soit, de la part d’Oracle ou
de Fujitsu Limited, ou des sociétés affiliées de l’une ou l’autre entité.
Ce document, ainsi que les produits et technologies qu’il décrit, peuvent inclure des droits de propriété intellectuelle de parties tierces protégés par
copyright et/ou cédés sous licence par des fournisseurs à Oracle et/ou ses sociétés affiliées et Fujitsu Limited, y compris des logiciels et des technologies
relatives aux polices de caractères.
Conformément aux conditions de la licence GPL ou LGPL, une copie du code source régi par la licence GPL ou LGPL, selon le cas, est disponible sur
demande par l’Utilisateur final. Veuillez contacter Oracle et/ou ses sociétés affiliées ou Fujitsu Limited.
Cette distribution peut comprendre des composants développés par des parties tierces.
Des parties de ce produit peuvent être dérivées des systèmes Berkeley BSD, distribués sous licence par l’Université de Californie. UNIX est une marque
déposée aux États-Unis et dans d’autres pays, distribuée exclusivement sous licence par X/Open Company, Ltd.
Oracle et Java sont des marques déposées d’Oracle Corporation et/ou de ses sociétés affiliées. Fujitsu et le logo Fujitsu sont des marques déposées de
Fujitsu Limited.
Toutes les marques SPARC sont utilisées sous licence et sont des marques déposées de SPARC International, Inc., aux États-Unis et dans d’autres pays. Les
produits portant la marque SPARC reposent sur des architectures développées par Oracle et/ou ses sociétés affiliées. SPARC64 est une marque de SPARC
International, Inc., utilisée sous licence par Fujitsu Microelectronics, Inc. et Fujitsu Limited. Tout autre nom mentionné peut correspondre à des marques
appartenant à d’autres propriétaires.
United States Government Rights - Commercial use. U.S. Government users are subject to the standard government user license agreements of Oracle
and/or its affiliates and Fujitsu Limited and the applicable provisions of the FAR and its supplements.
Avis de non-responsabilité : les seules garanties octroyées par Oracle et Fujitsu Limited et/ou toute société affiliée de l’une ou l’autre entité en rapport
avec ce document ou tout produit ou toute technologie décrits dans les présentes correspondent aux garanties expressément stipulées dans le contrat de
licence régissant le produit ou la technologie fournis. SAUF MENTION CONTRAIRE EXPRESSÉMENT STIPULÉE DANS CE CONTRAT, ORACLE OU
FUJITSU LIMITED ET LES SOCIÉTÉS AFFILIÉES À L’UNE OU L’AUTRE ENTITÉ REJETTENT TOUTE REPRÉSENTATION OU TOUTE GARANTIE,
QUELLE QU’EN SOIT LA NATURE (EXPRESSE OU IMPLICITE) CONCERNANT CE PRODUIT, CETTE TECHNOLOGIE OU CE DOCUMENT,
LESQUELS SONT FOURNIS EN L’ÉTAT. EN OUTRE, TOUTES LES CONDITIONS, REPRÉSENTATIONS ET GARANTIES EXPRESSES OU TACITES, Y
COMPRIS NOTAMMENT TOUTE GARANTIE IMPLICITE RELATIVE À LA QUALITÉ MARCHANDE, À L’APTITUDE À UNE UTILISATION
PARTICULIÈRE OU À L’ABSENCE DE CONTREFAÇON, SONT EXCLUES, DANS LA MESURE AUTORISÉE PAR LA LOI APPLICABLE. Sauf mention
contraire expressément stipulée dans ce contrat, dans la mesure autorisée par la loi applicable, en aucun cas Oracle ou Fujitsu Limited et/ou l’une ou
l’autre de leurs sociétés affiliées ne sauraient être tenues responsables envers une quelconque partie tierce, sous quelque théorie juridique que ce soit, de
tout manque à gagner ou de perte de profit, de problèmes d’utilisation ou de perte de données, ou d’interruptions d’activités, ou de tout dommage
indirect, spécial, secondaire ou consécutif, même si ces entités ont été préalablement informées d’une telle éventualité.
LA DOCUMENTATION EST FOURNIE « EN L’ÉTAT » ET TOUTE AUTRE CONDITION, DÉCLARATION ET GARANTIE, EXPRESSE OU TACITE, EST
FORMELLEMENT EXCLUE, DANS LA MESURE AUTORISÉE PAR LA LOI EN VIGUEUR, Y COMPRIS NOTAMMENT TOUTE GARANTIE
IMPLICITE RELATIVE À LA QUALITÉ MARCHANDE, À L’APTITUDE À UNE UTILISATION PARTICULIÈRE OU À L’ABSENCE DE
CONTREFAÇON.

vi
Contents
Preface x
Preparing for Installation 1
Server Overview 1
Server Handling Precautions 3
Input Power Information and Precautions 3
Tools and Equipment Needed 4
Optional Component Installation 5
ESD Precautions 6
Installation Overview 6
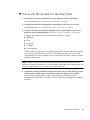
▼ Prepare for Installation 8
▼ Install the Hardware 8
▼ Configure the Service Processor 9
▼ Configure the Host Software 10
Cabling Notes for Both Servers 10
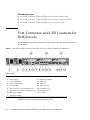
Port, Connector, and LED Locations for Both Servers 12
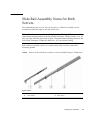
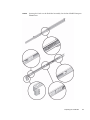
Slide Rail Assembly Notes for Both Servers 15
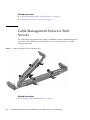
Cable Management Notes for Both Servers 18
Installing the Sun SPARC Enterprise T5140 and T5240 Servers 19
Installing the Servers in a Rack 19
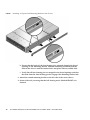
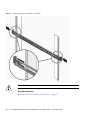
▼ Install the Slide Rail Assemblies 20
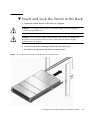
▼ Insert and Lock the Server in the Rack 26

vii Sun SPARC Enterprise T5140 and T5240 Servers Installation Guide • December 2010
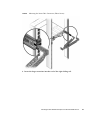
Installing the Cable Management Arm for Both Servers 28
▼ Install the Cable Management Arm 28
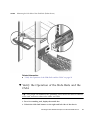
▼ Verify the Operation of the Slide Rails and the CMA 32
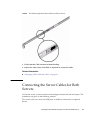
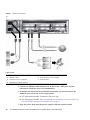
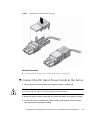
Connecting the Server Cables for Both Servers 34
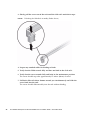
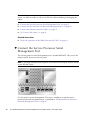
▼ Connect the Service Processor Serial Management Port 35
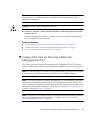
▼ Connect the Service Processor Network Management Port 36
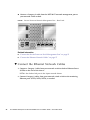
▼ Connect the Ethernet Network Cables 37
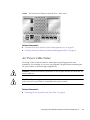
AC Power Cable Notes 38
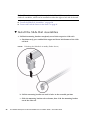
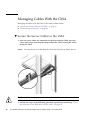
Managing Cables With the CMA 39
▼ Secure the Server Cables in the CMA 39
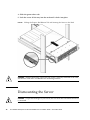
Dismounting the Servers 40
Powering On the System 41
Powering On the System for the First Time 41
ILOM System Console 42
ILOM Service Processor 42
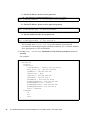
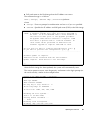
▼ Power On the System for the First Time 43
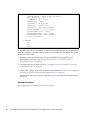
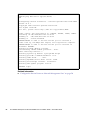
Enable the Service Processor Network Management Port 47
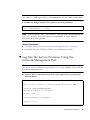
Logging Into the Service Processor 49
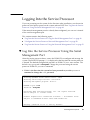
▼ Log Into the Service Processor Using the Serial Management Port 49
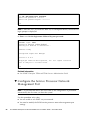
▼ Configure the Service Processor Network Management Port 50
▼ Log Into the Service Processor Using the Network Management Port
53
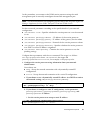
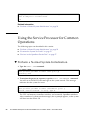
Using the Service Processor for Common Operations 54
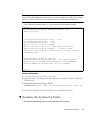
▼ Perform a Normal System Initialization 54
▼ Examine the System for Faults 56
Devices in the OpenBoot Device Tree 58
Booting the Solaris Operating System 59
▼ Boot the Solaris Operating System 59

Contents viii
▼ Avoid Booting the Solaris Operating System at Startup 60
▼ Reset the System 60
▼ Power Cycle the System 61
Verifying System Functionality 62
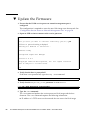
Updating the Firmware 63
flashupdate command 63
▼ Update the Firmware 64
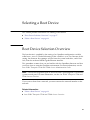
Selecting a Boot Device 67
Boot Device Selection Overview 67
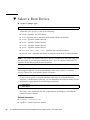
▼ Select a Boot Device 68
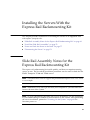
Installing the Servers With the Express Rail Rackmounting Kit 69
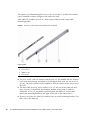
Slide Rail Assembly Notes for the Express Rail Rackmounting Kit 69
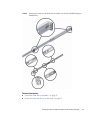
▼ Install the Slide Rail Assemblies 72
▼ Insert and Lock the Server in the Rack 77
Dismounting the Server 79
Assembling and Installing DC Power Cables for the Sun SPARC Enterprise
T5140 Server 81
Requirements for Servers With DC Input Power 81
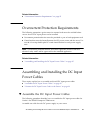
DC Supply and Ground Conductor Requirements 82
Overcurrent Protection Requirements 83
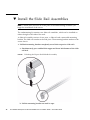
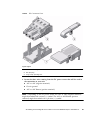
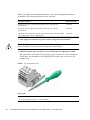
Assembling and Installing the DC Input Power Cables 83
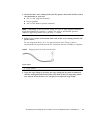
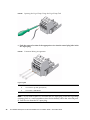
▼ Assemble the DC Input Power Cable 83
▼ Install the Strain Relief Housings 89
▼ Connect the DC Input Power Cords to the Server 91
Assembling and Installing DC Power Cables for the Sun SPARC Enterprise
T5240 Server 93
Requirements for Servers With DC Input Power 93

ix Sun SPARC Enterprise T5140 and T5240 Servers Installation Guide • December 2010
DC Supply and Ground Conductor Requirements 94
Overcurrent Protection Requirements 95
Assembling and Installing the DC Input Power Cables 95
▼ Assemble the DC Input Power Cables 95
▼ Connect the DC Input Power Cords to the Server 99
Index 101

x
Preface
This installation guide provides instructions and information to help you install the
Sun SPARC Enterprise T5140 and T5240 servers from Oracle. The installation
instructions assume that you are a system administrator experienced with the Oracle
Solaris Operating System.
■ “UNIX Commands” on page x
■ “Shell Prompts” on page xi
■ “Related Documentation” on page xi
■ “Documentation, Support, and Training” on page xii
■ “Documentation Feedback” on page xii
UNIX Commands
This document might not contain information on basic UNIX commands and
procedures such as shutting down the system, booting the system, and configuring
devices. Refer to the following for this information:
■ Software documentation that you received with your system
■ Solaris Operating System documentation, which is at
(http://docs.sun.com)

xi Sun SPARC Enterprise T5140 and T5240 Servers Installation Guide • December 2010
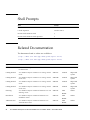
Shell Prompts
Related Documentation
The documents listed as online are available at:
(http://docs.sun.com/app/docs/prod/sparc.t5140)
(http://docs.sun.com/app/docs/prod/sparc.t5240)
Shell Prompt
C shell machine-name%
C shell superuser machine-name#
Bourne shell and Korn shell $
Bourne shell and Korn shell superuser #
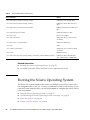
Application Title Part Number Format Location
Product Notes Sun SPARC Enterprise T5140 and T5240 Servers
Product Notes
820-3312 PDF Online
Getting Started Sun SPARC Enterprise T5140 Server Getting Started
Guide
820-3875 Printed Ships with
system
Getting Started Sun SPARC Enterprise T5140 Server Getting Started
Guide (DC)
820-5840 Printed Ships with
system
Getting Started Sun SPARC Enterprise T5240 Server Getting Started
Guide
820-3521 Printed Ships with
system
Getting Started Sun SPARC Enterprise T5240 Server Getting Started
Guide (DC)
820-5841 Printed Ships with
system
Planning Sun SPARC Enterprise T5140 and T5240 Servers Site
Planning Guide
820-3314 PDF
HTML
Online
Installation Sun SPARC Enterprise T5140 and T5240 Servers
Installation Guide
820-3315 PDF
HTML
Online
Administration Sun SPARC Enterprise T5140 and T5240 Servers
Administration Guide
820-3316 PDF
HTML
Online

Preface xii
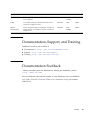
Documentation, Support, and Training
Additional resources are available at:
■ Documentation (http://www.sun.com/documentation)
■ Support (http://www.sun.com/support)
■ Training (http://www.sun.com/training)
Documentation Feedback
Submit comments about this document by clicking the Feedback[+] link at
(http://docs.sun.com).
Please include the title and part number of your document with your feedback:
Sun SPARC Enterprise T5140 and T5240 Servers Installation Guide, part number
820-3315-14.
Service Sun SPARC Enterprise T5140 and T5240 Servers
Service Manual
820-3318 PDF
HTML
Online
Safety Sun SPARC Enterprise T5140 and T5240 Servers
Safety and Compliance Guide
820-3319 PDF Online
Remote
Management
Oracle Integrated Lights Out Manager (ILOM) 3.0
Supplement for Sun SPARC Enterprise T5140 and
T5240 Servers
820-6684 PDF
HTML
Online
Application Title Part Number Format Location

xiii Sun SPARC Enterprise T5140 and T5240 Servers Installation Guide • December 2010

1
Preparing for Installation
This chapter provides background information about the installation procedures for
both servers. This chapter contains these topics:
■ “Server Overview” on page 1
■ “Server Handling Precautions” on page 3
■ “Input Power Information and Precautions” on page 3
■ “Tools and Equipment Needed” on page 4
■ “Optional Component Installation” on page 5
■ “ESD Precautions” on page 6
■ “Installation Overview” on page 6
■ “Prepare for Installation” on page 8
■ “Install the Hardware” on page 8
■ “Configure the Service Processor” on page 9
■ “Configure the Host Software” on page 10
■ “Cabling Notes for Both Servers” on page 10
■ “Port, Connector, and LED Locations for Both Servers” on page 12
■ “Slide Rail Assembly Notes for Both Servers” on page 15
■ “Cable Management Notes for Both Servers” on page 18
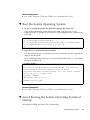
Server Overview
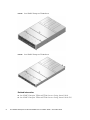
The Sun SPARC Enterprise T5140 server from Oracle is a 1 rack unit (1U) server.
Oracle’s Sun SPARC Enterprise T5240 server is a 2 rack unit (2U) server.

2 Sun SPARC Enterprise T5140 and T5240 Servers Installation Guide • December 2010
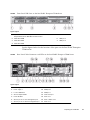
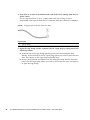
FIGURE: Sun SPARC Enterprise T5240 Server
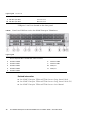
FIGURE: Sun SPARC Enterprise T5140 Server
Related Information
■ Sun SPARC Enterprise T5140 and T5240 Servers Getting Started Guide
■ Sun SPARC Enterprise T5140 and T5240 Servers Getting Started Guide (DC)

Preparing for Installation 3
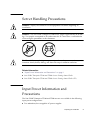
Server Handling Precautions
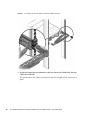
Caution – Deploy the antitilt bar on the equipment rack before beginning an
installation.
Caution – The Sun SPARC Enterprise T5240 server weighs approximately 46 lb (20.7
kg). Two people are required to lift and mount this 2U server into a rack enclosure
when using the procedures in this document.
Caution – When completing a two-person procedure, always communicate your
intentions clearly before, during, and after each step to minimize confusion.
Related Information
■ “Input Power Information and Precautions” on page 3
■ Sun SPARC Enterprise T5140 and T5240 Servers Getting Started Guide
■ Sun SPARC Enterprise T5140 and T5240 Servers Getting Started Guide (DC)
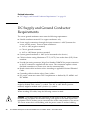
Input Power Information and
Precautions
The Sun SPARC Enterprise T5140 and T5240 servers are available in the following
input power configurations:
■ Two redundant, hot-swappable AC power supplies

4 Sun SPARC Enterprise T5140 and T5240 Servers Installation Guide • December 2010
■ Two redundant, DC power supplies
Note – Safety agency requirements prohibit manufacturers from changing a product
from AC input to DC input or from DC input to AC input after the product has been
removed from the agency approved manufacturing site.
Note – The DC version of the server must be installed in a restricted-access location.
According to the intent of the National Electrical Code, a restricted-access location is
an area intended for qualified or trained personnel only and has access controlled by
a locking mechanism, such as a key lock or an access card system.
When each power supply is connected to a separate power source, the server
continues to operating under the following fault conditions:
■ A power source failure that removes input power from one of the power supplies.
■ Failure of one of the power supplies.
■ Service actions which require removal of one of the power supplies.
Refer to the Sun SPARC Enterprise T5140 and T5240 Servers Site Planning Guide for
input power specifications.
Note – Input AC/DC power cables: To avoid missing initialization messages, do not
attach power cables to the power supplies until you have finished connecting the
data cables, and have connected the server to a serial terminal or a terminal emulator
(PC or workstation). The server goes into Standby mode and the ILOM service
processor initializes as soon as the input power cables are connected to the power
source.
Related Information
■ Sun SPARC Enterprise T5140 and T5240 Servers Site Planning Guide
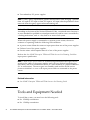
Tools and Equipment Needed
To install the system, you must have the following tools:
■ No. 2 Phillips screwdriver
■ No. 1 Phillips screwdriver

Preparing for Installation 5
■ ESD mat and grounding strap
In addition, you must provide a system console device, such as one of the following:
■ ASCII terminal
■ Workstation
■ Terminal server
■ Patch panel connected to a terminal server
Related Information
■ “Optional Component Installation” on page 5
Optional Component Installation
The standard components of the server are installed at the factory. However, if you
ordered options such as additional memory or PCI cards, these will be shipped
separately. If possible, install these components prior to installing the server in a
rack.
If you ordered any options that are not factory-installed, see the Sun SPARC
Enterprise T5140 and T5240 Servers Service Manual for installation instructions.
Note – The list of optional components can be updated without notice. See the
product web pages for the most current list of components supported in the server.
Related Information
■ Sun SPARC Enterprise T5140 and T5240 Servers Getting Started Guide
■ Sun SPARC Enterprise T5140 and T5240 Servers Getting Started Guide (DC)
■ Sun SPARC Enterprise T5140 and T5240 Servers Service Manual

6 Sun SPARC Enterprise T5140 and T5240 Servers Installation Guide • December 2010
ESD Precautions
Electronic equipment is susceptible to damage by static electricity. Use a grounded
antistatic wriststrap, footstrap, or equivalent safety equipment to prevent
electrostatic damage (ESD) when you install or service the servers.
Caution – To protect electronic components from electrostatic damage, which can
permanently disable the system or require repair by service technicians, place
components on an antistatic surface, such as an antistatic discharge mat, an antistatic
bag, or a disposable antistatic mat. Wear an antistatic grounding strap connected to a
metal surface on the chassis when you work on system components.
Related Information
■ “Installation Overview” on page 6
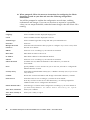
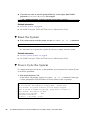
Installation Overview
This installation guide provides procedures that are to be performed in the following
order.

Preparing for Installation 7
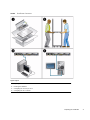
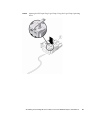
FIGURE: Installation Overview
Figure Legend
1 Preparing for installation
2 Installing the hardware
3 Configuring the service processor
4 Configuring the host software

8 Sun SPARC Enterprise T5140 and T5240 Servers Installation Guide • December 2010
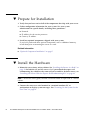
▼ Prepare for Installation
1. Verify that you have received all of the components that ship with your server.
2. Gather configuration information for your system. See your system
administrator for specific details, including these parameters:
■ Netmask
■ IP address for the service processor
■ Gateway IP address
3. Install any optional components shipped with your system.
If you have purchased other optional components such as additional memory,
install them prior to mounting the server in a rack.
Related Information
■ “Optional Component Installation” on page 5
▼ Install the Hardware
1. Mount the server into a rack or cabinet. See “Installing the Servers in a Rack” on
page 19 for both the 1U and 2U servers. Or, if you ordered the express rail
rackmounting kit, which has the same rack rail assemblies for both servers, see
“Installing the Servers With the Express Rail Rackmounting Kit” on page 69.
Note – In the rest of this guide, the term rack means either an open rack or a closed
cabinet.
2. Connect the server to a serial terminal or a terminal emulator (PC or
workstation) to display system messages. See “Powering On the System for the
First Time” on page 41.

Preparing for Installation 9
Tip – The serial terminal or a terminal emulator should be connected before you
connect the power cables. As soon as AC power is connected to the system, the
service processor immediately powers on and runs diagnostics. Diagnostic test
failures will be printed on the serial terminal. For more information, refer to the
Integrated Lights Out Manager Supplement for Sun SPARC Enterprise T5140 and T5240
Servers.
3. Connect the data cables to the server, but do not connect the AC power cable
yet. See “Connecting the Server Cables for Both Servers” on page 34.
4. Connect the AC power cable to the server and examine the display for any error
messages. See “Powering On the System for the First Time” on page 41.
Caution – There is a potential for electric shock if the server and related equipment
are not properly grounded.
Note – The service processor runs on the 3.3V standby voltage. As soon as AC
power is connected to the system, the service processor immediately powers on, runs
diagnostics, and initializes the ILOM firmware.
Related Information
■ “Powering On the System for the First Time” on page 41
▼ Configure the Service Processor
1. After the service processor boots, access the ILOM command-line interface
(CLI) through the serial management port. See “Log Into the Service Processor
Using the Serial Management Port” on page 49.
2. Configure the service processor network addresses. See “Configure the Service
Processor Network Management Port” on page 50.
Note – The service processor network management port is not operational until you
configure network settings for the service processor (through the service processor
serial management port).
La page charge ...
La page charge ...
La page charge ...
La page charge ...
La page charge ...
La page charge ...
La page charge ...
La page charge ...
La page charge ...
La page charge ...
La page charge ...
La page charge ...
La page charge ...
La page charge ...
La page charge ...
La page charge ...
La page charge ...
La page charge ...
La page charge ...
La page charge ...
La page charge ...
La page charge ...
La page charge ...
La page charge ...
La page charge ...
La page charge ...
La page charge ...
La page charge ...
La page charge ...
La page charge ...
La page charge ...
La page charge ...
La page charge ...
La page charge ...
La page charge ...
La page charge ...
La page charge ...
La page charge ...
La page charge ...
La page charge ...
La page charge ...
La page charge ...
La page charge ...
La page charge ...
La page charge ...
La page charge ...
La page charge ...
La page charge ...
La page charge ...
La page charge ...
La page charge ...
La page charge ...
La page charge ...
La page charge ...
La page charge ...
La page charge ...
La page charge ...
La page charge ...
La page charge ...
La page charge ...
La page charge ...
La page charge ...
La page charge ...
La page charge ...
La page charge ...
La page charge ...
La page charge ...
La page charge ...
La page charge ...
La page charge ...
La page charge ...
La page charge ...
La page charge ...
La page charge ...
La page charge ...
La page charge ...
La page charge ...
La page charge ...
La page charge ...
La page charge ...
La page charge ...
La page charge ...
La page charge ...
La page charge ...
La page charge ...
La page charge ...
La page charge ...
La page charge ...
La page charge ...
La page charge ...
La page charge ...
La page charge ...
La page charge ...
La page charge ...
La page charge ...
-
 1
1
-
 2
2
-
 3
3
-
 4
4
-
 5
5
-
 6
6
-
 7
7
-
 8
8
-
 9
9
-
 10
10
-
 11
11
-
 12
12
-
 13
13
-
 14
14
-
 15
15
-
 16
16
-
 17
17
-
 18
18
-
 19
19
-
 20
20
-
 21
21
-
 22
22
-
 23
23
-
 24
24
-
 25
25
-
 26
26
-
 27
27
-
 28
28
-
 29
29
-
 30
30
-
 31
31
-
 32
32
-
 33
33
-
 34
34
-
 35
35
-
 36
36
-
 37
37
-
 38
38
-
 39
39
-
 40
40
-
 41
41
-
 42
42
-
 43
43
-
 44
44
-
 45
45
-
 46
46
-
 47
47
-
 48
48
-
 49
49
-
 50
50
-
 51
51
-
 52
52
-
 53
53
-
 54
54
-
 55
55
-
 56
56
-
 57
57
-
 58
58
-
 59
59
-
 60
60
-
 61
61
-
 62
62
-
 63
63
-
 64
64
-
 65
65
-
 66
66
-
 67
67
-
 68
68
-
 69
69
-
 70
70
-
 71
71
-
 72
72
-
 73
73
-
 74
74
-
 75
75
-
 76
76
-
 77
77
-
 78
78
-
 79
79
-
 80
80
-
 81
81
-
 82
82
-
 83
83
-
 84
84
-
 85
85
-
 86
86
-
 87
87
-
 88
88
-
 89
89
-
 90
90
-
 91
91
-
 92
92
-
 93
93
-
 94
94
-
 95
95
-
 96
96
-
 97
97
-
 98
98
-
 99
99
-
 100
100
-
 101
101
-
 102
102
-
 103
103
-
 104
104
-
 105
105
-
 106
106
-
 107
107
-
 108
108
-
 109
109
-
 110
110
-
 111
111
-
 112
112
-
 113
113
-
 114
114
-
 115
115


Oracle T5140 Guide d'installation
- Catégorie
- Les serveurs
- Taper
- Guide d'installation
- Ce manuel convient également à
dans d''autres langues
- English: Oracle T5140 Installation guide
Documents connexes
-
Oracle SPARC T7-4 Guide d'installation
-
-
-
-
-
-
-
Autres documents
-
Sun Microsystems Sun Fire X2250 Guide d'installation
-
Fujitsu SPARC ENTERPRISE T5240 Overview Manual
-
Siemens Security Camera T1000 Manuel utilisateur
-
 Sun Enterprise 450 server Upgrade Manual
-
-
-
Fujitsu SPARC M12 Mode d'emploi
-
-
-
Fujitsu SPARC T2000 Manuel utilisateur
