
P02
P16
P31
Lawn Mowing Robot
Robot tondeuse à gazon
Robot cortacésped
EN
F
ES

Lawn Mowing Robot EN
2
TABLE OF CONTENTS
1. Product safety
1.1 General & Additional safety instruction
1.2 Information on the Landroid
®
M
2. Technical Data and Component List
2.1 Technical data
2.2 Component list
3. Understanding Your Landroid
®
M
3.1 How does my Landroid
®
M know what to mow?
3.2 How does my Landroid
®
M know where to go?
A. Finding the charging base
B. Rain sensors
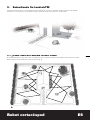
C. Sensing the boundary wire
D. Starting and stopping while mowing
3.3 How big an area can my Landroid
®
M mow?
3.4 How efficiently will my Landroid
®
M mow the grass?
4. Boundary Wire Basics
4.1 Pegging the Boundary Wire
4.2 Burying the Boundary Wire
4.3 Splicing the Boundary Wire
5. Software update
6. Maintenance
6.1 Keep it Sharp
A. Rotate and Flip the Blades
B. Replace the Blades
6.2 Keep it Clean
A. Cleaning the Body
B. Cleaning the Underside
C. Clean the contact pins and the charging strips
6.3 Battery Life
6.4 Winter Hibernation
6.5 Replacing the battery
3
3
5
6
6
7
9
9
10
10
10
10
10
11
11
12
12
12
12
12
12
13
13
13
13
13
14
14
14
15
15

Lawn Mowing Robot EN
3
1. Product safety
1.1 General & Additional safety instruction
WARNING: Some dust created by power sanding, sawing, grinding, drilling and other
construction activities contains chemicals known to the state of California to cause cancer, birth
defects or other reproductive harm. Some examples of these chemicals are:
• Lead from lead-based paints;
• Crystalline silica from bricks and cement and other masonry products and
• Arsenic and chromium from chemically-treated lumber.
Your risk from these exposures varies, depending on how often you do this type of work. To reduce
your exposure to these chemical: work in a well ventilated area, and work with approved safety
equipment, such as those dust masks that are specially designed to filter out microscopic particles.
WARNING: This product maybe contains lead, phthalate or other chemicals known to the State
of California to cause cancer, birth defects and other reproductive harm. Please wash your hands
after use.
WARNING: Read all safety warnings and all instructions. Failure to follow the warnings and instructions
may result in electric shock, fire and/or serious injury.
Carefully read the instructions for the safe operation of the machine.
Save all warnings and instructions for future reference.
- This appliance is not intended for use by persons (including children) with reduced physical, sensory or mental
capabilities, or lack of experience and knowledge, unless they have been given supervision or instruction concerning
use of the appliance by a person responsible for their safety.
- Children should be supervised to ensure that they do not play with the appliance.
- The appliance is only to be used with the power supply unit provided with the appliance.
IMPORTANT
READ CAREFULLY BEFORE USE
KEEP FOR FUTURE REFERENCE
SAFE OPERATION PRACTICES
Training
a) Read the instructions carefully. Make sure you understand the instructions and be familiar with the controls and the
proper use of the appliance.
b) Never allow people unfamiliar with these instructions or children to use the appliance. Local regulations can restrict the
age of the operator.
c) The operator or user is responsible for accidents or hazards occurring to other people or their property.
Preparation
a) Ensure the correct installation of boundary wire as instructed.
b) Periodically inspect the area where the appliance is to be used and remove all stones, sticks, wires, bones, and other
foreign objects.
c) Periodically visually inspect to see that the blades, blade bolts and cutter assembly are not worn or damaged. Replace
worn or damaged blades and bolts in sets to preserve balance.
d) On multi-spindle appliances, take care as rotating one blade can cause other blades to rotate.
e) WARNING! The lawnmower shall not be operated without the guard in place.
OPERATION
1. GENERAL
a) Never operate the appliance with defective guards, or without safety devices, for example deflectors, in place.
b) Do not put hands or feet near or under rotating parts. Keep clear of the discharge opening at all times.
c) Never pick up or carry an appliance while the motor is running.
d) Operate the disabling device from the appliance and turn off appliance before:
– Clearing a blockage;
– Checking, cleaning or working on the appliance.
e) It is not permitted to modify the original design of robotic lawnmower. All modifications are made at your own risk.
f) Start robotic lawnmower according to the instructions. When the power key is switched on, make sure you keep your
hands and feet away from the rotating blades. Never put your hands and feet under the mower.
g) Never lift up robotic lawnmower or carry it when the power key is switched on.
h) Do not let persons who do not know how robotic lawnmower works and behaves use the mower.
i) Do not put anything on top of robotic lawnmower or its charging station.
j) Do not allow robotic lawnmower to be used with a defective blade disc or body. Neither should it be used with
defective blades, screws, nuts or cables.
k) Always switch off robotic lawnmower when you do not intend to use the mower. Robotic lawnmower can only start
when the power key is switched on and the correct PIN code has been entered.

Lawn Mowing Robot EN
4
2. ADDITIONALLY WHEN THE APPLIANCE IS OPERATING AUTOMATICALLY
a) Do not leave the machine to operate unattended if you know that there are pets, children or people in the vicinity.
MAINTENANCE AND STORAGE
WARNING! When the mower is turned upside down the power key must always be switched off.
The power key should be switched off during all work on the mower’s underframe, such as
cleaning or replacing the blades.
a) Keep all nuts, bolts and screws tight to be sure the appliance is in safe working condition.
b) Inspect the robotic lawnmower each week and replace worn or damaged parts for safety.
c) Check especially that the blades and blade disc are not damaged. Replace all blades and screws at the same time if
necessary so that the rotating parts are balanced.
d) Ensure that only replacement cutting means of the right type are used.
e) Ensure that batteries are charged using the correct charger recommended by the manufacturer. Incorrect use may result
in electric shock, overheating or leakage of corrosive liquid from the battery.
f) In the event of leakage of electrolyte flush with water/neutralizing agent, seek medical help if it comes into contact with
the eyes etc.
g) Servicing of the appliance should be according to manufacturers’ instructions.
Transport
The original packaging should be used when transporting robotic lawnmower over long distances.
To safely move form or within the working area:
a) Press the STOP button to stop the mower.
b) You select the four digit PIN code when you start the mower for the first time.
c) Always switch off robotic lawnmower if you intend to carry the mower.
d) Carry the mower by the handle at the rear under the mower. Carry the mower with the blade disc away from the body.
GENERAL SAFETY WARNINGS
WARNING: Read all safety warnings and instructions. Failure to follow the warnings and
instructions may result in electric shock, fire and/or serious injury.
1) WARNING: Risk of fire and burns. Do not disassemble, heat above 100°C (212°F), or incinerate. Do
not expose cells or batteries to heat or fire. Avoid storage in direct sunlight.
2) Dispose of used battery promptly. When disposing of secondary cells or batteries, keep cells or
batteries of different electrochemical systems separate from each other.
3) Keep battery out of reach of children and in original package until ready to use.
4) Never put batteries in mouth. If swallowed, contact your physician or local poison control center.
5) CAUTION – The battery used in this device may present a risk of fire or chemical burn if mistreated.
Replace battery with WORX only. Use of another battery may present a risk of fire or explosion.
6) Warning: Do not use a visibly damaged battery pack or appliance as applicable.
7) Warning: Do not modify or attempt to repair the appliance or the battery pack as applicable.
8) BATTERY MUST BE RECYCLED.
9) Do not short-circuit a cell or battery. Do not store cells or batteries haphazardly in a box or drawer
where they may short-circuit each other or be short-circuited by conductive materials.
10)Do not subject cells or batteries to mechanical shock.
11)Keep cells and batteries clean and dry. Wipe the cell or battery terminals with a clean dry cloth if they become
dirty.
12)Do not maintain secondary cells and batteries on charge when not in use.
13)Retain the original cell and battery literature for future reference.
14) Do not use any charger other than that specifically provided for use with the equipment. Secondary cells and batteries
need to be charged before use. Always use the correct charger and refer to the manufacturer’s instructions or
equipment manual for proper charging instructions.
15) When possible, remove the battery from the equipment when not in use.
16) Prevent unintentional starting. Ensure the switch is in the off-position before connecting to battery pack, picking up
or carrying the appliance. Carrying the appliance with your finger on the switch or energizing appliance that have the
switch on invites accidents.
17) Under abusive conditions, liquid may be ejected from the battery; avoid contact. If contact accidentally occurs, flush
with water. If liquid contacts eyes, additionally seek medical help. Liquid ejected from the battery may cause irritation or
burns.
18) Have servicing performed by a qualified repair person using only identical replacement parts. This will ensure that the
safety of the product is maintained.

Lawn Mowing Robot EN
5
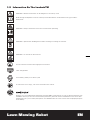
1.2 Information On The Landroid
®
M
WARNING - Robotic lawnmower can be dangerous if incorrectly used.
Read through the Operator’s manual carefully and understand the content before using your robotic
lawnmower.
WARNING - Keep a safe distance from the machine when operating.
WARNING - Operate the disabling device before working on or lifting the machine.
WARNING - Do not ride on the machine.
Do not wash the machine with a high pressure washer.
CPSC Danger label.
Li-Ion battery, battery must be recycled
To reduce the risk of injury, user must read instruction manual.
POSITEC Inc. has established a partnership with the RBRC Corporation to recycle any Positec batteries with
the RBRC-call2recycle seal. For environmental protection, please do not discard batteries in the trash. After
the batteries' life cycle is ended, then please call 1-800-822-8837 for a free service that will properly dispose
of the battery.
KEEP HANDS AND FEET
AWAY
GARDER MAINS ET PIEDS À DISTANCE

Lawn Mowing Robot EN
6
2. Technical Data and Component List
2.1 Technical Data
Rated voltage 28V Max*
No load speed 2800/min
Cutting diameter 7 in.
Cutting height 1.6 in.-4.0 in.
Cutting height positions 5
Battery type Lithium-Ion
Battery model WA3225
Charging time 1.5h approx
Charger model WA3744
Charger rating
Input: 100-240V~50/60Hz, 60W
Output: 24-28V DC, 1.5A
Machinery weight 22.5 lbs
Protection degree III
*Voltage measured without workload. Initial battery voltage reaches maximum of 28 volts. Nominal voltage is 25.2 volts.
Accessories
Charging Base with 15m Extension Cable 1
Blades (WA0176) 9
Screws 9
Battery pack (WA3225) 1
Wire Pegs (WA0179) 200
590 feet Boundary wire (WA0177, WA0178) 1
Charging Base Fixing Nails 4
Power Adaptor (WA3744) 1
Boundary Wire Distance Gauge (printed on cartons top cover) 2
Hex key 1
Only use the appropriate accessories intended for this tool. Accessory information can be found on the product packaging,
at a WORX dealer or on our website at www.worx.com.

Lawn Mowing Robot EN
7
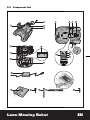
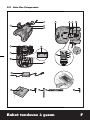
2.2 Component List
6
8
75
9
10
11
12
13
23
2221
17
19
16
18
3
4
2
1
25
20
24
15
14

Lawn Mowing Robot EN
8
1. HANDLE BAR
2. LOW VOLTAGE CABLE
3. CONTACT PINS
4. CHARGING BASE
5. CHARGING STRIP
6. DISPLAY WINDOW
7. CONTROL PANEL COVER
8. STOP BUTTON
9. RAIN SENSOR
10. REAR DRIVING WHEEL
11. HANDLE
12. BATTERY PACK
13. BLADE DISC
14. CUTTING BLADE
15. FRONT WHEEL
16. START KEY
17. DISPLAY
18. KEYPAD
19. ON/OFF KEY
20. POWER ADAPTOR
21. BOUNDARY WIRE
22. WIRE PEGS
23. CHARGING BASE FIXING NAILS
24. BOUNDARY WIRE DISTANCE GAUGE (AFFIXED TO BOX CARTON)
25. HEX KEY

Lawn Mowing Robot EN
9
3. Understanding Your Landroid
®
M
We would like to congratulate you on your new purchase of the Landroid
®
M and entering into the care-free life of automatic
mowing. In the following, we would like to help you better understand how your Landroid
®
M thinks.
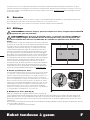
3.1 How Does My Landroid
®
M Know What To Mow?
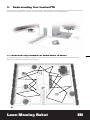
The Landroid
®
M chooses its direction at random. It will make sure your entire lawn is evenly mowed without leaving
behind any unattractive mowing paths (See Fig. A).
A

Lawn Mowing Robot EN
10
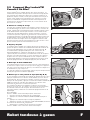
3.2 How Does My Landroid
®
M
Know Where To Go?
Your Landroid
®
M is capable of doing things on its own. The
Landroid
®
M knows when it needs to go to its Charging Base (4)
to charge, can sense when it is raining, can stop itself if it senses
a problem, and knows to stop, draw back, and then turn around
when it bumps into something blocking its path or other object.
The Landroid
®
M will also automatically stop its Blade Disc(13) from
rotating if it is lifted off the ground to prevent an accident.
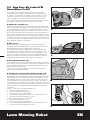
A. Finding the charging base
When your Landroid
®
M needs to recharge, it will stop mowing and
follow the Boundary Wire (21) in an counter-clockwise direction back
to its Charging Base. Landroid
®
M is pre-programmed to mow the
grass near the boundary wire once a week. If you want to mow the
grass near the boundary wire at other times, open the panel cover,
press the home button and close the panel cover. Landroid
®
M will
stop mowing, locate the boundary wire and mow the grass near the
boundary wire while it locates the charging station . We suggest you
use this function when the battery power is more than 75%. You can
check the battery power in the display.
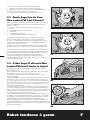
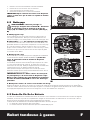
B. Rain sensors
The Landroid
®
M is fitted with a Rain Sensor (9) that will detect
rain drops and tell the Landroid
®
M to stop mowing and follow the
Boundary Wire back to its Charging Base (See Fig. B )
The Landroid
®
M is programmable to have a delay start function
(0 – 180 mins) when it rains. When the rain sensors are wet, the
Landroid
®
M stops cutting and returns to its docking station. Only
when the rain sensors become dry will the Landroid
®
M begin the
delay start countdown or return to mowing immediately. See the
Programming and Troubleshooting Guide for more details.
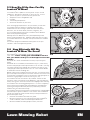
C. Sensing the boundary wire
The Landroid
®
M always obeys the border set by the Boundary Wire
and uses two sensors at its front to sense when it is getting close (See
Fig. C). Before changing direction, the Landroid
®
M will overrun the
Boundary Wire up to 8 inches*.
*This is the recommended distance. Use the provided distance
gauge to ensure proper installation.
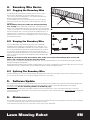
D. Starting and stopping while mowing (See Fig. D, E)
If you would like to command the Landroid
®
M to stop mowing,
then simply press the STOP button (8) on top of the mower. To start
mowing open the Control Panel Cover, press the ON/OFF key and
input the PIN code, then press start key and close the panel cover.
If the Landroid
®
M senses that something is wrong, it will display a
fault message on the Display (17), and will turn itself off if it does not
receive any input from the user within 20min (for information on fault
messages refer to the Programming and Troubleshooting Guide).
To resume:
Action 1: STOP –Auto Shutdown after 20 mins
• Open the Control Panel Cover
• Press the ON/OFF Key (19) to ON
• Press 0 key to correct the problem
• Press START button again and Close the Control Panel Cover
• Now the Landroid
®
M will begin to mow!
Action 2: STOP– Without Auto Shutdown
• Open the Control Panel Cover
• Press 0 key to correct the problem
• Press START button again and Close the Control Panel Cover
• Now the Landroid
®
M will begin to mow!
B
C
DD
E

Lawn Mowing Robot EN
11
3.3 How Big Of An Area Can My
Landroid
®
M Mow?
Your Landroid
®
M is capable of mowing areas of up to around
10000sq.ft, although this depends on various factors, such as:
• Species of grass in your lawn and its growth rate
• Sharpness of the Cutting Blades (14)
• Humidity
• Surrounding temperature
• Amount of obstacles in your Lawn
If the surrounding temperature is very hot where you live then
your Landroid
®
M may charge at a slightly slower rate. The
Landroid
®
M uses less energy in open areas that have fewer
obstacles, such as flower beds, fountains, walkways, etc…
You can find the default work time of Landroid
®
M for different
lawn size in programming guide.
Mowing times are different for every lawn depending on the
factors mentioned previously. Gradually adjust the time you allow
your Landroid
®
M to mow each day until you find the most suitable
setting.
You can also program Landroid
®
M working time to suit your
schedule – refer to Programming Guide.
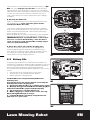
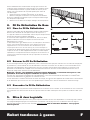
3.4 How Efficiently Will My
Landroid
®
M Mow The Grass?
The Landroid
®
M’s cutting height can be adjusted between
1.6 in.- 4.0 in.. Before starting your Landroid
®
M for the first
time, you should cut the grass to the height not more than
5 inches.
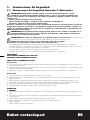
The blade disc can be assembled in two ways as per the grass
height.
The blade disc is assembled, as illustrated in Fig. F1, in the factory
and the cutting height can be adjusted from 2.4in. to 4.0in.. (See Fig.
F1). When turning over the Blade disc assembly (See Fig. F2), the
cutting height can be adjusted from 1.6 in. to 3.1in. with the blades
on the bottom side of the blade disc.
Before starting your Landroid
®
M for the first time, you should cut the
grass manually to the height not more than 5 inches. Then make sure
you open the Control Panel Cover (7) and set the cutting height to its
maximum cutting height of 4 inches (See Fig. G1, G2).
Your Landroid
®
M will cut its best in dry weather. It does not like
wet grass, which can build up on the Blade Disc (13) and within the
motor, and can also cause loose traction and slippage while working.
Your Landroid
®
M is afraid of lightning storms. In case of a lightning
storm, protect the Landroid
®
M by unplugging the Charging Base
(4), disconnecting the Boundary Wire (21), and making sure the
Landroid
®
M is not allowed to charge.
Your Landroid
®
M loves mowing grass and requires the Cutting Blades
(14) to be kept in good condition to cut at its best. The Landroid
®
M
can do most things by itself, but will need your help sometimes to
prevent damage to itself.
• Never let the Landroid
®
M travel over gravel.
• Remove or prevent access to obstacles that the Landroid
®
M
could accidentally climb on and damage its Blade Disc.
• Remove all debris and foreign objects from your lawn.
G2
G1
F1
F2

Lawn Mowing Robot EN
12
4. Boundary Wire Basics
4.1 Pegging the Boundary Wire
Use the Boundary Wire Distance Gauge (24) to set the correct
distance from the border of your lawn (More than 14 in.*).
* This is the recommended distance. Use the provided distance
gauge to ensure proper installation.
If your neighbor also uses a Landroid
®
M, then you must keep a
spacing of at least 20 in. between your Boundary Wire and your
neighbors.
The boundary wire must outline the intended mowing
area exactly.
Your Landroid
®
M will become confused by extra
bends or coils of Boundary Wire that are not part of its mowing area
( See Fig. H). If there is excess Boundary Wire after the mowing area
has been outlined, then cut it off and store this additional wire in a
separate location. However, it is important to leave the necessary
length where it connects to the Charging Base so it can be connected
and still remain buried.
4.2 Burying the Boundary Wire
If you are planning to bury the Boundary Wire then it should be
noted that when entering its Charging Base for the first time, your
Landroid
®
M may find problems with the way you have laid the wire.
It is recommended to first peg down the Boundary Wire to the lawn
so it is easy to make adjustments if necessary. This will allow the
Landroid
®
M to become adjusted to its new environment and ensures
it will successfully work with the charging base before the Boundary
Wire is buried.
NOTE: If you intend to bury the boundary wire, make sure to place the boundary wire at least 0.4
inches and a maximum of 2 inches into the ground.
When you have completed installing the boundary wire, it is recommended that you ask Landroid
®
M to follow the boundary
wire by pressing the home button.
Whilst observing Landroid
®
M locating the charging station you can then make alterations to the boundary wire route to ensure
trouble free tracking of the boundary wire by Landroid
®
M when locating the charging station
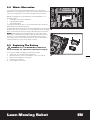
4.3 Splicing The Boundary Wire
The Boundary Wire (21) can be extended simply by splicing the ends and connecting it to the ends of another piece of wire.
You can use electrical tape to secure the joined part of the wire. (See Fig. I)
5. Software Update
Your Landroid
®
M software can be updated when new versions become available. The software version will be displayed in
the diagnosis page by pressing button 2 on homepage. The latest software can be downloaded from our website
www.worx.com. See the detailed guideline on download page.
The manual in box is based on the default software in the mass production. Some new features/functions in the new
version may not exist in the manual. If you found some settings not in the manual, please visit www.worx.com to download
the latest manual.
6. Maintenance
Your Landroid
®
M needs to be checked from time to time. The Landroid
®
M works hard and after time needs a good cleaning
as well as having some parts replaced, as they can become worn.
In the following we want to let you know how to take care of your Landroid
®
M.
H
I

Lawn Mowing Robot EN
13
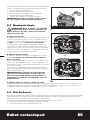
6.1 Keep It Sharp
WARNING: Before cleaning, adjusting, or replacing
the Blades, turn your Landroid
®
M OFF and put on
protective gloves.
WARNING: When fitting new blades, make sure
you replace ALL the blades. Always use new
screws when fitting blades . This is important to ensure
blade retention. Failure to use new screws could cause
serious injury.
The Landroid
®
M does not cut grass like other mowers. Its
Cutting Blades (14) are razor sharp on all 4 edges and spin in both
directions for maximum cutting capacity (See Fig. K). Each blade of
your Landroid
®
M has 4 cutting edges. Depending on the frequency
the Landroid
®
M mows your lawn, the cutting blades will need
to be flipped/rotated periodically for a new cutting edge. If your
Landroid
®
M is programmed to mow the lawn every day then
the cutting blades will need to be rotated monthly for the best
mowing results. Each cutting blade will last up to 4 months when
it is programmed to mow every day. When the cutting blades are
dull and worn out, they should be replaced with the spare blades
provided with your Landroid
®
M. Spare blades are also available at
your nearest WORX retailer or www.worx.com.
A. Rotate and flip the blades
Your Landroid
®
M carries the Blades that are all screwed onto
the Blade Disc(13). The blades allow the Landroid
®
M do its job
and need care and attention. Every once in a while, you should
simultaneously rotate and flip all blades for a perfect cut. When
rotating and flipping the blades, make sure all the blades are
adjusted at the same time or else it could make the
Blade Disc off balance. If your Landroid
®
M mows on a normal
schedule (daily) then the blades should last 4 months if they are
rotated and flipped every month. Always check to see if the blades
are chipped or damaged and replace them if they are.
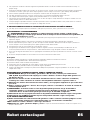
B. Replace the blades (See Fig. K)
After some time, usually every season, your Landroid
®
M’s Blades
will need to be replaced. Your Landroid
®
M does not like mowing
while using Blades of different age and quality. So when replacing
the Blades, make sure to replace all of them at the same time. You
can replace them with one of the three spare Blade kits and extra
Blade screws supplied with your Landroid
®
M.
Before attempting to replace your Landroid
®
M’s Blades, turn the
power off and put on protective gloves. Then follow these steps:
1. Gently flip the Landroid
®
M over.
2. Remove the battery cover and remove the battery.
3. Take the screws off the Blades with a screwdriver.
4. Firmly screw on the new Blades.
5. Refit the battery and the battery cover.
IMPORTANT: After screwing the Blade to the Blade Disc, make sure the Blade is able to spin freely.
6.2 Keep It Clean
WARNING: Before cleaning turn your Landroid
®
M OFF . Put on protective gloves before cleaning
the Blade Disc (13) and do not use running water. (See Fig. L, M)
A. Cleaning the body
Your Landroid
®
M will live a much happier and longer life if it is cleaned regularly. Although, as your Landroid
®
M is an
43
1 2
J
K
L

Lawn Mowing Robot EN
14
electric machine, you will need to take care when cleaning, so DO
NOT use a hose, high pressure washers or otherwise pour
running water on your Landroid
®
M, it is best to use a spray bottle
filled with water. When cleaning the machine body use a soft brush
or clean cloth and avoid using solvents or polishes (See Fig. L).
Lastly, make sure that you remove all build up of grass clippings
and debris.
B. Cleaning the Underside
Again, it is important that you power the Landroid
®
M OFF using
the ON/Off Button and wear protective gloves before
touching the Blade Disc (13).
First, flip your Landroid
®
M upside down to expose its underside.
Here you will see the Blade Disc (a), the chassis (b), and the Front
Wheel (15) and Driving Wheel (10). Clean everything thoroughly
with a soft brush or moist rag.
Rotate the Blade Disc to ensure it rotates freely. Check the blades
spin freely around the fixing screws. Remove any obstructions.
IMPORTANT: Remove any lodged debris so that it does
not cause a crack in the Blade Disc. Even the tiniest
crack can decrease your Landroid
®
M's mowing output
and cause potential damage.
C. Clean the contact pins and the charging strips
Clean the Contact Pins (3) located on the Charging Base (4)
and the Charging Strip (5) located on the Landroid
®
M using a
cloth. Remove any build up of grass clippings and debris around
the contact pins and charge strips periodically to ensure the
Landroid
®
M successfully charges each time.
6.3
Battery Life
The heart of the Landroid
®
M is its 28-volt lithium-ion battery. No
maintenance is required. For proper storage of the battery, make sure
it is fully charged and kept in a cool dry place between (20°C-60°C).
Never let the battery be exposed to freezing temperatures.
The life-span of the Landroid
®
M’s battery depends on various factors,
such as:
• The time span of the mowing season in your region.
• Amount of hours the Landroid
®
M mows per day.
• Battery maintenance during storage.
Landroid
®
M can be charged manually without the
boundary wire.
To manually charge the battery without connecting the
boundary wire to the charging base;
1. Connect the Charging Base to a suitable power supply.
2. Manually dock the Landroid
®
M into the Charging Base
while the Landroid
®
M is powered off.(See Fig. N1)
3. The charging base red light will turn on.
4. While “charging” is shown on the screen. (See Fig.
N2) Landroid
®
M will begin to charge.
5. Landroid
®
M will be completely charged when the
light turns to a green color.
M
(a)
(b)
1
N1
N2

Lawn Mowing Robot EN
15
6.4 Winter Hibernation
Your Landroid
®
M will live longer and healthier if it is allowed to
hibernate. So even though it is tough, we would recommend that you
store your Landroid
®
M in your shed or garage during the winter.
Before you prepare your Landroid
®
M for winter hibernation, we
recommend you:
• Thoroughly clean your Landroid
®
M
• Fully charge the battery
• Turn the power off
To maximize the battery life, it is recommended to fully charge the
battery before storage during winter.
The Boundary Wire can be left in the ground although its ends should
be protected, such as placed in a tin can with grease. If the Charging
Base is left outside for winter, leave the Boundary Wire connected.
NOTE:When bringing the Landroid
®
M back to work after winter
hibernation, make sure the Charging Strips (5) and Contact Pins (3)
are clean, it is recommended to use a fine grade emery cloth to
clean. Then make sure the date and time are correct and send the
Landroid
®
M back to what it loves doing: mowing.
6.5 Replacing The Battery
WARNING: Press the ON/OFF Key to OFF before
attempting any adjustment, replacement or repair.
If you need to replace the Battery, follow these steps:
1. Gently turn your Landroid
®
M upside down.
2. Remove the four screws on the battery cover (See Fig. O).
3. Remove the old battery (See Fig. P).
4. Install the new battery.
5. Firmly replace the screws.
O
P

Robot tondeuse à gazon F
16
TABLE DES MATIÈRES
1. Consignes de sécurité
1.1 Consignes de sécurité générales et supplémentaires
1.2 Informations sur le Landroid
®
M
2. Données techniques et liste des composants
2.1 Données techniques
2.2 Liste des composants
3. Connaître votre Landroid
®
M
3.1 Comment mon Landroid
®
M connaît-il les zones à tondre?
3.2 Comment mon Landroid
®
M connaît-il où aller?
A. Trouver la station de charge
B. Capteurs de pluie
C. Détection du fil de délimitation
D. Démarrage et arrêt pendant la tonte
3.3 Quelle superficie de zone mon Landroid
®
M peut-il tondre?
3.4 À quel degré d'efficacité mon Landroid
®
M peut-il tondre le gazon?
4. Fil de délimitation de base
4.1 Fixer le fil de délimitation
4.2 Enterrer le fil de délimitation
4.3 Raccorder le fil de délimitation
5. Mise à jour logicielle
6. Entretien
6.1 Affûtage
A. Pivoter et retourner les lames
B. Remplacer les lames
6.2 Nettoyage
A. Nettoyage du corps
B. Nettoyage du carter
C. Nettoyez les bornes de contact et les bandes de charge
6.3 Durée de vie de la batterie
6.4 Hiver
6.5 Remplacement de la batterie
17
17
20
21
21
22
24
24
25
25
25
25
25
26
26
27
27
27
27
27
28
28
28
28
29
29
29
29
29
30
30

Robot tondeuse à gazon F
17
1. Consignes De Sécurité
1.1 Consignes De Sécurité Générales Et Supplémentaires
AVERTISSEMENT: Certaines poussières créées par le ponçage, le sciage, le meulage, le perçage
et autres activités de construction contiennent des produits chimiques reconnus par l'État de
Californie comme pouvant causer le cancer, des anomalies congénitales ou d'autres problèmes de
reproduction. Quelques exemples de ces produits chimiques:
• Le plomb provenant des peintures au plomb;
• La silice cristallisée provenant des briques et du ciment et d'autres produits de maçonnerie et
• L'arsenic et le chrome provenant du bois traité chimiquement.
Les risques que vous encourez résultant de ces expositions varient selon la fréquence à laquelle
vous effectuez ce type de travail. Pour réduire votre exposition à ces produits chimiques : travailler
dans un endroit bien ventilé, et porter un équipement de sécurité approprié tel que certains masques
antipoussières qui sont spécialement conçus pour filtrer les particules microscopiques.
AVERTISSEMENT: Ce produit contient peut-être le plomb, le phtalate ou d'autres produits
chimiques reconnus par l'État de Californie comme pouvant causer le cancer, des anomalies
congénitales ou d'autres problèmes de reproduction. Veuillez vous laver les mains après utilisation.
AVERTISSEMENT: Veuillez lire toutes les consignes de sécurité et les instructions. Le non-respect
des avertissements et instructions peut entraîner un choc électrique, un incendie et/ou des blessures graves.
Lisez attentivement les instructions pour assurer le fonctionnement en toute sécurité de la machine.
Conservez tous les avertissements et les instructions pour une référence future.
- Cet appareil n'est pas destiné à être utilisé par des personnes (y compris les enfants) dont les capacités physiques,
sensorielles ou mentales sont réduites, sans expérience et/ou aux compétences insuffisantes, sauf si elles ont été
encadrées concernant l'utilisation de l'appareil par une personne responsable de leur sécurité.
- Les enfants doivent être surveillés pour s'assurer qu'ils ne jouent pas avec l'appareil.
- Veillez à utiliser uniquement le bloc d'alimentation fourni avec l'appareil.
IMPORTANT
LISEZ ATTENTIVEMENT AVANT L'UTILISATION
CONSERVEZ POUR UNE RÉFÉRENCE FUTURE
CONSIGNES DE SÉCURITÉ
Formation
a) Lisez attentivement les instructions. Assurez-vous de bien comprendre les instructions et de vous familiariser avec les
commandes et la bonne utilisation de l'appareil.
b) Ne laissez jamais les personnes peu familières avec ces instructions ou les enfants utiliser l'appareil. Les
réglementations locales peuvent limiter l'âge de l'opérateur.
c) L'opérateur ou l'utilisateur est responsable des accidents ou dommages causés à d'autres personnes ou à leurs biens.
Préparation
a) Assurez l'installation correcte du fil de délimitation comme indiqué.
b) Inspectez périodiquement la zone où l'appareil doit être utilisé et enlever toutes les pierres, bâtons, fils, os et autres
objets étrangers.
c) Inspectez visuellement de façon périodique pour voir si les lames, les boulons de lame et le carter de coupe ne sont
pas usés ou endommagés. Remplacez les lames ou les boulons usés ou endommagés dans des ensembles pour
préserver l'équilibre.
d) Sur les appareils multibroches, sachez que la rotation d'une lame peut entraîner celle des autres lames.
e) AVERTISSEMENT! La tondeuse ne doit pas être utilisée sans l'installation adéquate de la garde.
FONCTIONNEMENT
1. GÉNÉRALITÉS
a) Ne jamais faire fonctionner l'appareil des gardes défectueuses ou sans dispositifs de sécurité, par exemple des
déflecteurs, en place.
b) Ne mettez pas les mains ou les pieds près ou sous les pièces rotatives. Restez à l'écart de l'ouverture de décharge à
tout moment.
c) Ne soulevez ou portez jamais un appareil pendant que le moteur est en marche.
d) Faites fonctionner le dispositif de désactivation de l'appareil etéteignez votre Landroid
®
M avant de,
– Enlever l'objet à l'origine du blocage;
– Contrôler, nettoyer ou travailler sur l'appareil.

Robot tondeuse à gazon F
18
e) Il n'est pas autorisé de modifier la conception originale de la tondeuse à gazon robot. Toutes les modifications sont
effectuées à vos propres risques.
f) Démarrez la tondeuse à gazon robot selon les instructions. Lorsque le bouton de mise sous tension est allumé, assurez-
vous de garder vos mains et pieds éloignés des lames pivotantes. Ne mettez jamais vos mains et vos pieds sous la
tondeuse.
g) N'essayez jamais de soulever la tondeuse robot ou de la porter lorsque le bouton de mise sous tension est allumé.
h) Ne laissez pas les personnes qui ont des connaissances réduites sur le fonctionnement et le comportement des
tondeuses à gazon robot utiliser la tondeuse.
i) Ne posez rien au-dessus de la tondeuse robot ou sa station de charge.
j) N'autorisez pas l'utilisation de la tondeuse robot avec un disque de coupe ou un carter défectueux. Elle ne doit pas être
utilisée avec des lames, vis, écrous ou câbles défectueux.
k) Mettez toujours la tondeuse robot hors tension lorsque vous n'avez pas l'intention de l'utiliser. La tondeuse robot peut
démarrer uniquement si le bouton de mise sous tension est allumé et le code PIN correct a été saisi.
2. DE PLUS LORSQUE L'APPAREIL FONCTIONNE AUTOMATIQUEMENT
a) Ne laissez pas la machine fonctionner sans surveillance si vous savez que des animaux domestiques, des enfants ou
des personnes se trouvent à proximité.
ENTRETIEN ET STOCKAGE
AVERTISSEMENT! Lorsque la tondeuse est retournée, le bouton d'alimentation doit toujours être
désactivé.
Le bouton d'alimentation doit toujours être désactivé pendant tous les travaux sur le châssis de la
tondeuse, comme le nettoyage ou le remplacement des lames.
a) Maintenez tous les écrous, boulons et vis bien serrés pour s'assurer que l'appareil est en bon état de marche.
b) Inspectez la tondeuse à gazon robot chaque semaine et remplacez les pièces usées ou endommagées pour la sécurité.
c) Assurez-vous particulièrement que les lames et le disque de coupe ne sont pas endommagés. Remplacez toutes les
lames et les vis en même temps si nécessaire pour assurer le bon équilibre des pièces rotatives.
d) Veiller à ce que seules les pièces de rechange du matériel de coupe de bonne qualité soient utilisées.
e) S'assurez que les batteries sont chargées en utilisant le chargeur adéquat recommandé par le fabricant. La mauvaise
utilisation peut entraîner un choc électrique, une surchauffe ou une fuite du liquide corrosif de la batterie.
f) En cas de fuite d'électrolyte avec de l'eau /un agent de neutralisation, consultez un médecin en cas de contact avec les
yeux etc.
g) L'entretien de l'appareil devrait être effectué selon les instructions du fabricant.
Transport
L'emballage d'origine doit être utilisé lors du transport de la tondeuse robot sur de longues distances.
Pour se déplacer en toute sécurité dans la zone de travail:
a) Appuyez sur le bouton STOP (ARRÊT) pour arrêter la tondeuse.
b) Vous choisissez un code PIN à quatre chiffres quand vous démarrez la tondeuse pour la première fois.
c) Mettez toujours la tondeuse robot hors tension si vous avez l'intention de la porter.
d) Portez la tondeuse par la poignée situeé à l'arrière sous la tondeuse. Portez la tondeuse avec le disque de coupe éloigné
de votre corps.
CONSIGNES GÉNÉRALES DE SÉCURITÉ CONCERNANT LA BATTERIE
1) AVERTISSEMENT: Risque d’incendie et de brûlures. Ne démontez pas, ne chauffez pas à une
température supérieure à 100°C (212°F) et n’incinérez pas l’appareil. N’exposez pas les piles
cellulaires ou la batterie à la chaleur ou au feu. Evitez de ranger la batterie dans un endroit exposé
à la lumière directe du soleil.
2) Jetez rapidement les piles usagées. Lors de l'élimination des piles cellulaires ou des batteries,
gardez les piles ou les batteries de types électrochimiques différents séparés les uns des autres.
3) Gardez les piles hors de portée des enfants et dans leur emballage d'origine jusqu'au moment de
vous en servir.
4) Ne mettez jamais les piles dans la bouche. En cas d'ingestion, consultez avec votre médecin ou un
centre antipoison.
5) ATTENTION – La batterie utilisée dans cet appareil peut présenter un risque d’incendie ou de
brûlure chimique si elle n’est pas utilisée avec soin. Remplacez la batterie usée uniquement avec
une batterie (WORX). L’utilisation de toute autre batterie peut engendrer un risque d’incendie ou
d'explosion.
6) Avertissement : N'utilisez pas la batterie ou l'appareil s'il est visiblement endommagé.
7) Avertissement : Ne modifiez pas et n’essayez pas de réparer l'appareil ou la batterie vous-même.
8) LA BATTERIE DOIT ÊTRE RECYCLÉE;

Robot tondeuse à gazon F
19
9) Les bornes de contact d'une pile cellulaire ou d'une batterie ne doivent pas être mises en court-
circuit. Ne placez pas en vrac les piles ou les batteries dans une boîte ou un tiroir où leurs bornes
pourraient être mises en court-circuit par un matériau conducteur.
10)N'exposez pas la pile cellulaire ou la batterie à des chocs mécaniques.
11)Gardez les piles cellulaires et les batteries propres et sèches. Essuyez les bornes de la pile cellulaire ou de
la batterie avec un chiffon propre et sec si elles sont sales.
12)Ne laissez pas la pile cellulaire ou la batterie en charge lorsqu'elles ne sont pas utilisées.
13)Conservez les instructions originales accompagnant la pile cellulaire ou la batterie pour toute
future référence.
14) N'utilisez pas un chargeur autre que celui spécifiquement conçu pour être utilisé avec l'équipement. Accumulateurs
besoin d'être rechargée avant l'utilisation. Les piles cellulaires et les batteries doivent toujours être
chargées avant l'utilisation. Utilisez toujours le chargeur adapté et reportez-vous aux instructions du fabricant ou
au manuel de l'équipement pour suivre les instructions concernant la procédure de charge.
15) Si possible, enlevez la batterie de l'équipement lorsqu'il n'est pas utilisé.
16) Pour éviter le démarrage non intentionnel, s’assurer que le bouton de démarrage est en position d’arrêt avant de
brancher l’appareil au chargeur ou de le prendre ou de le transporter. Un accident pourrait arriver si vous vous promenez
avec l’appareil avec le doigt sur l’interrupteur ou sur le dispositif de charge dont l’interrupteur est en position de charge.
17) Dans des conditions d’utilisation abusive, du liquide pourrait s’éjecter de la batterie; évitez tout contact. Si vous entrez
accidentellement en contact avec le liquide, passez la partie du corps touchée sous le robinet. Si vos yeux entrent en
contact avec le liquide, vous devez consulter immédiatement un médecin. Le liquide expulsé de la batterie peut causer
des irritations ou des brûlures.
18) Faites faire le service par un technicien de réparation compétent qui ne doit utiliser que des pièces de rechange
identiques. Ceci maintiendra la sécurité du produit.

Robot tondeuse à gazon F
20
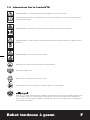
1.2 Informations Sur Le Landroid
®
M
AVERTISSEMENT – la tondeuse robot peut être dangereuse si elle est mal utilisée.
Lisez attentivement le manuel de l'opérateur et assurez-vous de maîtriser le contenu avant d'utiliser votre
tondeuse à gazon robot.
AVERTISSEMENT - Tenez-vous à une distance de sécurité de la machine lors de l'utilisation.
AVERTISSEMENT – Faites fonctionner le dispositif de désactivation avant de travailler sur l'appareil ou de le
soulever.
AVERTISSEMENT - Ne montez pas sur la machine.
Ne lavez pas la machine à l’aide d’un nettoyeur à haute pression
Étiquette de danger CPSC.
Batterie Li-Ion, les batteries doivent être recyclées
Afin de réduire les risques de blessure, l’utilisateur doit lire ce mode d’emploi.
POSITEC Inc. a établi un partenariat avec la RBRC Corporation pour recycler toutes les batteries Positec avec
le sceau RBRC-call2recycle. Pour protéger l'environnement, ne jetez pas les batteries dans la poubelle. À
la fin du cycle de vie des batteries, appelez le 1.800-822-8837 pour un service gratuit qui vous débarrassera
correctement de la batterie.
KEEP HANDS AND FEET
AWAY
GARDER MAINS ET PIEDS À DISTANCE
La page est en cours de chargement...
La page est en cours de chargement...
La page est en cours de chargement...
La page est en cours de chargement...
La page est en cours de chargement...
La page est en cours de chargement...
La page est en cours de chargement...
La page est en cours de chargement...
La page est en cours de chargement...
La page est en cours de chargement...
La page est en cours de chargement...
La page est en cours de chargement...
La page est en cours de chargement...
La page est en cours de chargement...
La page est en cours de chargement...
La page est en cours de chargement...
La page est en cours de chargement...
La page est en cours de chargement...
La page est en cours de chargement...
La page est en cours de chargement...
La page est en cours de chargement...
La page est en cours de chargement...
La page est en cours de chargement...
La page est en cours de chargement...
La page est en cours de chargement...
La page est en cours de chargement...
La page est en cours de chargement...
La page est en cours de chargement...
-
 1
1
-
 2
2
-
 3
3
-
 4
4
-
 5
5
-
 6
6
-
 7
7
-
 8
8
-
 9
9
-
 10
10
-
 11
11
-
 12
12
-
 13
13
-
 14
14
-
 15
15
-
 16
16
-
 17
17
-
 18
18
-
 19
19
-
 20
20
-
 21
21
-
 22
22
-
 23
23
-
 24
24
-
 25
25
-
 26
26
-
 27
27
-
 28
28
-
 29
29
-
 30
30
-
 31
31
-
 32
32
-
 33
33
-
 34
34
-
 35
35
-
 36
36
-
 37
37
-
 38
38
-
 39
39
-
 40
40
-
 41
41
-
 42
42
-
 43
43
-
 44
44
-
 45
45
-
 46
46
-
 47
47
-
 48
48


dans d''autres langues
- English: Worx WG794 Owner's manual
- español: Worx WG794 El manual del propietario
Documents connexes
Autres documents
-
Landxcape LX793 Le manuel du propriétaire
-
Stiga A 3000 Manuel utilisateur
-
Anova RC500 Le manuel du propriétaire
-
Greenworks Optimow 10 Le manuel du propriétaire
-
 Yard Force XKZ1820A – Amiro Robot Mower 400 Le manuel du propriétaire
-
Hasbro Transformer Fuzors Maximal Rattrap Mode d'emploi
-
Husqvarna 440 e-series Manuel utilisateur
-
-
Husqvarna 967852966 Mode d'emploi
