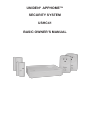
UNIDEN
®
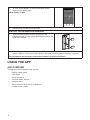
APPHOME™
SECURITY SYSTEM
USHC41
BASIC OWNER’S MANUAL

SAVE YOUR RECEIPT! Proof of Purchase is required for warranty.
© 2015 Uniden America Corporation
Irving, Texas
UNIDEN is a registered trademark of Uniden America Corporation.

1
UNIDEN
®
APPHOME SECURITY SYSTEM
USHC41 BASIC OWNER’S MANUAL
This Basic Owner’s Manual provides simple instructions on how to set up, install, and use your
system for the sensors included in this kit. For more detailed information, refer to the Detailed
Owner’s Manual on the Uniden website, www.uniden.com.
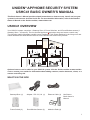
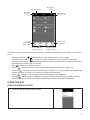
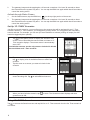
USHC41 OVERVIEW
Your USHC41 system comprises 1 Gateway Siren, 2 Power Switches, and 2 Door/Window sensors (1
Gateway Siren + 4 Sensors). The free Uniden AppHome app makes setup and sensor control easy.
The following graphic illustrates possible sensor installation, with Power Switches in the living room and
master bedroom and Door/Window sensors on the kitchen door and nursery window.
Optional sensors can be added to your USHC41 system. Visit the Uniden website at www.uniden.
com or contact your retailer for information about adding cameras, motion detectors, sirens, or a
remote control key fob.
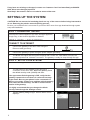
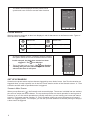
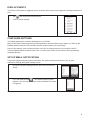
WHAT’S IN THE BOX
Not Shown:
Basic Owner’s
Manual
Gateway/Siren (1) Adapter - DC 12V, 1A (1) Ethernet Cable (1)
Power Switch (2) Door/Window Sensor (2) Adhesive Pads (2)

2
If any items are missing or damaged, contact our Customer Care Line immediately at 800-658-
8063. Never use damaged products!
Need help? Get answers 24/7 at our website: www.uniden.com.
SETTING UP THE SYSTEM
CAUTION! Do not remove the insulating plastic on any of the sensors before being instructed to
do so. Removing the plastic starts the pairing process.
Be sure your mobile device is connected to your home WiFi router from app download through system
setup and installation.
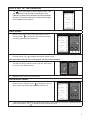
STEP 1: DOWNLOAD THE APP
Download the Uniden AppHome app from the Apple AppStore,
Google Play, or the Amazon Appstore for Android.
STEP 2: INSTALL THE GATEWAY/
CONNECT TO INTERNET
1. Connect the gateway to the WiFi router using the
Ethernet cable (provided).
2. Connect the gateway to power using the power adapter (provided).
3. The BLUE LED lights and the system responds with “Power On.” After about a minute, the
system responds with “Network Connected.” The gateway is ready for setup through the app.
STEP 3: SET UP YOUR SYSTEM
1. Launch the app.
2. The app looks for the Gateway’s DID through its
connection to the home WiFi. Name the gateway. Enter
the default security code (123456) and save.
If the app cannot nd the gateway’s DID, verify that the
gateway is powered on and that it is connected securely
to the router. Be sure your phone is also connected via
WiFi to your router. If there is no problem with the gateway
itself, enter the DID manually. The DID is located on the
bottom of the gateway.
It is highly recommend that you change the default
security code through the Settings screen.
3. Tap the gateway listing to log in. A blank Status screen
displays.

3
STEP 4: SET UP THE SENSORS
1. Tap from the System screen to add a sensor. The
app displays a list of devices to choose from. The
USHC41 provides Power Switches and Door/Window
Sensors. Visit www.uniden.com for other devices that
can be added to the network.
Power Switch
1. Select Power Switch from the Select Device screen.
Tap the arrow ( ) to display the rst of three screens
providing pairing setup instructions.
2. Follow the screen instructions for pairing the sensor. After pairing is complete, plug a light xture
into the sensor. Tap to display the sensor Status screen.
If the light xture has its own on/off switch, put it in the ON position.
3. Tap the sensor and then an ON/OFF screen displays.
Tap ON and OFF to test the sensor.Tap the back arrow
to return to the Status screen.
4. Repeat this procedure for each sensor.
Door/Window Sensor
1. Select Door Sensor or Window Sensor from the Select
Device screen. Tap the arrow ( ) to display the rst of
three screens providing pairing setup instructions.
2. Follow the screen instructions for pairing the sensor. After pairing is complete, separate the two
parts of the sensor. Tap to display the sensor Status screen.

4
3. An alert should display on the Door/Window Sensor
section of the Status page.
Alerts display in RED.
4. Repeat this procedure for each sensor.
INSTALL DOOR/WINDOW SENSOR
1. After the Door/Window sensors are paired to the
gateway through the app, apply the adhesive pads to the
back of the sensor.
2. Select a location the door/window frame. Place the large part of the sensor on the frame and
press to adhere. Line up the smaller piece to the larger one and press on the door or window.
The gap between the two parts of the sensor should not exceed 0.5 inches.
USING THE APP
APP OVERVIEW
Through the Uniden AppHome app you can:
• Display sensor status
• Clear alerts
• Set up scenarios
• Arm and disarm sensors
• Display Events
• Set up email alerts and push notications
• Congure your system

5
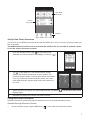
Displays
current status
of all sensors
Set up customized
security sequences
Displays list of all
triggered events
Allows system
conguration
Edit elds on
current screen
Arm/Disarm
status
Add sensor/device
Return to
previous
screen
The Status screen is the primary screen in the app. In addition to displaying sensor status, it also allows
you to:
• Add Sensor/Device ( ). Select this icon to pair another sensor to your system.
• Arm/Disarm the system ( ). Tap the icon to arm or disarm a sensor group set up through
Scenario/Arm screens. The gateway beeps when you arm the system and you have 30 seconds to
leave before the sensors are fully armed.
• Edit ( ). Rename or delete the sensor.
• Status ( ). Displays sensors’ current status and allows operation (turn on light, etc).
• Scenario ( ). Sets up one-touch scenarios (Arm or Panic) or If...Then scenarios (pre-determined
sequences where an event on one sensor will trigger other sensors).
• Event ( ). Displays a list of events resulting from sensors being triggered.
• Setting ( ). Allows system conguration such as IP Setup, Security Setup, Notication Setup,
Schedule Setup, etc. Refer to the online Detailed Owner’s Manual for further information.
USING THE APP
DISPLAY SENSOR STATUS
1. Open the app and tap the system name.

6
2. The Status screen displays sensors paired to that
system and a set of icons to access other functions
CLEAR ALERTS
When a sensor is triggered, an alert icon displays in red for that sensor on the Status screen. Types of
alerts and their icons are:
Sensor ON Sensor OFF
Triggered (Closed) Triggered (Open)
Low Power
1. Access the Status screen. It displays sensors paired to
the system and a set of icons to access other functions
In this example, the back door sensor has been
triggered. The icon displays.
2. Tap on the alert icon to clear it. The icon displays,
showing that you have acknowledged the sensor
alert and the door is still open.
SET UP SCENARIOS
Scenarios are preset sensor actions that are triggered by some kind of event. One-Touch scenarios are
triggered when you tap a specic icon in the One-Touch senario section of the Scenario screen. If...Then
scenarios activate when a specied sensor is triggered.
Scenario Main Screen
When you tap Scenario ( ), the Scenario main screen displays. The screen is divided into two sections
plus an icon section across the bottom. The top section provides one-touch operation for turning sets of
sensors on or off. One-touch operations are usually used when you are leaving your house and want to
secure it. The bottom section contains “If...Then” scenarios, where you set up a sequence of events if
there is a triggering action. For example, you can set up Power Switches to activate (turning on lamps) if
a door sensor is triggered.

7
One-Touch
Scenarios
Icon Bar
If...Then
Scenarios
Set Up One-Touch Scenarios
You can set up one ARM one-touch scenario with the USHC41 kit. Use it to secure your home when you
plan to be away.
The ARM one-touch scenario can be used with this USHC41 kit. You can add an optional camera
to use the camera one-touch scenario.
1. From the Scenario screen, tap to enter Edit mode.
Available one-touch scenario icons display an edit icon ( ).
2. Tap on the ARM icon. The Scenario Setup screen
displays the sensors and devices on your system. The
system defaults to status = ON (check mark) for all sensors.
If you do not want to include a specic sensor in the one-
touch ARM scenario, tap the check mark on the sensor to
turn it off.
3. When you have set up your one-touch ARM scenario, tap SAVE ( ). The Scenario main screen
displays again.
4. Repeat these steps for the Panic one-touch scenario.
Using One-Touch Scenarios
Activate a one-touch scenario through the Scenario screen or through the Status screen.
Activate through Scenario Screen
1. On the Scenario screen, tap the ARM icon ( ) in the One-Touch scenario section.

8
2. The gateway beeps and the app begins a 30 second countdown. You have 30 seconds to leave
the house before the system fully arms. You can tap the ARM icon again within that 30 seconds to
cancel the arming action.
Activate through Status Screen
1. On the Status screen, tap the ARM icon ( ) in the top right portion of the screen.
2. The gateway beeps and the app begins a 30 second countdown. You have 30 seconds to leave
the house before the system fully arms. You can tap the ARM icon again within that 30 seconds to
cancel the arming action.
Set Up “IF...THEN” Scenarios
Just like one-touch scenarios, you must rst set up the sensors that will be activated for an If...Then
scenario. With an If...Then scenario, you designate a primary sensor. If it is triggered, then secondary
sensors activate. For example, you can set up Power Switches to activate (turning on lamps) if a door
sensor is triggered (door opened).
1. Tap on the Status screen to display the Scenario main
screen. A list of Door/Window sensors able to initiate an If...
Then scenario displays. The sensor status is automatically
set to OFF.
Door/window sensors are the only sensors included in this kit
that can initiate an If...Then scenario.
2. Tap on a sensor; the Scenario Setup screen displays. Next,
tap to display a list of available sensors to add to the
scenario.
3. Tap the arrow on a sensor you want to include in the
scenario.
4. The app returns to the Scenario Setup screen with that
sensor showing ON. Tap to add additional sensors.
5. When you have built the scenario, tap to save. The Scenario screen displays with that
scenario set to ON.
6. Repeat to add another If...Then scenario.
Using “IF...THEN” Scenarios
Tap to access the Senario screen and tap ON for an If...Then scenario from the list. That scenario is
now active.

9
DISPLAY EVENTS
The Event List displays all triggered events. It shows which sensor was triggered, including the date and
time.
1. Tap and access the Events screen.
2. A list of events displays.
CONFIGURE SETTINGS
The default password to enter the Settings menu is 123456.
Many of the System Setting options are self-explanatory and should be easy to gure out. Refer to the
Detailed Owner’s Manual on the Uniden website at www.uniden.com if necessary.
Some of the settings, such as Remote Style, may refer to optional devices not included in this kit.
Visit the Uniden website at www.uniden.com or contact your retailer for information about purchasing
additional devices.
SET UP EMAIL NOTIFICATONS
If a sensor triggers while the system is alarmed, the system sends an email alert. Set up push
notication through the System Setting screen.
1. Access the System Settings screen, then select Notication
Setup.
2. Fill in the elds and tap . The System Setting screen
displays. You will now receive an email notication if a sensor
is triggered.
For complete operation instructions, refer to the Detailed Owner’s Manual online at www.uniden.com.

10
FCC/IC COMPLIANCE
This device complies with Part 15 of the FCC rules. Operation is subjected to the following two
conditions: (1) this device may not cause harmful interference, and (2) this device must accept
any interference received, including interference that may cause undesired operation.
This device complies with Industry Canada license-exempt RSS standard(s).Operation is subject
to the following two conditions: (1) this device may not cause interference, and (2) this device
must accept any interference, including interference that may cause undesired operation of the
device.
The distance between user and products should be no less than 7.9 in (20cm.).
Changes or modications not expressly approved by the party responsible for compliance could
void your authority to operate the equipment.
Avis de conformité à la FCC : Cet dispositif a été testé et s’avère conforme à l’article 15 des
règlements de la Commission fédérale des communications (FCC). Ce dispositif est soumis
aux conditions suivantes: 1) Ce dispositif ne doit pas causer d’interférences nuisibles et; 2)
Il doit pouvoir supporter les parasites qu’il reçoit, incluant les parasites pouvant nuire à son
fonctionnement.
Cet appareil est conforme aux normes RSS exemptes de licences d’Industrie Canada. Son
fonctionnement est soumis aux deux conditions suivantes : (1) cet appareil ne doit pas causer
d’inteférences nuisibles et (2), il doit pouvoir accepter les interférences, incluant celles pouvant
nuire à son fonctionnement normal.
La distance entre l’utilisateur et les produits ne devrait pas être moins de 20 cm (7,9 po).
Tout changement ou modication non approuvé expressément par la partie responsable pourrait
annuler le droit à l’utilisateur de faire fonctionner cet équipement.
One-Year Limited Warranty
SAVE YOUR RECEIPT! Evidence of original purchase is required for warranty service.
WARRANTOR: Uniden America Corporation (“Uniden”) ELEMENTS OF WARRANTY: Uniden
warrants, for one year, to the original retail owner, this Uniden Product to be free from defects in
materials & craftsmanship with only the limitations or exclusions set out below.
WARRANTY DURATION: This warranty to the original user shall terminate & be of no further
effect 12 months after the date of original retail sale. The warranty is invalid if the Product is (A)
damaged or not maintained as reasonable or necessary, (B) modied, altered, or used as part
of any conversion kits, subassemblies, or any congurations not sold by Uniden, (C) improperly
installed, (D) serviced or repaired by someone other than an authorized Uniden service center
for a defect or malfunction covered by this warranty, (E) used in any conjunction with equipment
or parts or as part of any system not manufactured by Uniden, or (F) installed or programmed by
anyone other than as detailed by the owner’s manual for this product.
STATEMENT OF REMEDY: In the event that the product does not conform to this warranty
at any time while this warranty is in effect, warrantor will either, at its option, repair or replace
the defective unit & return it to you without charge for parts, service, or any other cost (except
shipping & handling) incurred by warrantor or its representatives in connection with the
performance of this warranty. Warrantor, at its option, may replace the unit with a new or
refurbished unit.
THE LIMITED WARRANTY SET FORTH ABOVE IS THE SOLE & ENTIRE WARRANTY
PERTAINING TO THE PRODUCT & IS IN LIEU OF & EXCLUDES ALL OTHER WARRANTIES
OF ANY NATURE WHATSOEVER, WHETHER EXPRESS, IMPLIED OR ARISING BY

11
OPERATION OF LAW, INCLUDING, BUT NOT LIMITED TO ANY IMPLIED WARRANTIES OF
MERCHANTABILITY OR FITNESS FOR A PARTICULAR PURPOSE. THIS WARRANTY DOES
NOT COVER OR PROVIDE FOR THE REIMBURSEMENT OR PAYMENT OF INCIDENTAL OR
CONSEQUENTIAL DAMAGES. Some states do not allow this exclusion or limitation of incidental
or consequential damages so the above limitation or exclusion may not apply to you.
LEGAL REMEDIES: This warranty gives you specic legal rights, & you may also have other
rights which vary from state to state. This warranty is void outside the United States of America &
Canada.
PROCEDURE FOR OBTAINING PERFORMANCE OF WARRANTY: If, after following the
instructions in the owner’s manual you are certain that the Product is defective, pack the
Product carefully (preferably in its original packaging). Disconnect the battery from the Product
& separately secure the battery in its own separate packaging within the shipping carton. The
Product should include all parts & accessories originally packaged with the Product. Include
evidence of original purchase & a note describing the defect that has caused you to return it. The
Product should be shipped freight prepaid, by traceable means, to warrantor at:
Uniden America Corporation
c/o Saddle Creek
743 Henrietta Creek Rd., Suite 100
Roanoke, TX 76262
(800) 658-8063, 8 a.m. to 4:30 p.m., Central, Monday through Friday


-
 1
1
-
 2
2
-
 3
3
-
 4
4
-
 5
5
-
 6
6
-
 7
7
-
 8
8
-
 9
9
-
 10
10
-
 11
11
-
 12
12
-
 13
13
-
 14
14
-
 15
15
-
 16
16