Frigidaire FFRE2233S2 Mode d'emploi
- Catégorie
- Purificateurs d'air
- Taper
- Mode d'emploi

TABLE OF CONTENTS
All about the
Use & Care
Care and Cleaning
.............................................. 11
Energy Saving Ideas ........................................... 11
16120300A00439 (June 2009)
Product Registration
...........................................................
4
Packaging 4
Normal Sounds .................................................... 4
.............................................
Air Conditioner Features 5.......................................
Important Safety Instructions ............................... 2-3
Operating Instructions 5-11.........................................
of your
Room Air Conditioner
Before You Call ................................................... 12
Major Appliance Limited Warranty ........................ 13
www.frigidaire.com USA 1-800-944-9044 www.frigidaire.ca Canada 1-800-265-8352

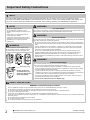
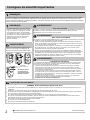
Important Safety Instructions
WARNING
For Your Safety
Do not store or use gasoline or other flammable vapors and liquids in the vicinity of this or any
other appliance. Read product labels for flammability and other warnings.
WARNING
Prevent Accidents
To reduce the risk of fire, electrical shock, or injury to persons when using your air conditioner,
follow basic precautions, including the following:
Be sure the electrical service is adequate for the model you have chosen. This information
can be found on the serial plate, which is located on the side of the cabinet and behind the
grille.
If the air conditioner is to be installed in a window, you will probably want to clean both
sides of the glass first. If the window is a triple-track type with a screen panel included,
remove the screen completely before installation.
Be sure the air conditioner has been securely and correctly installed according to the
separate installation instructions provided with this manual. Save this manual and the
installation instructions for possible future use in removing or reinstalling this unit.
When handling the air conditioner, be careful to avoid cuts from sharp metal fins on front
and rear coils.
The complete electrical rating of your new room air conditioner is stated on the serial plate.
Refer to the rating when checking the electrical requirements.
Be sure the air conditioner is properly grounded. To minimize shock and fire hazards,
proper grounding is important. The power cord is equipped with a three-prong grounding
plug for protection against shock hazards.
Your air conditioner must be used in a properly grounded wall receptacle. If the wall
receptacle you intend to use is not adequately grounded or protected by a time delay fuse
or circuit breaker, have a qualified electrician install the proper receptacle.
Do not run air conditioner without outside protective cover in place. This could result in
mechanical damage within the air conditioner.
Do not use an extension cord or an adapter plug.
WARNING
Electrical Information
WARNING
Avoid fire hazard or electric shock. Do not
use an extension cord or an adaptor plug. Do
not remove any prong from the power cord.
NOTE:
The power supply cord with
this air conditioner contains a current
detection device designed to reduce the risk
of fire.
Please refer to the section ‘Operation of
Current Device’ for details.
In the event that the power supply cord is
damaged, it cannot be repaired. It must be
replaced with a cord from the product
manufacturer.
2
2009 Electrolux Home Products, Inc. All rights reserved.
NOTE:
This USE & CARE MANUAL provides specific operating instructions for your model. Use the room air conditioner only as
instructed in this USE & CARE MANUAL. These instructions are not meant to cover every possible condition and situation that
may occur. Common sense and caution must be practiced when installing, operating, and maintaining any appliance.
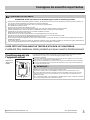
SAFETY PRECAUTIONS
This air conditioner contains no user-serviceable parts. Always call an authorized Electrolux servicer for repairs.
Do not insert or place fingers or objects into the air discharge area in the front of the unit.
Do not start or stop the air conditioner by unplugging the power cord or turning off the power at the electrical box.
Do not cut or damage the power cord.
If the power cord is damaged, it should only be replaced by an authorized Electrolux servicer.
In the event of a malfunction (sparks, burning smell, etc.), immediately stop the operation, disconnect the power cord, and call an authorized
Electrolux servicer.
Do not operate the air conditioner with wet hands.
Do not pull on the power cord.
Do not drink any water that is drained from the air conditioner.
DANGER! Avoid Serious Injury or Death
115V
15A
230V
15A
230V
20A
230V
30A
Do not, under any
circumstances, cut,
remove or bypass the
grounding prong.
Grounding Prong

Important Safety Instructions
3
2009 Electrolux Home Products, Inc. All rights reserved.
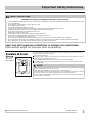
READ THIS SECTION BEFORE ATTEMPTING TO OPERATE AIR CONDITIONER.
Unit must be upright for one hour prior to operating.
Plug in &
press RESET
The power supply cord contains a current device that senses damage to the power cord. To test
your power supply cord do the following:
Plug in the Air Conditioner.
The power supply cord will have TWO buttons on the plug head. Press the TEST button. You will
notice a click as the RESET button pops out.
Press the RESET button. Again you will notice a click as the button engages.
The power supply cord is now supplying electricity to the unit. (This is also indicated by a light
on the plug head).
SAFETY PRECAUTIONS
Provide occasional ventilation during use. Do not direct airflow at fireplaces or other heat related sources as this could cause flare ups or make
units run excessively.
Do not climb on or place objects on outdoor part of the unit.
Do not hang objects off the unit.
Do not place containers with liquids on the unit.
Turn off the air conditioner at the power source when it will not be used for an extended period of time.
Periodically check the condition of the unit’s installation accessories for any damage.
Do not apply heavy pressure to the radiator fins of the unit.
Operate the unit with air filter in place.
Do not block or cover the intake grille, discharge area and outlet ports.
Ensure that any electrical/electronic equipment is one yard away from the unit.
Do not use or store flammable gases near the unit.
Do not touch the metal parts of the unit when removing the filter. Injuries can occur when handling sharp metal edges.
Do not use water to clean inside the air conditioner. Exposure to water can destroy the insulation, leading to possible electric shock.
When cleaning the unit, first make sure that the power and circuit breaker are turned off.
NOTE:
Do not use this device to turn the unit on or off.
Always make sure the RESET button is pushed in for correct operation.
The power supply cord must be replaced if it fails to reset when either the TEST button is pushed,
or it cannot be reset. A new one can be obtained from the product manufacturer.
If power supply cord is damaged, it CANNOT be repaired. It MUST be replaced by one obtained
from the product manufacturer.
CAUTION! Avoid Injury or damage to the unit or other property

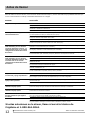
Record Your Model and Serial Numbers
Record in the space provided below the model and serial numbers. On all models, the
serial plate is located on the outside of the cabinet.
Model No.
Serial No.
Register Your Product
The self-addressed PRODUCT REGISTRATION CARD should be filled in completely,
signed and returned to the Frigidaire Company.
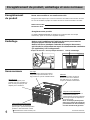
Normal Sounds
Today’s high efficiency compressors
may have a high pitched chatter
during the cooling cycle.
High pitched Chatter
Unit may vibrate and make noise
because of poor wall or window
construction or incorrect installation.
Vibration
Pinging or Swishing
Sound of Rushing Air
At the front of the unit, you may
hear the sound of rushing air
being moved by the fan.
Gurgle/Hiss
“Gurgling or hissing” noise may be
heard due to refrigerant passing
through evaporator during normal
operation.
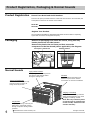
Product Registration
4
Product Registration, Packaging & Normal Sounds
2009 Electrolux Home Products, Inc. All rights reserved.
Packaging
Remove all packaging from inside the carton, along with any
inserts placed into the side louvers.
Remove the plastic ties and foam pad that secure the
compressor to the fan shroud (where applicable). See diagram.
foam pad + plastic ties
Packing Inserts
Droplets of water hitting condenser
during normal operation may cause
“pinging or swishing” sounds.
Note: Don’t try to drill any holes
on the base pan to eliminate the
normal sounds, otherwise it will
void the warranty.

5
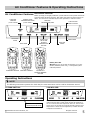
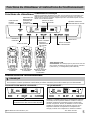
Before you begin, thoroughly familiarize yourself with the control panel and remote
as shown below and all its functions, then follow the symbol for the functions you
desire. The unit can be controlled by the touch pad alone or with the remote.
ELECTRONIC CONTROL
Air Conditioner Features
2009 Electrolux Home Products, Inc. All rights reserved.
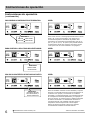
Operating Instructions
NOTE
The following instructions represent the Touch Pad, the same instructions can be used for the Remote Control.
TO TURN UNIT ON: YOU WILL SEE:
PRESS ON/OFF BUTTON
DO THIS:
Air Conditioner Features & Operating Instructions
ADJUSTS
TEMPERATURE
OR TIME
DISPLAYS
TEMPERATURE/TIME
SETS FAN
SPEED
SETS MODE
TURNS UNIT
ON OR OFF
ACTIVATES
TIMER
CHECK FILTER
RESET BUTTON
SLEEP MODE
REMOTE TEMP
SENSING INDICATOR
(some models)
CLEAN AIR
FEATURE
(some models)
STANDARD REMOTE w/DISPLAY &
REMOTE SENSING
BUTTON
FOR HEAT MODELS
Battery Size: AAA
Warning: Do not mix old and new batteries. Do not mix
alkaline, standard (carbon-zinc), or rechargeable (nickel-
cadmium) batteries.
Note: The unit will run in energy saver(econ) mode when
used for the first time. In this mode, the fan will continue to
run for 1 minute after the compressor shuts off. The fan then
cycles on for 20 seconds at 10 minute intervals until the room
temperature is above the set temperature, at which time the
compressor turns back on.

6
Operating Instructions
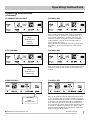
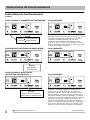
TO CHANGE TEMPERATURE SETTlNG:
TO ADJUST FAN SPEEDS: YOU WILL SEE:
Note: Fan starts at High Speed and adjusts to a slower
speeds the room temperature dictates. For example, if the
room doesn't get too warm, it will stay at the slowest speed.
If the room temperature rises quickly, such as a door being
opened, it will automatically go to the highest speed. The fan
speeds will re-adjust back to the slowest speed as the room
returns to the original set temperature. Press either the fan
slower or fan faster button to adjust the fan speed manually.
2009 Electrolux Home Products, Inc. All rights reserved.
YOU WILL SEE:
PRESS TO RAISE
PRESS TO LOWER
DO THIS:
Note: Tap or hold either up ( ) or down ( ) button until
the desired temperature is seen on the display. This tempe-
rature will be automatically maintained anywhere between
60 °F (16 °C) and 90 °F (32 °C) . If you want the display to
read the actual room temperature. See "To Operate on Fan
Only" section on Page 7.
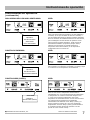
TO USE AUTO FAN FEATURE:
PRESS FAN BUTTON,
CHOOSE AUTO
DO THIS:
YOU WILL SEE:
DO THIS:
PRESS TO SELECT
Operating Instructions
(continued)

7
Operating Instructions
Operating Instructions
(continued)
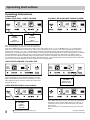
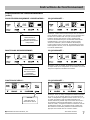
TO OPERATE ON FAN ONLY: YOU WILL SEE:
YOU WILL SEE:
2009 Electrolux Home Products, Inc. All rights reserved.
DO THIS:
PRESS
MODE BUTTON
CHOOSE
FAN ONLY
CHOOSE COOL
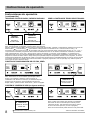
Note: In this mode the selected temperature will increase
by 2 °F 30 minutes after the mode is selected. The tempe-
rature will then increase by another 2 °F after an additional
30 minutes. This new temperature will be maintained for 7
hours before it returns to the originally selected tempera-
ture. This ends the "Sleep" mode and the unit will continue
to operate as originally programmed. The "Sleep" mode
program can be cancelled at any time during operation by
again pressing the "Sleep" button.
SLEEP FEATURE:
DO THIS:
PRESS
SLEEP BUTTON
YOU WILL SEE:
Note: Use this function only when cooling is not desired,
such as for room air circulation or to exhaust stale air on
some models. (Remember to open the vent during this
function, but keep it closed during cooling for maximum
cooling efficiency.) You can choose any fan speed you
prefer. (Except “Auto Fan”).
During this function, the display will show the actual room
temperature, not the set temperature as in the cooling
mode.
DO THIS:
PRESS
MODE BUTTON
COOL FEATURE:
Note: In this mode, the fan remains on all the time with the
compressor cycling on and off when room temperature is
reached.

8
Operating Instructions
Operating Instructions
(continued)
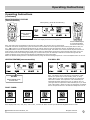
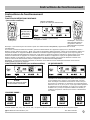
CHECK FILTER FEATURE, YOU WILL SEE:
2009 Electrolux Home Products, Inc. All rights reserved.
DO THIS:
PRESS FILTER
RESET BUTTON
TIMER: DELAY STOP / START FEATURE YOU WILL SEE HOW MUCH TIME IS CHOSEN:
FIRST
DO THIS:
PRESS
TIMER BUTTON
THEN
DO THIS:
PRESS
UP/DOWN BUTTONS
Note: This feature is a reminder to clean the Air Filter (See
Care and Cleaning) for more efficient operation. The LED
(light) will illuminate after 250 hours of operation. To reset
after cleaning the filter, press the "Filter Reset" button and
the light will go off.
Note: For Delay Stop, the unit must be in the On position
Note: For Delay Start, the unit must be in the Off position.
First, Press TIMER button, then adjust timer setting, tap or hold the UP arrow ( ) or the DOWN arrow ( ) to change delay
timer at 0.5 hour increments, up to 10 hours, then at 1 hour increments up to 24 hours. The control will count down the time
remaining until start (8, 7.5, 7, etc.). The Delay Start Operation automatically selects cooling with maximum Fan speed (if Cool,
Energy Saver, or Fan Only was the last mode selected) . The temperature maintained will be the same as previously set. To change
the set temperature, press "COOL" then Up or Down arrows until the desired temperature is indicated on the display. After 5
seconds, the control will automatically change the display back to the hours remaining until the unit will start/stop. Pressing the
unit On/Off button at any time will cancel the Delay Start/Stop function. The Delay Start/Stop Feature will work until the unit either
starts or stops. Once that happens the above steps have to be repeated again.
CLEAN AIR FEATURE(on some models):
Note: When this feature is "ON", the electronic air purifier is
energized to remove pollen and impurities from the air. To
cancel this feature, press the Clean Air button (the LIGHT
will turn off).
Note: This feature can be activated on the unit touch pad
ONLY.
DO THIS:
PRESS
CLEAN AIR
BUTTON

9
Operating Instructions
Operating Instructions
(continued)
2009 Electrolux Home Products, Inc. All rights reserved.
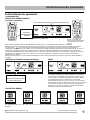
REMOTE SENSING FEATURE
(on some models)
LIGHT pulsing ( On & Off intermittently ).
DO THIS:
PRESS REMOTE
SENSING
START BUTTON
NOTE: Remote display
is actual temperature
at remote control only
NOTE: Unit display shows the set temperature
FAULT CODES:
Note: This feature can be activated from the remote control ONLY, the unit must be in a cooling mode.
To activate the remote sensing feature, point the remote control towards the unit and press the remote sensing Start button. Next, use
the “ ” buttons to set the desired temperature at the remote. (Note that the set temperature will only be displayed on the unit
itself ). The LIGHT on the unit control will pulse to indicate it received the signal. The LIGHT on the remote control will pulse each time it
sends a signal. lt will periodically send this signal until the feature is deactivated by pressing the remote sensing Stop button. lf the unit
does not receive the remote sensing signal during any 3 minute interval, the unit will beep to indicate the remote sensing mode has
ended. The display on the remote control indicates the temperature at the remote ONLY.
NOTE: The Remote Sensing function is terminated either by using the Remote Sensing Stop button or the main ON/OFF button on the unit.
YOU WILL SEE:HEATING FEATURE(on some models):
PRESS MODE BUTTON,
CHOOSE HEAT
DO THIS:
If the display reads "HS", ”AS”, ”ES”, ”CS” or ”OS”, a sensor has failed. Contact your Authorized Frigidaire Service Center.
Note: This feature can be used with any combination of FAN
Speeds (Low speed only on 115V models), Timer, or Sleep
Modes. When in the "Heat" mode,the fan will run continuously
while heat is needed. The temperature will automatically be
maintained anywhere between 55 °F(13 °C) and 80 °F(27 °C)
(The upper limit of temperature could reach 86°F(30 °C) on some
of the 115V models.). When the room set temperature is satisfied,
the fan will cycle off and on to circulate and sample the room air.

10
Operating Instructions
Operating Instructions
(continued)
2009 Electrolux Home Products, Inc. All rights reserved.
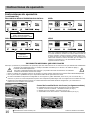
ADDITIONAL THINGS YOU SHOULD KNOW
Fresh Air Vent Control (on some models)
The Fresh Air Vent allows the air conditioner to:
1. Recirculate inside air - Vent Closed (see Fig. 1)
2. Draw fresh air into the room - Fresh Air (see Fig. 2)
3. Exchange air from the room - Vent Open (see Fig. 3)
Figure 1 (VENT CLOSED)
Figure 2 (FRESH AIR)
Figure 3 (VENT OPEN)
YOU WILL SEE:TO TURN UNIT OFF:
DO THIS:
PRESS
ON/OFF BUTTON
TO CHANGE TEMPERATURE DISPLAY:
Note: The control is capable of displaying temperature in
degrees Fahrenheit or degrees Celsius.
YOU WILL SEE:
Now that you have mastered the operating procedure, here are more features in your control that you should become familiar with.
The "Cool" circuit has an automatic 3 minute time delayed start if the unit is turned off and on quickly.
This prevents overheating of the compressor and possible circuit breaker tripping. The fan will continue
to run during this time.
There is a 2-Second delay for the compressor shutting down when selecting FAN ONLY/HEAT. This is to cover the possibility of
having to roll through to select another mode.
After a power outage, the unit will memorize the last setting and return the unit to the same setting once power is restored.
The control will maintain the set temperature within 2 degrees Fahrenheit, between 60F and 90F degrees in cool mode, 55F
and 80F degrees in heat mode(the upper limit of temperature could reach 86F degrees on some of the 115V models).
Note: If the unit is turned off in heat mode (if applicable) or
fan only mode, it will return to the same setting when it is
turned on again. When the unit is turned off in cool or energy
saver(econ) mode, it will run in energy saver(econ) mode
when it is turned on again, but the setting of temperature
and fan speed will remain.
DO THIS:
PRESS AND HOLD THE
UP/DOWN BUTTONS
TOGETHER FOR 3 SECONDS

Operating Instructions, Care and Cleaning & Energy Saving Ideas
11
2009 Electrolux Home Products, Inc. All rights reserved.
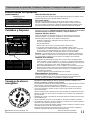
Care and Cleaning
Clean your air conditioner occasionally to keep it looking new. Be sure to unplug
the unit before cleaning to prevent shock or fire hazards.
Air Filter Cleaning
The air filter should be checked at least once a month to see if cleaning is
necessary. Trapped particles in the filter can build up and cause an accumulation
of frost on the cooling coils.
Grasp the filter by the center and pull up and out.
Wash the filter using liquid dishwashing detergent and warm water. Rinse filter
thoroughly. Gently shake excess water from the filter. Be sure filter is
thoroughly dry before replacing
Or instead of washing, you may vacuum the filter clean.
Push the vent handle to the Vent Closed position(where applicable).
Open the front panel.
Cabinet Cleaning
Be sure to unplug the air conditioner to prevent shock or fire hazard. The
cabinet and front may be dusted with an oil-free cloth or washed with a cloth
dampened in a solution of warm water and mild liquid dishwashing detergent.
Rinse thoroughly and wipe dry.
Never use harsh cleaners, wax or polish on the cabinet front.
Be sure to wring excess water from the cloth before wiping around the controls.
Excess water in or around the controls may cause damage to the air conditioner.
Plug in air conditioner.
Winter Storage
If you plan to store the air conditioner during the winter, remove it carefully from
the window according to the installation instructions. Cover it with plastic or return
it to the original carton.
NOTE: When replacing the air filter after cleaning, make sure the tabs on the air
filter are on the upper part of filter, and placed outward as shown in the drawing
on the left side.
Air Filter
Tab
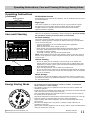
Energy Saving Ideas
Do not block air flow inside with blinds, curtains or furniture; or outside with
shrubs, enclosures, or other buildings.
The capacity of the room air conditioner must fit the room size for efficient and
satisfactory operation.
Install the room air conditioner on the shady side of your home. A window that faces
north is best because it is shaded most of the day.
Close the fireplace damper, floor and wall registers so cool air does not escape up
the chimney and into the duct work.
Keep blinds and drapes in other windows closed during the sunniest part of the day.
Clean the air filter as recommended in the section “Care and Cleaning”.
Proper insulation and weather stripping in your home will help keep warm air out
and cool air in.
External house shading with trees, plants or awnings will help reduce the air
conditioner’s work load.
Operate heat producing appliances such as ranges, washers, dryers and dishwashers
during the coolest part of the day.
(8-WAY)
Air Directional Louvers
Air directional louvers control air flow direction. Your air conditioner has the louver
type described below.
Auger Type
The louvers will allow you to direct the air flow Up or Down and Left or Right
throughout the room as needed. Rotate the Auger Wheels until the desired
Left/Right direction is obtained. Pivot horizontal louvers until the desired
Up/Down direction is obtained.
AUGER WHEELS
Operating Instructions
(continued)

OCCURRENCE SOLUTION
Wall plug disconnected. Push plug firmly into wall outlet.
Plug Current Device Tripped. Press the RESET button.
House fuse blown or circuit breaker tripped. Replace fuse with time delay type or reset circuit breaker.
Control is OFF. Turn Control ON and set to desired setting.
Air conditioner will not operate.
Air conditioner cooling, but room
is too warm - NO ice forming on
cooling coil behind decorative
front.
Dirty air filter - air restricted. Clean air filter. Refer to Care and Cleaning section.
Temperature is set too high. Set temperature to a lower setting.
Air directional louvers positioned improperly. Position louvers for better air distribution.
Front of unit is blocked by drapes, blinds, furniture, etc. - restricts air distribution. Clear blockage in
front of unit.
Doors, windows, registers, etc. open - cool air escapes. Close doors, windows, registers, etc.
Unit recently turned on in hot room. Allow additional time to remove “stored heat” from walls, ceiling,
floor and furniture.
Air conditioner turns on and off
rapidly.
Dirty air filter - air restricted. Clean air filter.
Outside temperature extremely hot. Set FAN speed to a faster setting to bring air through cooling coils
more frequently.
Before You Call
Air conditioner cooling, but room
is too warm - ice forming
on cooling coil behind decorative
front
Outdoor temperature below 60 F (16 C). To defrost the coil, set FAN ONLY mode.
OO
Air filter may be dirty. Clean filter. Refer to Care and Cleaning section. To defrost, set to FAN ONLY
mode.
Temperature is set too low for night-time cooling. To defrost the coil, set to FAN ONLY mode. Then,
set temperature to a higher setting.
12
Room temperature below 60°F (16°C). Cooling may not occur until room temperature rises above
60°F (16°C).
Temperature sensing element touching cold coil, located behind air filter. Straighten away from coil.
Air from unit does not feel cold
enough.
Compressor shut-off by changing modes. Wait approximately 3 minutes and listen for compressor to
restart when set in the COOL mode.
Reset to a lower temperature.
Noise when unit is cooling.
Air movement sound. This is normal. If too loud, set to lower FAN setting.
2009 Electrolux Home Products, Inc. All rights reserved.
Water dripping INSIDE when
unit is cooling.
Improper installation. Tilt air conditioner slightly to the outside to allow water drainage. Refer to
installation instructions or check with installer.
Water dripping OUTSIDE when
unit is cooling.
Unit removing large quantity of moisture from humid room. This is normal during excessively humid
days.
Window vibration - poor installation. Refer to installation instructions or check with installer.
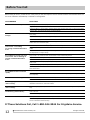
Before calling for service, review this list. It may save you time and expense. This list includes common occurrences that are not
the result of defective workmanship or materials in this appliance.
If These Solutions Fail, Call 1-800-944-9044 For Frigidaire Service.
Remote Sensing Deactivating
Prematurely (some models).
Remote control not located within range. Place remote control within 20 feet & 120° radius of the
front of the unit
Room too cold.
Set temperature too low. lncrease set temperature.
Remote control signal obstructed. Remove obstruction.
Remote Sensing activated (on some models) and remote control located in Hot Spot - Relocate remote
control or deactivate remote sensing.

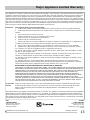
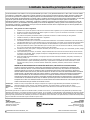
Major Appliance Limited Warranty
13
Exclusions
1. Products with original serial numbers that have been removed, altered or cannot be readily determined.
This warranty does not cover the following:
2. Product that has been transferred from its original owner to another party or removed outside the USA or
Canada.
3. Rust on the interior or exterior of the unit.
4. Products purchased "as-is" are not covered by this warranty.
5. Food loss due to any refrigerator or freezer failures.
6. Products used in a commercial setting.
7. Service calls which do not involve malfunction or defects in materials or workmanship, or for appliances not
in ordinary household use or used other than in accordance with the provided instructions.
8. Service calls to correct the installation of your appliance or to instruct you how to use your appliance.
9. Expenses for making the appliance accessible for servicing, such as removal of trim, cupboards, shelves,
etc., which are not a part of the appliance when it is shipped from the factory.
10. Service calls to repair or replace appliance light bulbs, air filters, water filters, other consumables, or knobs,
handles, or other cosmetic parts.
11. Surcharges including, but not limited to, any after hour, weekend, or holiday service calls, tolls, ferry trip
charges, or mileage expense for service calls to remote areas, including the state of Alaska.
12. Damages to the finish of appliance or home incurred during installation, including but not limited to floors,
cabinets, walls, etc.
13. Damages caused by: services performed by unauthorized service companies; use of parts other than
genuine Electrolux parts or parts obtained from persons other than authorized service companies; or external
causes such as abuse, misuse, inadequate power supply, accidents, fires, or acts of God.
DISCLAIMER OF IMPLIED WARRANTIES; LIMITATION OF REMEDIES
CUSTOMER'S SOLE AND EXCLUSIVE REMEDY UNDER THIS LIMITED WARRANTY SHALL BE PRODUCT REPAIR OR
REPLACEMENT AS PROVIDED HEREIN. CLAIMS BASED ON IMPLIED WARRANTIES, INCLUDING WARRANTIES OF
MERCHANTABILITY OR FITNESS FOR A PARTICULAR PURPOSE, ARE LIMITED TO ONE YEAR OR THE SHORTEST
PERIOD ALLOWED BY LAW, BUT NOT LESS THAN ONE YEAR. ELECTROLUX SHALL NOT BE LIABLE FOR
CONSEQUENTIAL OR INCIDENTAL DAMAGES SUCH AS PROPERTY DAMAGE AND INCIDENTAL EXPENSES
RESULTING FROM ANY BREACH OF THIS WRITTEN LIMITED WARRANTY OR ANY IMPLIED WARRANTY. SOME
STATES AND PROVINCES DO NOT ALLOW THE EXCLUSION OR LIMITATION OF INCIDENTAL OR CONSE-
QUENTIAL DAMAGES, OR LIMITATIONS ON THE DURATION OF IMPLIED WARRANTIES, SO THESE LIMITATIONS
OR EXCLUSIONS MAY NOT APPLY TO YOU. THIS WRITTEN WARRANTY GIVES YOU SPECIFIC LEGAL RIGHTS.
YOU MAY ALSO HAVE OTHER RIGHTS THAT VARY FROM STATE TO STATE.
If You Need
Service
Keep your receipt, delivery slip, or some other appropriate payment record to establish the warranty period
should service be required. If service is performed, it is in your best interest to obtain and keep all receipts.
Service under this warranty must be obtained by contacting Electrolux at the addresses or phone
numbers below.
This limited warranty only applies in the USA and Canada. In the USA, your appliance is warranted by Electrolux Major Appliances
North America, a division of Electrolux Home Products, Inc. In Canada, your appliance is warranted by Electrolux Canada Corp.
Electrolux authorizes no person to change or add to any obligations under this warranty. Obligations for service and parts under
this warranty must be performed by Electrolux or an authorized service company. Product features or specifications as described
or illustrated are subject to change without notice.
2009 Electrolux Home Products, Inc. All rights reserved.
Canada
1.800.265.8352
Electrolux Canada Corp.
5855 Terry Fox Way
Mississauga, Ontario, Canada
L5V 3E4
Your appliance is covered by a limited one-year warranty and a limited 2-5 year warranty on the sealed system (the compressor,
condenser, evaporator and tubing). For one year from your original date of purchase, Electrolux will pay all costs for repairing or
replacing any parts of this appliance that prove to be defective in materials or workmanship when such appliance is installed,
used and maintained in accordance with the provided instructions. From the second to the fifth year from your original purchase
date, Electrolux will repair or replace any parts in the Sealed Refrigeration System (compressor, condenser, evaporator and tubing)
that prove to be defective in materials or workmanship. In years 2-5, the consumer will be responsible for diagnostic, labor and
parts costs as well as any removal, transportation and reinstallation expenses which are incurred during service on components
other than those covered under the Sealed Refrigeration System 5-year warranty.
USA
1.800.944.9044
Electrolux Major Appliances
10200 David Taylor Drive
Charlotte, NC 28262


www.frigidaire.com USA 1-800-944-9044 www.frigidaire.ca Canada 1-800-265-8352
16120300A00439 (June 2009)
ÍNDICE DE CONTENIDOS
Todo sobre
Instrucciones de operación ................................. 5-11
Registro del producto
.......................................................
4
4odateuqapmE
Sonidos normales ................................................. 4
............................................
Funciones de su aparato de aire acondicionado 5.......
Instrucciones importantes sobre seguridad............. 2-3
de su
Aire acondicionado
Cuidados y limpieza ........................................... 11
Consejos de ahorro energético............................ 11
Antes de llamar.................................................. 12
Limitado Garantía principal del aparato................ 13
Uso y Cuidados

Bajo ninguna
circunstancia corte,
remueva o evite el
uso de la clavija de
conexión a tierra.
230V
20A
230V
15A
115V
15A
230V
30A
clavija de
conexión a tierra.
Instrucciones importantes sobre seguridad
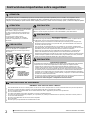
PRECAUCIÓN
Por su seguridad
No almacene gasolina ni otros líquidos o vapores inflamables alrededor de este u otro aparato
eléctrico. Lea las etiquetas del producto sobre inflamabilidad y otras advertencias.
PRECAUCIÓN
Prevenga accidentes
Para reducir el riesgo de incendio, choque eléctrico o lesiones al operar su aparato de aire
acondicionado, siga unas instrucciones básicas entre las que se encuentran:
Asegúrese de que la toma eléctrica es adecuada para el modelo que ha escogido. Esta
información puede encontrarse en la placa de serie, que está localizada en el interior de
la carcasa y detrás de la rejilla.
Si el aparato de aire acondicionado va a ser instalado en una ventana, probablemente
necesitará limpiar antes ambas caras del cristal. Si la ventana es de triple raíl con un panel
apantallado, remueva éste completamente antes de realizar la instalación.
Asegúrese de que el aparato de aire acondicionado ha sido instalado firme y correctamente de
acuerdo a las instrucciones de montaje provistas con este manual. Guarde este manual y las
instrucciones de montaje para un posible uso en el futuro a la hora de remover o reinstalar el equipo.
Cuando manipule el aparato de aire acondicionado, tenga cuidado para evitar producirse
cortes con las aletas metálicas afiladas de la parte delantera y trasera.
Las especificaciones eléctricas completas de su nuevo aparato de aire acondicionado están expresadas
en la placa de serie. Consulte estas especificaciones cuando chequee los requisitos eléctricos.
Asegúrese de que el aparato de aire acondicionado queda adecuadamente conectado a tierra. Para
minimizar el riesgo de choque eléctrico e incendio es importante una polarización adecuada. El cable de
corriente está equipado con un enchufe polarizado de tres clavijas para protección contra choques eléctricos.
Su aparato de aire acondicionado debe conectarse a un tomacorrientes adecuadamente
polarizado. Si el tomacorrientes que pretende utilizar no está adecuadamente polarizado o
protegido por un fusible retardante o cortacorrientes, consiga que un electricista cualificado
le instale un tomacorrientes adecuado.
No ponga en marcha el aparato de aire acondicionado sin la cubierta protectora exterior en
su sitio. Esto podría provocar daños mecánicos en el interior del aparato.
No utilice un cable alargador o adaptador de tomacorrientes.
PRECAUCIÓN
Información eléctrica
PRECAUCIÓN
Evite el riesgo de incendio o choque eléctrico.
No use un alargador ni un adaptador de
tomacorrientes. No remueva ninguna clavija
del enchufe.
ATENCIÓN:
El cable de corriente provisto con este aparato
contiene un dispositivo cortacorriente diseñado
para reducir el riesgo de incendio.
Por favor, consulte la sección 'Operación del
dispositivo cortacorriente' para obtener más
detalles.
En caso de que el cable provisto
resulte dañado, no podrá ser reparado.
Deberá ser reemplazado por un cable del
fabricante..
2
2009 Electrolux Home Products, Inc. Todos los derechos reservados.
ATENCIÓN:
Este MANUAL DE USO Y CUIDADOS proporciona instrucciones de operación específicas para su modelo. Use el aparato de aire
acondicionado sólo como se indica en este MANUAL DE USO Y CUIDADOS. Estas instrucciones no están concebidas para cubrir
cualquier eventualidad que pueda suceder. Debe emplear precaución y sentido común al instalar, operar y mantener cualquier aparato.
PRECAUCIONES DE SEGURIDAD
Este acondicionador de aire no contiene partes con service de usuario. Siempre llame un service autorizado Electrolux para las reparaciones.
No inserte ni coloque los dedos u objetos en el área de descarga del aire en el frente de la unidad.
No inicie ni detenga el acondicionador de aire desenchufando el cable o apagando la potencia de la caja eléctrica.
No corte ni dañe el cable.
Si el cable está dañado solo lo debe reemplazar un service autorizado Electrolux.
En el caso de mal funcionamiento (chispazos, olor a quemado, etc.) detenga inmediatamente la operación, desconecte el cable y llame un
service autorizado Electrolux.
No opere el acondicionador de aire con las manos mojadas.
No tire del cable.
No beba agua que haya drenado del acondicionador de aire.
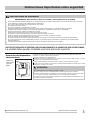
PELIGRO! Evite Lesiones Serias o Muerte

3
PRECAUCIONES DE SEGURIDAD
ADVERTENCIA! Evite lesiones o daño a la unidad u otros objetos de su propiedad
Provea ocasionalmente ventilación durante el uso. No dirija el flujo de aire hacia la estufa hogar u otras fuentes de calor ya que esto podría
causar llamaradas o hacer que las unidades operen excesivamente.
No se suba ni coloque objetos sobre la parte exterior de la unidad.
No cuelgue objetos de la unidad.
No coloque recipientes con líquidos sobre la unidad.
Apague el acondicionador de aire en la fuente de potencia cuando no será usado por un período de tiempo prolongado.
Periódicamente chequee el estado de los accesorios de instalación de la unidad para verificar que no haya daños.
No aplique presión fuerte a aletas del radiador de la unidad.
Cuando opere la unidad verifique que los filtros de aire estén en su lugar.
No bloquee ni cubra la rejilla de entrada, el área de descarga ni los puertos de salida.
Asegúrese que todo equipo eléctrico/electrónico esté al menos a una yarda (0,914m) de la unidad.
No use ni almacene gases inflamables cerca de la unidad.
No toque las piezas de metal de la unidad cuando quite el filtro. Podrían ocurrir lesiones al manipular los bordes de metal afilados.
No use agua para limpiar el aire acondicionado por dentro. La exposición al agua puede destruír el aislamiento, provocando posibles
descargas eléctricas.
Cuando limpie la unidad, asegúrese primeramente de que la electricidad y el disyuntor estén apagados.
Instrucciones importantes sobre seguridad
2009 Electrolux Home Products, Inc. Todos los derechos reservados.
LEA ESTA SECCIÓN ANTES DE INTENTAR PONER EN FUNCIONAMIENTO EL APARATO DE AIRE ACONDICIONADO.
La unidad debe quedar instalada una hora antes de operarla.
Conéctelo al
tomacorrientes
y presione
RESET
El cable de corriente contiene un dispositivo cortacorriente que detecta daños en el cable. Para
comprobar su cable de corriente haga lo siguiente:
Enchufe el aparato de aire acondicionado.
El cable de corriente tiene DOS botones en el enchufe. Presione el botón TEST. Percibirá un sonido
al tiempo que el botón RESET sale hacia fuera.
Presione el botón RESET. De nuevo percibirá un sonido al encajar el botón en su lugar.
El cable de corriente estará en este momento suministrando electricidad a la unidad. (Esto se indica
además con un piloto en el enchufe).
ATENCIÓN:
No use este dispositivo para encender y apagar la unidad.
Asegúrese siempre de que el botón RESET está presionado antes de operar el aparato.
El cable de corriente debe ser reemplazado si falla el reseteado ya sea al presionar el botón TEST
o si no puede ser reseteado. Deberá obtener uno nuevo del fabricante del producto.
Si el cable de corriente resulta dañado, NO PODRÁ ser reparado. DEBE ser reemplazado por otro
obtenido del fabricante del producto.
Operación del dispositivo
cortacorriente

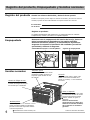
Guarde los números de Modelo y de Serie de su aparato
Escriba en el espacio provisto abajo los números de modelo y de serie. En todos los
modelos, la placa de serie está localizada en la parte exterior de la carcasa.
Nº de Modelo:
Nº de Serie:
Registre su producto
La TARJETA DE REGISTRO DEL PRODUCTO pre-franqueada debe ser rellenada
completamente, firmada y devuelta a la Compañía Frigidaire.
Sonidos normales
Los compresores modernos de alto
rendimiento pueden presentar un
traqueteo agudo durante el ciclo
de enfriado.
Traqueteo agudo
La unidad puede vibrar y hacer ruido
debido a una estructura débil de la
pared o la ventana, o a una instalación
incorrecta.
Vibración
Sonido de ráfagas de aire
Delante de la unidad, puede oír
el sonido de ráfagas de aire que
son movidas por el ventilador.
Borboteo/Siseo
Un sonido parecido a un "borboteo o siseo"
puede escucharse debido al refrigerante
pasando a través del evaporador durante
una normal operación.
Registro del producto
4
.sodavreser sohcered sol sodoT.cnI ,stcudorP emoH xulortcelE 9002
Registro del producto, Empaquetado y Sonidos normales
Empaquetado
Remueva todo el empaquetado del interior de la caja, junto con
todos los separadores insertados en los paneles laterales.
Remueva las tiras de plástico y la almohadilla de espuma que
aseguran el compresor al envoltorio del ventilador (en caso de
que existan). Observe el diagrama.
almohadilla de espuma + tiras de plástico
Injertos de empaquetado
Goteo o chapoteo
Las gotas de agua que caen sobre
el condensador durante la normal
operación del producto pueden
producir sonidos de "goteo o
chapoteo".
Nota: No intente hacer
perforaciones en la base para
eliminar los sonidos normales,
de lo contrario se anulará la
garantía.

5
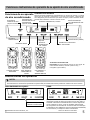
Antes de empezar, familiarícese completamente con el panel de control y el control
remoto que se muestran a continuación y con todas sus funciones, y después siga
estos diagramas para las funciones que desea. El equipo puede controlarse desde
el panel táctil solamente o desde el control remoto.
CONTROL ELECTRÓNICO
Funciones de su aparato
de aire acondicionado
Instrucciones de operación
NOTA
Las instrucciones a continuación representan la el panel táctil, las mismas instrucciones pueden ser usadas en el control remoto.
:ÁREV:OPIUQE LE REDNECNE ARAP
Funciones e instrucciones de operación de su aparato de aire acondicionado
AJUSTA LA
TEMPERATURA
O EL TIEMPO
MUESTRA TEMPERATURA/ TIEMPO
ESTABLECE LA VELOCIDAD
DEL VENTILADOR
ESTABLECE MODO
APAGA O ENCIENDE
EL EQUIPO
ACTIVA EL
TEMPORIZADOR
BOTÓN DE RESETEO
DE COMPROBACIÓN DEL
FILTRO
FUNCIÓN SLEEP (SUEÑO)
INDICADOR DEL
SENSOR REMOTO DE
TEMPERATURA
(algunos modelos)
FUNCIÓN DE
LIMPIEZA DE AIRE
(algunos modelos)
CONTROL REMOTO
ESTÁNDAR
PRESIONE EL BOTÓN ON/OFF
HAGA ESTO:
2009 Electrolux Home Products, Inc.
Todos los derechos reservados.
CON PANTALLA Y
BOTÓN DE
SENSOR REMOTO
PARA MODELOS
CON BOMBA DE
CALOR
Tamaño de las baterías: AAA
Precaución: No mezcle baterías nuevas con otras viejas. No
mezcle baterías alcalinas, estándar (carbono-zinc), o
recargables (níquel-cadmio).
Nota: La unidad funcionará en modo de ahorro de energía
(económico) cuando se utilice por primera vez. En este modo, el
ventilador continuará funcionando durante 1 minuto después de
que el compresor se cierre. Luego el ventilador realizará ciclos
de 20 segundos con intervalos de 10 minutos cada uno hasta que
la temperatura de la habitación supere la temperatura establecida,
en ese momento, el compresor volverá a encenderse.

OPRIMA PARA SUBIR
OPRIMA PARA BAJAR
6
Instrucciones de operación
PARA CAMBIAR LA CONFIGURACIÓN DE TEMPERATURA:
PARA AJUSTAR LA VELOCIDAD DEL VENTILADOR:
VERÁ:
Nota: El ventilador comienza en alta velocidad y se ajusta
después a la velocidad necesaria según la temperatura de
la estancia. Por ejemplo, si la estancia no se calienta
demasiado, se mantendrá girando a la velocidad más baja.
Si la temperatura asciende rápidamente, por ejemplo al
abrir una puerta, se pondrá a girar a la máxima velocidad
de manera automática. La velocidad del ventilador se
reajustará después a la velocidad más baja según la
temperatura vuelva a bajar hasta el nivel original.
Oprima los botones de arriba o abajo para cambiar
la velocidad del ventilador de manera manual.
VERÁ:
HAGA ESTO:
Nota: Pulse una vez o mantenga presionado tanto el botón
arriba ( ) como el botón abajo ( ) hasta que se
muestre la temperatura deseada en la pantalla. Esta
temperatura se mantendrá automáticamente entre 60 °F
(16 °C) y 90 °F (32 °C). Si quiere que la pantalla muestre
la temperatura actual de la estancia, consulte la sección
"Para operar sólo en modo ventilador" en la página 7.
PARA USAR LA CARACTERÍSTICA DE VENTILADOR AUTOMÁTICO:
OPRIMA EL BOTÓN
DEL VENTILADOR, Y
SELECCIONE AUTO
HAGA ESTO:
VERÁ:
HAGA ESTO:
OPRIMA PARA
SELECCIONAR
Instrucciones de operación
(continuación)
2009 Electrolux Home Products, Inc.
Todos los derechos reservados.
La page est en cours de chargement...
La page est en cours de chargement...
La page est en cours de chargement...
La page est en cours de chargement...
La page est en cours de chargement...
La page est en cours de chargement...
La page est en cours de chargement...
La page est en cours de chargement...
La page est en cours de chargement...
La page est en cours de chargement...
La page est en cours de chargement...
La page est en cours de chargement...
La page est en cours de chargement...
La page est en cours de chargement...
La page est en cours de chargement...
La page est en cours de chargement...
La page est en cours de chargement...
La page est en cours de chargement...
La page est en cours de chargement...
La page est en cours de chargement...
La page est en cours de chargement...
La page est en cours de chargement...
La page est en cours de chargement...
La page est en cours de chargement...
-
 1
1
-
 2
2
-
 3
3
-
 4
4
-
 5
5
-
 6
6
-
 7
7
-
 8
8
-
 9
9
-
 10
10
-
 11
11
-
 12
12
-
 13
13
-
 14
14
-
 15
15
-
 16
16
-
 17
17
-
 18
18
-
 19
19
-
 20
20
-
 21
21
-
 22
22
-
 23
23
-
 24
24
-
 25
25
-
 26
26
-
 27
27
-
 28
28
-
 29
29
-
 30
30
-
 31
31
-
 32
32
-
 33
33
-
 34
34
-
 35
35
-
 36
36
-
 37
37
-
 38
38
-
 39
39
-
 40
40
-
 41
41
-
 42
42
-
 43
43
-
 44
44


Frigidaire FFRE2233S2 Mode d'emploi
- Catégorie
- Purificateurs d'air
- Taper
- Mode d'emploi
dans d''autres langues
- English: Frigidaire FFRE2233S2 User guide
- español: Frigidaire FFRE2233S2 Guía del usuario
Documents connexes
-
Frigidaire FFRH11L2R1 Manuel utilisateur
-
Frigidaire FFRE0833U1 Mode d'emploi
-
Frigidaire FFRS0822S1 Manuel utilisateur
-
-
Frigidaire FFRA2822U2 Mode d'emploi
-
Frigidaire FRA106CT1 Le manuel du propriétaire
-
Frigidaire FFRE2233Q2 Le manuel du propriétaire
-
Frigidaire FFRA0611U1 Guide d'installation
-
Frigidaire FFRA0811U1 Manuel utilisateur
-
Frigidaire FFRA1211U1 Mode d'emploi