La page est en cours de chargement...

1
User Manual
Manual del usuario
Mode d’emploi
Benutzerhandbuch
Manuale d’uso

2
Contents
Introduction 3
Kit Contents 3
Pump Parts 3
Cleaning and Sterilising 4
Installation Guide 5
Pump Controls and Display 6
Mode Settings 7
Pumping with Nouri Duo 8
Storing Breast Milk 10
Preparing Breast Milk 10
Feeding Breast Milk 11
Charging your Nouri Duo 11
When to start using Nouri 11
Troubleshooting 12
Warnings 12
Technical Information 13
Warranty 14

3
Kit Contents
1 x Duo electric pump
2 x Bottle (150ml)
2 x Feeding teat and cap
2 x Diaphragm cap
2 x Shield connector
2 x Breast shield
2 x Shield cover
Introduction
Nouri Duo is an automatic breast pump, designed to provide optimal
comfort and performance whilst you express milk. The dual-pump allows
you to express milk from both breasts simultaneously whilst the soft massage
cushions gently stimulate milk ow. Eight suction levels ensure comfortable
and quick pumping, so that mothers can enjoy every expression. The
integrated LCD screen clearly displays suction level, working mode and
battery level. Nouri Duo has a built-in rechargeable battery and integrated
lights, allowing you to pump day and night in complete comfort.
2 x Bottle cap
2 x Diaphragm
4 x Bottle valve
2 x Tube
1 x Bottle dock
1 x USB cable
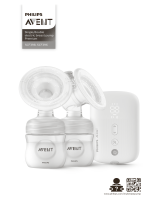
Pump Parts
Electric Pump
Tube
Teat Cap
Teat
Shield
Connector
Bottle Valve
Diaphragm
Cap
Diaphragm
Breast Shield
Bottle

4
Cleaning and Sterilising
Before using for the rst time
Clean and sanitise the below parts before using your Nouri Duo for the rst
time. Use the following cleaning and sanitising instructions.
• Breast shield
• Shield connector
• Bottle valve
• Bottle
After each use
Clean all parts that come in contact with your breast and breast milk.
• Separate all parts, remembering to remove the bottle valve from the
shield connector.
• Rinse the parts in cool water to remove breast milk residue.
Washing in sink
• Soak all parts in warm soapy water for 5 minutes and then clean with a
clean dish-cloth or soft brush.
• Rinse all parts that come in contact with your breast and breast milk with
clear water.
• Allow parts to dry.
Washing in dishwasher
• Wash all separated parts on the top rack of the dishwasher.
• Allow all parts to dry.
Sanitise daily
• Wash hands thoroughly.
• Separate all parts that come in contact with your breast and breast milk,
remembering to remove the bottle valve from the shield connector.
• Immerse parts in boiling water for 10 minutes using a household pot.
• Allow water to cool before removing parts from the water.
• Place parts on a clean surface and/or towel and allow to dry.
Tubing and Electric Pump Unit
• Turn off the breast pump.
• Unplug the pump from any power source.

5
• Separate the tube from the pump and bottle.
• Wipe the electric pump unit and tube with a clean, damp cloth.
Caution:
Only use drinking tap water or bottled water for cleaning.
Separate and wash all parts that come in contact with the breast and milk
immediately after use to avoid milk residue drying and to prevent bacteria
growth.
Do not store wet or damp parts.
During sanitising with boiling water, prevent the parts from touching the side
of the pot. This can cause the parts to deform or be damaged.
Nouri is for single person use. To avoid contamination, please do not share
the pump.
Note:
Wash the Nouri Duo parts that come in contact with the breast and breast
milk after every use.
Sanitise the Nouri Duo parts that come in contact with the breast and breast
milk once a day.
Be careful not to damage parts during cleaning.
1. Wash your hands
thoroughly with
soap and water.
2. Insert diaphragm into
the connector and
make sure the edge
is engaged.
3. Put diaphragm cap
on the connector and
align the triangle marks
on both components.
The angle should be
roughly 35 degrees.
Installation Guide

6
5. Engage the breast
shield with the spout
of the connector and
make sure they are
xed securely.
6. Insert the valve into the
connector and make
sure they are xed
securely.
7. Screw the bottle into
the shield connector
assembly.
8. Plug one side of the tubing into the
diaphragm cap. Connect the other
side of the tubing with the airhole
plug on the pump unit.
Pump Controls and Display
1. ON/OFF
2. Suction Increase: Increase suction force
4. Screw the
diaphragm cap
clockwise.
1
6
7
8
9
10
11
12
2
3
4
5

7
Mode Suction Level Frequency (cycles/min)
Massage 1-5 45 50
Expression 1-12 20 24 28 32
Mode Settings
3. Suction Decrease: Reduce suction force
4. Mode Switch: Switch between massage mode and expression mode.
5. Night Lamp: Press to turn on/off the lamp. Press once for low brightness,
twice for high brightness.
6. Massage mode indicator: Indicates the mode
7. Frequency: Shows pumping frequency. Frequency is adjusted by pressing
and holding the mode switch button until the frequency indicator ashes.
Use increase and decrease to select pumping frequency.
8. Suction level: Shows suction levels. Use increase and decrease to select
suction level.
9. Pause/work indicator
10. Battery level indicator: Flashing icon means battery is low.
11. Power indicator: indicates the power adapter is connected and the
pump is being charged.
12. Time of working: shows how long the pump has been used since turning
on (default expression time is 30 minutes).

8
4. When turning on,
massage mode
will begin. Use
the increase and
decrease buttons to
nd a comfortable
suction level.
5. To adjust pumping
frequency, press
and hold mode
switch button until
the frequency
indicator ashes. Then
use increase and
decrease to select
pumping frequency.
6. After 2 minutes,
expression mode
will automatically
begin. Again, select
a comfortable
suction level and
frequency.
1. Wash your hands
thoroughly with
soap and water
and make sure that
your breast is clean.
2. Place the breast
pumps onto your
breasts. Make sure
that you centre
your nipples. If only
pumping one breast,
make sure to insert
the tube plug on the
electric pump.
3. Turn on the Nouri
Duo by holding
the power button.
Note pumping will
start automatically
so make sure the
breast is positioned
correctly before
switching on the
pump.
Pumping with Nouri Duo

9
7. Stop pumping
when the milk stops
owing or when the
bottle is full. To turn
off, hold the power
button.
8. Remove the tube
from the bottle
assembly.
9. Unscrew the bottle
from the shield
connector. Use
the bottle cap
to seal the bottle
for storage or the
feeding teat for
feeding.
Note:
• The pump will run for 30 minutes before automatically turning off. A single
expression should not last longer than 20 minutes.
• User can pause the expression by tapping the power button. To begin
pumping again, tap the power button again.
• Both breasts must use the same pumping settings.
• Night light has 2 brightness settings. Press the light button to cycle between
OFF, low brightness and high brightness.
Advice
• Hot compress your breast before pumping. Pumping after a bath can be
useful as the body is warm.
• Whilst you are breastfeeding, pump milk on the other breast, or pump
surplus milk after feeding.
• Change the placement position on the breast to stimulate milk secretion
• Practice using Nouri until you nd the approach that works best for you. If
discomfort occurs during use, please consult a doctor.

10
Warning:
• Do not refreeze thawed milk.
• Do not mix fresh breast milk with thawed milk.
Note:
• Fresh breast milk should be stored in refrigerator or freezer.
• Be sure to date the milk for storage. Mild should be stored in a refrigerator
for no longer than 48 hours and the freezer for no longer than 3 months.
• When freezing, maximum milk volume should be ¾ of storage bottle. Milk
can expand during freezing.
Preparing Breast Milk
• If the milk is refrigerated, put the milk container in warm water to heat the
milk. Shake the container to warm the milk through.
• If the milk is frozen, defrost in the refrigerator 24 hours prior to using. Once
defrosted, warm it as refrigerated milk.
Using milk heater:
Turn on milk heater and set it to 400C. Put milk container into heater.
Layers of liquid may for when using frozen milk. This is normal. Please shake
bottle well before feeding.
Warning:
• Do not heat thawed milk again.
• Do not use microwave oven to defrost breast milk.
• Do not heat milk with boiling water.
• If hot water is used to heat milk, please try milk temperature before
feeding.
Storing Breast Milk
Storage location Temperature Max. storage duration
Room 16-29 0C (60-85 0F) 4 hours
Refrigerator 4 0C (39 0F) 4 days
Freezer <-4 0C (25 0F) 0-6 months
The above only applies for infants one month of older. Please consult a
doctor for more details.

11
Feeding Breast Milk
It is recommended that breastfeeding is well established prior to bottle
feeding your baby.
• Always inspect the bottle, teat and other parts before and after each use.
If the teat appears cracked or torn, stop using immediately.
• To prevent possible choking hazard, test the strength of teat by pulling on
bulb portion of the teat.
• Do not attempt to enlarge the teat hole.
• Infants must not be bottle fed without adult supervision.
• The teat should not be used as a pacier.
• Clean and disinfect the bottle before rst use and after every use.
Charging your Nouri Duo
To charge the Nouri Duo, connect the USB charging cable to the pump and
a power socket. The charging indicator and battery level will show on the
display.
When fully charged, the battery indicator will stop ashing and show a full
battery.
The Nouri Duo can be used during charging if needed.
The battery has a charge time of 3 hours and will last for 90 minutes before
needing to be recharged.
When to start using Nouri
1. If you start breastfeeding successfully, we suggest to start using Nouri after
regular milk secretion and feeding is formed. (Breast pumps are usually
used 2-4 weeks after the baby is born)
2. Nouri Pump should be used in the following circumstances
• If you cannot start breastfeeding, regular pumping helps establish and
sustain milk secretion.
• When you feed your baby in hospital.
• When you feel your breast is swelling or painful, you can pump milk
between feeding to release discomfort.
• If your nipple is painful or cracked and therefore unable to feed your
baby, you can pump milk until the nipple recovers.
• If you have to leave your baby for a period of time and therefore not
breastfeed regularly, you can pump milk to keep functional milk secretion.

12
Troubleshooting
Problem Possible causes Solution
Pump does
not work
• Empty battery • Recharge battery
Low suction
force
• Air leakage at connection
positions (Valve, diaphragm,
silicone breast shield, tubing)
• The output air path of breast
pump is blocked, e.g. the
suction pipe is pressed or
bent, or there are sundries in
the pipe
• No cause found
• Check all connecting
parts to make sure they
are installed properly
• Straighten or clean air
tubing
• Please contact supplier
No suction
• Valve is not installed or
damaged due to
deformation
• No case found
• Reinstall or replace
valve
• Please contact supplier
Warnings
• This product is a precision electronic appliance. Please do not use it during
bathing. Please keep it in a cool, dry and ventilated place, avoid direct
sunlight, and keep it out of the reach of children.
• Unplug the power adapter after use.
• This product is for personal use only. Do not use it between more than one
person to avoid cross infection.
• Do not use a breast pump during pregnancy, because early breastmilk
expression will stimulate uterine contraction which may lead to abortion.
• Do not forcibly remove breast shield from breast. Please power off and
gently release the seal between the breast and the breast shield, and
then remove breast shield from the breast.
• When disassembling or assembling the pump, make sure to assemble
each part according to the Installation Guide. When disassembling and
cleaning, please be careful not to misplace/lose the small parts.
• Set the suction level according to individual physique to ensure
comfortable milk expression.
• Please clean with water and disinfect before use.

13
Technical Information
Technical Information
Model Number K-NRIDUO
Power Input AC100-240V, 50-60Hz, 0.3A
Power Output 5V-1A
Rated Power 3.6W
Battery Capacity 3.7V/800mAh
Net Weight 367g
Executive Standard GB 4806.7-2016 GB 4806.11-2016 GB 4806.2-2015

14
Should repair be needed within
the warranty period, please return
the device with the following
details:
1. Name:
2. Address:
3. Telephone:
4. E-mail:
5. Date of Purchase:
6. Proof of Purchase:
Returns should be sent to the
following address:
TensCare Ltd
PainAway House,
9 Blenheim Road,
Longmead Business Park,
Epsom, Surrey
KT19 9BE, UK
For more information, please call +44 (0) 1372 723 434.
Warranty
This product is warranted to be free from manufacturing defects for one year
from the date of purchase. This warranty is void if the product is modied or
altered, is subject to misuse or abuse; damaged in transit; lack of responsible
care; is dropped; if damage occurs by reason of failure to follow the written
instruction booklet enclosed; or if product repairs are carried out without
authority from TensCare Ltd.
We will repair, or at our option replace free of charge, any parts necessary
to correct material or workmanship, or replace the entire unit and return
to you during the period of the warranty. Otherwise, we will quote for any
repair which will be carried out on acceptance of our quotation. The
benets conferred by this warranty are in addition to all other rights and
remedies in respect of the product, which the consumer has under the
Consumer Protection Act 1987.
Our goods come with guarantees that cannot be excluded under the UK
consumer Law. You are entitled to have the goods repaired or replaced if
the goods fail to be of acceptable quality.
Before you send your unit for service please be sure to read the
user manual and follow all the instructions.

15
Contenido
Introducción 16
Contenido 16
Partes de la Bomba 16
Limpieza y Esterilización 17
Guía de Instalación 18
Controles y Pantalla de la Bomba 19
Ajustes del Modo 20
Bombeo con Nouri Duo 20
Almacenamiento de la Leche Materna 22
Preparar la Leche Materna 23
Alimentación de la Leche Materna 23
Cargando tu Nouri Duo 23
Cuándo empezar a usar Nouri 24
Solución de Problemas 24
Advertencias 25
Información Técnica 25
Garantía 26

16
Contenido
1 x cuerpo del extractor de leche
2 x tubos
2 x tapa de pezón
2 x pezón +anillo de pezón
2 x escudo de silicona para el pecho
2 x tapa de diafragma
2 x diafragma
2 x conector del escudo del pecho
4 x válvula
2 x botella
1 x USB cable
Introducción
Nouri Duo es un extractor de leche automático, diseñado para
proporcionar una comodidad y un rendimiento óptimos mientras se
extrae la leche. La doble bomba permite extraer leche de ambos pechos
simultáneamente, mientras que los suaves cojines de masaje estimulan
suavemente el ujo de leche. Ocho fuerzas y rápido, para que las madres
puedan disfrutar de cada extracción. La pantalla LCD integrada muestra
claramente la fuerza de succión, el modo de trabajo y el nivel de la batería.
Nouri Duo tiene una batería recargable incorporada y luces integradas, lo
que le permite bombear día y noche con total comodidad.
Partes de la Bomba
Cuerpo del
extractor de
leche
Tubos
Tapa de pezón
Pezón +anillo
Conector del
escudo del
pecho
Válvula
Tapa de
diafragma
Diafragma
Escudo de silicona
para el pecho
Botella

17
Limpieza y Esterilización
Antes de usar por primeravez
Limpia y desinfecta las partes de abajo antes de usar tu Nouri Duo por
primera vez. Siga las siguientes instrucciones de limpieza y desinfección.
• Escudo de silicona para el pecho
• Conector del escudo del pecho
• Válvula
• Botella
Después de cada uso
Limpia todas las partes que entran en contacto con tu pecho y la leche
materna.
• Separa todas las partes que entran en contacto con el pecho y la
leche materna, recordando quitar la válvula del biberón del conector
de la pantalla.
• Separa todas las partes que entran en contacto con el pecho y la
leche materna.
Lavar en el fregadero:
• Remoje todas las partes en agua tibia y jabonosa durante 5 minutos y
luego limpie con un trapo de cocina limpio o un cepillo suave.
• Enjuague todas las partes con agua clara.
• Deje que las partes se sequen.
Lavado en el lavavajillas:
• Lavar todas las partes separadas en la rejilla superior del lavavajillas.
• Deje que todas las partes se sequen.
Saneado diario
• Lávate bien las manos.
• Separa todas las partes que entran en contacto con el pecho y la leche
materna, recordando quitar la válvula del biberón del conector de la
pantalla.
• Sumergir las partes en agua hirviendo durante 10 minutos usando una olla
doméstica.
• Deje que el agua se enfríe antes de sacar partes del agua.
• Coloca las piezas sobre una supercie limpia y/o una toalla y déjalas
secar.
Precaución:
Sólo usa agua del grifo o agua embotellada para la limpieza.
Separe y lave todas las partes que entren en contacto con el pecho y la

18
leche inmediatamente después de su uso para evitar que los residuos de la
leche se sequen y para prevenir el crecimiento de bacterias.
No guarde las partes húmedas o mojadas.
Durante la higienización con agua hirviendo, evitar que las piezas toquen el
lado de la olla. Esto puede causar que las partes se deformen o se dañen.
El Nouri es para uso de una sola persona. Para evitar la contaminación, por
favor no comparta la bomba.
Nota:
Lave las partes de Nouri Duo que entran en contacto con el pecho y la
leche materna después de cada uso.
Desinfectar las partes de Nouri Duo que entran en contacto con el pecho y
la leche materna una vez al día.
1. Lávate bien las
manos con agua y
jabón.
2. Inserte el diafragma
en el conector
y asegúrese de
que el borde esté
encajado.
3. Ponga la tapa del
diafragma en el
conector y alinee las
marcas triangulares de
ambos componentes.
El ángulo debe ser de
aproximadamente 35
grados.
4. Enrosca la tapa del
diafragma en el
sentido de las agujas
del reloj.
Guía de Instalación
5. Enganche el escudo
del pecho con el
pico del conector y
asegúrese de que
estén bien jados.
6. Inserta la válvula en el
conector y asegúrate
de que estén bien
jadas.

19
7. Atornille la botella
en el conjunto
del conector del
escudo.
8. Conecta un lado del tubo en la tapa del
diafragma. Conecte el otro lado del tubo
con el tapón del oricio de aire de la
unidad de bombeo.
Controles y Pantalla de la Bomba
1
6
7
8
9
10
11
12
2
3
4
5
1. ON/OFF
2. Aumento de succión: Aumentar la fuerza de succión
3. Disminución de succión: Reducir la fuerza de succión
4. Interruptor de modo: Cambiar entre el modo de masaje, el modo de
expresión.
5. Lámpara de noche: Pulse para encender o apagar la lámpara. Presione
una vez para un brillo bajo, dos veces para un brillo alto.
6. Indicador del modo de masaje
7. Frecuencia: Muestra la frecuencia de bombeo. La frecuencia se ajusta
pulsando y manteniendo el botón del interruptor de modo hasta que
el indicador de frecuencia parpadee. Use aumentar y disminuir para
seleccionar la frecuencia de bombeo.
8. Nivel de succión: Muestra los niveles de succión. Use aumentar y disminuir
para seleccionar el nivel de succión.
9. Indicador de pausa / trabajo

20
Modo Nivel de succión Frecuencia (ciclos/min)
Masaje 1-5 45 50
Expresión 1-12 20 24 28 32
Ajustes del Modo
1. Lávate bien las
manos con agua y
jabón y asegúrate
de que tu pecho
esté limpio.
2. Coloque los
extractores de leche
en sus pechos.
Asegúrese de centrar
los pezones. Si sólo se
extrae leche de un
pecho, asegúrese de
insertar el enchufe del
tubo en el extractor
eléctrico.
3. Encienda el Nouri
Duo manteniendo el
botón de encendido.
Tenga en cuenta que
el bombeo se iniciará
automáticamente,
por lo que debe
asegurarse de que
el pecho esté en la
posición correcta
antes de encender el
bombeo.
Bombeo con Nouri Duo
10. Indicador del nivel de la batería. El icono parpadeante signica que la
batería está baja.
11. Indicador de energía: indica que el adaptador de energía está
conectado y que la bomba se está cargando.
12. Tiempo de funcionamiento: muestra el tiempo que la bomba ha sido
utilizada desde que se encendió (el tiempo de expresión por defecto es
de 30 minutos).
1/68