
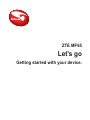
1
ZTE MF65
Let’s go
Getting started with your device.

2
LEGAL INFORMATION
Copyright © 2014 ZTE CORPORATION.
All rights reserved.
No part of this publication may be excerpted, reproduced, translated
or utilized in any form or by any means, electronic or mechanical,
including photocopying and microlm, without the prior written per-
mission of ZTE Corporation.
The manual is published by ZTE Corporation. We reserve the right
to make modications on print errors or update specications with-
out prior notice.
Version No. : R1.0
Edition Time : 2014.03
NOTE:
Do not use the device in an enclosed environment or where heat
dissipation is poor. Prolonged work in such space may cause ex-
cessive heat and raise ambient temperature, which may lead to au-
tomatic shutdown of the device for your safety. In the case of such
event, cool the device in a well-ventilated place before turning on
for normal use.

3
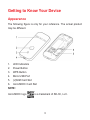
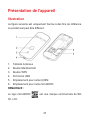
Getting to Know Your Device
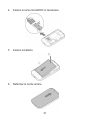
Appearance
The following gure is only for your reference. The actual product
may be different.
1. LED Indicators
2. Power Button
3. WPS Button
4. Micro USB Port
5. (U)SIM Card Slot
6. microSDHC Card Slot
NOTE:
microSDHC logo is a trademark of SD-3C, LLC.

4
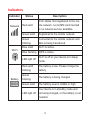
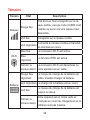
Indicators
Indicator Status Description
Network
Red solid
Error status. Not registered to the mo-
bile network, no (U)SIM card inserted
or no network service available.
Green solid Registered to the mobile network.
Green
blinking
Connected to the mobile network and
data is being transferred.
Wi-Fi
Blue solid Wi-Fi is active.
Blue blinking WPS is active.
LED light off
Wi-Fi is off or your device is in sleep
mode.
Battery
Red solid/
blinking
The battery is low. Please charge the
battery.
Green
blinking
The battery is being charged.
Green solid The battery level is middle or high.
LED light off
Your device is in standby mode and
not being charged, or the battery is not
inserted.

5
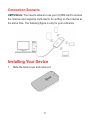
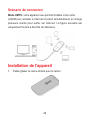
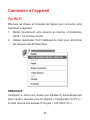
Connection Scenario
UMTS Mode: Your device allows to use your (U)SIM card to access
the Internet and supports multi-clients for surng on the Internet at
the same time. The following gure is only for your reference.
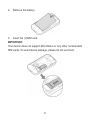
Installing Your Device
1. Slide the back cover and remove it

6
2. Remove the battery.
3. Insert the (U)SIM card.
IMPORTANT:
Your device does not support Micro/Nano or any other nonstandard
SIM cards. To avoid device damage, please do not use them.

7
4. Insert the microSDHC card if necessary.
5. Insert the battery.
6. Close the back cover.

8
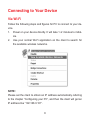
Connecting to Your Device
Via Wi-Fi
Follow the following steps and gures for PC to connect to your de-
vice.
1. Power on your device directly. It will take 1~2 minutes to initial-
ize.
2. Use your normal Wi-Fi application on the client to search for
the available wireless networks.
NOTE:
Please set the client to obtain an IP address automatically referring
to the chapter “Conguring your PC”, and then the client will get an
IP address like “192.168.0.101”.

9
3. Select the SSID of your device, and then click Connect.
NOTE:
Please check the label on your device to get the default SSID.
4. Input the password, and then click Connect.
NOTE:
You may need to input the password for Wi-Fi connection. Please
check the label on your device to get the default.

10
5. Wait a moment, and then the client will connect to your device
successfully.
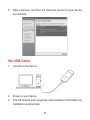
Via USB Cable
1. Connect to the device.
2. Power on your device.
3. The OS detects and recognizes new hardware and nishes the
installation automatically.

11
NOTE:
If the system does not launch installation automatically, you can run
the installation program in path of My Computer > Cellcom.
4. Wait a moment, and then the client will connect to your device
successfully.
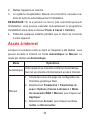
Accessing the Internet
After the client connected to your device successfully, you can ac-
cess the Internet in the Automatic or Manual mode. The default
mode is Automatic.
Mode Operations
Automatic
Your device will connect to the Internet automati-
cally, and your clients can surf on the Internet
directly.
Manual
1. Log in the webGUI conguration page.
2. Select Settings > Network Settings > Dial-
up Settings > WAN Connection Mode >
Manual, and then click Apply.
3. Select Home, and then click Connect or
Disconnect.
NOTE:
If you want to modify the detailed parameters of your device, please
log in the webGUI conguration page by visiting http://192.168.0.1
or http://m.home. The default password is admin.

12
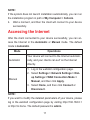
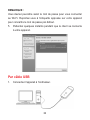
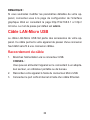
LAN-Micro USB cable
The LAN-Micro USB cable is an accessory of your device. With
this cable, your device can provide a transformation from wireless
broadband to xed broadband.
Connecting the cable
1. Connect the power via the USB connector.
TIP:
You can supply the power by connecting a power adapter, lap-
top or PC.
2. Connect your device via Micro USB connector.
3. Connect the LAN port to the Internet via an Ethernet cable.

13
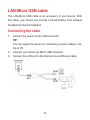
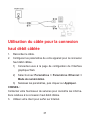
Using the cable to connect to the xed
broadband
1. Connect the cable.
2. Congure the settings of your device for the xed broadband.
1) Log in the webGUI conguration page.
2) Select Settings > Ethernet Settings > Dial Mode.
3) Enter the parameters and then click Apply.
TIP:
Please contact with your service provider for the xed broadband
information.
3. Use your client to enjoy the Internet service.
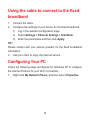
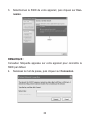
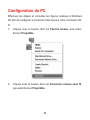
Conguring Your PC
Follow the following steps and gures for Windows XP to congure
the Internet Protocol for your Wi-Fi connection.
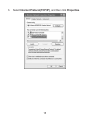
1. Right-click My Network Places, and then select Properties.

14
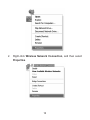
2. Right-click Wireless Network Connection, and then select
Properties.

15
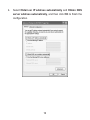
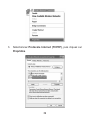
3. Select Internet Protocol(TCP/IP), and then click Properties.

16
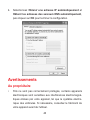
4. Select Obtain an IP address automatically and Obtain DNS
server address automatically, and then click OK to nish the
conguration.

17
Warning and Notice
To the Owner
• Some electronic devices are susceptible to electromagnetic
interference sent by your device if inadequately shielded, such
as the electronic system of vehicles. Please consult the manu-
facturer of your device before using if necessary.
• Operating your device may interfere with medical devices like
hearing aids and pacemakers. Please always keep them more
than 20 centimeters away from such medical devices when
they are turned on. Turn your device off if necessary. Consult a
physician or the manufacturer of the medical device before us-
ing your device.
• Be aware of the usage limitation when using your device at
places such as oil warehouses or chemical factories, where
there are explosive gases or explosive products being pro-
cessed. Turn off your device if required.
• The use of electronic transmitting devices is forbidden in air-
crafts, at petrol stations and in hospitals. Please observe and
obey all warning signs and switch off your device in these con-
ditions.
• Do not touch the inner antenna area if not necessary. Other-
wise it will affect your device’s performance.

18
• Store your device out of the reach of little children. Your device
may cause injury if used as a toy.
• Do not touch the metallic parts of your device so as to avoid a
burn, when your device is working.
Using Your Device
• Please use original accessories or accessories that are au-
thorized. Using any unauthorized accessories may affect your
device’s performance, and violate related national regulations
about telecom terminals.
• Avoid using your device near or inside metallic structures or
establishments that can emit electromagnetic waves. Other-
wise it may inuence signal reception.
• Your device is not waterproof. Please keep it dry and store in a
shady and cool place.
• Do not use your device immediately after a sudden tempera-
ture change. In such case, it will produce dew inside and out-
side your device, so don’t use it until it becomes dry.
• Handle your device carefully. Do not drop, bend or strike it.
Otherwise your device will be damaged.
• No dismantling by non-professionals and only qualied techni-
cians can undertake repair work.
• Operating temperature range of 0°C ~ +35°C and humidity
range of 5% ~ 95% are recommended.

19
Using Battery
• Do not short-circuit the battery, as this can cause excessive
heat and re.
• Do not store battery in hot areas or dispose of it in a re to
avoid explosion.
• Do not disassemble or modify the battery.
• When not using the battery for a long period, remove it from
your device and store it in a cool dry place.
• Never use any charger or battery damaged or worn out.
• Return the wear-out battery to the provider or put it in the ap-
pointed recycle place. Do not put it in familial rubbish.
WARNING:
If the battery is broken, keep away from it. If it taints your skin, wash
your skin with abundant fresh water and ask doctor help if necessary.
Limited Warranty
• This warranty does not apply to defects or errors in the Product
caused by:
i. Reasonable abrasion.
ii. End User’s failure to follow ZTE’s installation, operation or
maintenance instructions or procedures.
iii. End User’s mishandling, misuse, negligence, or improper
installation, disassembly, storage, servicing or operation of
the Product.

20
iv. Modications or repairs not made by ZTE or a ZTE-certi-
ed individual.
v. Power failures, surges, fire, flood, accidents, actions of
third parties or other events outside ZTE’s reasonable
control.
vi. Usage of third-party products, or usage in conjunction with
third-party products provided that such defects are due to
the combined usage.
vii. Any other cause beyond the range of normal usage in-
tended for the Product.
End User shall have no right to reject or return the Product, or re-
ceive a refund for the Product from ZTE under the above-mentioned
situations.
• This warranty is End User’s sole remedy and ZTE’s sole li-
ability for defective or nonconforming items, and is in lieu of all
other warranties, expressed, implied or statutory, including but
not limited to the implied warranties of merchantability and t-
ness for a particular purpose, unless otherwise required under
the mandatory provisions of the law.
La page est en cours de chargement...
La page est en cours de chargement...
La page est en cours de chargement...
La page est en cours de chargement...
La page est en cours de chargement...
La page est en cours de chargement...
La page est en cours de chargement...
La page est en cours de chargement...
La page est en cours de chargement...
La page est en cours de chargement...
La page est en cours de chargement...
La page est en cours de chargement...
La page est en cours de chargement...
La page est en cours de chargement...
La page est en cours de chargement...
La page est en cours de chargement...
La page est en cours de chargement...
La page est en cours de chargement...
La page est en cours de chargement...
La page est en cours de chargement...
La page est en cours de chargement...
La page est en cours de chargement...
La page est en cours de chargement...
La page est en cours de chargement...
La page est en cours de chargement...
La page est en cours de chargement...
La page est en cours de chargement...
La page est en cours de chargement...
-
 1
1
-
 2
2
-
 3
3
-
 4
4
-
 5
5
-
 6
6
-
 7
7
-
 8
8
-
 9
9
-
 10
10
-
 11
11
-
 12
12
-
 13
13
-
 14
14
-
 15
15
-
 16
16
-
 17
17
-
 18
18
-
 19
19
-
 20
20
-
 21
21
-
 22
22
-
 23
23
-
 24
24
-
 25
25
-
 26
26
-
 27
27
-
 28
28
-
 29
29
-
 30
30
-
 31
31
-
 32
32
-
 33
33
-
 34
34
-
 35
35
-
 36
36
-
 37
37
-
 38
38
-
 39
39
-
 40
40
-
 41
41
-
 42
42
-
 43
43
-
 44
44
-
 45
45
-
 46
46
-
 47
47
-
 48
48


