Nesco NPC-9 Le manuel du propriétaire
- Catégorie
- Petits appareils de cuisine
- Taper
- Le manuel du propriétaire

Guide de l’utilisateur et d’entretien
Care/Use Guide
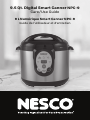
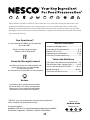
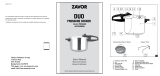
9.5 Qt. Digital Smart Canner NPC-9
9 L Numérique Smart Canner NPC-9

Technical Specifications:
Model: NPC-9 / NESCO 9.5 Qt. Digital Smart Canner
Input - 120Volts / 60HZ / 1200Watts
“NESCO” is a registered trademark of The Metal Ware Corp.
Two Rivers, Wisconsin
Visit us at
nesco.com
Follow us on
#YourKeyIngredient
Thank you for purchasing a NESCO Smart Canner. There is nothing better than knowing
you are making delicious canned goods for you and your family. We have been creating
kitchen products and accessories for many years and are excited to share our
knowledge and welcome more enthusiasts to the world of home canning.
Questions?
NESCO Customer Service available
8 am to 4 pm CST.
Email: nescocs@nesco.com
Phone: 1-800-288-4545
Warranty/Registration
Please see warranty info included on
the package and in this guide.
This guide is available at Nesco.com
Returns
Please do not return this item to the
place of purchase. If you are missing
any parts, or need assistance, contact
NESCO Customer Service.
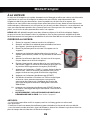
Important Safeguards.............................1
Overview of Components..................2-3
Before First Use....................................3-4
Operating Instructions
.....................5-10
One Year Limited Warranty.......................11
Table of Contents
Table des Matières
Consignes De Sécurité Importantes.....13
Présentation Des Composants
..........14-15
Avant La Première Utilisation.............16-17
Mode D’emploi.....................................18-25
Garantie Limitée D’un An.........................26
SAVE THESE INSTRUCTIONS

IMPORTANT SAFEGUARDS
When using any electrical appliance, basic safety precautions should
always be observed including the following:
• READ ALL INSTRUCTIONS.
• To protect against risk of electrical shock, DO NOT put cord, plugs, or appliance in water or
other liquid.
• DO NOT touch hot surfaces. Use handles, knobs or oven mitts.
• Close supervision is necessary when any appliance is used by or near children. This
appliance is NOT recommended for use by children.
• Unplug from outlet when not in use, before putting on or taking o parts, and before
cleaning.
• Allow to cool before putting on or taking o parts.
• DO NOT operate the appliance for any other purpose than the intended use. DO NOT use
electrical equipment with a damaged cord or plug or after the appliance malfunctions, is
dropped or damaged in any manner. Contact NESCO Customer Service.
• DO NOT use outdoors.
• DO NOT let cord hang over edge of table or counter, contact sharp edges, or touch
hot surfaces.
• DO NOT pull on the power cord to disconnect.
• Never plug in the appliance where water may flood the area.
• Place the appliance on a firm and stable surface.
• Ensure that the appliance is not placed close to the edge of the table, worktop, etc. where
it can be pushed o or fall.
• The use of attachments, including electrical converters, not recommended or sold by the
manufacturer may cause fire, electric shock or injury.
• NEVER use abrasive cleaning agents or abrasive cloths when cleaning the unit.
• Only use the unit when completely assembled.
• DO NOT leave the appliance unattended while it is running.
• Before using for the first time, remove all packaging and wash parts.
• A short power-supply cord is provided to reduce the risk resulting from becoming
entangled in or tripping over a longer cord.
- Longer detachable power-supply cords or extension cords are available and may be
used if care is exercised in their use.
- If a longer detachable power-supply cord or extension cord is used, the marked electrical
rating of the cord set or extension cord should be at least as great as the electrical rating
of the appliance.
- The cord should be arranged so that it will not drape over the countertop or tabletop
where it can be pulled on by children or tripped over unintentionally
- The cord set or extension cord should be a grounding-type 3-wire cord.
• Prior to unplugging unit, turn power o.
• Do not place on or near hot gas, electric burner or in a heated oven.
• Extreme caution must be used when moving an appliance containing hot oil or other
hot liquids.
• CAUTION: Turn unit on and o using timer or On/O button only.
• To disconnect, turn any control to “o”, then remove plug from wall outlet.
• For household use only.
• CAUTION: Risk of electrical shock. Cook/Can only when removable inner pot is in place.
WARNING
1
SAVE THESE INSTRUCTIONS

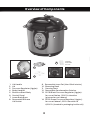
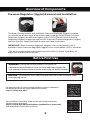
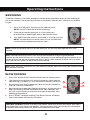
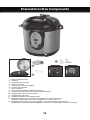
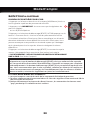
1. Lid Handle
2. Lid
3. Pressure Regulator (Jiggler)
4. Body Handles
5. Stainless Steel Body
6. Control Panel
7. Lower Body Base
8. Removable Silicone
Lid Gasket
14
Already
attached
on unit.
13
12
11
10
9
8
7
65
4
12
3
4
2
9. Removable Inner Pot (Non-Stick Interior)
10. Steaming Rack
11. Canning Rack
12. Removable Condensation Catcher
13. 10 PSI Black Pressure Regulator (Jiggler)-
for use at/below 1,000 ft. elevation
(pictured on unit above)
14. 15 PSI Green Pressure Regulator (Jiggler)-
for use at/above 1,001 ft. elevation to
6,000 ft. (located in packaging inside unit)
Overview of Components

3
Overview of Components
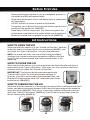
Pressure Regulator (Jiggler) Removal and Installation
IMPORTANT: Black Pressure Regulator (Jiggler) is for use at/below 1,000 ft.
elevation. Green Pressure Regulator (Jiggler) is for use at/above 1,001 ft. elevation.
* We do not recommend using the canner over 6,000 ft. due to the eects of
excessive air pressure on the unit.
WARNING - During the canning process, hot steam will
continuously be released out of the Pressure Regulator (Jiggler). Be
sure nothing is directly above this area when using the Smart Canner.
For the USDA’s Complete Guide to Home Canning and tested
recipes please reference:
https://nchfp.uga.edu/publications/publications_usda.html
and follow their instructions precisely.
For general rules on safe canning guidelines please reference
the National Center for Home Food Preservation:
https://nchfp.uga.edu/
CAUTION - To avoid burn injury, keep face and hands away from escaping steam
when opening the lid.
Before First Use
The Smart Canner comes with the Black Pressure Regulator (Jiggler) installed
in cover on top of vent stem. Should you need to change to the Green Pressure
Regulator (Jiggler) (for altitudes higher than 1,000 ft.) Simply lift the Pressure
Regulator (Jiggler) straight up and pull o. To put the Pressure Regulator (Jiggler)
back on the unit, simply put back on vent stem and push down.

4
• Remove packaging materials such as cardboard, plastics or
styrofoam and discard appropriately.
• Wipe clean all the parts with a soft damp cloth or sponge and
dry thoroughly.
• DO NOT immerse in water or place in dishwasher.
• The gasket sets in behind the wire guide. Before your first use,
gently pull the gasket out. (IMAGE 1)
• Hand wash in warm soapy water. Dry, then firmly press the
gasket back in behind the wire guide. Make sure the gasket is
properly installed into the groove inside the lid. (IMAGE 2)
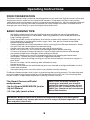
HOW TO OPEN THE LID
When the lid of the canner is at the “Closed-Lid Position”, hold the
lid handle and turn it about 1/8 of a turn clockwise (IMAGE 1), until
you reach the “Open-Lid Position”. Lift up on the lid handle.
NOTE: For brand new units, the seal of the lid may be slightly
stronger than normal and may be somewhat dicult to unlock.
Once the lid has been opened and closed several times, it will
loosen up.
1.
2.
HOW TO DISMANTLE THE LID
When the lid of the cannner is in the upright vertical position, hold the lid with both
hands, and adjust the height between the lid and the upper edge of the cooker to
around 4 inches (IMAGE 3). Then turn it in a counter clockwise direction until you
reach the “Closed-Lid Position” (IMAGE 4). Then lift the lid up and away from the
Smart Canner body. (IMAGE 5).
HOW TO CLOSE THE LID
When the lid of the canner is in vertical position hold the lid handle and close it
downwards at the “Open-Lid Position”. After that, turn it in a counter clockwise
direction until you reach the “Closed-Lid Position”.
4. 5.
1.
IMPORTANT: The lid must be closed and turned to the
“Closed-Lid Position” for the control panel settings to
function. If the lid is not turned to the closed position, the
display will illuminate the word “LID” and beep three times
continuously. (IMAGE 2)
2.
Before First Use
Lid Instructions
3.

5
Operating Instructions
FOOD PRESERVATION
The Smart Canner helps make the canning process easy and safe. Digital controls will make
the process easier, even for first-time home canners. The process of pressure canning
safely eliminates and protects against unwanted microorganisms. We’ve included some tips
on the basics of canning. Feel free to explore the many recipe resources available online,
through your local library, or your local agriculture extension.
BASIC CANNING TIPS
• We highly recommend that you familiarize yourself with the canning procedures,
the dierent acid levels of fresh foods and FDA guidelines that can be found online.
http://nchfp.uga.edu/
• There are a wide variety of products that can be successfully canned. However, not
every food item is preservable ie dairy, eggs, flour, rice, pasta. Check for certified
recipes before proceeding.
• Follow guidelines for safety procedures from canning jar and lid manufacturers. Never
use jars that are not designed for home canning.
• Canner rack must be used in the liner pot with all types of jars.
• Make sure all utensils, jars and lids are thoroughly clean before canning.
• It’s best to keep your newly cleaned jars warm to help reduce chance of breakage
caused by temperature changes when adding hot foods.
• The Smart Canner can seal jars through both pressure canning and water bath
techniques—check with your recipe for suggested method.
• Seasonings intensify during canning, err on the side of caution. Do not use sage as it
gets bitter.
• Do not use table salt for canning. Non-iodized salt only.
• Do not reuse lids.
• NCHFP recommends low acid foods be pressure canned and high acid foods use the
water bath method.
• Consider doing a test run with water in jars before actually canning.
The Smart Canner comes with 2 racks to use during the canning process. The canning rack
must be used to keep the canning jars o the bottom of the inner pot. The steaming rack
can be used as a separation layer when stacking smaller size jars.
The Smart Canner will hold
and process:
· Up to 4 Quarts (WIDE MOUTH jars) or
· Up to 5 Pints or
· 16 - 4 oz jelly jars at a time
NOTE: There are many varieties of
canning jars available; not all will fit
perfectly in the Smart Canner. Please
dry fit your jars in canner prior to use.
QUART jars should not be used with the
Water Bath function.
IMPORTANT: Botulism spores must be killed at temperatures higher than boiling water
(pressure canned) or by extreme pH balance found in vinegar of pickled vegetables or sweet
jams and jellies (water bath).

Operating Instructions
WATER BATH (WB)
It is important in water bath canning, that the jars be covered with water. If your jars are too
tall, you should use the LOW pressure setting. This allows the use of much less water and
gives you more flexibility on the types of jars that can be used.
High acid foods such as fruits, pickles and tomatoes prohibit the development of harmful
bacteria better than low acid foods. Therefore, water bath canning can be used to preserve
these foods.
1. Prepare your products following your recipe and Federal FDA Guidelines.
2. Place food in canning jars and hand tighten following jar manufacturer guidelines.
3. Place the canning rack into the bottom of the inner pot. Set your filled jars on the canning
rack.
4. Fill the inner pot with water so that the jars are completely covered by 1-2” of water.
5. Close lid and ensure the Pressure Regulator (Jiggler) is set to exhaust.
(CONTROL PANEL USE FOR WB)
6. Press the “WB/STEAM” button on top left of control panel.
7. Press the “TIME (+)” button to set time required for recipe.
IMPORTANT: Make sure the Pressure Regulator (Jiggler)
is set to exhaust.
8. Next press the “START” button. DO NOT press the “Pressure Cook”
button at bottom of control panel.
9. Digital Dial Chase will begin to rotate. The unit should begin to boil
within 20-25 minutes. You will see a constant stream of steam
coming from the pressure exhaust valve when boil has
been reached.
10. Press “START” again when the constant stream of steam is seen.
This will activate the timer.
1
2
3
5
WATER BATH CYCLE IS COMPLETE:
11. When steam has ceased coming from the Pressure Regulator (Jiggler).
12. Carefully turn the lid clockwise 1/8 turn and open the lid.
13. Carefully remove the jars from the Smart Canner; the jar lids will “pop”
as they cool and seal.
Helpful Hint: A common reason for seeing a ERR or EEE code is that the Start/Stop button
was not pressed a second time when the water bath came to a boil. If this should happen, we
recommend that you restart the process from step one above.
6
IMPORTANT: QUART size jars cannot be used with the Water Bath function.
CAUTION: DO NOT HIT THE START BUTTON A THIRD TIME. This will result in the unit
shutting o.

7
LOW PRESSURE CANNING
The following instructions are for low pressure canning for high acid foods.
The Smart Canner makes pressure canning safe and easy. You can LOW PRESSURE CAN
most vegetables, fruits, sauces, and soup stocks.
Refer to the USDA’s Complete Guide to Home Canning for tested recipes and follow their
instructions precisely. https://nchfp.uga.edu/publications/publications_usda.html
1. Place your filled jars to be canned onto the canning rack in the inner pot.
2. Add 8 cups of hot water.
3. Close and lock the lid. Attach the proper Pressure Regulator (Jiggler) to the lid.
4. Select the “LOW” button from the control panel.
5. Press the “TIME” button to set the canning recipe required process time.
6. Set the pressure limiting valve to exhaust.
7. Press “START” to begin the canning process.
The Digital Dial Chase will begin to rotate and this will continue until the correct
internal temperature is reached which can take up to 30 minutes.
Steam will begin venting through the pressure limiting valve, this is normal. Once
the pressure canner reaches the correct internal temperature, the canner will
beep, and the control panel LED display will read “E10”. The pre-set “E10” code
means: (E) for exhaust mode and (10) equals the number of minutes that will
count down.
8. The pressure canner will automatically countdown from “E10” to “E0”. Once the control
panel LED display shows a blinking “E0” the canner will beep. At this time, move Jiggler
to airtight and allow to process through time countdown.
The required process time entered earlier will now start to count down. During this time
your canner will begin to release steam. The weighted venting ensures a consistent
internal PSI. When the countdown procedure is complete, the canner will beep three
times and the control panel LED display will read “OFF”.
If the Pressure Regulator (Jiggler) is not set to “Airtight” after the E10 countdown reaches “E0” and
beeps, the canner will allow for an additional 5 minutes. It will then beep, and the control panel
LED display will then display an “EEE” code and power down.
9. Unplug the Smart Canner and allow the temperature inside the canner to gradually
decrease. The canner should be allowed to cool for 60-90 minutes before attempting
to open the lid. The canning process is now complete.
Carefully remove the jars; the jar’s
lids will “pop” as they cool and seal.
Operating Instructions
Helpful Hint: After removing jars from canner, leave untouched in a covered location for 12-18
hours before checking seal.

HIGH PRESSURE CANNING
The following instructions are for high pressure canning for low acid foods.
The Smart Canner makes pressure canning safe and easy. You can HIGH PRESSURE CAN most
vegetables, fruits, sauces, meats, and soup stocks.
Refer to the USDA’s Complete Guide to Home Canning for tested recipes and follow their
instructions precisely. https://nchfp.uga.edu/publications/publications_usda.html
1. Place your filled jars to be canned onto the canning rack in the inner pot.
2. Add 8 cups of hot water.
3. Close and lock the lid. Attach the proper Pressure Regulator (Jiggler) to the lid.
4. Select the “HIGH” button from the control panel.
5. Press the “TIME” button to set the canning recipe required process time.
6. Set the pressure limiting valve to exhaust.
7. Press “START” to begin the canning process.
The Digital Dial Chase will begin to rotate and this will continue until the correct
internal temperature is reached which can take up to 30 minutes.
Steam will begin venting through the pressure limiting valve, this is normal. Once
the pressure canner reaches the correct internal temperature, the canner will
beep, and the control panel LED display will read “E10”. The pre-set “E10” code
means: (E) for exhaust mode and (10) equals the number of minutes that will
count down.
8. The pressure canner will automatically countdown from “E10” to “E0”. Once the control
panel LED display shows a blinking “E0” the canner will beep. At this time the pressure
limiting valve must be set to “Airtight”. Once the canner resumes, the control panel will
beep again.
The required process time entered earlier will now start to count down. During this time
your canner will begin to release steam even though the pressure limiting valve is set
to “Airtight”, this is normal. The weighted venting ensures a consistent internal PSI.
When the countdown procedure is complete, the canner will beep three times and the
control panel LED display will read “OFF”.
If the Pressure Regulator (Jiggler) is not set to “Airtight” after the E10 countdown reaches “E0” and
beeps the canner will allow for an additional 5 minutes. It will then beep, and the control panel
LED display will then display an “EEE” code and power down.
9. Unplug the Smart Canner and allow the temperature and pressure inside the canner to
gradually decrease, do not manually release the pressure. The canner should be allowed
to cool for one hour before attempting to open the lid. The canning process is
now complete.
Carefully remove the jars; the lids will “pop” as they cool and seal.
Operating Instructions
8
Important: If unit bypasses the E10 countdown the water added to the canner may have
been too hot. Stop process and allow canner to cool briefly. Restart using lukewarm/
room tempurature water.
Helpful Hint: After removing jars from canner, leave untouched in a covered location for 12-18
hours before checking seal.

9
SLOW COOKING
1
2
5
2
1. Press the “BROWN” function on the control panel.
NOTE: DO NOT close the lid while browning.
2. Place meat into the inner pot. It is not necessary
to add butter or cooking oil, unless desired for flavor.
3. Turn and brown the meat as you would as if using a fry pan.
NOTE: You can brown an entire roast, or cut up meat into
smaller pieces before browning for stews.
1
1. Press the “SLOW COOK” function button on the control panel.
2. The cooking time display will show 30 minutes, which can be
adjusted up (+) or down (-), to a max of 600 minutes (10 hours).
3. Close the lid, turn the lid about an 1/8 turn counter clockwise
into the “Closed-Lid Position”.
4. Set the pressure regulator (jiggler) to exhaust so the pressure
does not build up inside the cooker while slow cooking. You
will still seal in liquids for moisture to create the perfect slow
cooking environment.
5. Press “START” to begin cooking. The Smart Canner will beep
three times once the time has finished.
BROWNING
The Smart Canner is versatile enough to handle browning meats prior to slow cooking or
pressure cooking. The browning function on the Smart Canner acts similar to a standard
fry pan.
NOTE: Avoid using metal utensils on the inner pot, as you may damage the non-stick
surface.
Operating Instructions
CAUTION: 4/5 RULE: NEVER fill a pressure cooker more than 4/5 full with food. Also, don’t
pack food tightly into a pressure cooker. These practices may cause the pressure cooker
to operate incorrectly which will aect the outcome of your food.
HINT: There are many resources for slow cooking recipes which can easily be adapted to use
with the Smart Canner.
HINT: Consider browning meats that will be slow cooked first by using the BROWN
function on the Smart Canner. It is usually not necessary to add cooking oil or butter to the
bottom of the inner pot when browning meats, but a small amount of liquid such as water,
soup stock or fruit juice can help when slow cooking.

5
1
4
1. Press the “PRESSURE COOK” function button on the front
control panel.
2. Add the ingredients from your favorite recipe into the inner
pot liner.
3. Close the lid, turn the lid about an 1/8 turn counter clockwise
into the “Closed-Lid” position. Set the pressure limiting valve
to the airtight position.
4. Press the “TIME (+)” to set time required for the recipe.
5. Press “START” to start the process. The display will circle
until the internal pressure is reached. You may notice some
clicks as the unit heats up, this is normal. Once the internal
pressure is reached, the cooking time will start counting
down to “000” and beep 3 times.
6. Carefully move the Pressure Regulator (Jiggler) to the exhaust
position. A large amount of steam will be released from the
Pressure Regulator (Jiggler) , so make sure to keep your face,
body and fingers away from the steam.
7. Once the steam has been released, turn the lid handle an 1/8
turn clockwise and open the lid.
PRESSURE COOKING
Pressure cooking is an easy way to seal in the flavor and nutrition of your favorite foods.
You can cook single foods like corn on the cob, or an entire pot roast dinner.
Operating Instructions
4/5 RULE: NEVER fill a pressure cooker more than 4/5 full with food. Also, don’t
pack food tightly into a pressure cooker. These practices may cause the pressure
cooker to operate incorrectly which will aect the outcome of your food.
10
STEAMING FOOD
1. Place the canning rack into the inner pot liner.
2. Fill with hot water to the rack level. (approximately 4 cups)
3. Place the steaming tray over the rack.
4. Press the “WB/STEAM” function on the control panel.
5. Add foods that you wish to steam, not exceeding the
4/5 fill rule of the pressure cooking.
6. Close the lid, turn counter clockwise an 1/8 turn, set the Pressure Regulator
(Jiggler) to the exhaust position.
7. Press the “TIME (+)” to set time required for the recipe.
8. Press the “START” button.
9. Digital Dial Chase will begin to rotate. You will see a constant stream of steam
coming from the pressure exhaust valve when boil has been reached.
10. Press “START” again when the constant stream of steam is seen. This will activate
the timer.
4
7
8
CAUTION: DO NOT HIT THE START BUTTON A THIRD TIME. This will result in the unit
shutting o.

One-Year Limited WarrantyOne-Year Limited Warranty
NPC-9 / NESCO 9.5 Qt. Digital Smart Canner
C/O MW
PO Box 237
Two Rivers, WI 54241-0237
The Metal Ware Corporation warrants the original purchaser that your product will be free
from defects in material and workmanship for a period of one year from date of purchase.
Product must be used for personal or sole household usage in accordance with the
instructions. Should your product prove defective within one year from date of purchase,
contact our customer service team at 1-800-288-4545 or email at nescocs@nesco.com
with an explanation of the claim. If a viable warranty claim is determined, a customer service
member will provide you with the necessary details to have your unit replaced. Under
this limited time warranty, we undertake to replace any parts found to be defective at our
sole discretion. This limited time warranty is void if the unit is connected to an unsuitable
electrical supply or dismantled or interfered with in any way or damaged through misuse.
This warranty is not transferable.
LIMITATION OF REMEDIES AND DAMAGES: Except for the limited time warranty and remedies
expressly stated above, the Metal Ware Corp shall not be liable to you, or to anyone claiming
by or through you, for any obligations or liabilities, including, but not limited to, obligations or
liabilities arising out of breach of contract, breach of warranty, statutory claims, negligence
or other tort or any theory of strict liability, with respect to the product or the Metal Ware
Corp’s acts or omissions or otherwise. Buyer agrees that in no event shall the Metal Ware
Corp be liable for incidental, compensatory, punitive, consequential, indirect, special or
other damages. Warranty does not cover consequential or incidental damages such as
property damage and does not cover incidental costs and expenses resulting from any
breach of this warranty, even if foreseeable. Some states or provinces do not allow the
exclusion or limitations of incidental or consequential damages, so the above limitation or
exclusion may not apply to you depending on the state or province of purchase.
You may register your product on our website but will need to retain
a copy of your proof of purchase should a warranty issue arise.
We suggest you staple your receipt to this care and use guide.
https://www.nesco.com/customer-service/warranty-registration
Or fill in your warranty card and return it within one week from
date of purchase along with a copy of proof of purchase.
Send warranty card to:
11
CAUTION: DO NOT HIT THE START BUTTON A THIRD TIME. This will result in the unit
shutting o.

“NESCO” est une marque de commerce enregistrée
de la société The Metal Ware Corp
Visit us at
nesco.com
Follow us on
#YourKeyIngredient
Merci d’avoir acheté un NESCO Smart Canner. Il n’y a rien de mieux que de savoir vous
préparez de délicieux repas en conserve pour vous et votre famille. Nous créons des
produits et accessoires de cuisine depuis de nombreuses années et sommes ravis de
partager notre connaissances et accueillir plus de passionnés dans le monde de la mise
en conserve maison.
Des Questions?
Le service client NESCO est disponible
8 h à 16 h CST.
Email: nescocs@nesco.com
Phone: 1-800-288-4545
Garantie/Enregistrement
Veuillez consulter les informations de
garantie incluses sur emballage
et dans ce manuel.
Ce manuel est disponible sur Nesco.com
Retour
Veuillez ne pas retourner cet article
au lieu d’achat. S’il vous manque des
pièces ou si vous avez besoin d’aide,
contactez le service client NESCO.
Caractéristiques
:
Modèle: NPC-9 / 9 L Numérique Smart Canner par NESCO
Entrée De L'appareil - 120Volts / 60HZ / 1200Watts
12
Important Safeguards.............................1
Overview of Components..................2-3
Before First Use....................................3-4
Operating Instructions
.....................5-10
One Year Limited Warranty.......................11
Table of Contents
Table des Matières
Consignes De Sécurité Importantes.....13
Présentation Des Composants
..........14-15
Avant La Première Utilisation.............16-17
Mode D’emploi.....................................18-25
Garantie Limitée D’un An.........................26

IMPORTANTES PRÉCAUTIONS
Lors de l’utilisation d’un appareil électrique, les précautions de sécurité de
base doivent toujours être observées, et inclus les suivantes :
• LIRE TOUTES LES INSTRUCTIONS.
• Pour vous protéger contre les risques d’électrocution, NE PAS mettre le cordon, la fiche ou
l’appareil dans l’eau ou tout autre liquide.
• NE PAS toucher les surfaces chaudes. Utiliser les poignées latérales et celle du couvercle,
ou des maniques.
• Veuillez être attentif lorsque l’appareil est utilisé par un enfant ou à proximité d’enfant.
L’utilisation de cet appareil par des enfants N’EST PAS recommandée.
• Débrancher la fiche du cordon d’alimentation électrique de la prise murale lorsque l’appareil
n’est pas utilisé, avant d’insérer ou de retirer des pièces et avant le nettoyage.
• Allouer une période de temps pour refroidir les pièces avant leur manipulation.
• NE PAS utiliser cet appareil pour un usage autre que celui auquel il est destiné. - NE
PAS utiliser un appareil si le cordon ou la fiche est endommagé, s’il ne fonctionne pas
correctement, s’il est tombé, ou endommagé de quelque façon que ce soit. Contacter le
service client NESCO.
• NE PAS utiliser à l’extérieur.
• NE PAS laisser le cordon dépasser sur le côté d’une table ou d’un comptoir, en contact avec
des objets tranchants ou des surfaces chaudes.
• NE PAS tirer sur le cordon d’alimentation électrique pour débrancher l’appareil.
• Ne jamais brancher l’appareil si l’endroit est susceptible d’être inondé.
• Placer l’appareil sur une surface ferme et stable.
• Placer l’appareil dans un endroit éloigné des bords de comptoir, de table, etc. pour éviter
qu’il tombe ou qu’il soit poussé.
• L’utilisation d’accessoires, y compris de convertisseurs électriques, non recommandés ou
vendus par le fabricant peut provoquer un incendie, un choc électrique ou des blessures.
• NE JAMAIS utiliser de produit ou lingette de nettoyage abrasif pour nettoyer l’appareil.
• Seulement utiliser l’appareil avec un assemblage complet.
• NE PAS quitter l’appareil lorsqu’il est en fonction.
• Avant la première utilisation, retirer tous les emballages et nettoyer les pièces.
• Un cordon d’alimentation court est fourni pour réduire le risque de s’emmêler ou
de trébucher sur un cordon plus long. Des cordons d’alimentation ou des rallonges
détachables plus longs sont disponibles et peuvent être utilisés si l’on prend soin de les
utiliser. Si un cordon d’alimentation ou une rallonge détachable plus long est utilisé, la
puissance électrique indiquée du cordon ou de la rallonge doit être au moins aussi élevée
que la puissance électrique de l’appareil. Le cordon doit être disposé de manière à ne
pas tomber sur le comptoir ou la table où il peut être tiré par des enfants ou trébuché
involontairement et le cordon ou la rallonge doit être un cordon à 3 fils avec mise à la terre.
• Avant de débrancher l’appareil, éteindre en appuyant sur le bouton d’alimentation.
• Ne pas placer près ou sur une surface de gaz chauant, d’un bruleur électrique ou dans un
four chauant.
• Soyez très vigilant lors du transport d’un appareil contenant de l’huile chaude ou tout autre
liquide chaud.
• Pour déconnecter, éteindre l’appareil avec le bouton (OFF), puis retirer la fiche de la prise
murale.
• AVERTISSEMENT : Allumer ou éteindre l’appareil à l’aide des boutons de minuterie ou
d’alimentation électrique (ON/OFF) seulement.
• Pour usage domestique uniquement.
• ATTENTION : Risque de choc électrique. Cuire uniquement dans une marmite intérieure
amovible.
AVERTISSEMENT
CONSERVEZ CES INSTRUCTIONS
13

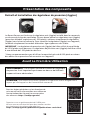
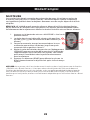
Déjà
fixé sur
l’appareil.
1. Poignée Du Couvercle
2. Ouvercle
3. Régulateur De Pression
4. Poignée Latérale
5. Extérieure En Acier Inoxydable
6. Panneau De Contrôle
7. Base Inférieure
8. Joint De Silicone Rétractable Du Couvercle
9. Récipient (Intérieur Avec Une Couche Anti-Adhérente)
10. Suppport Pour Cuisson À La Vapeur
11. Support Pour Conserve
12. Capteur De Condensation Rétractable
13. Régulateur de pression noir 10 PSI (Jiggler) pour une utilisation à une
altitude de 1 000 pieds ou en dessous (photo sur l’unité ci-dessus)
14. Régulateur de pression vert 15 PSI (Jiggler)- pour une utilisation à/au-dessus
de 1 001 pieds d’altitude jusqu’à 6 000 pieds (situé dans l’emballage à l’intérieur de l’unité)
14
13
12
11
10
9
8
7
65
4
12
3
4
14
Présentation Des Composants

16
AVERTISSEMENT - De la vapeur chaude est libérée du régulateur
de pression. Il est important que la zone au-dessus de l’orifice à
vapeur soit sans obstruction.
Reportez-vous au guide complet de l’USDA pour
Mise en conserve à domicile pour des recettes testées
et suivez leurs instructions avec précision.
https://nchfp.uga.edu/publications/publications_usda.html
Pour les règles générales sur les directives de
mise en conserve sûresveuillez vous référer au
Centre National de l’Accueil La conservation
des aliments: https://nchfp.uga.edu/
ATTENTION - Pour éviter les brûlures, gardez le visage et les mains éloignés de la
vapeur qui s’échappe lors de l’ouverture du couvercle.
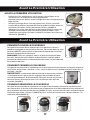
Avant La Première Utilisation
Retrait et installation du régulateur de pression (Jiggler)
Présentation des composants
Le Smart Canner est livré avec le régulateur noir (Jiggler) installé dans le couvercle
au-dessus de la tige de ventilation. Si vous devez passer au régulateur vert (Jiggler)
(pour des altitudes supérieures à 1 000 pieds), soulevez simplement le régulateur
(Jiggler) vers le haut et retirez-le. Pour remettre le régulateur (Jiggler) sur l’appareil,
remettez simplement le conduit d’aération. tige et poussez vers le bas.
IMPORTANT : Le régulateur de pression noir (Jiggler) doit être utilisé à une altitude
de 1 000 pieds ou en dessous. Le régulateur de pression vert (Jiggler) doit être utilisé
à une altitude de 1 001 pieds/au-dessus.
* Nous ne recommandons pas d’utiliser la marmite à plus de 6 000 pieds en raison
des eets d’une pression d’air excessive sur l’appareil.

17
AVANT LA PREMIÈRE UTILISATION
• Retirer tous les emballages, soit le carton, le plastique, ou la
styromousse, et disposer de façon appropriée.
• Nettoyer toutes les pièces avec un linge doux ou une éponge puis
bien sécher.
• NE PAS immerger dans l’eau ou placer dans le lave-vaisselle.
• Le joint d’étanchéité se place derrière le guide du câble. Avant la
première utilisation, retirer doucement le joint. (IMAGE 1)
• Nettoyer à la main avec de l’eau savonneuse tiède. Essuyer puis
replacer fermement le joint derrière le guide du câble. Il est
important que le joint soit bien installé et fixé dans les sillons du
couvercle. (IMAGE 2)
COMMENT OUVRIR LE COUVERCLE
Lorsque le couvercle de la mijoteuse est en position « fermé »,
prendre la poignée du couvercle et tourner 1/8 de tour dans le sens
horaire (IMAGE 1), pour obtenir la position de couvercle «ouverte».
Soulever la poignée du couvercle.
REMARQUE: Pour les appareils neufs, le joint du couvercle peut
être très étanche et plus dicile à déverrouiller. Une fois que le
couvercle a été ouvert et refermé plusieurs fois, le joint devrait
être moins robuste.
1.
1.
2.
COMMENT DÉMONTER LE COUVERCLE
Lorsque le couvercle de la mijoteuse est en position verticale, prendre le couvercle avec
vos deux mains et ajuster la hauteur entre le couvercle et le bord supérieur de la mijoteuse
pour atteindre environ quatre pouces (IMAGE 3). Puis, tourner dans le sens antihoraire pour
atteindre la position « fermer » (IMAGE 4). Puis, retirer le couvercle du « Smart CAnner » et
mettre de côté (IMAGE 5).
3.
COMMENT FERMER LE COUVERCLE
Lorsque le couvercle de la mijoteuse est en position verticale, prendre la poignée et placer
vers le bas en position « ouverte ». Puis, tourner dans le sens antihoraire pour atteindre la
position « fermé ».
4. 5.
IMPORTANT: Le couvercle doit être fermé et tourné en position
«Couvercle fermé» pour que les réglages du panneau de com-
mande fonctionnent. Si le couvercle n’est pas tourné en position
fermée, l’écran allumera le mot «LID» et émettra trois bips en
continu. (IMAGE 2)
2.
Avant La Première Utilisation
Avant La Première Utilisation

18
PRÉSERVATION DES ALIMENTS
ASTUCE DE BASE POUR LA PRÉSERVATION
• Il est sérieusement recommandé de vous familiariser avec les procédures de
préservation, les diérents niveaux d’acidité des aliments frais et les directives de la
FDA retrouvée en ligne. http://nchfp.uga.edu/
• Il y a une variété de produits qui sont faciles à préserver avec succès. Toutefois,
certains aliments ne sont pas appropriés. Consulter des recettes avant de débuter.
• Suivre avec attention les directives de la recette.
• Sélectionner la dimension des pots selon la quantité de nourriture que vous et votre
famille pouvez consommer dans un délai convenable. Il est important que le bord
des pots soit impécable et sans éclat de verre, pour éviter un scellage inadéquat.
Avec un entretien approprié, les pots de conserve peuvent être réutilisés pendant
plusieurs années. NE JAMAIS TENTER DE RÉUTILISER LES COUVERCLES.
• Certains articles pratiques normalement utilisés incluent une casserole, des tasses
et cuillères à mesurer, des couteaux de cuisine coupants, des grandes cuillères
ou louches, une planche à couper, une spatule non métallique, un entonnoir, des
pinces pour retirer les pots, des gants de cuisson et des chions propres. Aussi, des
étiquettes peuvent être ajoutées pour embellir votre produit final.
• Il est important que tous les ustensiles, pots et couvercles soient propres avant de
terminer le processus de conservation. Il est préférable de préserver les pots à la
chaleur pour éviter de briser le verre avec un soudain changement de température.
• Le « Smart Canner » utilise les techniques sous pression et bain d’eau pour rendre
hermétiques les pots. Veuillez suivre votre recette et sélectionner la
méthode appropriée.
• Suivre les directives de procédures sécuritaires pour la mise en conserve provenant
du fabricant de pot et couvercle. Ne jamais utiliser des pots qui ne sont pas
appropriés pour la mise en conserve à la maison.
• Les assaisonnements s’intensifient pendant la mise en conserve, faites preuve de
prudence. N’utilisez pas la sauge car elle devient amère.
Le S facilite le processus et le rend sécuritaire. Les éléments de contrôle numérique facili-
tent le processus, même pour la première tentative de préservation. Le processus de mise
en conserve sous pression élimine et protège contre les microorganismes non désirés.
Nous avons aussi inclus certaines astuces pour la mise en conserve de base. Explorez les
multiples recettes disponibles en ligne ou dans votre bibliothèque régionale. Rejoignez un
club, et apprenez encore plus d’astuces.
Mode D’emploi

19
POUR LA MISE EN CONSERVE AVEC SMART CANNER
Le Smart Canner est vendu avec deux supports à utiliser durant le processus de mise en
conserve. Le support de mise en conserve doit être utilisé pour éviter que les pots touchent
le fond du récipient. Le support pour la vapeur est utilisé pour séparer les niveaux lors de
l’utilisation de petits pots.
Le Smart Canner contient un maximum de :
Les spores de botulisme doivent être éliminées en utilisant des températures
supérieures à l’eau bouillante (mise en conserve sous pression)
ou avec un pH extrême retrouvé dans les vinaigres, les aliments fermentés, les confi-
tures et les gelés sucrées (Bain d’eau).
*4 litres (pots à GRANDE OUVERTURE) ou
*5 pintes (pots à GRANDE OUVERTURE) ou
*16 x pots de 4 onces pour les confitures
NOTE: Il y a plusieurs variétés de pots disponibles pour la mise en conserve. Ils n’ont
pas tous la dimension parfaite pour la cuisson avec le « Smart Canner ». Veuillez
utiliser les pots avec une grande ouverture pour de meilleurs résultats. Fonction de
bain d’eau non compatible avec les bocaux de taille quart.
BAIN D’EAU (WATER BATH – WB)
Il est important de couvrir les pots d’eau lors de la mise en conserve avec un bain
d’eau. Si vos pots sont trop longs, utiliser le réglage de pression minimal (LOW). Ceci
vous permet d’utiliser moins d’eau et ore une flexibilité dans le choix de types de
pots à utiliser. Veuillez utiliser des bocaux à GRANDE OUVERTURE, conçus pour la
mise en conserve. Le couvercle du récipient doit pouvoir se fermer complètement. La
fonction bain-marie n’est pas compatible avec les bocaux de la taille d’un litre.
Les aliments avec un niveau d’acidité élevé tels que les fruits, les cornichons et les
tomates empêchent le développement de bactérie dangereuse, comparativement
aux aliments de basse acidité. C’est pourquoi la mise en conserve avec la technique
de bain d’eau est utilité pour ces aliments.
1. Préparer les aliments suivant votre recette, suivant les directives de la FDA (Food
and Drug Administration) américaine.
2. Remplir les pots de mise en préserve et serrer les couvercles à la main, suivant les
directives du fabricant de couvercles et pots.
3. Placer le support à conserve dans le fond du récipient. Placer les pots pleins
d’aliments sur le support à conserve.
4. Remplir le récipient avec de l’eau et couvrir complètement les pots.
5. Fermer le couvercle et inspecter le réglage de la valve de limitation de pression, elle
doit être réglée sur l’échappement (exhaust).
Mode D’emploi
La page est en cours de chargement...
La page est en cours de chargement...
La page est en cours de chargement...
La page est en cours de chargement...
La page est en cours de chargement...
La page est en cours de chargement...
La page est en cours de chargement...
La page est en cours de chargement...
-
 1
1
-
 2
2
-
 3
3
-
 4
4
-
 5
5
-
 6
6
-
 7
7
-
 8
8
-
 9
9
-
 10
10
-
 11
11
-
 12
12
-
 13
13
-
 14
14
-
 15
15
-
 16
16
-
 17
17
-
 18
18
-
 19
19
-
 20
20
-
 21
21
-
 22
22
-
 23
23
-
 24
24
-
 25
25
-
 26
26
-
 27
27
-
 28
28


Nesco NPC-9 Le manuel du propriétaire
- Catégorie
- Petits appareils de cuisine
- Taper
- Le manuel du propriétaire
dans d''autres langues
- English: Nesco NPC-9 Owner's manual
Autres documents
-
Fagor SPLENDID PRESSURE COOKER Manuel utilisateur
-
Tefal P3105231 Manuel utilisateur
-
Fagor 918060251 Mode d'emploi
-
 Zavor .Pressure Cooker514 Manuel utilisateur
-
 Zavor 124682 Manuel utilisateur
-
 Zavor 124677 Mode d'emploi
-
-
Fagor America ELECTRIC PRESSURE COOKER Manuel utilisateur
-
-


