
GEAppliances
Owner's Manual
Manuel d'utilisation
Manual delpropieta6o
Type#95
TypeS05
English section begins on page 2
La section fran_aise commence a la page 16
La seccion en espa_ol empieza en la pagina 32
Part No. 175D1807P246 Pub. No. 49-9975 3-98 cG
500A295P023

m
m
r _
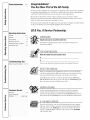
Safety information .... 3-5
Operating instructions
Controls .................. 6,7
Features..................... 8
DryingCenter................ 9
ReversingTheDoor........... I0
LoadingandUsingTheDryer .., 1I
VentingTheDryer........... 12
Troubleshooting 77ps
BeforeYouCallForService...I3 74
CustomerService
Warranty................. I5
ServiceTelephone
Numbers............ BackCover
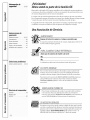
Congratulations!
YouAreNow PartoftheGEFamily.
Welcome to d_e GE fhmily. We're proud of our quality products and we are committed
to prox_kling dependable sel_ice. You'll see it in this easy-to-use Owner's Manual and
you'll hear it in tt_e fiien(lly voices of our customer sel_ice department.
Best of all, you'll experience these values each time you use your (hyer. That's
important, because your new (hyer willbe part of your fmnily f_)rmany years. And we
hope you will be part of ours for a long time to come.
We thank you for buying GE. We appreciate your purchase, and hope you will continue
to rely on us whenever you need quality appliances for your home.
GE& You,P ServicePartnership.
IMPORTANT!
Staple sales slip or cancelled check here.
Proof ofthe original purchase date is needed to obtain sel_ice
under the warranty.
FORYOURRECORDS
Write the model and serial numbershere:
#
#
They are on tl_elabel on the fi'ont of the (hyer behind the door.
READTHISMANUAL
Inside you will find many helpflfl hints on how to use and maintain
your (hyer properly.Just a little preventive care on your part can save
you a great deal of time and money over the life of your (hTer.
You'll find many answers t() common problems in the Before You
Call For Service section. If you review our chart of Troubleshooting ?Tps
first, you may not need to call for se_ice at all.
PROPERVENTING
For file best dl)dng performance the d_Terneeds to be properly
vented. The dlTer _.dlluse more ener_, and mn longer if it is not
vented to the spedficafions outlined in the Venting the Dryersection in
this manual and the Exhaustingsection in the Installation Instructions.
IFYOUNEEDSERVICE
If you do need service, you can relax knowing help is only a phone
call away. A list of toll-fi'ee customer sei_dce numbers is included in
the back section. Or, in the U.S.,you can always call the GE Answer
Center ®at 800.626.2000,'_" _ 24 hours a day, 7 days a week. InCanada,
call 1-800-361-3400.
2

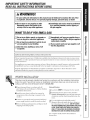
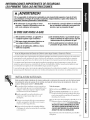
IMPORTANTSAFETYINFORMATION.
READALLINSTRUCTIONSBEFOREUSING
WARNING!
For your safety, the information in this manual must be followed to minimize the risk of fire
or explosion, electric shock, or to prevent properly damage, personal injury, or death.
[] Do not store or use gasoline or other
flammable vapors and liquids in the
vicinity of this or any other appliance.
[] Installation and service must be performed
by a qualified installer, service agency or
the gas supplier.
WHATTODOIF YOUSMELLGAS:
_-_ Do not try to light a match, or cigarette, or
turn on any gas or electrical appliance.
[] Do not touch any electrical switch; do not
use any phone in your building.
[] Clear the room, building or area of all
occupants.
F_ lmmediately call your gas supplier from a,
neighbors phone. Follow the gas suppliers
instructions carefully,
[] ffyou cannotroach yourgassupplier,call
the fire department.
Cafifomia Safe Drinking Water and ToxicEnforcement Act
This act requires the governor of California to publish a list of substances kno_m to the state to cause cancer,
birfl_ defects or other reproductive harm and requires businesses to warn customers of potential exposure
to such substances.
Gas appliances can cause minor exposure to %ur of these substances, nmnely benzene, carbon monoxide,
formaMehyde and soot, caused primarily by tt_eincomplete combustion of natural gas or LP filels.
Properly adjusted (hTers will minimize incomplete combustion. Exposure to these substances can be
minimized fllrther by properly venting the (hyer to the outdoors.
PROPERINSTALLATION
This dryer must be properly instafled and located in accordance with the Instafiation Instructions
before it is used. If you did not receive an Installation Instructions sheet, you can receive one by
calling us toll-free at the GEAnswer Center ®,800.626.2000.
[] Properly ground (hyer to confbrm with all
governing codes and ordinances. Follow details in
Installation Instructions.
[] Install or store where it will not be exposed to
temperatures below freezing or exposed to the
weather.
Exhaust/Ducting:
Z] Gas (hyers MUSTbe exhausted to the outside.
[_-_Exhausting electric (hyers to tt_eoutside is
stronglyrecommendedto prevent large amounts
of moisture and lint fl'om being blown into the
roDin.
[] Connect to a properly rated, protected and sized
power supply circuit to re<rid electrical overload.
[] Remove all shmqppacking items and dispose of all
shipping materials properly.
Use only rigid metal or flexible metal 4"
diameter ductwork inside tt_e (hyer cabinet or
fbr exhausting m the outside. USEOFPLASTIC
OROTHERCOMBUSTIBtEDUCTWORKCANCAUSE
AFIRE.PUNCTUREDDUCTWORKCANCAUSEA
FIREIFIT COLLAPSESORBECOMESOTHERWISE
RESTRICTEDIN USEORDURINGINSTALLATION.
For complete details, ff41ow the Installation
Instructions. oo

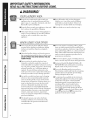
iMPORTANTSAFETYINFORMATION.
READALLiNSTRUCTiONSBEFOREUSING
WA
,!
m
YOURLAUNDRYAREA
[]
Keep the area underneath and around your
appliances flee of combustible materials (lint,
paper, rags, etc.), gasoline, chemicals, and other
flmnmable vapors and liquids.
[] Keep all lmmd U aids (such as detergents,
bleaches, etc.) out of the reach of children,
preferably in a locked cabinet. Obseis_e all
warnings on container labels m avoid inju137.
[] Keep the floor around your appliances clean and [] Never climb on or stand on the dUeT top.
dU m re&me dm possibilipy of slipping.
[]
(;lose supervision is necessa U if this appliance is
used by or near children. Do not allow children
to play on, with, or inside t|_is or aW other
appliance.
WHENUSINGYOURDRYER
[]
[]
Never reach into tt_edUeT while tt_e drum is
moving. Be%re loading, unloading or adding
clothes, wait until the dram has complemly
stopped.
Clean the lint filter befbre each load to prevent
lint accumulation inside the dUeT or in the room.
DONOTOPERATETHEDRYERWITHOUTTHELINT
FILTERIN PLACE.
[]
Do not wash or dU articles flint have been
cleaned in, washed in, soaked in, or spotmd
with combustible or explosive substances (such as
wax, oil, paint, gasoline, de_'easers, (h)_cleaning
solvents, kerosene, etc.) which may ignite or
explode. Do not add these substances to the
wash water. Do not use or place dmse substances
around your washer or dUeT during operation.
[] An?."article on which you have used a cleaning
solvent or dmt contains flammable materials
(such as cleaning clod, s, mops, towels used in
beauty salons, restaurants, or barber shops, etc.)
must not be placed in or near the dUeT until
solvents or flammable materials have been
removed. There are mmly highly flammable
items used in homes such as acetone, denatured
alcohol, gasoline, kerosene, some household
cleaners, some spot removers, mqoentines,
waxes, wax removers and products containing
petroleum distillams.
[] Do not dU articles containing rubber, plastic,
fbam, or similar materials such as padded bras,
tennis shoes, galoshes, bath mats, rugs, bibs, baby
pants, plastic bags, pillows, etc., that may melt or
burn. Some robber materials, when heated, can
under certain circumstances pro&me fire 1)77
spontaneous combustion.
[] Do not store plastic, paper or clothing that may
burn or melt on top of the dUeT during operation.
[] Gammnts labeled DryAway from Hoator Do
Not TumbleDr},(such as life jackets containing
Kapok) must not be put in your (hTer.
[] Do not dU fiberglass articles in your duer.
Skin irritation could result fl'om the remaining
particles that may be picked up by clothing
(hmng subsequent (hyer uses.
[] To minimize dm possibility of elecuic shock,
unplug this appliance fi'om the power supply
or disconnect dm dUeT at the household
distribution panel by removing the fi.meor
switching off dm circuit breaker before
attempting aW maintenance or cleaning
(except the removal and cleaning of the lint
filter). NOTE:Turning the Cycle Selector knob
m an OFFposition does N0gdisconnect the
appliance from the power supply.
[]
The lmmd U process can reduce tt_eflame
retardan(.y of fi_brics. To avoid such a result,
carefiflly follow the gm-ment manuf_mmrer's
care instructions.
4

Never attempt to operate this appliance if it is
damaged, malfimctioning, partially
disassembled, or has missing or broken parks,
including a damaged cord or plug.
The interior of tim machine and the exhaust duct
connection inside the dryer shouM be cleaned at
least once a year by a qualified technician. See the
Loadingand Usingthe Dryersection.
Ifyours is a gas (hyer, it is equipped with an
automatic electric ignition and does not have a
pilot light. DONOTATTEMPTTOLIGHTWITHA
MATCH.Burns may result fi'om having your hand
in the vk:inity of the burner when the automatic
ignition turns on.
• You may xdsh to soften your laundered f_tbrics
or re&me the static electricity in theln by using
a due>applied f>lbricsoftener or an anti-static
conditioner. We recommend you use either a
f>lbricsoftener in the wash cycle, according to
the manufacturer's instructions for those
pro(hm_s, or uy a due>added product for
which the manufacturer gives written assurance
on the package that their product can be safely
used in your duet. Sets@e or perfbmlance
problems caused by use of these pro(hints are
the responsibility, of the manuf_mmrers of those
produc_s and are not covered under the wan'anty
m this appliance.
WHENNOTUSINGYOURDRYER
• Grasp file plug fimdy when disconnecting this
appliance to avoid damage to the cord while
pulling. Place the cord away fi'om traffic areas so
it,_411not be stepped on, tripped over or
subjected m damage.
• Befbre discarding a (hyer, or relnoving it from
service, remove the (hyer door to prevent
chiMren fi'Oln hiding inside.
• Do not tamper _ith controls.
Do not attempt to repair or replace any part of
this appliance or attempt any sei_:icing unless
spedfically recommended in this Ox.mer's Manual
or in published user-repair instructions that)<)u
understand and have the skills to cany out.
Readandfollow thisSafetyInformationcarefully.
SAVETHESEINSTRUCTIONS
5

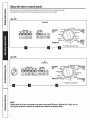
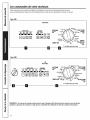
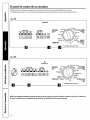
Aboutthe dryercontrolpanel.
Youcan locate your model number on the label on the front of the dryer behind the door.
Throughout this manual, features and appearance may vary from your model
Type 495
SensorDry
FABRICCARE OPTIONS
NO REG. MED LOW EXTRA SIGNAL
HEAT HEAT HEAT HEAT CARE
RESET PUSH TO
I _ _ m B _ OPTIONS START
m [i
• MORE DRY
C-TT-N- EXTRACARE_ LESSDRYEASYCARE
U U :_ _-"_ COOLOOW.
_M ATIC LESSDRY/_'_ "_ _ P_U_v'_PMR_TsIsC
* f / \ \ "_ ErRACARE
MOREURVI(\ \ II
"\\ \ \ /I MOREO.,
UEWR,NKLE20\\t,.)J/ ,ESSURY
DAMP DRY 30 __ E;°TRL;°c_RE KNITS/
TIMED DRY so6070 80 • DELICATES
MIN AUTOMATIC
"X-= PREFERREDREGULARSETTING
!t
Type 505
SensorDry
FABRICCARE OPTIONS
START
oGGENTLELOWMEOREGEXTRAS,GOAL
HEATHEAT,EATHEATHEATCARE
RESET
_ m _ OPTIONS
@0@@@
• WRINKLE FREECO'R'ON
COTTONS EXTRACARE_""='=_ r_E[J_(NITS EASYCARE
MATIC [.__y AUTOMATIC
SHIRTS _'_"_ [ PERM PRESS/DELICATES
•'X- f / \ \ _l '_i EXTRACARE _
JEANS/TOWELSII \ \ I | •
....... = | I \ \ I I WOOLENS/LINENS
- \\ \ \ //R;;"_°,;,<K
DEWRINKLE 20 _,._ _,.._/,_ .......
DAMPDRY 30 _ E; OOLoOwN
._ EXTRA CARE
TIMED DRY oulc_?_Y_"°so607o8o • ULTRACARE
MIN AUTOMATIC
-X-= PREFERREDREGULARSETTING
"El m m
NOTE:
Drying times will vary according to the type of heat used (Electric, Natural or LP gas), size of
load, types of fabrics, wetness of clothes and condition of exhaust ducts.
6

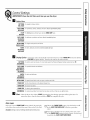
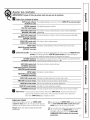
Control Settings
IMPORTANT."Clean the lint filter each time you use the dryer.
f_ Fabric Care
COTTONSForregulartoheavycottons.
REG.HEAT
EASYCARE Forsynthetics,blends,delicatesanditemslabeledpermanentpress.
MEDHEAT
FLUFFForfluffingitemswithoutheat.Usetile TIMEDDRYcycle.
NOHEAT
EASYCAREFordelicates,syntheticsanditemslabeledtumble drylow.
DEUCATES
LOWHEAT
ULTRACAREForlingerieandspecialcarefabrics.
GENTLEHEAT
KNITS Forknits,delicatesanditemslabeledtumbledrylow.
DEUCATES
LOWHEAT
D
D
Orying Cycles- Automatic QTclesautomatically sense f_lbric (h)_less. Select MOREORYfbr hemier [:abrics,
LESSDRYfbr lighter [:ablics. Timed Q_clesrun for tt_eselected dme.
COTTONSForcottonsandmosttowels.FormostloadsselectthePreferredRegularSettingmarkedwith an _.
AUTOMATIC
EASYCAREForsyntheticblendsanddelicates.
AUTOMATIC
PERMPRESS/
DEUCATES
KNITS/ Forknitsanddelicates.
DEUCATES
AUTOMATIC
ULTRACARE Forspecialcarefabricssuchasrayons,woolensandsilks
TIMEDDRY SettileCycleSelectorattiledesireddryingtime.
QUICKDRY Foroneortwo items,
DAMPDRY Forleavingitemspartiallydry.
DEWRINI{LEForremovingwrinklesfromitemsthatarecleananddryorthatareverylightlydamp.
Start- (;lose the (hyer door. Select STARTOpening the door during operation will stop tt_e(hyer. To
restart the (hyer, close the door and select STARTtocomplete the (?Tcle.
Color Logic
Select the CoITectFABRICCAREsetting. Match the particular
color below the words with the same color on the Cycle Dial.
Example:Dryinga loadof clothinglabeledpermanentpress.
[_ Choose the FABRICCAREsetdng--fbr fl_isload it would
be tt_e EASYCAREMEDHEAT(which is a particular
color).
[_] Turn d_e Cycle Dial to the area tt_at has the stone color
as tt_e FABRICCAREsetting you have chosen-for dfis load
it would be tlle EASYCAREPERMPRESS. 7

Aboutyourdryerfeatures.
iii__ ii _ii_I :i iiii_ _ _ i i
iiiiii__ii_i i_ii_i_i7_ii_ii_i_ii_ii_i_iii:_
EXTRA SIGNAL
CARE
Extra Care
Use this option to minimize the wrinkles
in clothes. It provides approximately 15
minutes of no-heat um_bling after tt_e
clothes are (hy.
This option can only be used with
Automatic cycles. If you are using the
CYCLESIGNALand you select the EXTRA
CAREoption, a si_lal will sound at the end
of d@ng time and several times (luring the
EXTRACAREcycle. This will remind you that
it is time to remove the clothes.
Cycle Signal
This signal will sound just befbre the end of
the (.Tcleto remind you to remove the
clothes. The si_ml sound level can be
adjusmd.
If you selected the EXTRACAREoption the
signal will sound at the end of the &Ting
time and will sound several times during
the EXTRACAREcycle. This will remind
you that it is time to remove the clothes.
NOTE:
• Removegarmentspromptlyat thesound
of the signal Place clothes on hangersso
wrinMes won't setin.
• UsetheCycleSignal especially when
dryingfabricslike polyesterknits and
permanentpress.Thesefabricsshould be
removedso wrinkles won'tset in.
Reset Options
Selecting RESETOPTIONScancelsall options
that have been selected.
ii¸ (( :
iiiiiiiiiii
SensorDry
This feature is only activated in the
automatic cycles.
As the clothes ramble they touch a large
sensor. The SensorDry feature will stop
the heating cycle as soon as the clothes
have reached the selected (hyness.
On some models there is a SensorDry
indicator light. This light is illuminated
(luring automatic cycles. When the
SensorOry feature stops the heating cycle
the light will go out and the cool down
period will begin.
NOTE:The clothes will be hot if they are
removed immediately after the indicator
light goes out.
Drum Lamp
Before replacing the light bulb, be sure to
unplug the dryer power cord or disconnect
the dUeT at the household distribution
panel by removing the filse or s_dtching
off the circuit breaker. Reach above dUeT
opening fi'om inside the dram. Remove the
bulb and replace with the same size bulb.
8
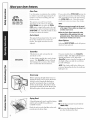
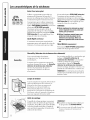
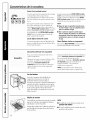
Drying Rack
A handy (hying rack may be used fbr dp)_ng
articles such as stuffed tWs, pillows or
washable sweaters.
Hook the rack over the lint filter so the rack
extends into the (hyer drum.
NOTE:
• The (hying rack must be used with the
TIMEDCYCLE.
• Do not use this (hying rack when there
are other clothes in the (hyer.

Aboutthe dryingcenter.
i !! i /!
i ¸ i \ _
!iiil
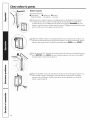
WARNING!
• Do not overload the Dt?_ng Center. It lllay be damaged ifnlore than 20 lbs. are applied.
• Alwws store the Drying Center in a sad position so that it does not hit awone.
• Do not allow chil&en m plW _ith the Drying Center.
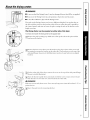
The pole on the Dwing Center can be set at different heights. Line up the tabs on
the pole _ith the notch on the brackets (this will occur when the pole is parallel to
the control panel) and raise or lower the pole, resting the tab on the bracket at the
height you want.
The Drying Center can be mounted on either side of the dryer.
Toremove andtransferthe DryingCenterto theoppositeside:
[_] Remove the pole by raising it up. Make sure to line up the tabs on the pole with the
notches on the bracket.
[-_ Remove the four screws tl_at secure the bracket to the (hyer. Three of the screws xdll
be required to mount the bracket on the odmr side. The fourth screw at the top of din
side panel flange (shox,m in circled illustration) needs to be put back into its ori_nal
location.
[-_On the other side of the (hTer remove tt_e screw at tt_e top of tt_e side panel flange
(shown in circled illustration).
[-_ Turn the bracket upside down and attach it witt_ tt_e screw you just removed and
with the three screws that were removed fi'om the other side.
WaRNNa!
Make stu'e you use only dmse screws. Never use any long screws (must be less dmn 3/8") or
pointed screws.
N Insert tt_e pole into tt_e mounting bracket.
9

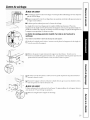
Aboutmvemingthedoor.
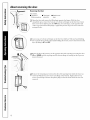
Reversing the Door
Too/sneeded,
[] Standard#2 [] Tape-tipped
Phillipsscrewdriver puttyknife
[] Needle-nosed
pliers
F_Open the door and remove the filler plugs opposite the hinges. With tim door
completely open, remove the bottom sc_ew fk'om each hinge on the (hyer f:ace.Insert
these screws about halfway into the lOP holes, for each hinge, on the opposite side
(where you removed the filler plugs). Apply firm pressure to get the screw started in
untapped holes.
_-] Loosen top screw from each hinge on the duer face halfway. With one hand holding
the top of the door and the other hand holding the bottom, remove the door fi'om the
duet by lifting it UPand OUT
[-_-]Rotate the door 180°.Insert it on the opposite side of the opening by moving the door
IN and DOWNuntil the top hinge and the bottom hinge are resting on the top screws
inserted in step 1.
[_ Remove the remaining screws fi'om the side of the opening fi'om which the door was
removed. With these screws secure each hinge at the bottom. Tighten the two top
screws of each hinge. Reinsert the plastic plugs on the side fi'om which the door was
removed.
10

Loadingand usingthe dryer.
Always foflow the fabric manufacturer's care label when laundering.
SortingandLoadingHints
As a general rule, if clothes are sorted properly tbr the washer, they are sorted properly tbr the &yer.
Donotaddfabricsoftenersheetsoncetheloadhasbecomewarm.Theymaycausefabricsoftenerstains.
Donot overload. Thiswastesenergyandcauseswrinkling.
Donotdrythefollowing items:fiberglassitems,woolens,rubber-coateditems,plastics,itemswithplastictrimand
foam-filleditems.
CareandCleaningof theDryer
TheExterior:Wipe or dust an?."spills or washing
compounds wid_ a damp clod_. D1).'ercontrol
panel and finishes may be damaged by some
lmmd U pretreatment soil and stain remover
products. Apply these products away fi'om the duet.
The fabric may then be washed and (kie(t naturally.
Damage m your duet caused by these products is
not covered by your warran V.
TheLint Filter:(;lean dm lint filter befbre each
use. Moisten your fingers and reach into tt_e filter
opening. Run your fingers across the filter. Have a
qualified technician vacuum the lint fi'om the duet
once a year.
TheExhaust Duct: Inspect and clean the exhm.lst
&rating at least once a year m prevent clogging. A
partially clogged exhaust can lengthen the d@ng
time.
Follow these steps:
[7] Turn off electrical supply by disconnecting the
plug fi'om tt_ewall socket.
[2-]Disconnect dm duct fi'om the d_yer.
[-_ Vacuum the duct urith the hose attachment and
reconnect dm duct.
TheExhaust Hood:Check with a milTor that the inside
flaps of the hood move fi'eely when operaung. Make
sure that there is not wildlife (birds, insects, etc.)
nesOng inside the duct or hood.
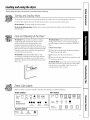
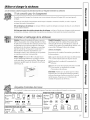
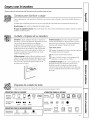
FabricCareLabels
Below are fabric care label "s)qmbols" tt_at affect the cladding you will be laundering.
WASH LABELS BRY LABELS
wash __ __
cycle Normal PermanentPress/ Gentle--/ Donotwash Donotwrin_
wr_,_k_eres_sta,_t delicate an wash
Water • • • • • •
temperature Hot Warm Cold/cool
(50°C/120°F) (40°C/105°F) (30°C/85°F)
BLEACH LABELS
_,eacbA /'iX :W,-.
symbols _"J,,_,l_ .....i'_,',l_,_",_f,';;_l..................
Tumble D
dry
Dry
Ib--IIb--IIb--1 I2
-- DO not dry
Normal Permanent Press/ Gentle/ Do not tl_mble dry (used with
wrinkle resistant delicate do not wash}
.eat e ® ® •
setting
High Medilml Low No heat/air
Special _1
instructions
Line dry/
hang to dry
m D Fq
Dril} dry Dry flat In the shade
II

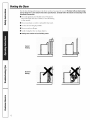
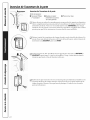
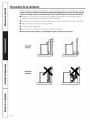
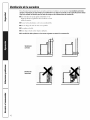
VentingtheDryer
For the best (hTing perfbrmance the (hTer needs to be properly vented. The dryer wi//use more energy
andrunlongerif it is not vented tothe belowspecifications. Carefullyfollow thedetailson Exhausting in the
InstallationInstructions.
[] Use only rigid metal or flexible metal 4" diameter
ductwork inside the duet cabinet or for exhausung
to the outside.
[] Do not use plastic or other combusuble ductwork.
[] Use the shortest length possible.
[] Do not crush or collapse.
[] Avoid resung the duct on sharp objects.
[] Ventingmustconformtolocalbuildingcodes.
Correct
Venting
i¸¸
i_ii i _ i
Incorrect
Venting
12

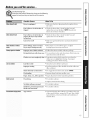
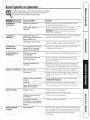
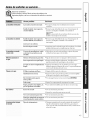
Beforeyoucall forservice...
Troubleshooting 77ps
Save time and money! Review the charts on the following
pages first and you may not need to carl for service.
Dryerdoesn'tstart
Possible Causes
Dryer is unplugged
What ToDo
* Make sure the (hyer plug is pushed completely into
the outlet.
Fuse is blown/circuit breaker is * Check the house filse/circuit breaker box and
tripped replace fllse or reset breaker. NOTE:Most electric
(hTers use two filses/breakers.
Dryer doesn't heat Fuse is blown/circuit breaker is * Check the house filse/circuit breaker box and
tripped, the dryer may tumble replace fllse or reset breaker.
but not heat
Gas service is off * Make sure gas shutoffat (hyer and main shutoffare
flflly open.
Dryershakesormakes Some shaking/noise is normal * Move (hyer to an even floor space, or adjust
noise Dryer may be sitting unevenly leveling legs as necess_uy until even.
Greasy spots on clothes Improper use of fabric softener * Follow directions on fabric softener paclc_ge.
Drying dirty items with clean ones * Use your (hTer to (hy only clean items. DirV items can
stain clean items and tt_e (hyer.
Clothes were not completely clean * Sometimes stains w|fich cannot be seen when tt_e
clothes are wet appear _6_er(hying. Use proper
washing procedures befbre (hying.
Lint on clothes Lint filter is full * Clean lint screen befbre each load.
Improper sorting * Sort lint producers (like chenille) fl'om lint collectors
(like corduroy).
Static electricity can attract lint * See suggestions in tiffs section under StATiC.
Overloading * Separate large loads into smaller ones.
Paper, tissue, etc., left in pockets * Empty all pockets before laundering clothes.
Static occurs Overdrying * TIy a fabric softener.
* Adjust controls for less d@ng.
No fabric softener was used * TU a fitbric softener.
Synthetics, permanent press and * T U a [hbric softener.
blends can cause static
Inconsistent drying times Type of heat * Automatic (hying times will wuy according to the t?qoe
of heat used (elecu'ic, natural or LP gas), size of load,
bqoes of fabrics, wemess of clothes and condition of
exhaust ducts.
/2

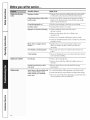
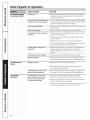
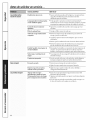
Beforeyoucall forservice...
Clothestaketoolong
todq
Possible Causes What ToDo
Improper sorting *Separate hemT items from lightweight items (generally,
a well-sormd washer load is a well-sormd dlyer load).
Large loads of heavy fabrics (like *Large, hemT f:abrics contain more moisulre and rake
beach towels) longer to (hy. Separate large, heaxT fhbrics into smaller
loads to speed d@ng time.
Controls improperly set *Match control settings to the load you are (hying.
Lint filter is full *Clean lint filmr before eveU load.
Improper or obstructed ducting *Check installation instructions for proper
ducOng/venfing.
• Make sure ducOng is clean, fi'ee of kinks and
unobstrucmd.
*Check to see if outside wall damper operams easily.
*Check the Installation InstmcOons to make sure tile duet
venting is correct.
Blown fuses or tripped circuit *Replace fllses or reset circuit breakers. Since most
breaker duers use 2fllses/breakers, make sure both are
operating.
Overloading/combining loads *Do not put more than one washer load in tile duer at
a time.
Underloading *If you are d@ng only one or a,vo items, add a few items to
ensure proper umlbling.
CloNes are wrinkled Overdrying *Select a shorter (hying Ome.
• Remove items while they sell hold a slight amount of
moisture.
Letting items sit in dryer after *Remove items when Q_cleends and fold or hang
cycle ends immediately.
Clothes shrink Some fabrics will naturally shrink *To avoid shrinkage, fbllow garment care labels exactly.
Maen washed. Others can be *Some items may be pressed back into shape ;ffter d@ng.
safely washed, but will shrink
in the dryer *Ifyou are concerned about shrinkage in a parOcular item,
do not machine wash or umlble (hy it.
14

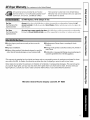
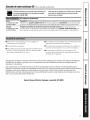
GEDryer WarrantyCotcustomers in the United States)
Aft warranty service provided by our Factory This warranty is valid only in the United States.
Service Centers, or an authorized Customer Care® Warranty may vary in Canada. See your approved
technician. For service, carl 800-GE-CARES. Profile dealer for details.
GE Will Replace, At No Charge To You:
OneYear
Fromthe dateofthe
originalpurchase
Anypartof the dpyer which f_dls(hie to a defect in materials or worklnanship. During tiffs full
one-yearwarranty,GE _ill also provide, freeofcharge,all labor and in-holne service to replace the
(tefbctive part.
Five Years Anyextralargeorsupercapacitydryerdrumwlfich fails due to a defect in materials or worknlanship.
Fromthe dateofthe During this five-yearlimitedwarranty,you xdll be responsible for any labor or in-home se_:ice costs.
originalpurchase
[] Service trips to your home to teach you how to use the
product.
[] Improper installation.
[] Failure of the product if it is abused, misused, or used for
other than the intended purpose or used commercially.
[] Replacement of house fuses or resetting of circuit
breakers.
[] Damage to the product caused by accident, fire, floods or
acts of God.
[] Incidental or consequential damage to personal property
caused by possible defects with this appliance.
This warranty is extended to the original purchaser and any succeeding owner for products purchased for home
use within the USA. In Alaska, the warranty excludes the cost of shipping or service calls to your home.
Some states do not allow the exclusion or limitation of incidental or consequential damages. This warranty gives
you specific legal rights, and you may also have other rights which vary from state to state. Toknow what your
legal rights are, consult your local or state consumer affairs office or your state's Attorney General
Warrantor: General Electric Company.Louisville, KY 40225
15

ML
.g
_eq_
M_
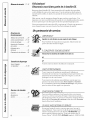
Mesures de securite .. 17-19
Directives de
fonctionnement
Tableauxdecommande..... 20
Autrescaract6ristiques .21-22
Centredes6chage ......... 23
Inversionde lbuverture
de laporte ............ 24
Utilisationde la
s_cheuse ................ 25
E-vacuationde la s_cheuse. ..26
Conseils de d#pannage
Avant d'appeler
un repara_eur........... 27,28
Service gt/a c/iente/e
Garant/e ................ 29
Num6rosde
service .............. 30
16
r _ _ m f
Felicitations.
Besormaisvousfaitespattie deia fami//eGE.
Bienvenue (tans la fitmille GE. Nous sommes tiers de la qualitd de nos pro(tui_s
et de la tiabilit(_ de notre sen_ice apr&s-vente. Vous le constaterez dans le prdsent
manuel, fimile 5utiliser, et dans lavoix mnicale de notre personnel du sewice 5 la
clientele.
Mais, surtout, vous le constaterez chaque fbis que vous ferez votre lessive. C'est
important, car votre nouvelle lm,euse Dra partie de votre fitmille pendant des anndes.
Et nous espdrons que vous Drez partie tie la n6tre pendant longtemps aussi.
Nous vous remercions de votre achat GE, et espdrons qu'a l'm,enir vous penserez fi
nous chaque ff_isque vous aurez besoin d'un dlectromdnager de qualitd.
Unpartenariatdeservice.
IMPORTANT!
Agrafez ici votre facture ou une topic de votre cheque.
Pour b4ndticier de r@arations sous garantie, il f:autfoumir une
preuve de la dam d'achat d'origine.
CONSERVERSOIGNEUSEMENT
Transcrivezles num6rosde modele et des6rie ici.
N°
N°
Vous les trouverez (te_Ti_re le tableau de commande.
LISEZVOTREMANUEL
Vous y trouverez de nombreux conseils pour l'ufilisation et
l'entretien de votre laveuse. Ces quelques mesures prdventives vous
permettront d'dconomiser du romps et tie l'argent, et, ainsi, tie
prolonger lavie de vou'e laveuse.
Vous trouverez des solutions m_xprobl&mes courants que vous
poun'iez rencontrer dans la section Avant d'appolorun r6paratour.
Et, en consultant d'abord nos Conseilsdo dOpannago,vous pourrez
peut-(?u'e dvimr de faire appel 5un rdparamur.
EVACUATIONCORRECTE
Pour un meilleur rendement, la sdcheuse doit &tre con'ectement
&:acude. La sdcheuse usera plus d'(mergie et foncdonnera pendant
plus longtemps si elle n'est pas (:vacude suivant les consi_es donndes
dans la secdon Evacuation de la sOchouso et dans la secdon Evacuation
dans les Directives d'installadon.
SIVOUSAVEZBESOINDESERVICE
Sivous avez besoin de service, vous savez que vous n'avez qu'5
nous tel@honer. Vous u'ouverez 5 la tin (h._present manuel les
num(_ros sans fi'ais (h._service _'_la clienff:le. Aux Etats-Unis,vous
pouvez appeler 24 heures parjour, 7jours par semaine au GE
Answer Center ®,800.626.2000. Au Canada, appelez le 1-800-361-3400.

MESURESBES£-CUR/T "/MPORTANTES.
USEZB'ABORDTOUTESLESDIRECTIVES.
MISE EN GARDE!
Pourvotres#curit#, suivez les directivesfoumiesdonslepresentmanuelafin deminimiser lesrisques
d'incendie,d'explosionet de chocselectriqueset prevenirdesdeg_tsmaterielset desblessuresgraves
ormorteile&
m N'entreposezpas oun'utilisezpasd'essence
ouautres vapeurs ou /iquides inflammables
proximit# de cetappareil oude toutautre
electromenager.
mEinstallationet lesreparationsdoivent#tre
effectu#espar un installateur qualifi#, line
entrepriseder#parationou votre fournisseur
de gaz
SI [!OLLSREMARQUEZLINEOBEURBEGAZ:
F_ Ne faites fonctionner aucun appareil
#lectrique.
[] N'actionnez aucun interrupteur; n'utilisez
aucun t#lephone dons votre edifice.
[] [:'vacuezla pi#ce, I_difice ou les environs.
[] Appelez immediatement votre fournisseur
de gaz en utilisant le t#lephone dun voisin.
Suivez les directives qu'il vous donnera.
[] Si vous ne pouvez joindre votre fournisseur
de gaz, appelez les pompier&
Loi sur les produits toxiques et I'eau potable de la Califomie
En verm de cette loi, le Gouverneur de la Califbmie est tenu de publier une liste des substances reconnues par
l'ls<imtcomme pouvant causer le cancer, des mal%rmations cong4nimles ou auu'es problemes du genre et d'obliger
les entreprises a m_ertirleurs clients de route exposiuon potendelle a de telles substances.
Les (31ectrom4nagers 5gaz peuvent entrainer une exposition mineure _'lquatre de ces substances, en l'occurrence
le benzene, le monoxTde de carbone, le formaldehyde ou la suie, attribuables principalement a la combustion
incomplete du gaz namrel ou du gaz de patrole liqudfid.
Une sOcheuse bien rdglOe r4duit au minimum les risques de combusdon incompl&te. Pour r4duire au minimum
l'exposidon _'_ces substances, fidtes &,acuer Fair de la sdcheuse a l'extOrieur.
UNEINSTALLATIONADEOUATE
Avant d'uti/iser votre s#cheuse, assurez-vous qu'efle a#t# ad#quatement instafl#e, conform#ment
aux Directives d'installation. Si vous n'avez pas rew de Directives d'installation avec votre s#cheuse,
appelez sans frais aux Etats-Unisau Centre de r#ponse GEau 1-800-626-2000.Au Canada appelez sans
frais au 1-800-361-3400.
m
m
m
Mettez l'appareil 5la terre confbnnament 5 tous
les codes et r_glements en x4gueur. Suivez les
Direcuves d'installadon.
Installez ou entreposez l'appareil dans une piece
off la temperature est supdfieure 5 0 °C. et o_elle
sera _'_l'abri des intempdries.
Branchez l'appareil sur un circuit protdg4 et de
capacitd appropride _ffin d'dviter tome surcharge
41ectrique.
m Redrez tousles articles tranchants d'emballage et
jetez tous les matdriaux de transport.
Conduit d'Ovacuation •
[7] L'air des sdcheuses 5 OOIT4tre 4vacud 5
gaz
l'extdrieur.
_-_I1 est fortementrecommand#d'(_vacuer Fair
des sdcheuses 41ectriques 5Fextdrieur _ffin
d'(3viter l'accumuladon d'une grande quantitd
d'humiditd et de charpie dans la pi&ce. Suivez
les consi_ms donnOes pour l'&_acuation dans
les Direcuves d'installadon.
_!] N'utilisez qu'un conduit m4tallique figide ou
souple de 4 po de diam&tre _'_1intdrieur de la
carrosserie de la sdcheuse ou pour l'(3vacuadon
vers l'extdrieur. L'UTItlSATIOND'UNCONDUIT
DEPLASTIOUEOUFABRIOU[:"AVECTOUTAUTRE
MATIS"R/AUCOMBUSTIBLEPEUTCAUSERUN
/NCEND/E.LORSOU'UNCONDUITESTPERFORm"
OUDEVIENTOBSTRU[:"AUCOURSBE
L'UT/USAT/ONOUDELTNSTALLRT/ON,/LPEUT
CAUSERUN /NCENDIE.
Pour plus de ddtails, suivez les Directives
d'installadon.
17

IMPORTANTSAFETYINFORMATION.
READALl.INSTRUCTIONSBEFOREUSING
a, MISEEN GARDE!
AUTOURDEVOTRELAVEUSE
[]
[]
Ne laissez pas s'acommler amour et au-dessous
tie vos dlectrom4nagers ties matdfiaux
combustibles, cornme tie la charpie, du papier,
ties chiffbns, ties pro&tits chimiques, etc.
Gardez le sol propre et sec 5 proximitd tie vos
41ecu'om(magers afn tie ne pas glisser.
[] Gardez tousles pro&tits pour la lessive (comme
les d&ersifg, laJavel, etc.) en dehors tie la porff:e
ties enfimts, tie prafdrence dans une armoire
fermae _'/c14.Suivez toums les mises en garde sur
les 4tiquettes pour &_imrties blessures.
[] Ne montezjamais sur le dessus tie la s4cheuse.
[]
I1flint exercer une dtroite sm_,eillance lorsque
vous fidtes tbnctionner cet appareil en prasence
d'enfimts. Ne les laissez pasjouer avec l'appareil
ni monmr dessus, ou s'inu'oduire a l'inff:rieur
d'un vieil appareil qui ne sert plus.
LORSOUEVOUSUTILISEZLASECHEUSES
[] Ne vous penchezjamais dans la s4cheuse pendant
que le tambour toume. Avant tie charger ou
d4charger la s&heuse ou d'y >_outer ties
v&ements, attendez que le tambour se soit
complbtement arr&d.
[] Avant chaque s4chage, nettoyez le fihre _'_chmpie
afn tie pr&enir l'accumulation tie chmpie a
l'inff:rieur tie la s4cheuse ou dans la piece. NE
FAITESPASFONCTIONNERLASECHEUSESANSLE
FILTREA CHARPIE.
[]
[] I1ne flint pas mem'e dans la sdcheuse, ou _'_
[]
proximitd de celle-ci, tout article ayant eta utilisd
avec un solvant ddgraissant ou contenant une
substance inflmnmable (comme des chiffons de
nettoyage, des vadrouilles, ties serviettes utilisdes
dans les salons de coif[i.lre, etc.), "amoins qu'ils air []
ate &3barrassd tie route trace et tome vapeur tie
substance inflmnmable. On utilise "ala maison de
nombreux pro&tits inflmnmable :acdtone, alcool
ddnamrd, essence, kdros&ne, nettoyants
mdnagers, ddtachants, tdrdbenthine, cire, []
ddcapants, contenant thl distillat tie p&role.
[] Ne lavez pas oune faites pas sOcher ties articles
qui ont eft: laves avec des produits combustibles
ou explosif_, ou qui ont Off:trempds dans ces
produits ou qui en sont tachds (cire, peinmre,
huile, essence, dd_'aissants, solvants pour le
nettoyage 5 sec, kdros&ne, etc.) car ils fisquent de
s'enflammer ou d'exploser. Ne versez pasces
substances dans l'eau de la laveuse. N'utilisez pas
ces substances _'_proximit(: de vou'e laveuse ou de
votre sdcheuse pendant qu'elles fonctionnent.
[] La lessive peut attdnuer les propridt(:s
ignifi.lgeantes ties tissus. Pour dvimr cette
situation, suivez a la lem'e les directives donndes
par le f_tbricant (hi v_?mment.
[]
Ne faites pas sdcher ties articles contenant &.l
caoutchouc, du plastique, de la mousse ou autres
mat4riaux similaires (comme des soutiens-goNe
prdfbm_ds, des chaussures de tennis, des
caoutchoucs, des topis de bain, des carpeues, des
bavoirs, des culoues de bdbd, des sacs de
plastique, des oreillers, etc.) car ces mat4riaux
peuvent fondre ou bi_ler. De plus, dans cermines
circonsmnces, cermins matdrim_x tie caoutchouc
peuvent causer un incendie par combustion
sponmnde lorsqu'ils sont chmfff&.
Ne rangez pas ties articles qui peuvent %ndre ou
brfiler, comme du plastique, papier, ou ties
v&ements sur le dessus de la sdcheuse pendant
qu'elle fbnctionne.
Les v&ements portant la mention <<Faires4cher
loin tie la chaleur,, ou <<Nefidtes pas s4cher par
culbutage,, (comme les gilets tie sauvetage
contenant tin kapok) no doivent pas OttosOcMs
clans votro sOchouso.
Ne fhims pas sOcher d'articles en fbre tie verre
dans vou'e sdcheuse. Les particules qui restent
dans la sdcheuse et qui pourraient &re recueillies
par les v&ements lors d'un sdchage subsdquent
risquent de cruiser des irritations cutandes.
Pour rdduire les risques tie chocs dlectriques,
ddbranchez toujours l'appareil ou ddbranchez la
sdcheuse au panneau tie distribution en enlevant
le fl.lsible ou ddclenchant le disjoncteur avant de
le rdparer ou de le nettoyer (saufpour enlever et
nettoyer le fihre _'_charpie). REMAROUE:Lefair tie
placerle sdlecteur de pro_'amme "aune position
d'ARRETnecoupe PASl'alimenmtion 41ectrique
de l'appareil.
18

• Ne faites pas fonctionner l'appareil s'il est
endommagd, dOfecmeux, partiellelnent
ddmontO, ou si des pieces sont manquantes ou
defecmeuses, ou si le cordon d'alimenmtion ou la
fiche sont endommagas.
• L'interieur de l'appareil et le raccord du conduit
d'evacuation _ l'intefieur de la secheuse doivent
@'e nettwes une lois par an par une personne
qualifiee. Vwez la section Utiliseret charger la
laveuse.
• Sivotre sdcheuse fbnctionne "agaz, elle est
pouxsale d'un systteme d'allumage dlectrique
amomatique et ne possede pas de veilleuse.
N'ESSAYEZPASDEL'ALLUMERAVECUNE
ALLUMETTE.Vous risquez de vous bx_ler sivous
approchez votre main du bx_leur et que le
dispositif d'allumage mlmInatique s'allume.
• II est possible que vous desiriez assouplir votre
lessive ou reduire le colleInent electrostatique en
utilisant un assouplissant textile dans votre
secheuse ou tin produit antistatique. Nous vous
recommandons d'utiliser un assouplissant liquide
au cours du pro_'amme de lavage, conformement
aux directives du t_abricant de ce type de produit,
ou de t_airel'essai d'un assouplissant textile pour la
secheuse, pour lequel le fabricant certifie sur
l'emballage que son produit peut atre utilise en
route secufite dans la secheuse. La responsabilite
des probl&mes de rendement ou de
fonctionnement qui ne sont pas couverts pat"la
garantie de cet appareil et sont attfibuables it
l'utilisation de ces produits releve du fabricant de
ces produits.
LORSOUELASECHEUSESN'ESTPASUTILISEE
• Lorsque vous debranchez l'appareil, tirez stir la
fiche et non pas stir le cordon _din d'eviter
d'endoInInager le cordon d'alimentation.
Installez le cordon de sorte que personne ne
marche ni trebuche dessus ou qu'il ne stir pas
expose "ades doInInages ou des contraintes
• Avant dejeter ou d'entreposer une secheuse,
enlevez toujours la porte afin d'emp_cher les
ex_hnts de se cacher "al'interieur.
• Ne trafiquez pas les coInInandes de l'appareil.
• Ne reparez ou ne reInplacez mlcune pi&ce de cet
appareil, "aInoins que cela ne stir specifiquement
recommande dans le present manuel ou dans des
directives de reparation que vous coInprenez et
que vous etes en Inesure de suix_'e.
Veuillezfireetsuivreattenfivementcesmesuresdes#curit#.
CONSERVEZCESDIRECTIVES
19

Lescommandesde votre secheuse.
Vous trouverez votre num_ro de module sur I_tiquette DI'avant de la s_cheuse derriere la porte.
Los caract#ristiques et I'aspect de votre mod#le peuvent varier de ceux pr#sent#s Dtravers ce manuel
Type495
SensorDry
FABRICCARE OPTIONS
NO REG. MED LOW EXTRA SIGNAL
HEAT HEAT HEAT HEAT CARE
. _ o_._o_,sPHSHsTARTTO
I m m m
13@ @
,ira
• MORE DRY
COTTONS EXTRACAR_,,,,,,..--'..,,,,_.LESSDRYEASYCARE
_MAT,C LESSDR_I/Tr-'\ -_\ ........ 4_._
.1/ \ \ \\E:RACARE
MOREDR'I(\ \ II
•\\ \ \ II MOREDR,
DEWR,NKLE,0\\\)// 'ESSDR,
DAMP DRY 30 __ E;;RL;°cTRE KNITS/
TIMED DRY _u _5060 70 80 • DELICATES
MIN AUTOMATIC
"X-= PREFERREDREGULARSETTING
El
Type505
SensorDry
FABRICCARE OPTIONS
START
_, o(_GENTLELOWMEDREG.EXTRAS,GNAL
HEATHEAT,EATHEATHEATCARE
-- -- - =--_---=o_s
@ D@@@
• WRINKLEFREEco'n'ON
C_TTONS EXTRACARE_,""--""_"_°_IT._ EASYCARE
MATIC _.__y AUTOMATIC
SHIRTS _"_"_ _ PERM PRESS/DELICATES
....... // I \ \\ ........ \
•'X- ,f/" \ \ k _ti EXTRA CARE --
JEANS/TOWELSI I \ \ I | •
........ I I \ \ I I WOOLENS/LINENS
" \\ \ \ /1 R._;"_N°/;iLK
DEWRINKLE20_i._. %,. )il .......
DAMPDRY 30 _ E; °°LD°wN
,_ EXTRA CARE
TIMED DRY QUlC_,DRY_"_so6o70 8o • ULTRACARE
MIN AUTOMATIC
!
"X-= PREFERREDREGULARSETTING
REMARQUE: Lesdureesdesechage varient se/onle typed_nergie uti/is# (e/ectricite, gaznature/ou gazdep#tmle
/iqu#fi#), /a gmsseur de/a brassee,/e typede tissu,/'humiditedesv#tements et /_tat desconduitsd_vacuation.
2O
La page charge ...
La page charge ...
La page charge ...
La page charge ...
La page charge ...
La page charge ...
La page charge ...
La page charge ...
La page charge ...
La page charge ...
La page charge ...
La page charge ...
La page charge ...
La page charge ...
La page charge ...
La page charge ...
La page charge ...
La page charge ...
La page charge ...
La page charge ...
La page charge ...
La page charge ...
La page charge ...
La page charge ...
La page charge ...
La page charge ...
La page charge ...
La page charge ...
-
 1
1
-
 2
2
-
 3
3
-
 4
4
-
 5
5
-
 6
6
-
 7
7
-
 8
8
-
 9
9
-
 10
10
-
 11
11
-
 12
12
-
 13
13
-
 14
14
-
 15
15
-
 16
16
-
 17
17
-
 18
18
-
 19
19
-
 20
20
-
 21
21
-
 22
22
-
 23
23
-
 24
24
-
 25
25
-
 26
26
-
 27
27
-
 28
28
-
 29
29
-
 30
30
-
 31
31
-
 32
32
-
 33
33
-
 34
34
-
 35
35
-
 36
36
-
 37
37
-
 38
38
-
 39
39
-
 40
40
-
 41
41
-
 42
42
-
 43
43
-
 44
44
-
 45
45
-
 46
46
-
 47
47
-
 48
48


GE 495 Series Le manuel du propriétaire
- Taper
- Le manuel du propriétaire
- Ce manuel convient également à
dans d''autres langues
- English: GE 495 Series Owner's manual
- español: GE 495 Series El manual del propietario