Ryobi RY404150 Mode d'emploi
- Catégorie
- Souffleurs / sécheurs d'air
- Taper
- Mode d'emploi

OPERATOR’S MANUAL
MANUEL D’UTILISATION
MANUAL DEL OPERADOR
40V BLOWER/VACUUM
SOUFFLANTE / ASPIRATEUR DE 40 V
SOPLADORA/ASPIRADORA DE 40 V
RY404015
WARNING: To reduce the
risk of injury, the user must read and
understand the operator’s manual
before using this product.
TABLE OF CONTENTS
Important Safety Instructions .......... 2-4
Symbols .......................................... 4-5
Features ..............................................6
Assembly ........................................ 6-7
Operation ........................................ 8-9
Maintenance .....................................10
Troubleshooting .......................... 11-12
Parts Ordering/Service ........ Back Page
AVERTISSEMENT : Pour
réduire les risques de blessures,
l’utilisateur doit lire et veiller à bien
comprendre le manuel d’utilisation avant
d’employer ce produit.
TABLE DES MATIÈRES
Instructions importantes
concernant la sécurité .................... 2-4
Symboles ........................................ 4-5
Caractéristiques ..................................6
Assemblage .................................... 6-7
Utilisation ........................................ 8-9
Entretien ............................................10
Dépannage .................................. 11-12
Commande de pièces/
réparation .......................... Páge arrière
ADVERTENCIA: Para reducir
el riesgo de lesiones, el usuario debe leer
y comprender el manual del operador
antes de usar este producto.
ÍNDICE DE CONTENIDO
Instrucciones de seguridad
importantes ..................................... 2-4
Símbolos ......................................... 4-5
Características ....................................6
Armado ........................................... 6-7
Funcionamiento .............................. 8-9
Mantenimiento ..................................10
Solución de problemas ............... 11-12
Pedidos de piezas/
servicio ........................... Pág. posterior
SAVE THIS MANUAL FOR
FUTURE REFERENCE
CONSERVER CE MANUEL
POUR FUTURE RÉFÉRENCE
GUARDE ESTE MANUAL
PARA FUTURAS CONSULTAS

ii
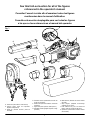
Fig. 1
A - Lower tube (tube inférieur, tubo inferior)
B - Vacuum nozzle (buse de l’aspirateur,
boquilla de aspiradora)
C - Speed tip (embout accéléré, punta de
velocidad)
D - Shoulder harness (bandoulière, sección del
arnés para hombros)
E - Blower inlet (entrée du souffleur, entrada de
sopladora)
F - Upper tube (tube supérieur, tubo superior)
G - Adjustable handle (poignée réglable, mango
ajustable)
H - Mode selector (sélecteur de mode, selector
de modo)
I - Strap hangers (dispositif d’accrochage,
colgador para la correa)
J - Leaf collection bag (sac de collecte de
feuilles, bolsa de recolección de hojas)
K - Speed dial (commande de vitesse, selector
de velocidad)
See this fold-out section for all of the figures
referenced in the operator’s manual.
Consulter l’encart à volets afin d’examiner toutes les figures
mentionnées dans le manuel d’utilisation.
Consulte esta sección desplegable para ver todas las figuras
a las que se hace referencia en el manual del operador.
A
B
C
D
EJ
I
F
G
H
K
I

iii
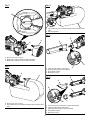
Fig. 2 Fig. 4
A - Rear port (rear port, rear port)
B - Blower inlet (entrée du souffleur, entrada de sopladora)
C - Mode selector (sélecteur de mode, selector de modo)
A
B
A
A - Rear port (rear port, rear port)
B - Leaf collection bag (sac de collecte de feuilles, bolsa de recolección de
hojas)
Fig. 3
B
A
Fig. 5
Fig. 6
A - Lower tube (tube inférieur, tubo inferior)
B - Upper tube (tube supérieur, tubo superior)
C - Tab (languette, orejeta)
D - Notch (fente, ranura)
A - Leaf collection bag (sac de collecte de feuilles, bolsa de recolección de
hojas)
B - Clip (clip, sujetador)
A - Vacuum nozzle (buse de l’aspirateur, boquilla de aspiradora)
B - Lower tube (tube inférieur, tubo inferior)
C - Speed tip (embout accéléré, punta de velocidad)
D - Tab (languette, orejeta)
E - Notch (fente, ranura)
A
A
C
B
B
B
C
D
D
E
CC
B

iv
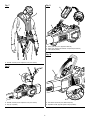
Fig. 9
Fig. 10
A - Battery pack (bloc-piles, paquete de baterías)
B - Battery port (logement de batteries, receptáculo para baterías)
C - Latch (loquet, pestillo)
A - Pivot button (bouton de pivot, botón del pivote)
B - Adjustable handle (poignée réglable, mango ajustable)
A
C
A
B
B
Fig. 7
Fig. 8
A - Shoulder harness (harnais d’épaules, arnés para hombro)
A - Shoulder harness (harnais d’épaules, arnés para hombro)
B - Clip (clip, sujetador)
A
B
A

v
Fig. 13
Fig.12
Fig.14
PROPER BLOWER OPERATING POSITION
POSITION D’UTILISATION ADÉQUATE DE LA SOUFFLANTE
POSICIÓN DE FUNCIONAMIENTO CORRECTA DE LA SOPLADORA
PROPER VACUUM OPERATING POSITION
POSITION D’UTILISATION ADÉQUATE DE L’ASPIRATEUR
POSICIÓN DE FUNCIONAMIENTO CORRECTA DE LA ASPIRADORA
A - Speed dial (commande de vitesse, selector de velocidad)
A
Fig. 11
A - Mode selector (sélecteur de mode, selector de modo
B - Vacuum position (position aspirateur, posición de aspiradora)
C - Blower position (position souffleur, posición de sopladora)
C
B
A

2 — English
When using an electrical appliance, basic precautions should
always be followed, including the following:
WARNING!
READ AND UNDERSTAND ALL INSTRUCTIONS
BEFORE USING THIS BLOWER/VACUUM. To reduce
the risk of electric shock, fire and/or serious personal
injury.
Know your blower/vacuum. Read operator’s manual
carefully. Learn its applications and limitations, as
well as the specific potential hazards related to this
blower/vacuum. Following this rule will reduce the risk
of electric shock, fire, or serious injury.
Do not permit children to use blower/vacuum. It is
not a toy. Close attention is necessary when used near
children.
Use only accessories that are recommended by the
manufacturer for your model described in this manual.
Accessories that may be suitable for one blower/vacuum
may create a risk of injury when used on another blower/
vacuum. Use only as described in this manual.
Do not handle charger, including charger plug, and
charger terminals with wet hands.
Do not put any object into openings. Do not use with
any opening blocked; keep free of dust, lint, hair, and
anything that may reduce air flow.
Do not charge the unit outdoors.
Keep hair, loose clothing, fingers, and all parts of body
away from openings and moving parts.
Turn off all controls before removing battery.
Use extra care when cleaning on stairs or steps.
Do not operate blower/vacuums in explosive atmo-
spheres, such as in the presence of flammable liquids,
gases, or dust. Blower/vacuums create sparks which
may ignite the dust or fumes.
Keep your work area clean and well lit. Cluttered
benches and dark areas invite accidents.
Keep bystanders, children, and visitors at least 50 ft.
away while operating a blower/vacuum. Distractions
can cause you to lose control.
A battery operated blower/vacuum with integral bat-
teries or a separate battery pack must be recharged
only with the specified charger for the battery. A charger
that may be suitable for one type of battery may create
a risk of fire when used with another battery.
Use battery operated blower/vacuum only with spe-
cifically designated battery pack. Use of any other
batteries may create a risk of fire.
IMPORTANT SAFETY INSTRUCTIONS
Use this product only with batteries and chargers listed
in tool/appliance/battery pack/charger correlation
supplement 987000-432.
Do not operate charger with a damaged cord or plug,
which could cause shorting and electric shock. If
damaged, have the charger replaced by an authorized
service center.
If appliance is not working as it should, has been
dropped, damaged, left outdoors, or dropped into
water, return it to a service center.
Stay alert, watch what you are doing and use
common sense when operating a blower/vacuum. Do
not use blower/vacuum while tired, upset, or under
the influence of drugs, alcohol, or medication. A mo-
ment of inattention while operating blower/vacuums may
result in serious personal injury.
Secure long hair above shoulder level to prevent en-
tanglement in moving parts.
Avoid accidental starting. Be sure dial is in the off
position before inserting battery pack.
Use safety equipment. Always wear eye protection.
Dust mask, non-skid safety shoes, hard hat, or hearing
protection must be used for appropriate conditions.
Do not wear loose clothing or jewelry. Contain long
hair. Loose clothes, jewelry, or long hair can be drawn
into air vents.
Do not use on a ladder, rooftop, tree, or other unstable
support. Stable footing on a solid surface enables better
control of the blower/vacuum in unexpected situations.
Do not use blower/vacuum if dial does not turn it on
or off. A blower/vacuum that cannot be controlled with
the dial is dangerous and must be repaired.
Disconnect battery pack from blower/vacuum or place
the dial in the off position before making any adjust-
ments, changing accessories, or storing the blower/
vacuum. Such preventive safety measures reduce the
risk of starting the blower/vacuum accidentally.
When battery pack is not in use, keep it away from
other metal objects like: paper clips, coins, keys, nails,
screws, or other small metal objects that can make
a connection from one terminal to another. Shorting
the battery terminals together may cause sparks, burns,
or a fire.
Check for misalignment or binding of moving parts,
breakage of parts, and any other condition that may
affect the blower/vacuum’s operation. If damaged,
have the blower/vacuum serviced before using. Many
accidents are caused by poorly maintained blower/
vacuums.

3 — English
IMPORTANT SAFETY INSTRUCTIONS
Keep the blower/vacuum and its handle dry, clean and
free from oil and grease. Always use a clean cloth when
cleaning. Never use brake fluids, gasoline, petroleum-
based products, or any strong solvents to clean your
blower/vacuum. Following this rule will reduce the risk of
loss of control and deterioration of the enclosure plastic.
Always wear safety glasses with side shields.
Everyday glasses have only impact resistant lenses. They
are NOT safety glasses. Following this rule will reduce
the risk of eye injury.
Always wear eye protection with side shields marked
to comply with ANSI Z87.1 along with hearing protec-
tion when operating this equipment.
Protect your lungs. Wear a face or dust mask if the
operation is dusty. Following this rule will reduce the
risk of serious personal injury.
Protect your hearing. Wear hearing protection during
extended periods of operation. Following this rule will
reduce the risk of serious personal injury.
Battery blower/vacuums do not have to be plugged
into an electrical outlet; therefore, they are always in
operating condition. Be aware of possible hazards
when not using your battery powered blower/vacuum
or when changing accessories. Following this rule will
reduce the risk of electric shock, fire, or serious personal
injury.
Under abusive conditions, liquid may be ejected from
the battery; avoid contact. If contact accidentally occurs,
flush with water. If liquid contacts eyes, additionally seek
medical help. Liquid ejected from the battery may cause
irritation or burns.
Do not use a battery pack or appliance that is dam-
aged or modified. Damaged or modified batteries may
exhibit unpredictable behavior resulting in fire, explosion
or risk of injury.
Do not expose a battery pack or appliance to fire or
excessive temperature. Exposure to fire or temperature
above 265°F may cause explosion.
Follow all charging instructions and do not charge the
battery pack or appliance outside of the temperature
range specified in the instructions. Charging improperly
or at temperatures outside of the specified range may
damage the battery and increase the risk of fire.
Do not modify or attempt to repair the appliance or the
battery pack except as indicated in the instructions
for use and care.
Do not place battery powered blower/vacuums or their
batteries near fire or heat. This will reduce the risk of
explosion and possibly injury.
Don’t expose blower/vacuums to rain or wet condi-
tions. Water entering a blower/vacuum will increase the
risk of electric shock.
Wear heavy long pants, long sleeves, and boots. Avoid
loose garments or jewelry that could get caught in moving
parts of the machine or its motor.
Do not operate the equipment while barefoot or when
wearing sandals or similar lightweight footwear. Wear
protective footwear that will protect your feet and improve
your footing on slippery surfaces.
Keep firm footing and balance. Do not overreach.
Overreaching can result in loss of balance.
Check the work area before each use. Remove all
objects such as rocks, broken glass, nails, wire, or string
which can be thrown or become entangled in the machine.
Do not point the blower nozzle in the direction of
people or pets.
When not in use, blower/vacuum should be stored
indoors in a dry, locked up place—out of the reach
of children.
Do not dispose of a severely damaged or worn out
battery pack or this blower/vacuum by incinerating.
The battery can explode in fire.
Stop the motor, wait until all moving parts come to a
complete stop, and disconnect from the power supply
before cleaning or performing any maintenance.
Never use water or any liquids to clean or rinse off
your product and do not expose the product to rain or
wet conditions. Store indoors in a dry area. Corrosive
liquids, water, and chemicals can enter the product’s
electronic components and cause damage, which can
result in a short circuit, increased risk of fire, and serious
personal injury. Remove any buildup of dirt and debris by
wiping the product clean with a dry cloth occasionally.
Blower/vacuum service must be performed only by
qualified repair personnel. Service or maintenance
performed by unqualified personnel may result in a risk
of injury.
When servicing a blower/vacuum, use only identical
replacement parts. Follow instructions in the Mainte-
nance section of this manual. Use of unauthorized parts
or failure to follow Maintenance Instructions may create
a risk of shock or injury.
Never use blower/vacuum near fires, fireplaces, hot
ashes, bar becue pits, etc. Use near fires or ashes can
spread fires and result in serious injury and/or property
damage.

4 — English
The following signal words and meanings are intended to explain the levels of risk associated with this product.
SYMBOL SIGNAL MEANING
DANGER: Indicates a hazardous situation, which, if not avoided, will result in death or
serious injury.
WARNING: Indicates a hazardous situation, which, if not avoided, could result in death or
serious injury.
CAUTION: Indicates a hazardous situation, that, if not avoided, may result in minor or
moderate injury.
NOTICE: (Without Safety Alert Symbol) Indicates information considered important, but
not related to a potential injury (e.g. messages relating to property damage).
SYMBOLS
IMPORTANT SAFETY INSTRUCTIONS
SAVE THESE INSTRUCTIONS
Never use blower/vacuum to spread chemicals, fertil-
izers, or any other toxic substances. Spreading these
substances could result in serious injury to the operator
or bystanders.
Never place blower/vacuum on any surface, except
a hard, clean surface when motor is running. Gravel,
sand, and other debris can be picked up by the air inlet
and thrown at the operator or bystanders, causing pos-
sible serious injuries.
For household use only.
Remove the battery pack from the tool when not in
use, before servicing, and before storing the tool. Such
preventative safety measures reduce the risk of starting
the tool accidentally.
Do not operate in poor lighting.
Do not pick up flammable or combustible liquids such
as gasoline or use in areas where they may be pres-
ent.
Do not pick up anything that is burning or smoking
such as cigarette matches or hot ashes.
Do not put any object into openings. Do not use with
any opening blocked; keep free of dust, lint, hair, and
anything that may reduce air flow.
Maintain tool with care. Keep fan area clean for best
and safest performance. Follow instructions for proper
maintenance.
Do not attempt to clear clogs from tool without first
removing the battery pack.
Rotating impeller blades can cause severe injury.
Remove the battery pack and make sure impeller blades
have stopped rotating before installing the blower inlet
or leaf collection bag.
Never run the unit without the proper equipment at-
tached. When used as a blower, always install the blower
inlet and lower tube. When used as a vacuum, always
install the lower tube and leaf collection bag. Make sure
the leaf collection bag is installed properly when the unit
is running to avoid flying debris.
Avoid situations that could catch the leaf collection
bag on fire. Do not operate near an open flame. Do not
vacuum warm ash from fireplaces, barbecue pits, brush
piles, etc. Do not vacuum discarded cigars or cigarettes
unless the cinders are completely cool.
Save these instructions. Refer to them frequently and
use them to instruct others who may use this tool. If you
loan someone this tool, loan them these instructions also.

5 — English
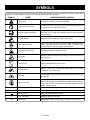
SYMBOLS
Some of the following symbols may be used on this product. Please study them and learn their meaning. Proper inter-
pretation of these symbols will allow you to operate the product better and safer.
SYMBOL NAME DESIGNATION/EXPLANATION
Safety Alert Indicates a potential personal injury hazard.
Read Operator’s Manual To reduce the risk of injury, user must read and understand opera-
tor’s manual before using this product.
Eye and Hearing Protection
Always wear eye protection with side shields marked to comply
with ANSI Z87.1 along with hearing protection when operating
this equipment.
Impeller Blades Rotating impeller blades can cause severe injury.
Wet Conditions Alert
Risk of fire and burns. Do not expose battery, battery compart-
ment, or electronic components to rain, water, or liquids. Close
cover during use. Do not operate on wet ground.
Keep Bystanders Away Keep all bystanders at least 50 ft. away.
Long Hair Failure to keep long hair away from the air inlet could result in
personal injury.
Blower Tube Do not operate without tube in place.
Loose Clothing Failure to keep loose clothing from being drawn into air intake
could result in personal injury.
Ricochet Thrown objects can ricochet and result in personal injury or prop-
erty damage.
Recycle Symbol
This product uses lithium-ion (Li-ion) batteries. Local, state, or federal
laws may prohibit disposal of batteries in ordinary trash. Consult your
local waste authority for information regarding available recycling
and/or disposal options.
V Volts Voltage
min Minutes Time
Direct Current Type or a characteristic of current
n
o
No Load Speed Rotational speed, at no load
.../min Per Minute Revolutions, strokes, surface speed, orbits etc., per minute

6 — English
PRODUCT SPECIFICATIONS
Motor ..................................................................................................................................................................... 40 Volts DC
Air Velocity
MPH .................................................................................................................................... 100 (blower) and 100 (vacuum)
CFM .................................................................................................................................... 600 (blower) and 600 (vacuum)
FEATURES
KNOW YOUR BLOWER/VACUUM
See Figure 1.
The safe use of this product requires an understanding of
the information on the tool and in this operator’s manual as
well as a knowledge of the project you are attempting. Before
use of this product, familiarize yourself with all operating
features and safety rules.
ADJUSTABLE HANDLE
The front handle assembly can be adjusted for ease of
operation and to help prevent loss of control.
BRUSHLESS MOTOR
This product features a brushless motor that maximizes
power and performance as well as battery run time.
LOWER TUBE
The lower tube can be installed on the blower/vacuum with-
out using any tools.
MODE SELECTOR KNOB
Use the mode selector knob to switch from blower operation
to vacuum operation.
SHOULDER HARNESS
The shoulder harness helps to redistribute the weight of the
tool during operation.
SPEED DIAL
The speed dial allows you to quickly adjust air velocity and
turn the blower/vacuum on and off.
SPEED TIP
The speed tip increases air velocity during blower operation.
ASSEMBLY
UNPACKING
This product requires assembly.
Carefully remove the product and any accessories from
the box. Make sure that all items listed in the Packing
List are included.
WARNING:
Do not use this product if any parts on the Packing List
are already assembled to your product when you unpack
it. Parts on this list are not assembled to the product by
the manufacturer and require customer installation. Use
of a product that may have been improperly assembled
could result in serious personal injury.
Inspect the product carefully to make sure no breakage
or damage occurred during shipping.
Do not discard the packing material until you have care-
fully inspected and satisfactorily operated the product.
If any parts are damaged or missing, please call
1-800-525-2579 for assistance.
PACKING LIST
Blower/Vacuum
Lower Tube
Vacuum Nozzle
Shoulder Harness
Leaf Collection Bag
Speed Tip
Operator’s Manual
WARNING:
If any parts are damaged or missing do not operate this
product until the parts are replaced. Use of this product
with damaged or missing parts could result in serious
personal injury.

7 — English
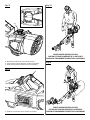
Align the tabs on the blower inlet with the notches on the
rear port and slide together.
Lift and rotate the mode selector to the blower position
to lock the blower inlet in place.
Install lower tube and speed tip as described later in this
section.
INSTALLING THE LOWER TUBE
See Figures 5 - 6.
With the tab facing down, slide the lower tube over the
upper tube on the motor housing.
Push the lower tube on the upper tube until the tab locks
into place through the notch in the motor housing.
NOTE: The lower tube must be fully locked into place or
the tool will not operate.
To remove the tube, depress the tab and slide tube off.
To install the speed tip or vacuum nozzle: Align the tab
on the speed tip or nozzle with the notch on the lower
tube and press together until the tab locks into place.
To remove the speed tip or vacuum nozzle: depress
the tab and slide off the speed tip or nozzle.
NOTICE:
When correctly assembled, the tube is difficult to sepa-
rate. If it can easily be pulled apart, the tube is not locked.
Check that the tab is aligned, and push the lower tube on
to the motor housing until the tube snaps into the locked
position. If the tube is not in the locked position, it can
separate during operation.
CONNECTING AND ADJUSTING THE
SHOULDER HARNESS
See Figures 7 - 8.
The shoulder harness is recommended when vacuuming.
Straps should be adjusted to a comfortable position before
starting the blower/vacuum.
Slip arm through harness strap and onto shoulder, then
repeat for the other shoulder.
Connect the waist straps and adjust for comfort.
Adjust the shoulder straps until the harness rests com-
fortably against the small of the back.
Once the harness is in a comfortable position, connect
the harness to the strap hangers on the blower/vacuum.
ASSEMBLY
WARNING:
Do not attempt to modify this product or create acces-
sories not recommended for use with this tool. Any such
alteration or modification is misuse and could result in a
hazardous condition leading to possible serious personal
injury.
WARNING:
To prevent accidental starting that could cause serious
personal injury, always remove the battery pack from the
tool when assembling parts.
ASSEMBLING THE TOOL
See Figures 2 - 4.
WARNING:
Contact with rotating impeller blades could result in seri-
ous personal injury. Always remove the battery pack and
make sure impeller blades have stopped rotating before
installing the blower inlet or leaf collection bag. Do not
put hands or any other object into the vacuum tubes while
they are installed on the unit.
This tool can be assembled for vacuum or blower operation.
To assemble the tool for vacuuming:
Remove the battery pack.
If applicable, lift and rotate the mode selector to the center
(unlocked) position then remove the blower inlet from the
rear port.
Align the tabs on the leaf collection bag with the notches
on the rear port and slide together.
Lift and rotate the mode selector to the vacuum position
to lock the leaf collection bag in place.
Attach the lower portion of the leaf collection bag to the
strap hanger on the bottom of the blower/vacuum.
Install lower tube and vacuum nozzle as described later
in this section.
To assemble the tool for blowing:
Remove the battery pack.
If applicable, lift and rotate the mode selector to the center
(unlocked) position then remove the leaf collection bag
from the rear port.

8 — English
WARNING:
Do not allow familiarity with products to make you care-
less. Remember that a careless fraction of a second is
sufficient to inflict serious injury.
WARNING:
Always wear eye protection with side shields marked to
comply with ANSI Z87.1, along with hearing protection.
Failure to do so could result in objects being thrown into
your eyes resulting in possible serious injury.
WARNING:
Do not use any attachments or accessories not recom-
mended by the manufacturer of this product. The use of
attachments or accessories not recommended can result
in serious personal injury.
WARNING:
Verify that all guards and tubes are in place prior to use.
If the blower/vacuum is dropped, stop blower/vacuum
and verify that no damage has occurred. If any guard,
part, or tube is damaged or missing, do not use blower/
vacuum until it has been repaired or replaced by a quali-
fied service center. Use of blower/vacuum with damaged
or missing guards, parts, or tubes can result in serious
personal injury or further damage to the blower/vacuum.
WARNING:
The vacuum function is for use with leaves only. Vacuum-
ing rocks, mulch, and other debris can result in serious
personal injury or damage to the unit.
NOTICE:
Before each use, inspect the entire product for damaged,
missing, or loose parts such as screws, nuts, bolts, caps,
etc. Tighten securely all fasteners and caps and do not
operate this product until all missing or damaged parts
are replaced. Please contact customer service or an
authorized service center for assistance.
APPLICATIONS
You may use this product for the purposes listed below:
Clearing leaves and other debris from your lawn
Keeping decks and driveways free from grass clippings,
leaves, pine needles, and other debris
INSTALLING/REMOVING BATTERY PACK
See Figure 9.
WARNING:
Always remove battery pack from your tool when you are
assembling parts, making adjustments, cleaning, or when
not in use. Removing battery pack will prevent accidental
starting that could cause serious personal injury.
To install:
Place the battery pack in the unit. Align the raised rib on
the battery pack with the groove in the unit’s battery port.
WARNING:
Make sure the latch on the bottom of the battery pack
snaps in place and the battery pack is fully seated and
secure in the unit’s battery port before beginning opera-
tion. Failure to securely seat the battery pack could cause
the battery pack to fall out, resulting in serious personal
injury.
NOTICE:
When placing battery pack in the tool, be sure raised rib
on battery pack aligns with the bottom of the tool and
latches into place properly. Improper installation of the
battery pack can cause damage to internal components.
To remove:
Locate the latch on the bottom of the battery pack and
depress to release the battery pack from the blower.
WARNING:
Battery tools are always in operating condition. Therefore,
switch should always be in the OFF position when not in
use or carrying at your side. Remove battery pack when
transporting or carrying blower to avoid accidental start-
ing, which could result in serious injury.
For complete charging instructions, see the operator’s manu-
als for your battery pack and charger.
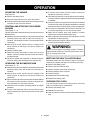
OPERATION

9 — English
OPERATION
ADJUSTING THE HANDLE
See Figure 10.
Remove the battery pack.
Place the blower/vacuum on a sturdy flat surface.
Push pivot button and adjust handle until it snaps securely
into place at one of the four detents.
STARTING AND STOPPING THE BLOWER/
VACUUM
See Figures 11 - 12.
Use the speed dial to start and stop the blower/vacuum and
adjust speeds.
Assemble the unit for blowing or vacuuming as described
previously. Make sure that all parts are correctly as-
sembled. The shoulder harness is recommended when
vacuuming.
Verify that the mode selector switch is rotated to the
blower position for blowing or the vacuum position for
vacuuming.
Install the battery pack.
Rotate the speed dial forward to start the unit at low
speeds. Continue rotating the dial forward for medium
and high speeds.
Rotate the speed dial backward to decrease speeds.
Continue rotating the dial backward to stop the unit.
OPERATING THE BLOWER/VACUUM
See Figures 13 - 14.
Assemble the unit for blowing or vacuuming as described
previously. Make sure that all parts are correctly as-
sembled.
Verify that the mode selector switch is rotated to the
blower position for blowing or the vacuum position for
vacuuming.
Slip an arm through each of the shoulder straps and place
the harness on your shoulders. Secure the shoulder har-
ness and attach it to the blower/vacuum.
Hold the tool in the proper operating position and begin
operation.
To keep from scattering debris, blow around the outer
edges of a debris pile. Never blow directly into the center
of a pile.
To reduce sound levels, limit the number of pieces of
equipment used at any one time.
Use rakes and brooms to loosen debris before blowing.
In dusty conditions, slightly dampen surfaces when water
is available.
Conserve water by using power blowers/vacuums instead
of hoses for many lawn and garden applications, including
areas such as screens, patios, grills, porches, and gardens.
The vacuum is designed to pick up leaves. Take care not
to vacuum large twigs. Do not vacuum wet leaves.
Watch out for children, pets, open windows, or freshly
washed cars, and blow debris safely away.
After using blowers/vacuums or other equipment, CLEAN
UP! Dispose of debris properly.
When cleaning is complete, stop the blower/vacuum and
disconnect the shoulder harness.
WARNING:
Battery tools are always in operating condition. Therefore,
switch should always be in the OFF position when not in
use or carrying at your side.
EMPTYING THE LEAF COLLECTION BAG
Periodically empty the leaf collection bag for best perfor-
mance and to prevent the bag from becoming too heavy.
Remove the battery pack.
Remove the leaf collection bag.
Grasp the zipper pull and pull downward.
Properly dispose of the contents.
Close the zipper.
Reinstall the leaf collection bag.
Reinstall the battery pack.
CHECKING FOR CLOGS
If the leaf vacuum seems to be losing suction, check the
tubes for possible clogs or obstructions.
Remove the battery pack.
Release the lower tube.
Clear any debris or leaves from the tubes and the housing
area.

10 — English
NOTICE :
Periodically inspect the entire product for damaged,
missing, or loose parts such as screws, nuts, bolts, caps,
etc. Tighten securely all fasteners and caps and do not
operate this product until all missing or damaged parts
are replaced. Please contact customer service or an
authorized service center for assistance.
GENERAL MAINTENANCE
Avoid using solvents when cleaning plastic parts. Most
plastics are susceptible to damage from various types of
commercial solvents and may be damaged by their use. Use
clean cloths to remove dirt, dust, oil, grease, etc.
WARNING:
Do not at any time let brake fluids, gasoline, petroleum-
based products, penetrating oils, etc., come in contact
with plastic parts. Chemicals can damage, weaken or
destroy plastic which can result in serious personal injury.
STORAGE
Remove the battery and store in a safe, dry place out of
the reach of children.
Clean all foreign material from the blower/vacuum.
Store indoors in a secure place that is inaccessible to
children. Keep away from corrosive agents such as garden
chemicals and de-icing salts.
WARNING:
To avoid serious personal injury, always remove the bat-
tery pack from the product when cleaning or performing
any maintenance.
WARNING:
Always wear eye protection with side shields marked to
comply with ANSI Z87.1, along with hearing protection.
Failure to do so could result in objects being thrown into
your eyes resulting in possible serious injury.
WARNING:
When servicing, use only identical replacement parts.
Use of any other parts can create a hazard or cause
product damage.
WARNING:
Never use water or any liquids to clean or rinse off
your product and do not expose the product to rain or
wet conditions. Store indoors in a dry area. Corrosive
liquids, water, and chemicals can enter the product’s
electronic components and/or battery compartment and
damage electronic components and/or the battery pack,
which can result in a short circuit, increased risk of fire,
and serious personal injury. Remove any buildup of dirt
and debris by wiping the product clean with a dry cloth
occasionally.
MAINTENANCE

11 — English
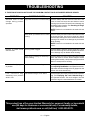
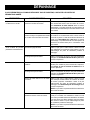
IF THESE SOLUTIONS DO NOT SOLVE THE PROBLEM CONTACT YOUR AUTHORIZED SERVICE DEALER.
PROBLEM POSSIBLE CAUSE SOLUTION
Product will not operate or
starts and stops
Lower tube not fully installed on the
motor housing
Ensure tab on the lower tube is fully latched onto
bottom of motor housing. See Installing the Lower
Tube in the Assembly section. Product has a safety
switch and will not operate without lower tube
installed.
Leaf collection bag or blower inlet is not
fully installed onto rear port of motor
housing
Ensure leaf collection bag or blower inlet is properly
attached to rear port and locked in place with the
mode selector knob. See Assembling the Tool in
the Assembly section. Product has a safety switch
and will not operate without attachment installed.
Sudden stop of product
during operation
Mulching blade clogged Remove battery and then remove lower tube. Use a
tool to remove clog from mulching blade. Be careful
not to damage any fan blades while cleaning.
Battery charge is low Remove and replace battery with fully charged
battery. See Installing/Removing Battery Pack in
the Operation section.
Reduced performance Leaf collection bag is full of debris Remove battery and empty contents of leaf collection
bag to restore vacuum performance. See Emptying
the Leaf Collection Bag in the Operation section.
Battery charge is low Remove and replace battery with fully charged
battery. See Installing/Removing Battery Pack in
the Operation section.
Clog in the lower tube or motor housing Remove battery and then remove lower tube. Use
a tool to clean out lower tube and inside of motor
housing up to the fans. Be careful not to damage any
fan blades while cleaning. See Checking for Clogs
in the Operation section.
NOTE: Product is not intended to be used with wet
leaves.
Debris build up between fans in motor
housing
Remove battery and then rotate mode selector knob
to access the fans. Use a tool to clean any debris
between fans making sure not to let debris into motor
housings. Be careful not to damage any fan blades
while cleaning.
NOTE: Product is not intended to be used with wet
leaves.
TROUBLESHOOTING

12 — English
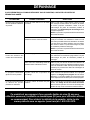
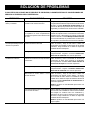
IF THESE SOLUTIONS DO NOT SOLVE THE PROBLEM CONTACT YOUR AUTHORIZED SERVICE DEALER.
PROBLEM POSSIBLE CAUSE SOLUTION
Abnormal noise or noise
change during product
operation
Clog in the lower tube or motor housing Remove battery and then remove lower tube. Use
a tool to clean out lower tube and inside of motor
housing up to the fans. Be careful not to damage any
fan blades while cleaning. See Checking for Clogs
in the Operation section.
NOTE: Product is not intended to be used with wet
leaves.
Debris build up between fans in motor
housing
Remove battery and then rotate mode selector knob
to access the fans. Use a tool to clean any debris
between fans making sure not to let debris into motor
housings. Be careful not to damage any fan blades
while cleaning.
NOTE: Product is not intended to be used with wet
leaves.
Difficult to rotate mode
selector knob
Mulching blade clogged Remove battery and then remove lower tube. Use a
tool to remove clog from mulching blade. Be careful
not to damage any fan blades while cleaning.
Debris around rotating fan assembly in
motor housing
Remove battery and then rotate mode selector knob
back and forth to loosen debris trapped around
rotating fan assembly. Hold product upright to allow
debris to escape motor housing.
Assist handle slipping out
of position
Handle removed from locking feature Avoid applying side pressure to adjustable handle.
See Adjusting the Handle in the Operation section.
Adjustable handle is designed to be gripped on the
shorter side of the handle only.
Leaf collection bag
detaching from product
while in use
Leaf collection bag is full of debris Remove battery and empty contents of leaf collection
bag. See Emptying the Leaf Collection Bag in
the Operation section. Too much weight in the leaf
collection bag will cause attachment to unlatch.
This product has a Five-year Limited Warranty for personal, family, or household
use (90 days for business or commercial use). For warranty details,
visit www.ryobitools.com or call (toll free) 1-800-525-2579.
TROUBLESHOOTING

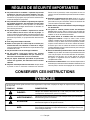
2 — Français
En utilisant un appareil électrique, précautions fondamentales
toujours devraient être suivies, y compris le suivre :
AVERTISSEMENT !
LIRE ET COMPRENDRE TOUTES LES INSTRUCTIONS
AVANT D’UTILISER CETTE SOUFFLANTE / ASPIRATEUR.
Pour réduire le risque de décharge électrique, et/ou de feu
blessure personnelle sérieuse.
Apprendre à connaître l’outil. Lire attentivement le manuel
d’utilisation. Apprendre les applications et les limites de
l’outil, ainsi que les risques spécifiques relatifs à son
utilisation. Le respect de cette consigne réduira les risques
d’incendie, de choc électrique et de blessures graves.
Interdire l’utilisation du soufflante / aspirateur aux enfants.
Ce n’est pas un jouet. Une surveillance étroite est impérative
lorsqu’il est utilisé à proximité d’enfants.
Utiliser exclusivement les accessoires recommandés
par le fabricant pour le modèle d’outil concerné décrit
dans ce manuel. Des accessoires appropriés pour un outil
peuvent être dangereux s’ils sont utilisés avec un autre.
Utiliser exclusivement selon les instructions de ce manuel.
Ne pas manipuler le chargeur, la fiche du chargeur et les
bornes du chargeur avec des mains humides.
Ne pas insérer d’objet dans les ouvertures. Ne pas
utiliser si une ouverture est bloquée ; veiller à ce que les
ouvertures ne soient jamais obstruées par de la poussière,
de la peluche, des cheveux ou quoi que ce soit risquant
de réduire le flux d’air.
Ne pas charger l’appareil à l’extérieur.
Garder les cheveux, les vêtements amples, les doigts et
toute autre partie du corps à l’écart des ouvertures et
pièces en mouvement.
Désactiver toutes les commandes avant de retirer la pile.
Faire preuve d’une grande prudence lors du nettoyage
des escaliers et des marches.
Ne pas utiliser d’outils dans des atmosphères explosives,
en présence de liquides, de gaz ou de poussières
inflammables par exemple. Les outils motorisés produisent
des étincelles qui risquent d’enflammer les poussières ou
les vapeurs.
Garder le lieu de travail propre et bien éclairé. Les établis
encombrés et les endroits sombres sont propices aux
accidents.
Éloigner les badauds, enfants et visiteurs à une distance
d’au moins 15 m (50 pi) pendant l’utilisation d’un outil
motorisé. Les distractions peuvent causer une perte de
contrôle.
Les piles d’outils motorisés, qu’elles soient intégrées
ou amovibles, ne doivent être rechargées qu’avec le
chargeur spécifié. Un chargeur approprié pour un type de
pile peut créer un risque d’incendie s’il est utilisé avec un
autre type de pile.
Utiliser exclusivement le bloc de pile spécifiquement
indiqué pour l’outil. L’utilisation de toute autre pile peut
créer un risque d’incendie.
Utiliser ce produit seulement avec la piles et le chargeurs
indiqués dans le supplément de raccordement pour
chargeur/outils/piles/appareil n˚ 987000-432.
Ne pas utiliser une chargeur dont la prise ou le cordon
sont endommagés au risque de causer un court-circuit et
un choc électrique. Le cas échéant, faire remplacer la prise
ou le cordon immédiatement par un centre de réparations
agréé.
Si l’appareil ne fonctionne pas correctement, s’il a été
échappé, s’il est endommagé, s’il a été laissé à l’extérieur
ou s’il est tombé dans l’eau, retourner le produit au centre
de réparations.
Rester attentif, prêter attention au travail et faire preuve
de bon sens lors de l’utilisation de tout outil motorisé.
Ne pas utiliser cet outil en état de fatigue, vexé ou sous
l’influence d’alcool, de drogues ou de médicaments. Un
moment d’inattention pendant l’utilisation d’un outil motorisé
peut causer des blessures graves.
Attacher les cheveux longs pour les maintenir au-dessus
des épaules, afin qu’ils ne se prennent pas dans les
pièces en mouvement.
Éviter les démarrages accidentels. S’assurer que la
commande est verrouillée en position d’arrêt avant
d’insérer le bloc-piles.
Utiliser un équipement de sécurité. Toujours porter des
lunettes de protection. Suivant les conditions, le port d’un
masque filtrant, de chaussures de sécurité, d’un casque ou
d’une protection auditive est recommandé.
Ne porter ni vêtements amples, ni bijoux. Attacher ou
couvrir les cheveux longs. Les vêtements amples, les
bijoux et les cheveux longs peuvent se prendre dans les
ouïes d’aération.
Ne pas utiliser sur une échelle, le dessus de toit, l’arbre
ou un support instable. Une position stable sur une surface
ferme permet de mieux contrôler l’outil en cas de situation
imprévue.
Ne pas utiliser l’outil si la commande ne permet pas de
le mettre en marche ou de l’arrêter. Un outil qui ne peut
pas être contrôlé par sa commande est dangereux et doit
être réparé.
Déconnecter le bloc-piles et mettre la commande sur
arrêt ou sur verrouillage avant d’effectuer des réglages,
de changer d’accessoire ou de remiser l’outil. Ces mesures
de sécurité réduisent les risques de démarrage accidentel
de l’outil.
Lorsque le bloc-piles n’est pas utilisé, le tenir à l’écart
d’objets métalliques tels que : les attaches trombones, les
pièces de monnaie, les clous, les vis et les autres petits
objets métalliques risquant d’établir le contact entre les
deux bornes. La mise en court-circuit des bornes de piles
peut causer des étincelles, des brûlures ou un incendie.
Vérifier qu’aucune pièce mobile n’est mal alignée ou
bloquée, qu’aucune pièce n’est brisée et s’assurer
RÈGLES DE SÉCURITÉ IMPORTANTES

3 — Français
RÈGLES DE SÉCURITÉ IMPORTANTES
qu’aucun autre problème ne risque d’affecter le bon
fonctionnement de l’outil. En cas de dommages, faire
réparer l’outil avant de l’utiliser de nouveau. Beaucoup
d’accidents sont causés par des outils mal entretenus.
Garder l’outil et sa poignée secs, propres et exempts
d’huile ou de graisse. Toujours utiliser un chiffon propre
pour le nettoyage. Ne jamais nettoyer l’outil avec du liquide
de frein, de l’essence, des produits à base de pétrole ou
des solvants puissants. Le respect de cette règle réduira
les risques de perte du contrôle et de dommage du boîtier
en plastique.
Toujours porter des lunettes de sécurité avec écrans
latéraux. Les lunettes de vue ordinaires sont munies
seulement de verres résistants aux impacts. Ce ne sont PAS
des lunettes de sécurité. Le respect de cette règle réduira
les risques de choc électrique.
Porter une protection oculaire avec écrans latéraux
certifiée conforme à la norme ANSI Z87.1 lors de
l’utilisation de ce produit.
Protection respiratoire. Porter un masque facial ou un
masque anti-poussière si le travail produit de la poussière.
Le respect de cette consigne réduira les risques de blessures
graves.
Protection auditive. Porter une protection auditive lors
de l’utilisation prolongée. Le respect de cette règle réduira
les risques de blessures graves.
Les outils fonctionnant sur piles n’ayant pas besoin d’être
branchés sur une prise secteur, ils sont toujours en état
de fonctionnement. Tenir compte des dangers possibles
lorsque l’outil n’est pas en usage et lors du remplacement
des piles. Le respect de cette consigne réduira les risques
d’incendie, de choc électrique et de blessures graves.
En cas d’usage abusif, du liquide peut s’échapper des
batteries. Éviter tout contact avec ce liquide. En cas
de contact accidentel, rincer immédiatement les parties
atteintes avec de l’eau. Si le liquide pénètre dans vos yeux,
il faut aussi consulter un médecin. Le liquide s’échappant
des batteries peut causer des irritations ou des brûlures.
Ne pas utiliser un bloc-piles ou un appareil endommagé
ou modifié. Le bris ou la modification du bloc-piles peut
causer un comportement imprévisible et causer un incendie,
une explosion ou des blessures.
Ne pas exposer le bloc-piles ou l’outil à un feu ou à des
températures excessives. Une exposition à un incendie
ou à une température supérieure à 130 °C (265 °F) peut
provoquer une explosion.
Suivre toutes les instructions afférentes à la recharge
et ne pas recharger le bloc-piles ou l’appareil hors des
températures spécifiées dans les instructions. Une
recharge incorrecte ou hors des températures spécifiées
peut endommager la pile et augmenter les risques de feu.
Ne modifiez pas ou n’essayez jamais de réparer l’appareil
ou le bloc de batterie, sauf comme indiqué dans les
instructions d’utilisation et d’entretien.
Ne pas placer les outils motorisés sans fil ou leurs piles
à proximité de flammes ou d’une source de chaleur. Ceci
réduira les risques d’explosion et de blessures.
Ne pas exposer les outils motorisés à la pluie ou l’humidité.
La pénétration d’eau dans ces outils accroît le risque de
choc électrique.
Porter des pantalons longs et épais, des manches
longues, et des bottes. Éviter de porter des vêtements
lâches ou des bijoux qui pourraient être pris dans les pièces
en mouvement de la machine ou le moteur.
Ne pas faire fonctionner l’équipement pied nus ou
en portant des sandales ou des chaussures légères
similaires. Porter des chaussures de protection qui protègent
les pieds et améliorent l’équilibre sur des surfaces glissantes.
Se tenir bien campé et en équilibre. Ne pas travailler
hors de portée de l’outil. Cette façon de travailler pourrait
vous faire perdre l’équilibre. Faire preuve de prudence pour
éviter de glisser ou tomber.
Examiner la zone de travail avant chaque utilisation. La
débarrasser de tous les objets tels que cailloux, verre brisé,
clous, fils métalliques, cordes, etc. risquant d’être projetés
ou de se prendre dans la machine.
Ne pas diriger la soufflante / aspirateur vers des
personnes ou un animaux.
Lorsqu’il n’est pas utilisé, l’outil doit être rangé à l’intérieur
dans un endroit sec et sous verrou, hors de la portée des
enfants.
Ne pas jeter de bloc-piles gravement endommagé ou
usé et ce soufflante / aspirateur dans un feu. La pile
incendiée peut exploser.
Arrêter le moteur, attendre que toutes les pièces en
mouvement cessent de bouger et retirer le bloc-piles avant
tout nettoyage ou entretien.
Ne jamais utiliser de l’eau ou une autre liquide pour
nettoyer ou rincer la produit et n’exposez pas à la
pluie ou conditions l’humidité. La remiser à l’intérieur
dans un endroit sec. Les liquides corrosifs, l’eau et les
produits chimiques peuvent s’infiltrer dans le composants
électroniques et/ou le compartiment de la pile et endommager
les composants électroniques et/ou le bloc-pile, ce qui peut
entraîner un court-circuit, augmenter le risque d’incendie ou
des blessures corporelles graves. Enlever toute accumulation
de la saleté et les débris sur la produit de temps en temps
avec un linge sec.
Le service d’outil doit être seulement exécuté par le
personnel de réparation qualifié. Entretenir ou l’entretien
exécuté par le personnel incompétent peut avoir pour résultat
un risque de blessure.
En entretenant un outil, un usage un remplacement
seulement identique sépare. Suivre des instructions dans
la section d’Entretien de ce manuel. L’usage de parties ou
l’échec inautorisées pour suivre les Instructions d’Entretien
peuvent créer un risque de choc ou de blessure.

4 — Français
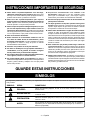
Les termes de mise en garde suivants et leur signification ont pour but d’expliquer le degré de risques associé à l’utilisation
de ce produit.
SYMBOLE SIGNAL SIGNIFICATION
DANGER : Indique une situation dangereuse qui, si elle n’est pas évitée, aura pour
conséquences des blessures graves ou mortelles.
AVERTISSEMENT : Indique une situation dangereuse qui, si elle n’est pas évitée, pourrait entraîner
des blessures graves ou mortelles.
ATTENTION : Indique une situation dangereuse qui, si elle n’est pas évitée, pourraît entraîner
des blessures légères ou de gravité modérée.
AVIS :
(Sans symbole d’alerte de sécurité) Indique les informations jugées importantes
sans toutefois représenter un risque de blessure (ex. : messages concernant
les dommages matériels).
RÈGLES DE SÉCURITÉ IMPORTANTES
Ne jamais utiliser la soufflante / aspirateur à proximité
de flammes, d’un foyer, de cendres chaudes, d’un grill,
etc. Ne pas respecter cette directive peut faire en sorte que
les flammes se propagent, ce qui peut causer des blessures
ou des dommages à la propriété.
Ne jamais utiliser la soufflante / aspirateur pour répandre
des produits chimiques, des fertilisants ou toute autre
substance toxique. Le fait de répandre ces substances
peut faire en sorte d’infliger des blessures à l’utilisateur ou
à des tierces personnes.
Ne jamais placer la soufflante / aspirateur en marche
sur une surface, sauf si celle-ci est dure et propre. Le
gravier, le sable et les autres débris peuvent être aspirés dans
l’entrée d’air et projetés en direction de l’utilisateur ou des
personnes à proximité, ce qui peut entraîner des blessures
graves.
Pour usage domestique seulement.
Retirer le bloc-piles de l’outil lorsqu’on ne l’utilise pas,
avant d’effectuer son entretien ou avant de le ranger.
Ces mesures de sécurité réduisent les risques de démarrage
accidentel de l’outil.
Ne pas travailler sous un éclairage insuffisant.
Ne pas utiliser l’outil pour aspirer des liquides
inflammables ou combustibles tels que l’essence, ni
dans des environnements où ils se trouveraient.
Ne pas aspirer d’éléments qui brûlent ou qui fument
comme des cigarettes, des allumettes ou des cendres
chaudes.
Ne placer aucun objet dans les ouvertures. Ne pas utiliser
le produit si l’une ou l’autre des ouvertures est obstruée.
CONSERVER CES INSTRUCTIONS
Enlever toute la poussière, toutes les peluche et tous les
cheveux, ou tout autre élément pouvant réduire la circulation
de l’air.
Entretenir soigneusement les outils. Veiller à ce que la
zone du ventilateur reste propre pour assurer la meilleure
performance et la plus sécuritaire. Suivre les directives de
l’outil en matière d’entretien adéquat.
Retirer le bloc-piles de l’outil avant d’essayer de dégager
les obstructions.
Les pales en rotation peuvent causer des blessures
graves. Retirer le bloc-piles et s’assurer que les pales de
la turbine ont arrêté de tourner avant d’installer le entrée du
souffleur ou le sac de collecte de feuilles.
Ne jamais utiliser la soufflante sans les accessoires
appropriés installés. Lorsqu’on utilise l’outil comme
souffleur, installer toujours le entrée du souffleur et le tube
inférieur. Lorsqu’on utilise l’outil comme aspirateur, installer
toujours le tube inférieur et le sac de collecte de feuilles.
S’assurer que le sac de collecte de feuilles est installé de
manière adéquate lorsque l’unité fonctionne pour éviter que
des débris soient projetés.
Éviter les situations pouvant mettre le sac de collecte de
feuilles. Ne pas utiliser la machine à proximité de flammes
vives. Ne pas aspirer les cendres chaudes de cheminées,
barbecues, feux de bois, etc. Ne pas aspirer de mégots
de cigares ou cigarettes dont les cendres ne sont pas
complètement froides.
Conserver ces instructions. Les consulter fréquemment et
les utiliser pour instruire les autres utilisateurs éventuels. Si cet
outil est prêté, il doit être accompagné de ces instructions.
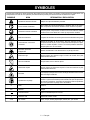
SYMBOLES

5 — Français
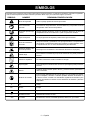
Certains des symboles ci-dessous peuvent être utilisés sur produit. Veiller à les étudier et à apprendre leur signification. Une
interprétation correcte de ces symboles permettra d’utiliser produit plus efficacement et de réduire les risques.
SYMBOLE NOM DÉSIGNATION / EXPLICATION
Symbole d’alerte de sécurité Indique un risque de blessure potentiel.
Lire le manuel d’utilisation Pour réduire les risques de blessures, l’utilisateur doit lire et veiller à
bien comprendre le manuel d’utilisation avant d’utiliser ce produit.
Protection oculaire et auditive
Toujours porter une protection oculaire avec écrans latéraux certifiée
conforme à la norme ANSI Z87.1 ainsi qu’un protection auditive.
Pales de ventilateur
Les pales de ventilateur en rotation peuvent causer des blessures graves
Avertissement concernant
l’humidité
Risque d’incendie et de brûlures. Ne pas exposer la pile, le
compartiment de la pile, ou les composants électroniques à la pluie,
l’eau ou d’autres liquides. Fermer le couvercle pendant l’utilisation.
Ne pas opérer sur un sol humide.
Ne laisser personne
s’approcher Garder les badauds à une distance de 15 m (50 pi) minimum.
Cheveux longs Ne pas garder les cheveux longs à l’écart de l’entrée d’air peut
entraîner des blessures.
Tube de soufflante Ne pas utiliser sans le tube en place.
Vêtements amples Ne pas garder les vêtements amples à l’écart de l’entrée d’air peut
entraîner des blessures.
Ricochet Les objets projetés peuvent ricocher et infliger des blessures ou causer
des dommages matériels.
Symbole de recyclage
Ce produit utilise les piles de lithium-ion (Li-ion). Les réglementations
locales ou gouvernementales peuvent interdire de jeter les piles dans
les ordures ménagères. Consulter les autorités locales compétentes
pour les options de recyclage et/ou l’élimination.
V Volts Tension
min Minutes Temps
Courant continu Type ou caractéristique du courant
n
o
Vitesse à vide Vitesse de rotation à vide
.../min Par minute Tours, coups, vitesse périphérique, orbites, etc., par minute
SYMBOLES
La page est en cours de chargement...
La page est en cours de chargement...
La page est en cours de chargement...
La page est en cours de chargement...
La page est en cours de chargement...
La page est en cours de chargement...
La page est en cours de chargement...
La page est en cours de chargement...
La page est en cours de chargement...
La page est en cours de chargement...
La page est en cours de chargement...
La page est en cours de chargement...
La page est en cours de chargement...
La page est en cours de chargement...
La page est en cours de chargement...
La page est en cours de chargement...
La page est en cours de chargement...
La page est en cours de chargement...
La page est en cours de chargement...
La page est en cours de chargement...
-
 1
1
-
 2
2
-
 3
3
-
 4
4
-
 5
5
-
 6
6
-
 7
7
-
 8
8
-
 9
9
-
 10
10
-
 11
11
-
 12
12
-
 13
13
-
 14
14
-
 15
15
-
 16
16
-
 17
17
-
 18
18
-
 19
19
-
 20
20
-
 21
21
-
 22
22
-
 23
23
-
 24
24
-
 25
25
-
 26
26
-
 27
27
-
 28
28
-
 29
29
-
 30
30
-
 31
31
-
 32
32
-
 33
33
-
 34
34
-
 35
35
-
 36
36
-
 37
37
-
 38
38
-
 39
39
-
 40
40


Ryobi RY404150 Mode d'emploi
- Catégorie
- Souffleurs / sécheurs d'air
- Taper
- Mode d'emploi
dans d''autres langues
- español: Ryobi RY404150 Guía del usuario
Documents connexes
-
Ryobi RY40405 Manuel utilisateur
-
Ryobi RY40451 Le manuel du propriétaire
-
-
-
-
-
-
-
Ryobi RY40450 Le manuel du propriétaire
-