Black & Decker BX4000 Le manuel du propriétaire
- Catégorie
- Mélangeurs
- Taper
- Le manuel du propriétaire

www.blackanddecker.ae
BX430J/BX440G/BX440
BX4000/BX4030
AR FR EN

2
ENGLISH
(Original instructions)
1
2
9
8
3
4
5
6
7

3
ENGLISH
(Original instructions)
Safety instructions
• Warning! When using mains-powered appliances, basic
safety precautions, including the following, should
always be followed to reduce the risk of fire, electric
shock, personal injury and material damage.
• Read all of this manual carefully before using the
appliance.
• The intended use is described in this manual. The use of
any accessory or attachment or the performance of any
operation with this appliance other than those
recommended in this instruction manual may present a
risk of personal injury.
• Retain this manual for future reference.
• Always route the cord carefully so it does not hang over
the edge of a worktop and cannot be caught accidentally
or tripped over.
• Never operate an appliance directly below the
socket-outlet it is connected to.
• If the supply cord is damaged, it must be replaced by the
manufacturer, its service agent or similarly qualified
persons in order to avoid a hazard.
• Use the blender according to this instruction, any misuse
may cause electric shock or other hazards.
Intended use
Your BLACK+DECKER™
BX430J/BX440G/BX440/BX4000/BX4030 blender has been
designed for blending, mixing and crushing of solid and
liquid food and beverage ingredients. This product is
intended for household use only.
This appliance is not to be used in:
• Staff kitchen areas in shops, offices and other working
environments;
• Farm houses;
• By clients in hotels, motels and other residential type
environments;
• Bed and breakfast type environments;
Using your appliance
• Always take care when using the appliance.
• Never pull the power supply cord to disconnect the plug
from the socket. Keep the power supply cord away from
heat, oil and sharp edges.
• Do not place the appliance on or near heat sources or in
a heated oven.
• Avoid spilling water on the Power Base.
• Do not use the appliance near flammable or explosive
materials.
• Do not use the appliance outdoors.
• Operate the appliance only with dry hands.
• If the power supply cord is damaged during use,
disconnect the appliance from the power supply
immediately. Do not touch the power supply cord before
disconnecting from the power supply.
• Disconnect the appliance from the power supply when
not in use, before fitting or removing parts and before
cleaning.
• This appliance is not intended to be operated by means
of an external timer or separate remote-control system.
• The outer surface of the blender may become hot when
in use.
• Allow moving parts to come to a stop before removing
any cover.
• Allow moving parts to come to a stop before
approaching.
• Unit must be attended in use
• Be careful if hot liquid is poured into the food processor
or blender as it can be ejected out of the appliance due to
a sudden steaming.
Safety of others
• This appliance is not intended for use by persons
(including children) with reduced physical, sensory or
mental capabilities, or lack of experience and knowledge,
unless they have been given supervision or instruction
concerning use of the appliance by a person responsible
for their safety.
• Children should be supervised to ensure that they do not
play with the appliance.
• Do not allow children or any person unfamiliar with these
instructions to use the appliance.
• Do not allow children or animals to come near the work
area or to touch the appliance or power supply cord.
• Close supervision is necessary when the appliance is
used near children
After use
• Switch off, remove the plug from the socket and let the
appliance cool down before leaving it unattended and
before changing, cleaning or inspecting any parts of the
appliance.
• When not in use, the appliance should be stored in a dry
place. Children should not have access to stored
appliances.
Inspection and repairs
• Before use, check the appliance for damaged or
defective parts. Check for breakage of parts, damage to
switches and any other conditions that may affect its
operation.
• Do not use the appliance if any part is damaged or
defective.

4
ENGLISH
(Original instructions)
• Have any damaged or defective parts repaired or
replaced by an authorised repair agent.
• Before use, check the power supply cord for signs of
damage, ageing and wear.
• Do not use the appliance if the power supply cord or
mains plug is damaged or defective.
• If the power supply cord or mains plug is damaged or
defective it must be repaired by an authorised repair
agent in order to avoid a hazard. Do not cut the power
supply cord and do not attempt to repair it yourself.
• Never attempt to remove or replace any parts other
than those specified in this manual.
Electrical safety
Your charger is double insulated; therefore no
earth wire is required. Always check that the
mains voltage corresponds to the voltage on
the rating plate. Never attempt to replace the charger unit
with a regular mains plug.
• If the supply cord is damaged, it must be replaced by
the manufacturer or an authorised BLACK+DECKER
Service Centre in order to avoid a hazard.
To avoid the risk of electric shock, do not
immerse the cord, plug or appliance in water
or other liquid.
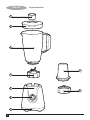
Features
1. Measuring cup
2. Jar cover
3. Jar
4. Blending blade assembly
5. Motor unit
6. Control knob
7. Base
8. Grinding blade assembly
9. Grinding bowl
Before first use
• Remove all packaging from the appliance.
• Clean the appliance before first use.
• Check that all parts are complete and not damaged.
• Choose the appropriate attachment to perform your
desired task:
• The blender attachment is suitable for blending fruits or
vegetables or crushing ice.
• The grinder attachment is for grinding coffee beans.
Warning! The blades are sharp, handle with great care and
ensure that you unplug the appliance from power outlet
before assembling and removing parts.
Blender operation
• Place the motor unit (5) on a flat horizontal surface and
make sure it is unplugged.
• Open the jar cover (2) by turning anticlockwise and place
it on the surface.
• Peel or core the fruits or vegetables and cut into small
pieces, then put them into the jar.
• Add an amount of purified water has to facilitate the
smooth running of the appliance.
• The amount of mixture should not exceed the max level
as indicated on the jar, nor sit lower than the min level.
The best proportion of the fruits or vegetables and water
is 2:3.
Note: The blender is not suitable for beating egg white,
mashing potatoes, mixing dough or extracting juice from fruit
and vegetables.
• Replace jar cover (2) on the jar (3) and turn it clockwise.
• Put the blending blade assembly (4) onto the jar bottom
and then rotate it anticlockwise to fix it onto the jar (3).
• Place the jar (3) onto the motor unit (5) and then rotate it
clockwise until it is fixed tightly onto the motor unit.
Note: There is a safety interlock device at the bottom of the
jar, if the jar is not assembled in place, the blender will not
operate.
• You may add ingredients into the jar (3) through the
center opening of the jar cover (2) during operation, then
replace the measuring cup (1) into position.
• Make sure that the Control Knob (6) is set to “O” position,
then connect the appliance to the power outlet.
• Turn Control Knob (6) to select your desired setting, the
appliance will start blending. During blending, you can
turn the Control Knob to “Pulse” position without
releasing it if you want to accelerate the process of
blending.
Note: Make sure the jar cover (2) is placed in position
completely before operation, and never open the jar cover (2)
during operation.
Note: Do not run the appliance for more than 3 minutes per
time, and wait until the unit is cooled to room temperature
before performing next operation cycle.
• Turn the Control Knob (6) to “O” position once the
mixture has been blended to your desired consistency.
• Turn the jar (3) anti-clockwise and remove it from the
motor unit (5), carefully remove the jar cover (2), then
pour and serve.

Grinder operation
• Place the motor unit (5) on a flat horizontal surface and
make sure it is unplugged.
• Fill the grinding bowl (9) with coffee beans, and then put
the grinding blade assembly (8) onto the grinding bowl
bottom and rotate it anticlockwise to fix it onto the
grinding bowl (9).
Note: The maximum quantity of coffee beans the grinding
bowl allows to grind is 50g.
• Assemble the grinder attachment (8) onto the motor unit.
Note: There is a safety interlock device at the bottom of
motor unit, if the grinder is not assembled in place, the
grinder will not operate.
• Make sure that the Control Knob (6) is set to the “O”
position before operation, then connect the appliance to
the power outlet.
• Select the desired speed setting on the Control Knob
(6), the appliance will start to grind. During grinding, you
can turn the Control Knob (6) to “Pulse” position without
releasing it if you want to accelerate the process of
grinding.
• Disconnect from the power supply once finished. And
then disassemble the grinder attachment from the unit,
keep the grinding bowl downward and turn it
anticlockwise, then empty the bowl and serve.
Note: Do not run the appliance for more than 30 second per
time, and wait until the unit is cooled to room temperature
before performing next operation cycle.
Cleaning and Maintenance
Before performing any maintenance:
• Switch off and disconnect from the mains supply.
• Wait for the appliance to completely cool down.
Warning! Do not immerse the appliance, the base, the cord
set or the plug in water or any other liquid.
• Wipe the exterior with a damp cloth.
• Do not use scouring pads.
• If necessary, use a mild detergent to remove spots.
• Do not use any abrasive or solvent based cleaner.
• Do not immerse the power base in water or any other
liquid.
CAUTION: Ensure that the blender is switched off before
removing it from the stand.
5
ENGLISH
(Original instructions)
For blender attachment:
The Auto Clean function can clean the blender easily and
rapidly in complete safety.
• Pour a little warm soapy water into the jar (3) and turn the
Control Knob (6) to “1” position and run the appliance for
a few seconds.
• Dissemble the jar from the motor unit and rinse it under
running water, then detach the blending blade assembly
from the jar assembly, detach the measure cup from the
jar cover. Finally, rinse the jar, blending blade assembly,
jar cover and measuring cup under running water.
• Dry all parts and then assemble them.
For grinder attachment:
• Rotate the grinding blade assembly clockwise to detach it
from the grinding bowl, and then rinse the grinding blade
assembly and the grinding bowl under running water.
• Dry all parts and then assemble them.
Mains plug replacement
If a new mains plug needs to be fitted:
• Safely dispose of the old plug.
• Connect the brown lead to the live terminal in the new
plug.
• Connect the blue lead to the neutral terminal.
• If the product is class I (earthed), connect the
green/yellow lead to the earth terminal
Note! If your product is class II double insulated (only 2 wires
in the cord set), no connection is to be made to the earth
terminal.
Follow the fitting instructions supplied with good quality plugs.
Any replacement fuse must be of the same rating as the
original fuse supplied with the product.
Warning! The above section on mains plug replacement is
for authorized service centre persons.

6
ENGLISH
(Original instructions)
Protecting the environment
Separate collection. This product must not be
disposed of with normal household waste.
Should you find one day that your BLACK+DECKER product
needs replacement, or if it is of no further use to you, do not
dispose of it with other household waste. Make this product
available for separate collection.
• BLACK+DECKER provides a facility for recycling
BLACK+DECKER products once they have reached the
end of their working life. This service is provided free of
charge. To take advantage of this service please return
your product to any authorised repair agent who will
collect them on our behalf.
• You can check the location of your nearest authorised
repair agent by contacting your local BLACK+DECKER
office at the address indicated in this manual.
Alternatively, a list of authorized BLACK+DECKER
repair agents and full details of our after-sales service
and contact are available on the Internet at:
www.2helpU.com.
Warranty
BLACK+DECKER is confident of the quality of its products
and offers an outstanding warranty.
This warranty statement is in addition to and in no way
prejudices your statutory rights.
If a BLACK+DECKER product becomes defective due to
faulty materials, workmanship or lack of conformity, within 24
months from the date of purchase, BLACK+DECKER
warranty to replace defective parts, repair products
subjected to fair wear and tear or replace such products to
ensure minimum inconvenience to the customer unless:
The product has been used for trade, professional or
hire purposes;
The product has been subjected to misuse or neglect;
The product has sustained damage through foreign
objects, substances or accidents;
Repairs have been attempted by persons other than
authorised repair agents or BLACK+DECKER service
staff.
To claim on the warranty, you will need to submit proof of
purchase to the seller or an authorised repair agent. You can
check the location of your nearest authorised repair agent by
contacting your local BLACK+DECKER office at the address
indicated in this manual.
Alternatively, a list of authorised BLACK+DECKER repair
agents and full details of our after-sales service and contacts
are available on the Internet at: www.2helpU.com.
Voltage/Frequency 220-240V ~ 50-60Hz
Power input 400W
Technical Data
BX430J/BX440G/
BX440/BX4000/BX4030
BX430J 2 1
BX440G 1 (glass) 2
BX440 1 2
BX4000 1 2
BX4030 1 1
Product
Quantity
Blender Jar Grinder

7
FRANÇAIS
(Traduction des instructions d'origine)
Consignes de sécurité
• Avertissement ! L’utilisation d’appareils électriques
requiert le respect des consignes de sécurité de base,
notamment celles qui sont indiquées ci-après, afin de
réduire le risque d’incendie, d’électrocution, de blessure
corporelle et de dégâts matériels.
• Lisez attentivement ce manuel dans son intégralité
avant d’utiliser l’appareil.
• L’usage prévu est décrit dans le présent manuel.
L’utilisation d’un accessoire ou d’une pièce jointe ou
l’exécution de toute opération avec cet appareil autre
que celles qui sont recommandées dans ce mode
d’emploi peuvent présenter un risque de blessure.
• Conservez ce manuel à titre de référence.
• Placez toujours le cordon avec précaution, afin qu’il ne
pende pas du bord d’un plan de travail et d’éviter tout
accrochage et trébuchement accidentels.
• Ne faites jamais fonctionner un appareil directement en
dessous de la prise de courant sur laquelle il est
branché.
• Si le cordon d’alimentation est endommagé, faites-le
remplacer par le fabricant, un agent de service agréé ou
toute autre personne avec les mêmes qualifications afin
d’éviter tout danger.
• Utilisez le mixeur conformément à ces instructions.
Toute mauvaise utilisation peut entraîner un choc
électrique ou d’autres dangers.
Usage prévu
Votre mixeur BLACK+DECKER™
BX430J/BX440G/BX440/BX4000/BX4030 a été conçu pour
mélanger, mixer et broyer des aliments solides et liquides et
des ingrédients de boissons. Ce produit est destiné à un
usage domestique uniquement.
Cet appareil ne doit pas être utilisé :
• dans les cuisines pour les employés de boutiques, de
bureaux et d’autres environnements professionnels ;
• dans les fermes ;
• par les clients d’hôtels, de motels et autres
environnements de type résidentiel ;
• dans des environnements du type petit-déjeuner au lit.
Utilisation de l’appareil
• Utilisez toujours l’appareil avec précaution.
• Ne tirez jamais sur le cordon d’alimentation pour
débrancher la fiche du secteur. Maintenez le cordon
d’alimentation à l’écart des sources de chaleur, de l’huile
et des bords tranchants.
• Ne posez pas l’appareil sur ou à proximité de sources
de chaleur ou directement à l’intérieur d’une cuisinière
en marche.
• Évitez de répandre de l’eau sur le socle d’alimentation.
• N’utilisez pas l’appareil à proximité de matières
inflammables ou explosives.
• N’utilisez pas l’appareil à l’extérieur.
• Faites fonctionner l’appareil uniquement avec les mains
sèches.
• Si le cordon d’alimentation est endommagé pendant
l’utilisation, débranchez immédiatement l’appareil. Ne
touchez pas le cordon d’alimentation avant de le
débrancher.
• Débranchez l’appareil avant le montage/démontage et le
nettoyage des pièces.
• Cet appareil n’a pas été conçu pour fonctionner au
moyen d’une minuterie externe ou d’un système de
télécommande séparé.
• La surface extérieure du mixeur peut devenir très chaude
durant l’utilisation.
• Veillez toujours à attendre l’arrêt total des pièces en
mouvement avant de retirer le couvercle.
• Veillez toujours à attendre l’arrêt total des pièces en
mouvement avant de vous approcher de l’appareil.
• L’appareil doit être surveillé durant son utilisation
• Faites preuve de prudence lorsque vous versez un
liquide chaud dans le robot ou le mixeur, car il peut être
éjecté hors de l’appareil à cause d’une production
soudaine de vapeur.
Sécurité d’autrui
• Cet appareil n’est pas prévu pour être utilisé par des
personnes (y compris les enfants) présentant des
capacités physiques, sensorielles ou mentales réduites,
ou manquant d’expérience et de connaissances, sans
surveillance ou sans avoir reçu d’instructions concernant
l’utilisation de l’appareil de la part d’une personne
responsable de leur sécurité.
• Les enfants doivent être surveillés pour s’assurer qu’ils
ne jouent pas avec l’appareil.
• Ne laissez pas les enfants et les personnes non
familiarisées avec ces instructions utiliser cet appareil.
• Ne laissez pas les enfants ou les animaux s’approcher
de la zone de travail ou toucher l’appareil ou le cordon
d’alimentation.
• Lorsque l’appareil est utilisé à proximité d’enfants, une
surveillance étroite doit être exercée.
Après utilisation
• Éteignez et débranchez la fiche du secteur et laissez
l’appareil refroidir avant de le laisser sans surveillance et
avant d’en remplacer, nettoyer ou inspecter les pièces.
• Lorsqu’il n’est pas utilisé, l’appareil doit être rangé à un
endroit sec. L’appareil doit être rangé hors de portée des
enfants.
Inspection et réparations
• Avant d’utiliser l’appareil, vérifiez qu’aucune pièce n’est
endommagée ou défectueuse. Vérifiez si des pièces ne
sont pas cassées, si des interrupteurs ne sont pas
endommagés, et toutes les autres conditions qui peuvent
affecter son fonctionnement.
• N’utilisez pas l’appareil si une pièce est endommagée ou
défectueuse.

08
FRANÇAIS
(Traduction des instructions d'origine)
• Faites réparer ou remplacer les pièces endommagées
ou défectueuses par un agent de service agréé.
• Avant l’utilisation, vérifiez que le cordon d’alimentation
ne présente pas de signes de dommages, de
vieillissement et d’usure.
• N’utilisez pas l’appareil si la fiche ou le cordon
d’alimentation est endommagé ou défectueux.
• Si la fiche ou le cordon d’alimentation est endommagé
ou défectueux, sa réparation doit être effectuée par un
agent de réparation agréé afin d’éviter tout danger. Ne
coupez pas le cordon d’alimentation et n’essayez pas de
le réparer par vos propres moyens.
• N’essayez jamais de retirer ou de remplacer des pièces
différentes de celles qui sont indiquées dans le présent
manuel.
Sécurité électrique
Votre chargeur dispose d’une double isolation
; par conséquent, aucun fil de terre n’est
nécessaire. Vérifiez toujours que la tension
secteur correspond à celle de la plaque
signalétique. N’essayez jamais de remplacer le chargeur
par une fiche secteur principale.
• Si le cordon d’alimentation est abîmé, il doit être
remplacé par le fabricant ou un centre de services agréé
BLACK+DECKER afin d’éviter tout danger.
Pour éviter le risque d’électrocution, ne
plongez pas le cordon, la fiche ou l’appareil
dans de l’eau ou tout autre liquide.
Caractéristiques
1. Doseur
2. Couvercle
3. Cruche
4. Lame de mixage
5. Bloc moteur
6. Bouton de commande
7. Base
8. Lame de broyage
9. Récipient de broyage
Avant la première utilisation
• Déballez complètement l’appareil.
• Nettoyez l’appareil avant la première utilisation.
• Vérifiez que toutes les pièces sont complètes et
qu’aucune n’est endommagée.
• Choisissez l’accessoire approprié pour exécuter la tâche
désirée :
• L’accessoire de mixage sert à mixer des fruits, des
légumes ou de la glace pilée.
• L’accessoire de broyage sert à broyer des grains de café.
Avertissement ! Les lames sont tranchantes. Manipulez-les
avec grand soin et assurez-vous de débrancher l’appareil du
secteur avec d’assembler ou de retirer des accessoires.
Fonctionnement du mixeur
• Placez le bloc moteur (5) sur une surface horizontale
plate et assurez-vous qu’il est débranché.
• Ouvrez le couvercle (2) en le tournant dans le sens
antihoraire et placez-le sur la surface.
• Pelez ou enlevez le cœur des fruits ou légumes,
coupez-les en petits morceaux, puis mettez-les dans la
cruche.
• Ajoutez de l’eau purifiée pour faciliter le bon
fonctionnement de l’appareil.
• La quantité de mélange ne doit ni dépasser le niveau
maximal indiqué sur la cruche, ni être inférieure au
niveau minimal. La meilleure proportion de fruits ou de
légumes et d’eau est de 2/3.
Remarque : Le mixeur n’est pas adapté au battage de blanc
d’œuf, à la purée de pommes de terre, au malaxage de pâte
ou à l’extraction du jus de fruits et de légumes.
• Replacez le couvercle (2) sur la cruche (3) et tournez-le
dans le sens horaire.
• Assemblez la lame de mixage (4) au bas de la cruche et
tournez-la dans le sens antihoraire pour l’attacher à la
cruche (3).
• Placez la cruche (3) sur le bloc moteur (5) et tournez-la
dans le sens horaire jusqu’à ce qu’elle soit attachée au
bloc moteur.
Remarque : Il y a un dispositif de verrouillage de sécurité au
fond de la cruche afin que le mixeur ne puisse fonctionner
tant que la cruche n’est pas correctement en place.
• Vous pouvez ajouter des ingrédients dans la cruche (3)
par l’ouverture centrale dans le couvercle (2) durant le
mixage, puis replacez le doseur (1) en position.
• Assurez-vous que le bouton de commande (6) est réglé
sur la position « O », puis branchez l’appareil sur le
secteur.
• Tournez le bouton de commande (6) pour sélectionner le
réglage désiré, l’appareil va commencer le mixage.
Durant le mixage, vous pouvez tourner le bouton de
commande dans la position « Pulse » sans le relâcher si
vous voulez accélérer le processus de mixage.
Remarque : Assurez-vous que le couvercle (2) est
parfaitement fermé avant de mettre en marche l’appareil, et
n’ouvrez jamais le couvercle (2) durant son fonctionnement.

09
FRANÇAIS
(Traduction des instructions d'origine)
Remarque : N’utilisez pas l’appareil pendant plus de 3
minutes à la fois, et attendez que l’appareil refroidisse à la
température ambiante avant de l’utiliser à nouveau.
• Tournez le bouton de commande (6) dans la position «
O » une fois que le mélange a la consistance désirée.
• Tournez la cruche (3) dans le sens antihoraire et
retirez-la du bloc moteur (5), puis retirez le couvercle (2)
avec précaution pour verser et servir.
Fonctionnement du broyeur
• Placez le bloc moteur (5) sur une surface horizontale
plate et assurez-vous qu’il est débranché.
• Remplissez le récipient de broyage (9) avec des grains
de café, puis placez la lame de broyage (8) sur le bas
du récipient et tournez-la dans le sens antihoraire pour
l’attacher au récipient de broyage (9).
Remarque : La quantité maximale de grains de café que
vous pouvez broyer dans le récipient de broyage est de 50 g.
• Assemblez la lame de broyage (8) sur le bloc moteur.
Remarque : Il y a un dispositif de verrouillage de sécurité au
fond du bloc moteur pour que le broyeur ne puisse
fonctionner tant qu’il n’est pas correctement en place.
• Assurez-vous que le bouton de commande (6) est réglé
sur la position « O » avant d’utiliser l’appareil, puis
branchez l’appareil sur le secteur.
• Sélectionnez la vitesse désirée à l’aide du bouton de
commande (6), l’appareil commence alors à broyer.
Durant le broyage, vous pouvez tourner le bouton de
commande (6) dans la position « Pulse » sans le
relâcher si vous voulez accélérer le processus de
broyage.
• Débranchez l’appareil de l’alimentation une fois terminé.
Puis démontez l’accessoire de broyage du bloc moteur.
En gardant le récipient de broyage orienté vers le bas,
tournez-le dans le sens antihoraire, puis videz le
récipient et servez.
Remarque : N’utilisez pas l’appareil pendant plus de 30
secondes à la fois, et attendez que l’appareil refroidisse à la
température ambiante avant de l’utiliser à nouveau.
Nettoyage et entretien
Avant d’effectuer toute opération d’entretien :
• Mettez l’appareil hors tension et débranchez-le du
secteur.
• Laissez l’appareil se refroidir complètement.
Avertissement ! Ne plongez pas l’appareil, le socle ou le
cordon ou la fiche dans l’eau ou tout autre liquide.
• Essuyez les surfaces extérieures avec un chiffon
humide.
• N’utilisez pas d’éponge à récurer.
• En cas de besoin, utilisez un détergent doux pour retirer
les taches.
• N’utilisez pas d’agent nettoyant abrasif ou à base de
solvant.
• Ne plongez pas la base de l’appareil et le bloc moteur
dans de l’eau ou tout autre liquide.
ATTENTION : Vérifiez que la cruche de mixage est éteinte
avant de la retirer du support.
Accessoires de mixage :
• La fonction de nettoyage automatique peut nettoyer la
lame facilement et rapidement en toute sécurité.
• Versez un peu d’eau savonneuse chaude dans la cruche
(3), tournez le bouton de commande (6) sur « 1 » et
utilisez l’appareil pendant quelques secondes.
• Démontez la cruche du bloc moteur et rincez-la sous
l’eau courante, puis détachez la lame de mixage de la
cruche et le doseur du couvercle. Finalement, rincez la
cruche, la lame de mixage, le couvercle et le doseur sous
l’eau courante.
• Séchez toutes les pièces puis assemblez-les.
Accessoires de broyage :
• Faites tourner la lame de broyage dans le sens horaire
pour la détacher du récipient de broyage, puis rincez la
lame de broyage et le récipient de broyage sous l’eau
courante.
• Séchez toutes les pièces puis assemblez-les.
Changement de la fiche
En cas de besoin de montage d’une nouvelle fiche :
• Mettez dûment l’ancienne fiche au rebut.
• Connectez le fil marron à la borne sous tension de la
nouvelle fiche.
• Connectez le fil bleu à la borne neutre.
• Si le produit est de classe I (mis à la terre), connectez le
fil vert/jaune à la borne de terre.
Remarque ! Si vous disposez d’un produit à double isolation
de classe II (2 fils uniquement dans le cordon), aucun
raccordement à la borne de terre n’est nécessaire.
Suivez les consignes d’installation fournies avec les fiches de
bonne qualité. Tout fusible de rechange doit avoir les mêmes
caractéristiques nominales que le fusible d’origine fourni avec
le produit.
Avertissement ! La section ci-dessus concernant le
remplacement de la fiche électrique s’adresse au personnel
des centres de service agréés.

Garantie
BLACK+DECKER est confiant dans la qualité de ses
produits et vous offre une garantie très étendue.
Ce certificat de garantie est un document supplémentaire et
ne peut en aucun cas se substituer à vos droits légaux.
Si un produit BLACK+DECKER s'avère défectueux en
raison de matériaux en mauvaises conditions, d'une erreur
humaine, ou d'un manque de conformité dans les 24 mois
suivant la date d'achat, BLACK+DECKER garantit le
remplacement des pièces défectueuses, la réparation des
produits usés ou cassés ou remplace ces produits à la
convenance du client, sauf dans les circonstances
suivantes:
Le produit a été utilisé dans un but commercial,
professionnel, ou a été loué.
Le produit a été mal utilisé ou avec négligence.
Le produit a subi des dommages à cause d'objets
étrangers, de substances ou à cause d'accidents.
Des réparations ont été tentées par des techniciens ne
faisant pas partie du service technique de
BLACK+DECKER
Pour avoir recours à la garantie, il est nécessaire de fournir
une preuve d'achat au vendeur ou à un réparateur agréé.
Pour connaître l'adresse du réparateur agréé le plus proche
de chez vous, contactez le bureau BLACK+DECKER à
l'adresse indiquée dans ce manuel.
Vous pourrez aussi trouver une liste des réparateurs agréés
de BLACK+DECKER et de plus amples détails sur notre
service après-vente sur le site Internet à l'adresse suivante :
www.2helpU.com
10
FRANÇAIS
(Traduction des instructions d'origine)
Protection de l'environnement
Collecte séparée. Ce produit ne doit pas être jeté
avec les déchets domestiques normaux.
Si vous décidez de remplacer ce produit BLACK+DECKER,
ou si vous n'en avez plus l'utilité, ne le jetez pas avec vos
déchets domestiques Rendez-le disponible pour une
collecte séparée.
• BLACK+DECKER fournit un dispositif permettant de
collecter et de recycler les produits BLACK+DECKER
lorsqu'ils ont atteint la fin de leur cycle de vie. Pour
pouvoir profiter de ce service, veuillez retourner votre
produit à un réparateur agréé qui se chargera de le
collecter pour nous.
• Pour connaître l'adresse du réparateur agréé le plus
proche de chez vous, contactez le bureau
BLACK+DECKER à l'adresse indiquée dans ce manuel.
Vous pourrez aussi trouvez un liste des réparateurs
agréés de BLACK+DECKER et de plus amples détails
sur notre service après-vente sur le site Internet à
l'adresse suivante : www.2helpU.com
Caractéristiques techniques
Tension/Fréquence 220-240V ~ 50-60Hz
Alimentation électrique 400W
BX430J/BX440G/
BX440/BX4000/BX4030
BX430J 2 1
BX440G 1 (verre) 2
BX440 1 2
BX4000 1 2
BX4030 1 1
Produit
Quantité
Cruche de mixage Broyeur

11
ﺔـﻴـﺑﺮـﻌـﻟﺍ
(ﺔﻴﺴﻴﺋﺮﻟﺍ ﺕﺎﻤﻴﻠﻌﺘﻟﺍ)
.áÑjòe hCG ᣰTÉc äÉضæe …CG Ωóîà°ùJ ’ •
.ôNBG πFÉ°S …CG ‘ hCG AÉŸG ‘ AÉHô¡µdG π«°UƒJ IóYÉb ¢ùª¨J ’ •
á°üæŸG ≈∏Y øe ¬àdGREG πÑb •ÓÿG ±É≤jEG ” ¬fCG ócCÉJ :ôjò–
:•ÓÿG ≥ë∏à ¢UÉN
¿ÉeCÉH áYöùHh ádƒ¡°ùH •ÓÿG »JGòdG ∞«¶æàdG áØ«Xh ∞¶æJ ¿CG øµÁ
.ΩÉJ
ºµëàdG ìÉàØe QOCGh (3) AÉYƒdG ‘ ÅaGódG AÉŸG øe
k
Ó«∏b Öµ°SG •
.
m
¿GƒK á©°†Ñd RÉ¡÷G π¨°Th “1” ™°VƒdG ¤EG (6)
ºb ºK ,
p
QÉ÷G AÉŸG πØ°SCG ¬Ø£°TGh ∑ôëŸG IóMh øe AÉYƒdG ∂ØH ºb •
܃c πëH ºbh ,AÉYƒdG áYƒª› øe §∏ÿG IôØ°T áYƒª› πëH
áYƒª›h AÉYƒdG ∞£°TG ,ájÉ¡ædG ‘ .AÉYƒdG AÉ£Z øe IôjÉ©ŸG
.
p
QÉ÷G AÉŸG πØ°SCG IôjÉ©ŸG ܃ch AÉYƒdG AÉ£Zh §∏ÿG IôØ°T
.É¡ÑcQh AGõLC’G áaÉc ∞«ØéàH ºb •
:áæ룟G ≥ë∏à ¢UÉN
¢SCÉc øY É¡∏◊ áYÉ°ùdG ÜQÉ≤Y √ÉŒÉH øë£dG IôØ°T áYƒª› QOCG •
AÉŸG πØ°SCG øë£dG ¢SCÉch øë£dG IôØ°T áYƒª› ∞£°TG ºK ,§∏ÿG
.
p
QÉ÷G
.É¡ÑcQh AGõLC’G áaÉc ∞«ØéàH ºb •
AÉHô¡µdG ¢ùHÉb ∫GóÑà°SG
:ójóL AÉHô¡c ¢ùHÉb Ö«côJ ¤EG áLÉ◊G ádÉM ‘
.áæeBG á≤jô£H Ëó≤dG ¢ùHÉ≤dG øe ¢ü∏îJ •
.ójó÷G ¢ùHÉ≤dG ‘ »◊G ±ô£dÉH »æÑdG ∂∏°ùdG π«°UƒàH ºb •
.ójÉëŸG ±ô£dÉH ¥QRC’G ∂∏°ùdG π°UhCG •
/ö†NC’G ∂∏°ùdG π«°UƒàH ºb ,(
k
É°VQDƒe) 1 áÄØdG èàæŸG ¿Éc GPEG •
.»°VQC’G ±ô£dÉH ôØ°UC’G
) ÚàdRÉY Úà≤Ñ£H
k
GOhõe á«fÉãdG áLQódG øe RÉ¡÷G ¿Éc GPEG !á¶MÓe
±ô£dÉH π«°UƒàdG ºàj ’ ,(§≤a ¿ÉæKG ¿ÉaôW πHɵdG πNGO óLƒj
.»°VQC’G
¿CG Öéj .IOƒ÷G á«dÉY ¢ùHGƒ≤dG ™e á≤aôŸG Ö«cÎdG äɪ«∏©J ™ÑJG
™e ≥aôŸG »∏°UC’G ô¡°üŸG ∞«æ°üJ ¢ùØf ≈∏Y ∫óÑà°ùŸG ô¡°üŸG ¿ƒµj
.èàæŸG
»°ù«FôdG πHɵdG ¢ùHÉb ∫GóÑà°SG ¢Uƒ°üîH á≤HÉ°ùdG äɪ«∏©àdG !ôjò–
.§≤a óªà©ŸG áeóÿG õcôe »ØXƒÃ á°UÉN
áÄ«ÑdG ájɪM
™e èàæŸG Gòg øe ¢ü∏îàdG ΩóY Ωõ∏j .π°üØæŸG ™ª÷G
.ájOÉ©dG á«dõæŸG áeɪ≤dG
èàæe ∫GóÑà°SG ΩÉjC’G øe Ωƒj ‘ Ωõd GPEG
Óa ,¬eóîà°ùJ ó©J ⁄ GPEG hCG ,∂H ¢UÉÿG
BLACK+DECKER
Gòg áMÉJEG øe ócCÉJ πH ,iôNC’G á«dõæŸG áeɪ≤dG ™e ¬æe ¢ü∏îàJ
.π°üØæŸG ™ªé∏d èàæŸG
ôjhóJ IOÉYE’ ≥aôe
BLACK+DECKER ácöT ôaƒJ •
ájÉ¡f ¤EG É¡dƒ°Uh Oôéà BLACK+DECKER äÉéàæe
.É
k
fÉ› áeóÿG √òg Ëó≤J ºàjh .πª©∏d É¡à«MÓ°U ΩóYh ÉgôªY
π«ch …CG ¤EG èàæŸG IOÉYEG ≈Lôj ,áeóÿG √òg øe IOÉØà°SÓd
áHÉ«f äÉéàæŸG ™ªL √QhóH ¤ƒàj ±ƒ°S …òdGh óªà©e áfÉ«°U
.ÉæY
∫ÓN øe óªà©e áfÉ«°U π«ch ÜôbCG ™bƒe ≈∏Y ±ô©àdG ∂æµÁ •
¿Gƒæ©dG ‘ »∏ëŸG
BLACK+DECKER Öàµe ≈∏Y ∫É°üJ’G
áfÉ«°üdG AÓcƒH áªFÉb óLƒJ ,∂dP øe
k
’óHh .π«dódG Gòg ‘ í°VƒŸG
π«°UÉØàdGh BLACK+DECKER ácöûd Ú©HÉàdG øjóªà©ŸG
≈∏Y ÉæH á°UÉÿG ∫É°üJ’G πFÉ°Shh ™«ÑdG ó©H Ée äÉeóÿ á∏eɵdG
.www.2helpU.com :ÊhεdE’G ™bƒŸG ≈∏Y âfÎfE’G
á«æØdG äÉfÉ«ÑdG
¿Éª°†d
É
k
fɪ°V ¢Vô©Jh É¡JÉéàæe IOƒL ‘ BLACK+DECKER ≥ãJ
.πLC’G πjƒW
’h ¿ƒfÉ≤dG É¡ëæÁ »àdG ∂bƒ≤M ¤EG áaÉ°VE’ÉH ¿ƒµj Gòg ¿Éª°†dG ¿É«H
.∫GƒMC’G øe ∫ÉM …CÉH É¡H πîj
‘ Ö«Y ÖÑ°ùH
BLACK+DECKER èàæe ‘ π∏N OƒLh ádÉM ‘
ïjQÉJ øe G
k
ô¡°T 24 ∫ÓN ,ÒjÉ©ŸG ™e ≥aGƒàdG ΩóY hCG áYÉæ°üdG hCG OGƒŸG
áÑ«©ŸG AGõLC’G ∫GóÑà°SG
BLACK+DECKER øª°†J ,AGöûdG
√òg ∫GóÑà°SG hCG »©«Ñ£dG ≈∏ÑdGh πcBÉàdG IÉYGôe ™e äÉéàæŸG ìÓ°UEGh
:⁄ Ée 𫪩∏d êÉYREG πbCG ¿Éª°†d äÉéàæŸG
;ÒLCÉJ ¢VGôZCG hCG á«æ¡e hCG ájQÉŒ ¢VGôZCG ‘ èàæŸG ΩGóîà°SG ºàj
;∫ɪgE’G hCG ΩGóîà°S’G Aƒ°ùd èàæŸG ¢Vô©àj
;çOGƒM hCG áÑjôZ OGƒe hCG AÉ«°TCG áé«àf ∞∏à∏d èàæŸG ¢Vô©àj
áfÉ«°üdG AÓch ÒZ ¢UÉî°TCG ᣰSGƒH èàæŸG ìÓ°UEG ádhÉfi ºàj
ácöûd ™HÉàdG áfÉ«°üdG ≥jôa hCG øjóªà©ŸG
.
BLACK+DECKER
AGöûdG π«dO Ëó≤J ¤EG êÉà– ±ƒ°S ,¿Éª°†dG ÖLƒÃ áÑdÉ£e Ëó≤àd
π«ch ÜôbCG ™bƒe ≈∏Y ±ô©àdG ∂æµÁh .óªà©ŸG áfÉ«°üdG π«ch hCG ™FÉÑ∏d
BLACK+DECKER Öàµe ≈∏Y ∫É°üJ’G ∫ÓN øe óªà©e áfÉ«°U
.π«dódG Gòg ‘ í°VƒŸG ¿Gƒæ©dG ‘ »∏ëŸG
ácöûd Ú©HÉàdG øjóªà©ŸG áfÉ«°üdG AÓcƒH áªFÉb óLƒJ ,∂dP øe
k
’óHh
™«ÑdG ó©H Ée äÉeóÿ á∏eɵdG π«°UÉØàdGh
BLACK+DECKER
:ÊhεdE’G ™bƒŸG ≈∏Y âfÎfE’G ≈∏Y ÉæH á°UÉÿG ∫É°üJ’G πFÉ°Shh
www.2helpU.com
1 2 BX430J
2 1 (»LÉLR AÉYh ) BX440G
2 1 BX440
2 1 BX4000
1 1 BX4030
RÉ¡L
᫪c
OOÎdG / »FÉHô¡µdG ó¡÷G
õJôg50-60Hz ~ âdƒa 220-240
äGh 400 ábÉ£dG πNO
BX430J/BX440G/
BX440/BX4000/BX4030
áfƒMÉW
AÉYh

12
ﺔـﻴـﺑﺮـﻌـﻟﺍ
(ﺔﻴﺴﻴﺋﺮﻟﺍ ﺕﺎﻤﻴﻠﻌﺘﻟﺍ)
hCG ™æ°ü
o
ŸG πÑb øe ¬dGóÑà°SG Öéj ,AÉHô¡µdG ∂∏°S ∞∏J ádÉM ‘ •
Öæéàd
BLACK+DECKER øe óªà©e áeóN õcôe …CG
.ôWÉîŸG
ôª¨J ’ ,á«FÉHô¡c áeó°üd ¢Vô©àdG ô£N Öæéàd
.ôNBG πFÉ°S …CG hCG AÉŸG ‘ RÉ¡÷G hCG ¢ùHÉ≤dG hCG ∂∏°ùdG
äÉØ°UGƒŸG
IôjÉ©e ܃c .1
AÉYƒdG AÉ£Z .2
AÉYh .3
§∏ÿG IôØ°T áYƒª› .4
∑ôëŸG IóMh .5
ºµëàdG ìÉàØe .6
IóYÉ≤dG .7
øë£dG IôØ°T áYƒª› .8
øë£dG ¢SCÉc .9
ΩGóîà°SG ∫hCG πÑb
.IƒÑ©dG øe πeɵdÉH RÉ¡÷G êôNCG •
.Iôe ∫hC’ ΩGóîà°S’G πÑb RÉ¡÷G ∞¶f •
.áØdÉJ â°ù«dh á∏eÉc AGõLC’G πc ¿CG øe ≥≤– •
:áHƒ∏£ŸG ᪡ŸG AGOC’ Ö°SÉæŸG ≥ë∏ŸG QÉàNG •
.è∏ãdG ¢TôL hCG äGhGö†ÿG hCG ¬cGƒØdG §∏ÿ Ö°SÉæe •ÓÿG ≥ë∏e •
.Iƒ¡≤dG ܃ÑM øë£d ó©e áæ룟G ≥ë∏e •
∂fCG ócCÉJh á≤FÉa ájÉæ©H É¡©e πeÉ©J Gò¡dh ,IOÉM äGôØ°ûdG ¿EG !ôjò–
.AGõLC’G ádGREG hCG ™«ªŒ πÑb AÉHô¡µdG òNCÉe øY RÉ¡÷G π°üØH âªb
•ÓÿG 𫨰ûJ
¢ùHÉ≤dG ¿CG ócCÉJh
m
ƒà°ùe »≤aCG í£°S ≈∏Y (5) ∑ôëŸG IóMh ™°V •
.´hõæe
áYÉ°ùdG ÜQÉ≤Y ¢ùµY √ôjhóJ ᣰSGƒH (2) AÉYƒdG AÉ£Z íàaG •
.í£°ùdG ≈∏Y ¬©°Vh
,IÒ¨°U AGõLC’ É¡©£bGh äGhGö†ÿG hCG á¡cÉØdG Öd ∫RCG hCG öûb •
.AÉYƒdG ‘ É¡©°V ºK
¢ù∏°ùdG 𫨰ûàdG á«∏ªY π«¡°ùàd »≤ædG AÉŸG øe ᫪c ∞°VCG •
.RÉ¡é∏d
≈∏Y ¬«dEG QÉ°û
o
ŸG ≈°übC’G ó◊G èjõŸG ᫪c ió©àJ ’CG Öéj •
hCG á¡cÉØ∏d á«°ùf π°†aCG .≈fOC’G ó◊G øY π≤J ’h ,IƒÑ©dG
.2:3 »g AÉŸG ™e äGhGö†ÿG
¢ùWÉ£ÑdG ¢Sôg hCG ¢†«ÑdG ¢VÉ«H ≥Øÿ Ö°SÉæe ÒZ •ÓÿG :á¶MÓe
.äGhGö†ÿG hCG á¡cÉØdG øe Ò°ü©dG ¢UÓîà°SG hCG Úé©dG §∏N hCG
ÜQÉ≤Y √ÉŒÉH √QOCGh (3) AÉYƒdG ≈∏Y (2) AÉYƒdG AÉ£Z ™°Vh óYCG •
.áYÉ°ùdG
¢ùµY ÉgQOCG ºK AÉYƒdG πØ°SCG (4) §∏ÿG IôØ°T áYƒª› ™°V •
.(3) AÉYƒdG ‘ É¡à«Ñãàd áYÉ°ùdG ÜQÉ≤Y
ÜQÉ≤Y √ÉŒÉH √QOCG ºK (5) ∑ôëŸG IóMh ≈∏Y (3) AÉYƒdG ™°V •
.∑ôëŸG IóMh ≈∏Y ΩɵMEÉH âÑã
o
j ≈àM áYÉ°ùdG
AÉYƒdG Öcô
o
j ⁄ GPEG ,AÉYƒdG πØ°SCG ‘ ¿ÉeC’G ≥«°û©J IGOCG óLƒJ :á¶MÓe
.•ÓÿG πª©j ø∏a ,¬fɵe ‘
∫ÓN øe 𫨰ûàdG AÉæKCG (3) AÉYƒdG ‘ äÉfƒµŸG áaÉ°VEG ∂æµÁ •
IôjÉ©ŸG ܃c ™°Vh óYCG ºK ,(2) AÉYƒdG AÉ£Z ‘ ájõcôŸG áëàØdG
.¬fɵe ‘ (1)
ºK ,“O” ™°VƒdG ≈∏Y •ƒÑ°†e (6) ºµëàdG ìÉàØe ¿CG øe ócCÉJ •
.AÉHô¡µdG òNCÉà RÉ¡÷G π°UhCG
‘ RÉ¡÷G CGóÑ«°Sh ,܃∏£ŸG OGóYE’G ójóëàd (6) ºµëàdG ìÉàØe QOCG •
™°VƒdG ¤EG ºµëàdG ìÉàØe ôjhóJ øµÁ ,§∏ÿG AÉæKCG .§∏ÿG
.§∏ÿG á«∏ªY ™jöùJ ójôJ âæc GPEG √ôjô– ΩóY ™e “Pulse”
’h ,𫨰ûàdG πÑb ¬fɵe ‘ G
k
ó«L âÑãe (2) AÉYƒdG AÉ£Z ¿CG ócCÉJ :á¶MÓe
.𫨰ûàdG AÉæKCG É
k
≤∏£e (2) AÉYƒdG AÉ£Z íàØJ
ô¶àfGh ,IóMGƒdG IôŸG ‘ ≥FÉbO 3 øe ÌcC’ RÉ¡÷G π¨°ûJ ’ :á¶MÓe
𫨰ûàdG IQhO AGôLG πÑb áaô¨dG IQGôM áLQO ¤EG IóMƒdG OÈJ ≈àM
.á«dÉàdG
≈∏Y èjõŸG §∏N Oôéà “O” ™°VƒdG ¤EG (6) ºµëàdG ìÉàØe QOCG •
.܃∏£ŸG ¢ùfÉéàdG
IóMh øe ¬àdGREÉH ºbh áYÉ°ùdG ÜQÉ≤Y √ÉŒG ¢ùµY (3) AÉYƒdG QOCG •
.¬eóbh §«∏ÿG Ö°U ºK ,(2) AÉYƒdG AÉ£Z ¢UôëH ∫RCGh ,(5) ∑ôëŸG
áæ룟G 𫨰ûJ
¢ùHÉ≤dG ¿CG ócCÉJh
m
ƒà°ùe »≤aCG í£°S ≈∏Y (5) ∑ôëŸG IóMh ™°V •
.´hõæe
IôØ°T áYƒª› ™°V ºK ,Iƒ¡≤dG ܃ÑëH (9) øë£dG ¢SCÉc CÓeG •
ÜQÉ≤Y √ÉŒG ¢ùµY ÉgôjhóàH ºbh øë£dG ¢SCÉc πØ°SCG (8) øë£dG
.(9) øë£dG ¢SCÉc ‘ É¡à«Ñàd áYÉ°ùdG
50 »g øë£dG ¢SCÉc É¡©°ùj Iƒ¡≤dG ܃ÑM øe ᫪c ≈°übCG :á¶MÓe
.ΩGôL
.∑ôëŸG IóMh ‘ (8) áæ룟G ≥ë∏e ÖcQ •
Öcô
o
J ⁄ GPEG ,∑ôëŸG IóMh πØ°SCG ‘ ¿ÉeC’G ≥«°û©J IGOCG óLƒJ :á¶MÓe
.πª©dG É¡æµÁ ø∏a ,É¡fɵe ‘ áæ룟G
πÑb “O” ™°VƒdG ≈∏Y •ƒÑ°†e (6) ºµëàdG ìÉàØe ¿CG øe ócCÉJ •
.AÉHô¡µdG òNCÉà RÉ¡÷G π°UhCG ºK ,𫨰ûàdG
RÉ¡÷G CGóÑ«°Sh ,(6) ºµëàdG ìÉàØe ‘ áHƒ∏£ŸG áYöùdG OGóYEG OóM •
™°VƒdG ¤EG (6) ºµëàdG ìÉàØe ôjhóJ øµÁ ,øë£dG AÉæKCG .øë£dG ‘
.øë£dG á«∏ªY ™jöùJ ójôJ âæc GPEG √ôjô– ΩóY ™e “Pulse”
áæ룟G ≥ë∏e ∂ØH ºb ºK .AÉ¡àf’G Oôéà ábÉ£dG Ohõe øY ¬∏°üaG •
,áYÉ°ùdG ÜQÉ≤Y ¢ùµY √ôjhóàH ºbh øë£dG ¢SCÉc ∫õfCGh ,IGOC’G øe
.¬àæëW Ée Ωóbh ¢SCɵdG ÆôaCG ºK
ô¶àfGh ,IóMGƒdG IôŸG ‘ á«fÉK 30 øe ÌcC’ RÉ¡÷G π¨°ûJ ’ :á¶MÓe
𫨰ûàdG IQhO AGôLG πÑb áaô¨dG IQGôM áLQO ¤EG IóMƒdG OÈJ ≈àM
.á«dÉàdG
áfÉ«°üdGh ∞«¶æàdG
:áfÉ«°üdG AGôLEG πÑb
.QÉ«àdG òNCÉe øY ¬∏°üaGh RÉ¡÷G ÅØWCG •
.É
k
eÉ“ RÉ¡÷G OÈj ≈àM ô¶àfG •
‘ ¢ùHÉ≤dG hCG π«°UƒàdG ∂∏°S hCG IóYÉ≤dG hCG RÉ¡÷G ¢ùªZ ô¶ëj !ôjò–
.ôNBG πFÉ°S …CG ‘ hCG AÉŸG
.á∏∏Ñe ¢Tɪb á©£≤H »LQÉÿG º°ù÷G í°ùeG •
.∞«¶æJ äGƒ°ûM Ωóîà°ùJ ’ •
.™≤ÑdG ádGRE’ ∞«ØN ∞¶æe Ωóîà°SG ,ôeC’G Ωõd GPEG •

13
ﺔـﻴـﺑﺮـﻌـﻟﺍ
(ﺔﻴﺴﻴﺋﺮﻟﺍ ﺕﺎﻤﻴﻠﻌﺘﻟﺍ)
áeÓ°ùdG äɪ«∏©J
Öéj ,»FÉHô¡µdG QÉ«àdÉH πª©J »àdG Iõ¡LC’G ΩGóîà°SG óæY !ôjò– •
,á«dÉàdG äÉWÉ«àM’G É¡«a Éà ,á«°SÉ°SC’G ¿ÉeC’G äÉWÉ«àMG PÉîJG
äÉHÉ°UE’Gh á«FÉHô¡µdG äÉeó°üdGh ≥jô◊G ôWÉfl øe óë∏d ∂dPh
.ájOÉŸG ôFÉ°ùÿGh á«°üî°ûdG
.RÉ¡÷G 𫨰ûJ πÑb ájÉæ©H πeɵdÉH π«dódG Gòg CGôbG •
…CG ∫ɪ©à°SG ¿EG .π«dódG Gòg ‘ í°Vƒe ΩGóîà°S’G øe ¢Vô¨dG ¿EG •
»àdG ÒZ RÉ¡÷G Gò¡H á«∏ªY ájCG AGôLEG hCG äÉ≤aôe hCG äÉ≤ë∏e
.á«°üî°ûdG áHÉ°UE’G ô£N ÖÑ°ùj ób π«dódG Gòg ‘ É¡H ≈°Uƒ
o
j
.áLÉ◊G óæY ¬«dEG ´ƒLô∏d π«dódG Gò¡H ßØàMG •
í£°S ±GƒM ¥ƒa ≥∏©àj ’ å«ëH ábóH »FÉHô¡µdG ∂∏°ùdG OôaG •
.ó°üb ¿hO ¬H Ì©àdG hCG ≥∏©àdG ºàj ’ å«ëHh πª©dG
…òdG »FÉHô¡µdG QÉ«àdG ¢ùÑ≤e πØ°SCG ¥ÓWE’G ≈∏Y RÉ¡÷G π¨°ûJ ’ •
.¬H RÉ¡÷G π«°UƒJ ºàj
RÉ¡÷G ™æ°ü
o
e πÑb øe ¬dGóÑà°SG Öéj ,ábÉ£dG ∂∏°S ∞∏J ádÉM ‘ •
áLQO ¢ùØf ≈∏Y »æa …CG hCG ¬d ™HÉàdG óªà©ŸG áeóÿG π«ch hCG
. ôWÉîŸG Öæéàd ∂dPh π«gCÉàdG
Aƒ°S …CG ÖÑ°ùàj ÉÃQ ,äɪ«∏©àdG √ò¡d É
k
≤ah •ÓÿG Ωóîà°SG •
.iôNCG ôWÉfl …CG hCG á«FÉHô¡c áeó°U ‘ ΩGóîà°SG
ΩGóîà°S’G øe ¢Vô¨dG
BLACK+DECKER™ •ÓN ºª
o
°U
BX430J/BX440G/BX440/BX4000/BX4030
Gòg .äÉHhöûŸG äÉfƒµe h πFÉ°ùdGh Ö∏°üdG ΩÉ©£dG öüYh êõeh §∏ÿ
.§≤a ‹õæŸG ΩGóîà°SÓd ºª°üe RÉ¡÷G
:‘ RÉ¡÷G Gòg Ωóîà°ù
o
j ’
πª©dG •É°ShCGh ÖJɵŸGh ôLÉàŸG ‘ ∫ɪ©dG ïHÉ£e ≥WÉæe •
;iôNC’G
;á«ØjôdG ∫RÉæŸG •
áeÉbE’G øcÉeCGh IÒ¨°üdG ¥OÉæØdGh ¥OÉæØdG ‘ AÓª©dG πÑ
p
b øe •
;iôNC’G
,QÉ£aE’Gh ΩƒædG øcÉeCG •
∂H ¢UÉÿG RÉ¡÷G ΩGóîà°SG
.RGèdG ΩGóîà°SG óæY É
k
ªFGO Qò◊G
n
ñƒJ •
.¢ùÑ≤ŸG øY ¢ùHÉ≤dG π°üØd AÉHô¡µdG ∂∏°S ó°T
k
É≤∏£e ∫hÉ– ’ •
âjõdGh IQGô◊G øY
k
Gó«©H AÉHô¡µdG ∂∏°S ™°Vh ≈∏Y ¢UôMGh
.IOÉ◊G ±Gƒ◊Gh
¿ôa ‘ hCG É¡æe Üô≤dÉH hCG IQGô◊G QOÉ°üe ¥ƒa RÉ¡÷G ™°†J ’ •
.øNÉ°S
.AÉHô¡µdG π«°UƒJ IóYÉb ≈∏Y AÉŸG Öµ°S ÖæŒ •
á∏HÉ≤dG hCG IôéØàŸG OGƒŸG øe Üô≤dÉH RÉ¡÷G ΩGóîà°SG ô¶ëj •
.∫É©à°TÓd
.≥∏£dG AGƒ¡dG ‘ RÉ¡÷G Ωóîà°ùJ ’ •
.¿ÉàaÉL ∑Gójh RÉ¡÷G 𫨰ûJ ≈∏Y ¢UôMG •
RÉ¡÷G π°üaG ,ΩGóîà°S’G AÉæKCG »FÉHô¡µdG ∂∏°ù∏d ∞∏J çóM GPEG •
πÑb »FÉHô¡µdG ∂∏°ùdG ¢ùª∏J ’ .QƒØdG ≈∏Y AÉHô¡µdG Qó°üe øY
.AÉHô¡µdG Qó°üe øY ¬∏°üa
πÑbh ¬eGóîà°SG ΩóY ádÉM ‘ AÉHô¡µdG Qó°üe øY RÉ¡÷G π°üaG •
.∞«¶æàdG πÑbh É¡dGóÑà°SG hCG AGõLC’G Ö«côJ
hCG »LQÉN âbDƒe ≥jôW øY 𫨰ûà∏d ¢ü°üfl ÒZ RÉ¡÷G Gòg •
.ó©H øY ºµëà∏d π°üØæe Ωɶf
.ΩGóîà°S’G AÉæKCG •Óî∏d »LQÉÿG í£°ùdG IQGôM áLQO ™ØJôJ ób •
.AÉ£Z …CG ádGREG πÑb ∞bƒàJ ácôëàŸG AGõLC’G ´O •
.ÜGÎb’G πÑb ∞bƒàJ ácôëàŸG AGõLC’G ´O •
.ΩGóîà°S’G AÉæKCG IóMƒdG á©HÉàe Öéj •
øµÁ å«M ,•ÓÿG ‘ øNÉ°S πFÉ°S Ö°U ádÉM ‘ Qò◊G ñƒJ •
.ÅLÉØŸG ÒîÑàdG AGôL RÉ¡÷G êQÉN √OôW
øjôNB’G áeÓ°S
ájó°ù÷G äGQó≤dG hhP ¢UÉî°TC’G ¬eóîà°ù«d ºª°üe ÒZ RÉ¡÷G Gòg •
∂dP ‘ ÉÃ) Úà∏«∏≤dG áaô©ŸGh IÈÿGh áæjóàŸG á«∏≤©dGh á«°ù◊Gh
á≤∏©àŸG äɪ«∏©àdG º¡FÉ£YEG hCG º¡«∏Y ±GöTE’G πX ‘ ’EG ,(∫ÉØWC’G
.º¡àeÓ°S øY ∫hDƒ°ùŸG ¢üî°ûdG πÑb øe RÉ¡÷G ΩGóîà°SÉH
.RÉ¡÷ÉH º¡ãÑY ΩóY ¿Éª°†d ∫ÉØWC’G ≈∏Y ±GöTE’G Öéj •
√òg ≈∏Y ™∏£e ÒZ ¢üî°T …CG hCG ∫ÉØWCÓd ìɪ°ùdG ΩóY Öéj •
.RÉ¡÷G ΩGóîà°SÉH äGOÉ°TQE’G
¢ùŸ hCG πª©dG ¿Éµe øe ÜGÎb’ÉH äÉfGƒ«◊G hCG ∫ÉØWCÓd íª°ùJ ’ •
.AÉHô¡µdG πHÉc hCG RÉ¡÷G
∫ÉØWC’G øe Üô≤dÉH RÉ¡÷G ΩGóîà°SG óæY Üôb øY ±GöTE’G Ωõ∏j •
ΩGóîà°S’G ó©H
∑ôJGh AÉHô¡µdG òNCÉe øe ¢ùHÉ≤dG ´õfGh RÉ¡÷G 𫨰ûJ ±É≤jEÉH ºb •
RÉ¡÷G AGõLCG øe …CG Ò«¨J πÑbh áÑbGôe ¿hO ¬côJ πÑb OÈj RÉ¡÷G
.É¡°üëa hCG É¡Ø«¶æJ hCG
Öéj .±ÉL ¿Éµe ‘ ¬æjõîJ Öéj ,RÉ¡÷G ΩGóîà°SG ΩóY ádÉM ‘ •
.∫ÉØWC’G ∫hÉæàe øY G
k
ó«©H áf
q
õîŸG Iõ¡LC’G ™«ªL ßØM
ìÓ°UE’Gh ¢üëØdG
hCG áØdÉJ AGõLCG ájCG øY ∞°ûµ∏d RÉ¡÷G ¢üëaG ,ΩGóîà°S’G πÑb •
,QGQRC’G ‘ ∞∏J hCG ,AGõLC’G ‘ Qƒ°ùc OƒLh ΩóY øe ≥≤– .áÑ«©e
.RÉ¡÷G 𫨰ûJ ≈∏Y ôKDƒJ ób ádÉM …CG hCG
.Ö«Y hCG ∞∏J ¬H AõL …CG OƒLh ádÉM ‘ RÉ¡÷G Ωóîà°ùJ ’ •
AGõLC’G ∫GóÑà°SG hCG ìÓ°UEÉH óªà©e ìÓ°UEG π«ch Ωƒ≤j ¿CG Öéj •
.áØdÉàdG hCG IQƒ°ùµŸG
hCG AGÎgG hCG ∞∏J äÉeÓY OƒLh ΩóY øe ≥≤– ,ΩGóîà°S’G πÑb •
.»FÉHô¡µdG ∂∏°ùdG ‘ πcBÉJ
∂∏°ùdG hCG ¢ùHÉ≤dG ‘ ∞∏J hCG Ö«Y OƒLh ádÉM ‘ RÉ¡÷G Ωóîà°ùJ ’ •
.»FÉHô¡µdG
¢ùHÉ≤dG hCG »FÉHô¡µdG ∂∏°ùdG ‘ Ö«Y hCG ∞∏J OƒLh ádÉM ‘ •
Öæéàd óªà©e ìÓ°UEG π«ch áaô©Ã ɪ¡MÓ°UEG Öé«a ,»°ù«FôdG
¬MÓ°UEG ∫hÉ– ’h »FÉHô¡µdG QÉ«àdG ∂∏°S ™£≤J ’ .ôWÉîŸG
.∂°ùØæH
‘ É¡«dEG QÉ°ûŸG ∂∏J ÒZ AGõLCG ájCG ∫GóÑà°SG hCG ádGREG É
k
≤∏£e ∫hÉ– ’ •
.π«dódG Gòg
AÉHô¡µdG ôWÉfl øe áeÓ°ùdG
¤EG áLÉM ’ ‹ÉàdÉHh ,É
k
LhOõe
k
’õY ∫hõ©e øMÉ°ûdG Gòg
QÉ«àdG ó¡L ≥aGƒJ øe
k
ɪFGO ≥≤– .»°VQCG ∂∏°S OƒLh
∫hÉ– ’ .Úæ≤àdG áMƒd ≈∏Y í°VƒŸG ó¡÷G ™e »°ù«FôdG
.…OÉY ¢ùHÉ≤H øMÉ°ûdG IóMh ∫GóÑà°SG É
k
≤∏£e

COUNTRY NAME ADDRESS TELEPHONE NO. EMAIL
N a m e s & A d d r e s s e s f o r B L A C K + D E C K E R S e r v i c e C o n c e s s i o n a r i e s
BAHRAIN Alfouz Services Co. WLL P.O. Box 26562, Tubli, Manama (00973) 17783562 / 17879987 [email protected]
BAHRAIN Kewalram & Sons Co. WLL P.O. Box 84, Manama, (00973) 17213110 [email protected]
EGYPT Anasia Egypt for Trading P.O. Box 2443, 9, Mostafa Refaat Street, (00202) 22684159 [email protected]
JORDAN Mega Hardware - 93 King Abdullah II St., (009626) 5349098 [email protected]
(Sami Bashiti & Partners Co.) P.O.BOX 3005 AMMAN 11953 www.mega-hardware.com
KSA Fawaz Ebrahim Al Zayani P.O. Box 76026, Al Raka : 31952 (009663) 8140914 [email protected]
Trading Est. www.fawazalzayanigroup.com
KSA United Trading & Marketing Co; #15, Khamis Mushait 62411, Abha, (00966) 172500378 [email protected]
(U-MARK) Military city road – Near City max
and Ghunaim Market
KSA United Trading & Marketing Co; #116, Prince Fahad Ibn Ibrahim (00966) 11473-3258 [email protected]
(U-MARK) Al Saud Street - Near Nawan Hotel
KSA United Trading & Marketing Co; Ash Shiqah, Al Hamr, Buraydah (00966) 16-3694969 [email protected]
(U-MARK) 52371 Al Hamr Road near Jaryat
Al Umran & Khub Ath Thinayan
KSA United Trading & Marketing Co; King Abdulaziz St, Al Aziziyah (00966) 138179319 [email protected]
(U-MARK) Dammam 32424 near Dat AS 138172654
Sihha Medical Center
KSA United Trading & Marketing Co; Jabal Ar-Rubabah, Misrifah, (00966) 126612552 [email protected]
(U-MARK) Jeddah 23331 Falastin Road Near
New Jeddah National Hospital
KSA United Trading & Marketing Co; (U-MARK) #356, Al Talah Medina 42322 (00966) 148423339 [email protected]
KUWAIT Al Omar Technical Co. P.O. Box 4062, Safat 13041, Kuwait (00965) 24848595 / 24840039 [email protected]
KUWAIT The Sultan Centre P.O. Box 26567-13126 Safat, Kuwait (00965) 24343155 [email protected]
LEBANON Aces Service Centre P.O. Box 90-102, Nahr El Mot, (009611) 898989 / 262626 [email protected]
Building, Beirut
LIBYA Homeworld Co. Senidal St. Amr Ibn Elaas Road, (0021861) 9094183 [email protected]
Benghazi, Libya (P.O. Box 18182 Salmany) ext. 103
LIBYA North Africa Trading P.O. Box 348, 7 October (00218061) 3383994 [email protected]
( El Ghoul Brothers) Street 11, Benghazi
LIBYA North Africa Trading AlBarniq Dewalt Center, (00218021) 3606430 [email protected]
MAURITIUS The Brandhouse Ltd. Rogers Industrial Park 1, Riche (00230) 2069450 claims([email protected]
MOROCCO Electronia Bd, Sidi Abdelrahman- Gr ceinture (00212) 618532680 r[email protected]
residence Rio - Ain Diab - 20050.
Casa Blanca
OMAN Oman Marketing & Service Co. P.O. Box 2734,Behind Honda (00968) 24560232 [email protected]
OMAN Oman Marketing & Service Co. (Omasco) Al Ohi, Sohar,Oman (00968) 26846379 [email protected]
OMAN Oman Marketing & Service Co. (Omasco) Sanaya, Salalah,Oman (00968) 23212290 [email protected]
PAKISTAN Ammar Service & Spares Office No 6068 6th Floor Central (009221) 32775252 [email protected]
Plaza Behind Gul Plaza Marston
Road.KARACHI
QATAR Al Muftah Service Centre Al Wakrah Road, P.O. Box 875, (00974) 44650880 [email protected]
SRI LANKA Delmege Forsyth & Co. Ltd Delmege Forsyth & Co. Ltd (009477) 2211111 [email protected]
Mawatha Colombo 10 Sri Lanka
TUNISIA Societe Tunisienne De RUE DE LA PHYSIQUE. NOUVELLE (0021679) 389687 [email protected]
Maintenance(STM) ZONE INDUSTRIELLE BEN AROUS.
2013 BEN AROUS, TUNISIA.
UAE Light House Electrical P.O. Box 120, Abu Dhabi (009712) 6726131 [email protected]
UAE Light House Electrical P.O. Box 120, Abu Dhabi (009712) 5548315 [email protected]
UAE Black & Decker (Overseas) GmbH P.O. Box 5420, Dubai (009714) 8127400 / 8127406 [email protected]
UAE Zillion Equipment and P.O. Box 10584, Ras Al Khaimah (009717) 2277095 [email protected]
UAE Zillion Equipment and Spare Parts P.O. Box 19740, Opp. Bin Sadal / (009713) 7216690 [email protected]
Trading LLC Trimix Redymix Sanaiya, Al Ain
YEMEN Middle East Trading Co. (METCO) 5th Flr.Hayel Saeed Anam (009674) 213455 [email protected]
YEMEN Middle East Trading Co. (METCO) Mualla Dakka, Aden (009672) 222670 [email protected]
YEMEN Middle East Trading Co. (METCO) Hayel st.,Sana'a,Yemen (009671) 204201 [email protected]


PRODUCT MODEL NO.
01.2018
WARRANTY REGISTRATION CARD
YOUR NAME/ VOTRE NOM/
YOUR ADDRESS/ VOTRE ADRESSE/
POSTCODE/ CODE POSTAL/
DATE OF PURCHASE/ JOUR D’ACHAT/
DEALER'S NAME & ADDRESS/ NOM ET ADRESSE DU VENDEUR/
«ùßr
«∞FMu«Ê
«∞d±e «∞∂d¥bÍ
¢U¸¥a «∞Ad«¡
≈ßr Ë ´Mu«Ê «∞∂Uzl
BX430J/BX440G/BX440/BX4000/BX4030


-
 1
1
-
 2
2
-
 3
3
-
 4
4
-
 5
5
-
 6
6
-
 7
7
-
 8
8
-
 9
9
-
 10
10
-
 11
11
-
 12
12
-
 13
13
-
 14
14
-
 15
15
-
 16
16
-
 17
17
-
 18
18


Black & Decker BX4000 Le manuel du propriétaire
- Catégorie
- Mélangeurs
- Taper
- Le manuel du propriétaire
dans d''autres langues
- English: Black & Decker BX4000 Owner's manual
Documents connexes
-
Black & Decker BX4000 Manuel utilisateur
-
Black & Decker BLX300 Manuel utilisateur
-
-
-
Black & Decker FX650 Manuel utilisateur
-
Black & Decker JBGM800-B5 Manuel utilisateur
-
Black & Decker FX1050 Manuel utilisateur
-
-
-