
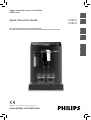
Quick Instruction Guide
READ THIS GUIDE CAREFULLY BEFORE USING THE MACHINE.
FOR COMPLETE INSTRUCTIONS DOWNLOAD USER MANUAL FROM WWW.PHILIPS.COM/SUPPORT
Register your product and get support at
www.philips.com/welcome
Super automatic espresso machine
4000 series
HD8841
HD8842
EnglishItalianoDeutschFrançaisEspañolPortuguês
La page est en cours de chargement...
La page est en cours de chargement...

DE - INHALT
SICHERHEITSHINWEISE .....................................................................................................................................................................................28
ERSTE INBETRIEBNAHME .................................................................................................................................................................................. 32
MANUELLER SPÜLZYKLUS..................................................................................................................................................................................33
COFFEESWITCH WAHLHEBEL "ESPRESSO" ODER "KAFFEE" ................................................................................................................................34
ERSTER ESPRESSO / GROSSER ESPRESSO ............................................................................................................................................................35
MEIN LIEBLINGSESPRESSO ............................................................................................................................................................................... 35
ERSTER KLASSISCHER KAFFEE CLASSIC COFFEE ................................................................................................................................................36
MEIN IDEALER KLASSISCHER KAFFEE CLASSIC COFFEE .....................................................................................................................................36
EINSTELLUNG KERAMIKMAHLWERK ..................................................................................................................................................................37
MILCH AUFSCHÄUMEN .......................................................................................................................................................................................38
HEISSWASSER ...................................................................................................................................................................................................39
ENTKALKEN ....................................................................................................................................................................................................... 40
UNTERBRECHUNG DES ENTKALKUNGSZYKLUS ................................................................................................................................................... 43
REINIGUNG DER BRÜHGRUPPE ..........................................................................................................................................................................44
REINIGUNG DES KLASSISCHEN MILCHAUFSCHÄUMERS ......................................................................................................................................45
HINWEISSIGNALE GELB ................................................................................................................................................................................... 46
ALARMSIGNALE ROT ....................................................................................................................................................................................... 47
PFLEGEPRODUKTE............................................................................................................................................................................................48
EN - CONTENT
SAFETY INSTRUCTIONS ........................................................................................................................................................................................6
FIRST INSTALLATION.......................................................................................................................................................................................... 10
MANUAL RINSE CYCLE........................................................................................................................................................................................11
COFFEESWITCH “ESPRESSO” OR “COFFEE” SELECTION LEVER ............................................................................................................................. 12
FIRST ESPRESSO / ESPRESSO LUNGO .................................................................................................................................................................. 13
MY FAVORITE ESPRESSO ....................................................................................................................................................................................13
PRIMO CAFFÈ LUNGO CLASSIC COFFEE .............................................................................................................................................................14
IL MIO CAFFE’ LUNGO CLASSIC COFFEE IDEALE” ................................................................................................................................................14
ADJUSTING THE CERAMIC COFFEE GRINDER .......................................................................................................................................................15
FROTHING MILK ................................................................................................................................................................................................ 16
HOT WATER........................................................................................................................................................................................................ 17
DESCALING ........................................................................................................................................................................................................ 18
INTERRUPTION OF THE DESCALING CYCLE .......................................................................................................................................................... 21
BREW GROUP CLEANING ....................................................................................................................................................................................22
CLASSIC MILK FROTHER CLEANING..................................................................................................................................................................... 23
WARNING SIGNALS YELLOW COLOUR ...............................................................................................................................................................24
WARNING SIGNALS RED COLOUR ..................................................................................................................................................................... 25
MAINTENANCE PRODUCTS .................................................................................................................................................................................26
IT - INDICE
NORME DI SICUREZZA ..........................................................................................................................................................................................8
PRIMA INSTALLAZIONE ...................................................................................................................................................................................... 10
CICLO DI RISCIACQUO MANUALE ......................................................................................................................................................................... 11
LEVA SELEZIONE “ESPRESSO” O “COFFEE” ...........................................................................................................................................................12
PRIMO ESPRESSO / ESPRESSO LUNGO ................................................................................................................................................................13
IL MIO ESPRESSO IDEALE ................................................................................................................................................................................... 13
PRIMO CAFFÈ LUNGO CLASSIC COFFEE .............................................................................................................................................................14
IL MIO CAFFE’ LUNGO CLASSIC COFFEE IDEALE” ................................................................................................................................................14
REGOLAZIONE MACINACAFFÈ IN CERAMICA ....................................................................................................................................................... 15
COME EMULSIONARE IL LATTE............................................................................................................................................................................ 16
ACQUA CALDA ....................................................................................................................................................................................................17
DECALCIFICAZIONE ............................................................................................................................................................................................18
INTERRUZIONE DEL CICLO DI DECALCIFICAZIONE ................................................................................................................................................ 21
PULIZIA DEL GRUPPO CAFFÈ .............................................................................................................................................................................. 22
PULIZIA MONTALATTE CLASSICO ........................................................................................................................................................................23
SEGNALI DI AVVISO GIALLO ............................................................................................................................................................................. 24
SEGNALI DI ALLARME ROSSO ...........................................................................................................................................................................25
PRODOTTI PER LA MANUTENZIONE ....................................................................................................................................................................26
La page est en cours de chargement...
La page est en cours de chargement...
La page est en cours de chargement...
La page est en cours de chargement...
La page est en cours de chargement...

10
Instructions
Istruzioni
www.philips.com/support
EN
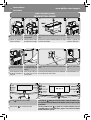
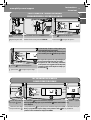
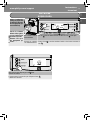
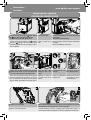
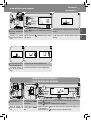
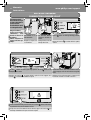
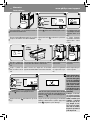
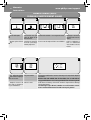
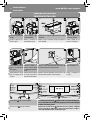
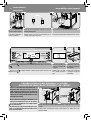
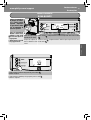
Open the water tank lid. Remove the water tank by
using the handle.
Rinse and ll the water tank with fresh water up to the MAX
level.
Open the co ee bean hop-
per lid.
IT
Sollevare il coperchio del
serbatoio dell’acqua.
Estrarre il serbatoio dell’ac-
qua utilizzando la maniglia.
Risciacquare e riempire il serbatoio dell'acqua con acqua
fresca no al livello MAX.
Sollevare il coperchio del
contenitore ca è in grani.
EN
Slowly pour the co ee beans
into the co ee bean hopper.
Insert the plug into the sock-
et located on the back of the
machine.
Insert the plug on the other end of the power cord into a wall
socket .
Switch the power button
to “I”.
IT
Versare lentamente il ca è
in grani nel contenitore caf-
fè in grani.
Inserire la spina nella presa
di corrente posta sul retro
della macchina.
Inserire la spina all’estremità opposta del cavo di alimenta-
zione in una presa di corrente a muro.
Portare l’interruttore su “I”.
EN
Press the button to turn on the machine.
If you keep the
button pressed for more than 8 seconds the machine enters
the demo mode. To exit the demo, turn the machine o and on again using the
power button.
IT
Premere il tasto per accendere la macchina.
Tenendo premuto il tasto
per più di otto secondi la macchina entra nel
programma demo. Per uscire dalla demo, spegnere e riaccendere la macchina
usando l’interruttore generale.
FIRST INSTALLATION
PRIMA INSTALLAZIONE
MAX

11
www.philips.com/support
Instructions
Istruzioni
EnglishItaliano
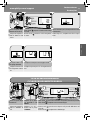
EN
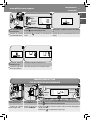
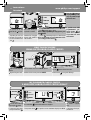
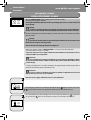
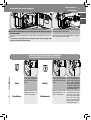
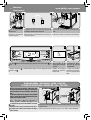
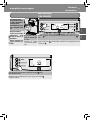
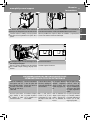
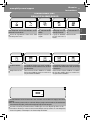
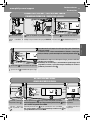
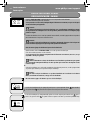
Place a container under the
Classic Milk Frother.
Press the
button to start priming the circuit.
When the process is complete the machine starts warming
up.
IT
Posizionare un contenitore
sotto il Montalatte Classico.
Premere il tasto
per avviare il ciclo di caricamento del
circuito.
Al termine del processo la macchina inizia la fase di riscal-
damento.
EN
Place a container under the
co ee dispensing spout.
Make sure that the lever is
in the “ESPRESSO” position.
Press the
button to select pre-ground co ee function. Do NOT add pre-ground co ee.
Press the
button. The machine starts dispensing water.
IT
Posizionare un contenitore
sotto l’erogatore ca è.
Veri care che la leva sia in
posizione “ESPRESSO”.
Premere il tasto
per selezionare la funzione ca è pre-macinato. NON aggiungere
ca è pre-macinato.
Premere il tasto
. La macchina inizia a erogare acqua.
MANUAL RINSE CYCLE
CICLO DI RISCIACQUO MANUALE
EN
The machine performs the
automatic rinse cycle.
The machine is ready for the manual rinse cycle.
IT
La macchina esegue un ciclo
di risciacquo automatico.
La macchina è pronta per il ciclo di risciacquo manuale.
1
2
ESPRESSO

12
Instructions
Istruzioni
www.philips.com/support
MAX
EN
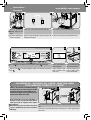
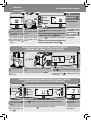
When the dispensing has
nished, empty the con-
tainer.
Repeat steps 1-4 twice, thereafter continue with step 6. Place a container under the Classic Milk Frother.
IT
Al termine dell'erogazione,
vuotare il contenitore.
Ripetere le operazioni dal punto 1 al punto 4 per due volte,
quindi passare al punto 6.
Posizionare un contenitore sotto il Montalatte Classico.
1
4
EN
Press the button. The machine shows the icon above. Press the button again.
Dispense water until the no
water icon appears.
At the end, ll the water tank
again up to the MAX level.
IT
Premere il tasto . La macchina visualizza il simbolo in alto. Premere nuovamente il
tasto
.
Erogare acqua no a visua-
lizzare il simbolo di man-
canza acqua.
Al termine, riempire nuova-
mente il serbatoio dell'ac-
qua no al livello MAX.
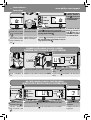
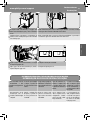
COFFEESWITCH - “ESPRESSO” OR “COFFEE” SELECTION LEVER
LEVA SELEZIONE “ESPRESSO” O “COFFEE”
EN
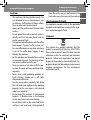
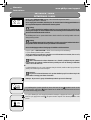
The lever must be turned to the correct “Espresso” or “Co ee” position before brewing a bev-
erage.
IT
La leva deve essere ruotata nella posizione corretta “Espresso” o “Co ee” prima di erogare
una bevanda.
ESPRESSO
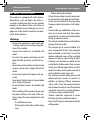
Thanks to the innovative Co eeSwitch technology,
the machine allows you to brew two types of co ee,
changing the brewing pressure at the ip of a lever.
You can increase the pressure for a perfect espresso or
decrease it for a delicate classic co ee.
Grazie all’innovativa tecnologia Co eeSwitch, la
macchina consente di erogare due tipi di ca è va-
riando la pressione di erogazione con il semplice
uso di una leva.
Aumentando la pressione per ottenere un perfetto
espresso o diminuendola per ottenere un delicato
ca è lungo.
COFFEE
La page est en cours de chargement...

14
Instructions
Istruzioni
www.philips.com/support
EN
The quantity can be saved
when the icon
is shown.
Wait until the desired quan-
tity of co ee is reached.
... press
to stop the process. Saved!
Note: to stop programming for long espresso, press
the
button.
IT
ll prodotto può essere me-
morizzato dal momento in
cui viene visualizzato il sim-
bolo
.
Attendere no al raggiun-
gimento della quantità di
ca è desiderata.
.... premere
per interrompere il processo. Memorizzato!
Nota: Per interrompere la programmazione dell’e-
spresso lungo premere il tasto
.
OK
Press the button to
exit programming. In this
case, the product length
will not be saved.
E’ possibile uscire dalla
programmazione pre-
mendo il tasto
. In
questo caso la quantità
del prodotto non verrà
memorizzata.
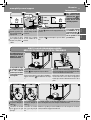
FIRST CLASSIC COFFEE
PRIMO CAFFÈ LUNGO (CLASSIC COFFEE)
EN
Adjust the co ee dispensing
spout.
Make sure that the lever is in the “COFFEE” position.
Press the
button to brew a classic co ee.
IT
Regolare l’erogatore ca è. Veri care che la leva sia in posizione “COFFEE”.
Premere il tasto
per erogare il ca è lungo.
COFFEE
MY FAVOURITE CLASSIC COFFEE
IL MIO CAFFE’ LUNGO (CLASSIC COFFEE) IDEALE”
EN
Select the desired aroma by
pressing the
button.
Press and hold the
button until the MEMO icon is displayed.
The machine is program-
ming.
IT
Selezionare l'aroma deside-
rato premendo il tasto
.
Tenere premuto il tasto
no a quando non viene visualizzata a display l’icona MEMO.
La macchina è in fase di pro-
grammazione.

15
www.philips.com/support
Instructions
Istruzioni
EnglishItaliano
EN
The quantity can be saved
when the icon
is shown.
Wait until the desired quan-
tity of co ee is reached.
... press
to stop the process. Saved!
IT
ll prodotto può essere me-
morizzato dal momento in
cui viene visualizzato il sim-
bolo
.
Attendere no al raggiun-
gimento della quantità di
ca è desiderata.
.... premere
per interrompere il processo. Memorizzato!
OK
ADJUSTING THE CERAMIC COFFEE GRINDER
REGOLAZIONE MACINACAFFÈ IN CERAMICA
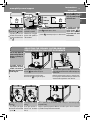
EN
For milder taste select coarse
grind (
).
For stronger taste select ne
grind ( ).
Brew 2-3 products to taste the di erence. If co ee is watery or is brewed slowly, change
the grinder setting.
IT
Per un gusto più leggero
selezionare una macinatura
grossa (
).
Per un gusto più forte se-
lezionare una macinatura
ne ( ).
Erogare 2-3 prodotti per gustare la di erenza. Se il ca è è acquoso o fuoriesce lentamen-
te, modi care le impostazioni del macinaca è.
1
2
EN
Place a cup under the dispensing spout.
Press the
button to brew an espresso.
While the machine grinds the co ee, press and turn the
grinder adjustment knob inside the co ee bean hopper one
notch at a time.
IT
Posizionare una tazzina sotto l’erogatore.
Premere il tasto
per erogare un espresso.
Mentre la macchina macina, premere e ruotare la mano-
pola di regolazione della macinatura posta all’interno del
contenitore ca è in grani di uno scatto alla volta.
You can only adjust the
grinder settings when the
machine is grinding cof-
fee beans.
È possibile regolare le
impostazioni del maci-
naca è solo mentre la
macchina sta macinando
il ca è in grani.
Press the button to
exit programming. In this
case, the product length
will not be saved.
E’ possibile uscire dalla
programmazione pre-
mendo il tasto
. In
questo caso la quantità
del prodotto non verrà
memorizzata.

16
Instructions
Istruzioni
www.philips.com/support
FROTHING MILK
COME EMULSIONARE IL LATTE
EN
Fill 1/3 of a container with
cold milk.
Immerse the Classic Milk
Frother in the milk.
Press the
button. The machine shows the icon above.
IT
Riempire un contenitore
con 1/3 di latte freddo.
Immergere il Montalatte
Classico nel latte.
Premere il tasto
. La macchina visualizza il simbolo in
alto.
EN
When the milk froth has the desired consistency, press button to stop dispensing steam
and remove the container.
IT
Quando la schiuma del latte raggiunge la consistenza desiderata, premere il tasto per
interrompere l’erogazione di vapore e rimuovere il contenitore.
Danger of scalding! Dis-
pensing may be preceded
by small jets of hot water.
Use the appropriate pro-
tective handle only.
Pericolo di scottature!
All’inizio dell’erogazione
possono veri carsi brevi
spruzzi di acqua calda.
Utilizzare solo la speci-
ca impugnatura pro-
tettiva.
EN
Press the button. The machine shows the icon above. Press the button button to
start dispensing steam.
Froth the milk by gently swirling the container and moving
it up and down.
IT
Premere il tasto . La macchina visualizza il simbolo in alto. Premere il tasto per
avviare l’erogazione di vapore.
Emulsionare il latte facendo compiere al contenitore dei
leggeri movimenti circolari verso l'alto e il basso.
1
2

17
www.philips.com/support
Instructions
Istruzioni
EnglishItaliano
HOT WATER
ACQUA CALDA
EN
Place a container under the
Classic Milk Frother.
Press the
button. The machine shows the icon above. Press the button again.
IT
Posizionare un contenitore
sotto il Montalatte Classico.
Premere il tasto
. La macchina visualizza il simbolo in alto. Premere nuovamente il
tasto
.
Danger of scalding! Dis-
pensing may be preceded
by small jets of hot water.
Use the appropriate pro-
tective handle only.
Pericolo di scottature!
All’inizio dell’erogazione
possono veri carsi brevi
spruzzi di acqua calda.
Utilizzare solo la speci-
ca impugnatura pro-
tettiva.
EN
To stop the hot water dispensing press the button.
Remove the container.
IT
Per interrompere l’erogazione di acqua calda premere il tasto .
Rimuovere il contenitore.
La page est en cours de chargement...

19
www.philips.com/support
Instructions
Istruzioni
EnglishItaliano
EN
Empty the drip tray and the
co ee grounds drawer.
Remove the Classic Milk Frother from the hot water/steam
wand.
Press the
button.
IT
Vuotare la vasca raccogli-
gocce ed il cassetto racco-
glifondi.
S lare il Montalatte Classico dal tubo vapore/acqua calda.
Premere il tasto
.
EN
The machine enters the program.
If you pressed the
button by mistake, press the button to quit. Otherwise go to
step 5.
Remove the “INTENZA+” water lter from the water tank if
it was installed and replace it with the small white original
one.
IT
La macchina avvia il programma.
Se il tasto
è stato premuto per errore, premere il tasto per uscire. Altrimenti pas-
sare al punto 5.
Estrarre il ltro acqua “INTENZA+” (se presente) dal serba-
toio dell’acqua e sostituirlo con il ltrino bianco originale.
EN
Pour the entire descaling solution in the water tank. Then ll the water tank with fresh water up to the CALC
CLEAN level and place it back into the machine.
IT
Versare tutta la soluzione decalci cante nel serbatoio acqua. Riempire il serbatoio con acqua fresca no al livello CALC
CLEAN e reinserirlo.
1
3
2
CALC
CLEAN

20
Instructions
Istruzioni
www.philips.com/support
EN
Place a large container (1,5 l) under both the steam/hot wa-
ter wand and the dispensing spout.
Press the
button to start the descaling cycle.
The descaling solution will
be dispensed at intervals
(this takes about 20 min).
IT
Posizionare un contenitore capiente (1,5l) sotto il tubo va-
pore/acqua calda e sotto l'erogatore.
Premere il tasto
per avviare il ciclo di decalci cazione.
La soluzione decalci can-
te sarà erogata a intervalli
regolari (durata: circa 20
min).
EN
When this icon is displayed,
the water tank is empty.
Rinse the water tank and ll it up to the CALC CLEAN level
with fresh water. Place it back into the machine.
Empty the drip tray and
place it back.
Empty the container and
place it back.
IT
Quando viene visualizzato
questo simbolo, il serbatoio
dell'acqua è vuoto.
Risciacquare il serbatoio e riempirlo con acqua fresca no
al livello CALC CLEAN. Reinserirlo nella macchina.
Vuotare la vasca raccogli-
gocce e reinserirla in posi-
zione.
Vuotare il contenitore e
reinserirlo in posizione.
1
3
2
EN
Press the button to start the rinse cycle.
When the amount of water needed for the rinse cycle has
been completely dispensed, this icon is displayed. Press the
button to quit the descaling cycle.
IT
Premere il tasto per avviare il ciclo di risciacquo.
Quando l’acqua richiesta per il risciacquo è stata comple-
tamente erogata, la macchina visualizza questo simbolo.
Premere il tasto
per uscire dal ciclo di decalci cazione.
Note: If the water tank
has not been lled up to
the CALC CLEAN level, the
machine might require
another rinse cycle. Re ll
the water tank and place
it back into the machine.
Repeat from step 14.
Nota: Se il serbatoio
dell’acqua non viene ri-
empito no al livello CALC
CLEAN la macchina può ri-
chiedere l’esecuzione di
un’altro ciclo di risciac-
quo. Riempire il serbato-
io dell’acqua e reinserirlo
nella macchina. Ripetere
dal punto 14.
CALC
CLEAN

21
www.philips.com/support
Instructions
Istruzioni
EnglishItaliano
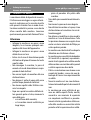
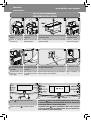
EN
Wash the Brew Group. For further guidance, see the “Brew
Group Cleaning” chapter.
The machine is ready for use.
IT
Pulire il gruppo ca è. Per ulteriori indicazioni, vedere il capi-
tolo “Pulizia del gruppo ca è”.
La macchina è pronta all’uso.
INTERRUPTION OF THE DESCALING CYCLE
INTERRUZIONE DEL CICLO DI DECALCIFICAZIONE
EN
The machine warms up and performs an automatic rinse cy-
cle. Empty the drip tray and place it back.
Remove the small white water lter and place back the “INTENZA+” water lter into the
water tank if it was installed. Put back the Classic Milk Frother.
IT
La macchina esegue il riscaldamento ed il risciacquo au-
tomatico. Vuotare la vasca raccogligocce e reinserirla in
posizione.
Rimuovere il ltrino bianco e riposizionare il ltro acqua “INTENZA+” (se presente) nel
serbatoio dell'acqua. Reinserire il Montalatte Classico.
1
3
2
EN
Once the descaling cycle has
started, you must complete
it till the very end without
turning o the machine.
In case you get stuck dur-
ing the cycle you can exit by
pressing the on/o button.
If this occurs, empty and
rinse carefully the water
tank, then ll it up to the
CALC CLEAN level.
Follow the instructions in the
“Manual rinse cycle” chapter
before brewing beverages.
If the cycle was not complet-
ed, the machine will require
another descaling cycle to be
performed at your earliest
convenience.
IT
Una volta avviato il ciclo di
decalci cazione deve essere
completato evitando di spe-
gnere la macchina.
Qualora la macchina si do-
vesse bloccare è possibile
uscire dal ciclo premendo il
tasto ON/OFF.
In questo caso vuotare e
sciacquare accuratamente il
serbatoio acqua e riempirlo
no al livello CALC CLEAN.
Seguire le istruzioni ripor-
tate nel capitolo “Ciclo di ri-
sciacquo manuale” prima di
procedere con l’erogazione
delle bevande.
Se il ciclo non è stato
completato la macchina
continuerà a richiedere l’e-
secuzione di un ciclo di de-
calci cazione da eseguirsi
non appena possibille.

22
Instructions
Istruzioni
www.philips.com/support
1
3
2
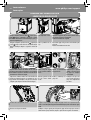
BREW GROUP CLEANING
PULIZIA DEL GRUPPO CAFFÈ
EN
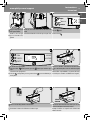
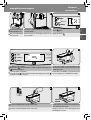
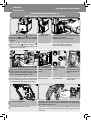
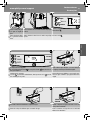
Turn o the machine by pressing the button. Wait until
the
button ashes and unplug the power cord.
Remove the drip tray and co ee grounds drawer.
Open the service door. To remove the brew group, press the «PUSH» button and pull
it by the handle.
Pull it horizontally without turning it.
IT
Spegnere la macchina premendo il tasto . Attendere
che il tasto
lampeggi e staccare la spina del cavo di
alimentazione. Rimuovere la vasca raccogligocce ed il cas-
setto raccoglifondi.
Aprire lo sportello di ser-
vizio.
Per estrarre il gruppo ca è premere il tasto «PUSH» tirando
la maniglia.
Estrarlo orizzontalmente senza ruotarlo.
EN
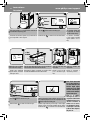
Clean the co ee outlet duct thoroughly with the cleaning tool
provided with the machine or with a spoon handle. Make
sure you insert the cleaning tool as shown in the picture.
Remove the co ee residues
drawer and wash it thor-
oughly.
Carry out maintenance to the
brew group.
Check that the lever on the
back is fully pushed down.
IT
Pulire a fondo il condotto di uscita del ca è con l’apposito
utensile per la pulizia fornito in dotazione con la macchi-
na, o con il manico di un cucchiaino. Assicurarsi di inserire
l’apposito utensile per la pulizia come mostrato in gura.
Rimuovere il cassetto rac-
cogli ca è e lavarlo accura-
tamente.
Eseguire la manutenzione
del gruppo ca è.
Veri care che la leva sul re-
tro del gruppo sia comple-
tamente abbassata.
EN
Firmly press the “PUSH” button. Make sure that the hook which locks the brew group is in the correct position. If it is still in the
downward position, push it upwards until it locks correctly into place.
IT
Premere con forza il tasto “PUSH”. Assicurarsi che il gancio per il blocco del gruppo ca è sia nella posizione corretta. Se è
ancora in posizione abbassata spingerlo verso l’alto no ad agganciarlo correttamente.

23
www.philips.com/support
Instructions
Istruzioni
EnglishItaliano
EN
Insert the co ee residues drawer in its seat and ensure that it is correctly in place.
If the co ee residues drawer is not correctly positioned, the brew group may not
t into the machine.
Insert the brew group in its seat again until it locks into place
without pressing the “PUSH” button.
IT
Inserire il cassetto raccogli ca è nella sua sede avendo cura di veri care che sia ben po-
sizionato.
Se il cassetto raccogli ca è viene posizionato in modo errato, il Gruppo ca è
potrebbe non inserirsi nella macchina.
Introdurre di nuovo in sede il gruppo ca è no ad aggan-
ciarlo senza premere il tasto “PUSH”.
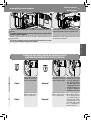
CLASSIC MILK FROTHER CLEANING
PULIZIA MONTALATTE CLASSICO
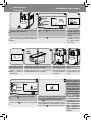
EN
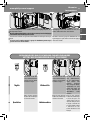
Daily
Remove the external part
of the Classic Milk Frother
and wash it with lukewarm
water.
Weekly
Remove the external part
of the Classic Milk Frother
and wash it with lukewarm
water.
Remove the upper part of
the Classic Milk Frother from
the hot water/steam wand.
Wash it under lukewarm
running water. Clean the hot
water/steam wand with a
wet cloth. Reassemble all the
Classic Milk Frother parts.
IT
Quotidiana
Rimuovere la parte esterna
del Montalatte Classico e la-
varla con acqua tiepida.
Settimanale
Rimuovere la parte esterna
del Montalatte Classico e la-
varla con acqua tiepida.
S lare la parte superiore del
Montalatte Classico
dal tubo
vapore/acqua calda. Lavarlo
sotto l’acqua corrente tiepida.
Pulire il tubo vapore/acqua
calda con un panno umido.
Rimontare tutti
i componen-
ti del
Montalatte Classico.

24
Instructions
Istruzioni
www.philips.com/support
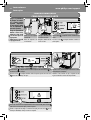
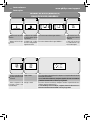
WARNING SIGNALS (YELLOW COLOUR)
SEGNALI DI AVVISO (GIALLO
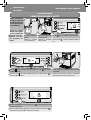
EN
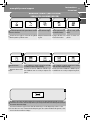
The machine is warming up. The machine is performing
the rinse cycle. Wait until this
has been completed.
You need to replace the “INTENZA+” lter. The brew group is being reset
due to machine reset.
IT
Macchina in fase di riscal-
damento.
La macchina sta eseguendo
un ciclo di risciacquo. Atten-
dere no al termine.
È necessario sostituire il ltro acqua “INTENZA+”. Gruppo ca è in fase di ri-
pristino in seguito a reset
macchina.
EN
Fill the co ee bean hop-
per and restart the brewing
cycle.
Prime the circuit.
You need to descale the machine. See descaling chapter for further guidance.
Not descaling your machine will ultimately make it stop working properly. In this
case repair is NOT covered under your warranty!
IT
Riempire il contenitore ca è
in grani e riavviare il ciclo di
erogazione.
Caricare il circuito.
È necessario eseguire la decalci cazione della macchina. Vedere il capitolo dedicato alla
decalci cazione per ulteriori indicazioni.
Se non viene eseguita la decalci cazione, la macchina smetterà di funzionare
correttamente. Il malfunzionamento NON è coperto da garanzia!

25
www.philips.com/support
Instructions
Istruzioni
EnglishItaliano
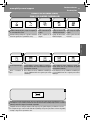
WARNING SIGNALS (RED COLOUR)
SEGNALI DI ALLARME (ROSSO)
Exx
EN
Fill the water tank.
Set the “ESPRESSO” or “COFFEE” selection lever to “ESPRES-
SO” within 30 seconds to complete brewing.
Set the “ESPRESSO” or “COFFEE” selection lever to “COFFEE”
within 30 seconds to complete brewing.
IT
Riempire il serbatoio dell’ac-
qua.
Ruotare la leva selezione “ESPRESSO” o “COFFEE” in posi-
zione “ESPRESSO” entro 30 secondi per completare l’ero-
gazione.
Ruotare la leva selezione “ESPRESSO” o “COFFEE” in posizio-
ne “COFFEE” entro 30 secondi per completare l’erogazione.
EN
The machine is out of order. Turn o the machine. After 30 seconds, turn it on again. Repeat the procedure 2 or 3 times.
If the machine does not start, contact the Philips hotline in your country (contact details in the warranty booklet) and quote
the error code shown on the display.
IT
La macchina non funziona. Spegnere la macchina. Riaccenderla dopo 30 secondi. Ripetere la procedura 2 o 3 volte.
Se la macchina non si avvia, contattare la hotline Philips del proprio Paese (numeri nel libretto della garanzia) e comu-
nicare il codice di errore indicato sul display.
EN
Insert the drip tray and the co ee grounds drawer. Thereafter
close the service door.
Fill the co ee bean hopper. The brew group must be in-
serted into the machine.
Empty the co ee grounds
drawer.
IT
Inserire la vasca raccogligocce ed il cassetto raccoglifondi.
Chiudere quindi lo sportello di servizio.
Riempire il contenitore ca è
in grani.
Il gruppo ca è deve essere
inserito nella macchina.
Vuotare il cassetto racco-
glifondi.

26
Maintenance products
Prodotti per la manutenzione
go to www.shop.philips.com
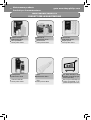
EN
Maintenance kit
product number: CA6706
IT
Kit manutenzione
numero prodotto: CA6706
EN
INTENZA+ water lter
product number: CA6702
IT
Filtro acqua INTENZA+
numero prodotto: CA6702
EN
Descaling solution
product number: CA6700
IT
Soluzione decalci cante
numero prodotto: CA6700
EN
Visit Philips onlineshop to check
availability and purchasing oppor-
tunities in your country.
IT
Visita il negozio online Philips per
veri care la disponibilità e le op-
portunità di acquisto nel tuo Paese.
MAINTENANCE PRODUCTS
PRODOTTI PER LA MANUTENZIONE
EN
Grease
product number: HD5061
IT
Grasso
numero prodotto: HD5061
EN
Co ee oil remover
product number: CA6704
IT
Pastiglie sgrassanti
numero prodotto: CA6704

La page est en cours de chargement...
La page est en cours de chargement...

30
Sicherheitshinweise
Consignes de sécurité
www.philips.com/support
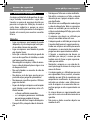
FR CONSIGNES DE SÉCURITÉ
La machine est équipée de dispositifs de sécu-
rité. Il est toutefois nécessaire de lire et de suivre
attentivement les consignes de sécurité conte-
nues dans le présent mode d’emploi a n d’évi-
ter des dommages accidentels aux personnes
ou aux choses suite à une utilisation impropre
de la machine. Conserver ce manuel pour toute
référence à venir.
Attention
• Brancher la machine à une prise murale ap-
propriée, dont la tension principale corres-
pond aux données techniques de l'appareil.
• Brancher la machine à une prise murale
pourvue de mise à la terre.
• Le câble d'alimentation ne doit pas pendre
de la table ou du plan de travail et ne doit pas
être en contact avec des surfaces chaudes.
• Ne pas plonger la machine, la prise de cou-
rant ou le câble d'alimentation dans l'eau:
danger de choc électrique!
• Ne pas verser de liquides sur le connecteur
du câble d’alimentation.
• Ne jamais diriger le jet d’eau chaude vers des
parties du corps: danger de brûlures!
• Ne pas toucher les surfaces chaudes. Utiliser
les poignées et les boutons.
• Après avoir éteint la machine à partir de
l’interrupteur général qui se trouve au dos
de l’appareil, débrancher la che de la prise
murale :
- en cas d'anomalies;
- si la machine reste inactive pendant
une longue période;
- avant de procéder au nettoyage de la
machine.
• Tirer la che et non le câble d'alimentation.
• Ne pas toucher la che avec les mains mouil-
lées.
• Ne pas utiliser la machine si la che, le câble
d'alimentation ou la machine sont endom-
magés.
• Ne pas altérer ni modi er d'aucune façon la
machine ou le câble d'alimentation. Toutes
les réparations doivent être e ectuées par
un centre d’assistance agréé par Philips pour
éviter tout danger.
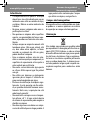
• La machine n'est pas conçue pour être utili-
sée par les enfants de moins de 8 ans.
• La machine peut être utilisée par les enfants
à partir de 8 ans, pourvu qu'ils aient été pré-
alablement instruits à utiliser correctement
la machine et qu'ils soient conscients des
risques potentiels, ou bien qu'ils soient sous
la supervision d'une personne adulte.
• Les opérations de nettoyage et entretien ne
doivent pas être exécutées par des enfants,
sauf s'ils ont plus de 8 ans et agissent sous la
supervision d'une personne adulte.
• Garder la machine ainsi que son câble d'ali-
mentation hors de la portée des enfants de
moins de 8 ans.
• La machine peut être utilisée par des per-
sonnes ayant de faibles capacités physiques,
mentales ou sensorielles, ou ayant une
expérience et/ou des compétences insuf-
santes, pourvu qu'elles aient été préala-
blement instruites à utiliser correctement la
machine et qu'elles soient conscientes des

31
Sicherheitshinweise
Consignes de sécurité
www.philips.com/support
DeutschFrançais
risques potentiels, ou bien qu'elles soient
sous la supervision d'une personne adulte.
• Il faut s'assurer que les enfants n'aient ja-
mais la possibilité de jouer avec cet appareil.
• Ne pas insérer les doigts ou d'autres objets
dans le moulin à café.
Avertissements
• Cette machine est destinée uniquement à un
usage domestique et n'est pas indiquée pour
une utilisation dans des cantines ou dans les
espaces cuisine de magasins, bureaux, fermes
ou d'autres environnements de travail.
• Toujours poser la machine sur une surface
plane et stable.
• Ne pas placer la machine sur des surfaces
chaudes, proches de fours chauds, de ré-
chau eurs ou d'autres sources de chaleur
similaires.
• Ne verser que du café torré é en grains dans
le réservoir. Le café en poudre, soluble, le
café cru ou d’autres objets, si insérés dans le
réservoir à café en grains, peuvent endom-
mager la machine.
• Laisser refroidir la machine avant d’insérer
ou de retirer des pièces. Les surfaces chauf-
fantes pourraient retenir de la chaleur rési-
duelle après l’utilisation.
• Ne pas remplir le réservoir avec de l'eau
chaude ou bouillante. Utiliser uniquement
de l’eau froide potable non pétillante.
• Pour le nettoyage, ne pas utiliser de produits
abrasifs ou de détergents agressifs. Un chif-
fon doux et imbibé d’eau est su sant.
• E ectuer régulièrement le détartrage de la
machine. Si cette opération n'est pas e ec-
tuée, l'appareil cesse de fonctionner correc-
tement. En pareil cas, la réparation n'est pas
couverte par la garantie!
• Éviter de garder la machine à une tempéra-
ture inférieure à 0°C. L'eau résiduelle à l'in-
térieur du système de chau age peut geler
et endommager la machine.
• Ne pas laisser d'eau dans le réservoir si la
machine n’est pas utilisée pendant une
longue période. L'eau pourrait être contami-
née. Utiliser de l'eau fraîche à chaque utili-
sation de la machine.
Champs électromagnétiques
Cet appareil est conforme à tous les standards
et à toutes les réglementations applicables en
matière d’exposition aux champs électroma-
gnétiques.
Élimination
La présence de ce symbole sur un produit in-
dique que celui-ci relève de la Directive euro-
péenne 2012/19/UE. Prière de se renseigner
sur les systèmes de collecte sélective en vigueur
pour les équipements électriques et électro-
niques. Veuillez vous conformer à la réglemen-
tation locale et ne pas traiter le produit comme
un déchet ménager. L’élimination correcte de
vos anciens produits aidera à prévenir d’éven-
tuelles conséquences nuisibles à l’environne-
ment et à la santé humaine.
La page est en cours de chargement...
La page est en cours de chargement...
La page est en cours de chargement...
La page est en cours de chargement...
La page est en cours de chargement...
La page est en cours de chargement...
La page est en cours de chargement...
La page est en cours de chargement...
La page est en cours de chargement...
La page est en cours de chargement...
La page est en cours de chargement...
La page est en cours de chargement...
La page est en cours de chargement...
La page est en cours de chargement...
La page est en cours de chargement...
La page est en cours de chargement...
La page est en cours de chargement...
La page est en cours de chargement...
La page est en cours de chargement...
La page est en cours de chargement...
La page est en cours de chargement...
La page est en cours de chargement...
La page est en cours de chargement...
La page est en cours de chargement...
La page est en cours de chargement...
La page est en cours de chargement...
La page est en cours de chargement...
La page est en cours de chargement...
La page est en cours de chargement...
La page est en cours de chargement...
La page est en cours de chargement...
La page est en cours de chargement...
La page est en cours de chargement...
La page est en cours de chargement...
La page est en cours de chargement...
La page est en cours de chargement...
La page est en cours de chargement...
La page est en cours de chargement...
La page est en cours de chargement...
La page est en cours de chargement...
La page est en cours de chargement...
-
 1
1
-
 2
2
-
 3
3
-
 4
4
-
 5
5
-
 6
6
-
 7
7
-
 8
8
-
 9
9
-
 10
10
-
 11
11
-
 12
12
-
 13
13
-
 14
14
-
 15
15
-
 16
16
-
 17
17
-
 18
18
-
 19
19
-
 20
20
-
 21
21
-
 22
22
-
 23
23
-
 24
24
-
 25
25
-
 26
26
-
 27
27
-
 28
28
-
 29
29
-
 30
30
-
 31
31
-
 32
32
-
 33
33
-
 34
34
-
 35
35
-
 36
36
-
 37
37
-
 38
38
-
 39
39
-
 40
40
-
 41
41
-
 42
42
-
 43
43
-
 44
44
-
 45
45
-
 46
46
-
 47
47
-
 48
48
-
 49
49
-
 50
50
-
 51
51
-
 52
52
-
 53
53
-
 54
54
-
 55
55
-
 56
56
-
 57
57
-
 58
58
-
 59
59
-
 60
60
-
 61
61
-
 62
62
-
 63
63
-
 64
64
-
 65
65
-
 66
66
-
 67
67
-
 68
68
-
 69
69
-
 70
70
-
 71
71
-
 72
72


Philips HD8841 Le manuel du propriétaire
- Catégorie
- Cafetières
- Taper
- Le manuel du propriétaire
dans d''autres langues
- italiano: Philips HD8841 Manuale del proprietario
- English: Philips HD8841 Owner's manual
- español: Philips HD8841 El manual del propietario
- Deutsch: Philips HD8841 Bedienungsanleitung
- português: Philips HD8841 Manual do proprietário
Documents connexes
Autres documents
-
Saeco HD8764/01 Le manuel du propriétaire
-
Saeco HD8767/01 Guide de démarrage rapide
-
Saeco HD8751/96 Manuel utilisateur
-
Saeco HD8664 Minuto Le manuel du propriétaire
-
Saeco HD8768/01 Guide de démarrage rapide
-
Philips-Saeco CA6702/00 Manuel utilisateur
-
-
Lavazza CLASSY MINI Guide de démarrage rapide