Milwaukee 4933471463 Original Instructions Manual
- Catégorie
- Meuleuses d'angle
- Taper
- Original Instructions Manual
Ce manuel convient également à

Original instructions
Originalbetriebsanleitung
Notice originale
Istruzioni originali
Manual original
Manual original
Oorspronkelijke
gebruiksaanwijzing
Original brugsanvisning
Original bruksanvisning
Bruksanvisning i original
Alkuperäiset ohjeet
Πρωτότυπο οδηγιών χρήσης
Orijinal işletme talimatı
Původním návodem k používání
Pôvodný návod na použitie
Instrukcją oryginalną
Eredeti használati utasítás
Izvirna navodila
Originalne pogonske upute
Instrukcijâm oriěinâlvalodâ
Originali instrukcija
Algupärane kasutusjuhend
Оригинальное руководство
по эксплуатации
Оригинално ръководство за
експлоатация
Instrucţiuni de folosire originale
Оригинален прирачник за
работа
Оригінал інструкції з
експлуатації
AGVKB 24-230 EKX
AGVKB 24-230 EKX DMS
Original instructions
Originalbetriebsanleitung
Notice originale
Istruzioni originali
Manual original
Manual original
Oorspronkelijke
gebruiksaanwijzing
Original brugsanvisning
Original bruksanvisning
Bruksanvisning i original
Alkuperäiset ohjeet
Πρωτότυπο οδηγιών χρήσης
Orijinal işletme talimatı
Původním návodem k používání


Technical Data,Safety Instructions, Specied Conditions of Use,
EC-Declaration of Conformity, Mains connection, Maintenance, Symbols
Please read and save
these instructions!
Technische Daten, Sicherheitshinweise, Bestimmungsgemäße Verwendung,
CE-Konformitätserklärung, Netzanschluss, Wartung, Symbole
Bitte lesen und
aufbewahren!
Caractéristiques techniques, Instructions de sécurité, Utilisation conforme aux
prescriptions, Déclaration CE de Conformité, Branchement secteur, Entretien, Symboles
A lire et à conserver
soigneusement
Dati tecnici,Norme di sicurezza,Utilizzo conforme, Dicharazione di Conformità CE,
Collegamento alla rete, Manutenzione, Simboli
Si prega di leggere e
conservare le istruzioni!
Datos técnicos, Instrucciones de seguridad, Aplicación de acuerdo a la nalidad,
Declaracion de Conformidad CE, Conexión eléctrica, Mantenimiento, Símbolos
Lea y conserve estas
instrucciones por favor!
Características técnicas, Instruções de segurança, Utilização autorizada,
Declaração de Conformidade CE, Ligação à rede, Manutenção, Symbole
Por favor leia e conserve
em seu poder!
Technische gegevens, Veiligheidsadviezen, Voorgeschreven gebruik van het
systeem, EC-Konformiteitsverklaring, Netaansluiting,Onderhoud, Symbolen
Lees en let goed
op deze adviezen!
Tekniske data, Sikkerhedshenvisninger, Tiltænkt formål,
CE-Konformitetserklæring, Nettilslutning, Vedligeholdelse, Symboler
Vær venlig at læse
og opbevare!
Tekniske data, Spesielle sikkerhetshenvisninger, Formålsmessig bruk,
CE-Samsvarserklæring, Nettilkopling, Vedlikehold, Symboler
Vennligst les og oppbevar!
Tekniska data, Säkerhetsutrustning, Använd maskinen Enligt anvisningarna,
CE-Försäkran, Nätanslutning, Skötsel, Symboler
Läs igenom och spara!
Tekniset arvot, Turvallisuusohjeet, Tarkoituksenmukainen käyttö,
Todistus CE-standardinmukaisuudesta, Verkkoliitäntä, Huolto, Symbolit
Lue ja säilytä!
Τεχνικά στοιχεία, Ειδικές υποδείξεις ασφάλειας, Χρήση σύμφωνα με το σκοπό
προορισμού, Δήλωση πιστότητας ΕΚ, Σύνδεση στο Ηλεκτρικό Δίκτυο, Συντήρηση, Σύμβολα.
Παρακαλούμε να τις διαβάσετε
και να τις φυλάξετε!
Teknik veriler, Güvenliğiniz için talimatlar, Kullanim, CE uygunluk beyanice,
Şebeke bağlantisi, Bakim, Semboller
Lütfen okuyun ve saklayın
Technická data, Speciální bezpečnostní upozornění, Oblast využití,
CE-prohlášení o shodě, Připojení na sít, Údržba, Symboly
Po přečtení uschovejte
Inhalt
English
15
Deutsch
20
Français
26
Italiano
32
Español
38
Português
44
Nederlands
50
Dansk
56
Norsk
61
Svenska
66
Suomi
71
Ελληνικά
76
Türkçe
82
Česky
87

2
3
5
14
4
Original instructions
Originalbetriebsanleitung
Notice originale
Istruzioni originali
Manual original
Manual original
Oorspronkelijke
gebruiksaanwijzing
Original brugsanvisning
Original bruksanvisning
Bruksanvisning i original
Alkuperäiset ohjeet
Πρωτότυπο οδηγιών χρήσης
Orijinal i
ş
letme talimatı
P
ů
vodním návodem k používání
Pôvodný návod na použitie
Instrukcją oryginalną
Eredeti használati utasítás
Izvirna navodila
Originalne pogonske upute
Instrukcijâm ori
ě
inâlvalodâ
Originali instrukcija
Algupärane kasutusjuhend
Оригинальное руководство
по эксплуатации
Оригинално ръковод ство за
експлоатация
Instruc
ţ
iuni de folosire originale
Оригинален прирачник за
работа
Оригінал інструкц ії з
експлуатації
AGVKB24-230 EKX
AGVKB24-230 EKX DMS

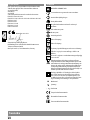
TIP
VII
X
I
IV
VIII
IX
II
VIV
III
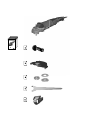
Accessory
Zubehör
Accessoires
Accessorio
Accessorio Acessório
Toebehoren
Tilbehør
Tilbehør
Tillbehör
Lisälaite
Εξαρτήματα
Aksesuar
řš
Príslušenstv
Wyposażenie
Azokat a tartozékokat
Oprema
Piederumi
Priedas
Tarvikud
Аксесоари
Accesoriu
ополнителна
опрема
Комплектуючі
قﺣﻠﻣﻟا

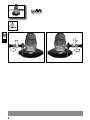
2
I

3
II
1. 2.
3. 4.
1
2
II
,
�
f
140
1200
100
,
�
f
140
1200
100

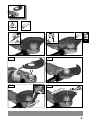
4
III
3. 4.
1. 2.

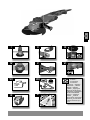
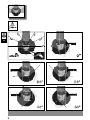
5
III
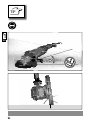
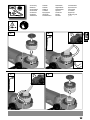
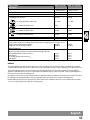
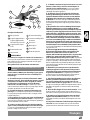
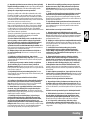
Use a spanner wrench if FIXTEC
nuts are stuck.
Bei festsitzender FIXTEC
Mutter Zweilochmutterschlüssel
verwenden.
Utiliser une clé à deux ergots si
l‘écrou FIXTEC est grippé.
Se il dado FIXTEC è bloccato,
utilizzare la chiave con 2 fori.
Si la tuerca FIXTEC está agarrotada,
utilizar la llave para tuercas de dos
agujeros.
Se a porca FIXTEC estiver xa,
utilizar a chave para porcas de dois
orifícios.
Bij vastzittende FIXTEC-moer de
tweegaats moersleutel gebruiken.
Ved fastsiddende FIXTEC-møtrik
anvendes tohuls-møtriknøgle.
Ved fastsittende FIXTEC mutter bruk
tohulls skrunøkkel .
Använd den tvåhålade mutterny-
ckeln, om FIXTEC-muttern sitter
fast.
Jos FIXTEC-mutteri on juuttunut
kiinni, käytä kaksireikäistä
mutteriavainta.
Σε περίπτωση που δεν ξεβιδώνει
το FIXTEC παξιμάδι χρησιμοποιείτε
κλειδί παξιμαδιών δύο οπών.
Sabit oturan FIXTEC somunları için
iki delikli somun anahtarı kullanın.
Při pevně utáhnuté matce FIXTEC
použijte dvojdílný klíč na matky.
Pri pevne utiahnutej matici FIXTEC
použite dvojdierový kľúč na matice.
W przypadku zakleszczonej nakrętki
FIXTEC należy zastosować klucz
maszynowy do nakrętek okrągłych
czołowych dwuotworowych.
Megszorult FIXTEC-anyánál kétlyu-
kas anyakulcsot kell használni.
Pri zategnjeni FIXTEC matici
uporabite ključ za matico z dvema
luknjama.
Kod čvrsto stegnute FIXTEC matice
upotrijebiti dvorupni ključ za matice
Ja iesprūdis uzgrieznis FIXTEC,
izmanotjiet uzgriežnu atslēgu ar
diviem caurumiem.
Jei FIXTEC veržlė tvirtai prisukta,
naudokite dvigalį veržliaraktį.
Kui FIXTEC mutter on kinni, kasu-
tada kahe auguga mutrivõtit.
В случае прочной фиксации гайки
FIXTEC использовать ключ для
гаек с двумя отверстиями.
При блокирали FIXTEC гайки да се
използва двурогов гаечен ключ.
Dac
ǎ
piuliţa FIXTEC s-a înţepenit,
folosiţi o cheie pentru piuliţe cu
dou
ǎ
g
ǎ
uri.
Во случај на прицврстена FIXTEC
навртка употребете клуч за
навртки со двојна дупка.
Якщо гайка FIXTEC сидить міцно,
використовувати ключ для гайки
з двома торцевими отворами.
ﻲﻏارﺑ طﺑر حﺎﺗﻔﻣ مادﺧﺗﺳا
FIXTEC لﯾﻣاوﺻ تﻧﺎﻛ اذإ
.ةر و ﺷ ﺣ ﻣ
2.
1.
3.

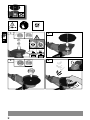
6
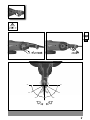
IV
60° 60°
30°
0°
30
°
60
°
30
°
60
°
0
°
30°

7
90° 90°
60° 60°
30° 30°
0°
V

8
VI
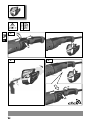
DEADMAN
Switch cannot be locked
Schalter ist nicht arretierbar
Le commutateur ne peut pas être verrouillé
L'interruttore non si può bloccare
El interruptor no se puede bloquear.
O interruptor não pode ser bloqueado
Schakelaar is niet vastzetbaar
Afbryder kan i k k e k s e r e s
Bryter kan ikke låses
Brytaren kan inte arreteras.
Katkaisinta ei voi lukita.
Ο διακόπτης δεν μπορεί να ασφαλιστεί
Şalter ayarlanamaz
Vypínač není aretovatelný
Vypínač je nie aretovateľný
Przełącznik nie daje się zablokować
A kapcsoló nem rögzíthető
Stikalo ni nastavljivo
Prekidač se ne može aretirati
Slēdzis nav labojams
Jungiklis negali būti užblokuojamas
Lüliti ei ole k s e e r i t a v
Нефиксируемый переключатель
Превключвателят не може да се фиксира
Comutatorul nu poate blocat
Прекинувачот не може да се заклучи
Перемикач без замком
لا يمكن قفل المفتاح
Techtronic Industries GmbH Max-Eyth-Straβe 10
71364 Winnenden-Germany Made in CZ
www. milwaukeetool.eu
radek 13
AGVKB 24-230 EKX
4931468385 52X31 UK 001
Code: 4681 73 01
2400 W M14
220-240 V ~ ⌀ max. 230 mm
11 A
MYYYY
n = 6600 min⁻¹50/60 Hz
XXXXXX
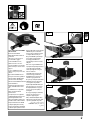
DEADMAN
AGVKV 24-230 EKX DMS
DEADMAN
DEADMAN
1
Start
2
Stop

9
VI
1
3
2
1
Stop
Start
Switch can be locked
Schalter ist arretierbar
Le commutateur peut être
verrouillé
L’interruttore si può bloccare
El interruptor se puede bloquear.
O interruptor pode ser bloqueado
Schakelaar is vastzetbaar
Afbryder kan k s e r e s
Bryter kan låses
Brytaren kan arreteras.
Katkaisimen voi lukita.
Ο διακόπτης μπορεί να
ασφαλιστεί
Şalter ayarlanabilir
Vypínač je aretovatelný
Vypínač je aretovateľný
Przełącznik daje się zablokować
A kapcsoló rögzíthető
Stikalo je nastavljivo
Prekidač se može aretirati
Slēdzis ir labojams
Jungiklis gali būti užblokuojamas
Lüliti on k s e e r i t a v
Фиксируемый переключатель
Превключвателят може да се
фиксира
Comutatorul poate blocat
Прекинувачот може да се заклучи
Перемикач з замком
حﺎﺗﻔﻣﻟا لﻔﻗ نﻛﻣﯾ
AGVKB 24-230 EKX
3.
Stop
1. 2.
AGVKV 24-230 EKX DMS & AGVKB 24-230 EKX
2
DEADMAN
DMS

10
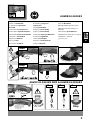
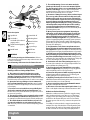
TIP
VII
< 30°
TIP
< 30°< 30°

11
VIII
1. 2.
1. 2.
Accessory
Zubehör
Accessoires
Accessorio
Accessorio
Acessório
Toebehoren
Tilbehør
Tilbehør
Tillbehör
Lisälaite
Εξαρτήματα
Aksesuar
řš
Príslušenstv
Wyposażenie
Tartozékokat
Oprema
Piederumi
Prieda
Tarvikud
Aksessuaarid
Аксесоари
Accesoriu
Додатоци
Комплектуючі
قﺣﻠﻣﻟا
1
2
1
2

12
VIII
Accessory
Zubehör
Accessoires
Accessorio
Accessorio
Acessório
Toebehoren
Tilbehør
Tilbehør
Tillbehör
Lisälaite
Εξαρτήματα
Aksesuar
řš
Príslušenstv
Wyposażenie
Tartozékokat
Oprema
Piederumi
Prieda
Tarvikud
Aksessuaarid
Аксесоари
Accesoriu
Додатоци
Комплектуючі
قﺣﻠﻣﻟا
1. 2.
1. 2.
1
1
2
2
M14

13
VIII
Accessory
Zubehör
Accessoires
Accessorio
Accessorio
Acessório
Toebehoren
Tilbehør
Tilbehør
Tillbehör
Lisälaite
Εξαρτήματα
Aksesuar
řš
Príslušenstv
Wyposażenie
Tartozékokat
Oprema
Piederumi
Prieda
Tarvikud
Aksessuaarid
Аксесоари
Accesoriu
Додатоци
Комплектуючі
قﺣﻠﻣﻟا
1.
2.
2.
1.
1
1
2
2

14
IX
1.
2. 3.
3
1
2
2
3
3
2
4
1
4

15
GB
English
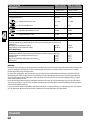
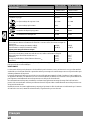
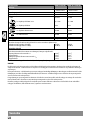
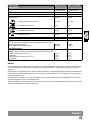
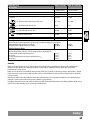
TECHNICAL DATA
Angle Grinder
AGVKB 24-230 EKX AGVKB 24-230 EKX DMS
Production code 4683 90 01...
... 000001-999999
4681 73 01...
... 000001-999999
Rated input 2400 W 2400 W
Rated speed 6600 min
-1
6600 min
-1
D= Grinding disc diameter max.
d= Grinding disc hole diameter
230 mm
22,2 mm
230 mm
22,2 mm
b= Cutting disc thickness min. / max. 1,9 / 3 mm 1,9 / 3 mm
b= Grinding disc thickness max. 8 mm 8 mm
D= Sanding disc diameter max. 230 mm 230 mm
D= Wiring brush diameter max. 100 mm 100 mm
Thread of work spindle M 14 M 14
Weight according EPTA-Procedure 01/2014 5,9 kg 5,9 kg
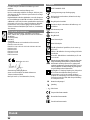
Noise information
Measured values determined according to EN 60745. Typically, the A-weighted noise levels of the tool are:
Sound pressure level (Uncertainty K=3dB(A)) 92 dB (A) 92 dB (A)
Sound power level (Uncertainty K=3dB(A))
Wear ear protectors!
103 dB (A) 103 dB (A)
Vibration information
Vibration total values (triaxial vector sum) determined according to EN 60745
Surface grinding: Vibration emission value a
h,AG
Uncertainty K=
6,8 m/s
2
1,5 m/s
2
6,8 m/s
2
1,5 m/s
2
Disc sanding: Vibration emission value a
h,DS
Uncertainty K=
2,8 m/s
2
1,5 m/s
2
2,8 m/s
2
1,5 m/s
2
For other applications, e.g. Abrasive Cutting-O Operations or Wire Brushing other vibration values could occur.
WARNING!
The declared vibration total value(s) and the declared noise emission value(s) were measured according to a standardized test method
according to EN 60745 and can be used to compare one power tool with another. It may be used for a preliminary assessment of exposure.
The declared vibration and noise emission level represents the main applications of the tool. However if the tool is used for di erent
applications, with di erent accessories or poorly maintained, the vibration and noise emission may di er. This may signi cantly increase
the exposure level over the total working period.
An estimation of the level of exposure to vibration and noise should also take into account the times when the tool is switched o or when
it is running but not actually doing the job. This may signi cantly reduce the exposure level over the total working period.
Identify additional safety measures to protect the operator from the e ects of vibration and/or noise such as: maintain the tool and the
accessories, keep the hands warm, organization of work patterns.

16
GB
English
4
10
2
9
3
8
7
6
1
511
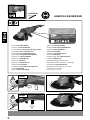
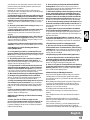
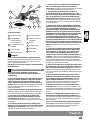
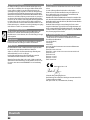
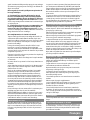
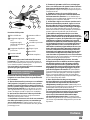
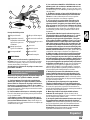
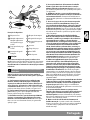
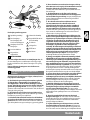
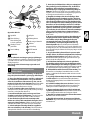
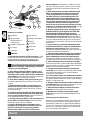
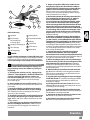
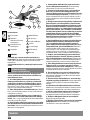
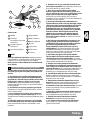
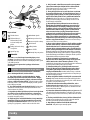
Device description
1
Spindle lock
2
Side handle /
Side handle AVS Insulated
gripping surface
3
Handle Insulated gripping
surface
4
On-O Switch
5
Switch lock-o
6
Grinding Guard
7
Guard lock lever
8
Accessory
9
2-piece ange
10
FIXTEC nut
11
Dust screen
WARNING!
Read all safety warnings and all instructions. Failure to
follow the warnings and instructions may result in electric shock,
re and/or serious injury.
Save all warnings and instructions for future reference.
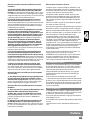
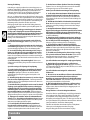
ANGLE GRINDER SAFETY WARNINGS
Safety Warnings Common for Grinding, Sanding, Wire
Brushing or Abrasive Cutting-O Operations:
a) This power tool is intended to function as a grin-
der, sander, wire brush or cut-o tool. Read all safety
warnings, instructions, illustrations and speci cations
provided with this power tool. Failure to follow all instructions
listed below may result in electric shock, re and/or serious injury.
b) Operations such as polishing are not recommended
to be performed with this power tool. Operations for which
the power tool was not designed may create a hazard and cause
personal injury.
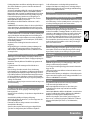
c) Do not use accessories which are not speci cally desi-
gned and recommended by the tool manufacturer. Just
because the accessory can be attached to your power tool, it does
not assure safe operation.
d) The rated speed of the accessory must be at least equal
to the maximum speed marked on the power tool. Accesso-
ries running faster than their rated speed can break and y apart.
e) The outside diameter and the thickness of your acces-
sory must be within the capacity rating of your power
tool. Incorrectly sized accessories cannot be adequately guarded
or controlled.
f) Threaded mounting of accessories must match the
grinder spindle thread. For accessories mounted by an-
ges, the arbour hole of the accessory must t the locating
diameter of the ange. Accessories that do not match the
mounting hardware of the power tool will run out of balance,
vibrate excessively and may cause loss of control.
g) Do not use a damaged accessory. Before each use inspect
the accessory such as abrasive wheels for chips and cracks,
backing pad for cracks, tear or excess wear, wire brush for
loose or cracked wires. If power tool or accessory is dropped,
inspect for damage or install an undamaged accessory.
After inspecting and installing an accessory, position your-
self and bystanders away from the plane of the rotating
accessory and run the power tool at maximum no-load
speed for one minute. Damaged accessories will normally break
apart during this test time.
h) Wear personal protective equipment. Depending on
application, use face shield, safety goggles or safety glas-
ses. As appropriate, wear dust mask, hearing protectors,
gloves and workshop apron capable of stopping small
abrasive or workpiece fragments. The eye protection must be
capable of stopping ying debris generated by various operations.
The dust mask or respirator must be capable of ltrating particles
generated by your operation. Prolonged exposure to high intensity
noise may cause hearing loss.
i) Keep bystanders a safe distance away from work area.
Anyone entering the work area must wear personal protec-
tive equipment. Fragments of workpiece or of a broken accessory
may y away and cause injury beyond immediate area of operation.
j) Hold the power tool by insulated gripping surfaces only,
when performing an operation where the cutting accessory
may contact hidden wiring or its own cord. Cutting accessory
contacting a “live” wire may make exposed metal parts of the power
tool “live” and could give the operator an electric shock.
k) Position the cord clear of the spinning accessory. If you
lose control, the cord may be cut or snagged and your hand or arm
may be pulled into the spinning accessory.
l) Never lay the power tool down until the accessory has
come to a complete stop. The spinning accessory may grab the
surface and pull the power tool out of your control.
m) Do not run the power tool while carrying it at your side.
Accidental contact with the spinning accessory could snag your
clothing, pulling the accessory into your body.
n) Regularly clean the power tool’s air vents.The motor’s fan
will draw the dust inside the housing and excessive accumulation of
powdered metal may cause electrical hazards.
o) Do not operate the power tool near ammable materi-
als. Sparks could ignite these materials.
p) Do not use accessories that require liquid coolants. Using
water or other liquid coolants may result in electrocution or shock.
Kickback and Related Warnings
Kickback is a sudden reaction to a pinched or snagged rotating
wheel, backing pad, brush or any other accessory. Pinching or
snagging causes rapid stalling of the rotating accessory which
in turn causes the uncontrolled power tool to be forced in the
direction opposite of the accessory’s rotation at the point of the
binding.
For example, if an abrasive wheel is snagged or pinched by the
workpiece, the edge of the wheel that is entering into the pinch
point can dig into the surface of the material causing the wheel
to climb out or kick out. The wheel may either jump toward or
La page charge ...
La page charge ...
La page charge ...
La page charge ...
La page charge ...
La page charge ...
La page charge ...
La page charge ...
La page charge ...
La page charge ...
La page charge ...
La page charge ...
La page charge ...
La page charge ...
La page charge ...
La page charge ...
La page charge ...
La page charge ...
La page charge ...
La page charge ...
La page charge ...
La page charge ...
La page charge ...
La page charge ...
La page charge ...
La page charge ...
La page charge ...
La page charge ...
La page charge ...
La page charge ...
La page charge ...
La page charge ...
La page charge ...
La page charge ...
La page charge ...
La page charge ...
La page charge ...
La page charge ...
La page charge ...
La page charge ...
La page charge ...
La page charge ...
La page charge ...
La page charge ...
La page charge ...
La page charge ...
La page charge ...
La page charge ...
La page charge ...
La page charge ...
La page charge ...
La page charge ...
La page charge ...
La page charge ...
La page charge ...
La page charge ...
La page charge ...
La page charge ...
La page charge ...
La page charge ...
La page charge ...
La page charge ...
La page charge ...
La page charge ...
La page charge ...
La page charge ...
La page charge ...
La page charge ...
La page charge ...
La page charge ...
La page charge ...
La page charge ...
La page charge ...
La page charge ...
La page charge ...
La page charge ...
-
 1
1
-
 2
2
-
 3
3
-
 4
4
-
 5
5
-
 6
6
-
 7
7
-
 8
8
-
 9
9
-
 10
10
-
 11
11
-
 12
12
-
 13
13
-
 14
14
-
 15
15
-
 16
16
-
 17
17
-
 18
18
-
 19
19
-
 20
20
-
 21
21
-
 22
22
-
 23
23
-
 24
24
-
 25
25
-
 26
26
-
 27
27
-
 28
28
-
 29
29
-
 30
30
-
 31
31
-
 32
32
-
 33
33
-
 34
34
-
 35
35
-
 36
36
-
 37
37
-
 38
38
-
 39
39
-
 40
40
-
 41
41
-
 42
42
-
 43
43
-
 44
44
-
 45
45
-
 46
46
-
 47
47
-
 48
48
-
 49
49
-
 50
50
-
 51
51
-
 52
52
-
 53
53
-
 54
54
-
 55
55
-
 56
56
-
 57
57
-
 58
58
-
 59
59
-
 60
60
-
 61
61
-
 62
62
-
 63
63
-
 64
64
-
 65
65
-
 66
66
-
 67
67
-
 68
68
-
 69
69
-
 70
70
-
 71
71
-
 72
72
-
 73
73
-
 74
74
-
 75
75
-
 76
76
-
 77
77
-
 78
78
-
 79
79
-
 80
80
-
 81
81
-
 82
82
-
 83
83
-
 84
84
-
 85
85
-
 86
86
-
 87
87
-
 88
88
-
 89
89
-
 90
90
-
 91
91
-
 92
92
-
 93
93
-
 94
94
-
 95
95
-
 96
96


Milwaukee 4933471463 Original Instructions Manual
- Catégorie
- Meuleuses d'angle
- Taper
- Original Instructions Manual
- Ce manuel convient également à
dans d''autres langues
- italiano: Milwaukee 4933471463
- English: Milwaukee 4933471463
- español: Milwaukee 4933471463
- Deutsch: Milwaukee 4933471463
- Nederlands: Milwaukee 4933471463
- português: Milwaukee 4933471463
- dansk: Milwaukee 4933471463
- čeština: Milwaukee 4933471463
- svenska: Milwaukee 4933471463
- Türkçe: Milwaukee 4933471463
- suomi: Milwaukee 4933471463
Documents connexes
-
Milwaukee PR 320 Original Instructions Manual
-
-
-
-
-
-
-
Milwaukee AG 15-125 C Original Instructions Manual
-
-
Autres documents
-
Flex L 26-6 230 Manuel utilisateur
-
Ryobi PBLAG01K1 Le manuel du propriétaire
-
-
AEG HBS 1000 E Fiche technique
-
Kress MEULEUSE ANGULAIRE Le manuel du propriétaire
-
AEG STEP 70 Le manuel du propriétaire
-
Flex LLK 1503 VR Manuel utilisateur
-
-
AEG STE 800 XE Le manuel du propriétaire
-
AEG WSB 230 S Le manuel du propriétaire