Toro 53cm Heavy-Duty Recycler/Rear Bagger Lawn Mower Manuel utilisateur
- Catégorie
- Tondeuses à gazon
- Taper
- Manuel utilisateur

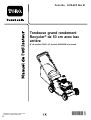
FormNo.3418-491RevB
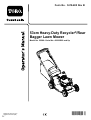
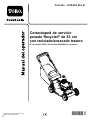
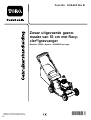
53cmHeavy-DutyRecycler®/Rear
BaggerLawnMower
22280
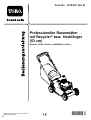
ProfessionellerRasenmähermit
Recycler®bzw.Heckfänger(53cm)
22280
Cortacéspeddeserviciopesado
Recycler®de53cmcon
reciclado/ensacadotrasero
22280
Tondeusegrandrendement
Recycler®de53cmavecbacarrière
22280
Zwaaruitgevoerdegazonmaaiervan
53cmmetRecycler®/grasvanger
22280
www.T oro.com.
*3418-491*B


ThisproductcomplieswithallrelevantEuropean
directives;fordetails,pleaseseetheseparateproduct
specicDeclarationofConformity(DOC)sheet.
GrossorNetTorque:Thegrossornettorque
ofthisenginewaslaboratoryratedbytheengine
manufacturerinaccordancewiththeSocietyof
AutomotiveEngineers(SAE)J1940.Asconguredto
meetsafety,emission,andoperatingrequirements,
theactualenginetorqueonthisclassofmowerwill
besignicantlylower.Gotowww.Toro.comtoview
specicationsonyourmowermodel.
Donottamperwithordisablesafetydevicesonthe
machine,andchecktheirproperoperationregularly.
Donotattempttoadjustortamperwiththeengine
speedcontrol;doingsomaycreateanunsafe
operatingcondition,resultinginpersonalinjury.
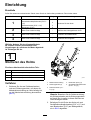
Introduction
Thisrotary-blade,walk-behindlawnmowerisintended
tobeusedbyresidentialhomeownersorprofessional,
hiredoperators.Itisdesignedprimarilyforcutting
grassonwell-maintainedlawnsonresidentialor
commercialproperties.Itisnotdesignedforcutting
brushorforagriculturaluses.
Readthisinformationcarefullytolearnhowtooperate
andmaintainyourproductproperlyandtoavoid
injuryandproductdamage.Youareresponsiblefor
operatingtheproductproperlyandsafely.
YoumaycontactT orodirectlyatwww.T oro.comfor
productandaccessoryinformation,helpndinga
dealer,ortoregisteryourproduct.
Wheneveryouneedservice,genuineToroparts,or
additionalinformation,contactanAuthorizedService
DealerorToroCustomerServiceandhavethemodel
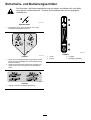
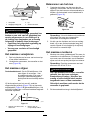
andserialnumbersofyourproductready.Figure1
identiesthelocationofthemodelandserialnumbers
ontheproduct.Writethenumbersinthespace
provided.
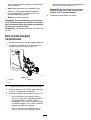
Important:Withyoursmartphoneortablet,scan
theQRcodeontheserialnumberdecaltoaccess
warranty,parts,andotherproductinformation.
g226623
Figure1
1.Modelandserialnumberlocation
ModelNo.
SerialNo.
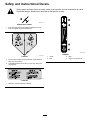
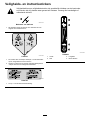
Thismanualidentiespotentialhazardsandhas
safetymessagesidentiedbythesafety-alertsymbol
(Figure2),whichsignalsahazardthatmaycause
seriousinjuryordeathifyoudonotfollowthe
recommendedprecautions.
g000502
Figure2
Safety-alertsymbol
Thismanualuses2wordstohighlightinformation.
Importantcallsattentiontospecialmechanical
informationandNoteemphasizesgeneralinformation
worthyofspecialattention.
©2018—TheToro®Company
8111LyndaleAvenueSouth
Bloomington,MN55420
2
Contactusatwww.Toro.com.
PrintedinMexico
AllRightsReserved

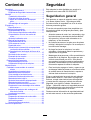
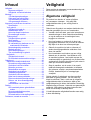
Contents
Safety.......................................................................3
GeneralSafety...................................................3
SafetyandInstructionalDecals..........................4
Setup........................................................................6
1InstallingtheHandle........................................6
2FillingtheCrankcasewithOil...........................8
3AdjustingtheSelf-PropelDrive........................8
4AssemblingtheGrassBag...............................9
ProductOverview...................................................10
Specications..................................................10
BeforeOperation..................................................11
BeforeOperationSafety....................................11
FillingtheFuelTank...........................................11
CheckingtheEngine-OilLevel..........................12
AdjustingtheCuttingHeight.............................12
DuringOperation.................................................13
DuringOperationSafety...................................13
StartingtheEngine...........................................13
ShuttingOfftheEngine.....................................14
OperatingtheSelf-PropelDriveand
EngagingtheCuttingBlades.........................14
CheckingtheBlade-BrakeClutch.....................14
RecyclingtheClippings....................................15
BaggingtheClippings.......................................15
OperatingTips.................................................16
AfterOperation....................................................17
AfterOperationSafety......................................17
CleaningundertheMachine.............................18
Maintenance...........................................................19
RecommendedMaintenanceSchedule(s)...........19
MaintenanceSafety..........................................19
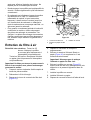
ServicingtheAirFilter.......................................20
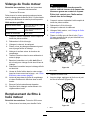
ChangingtheEngineOil...................................20
ChangingtheEngine-OilFilter..........................20
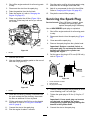
ServicingtheSparkPlug...................................21
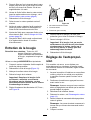
AdjustingtheSelf-PropelDrive.........................22
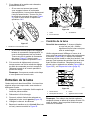
MaintainingtheBlade.......................................22
AdjustingtheBlade-BrakeCable......................24
CleaningundertheBeltCover..........................25
CleaningtheBlade-Brake-ClutchShield...........26
CleaningtheWheels.........................................26
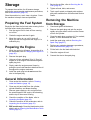
Storage...................................................................27
PreparingtheFuelSystem...............................27
PreparingtheEngine........................................27
GeneralInformation..........................................27
RemovingtheMachinefromStorage................27
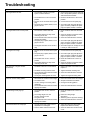
Troubleshooting......................................................28
Safety
Thismachinehasbeendesignedinaccordancewith
ENISO5395:2013.
GeneralSafety
Thisproductiscapableofamputatinghandsand
feetandofthrowingobjects.Alwaysfollowallsafety
instructionstoavoidseriouspersonalinjury.
Usingthisproductforpurposesotherthanitsintended
usecouldprovedangeroustoyouandbystanders.
•Read,understand,andfollowtheinstructions
andwarningsinthisOperator’sManualandon
themachineandattachmentsbeforestartingthe
engine.
•Donotputyourhandsorfeetnearmovingpartsof
orunderthemachine.Keepclearofanydischarge
opening.
•Donotoperatethemachinewithoutallguards
andothersafetyprotectivedevicesinplaceand
workingonthemachine.
•Keepbystandersandchildrenasafedistance
awayfromthemachine.Donotallowchildrento
operatethemachine.Allowonlypeoplewhoare
responsible,trained,familiarwiththeinstructions,
andphysicallycapabletooperatethemachine.
•Stopthemachine,shutofftheengine,andwaitfor
allmovingpartstostopbeforeservicing,fueling,
oruncloggingthemachine.
Improperlyusingormaintainingthismachinecan
resultininjury.T oreducethepotentialforinjury,
complywiththesesafetyinstructionsandalwayspay
attentiontothesafety-alertsymbol,whichmeans
Caution,Warning,orDanger—personalsafety
instruction.Failuretocomplywiththeseinstructions
mayresultinpersonalinjuryordeath.
Youcanndadditionalsafetyinformationwhere
neededthroughoutthismanual.
3

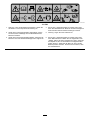
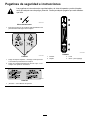
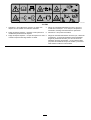
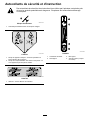
SafetyandInstructionalDecals
Safetydecalsandinstructionsareeasilyvisibletotheoperatorandarelocatednearanyarea
ofpotentialdanger.Replaceanydecalthatisdamagedormissing.
decaloemmarkt
Manufacturer'sMark
1.Thismarkindicatesthatthebladeisidentiedasapart
fromtheoriginalmachinemanufacturer.
decal112-8760
112-8760
1.Thrownobjecthazard—keepbystandersasafedistance
awayfromthemachine.
2.Cutting/dismembermentofhandorfoot—stayawayfrom
movingparts.
decal130-6722
130-6722
1.Attention—readtheOperator'sManual.
decal130-9656
130-9656
1.Choke3.Slow
2.Fast
4.Engine—stop(shutoff)
4

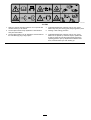
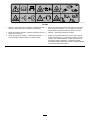
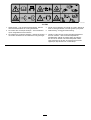
decal116-7583
116-7583
1.Warning—readtheOperator’sManual.Donotoperatethis
machineunlessyouaretrained.
4.Cutting/dismembermenthazardofhandorfoot,mower
blade—stayawayfrommovingparts;keepallguardsinplace.
2.Thrownobjecthazard—keepbystandersasafedistance
awayfromthemachine.
5.Warning—wearhearingprotection.
3.Thrownobjecthazard—donotoperatethemachinewithout
therear-dischargeplugorbaginplace.
6.Cutting/dismembermenthazardofhandorfoot,mower
blade—donotoperateupanddownslopes;operateside
tosideonslopes;shutofftheenginebeforeleavingthe
operatingposition—pickupobjectsthatthebladescould
throw;andlookbehindyouwhenbackingup.
5

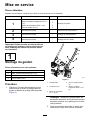
Setup
LooseParts
Usethechartbelowtoverifythatallpartshavebeenshipped.
ProcedureDescription
Qty.
Use
Handle1
Hex-head-angebolt(5/16x1-1/2
inches)
2
Carriagebolt(5/16x1-1/2inches)
2
1
Flangenut(5/16inch)
4
Installthehandle.
2
Nopartsrequired
–
Fillthecrankcasewithoil.
3
Nopartsrequired
–
Adjusttheself-propeldrive.
4
Nopartsrequired
–
Assemblethegrassbag.
Important:Removeanddiscardtheprotective
plasticsheetthatcoverstheengineandanyother
plasticorwrappingonthemachine.
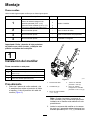
1
InstallingtheHandle
Partsneededforthisprocedure:
1Handle
2
Hex-head-angebolt(5/16x1-1/2inches)
2
Carriagebolt(5/16x1-1/2inches)
4
Flangenut(5/16inch)
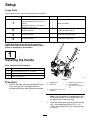
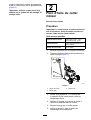
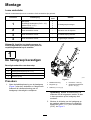
Procedure
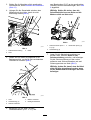
1.Removethecableguardfromthehandle(Figure
3)byremovingthe2carriageboltsand2
locknutsthatholdthecableguardtothehandle.
g024326
Figure3
1.Cableguard4.Flangenut—5/16inch(2)
2.Locknut(2)5.Hex-head-ange
bolt—5/16x1-1/2inches
(2)
3.Carriagebolt—1/4x1-1/2
inches(2)
Note:Savetheguard,thecarriagebolts,and
thelocknutssothatyoucaninstallthemonto
thehandlelaterinthisprocedure.
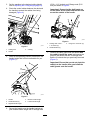
2.Installthehandleendsontothemowerhousing
with2hex-head-angebolts(5/16x1-1/2
inches)and2angenuts(5/16inch)asshown
inFigure3.
6

3.Setthemachinetothedesiredcuttingheight;
refertoAdjustingtheCuttingHeight(page12).
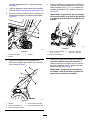
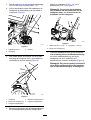
4.Routethecontrolcablesbetweenthedeckand
thehandletoprotectthecablesfrombeing
damaged(Figure4).
g033534
Figure4
1.Cableguard3.Cable(s)
2.Handle
5.Standintheoperatingpositiontodeterminethe
handleheightthatismostcomfortableforyou
(Figure5).
g024166
Figure5
1.Handle4.Mediumhandleheight
2.Handlebracket(2)
5.Lowesthandleheight
3.Highesthandleheight
6.Securethehandleontothehandlebracketsat
yourdesiredhandleheightwith2carriagebolts
(5/16x1-1/2inches)and2angenuts(5/16
inch)asshowninFigure6.
Important:Ensurethattheboltheadsare
ontheinsideofthehandleandthatthenuts
areontheoutsideofthehandle.
g024296
Figure6
1.Carriagebolt—5/16x
1-1/2inches(2)
3.Flangenut—5/16inch(2)
2.Handlebracket(2)
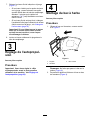
7.Positionthecableguardontothehandlewith
thecable(s)insidetheguard,andsecurethe
guardtothehandlewiththe2carriagebolts
andthe2locknutsthatyoupreviouslyremoved
(Figure3).
Important:Ensurethatyoudonotpinchthe
cable(s)tothehandlewhenyouinstallthe
cableguardsontothehandle.
7

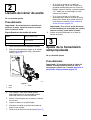
2
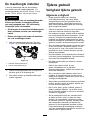
FillingtheCrankcasewith
Oil
NoPartsRequired
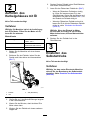
Procedure
Important:Yourmachinedoesnotcomewithoil
intheengine.Beforestartingtheengine,llthe
enginewithoil.
EngineOilSpecications
Engineoilcapacity
WIthoutoillter:0.59L(20
oz);withoillter:0.85L(29
oz)
OilviscositySAE30orSAE10W-30
detergentoil
APIserviceclassicationSJorhigher
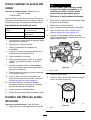
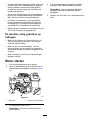
1.Movethemachinetoalevelsurface.
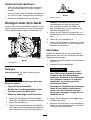
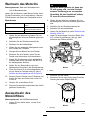
2.Removethedipstickbyrotatingthecap
counterclockwiseandpullingitout(Figure7).
g024162
Figure7
1.Dipstick3.Add
2.Full
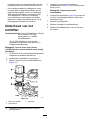
3.Carefullypourabout3/4oftheenginecapacity
ofoilintotheoil-lltube.
4.Wait3minutesfortheoiltosettleintheengine.
5.Wipethedipstickcleanwithacleancloth.
6.Insertthedipstickintotheoil-lltube,then
removethedipstick.
7.Readtheoillevelonthedipstick(Figure7).
•Iftheoillevelonthedipstickistoolow,
carefullypourasmallamountofoilintothe
oil-lltube,wait3minutes,andrepeatsteps
5through7untiltheoilonthedipstickisat
thecorrectlevel.
•Iftheoillevelonthedipstickistoohigh,drain
theexcessoiluntiltheoilonthedipstickis
atthecorrectlevel;refertoChangingthe
EngineOil(page20).
Important:Iftheoillevelintheengineistoo
lowortoohighandyouruntheengine,you
maydamagetheengine.
8.Installthedipstickintotheoil-lltubesecurely.
3
AdjustingtheSelf-Propel
Drive
NoPartsRequired
Procedure
Important:Youmustadjusttheself-propel-drive
cablebeforeyouoperatethemachinefortherst
time.RefertoAdjustingtheSelf-PropelDrive
(page22).
8

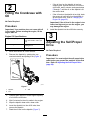
4
AssemblingtheGrassBag
NoPartsRequired
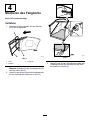
Procedure
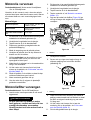
1.Slipthegrassbagovertheframeasshownin
Figure8.
g027289
Figure8
1.Handle
3.Grassbag
2.Frame
Note:Donotslipthebagoverthehandle
(Figure8).
2.Hookthebottomchannelofthebagontothe
bottomoftheframe(Figure9).
g027290
Figure9
3.Hookthetopandsidechannelsofthebagonto
thetopandsidesoftheframe,respectively
(Figure9).
9

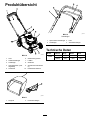
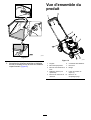
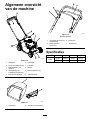
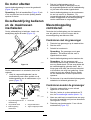
ProductOverview
g231063
Figure10
1.Handle6.Throttle-controllever
2.Self-propel-drivebar
7.Aircleaner
3.Blade-controlbar
8.Sparkplug
4.Reardeector(notshown)9.Cutting-heightlever(4)
5.Fuel-tankcap
10.Oilll/dipstick
g231061
Figure11
1.Grassbag
2.Rear-dischargeplug
g231779
Figure12
Controlbar
1.Blade-controllock-lever3.Handle
2.Blade-controlbail4.Drivebail
Specications
ModelWeightLengthWidthHeight
59kg150cm56cm107cm
22280
(130lb)
(59
inches)
(22
inches)
(42
inches)
10

Operation
Note:Determinetheleftandrightsidesofthe
machinefromthenormaloperatingposition.
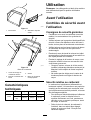
BeforeOperation
BeforeOperationSafety
GeneralSafety
•Becomefamiliarwiththesafeoperationofthe
equipment,operatorcontrols,andsafetysigns.
•Checkthatallguardsandsafetydevices,suchas
deectorsand/orgrasscatcher,areinplaceand
workingproperly.
•Alwaysinspectthemachinetoensurethatthe
blades,bladebolts,andcuttingassemblyarenot
wornordamaged.
•Inspecttheareawhereyouwillusethemachine,
andremoveallobjectsthatcouldinterferewith
theoperationofthemachineorthatthemachine
couldthrow.
•Adjustingthecuttingheightmaybringyouinto
contactwiththemovingblade,causingserious
injury.
–Shutofftheengine,removetheignitionkey
(electric-startmodelonly),andwaitforall
movingpartstostop.
–Donotputyourngersunderthehousing
whenadjustingthecuttingheight.
FuelSafety
•Fuelisextremelyammableandhighlyexplosive.
Areorexplosionfromfuelcanburnyouand
othersandcandamageproperty.
–Topreventastaticchargefromignitingthefuel,
placethecontainerand/ormachinedirectlyon
thegroundbeforelling,notinavehicleoron
anobject.
–Fillthefueltankoutdoors,inanopenarea,
whentheengineiscold.Wipeupanyfuelthat
spills.
–Donothandlefuelwhensmokingoraroundan
openameorsparks.
–Donotremovethefuelcaporaddfueltothe
tankwhiletheengineisrunningorhot.
–Ifyouspillfuel,donotattempttostartthe
engine.Avoidcreatingasourceofignitionuntil
thefuelvaporshavedissipated.
–Storefuelinanapprovedcontainerandkeep
itoutofthereachofchildren.
•Fuelisharmfulorfatalifswallowed.Long-term
exposuretovaporscancauseseriousinjuryand
illness.
–Avoidprolongedbreathingofvapors.
–Keepyourhandsandfaceawayfromthe
nozzleandthefuel-tankopening.
–Keepfuelawayfromyoureyesandskin.
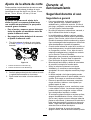
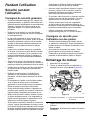
FillingtheFuelTank
DANGER
Gasolineisextremelyammableand
explosive.Areorexplosionfromgasoline
canburnyouandothers.
•Topreventastaticchargefromigniting
thegasoline,placethecontainerand/or
machinedirectlyonthegroundbefore
lling,notinavehicleoronanobject.
•Fillthetankoutdoorswhentheengineis
cold.Wipeupspills.
•Donothandlegasolinewhensmokingor
aroundanopenameorsparks.
•Storegasolineinanapprovedfuel
container,outofthereachofchildren.
•Forbestresults,useonlyclean,fresh(lessthan
30daysold),unleadedgasolinewithanoctane
ratingof87orhigher((R+M)/2ratingmethod).
•Oxygenatedfuelwithupto10%ethanolor15%
MTBEbyvolumeisacceptable.
•Ethanol:Gasolinewithupto10%ethanol
(gasohol)or15%MTBE(methyltertiarybutyl
ether)byvolumeisacceptable.Ethanoland
MTBEarenotthesame.Gasolinewith15%
ethanol(E15)byvolumeisnotapprovedforuse.
Neverusegasolinethatcontainsmorethan
10%ethanolbyvolume,suchasE15(contains
15%ethanol),E20(contains20%ethanol),orE85
(containsupto85%ethanol).Usingunapproved
gasolinemaycauseperformanceproblemsand/or
enginedamagewhichmaynotbecoveredunder
warranty.
•Donotusegasolinecontainingmethanol.
•Donotstorefueleitherinthefueltankorinfuel
containersoverthewinterunlessyouuseafuel
stabilizer.
•Donotaddoiltogasoline.
11

Important:Toreducestartingproblems,addfuel
stabilizertothefuelallgasoline.Mixthestabilizer
withgasolinelessthan30daysold.
Note:Thecapacityofthefueltankis3.8L(1.0US
gallon).
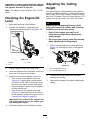
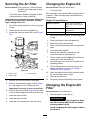
CheckingtheEngine-Oil
Level
1.Movethemachinetoalevelsurface.
2.Removethedipstickbyrotatingthecap
counterclockwiseandpullingitout(Figure13).
g024162
Figure13
1.Dipstick3.Add
2.Full
3.Wipethedipstickcleanwithacleancloth.
4.Insertthedipstickintotheoil-lltube,butdonot
screwitin,thenremovethedipstick.
5.Readtheoillevelonthedipstick(Figure13).
•Iftheoillevelonthedipstickistoolow
(Figure13),carefullypourasmallamount
ofSAE30orSAE10W-30detergentoilinto
theoil-lltube,wait3minutes,andrepeat
steps3through5untiltheoilonthedipstick
isatthecorrectlevel.
•Iftheoillevelonthedipstickistoohigh
(Figure13),draintheexcessoiluntiltheoil
onthedipstickisatthecorrectlevel;referto
ChangingtheEngineOil(page20).
Important:Iftheoillevelintheengineistoo
lowortoohighandyouruntheengine,you
maydamagetheengine.
6.Installthedipstickintotheoil-lltubesecurely.
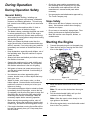
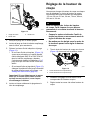
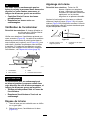
AdjustingtheCutting
Height
Youcanchangethecuttingheightateachwheelby
adjustingacutting-heightlever.Cuttingheightsare25
mm(1inch),38mm(1-1/2inches),51mm(2inches),
64mm(2-1/2inches),76mm(3inches),89mm(3-1/2
inches),102mm(4inches),114mm(4-1/2inches).
DANGER
Adjustingthecutting-heightleverscould
bringyourhandsintocontactwithamoving
bladeandresultinseriousinjury.
•Shutofftheengineandwaitforall
movementtostopbeforeadjustingthe
cuttingheight.
•Donotputyourngersunderthehousing
whenadjustingthecuttingheight.
1.Pullthecutting-heightlevertowardthewheel
(Figure14)andmovethelevertothedesired
setting.
g024301
Figure14
1.Rearcutting-heightlever(2)
2.Frontcutting-heightlever(2)
2.Releasethecutting-heightleverandseatit
securelyinthenotch.
3.Adjustallthewheelstothesamecutting-height
setting.
12

DuringOperation
DuringOperationSafety
GeneralSafety
•Wearappropriateclothing,includingeye
protection;longpants;slip-resistant,substantial
footwear;andhearingprotection.Tiebacklong
hair,securelooseclothing,anddonotwearloose
jewelry.
•Donotoperatethemachinewhileill,tired,or
undertheinuenceofalcoholordrugs.
•Thebladeissharp;contactingthebladecanresult
inseriouspersonalinjury.Shutofftheengine,
removetheignitionkey(electric-startmodelonly),
andwaitforallmovingpartstostopbeforeleaving
theoperatingposition.
•Whenyoureleasetheblade-controlbar,the
engineshouldshutoffandthebladeshouldstop
within3seconds.Ifnot,stopusingyourmachine
immediatelyandcontactanAuthorizedService
Dealer.
•Keepbystanders,especiallysmallchildren,outof
theoperatingarea.Stopthemachineifanyone
entersthearea.
•Alwayslookdownandbehindyoubeforemoving
themachineinreverse.
•Operatethemachineonlyingoodvisibilityand
appropriateweatherconditions.Donotoperate
themachinewhenthereistheriskoflighting.
•Wetgrassorleavescancauseseriousinjuryif
youslipandcontacttheblade.Avoidmowingin
wetconditions.
•Useextremecarewhenapproachingblind
corners,shrubs,trees,orotherobjectsthatmay
blockyourview.
•Watchforholes,ruts,bumps,rocks,orother
hiddenobjects.Uneventerraincouldcausethe
machinetooverturnorcauseyoutoloseyour
balanceorfooting.
•Ifthemachinestrikesanobjectorstartstovibrate,
immediatelyshutofftheengine,removethekey
(ifequipped),waitforallmovingpartstostop,and
disconnectthewirefromthesparkplugbefore
examiningthemachinefordamage.Makeall
necessaryrepairsbeforeresumingoperation.
•Beforeleavingtheoperatingposition,shutoff
theengine,removetheignitionkey(electric-start
modelonly),andwaitforallmovingpartstostop.
•Iftheenginehasbeenrunningthemuferwillbe
hotandcanseverelyburnyou.Keepawayfrom
thehotmufer.
•Checkthegrasscatchercomponentsand
thedischargechutefrequentlyforanywear
ordeteriorationandreplacethemwiththe
manufacturer'srecommendedpartswhen
necessary.
•Useaccessoriesandattachmentsapprovedby
TheT oro®Companyonly.
SlopeSafety
•Mowacrossthefaceofslopes;neverupand
down.Useextremecautionwhenchanging
directiononslopes.
•Donotmowonexcessivelysteepslopes.Poor
footingcouldcauseaslip-and-fallaccident.
•Mowwithcautionneardrop-offs,ditches,or
embankments.
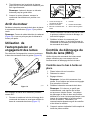
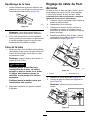
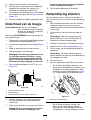
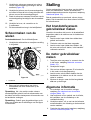
StartingtheEngine
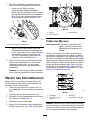
1.Connectthespark-plugwiretothesparkplug.
2.Openthefuelvalvebymovingthefuel-valve
levertotheright(Figure15).
g024304
Figure15
1.Throttle-controllever2.Fuel-valvelever
3.Movethethrottle-controllevertotheCHOKE
position.
Note:Donotusethechokewhentheengine
iswarm.
4.Pullthestarterhandlelightlyuntilyoufeel
resistance,thenpullitsharply.
Note:Allowtheropetoreturnslowlytothe
ropeguideonthehandle.
5.Whentheenginestarts,movethethrottle-control
levertotheFASTposition.
13

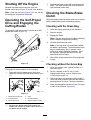
ShuttingOfftheEngine
Releasetheblade-controlbarandmovethe
throttle-controllever(Figure15)totheSTOPposition.
Note:Closethefuelvalve(Figure15)ifyouwillnot
bestartingtheenginesoonafterward.
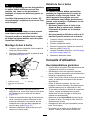
OperatingtheSelf-Propel
DriveandEngagingthe
CuttingBlades
Tooperatetheself-propeldrive,holdthedrivebail
againstthehandle(Figure16).
g033083
Figure16
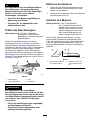
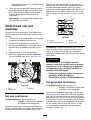
Toengagethecuttingblades,dothefollowing:
1.Pushandholdtheblade-controllocklever
forwardtoreleasetheblade-controlbail(Figure
17).
g012606
Figure17
1.Blade-controllocklever4.Push
2.Lockedposition5.Unlockedposition
3.Blade-controlbail
6.Squeezeagainsthandle
2.Squeezetheblade-controlbailagainstthe
handleandreleasetheblade-controllocklever;
thebladeshouldengage.
3.Releasetheblade-controlbailtodisengagethe
blade.Theblade-controllockleverwillresetto
locktheblade-controlbail.
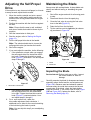
CheckingtheBlade-Brake
Clutch
Checktheblade-controlbarbeforeeachusetoensure
thattheblade-brakeclutchisoperatingproperly.
CheckingwiththeGrassBag
1.Installtheemptygrassbagonthemachine.
2.Starttheengine.
3.Engagetheblade.
Note:Thebagshouldbegintoinate,indicating
thatthebladeisengagedandrotating.
4.Releasetheblade-controlbar.
Note:Ifthebagdoesnotimmediatelydeate,
thebladeisstillrotating.Theblade-brakeclutch
maybedeterioratingand,ifignored,could
resultinanunsafeoperatingcondition.Have
themachineinspectedandservicedbyan
AuthorizedServiceDealer.
5.Shutofftheengineandwaitforallmovingparts
tostop.
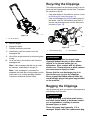
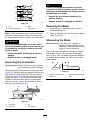
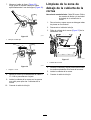
CheckingwithouttheGrassBag
1.Movethemachineontoapavedsurfaceina
non-windyarea.
2.Setall4wheelstothe76mm(3inch)
cutting-heightsetting;refertoAdjustingthe
CuttingHeight(page12).
3.Takeahalfsheetofnewspaperandcrumpleit
intoaballsmallenoughtogounderthemachine
housing(about76mmor3inchesindiameter).
4.Placethenewspaperballabout13cm(5inches)
infrontofthemachine(Figure18).
14

g231077
Figure18
1.13cm(5inches)
5.Starttheengine.
6.Engagetheblade.
7.Releasetheblade-controlbar.
8.Immediatelypushthemachineoverthe
newspaperball.
9.Shutofftheengineandwaitforallmovingparts
tostop.
10.Gotothefrontofthemachineandcheckthe
newspaperball.
Note:Ifthenewspaperballdidnotgounder
themachine,repeatsteps4through10.
Note:Ifthenewspaperisunravelledor
shredded,thebladedidnotstopproperly,which
couldresultinanunsafeoperatingcondition.
ContactanAuthorizedServiceDealer.
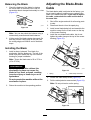
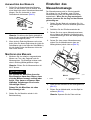
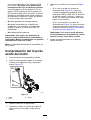
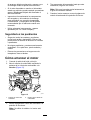
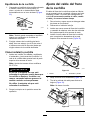
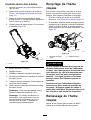
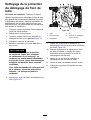
RecyclingtheClippings
Thismachinecomesfromthefactoryreadytorecycle
grassandleafclippingsbackintothelawn.T oprepare
themachinetorecycle:
•Ifthegrassbagisonthemachine,removeit;refer
toRemovingtheGrassBag(page16).
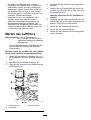
•Iftherear-dischargeplugisnotinstalled,gripitby
thehandle,raisethereardeector,andinsertit
intotherear-dischargechuteuntilthelatchlocks
intoplace(Figure19).
g024300
Figure19
1.Rear-dischargeplug
2.Reardeector
WARNING
Operatingthemachinetorecyclelawn
clippingswithoutthepluginplaceallows
objectstobethrowntowardyouor
bystanders.Also,contactwiththeblades
couldoccur.Thrownobjectsorbladecontact
cancauseseriousinjuryordeath.
Ensurethattherear-dischargeplugisin
placebeforeyourecycletheclippings.
Neverengagethebladeswithouteitherthe
rear-dischargeplugorthegrassbaginstalled
onthemachine.
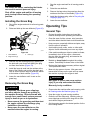
BaggingtheClippings
Usethegrassbagwhenyouwanttocollectgrassand
leafclippingsfromthelawn.
WARNING
Aworngrassbagcouldallowsmallstones
andothersimilardebristobethrowntoward
youorbystanders,resultinginserious
personalinjuryordeath.
Checkthegrassbagfrequently.Ifitis
damaged,installanewTororeplacementbag.
15

WARNING
Thebladesaresharp;contactingtheblades
canresultinseriouspersonalinjury.
Shutofftheengineandwaitforallmoving
partstostopbeforeleavingtheoperating
position.
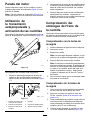
InstallingtheGrassBag
1.Shutofftheengineandwaitforallmovingparts
tostop.
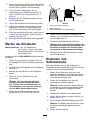
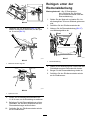
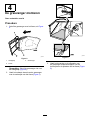
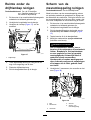
2.Raiseandholdupthereardeector(Figure20).
g024302
Figure20
1.Reardeector3.Notch(2)
2.Bag-rodend(2)
3.Removetherear-dischargeplugbypushingin
thelatchwithyourthumbandpullingtheplug
outfromthemachine(Figure19).
4.Installthebag-rodendsintothenotchesatthe
baseofthehandle,androckthebagbackand
forthtoensurethatthebag-rodendsareseated
atthebottomofbothnotches(Figure20).
5.Lowerthereardeectoruntilitrestsonthe
grassbag.
RemovingtheGrassBag
DANGER
Themachinecanthrowgrassclippings
andotherobjectsthroughanopeningin
themachinehousing.Objectsthrownwith
enoughforcecouldcauseseriouspersonal
injuryordeathtoyouortobystanders.
•Neverremovethegrassbagandthenstart
theenginewithoutthedischargeplug
installedonthemachine.
•Neveropenthereardeectoronthe
machinewhentheengineisrunning.
1.Stoptheengineandwaitforallmovingpartsto
stop.
2.Raisethereardeector.
3.Removethebagrodonthegrassbagfromthe
notchesatthebaseofthehandle(Figure20).
4.Installthedischargeplug;refertoRecyclingthe
Clippings(page15).
5.Lowerthereardeector.
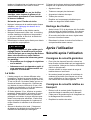
OperatingTips
GeneralTips
•Reviewthesafetyinstructionsandreadthis
manualcarefullybeforeoperatingthemachine.
•Cleartheareaofsticks,stones,wire,branches,
andotherdebristhatthebladecouldhitandthrow.
•Keepeveryone,especiallychildrenandpets,away
fromtheareaofoperation.
•Avoidstrikingtrees,walls,curbs,orothersolid
objects.Neverdeliberatelymowoveranyobject.
•Ifthemachinestrikesanobjectorstartstovibrate,
immediatelyshutofftheengine,disconnect
thewirefromthesparkplug,andexaminethe
machinefordamage.
•Maintainasharpbladethroughoutthecutting
season.Periodicallyledownnicksontheblade.
•Replacethebladewhennecessarywithanoriginal
Tororeplacementblade.
•Mowonlydrygrassorleaves.Wetgrassand
leavestendtoclumpontheyardandcancause
themachinetoplugortheenginetostall.
WARNING
Wetgrassorleavescancauseserious
injuryifyouslipandcontacttheblade.
Mowonlyindryconditions.
•Cleanunderthemachineaftereachmowing;refer
toCleaningundertheMachine(page18).
•Keeptheengineingoodrunningcondition.
•Cleantheairlterfrequently.Mulchingstirsup
moreclippingsanddustwhichclogstheairlter
andreducesengineperformance.
•Settheenginespeedtothefastestpositionforthe
bestcuttingresults.
16

WARNING
Operatingamachinewithitsengine
runningataspeedgreaterthanthefactory
settingcancausethemachinetothrowa
partofthebladeorenginetowardyouor
bystanders,resultinginseriouspersonal
injuryordeath.
–Donotchangetheenginespeedsetting.
–Ifyoususpecttheenginespeedisfaster
thannormal,contactanAuthorized
ServiceDealer.
CuttingGrass
•Grassgrowsatdifferentratesatdifferenttimes
oftheyear.Inthesummerheat,itisbesttocut
grassatthe64mm(2-1/2inch),76mm(3inch),
or89mm(3-1/2inch)cutting-heightsettings.Cut
onlyaboutathirdofthegrassbladeatatime.
Donotcutbelowthe64mm(2-1/2inch)setting
unlessthegrassissparseoritislatefallwhen
grassgrowthbeginstoslowdown.
•Whencuttinggrassover15cm(6inches)tall,rst
mowatthehighestcutting-heightsettingandwalk
slower;thenmowagainatalowersettingforthe
bestlawnappearance.Ifthegrassistoolongand
theleavesclumpontopofthelawn,themachine
mayplugandcausetheenginetostall.
•Alternatethemowingdirection.Thishelps
dispersetheclippingsoverthelawnforeven
fertilization.
Ifthenishedlawnappearanceisunsatisfactory,try1
ormoreofthefollowing:
•Sharpentheblade.
•Walkataslowerpacewhilemowing.
•Raisethecuttingheightonyourmachine.
•Cutthegrassmorefrequently.
•Overlapcuttingswathsinsteadofcuttingafull
swathwitheachpass.
CuttingLeaves
•Aftercuttingthelawn,ensurethathalfofthelawn
showsthroughthecutleafcover.Youmayneed
tomakemorethanasinglepassovertheleaves.
•Forlightleafcoverage,setallthewheelsatthe
samecutting-heightsetting.
•Slowdownyourmowingspeedifthemachine
doesnotcuttheleavesnelyenough.
AfterOperation
AfterOperationSafety
GeneralSafety
•Cleangrassanddebrisfromthemachinetohelp
preventres.Cleanupoilorfuelspills.
•Allowtheenginetocoolbeforestoringthemachine
inanyenclosure.
•Neverstorethemachineorfuelcontainerwhere
thereisanopename,spark,orpilotlight,such
asonawaterheateroronotherappliances.
HaulingSafety
•Removetheignitionkey(ifequipped)before
loadingthemachineforhauling.
•Usecarewhenloadingorunloadingthemachine.
•Securethemachinefromrolling.
17

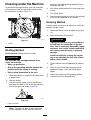
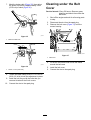
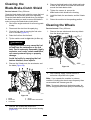
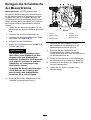
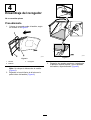
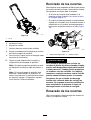
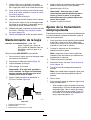
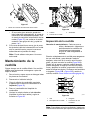
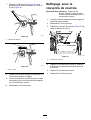
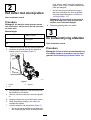
CleaningundertheMachine
Toensurethebestperformance,keeptheunderside
ofthemachineclean.Beespeciallycarefultokeep
thekickersfreeofdebris(Figure21).
g024281
Figure21
1.Kickers
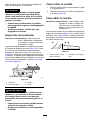
WashingMethod
ServiceInterval:Beforeeachuseordaily
WARNING
Themachinemaydislodgematerialfrom
underthemachine.
•Weareyeprotection.
•Stayintheoperatingposition(behindthe
handle)whiletheengineisrunning.
•Donotallowbystandersinthearea.
1.Movethemachinetoapavedlevelsurfacenear
agardenhose.
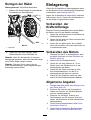
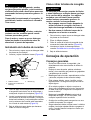
2.Starttheengine.
3.Holdtherunninggardenhoseathandlelevel
anddirectthewatertoowonthegroundjustin
frontoftheright,rearwheel(Figure22).
g002275
Figure22
1.Right,rearwheel
Note:Thebladewilldrawinwaterandwash
outtheclippings.Letthewaterrununtilyou
nolongerseeclippingsbeingwashedoutfrom
underthemachine.
4.Shutofftheengineandwaitforallmovingparts
tostop.
5.Turnoffthewater.
6.Startthemachineandletitrunforafewminutes
todryouttheundersideofthemachine.
ScrapingMethod
Ifwashingdoesnotremovealldebrisfromunderthe
machine,scrapeitclean.
1.Disconnectthewirefromthesparkplug(Figure
10).
2.Drainthefuelfromthefueltank.
WARNING
Tippingthemachinemaycausethefuel
toleakfromthecarburetororthefuel
tank.Fuelisextremelyammable,highly
explosive,and,undercertainconditions,
cancausepersonalinjuryorproperty
damage.
Avoidfuelspillsbyrunningtheengine
dryorbyremovingthefuelwithahand
pump;neversiphon.
3.Tipthemachineontoitsrightside(aircleaner
up).
4.Removethedirtandgrassclippingswitha
hardwoodscraper.Avoidburrsandsharp
edges.
5.Returnthemachinetotheoperatingposition.
6.Connectthewiretothesparkplug.
18

Maintenance
Note:Determinetheleftandrightsidesofthemachinefromthenormaloperatingposition.
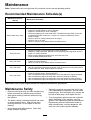
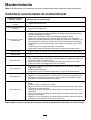
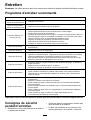
RecommendedMaintenanceSchedule(s)
MaintenanceService
Interval
MaintenanceProcedure
Aftertherst8hours
•Changetheengineoil.
Aftertherst25hours
•Tightenanyloosefasteners.
Beforeeachuseordaily
•Removegrassclippingsanddirtfromunderthehousing.
•Inspectthemowerbladesforwearordamage.
•Inspecttheacceleratorforwearordamage.
•Checkthestoppingtimeofthebladebrake.Theblademuststopwithin3seconds
ofreleasingtheblade-controlbar;ifitdoesnot,contactanAuthorizedService
Dealerforrepair.
•Checkforlooseormissingfastenersontheengine.
•Checkforfueloroilleaks.
•Checkorcleantherecoilstarterandtheair-intakescreen.
Every25hours
•Cleanthefoampre-lter(morefrequentlyindustyconditions).
Every40hours
•Cleanthewheelsandgears.
Every50hours
•Changetheengineoil(morefrequentlyindustyconditions).
•Sharpenorreplacetheblade.Maintainitmorefrequentlyiftheedgedullsquicklyin
roughorinsandyconditions.
•Removegrassclippingsanddebrisfromunderthebeltcover.
•Cleantheblade-brake-clutchshield.
Every100hours
•Inspect,clean,andadjustthesparkpluggap;replacethesparkplugifnecessary.
•Tightenanyloosefasteners.
•Checkorcleantherecoilstarterandtheair-intakescreen.
Every200hours
•Changetheengine-oillter.
•Haveanauthorizedengineservicingdealercheckforleaksinthefuelsystemand/or
adeterioratingfuelhose.Replacepartsifnecessary.
Every300hours
•Replacethepaperairlter(morefrequentlyindustyconditions).
•Cleanthecylinderandthecylinder-headns.
•Haveanauthorizedengineservicingdealercheckandadjusttheengineidlespeed.
•Haveanauthorizedengineservicingdealercleanthecombustionchamber.
•Haveanauthorizedengineservicingdealercheckandadjustthevalveclearance.
•Haveanauthorizedengineservicingdealercleanandlapthevalveseatingsurface.
Important:Refertoyourenginemanualforadditionalmaintenanceprocedures.
MaintenanceSafety
•Disconnectthespark-plugwirefromthesparkplug
beforeperforminganymaintenanceprocedure.
•Wearglovesandeyeprotectionwhenservicing
themachine.
•Thebladeissharp;contactingthebladecanresult
inseriouspersonalinjury.Weargloveswhen
servicingtheblade.Donotrepairoralterthe
blade(s).
•Nevertamperwithsafetydevices.Checktheir
properoperationregularly.
•Tippingthemachinemaycausethefueltoleak.
Fuelisammableandexplosive,andcancause
personalinjury.Runtheenginedryorremovethe
fuelwithahandpump;neversiphonthefuel.
•Toensureoptimumperformanceandcontinued
safetycerticationofthemachine,useonly
genuineT ororeplacementpartsandaccessories.
Replacementpartsandaccessoriesmadeby
othermanufacturerscouldbedangerous,and
suchusecouldvoidtheproductwarranty.
19
La page est en cours de chargement...
La page est en cours de chargement...
La page est en cours de chargement...
La page est en cours de chargement...
La page est en cours de chargement...
La page est en cours de chargement...
La page est en cours de chargement...
La page est en cours de chargement...
La page est en cours de chargement...
La page est en cours de chargement...
La page est en cours de chargement...
La page est en cours de chargement...
La page est en cours de chargement...
La page est en cours de chargement...
La page est en cours de chargement...
La page est en cours de chargement...
La page est en cours de chargement...
La page est en cours de chargement...
La page est en cours de chargement...
La page est en cours de chargement...
La page est en cours de chargement...
La page est en cours de chargement...
La page est en cours de chargement...
La page est en cours de chargement...
La page est en cours de chargement...
La page est en cours de chargement...
La page est en cours de chargement...
La page est en cours de chargement...
La page est en cours de chargement...
La page est en cours de chargement...
La page est en cours de chargement...
La page est en cours de chargement...
La page est en cours de chargement...
La page est en cours de chargement...
La page est en cours de chargement...
La page est en cours de chargement...
La page est en cours de chargement...
La page est en cours de chargement...
La page est en cours de chargement...
La page est en cours de chargement...
La page est en cours de chargement...
La page est en cours de chargement...
La page est en cours de chargement...
La page est en cours de chargement...
La page est en cours de chargement...
La page est en cours de chargement...
La page est en cours de chargement...
La page est en cours de chargement...
La page est en cours de chargement...
La page est en cours de chargement...
La page est en cours de chargement...
La page est en cours de chargement...
La page est en cours de chargement...
La page est en cours de chargement...
La page est en cours de chargement...
La page est en cours de chargement...
La page est en cours de chargement...
La page est en cours de chargement...
La page est en cours de chargement...
La page est en cours de chargement...
La page est en cours de chargement...
La page est en cours de chargement...
La page est en cours de chargement...
La page est en cours de chargement...
La page est en cours de chargement...
La page est en cours de chargement...
La page est en cours de chargement...
La page est en cours de chargement...
La page est en cours de chargement...
La page est en cours de chargement...
La page est en cours de chargement...
La page est en cours de chargement...
La page est en cours de chargement...
La page est en cours de chargement...
La page est en cours de chargement...
La page est en cours de chargement...
La page est en cours de chargement...
La page est en cours de chargement...
La page est en cours de chargement...
La page est en cours de chargement...
La page est en cours de chargement...
La page est en cours de chargement...
La page est en cours de chargement...
La page est en cours de chargement...
La page est en cours de chargement...
La page est en cours de chargement...
La page est en cours de chargement...
La page est en cours de chargement...
La page est en cours de chargement...
La page est en cours de chargement...
La page est en cours de chargement...
La page est en cours de chargement...
La page est en cours de chargement...
La page est en cours de chargement...
La page est en cours de chargement...
La page est en cours de chargement...
La page est en cours de chargement...
La page est en cours de chargement...
La page est en cours de chargement...
La page est en cours de chargement...
La page est en cours de chargement...
La page est en cours de chargement...
La page est en cours de chargement...
La page est en cours de chargement...
La page est en cours de chargement...
La page est en cours de chargement...
La page est en cours de chargement...
La page est en cours de chargement...
La page est en cours de chargement...
La page est en cours de chargement...
La page est en cours de chargement...
La page est en cours de chargement...
La page est en cours de chargement...
La page est en cours de chargement...
La page est en cours de chargement...
La page est en cours de chargement...
La page est en cours de chargement...
La page est en cours de chargement...
La page est en cours de chargement...
La page est en cours de chargement...
La page est en cours de chargement...
La page est en cours de chargement...
La page est en cours de chargement...
La page est en cours de chargement...
La page est en cours de chargement...
La page est en cours de chargement...
La page est en cours de chargement...
La page est en cours de chargement...
La page est en cours de chargement...
La page est en cours de chargement...
La page est en cours de chargement...
La page est en cours de chargement...
La page est en cours de chargement...
La page est en cours de chargement...
La page est en cours de chargement...
La page est en cours de chargement...
La page est en cours de chargement...
La page est en cours de chargement...
La page est en cours de chargement...
La page est en cours de chargement...
La page est en cours de chargement...
La page est en cours de chargement...
La page est en cours de chargement...
La page est en cours de chargement...
-
 1
1
-
 2
2
-
 3
3
-
 4
4
-
 5
5
-
 6
6
-
 7
7
-
 8
8
-
 9
9
-
 10
10
-
 11
11
-
 12
12
-
 13
13
-
 14
14
-
 15
15
-
 16
16
-
 17
17
-
 18
18
-
 19
19
-
 20
20
-
 21
21
-
 22
22
-
 23
23
-
 24
24
-
 25
25
-
 26
26
-
 27
27
-
 28
28
-
 29
29
-
 30
30
-
 31
31
-
 32
32
-
 33
33
-
 34
34
-
 35
35
-
 36
36
-
 37
37
-
 38
38
-
 39
39
-
 40
40
-
 41
41
-
 42
42
-
 43
43
-
 44
44
-
 45
45
-
 46
46
-
 47
47
-
 48
48
-
 49
49
-
 50
50
-
 51
51
-
 52
52
-
 53
53
-
 54
54
-
 55
55
-
 56
56
-
 57
57
-
 58
58
-
 59
59
-
 60
60
-
 61
61
-
 62
62
-
 63
63
-
 64
64
-
 65
65
-
 66
66
-
 67
67
-
 68
68
-
 69
69
-
 70
70
-
 71
71
-
 72
72
-
 73
73
-
 74
74
-
 75
75
-
 76
76
-
 77
77
-
 78
78
-
 79
79
-
 80
80
-
 81
81
-
 82
82
-
 83
83
-
 84
84
-
 85
85
-
 86
86
-
 87
87
-
 88
88
-
 89
89
-
 90
90
-
 91
91
-
 92
92
-
 93
93
-
 94
94
-
 95
95
-
 96
96
-
 97
97
-
 98
98
-
 99
99
-
 100
100
-
 101
101
-
 102
102
-
 103
103
-
 104
104
-
 105
105
-
 106
106
-
 107
107
-
 108
108
-
 109
109
-
 110
110
-
 111
111
-
 112
112
-
 113
113
-
 114
114
-
 115
115
-
 116
116
-
 117
117
-
 118
118
-
 119
119
-
 120
120
-
 121
121
-
 122
122
-
 123
123
-
 124
124
-
 125
125
-
 126
126
-
 127
127
-
 128
128
-
 129
129
-
 130
130
-
 131
131
-
 132
132
-
 133
133
-
 134
134
-
 135
135
-
 136
136
-
 137
137
-
 138
138
-
 139
139
-
 140
140
-
 141
141
-
 142
142
-
 143
143
-
 144
144
-
 145
145
-
 146
146
-
 147
147
-
 148
148
-
 149
149
-
 150
150
-
 151
151
-
 152
152
-
 153
153
-
 154
154
-
 155
155
-
 156
156
-
 157
157
-
 158
158
-
 159
159
-
 160
160
-
 161
161
-
 162
162
-
 163
163
-
 164
164


Toro 53cm Heavy-Duty Recycler/Rear Bagger Lawn Mower Manuel utilisateur
- Catégorie
- Tondeuses à gazon
- Taper
- Manuel utilisateur
dans d''autres langues
- English: Toro 53cm Heavy-Duty Recycler/Rear Bagger Lawn Mower User manual
- español: Toro 53cm Heavy-Duty Recycler/Rear Bagger Lawn Mower Manual de usuario
- Deutsch: Toro 53cm Heavy-Duty Recycler/Rear Bagger Lawn Mower Benutzerhandbuch
- Nederlands: Toro 53cm Heavy-Duty Recycler/Rear Bagger Lawn Mower Handleiding
Documents connexes
-
Toro Heavy-Duty Proline 53 cm Professional Walk Behind Mower 22291 Manuel utilisateur
-
Toro 55cm Recycler Lawn Mower Manuel utilisateur
-
Toro 53cm Super Bagger Lawn Mower Manuel utilisateur
-
-
-
-
-
-
Toro 76cm TurfMaster Walk-Behind Lawn Mower Manuel utilisateur
-