Episode ES-SUB-MEGA-D10-BLK Le manuel du propriétaire
- Catégorie
- Matériel musical
- Taper
- Le manuel du propriétaire

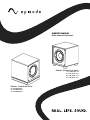
OWNER’S MANUAL
MEGA Powered Subwoofers
S Series - Single Driver Series
ES-SUB-MEGA-S8
ES-SUB-MEGA-S10
ES-SUB-MEGA-S12
ES-SUB-MEGA-S15
D Series - Dual Driver Series
ES-SUB-MEGA-D8
ES-SUB-MEGA-D10
ES-SUB-MEGA-D12

www.snapav.com Support 866.838.5052
page | 2
www.snapav.com Support 866.838.5052
REGULATORY COMPLIANCE & SAFETY INFORMATION
1. Read these instructions.
Lisez ces instructions.
2. Keep these instructions.
Conservez ces instructions
3. Heed all warnings.
Respectez tous les avertissements.
4. Follow all instructions.
Suivez toutes les instructions.
5. Do not use this apparatus near water.
Ne pas utiliser cet appareil près de l’eau.
6. Clean only with dry cloth.
Nettoyez-le uniquement avec un chiffon sec.
7. Do not block any ventilation openings. Install in accordance with the manufacturer’s instructions.
Ne pas bloquer les ouvertures de ventilation. Installer conformément aux instructions du fabricant.
8. Do not install near any heat sources such as radiators, heat registers, stoves, or other apparatus (including
amplifiers) that produce heat.
Ne pas installer près de sources de chaleur telles que des radiateurs, registres de chaleur, poêles, ou autres
appareils (incluant les amplificateurs) qui produisent de la chaleur.
9. Do not defeat the safety purpose of the polarized or grounding-type plug. A polarized plug has two blades with one
wider than the other. A grounding type plug has two blades and a third grounding prong. The wide bladed or the
third prong are provided for your safety. If the provided plug does not fit into your outlet, consult an electrician for
replacement of the obsolete outlet.
Ne pas contourner le dispositif de sécurité de la fiche polarisée ou de mise à la terre. Une fiche polarisée possède
deux lames dont une plus large que l’autre. Une fiche de terre a deux lames et une troisième broche de terre. La
lame large ou la troisième broche est fournie pour votre sécurité. Si la fiche fournie ne s’adapte pas à votre prise,
consultez un électricien pour le remplacement de la prise obsolète.
10. Protect the power cord from being walked on or pinched particularly at plugs, convenience receptacles, and the
point where they exit from the apparatus.
Protégez le cordon d’alimentation ne soit piétiné ou pincé, en particulier au niveau des fiches, des prises et au point
où il sort de l’appareil.
11. Only use attachments/accessories specified by the manufacturer.
Utilisez uniquement des fixations / accessoires spécifiés par le fabricant.
12. Use only with the cart, stand, tripod, bracket, or table specified by the manufacturer, or sold with the
apparatus. When a cart is used, use caution when moving the cart/apparatus combination to avoid injury
from tip-over.
Utilisez uniquement avec le chariot, le socle, le trépied, le support ou la table spécifiés par le fabricant ou
vendu avec l’appareil. Lorsque vous utilisez un chariot, soyez prudent lorsque vous déplacez l’ensemble chariot /
appareil pour éviter des blessures dues au renversement.
13. Unplug this apparatus during lightning storms or when unused for long periods of time.
Débranchez cet appareil pendant les orages ou lorsqu’il n’est pas utilisé pendant de longues périodes de temps.
14. Refer all servicing to qualified service personnel. Servicing is required when the apparatus has been damaged in
any way, such as power-supply cord or plug is damaged, liquid has been spilled or objects have fallen into the
apparatus, the apparatus has been exposed to rain or moisture, does not operate normally, or has been dropped.
Confiez toutes les réparations à un personnel qualifié. Une réparation est nécessaire lorsque l’appareil a été
endommagé de quelque façon que ce soit le cordon d’alimentation ou la fiche est endommagé, du liquide a été
renversé ou si des objets sont tombés dans l’appareil, l’appareil a été exposé à la pluie ou à l’humidité, ne fonctionne
pas normalement, ou s’il est tombé.
15. This equipment uses AC power which can be subjected to electrical surges, typically lightning transients which are
very destructive to customer terminal equipment connected to AC power sources. The warranty for this equipment
does not cover damage caused by electrical surge or lightning transients. To reduce the risk of this equipment
becoming damaged it is suggested that the customer consider installing a surge arrestor.
Cet équipement utilise la puissance AC qui peuvent être soumis à des surtensions électriques, la foudre
généralement transitoires qui sont très destructives envers les équipements terminaux connectés à des sources
d’alimentation CA. La garantie de cet appareil ne couvre pas les dommages causés par les surtensions électriques
ou transitoires de foudre. Pour réduire le risque de cet équipement devient endommagé, il est suggéré que le client
envisager l’installation d’un limiteur de surtension.
16. The socket-outlet providing power to the equipment shall be easily accessible. To completely disconnect unit power

www.snapav.com Support 866.838.5052
page | 3
from the AC mains, remove the power cord from the socket-outlet or turn off the circuit breaker that supplies the AC
mains power to the socket-outlet.
La prise de courant qui alimente l’équipement doit être facilement accessible. Pour déconnecter complètement
l’alimentation de l’unité du secteur, débranchez le cordon d’alimentation de la prise de courant ou éteignez le
disjoncteur qui fournit l’alimentation secteur à la prise de courant.
17. This product relies on the buildings installation for short-circuit (overcurrent) protection. Ensure that the protective
device is rated not greater than: 20A.
Ce produit repose sur l’installation des bâtiments pour les courts-circuits (surintensité) de protection. Assurez-vous
que le dispositif de protection est assignée ne dépassant pas: 20A.
18. Never push objects of any kind into this product through cabinet slots as they may touch dangerous voltage points
or short out parts that could result in fire or electric shock.
N’introduisez jamais d’objets d’aucune sorte dans ce produit à travers les fentes du boîtier car ils pourraient toucher
des points de tension dangereux ou court-circuiter des pièces qui pourraient entraîner un incendie ou un choc
électrique.
19. This product can interfere with electrical equipment such as tape recorders, TV sets, radios, computers and
microwave ovens if placed in close proximity.
Ce produit peut interférer avec des appareils électriques tels que les magnétophones, téléviseurs, radios,
ordinateurs et fours à micro-ondes si placés à proximité.
20. This product shall be used at maximum 35 degree Celsius ambient temperature.
Ce produit doit être utilisé à une température ambiante maximale de 35 degrés Celsius.
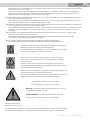
The lightning flash and arrow head within the triangle is a warning sign
alerting you of dangerous voltage inside the product
L’éclair et la flèche dans le triangle est un signe d’alerte pour vous avertir
d’une tension dangereuse à l’intérieur du produit
Caution: To reduce the risk of electric shock, do not remove cover (or
back). No user serviceable parts inside. Refer servicing to qualified
service personnel.
Attention: Pour réduire le risque de choc électrique, ne pas retirer le
couvercle (ou l’arrière). Aucune pièce réparable par l’utilisateur. Confiez
l’entretien à un personnel qualifié.
.
The exclamation point within the triangle is a warning sign alerting you of
important instructions accompanying the product.
Le point d’exclamation dans un triangle est un signe d’avertissement vous
signale des instructions importantes accompagnant le produit.
See marking on bottom / back of product
Voir le marquage sur les bas / dos du produit
Warning!: To reduce the risk of electrical shock, do not expose
this apparatus to rain or moisture
AVERTISSEMENT! Pour réduire le risque de choc électrique,
n'exposez pas cet appareil à la pluie ou à l'humidité.
Save these instructions
Conservez ces instructions
Compliance of this equipment is confirmed by the following label that is placed on the equipment:
Conformité de cet appareil est confirmé par le symbole suivant qui est placé sur l’équipement:

www.snapav.com Support 866.838.5052
page | 4
www.snapav.com Support 866.838.5052
USA & Canada Compliance
FCC Part 15, Subpart B & IC Unintentional Emissions Interference Statement
This equipment has been tested and found to comply with the limits for a Class B digital device, pursuant to Part 15 of
the FCC rules. These limits are designed to provide reasonable protection against harmful interference when the equip-
ment is operated in a residential installation. This equipment generates uses and can radiate radio frequency energy
and, if not installed and used in accordance with the instructions, may cause harmful interference to radio communica-
tions. However, there is no guarantee that interference will not occur in a particular installation. If this equipment does
cause harmful interference to radio or television reception, which can be determined by turning the equipment off and
on, the user is encouraged to try to correct the interference by one or more of the following measures:
• Reorient or relocate the receiving antenna.
• Increase the separation between the equipment and receiver.
• Connect the equipment into an outlet on a circuit different from that to which the receiver is connected.
• Consult the dealer or an experienced radio/TV technician for help.
This device complies with part 15 of the FCC rules and ISED’s license-exempt RSSs. Operation is subject to the following
two conditions: (1) This device may not cause harmful interference, and (2) this device must accept any interference
received, including interference that may cause undesired operation.
Cet appareil est conforme à la section 15 des règles de la FCC et ISED’s aux RSS exempts de licence d’ISED. Son utilisa-
tion est soumise aux deux conditions suivantes: (1) Cet appareil ne doit pas causer d’interférences nuisibles et (2) cet ap-
pareil doit accepter toutes les interférences reçues, y compris celles pouvant entraîner un fonctionnement non souhaité.
IMPORTANT! Any changes or modifications not expressly approved by the party responsible for compliance could void
the user’s authority to operate this equipment.
IMPORTANT! Tous les changements ou modifications pas expressément approuvés par la partie responsable de la confor-
mité ont pu vider l’autorité de l’utilisateur pour actionner cet équipement.
Canada Warning Statement:
CAN ICES-3 (B)/NMB-3(B)
• This product meets the applicable Innovation, Science and Economic Development Canada technical specifications.
• Ce produit répond aux spécifications techniques applicables à l’innovation, Science et Développement économique
Canada.
FCC Part 15, Subpart C / RSS-247 Intentional Emissions Interference Statement
Compliance of this equipment is confirmed by the following certification numbers that are placed on the equipment:

www.snapav.com Support 866.838.5052
page | 5
Notice: The term “FCC ID:” and “IC:” before the certification number signifies that FCC and Industry Canada technical
specifications were met.
CONTAINS FCC ID: A8TBM70ABCDEFGH
CONTAINS IC: 12246A-BM70BLES1F2
CONTAINS FCC ID: NKR-SWA12
CONTAINS IC: 4441A-SWA12
This equipment must be installed by qualified professionals or contractors in accordance with FCC Part 15.203 & IC RSS-
247, Antenna Requirements. Do not use any antenna other than the one provided with the unit.
FCC Partie 15, sous-partie C / RSS-247 Déclaration volontaire des émissions interférences
Conformité de cet appareil est confirmé par les chiffres de certification suivants qui sont placés sur l’équipement:
Avis: Le terme «FCC ID:” et “IC:” devant le numéro de certification signifie que les spécifications techniques de la FCC et
d’Industrie Canada ont été respectées.
CONTAINS FCC ID: A8TBM70ABCDEFGH
CONTAINS IC: 12246A-BM70BLES1F2
CONTAINS FCC ID: NKR-SWA12
CONTAINS IC: 4441A-SWA12
Cet équipement doit être installé par des professionnels qualifiés ou entrepreneurs conformément aux normes FCC partie
15.203 & IC RSS-247, Exigences d’antenne. Ne pas utiliser une antenne autre que celui fourni avec l’appareil.
Cet émetteur ne doit pas être localisé ou fonctionner avec d’autres antennes ou transmetteurs. Les opérations dans la
bande 5.15-5.25GHz sont limitées à l’utilisation à l’intérieur seulement.
RF Radiation Exposure Statement
This equipment complies with FCC RF and IC radiation exposure limits set forth for an uncontrolled environment. This
equipment should be installed and operated with a minimum distance of 20 centimeters between the radiator and your
body or nearby persons.
Déclaration d’exposition aux radiations RF
Cet équipement est conforme aux limites d’exposition aux rayonnements RF et IC de la FCC définies pour un environne-
ment non contrôlé. Cet équipement doit être installé et utilisé avec une distance minimale de 20 centimètres entre le
radiateur et votre corps ou des personnes proches.
Europe Compliance
Compliance of this equipment is confirmed by the following logo that is placed on the product ID label that is placed on
the bottom of the equipment. The full text of the EU Declaration of Conformity (DoC) is available on the regulatory web-
page:

www.snapav.com Support 866.838.5052
page | 6
www.snapav.com Support 866.838.5052
Recycling
Wirepath Home Systems, LLC understands that a commitment to the environment is essential for a health life and
sustainable growth for future generations. We are committed to supporting the environmental standards, laws,
and directives that have been put in place by various communities and countries that deal with concerns for the
environment. This commitment is represented by combining technological innovation with sound environmental
business decisions.
WEEE Compliance
Wirepath Home Systems, LLC is committed to meeting all requirements of the Waste Electrical and Electronic
Equipment (WEEE) directive (2012/19/EC). The WEEE directive requires the manufacturers of electrical and
electronic equipment who sell in EU countries: (1) label their equipment to notify customers that it needs to be
recycled, and (2) provide a way for their products to be appropriately disposed of or recycled at the end of their
product lifespan. For collection or recycling of Wirepath Home Systems, LLC products, please contact your local
Wirepath Home Systems, LLC representative or dealer.
Australia & New Zealand Compliance
Compliance of this equipment is confirmed by the following logo that is placed on the product ID label that is
placed on the bottom of the equipment.

www.snapav.com Support 866.838.5052
page | 7
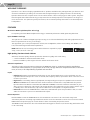
CONTENTS
REGULATORY COMPLIANCE & SAFETY INFORMATION ........................................................................................................ 2
WELCOME TO EPISODE®........................................................................................................................................................ 8
FEATURES................................................................................................................................................................................ 8
INSTALLATION......................................................................................................................................................................... 9
BACK PANEL SUBWOOFER HOOK-UP AND CONTROLS..................................................................................................... 10
GETTING CONNECTED.......................................................................................................................................................... 13
LINE-LEVEL/UNBALANCED INPUTS.................................................................................................................................... 13
UNBALANCED HI LEVEL INPUTS......................................................................................................................................... 14
BALANCED INPUTS............................................................................................................................................................... 15
12V DC TRIGGER................................................................................................................................................................... 16
IP CONTROL........................................................................................................................................................................... 16
EPISODE MEGA SUBWOOFER CONTROL AND SETUP APPLICATION................................................................................ 18
FINE TUNING......................................................................................................................................................................... 20
INSTALLING AND REMOVING THE GRILLES........................................................................................................................ 21
CARPET SPIKES.................................................................................................................................................................... 21
CLEANING ............................................................................................................................................................................. 21
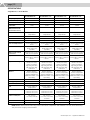
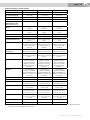
SPECIFICATIONS................................................................................................................................................................... 22
TROUBLESHOOTING............................................................................................................................................................. 24
WARRANTY........................................................................................................................................................................... 24
CONTACTING TECHNICAL SUPPORT.................................................................................................................................... 24

www.snapav.com Support 866.838.5052
page | 8
www.snapav.com Support 866.838.5052
WELCOME TO EPISODE®
Episode is one of the most highly regarded brands of speakers available today. We appreciate your business and
we stand committed to providing our customers with the highest degree of quality and service in the industry.
Episode subwoofers are a superb choice for bass reinforcement of almost every type of audio system. They have
been designed with advanced technology components that accurately reproduce low frequencies in all types of
music and movies. For optimum system performance, we recommend pairing them with our acclaimed Episode
loudspeakers.
FEATURES
World-Class BASH® Hybrid Amplifier Technology
Incorporating the latest BASH amplifier technology to maximize performance while generating little heat.
Episode MEGA Control App
Through the use of advanced digital signal processing, most of the standard back panel analog adjustments have
been incorporated into an easy, accurate app.
The app allows you to set up and adjust the Volume, Pre-set EQ Modes, Phase control, Delay, Auto Off/On, Low
Pass, Parametric EQ, and Automatic Equalization.
NOTE: A Bluetooth 4.0, low-energy, iOS or Android device is required for proper
setup, control, and use of the app.
High-Quality / Furniture-Grade Cabinets
Attractive, furniture-quality cabinets provide the ultimate in rigidity and sound clarity.
• S Series available in attractive matte black finish.
• D Series available in polished gloss black or walnut wood veneer finish.
Automatic Equalization
The built-in, high-performance DSP and the Episode MEGA app allow for simplified and precise equalization
corrections of the subwoofer, to your position in the room. The app allows for multiple subwoofers in the same
room, or home, to be independently equalized and controlled.
Inputs
• Unbalanced: Features stereo RCA line-level inputs for two-channel applications. For home theater use, the
right RCA unbalanced input also serves as an LFE (low-frequency effects) input with a direct connection from a
receiver or processor.
• High Level: For versatility, there are gold-plated, five-way binding-post inputs for speaker-level connections.
• Wireless: All MEGA Series subwoofers have a built-in wireless receiver that is compatible with the optional
Episode Subwoofer Wireless Transmitter (ES-SUB-WIFI-TX-MEGA). Connect the wireless transmitter to your
AVR / processor subwoofer / LFE output, pair the transmitter to the subwoofer(s) in the system, and the signal
is reliably sent to the subwoofer(s). Up to three subwoofers can be paired to a single transmitter.
• Balanced: Exclusive to the MEGA D Series subwoofers, XLR balanced inputs are provided for clean, accurate
audio from receivers or processors with balanced outputs.
Remote Operation
Both the MEGA S Series and MEGA D Series offer an Ethernet connection for IP control with many home
automation platforms. Currently supported drivers and IP control documentation can be found on the associated
MEGA subwoofer product page. IP control allows for basic functionality and product status.
The MEGA D Series subwoofers also offer a dedicated 12V trigger for remote on/off functionality, without the need
for IP connectivity.

www.snapav.com Support 866.838.5052
page | 9
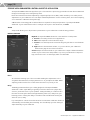
INSTALLATION
Subwoofer placement affects the audio performance
that you receive. All rooms are different, but the
strongest output will likely occur if the subwoofer
is placed on the floor, in a corner of the room on the
same wall as the front channel speakers. This is
known as the boundary effect and emphasizes certain
bass frequencies; however, it cancels other bass
frequencies.
Some listeners will find this to be the best-sounding
result, while others may find it overly “boomy” or
muddy. Experiment with the placement options
available to you and follow the fine-tuning instructions
on page 12 of this manual.
Note for corner placement with the D Series (Dual
Driver): For optimal performance, we recommend that
the subwoofer be placed at a 45° angle and at least
30cm (12“) from the corner.
For ultimate flexibility in placement, use the optional
Episode MEGA Subwoofer Wireless Transmitter
(ES-SUB-WIFI-TX-MEGA).
Left
Right
Center
Left
Side
Right
Side
Right
Rear
Left
Rear
Sub

www.snapav.com Support 866.838.5052
page | 10
www.snapav.com Support 866.838.5052
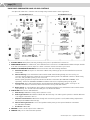
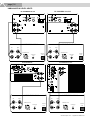
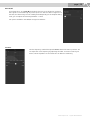
BACK PANEL SUBWOOFER HOOK
-
UP AND CONTROLS
Your Episode subwoofer is suited to match nearly every home theater or music application.
1. HI LEVEL INPUTS: Gold-plated, five-way, binding post inputs for speaker-level connections.
2. UNBALANCED LINE IN: For unbalanced, stereo RCA line-level connections. The RIGHT RCA unbalanced input doubles
as an LFE (low-frequency effects) input for a direct connection from the receiver or processor.
3. WIRELESS PAIRING/RESET BUTTON: Multi-function button with the following attributes:
a. Manual Power ON: Short press on the button: LED shows powering up process described below (section 4.
Status LED).
b. Wireless Pairing: Press and hold the button until the LED starts blinking slowly (200 ms on/off @ 10
seconds). Release the button subwoofer now in wireless pairing mode. The LED will continue to blink slowly
for 1 min, and goes OFF if pairing is not successful.
Wireless pairing requires the Episode Subwoofer Wireless Transmitter (ES-SUB-WIFI-TX-MEGA), sold
separately. See the ES-SUB-WIFI-TX-MEGA installation manual for complete pairing set-up guide.
c. Factory Reset: Press and hold the button until the LED starts blinking quickly (100ms on/off @ 10–15
seconds). If the button is released, subwoofer executes factory reset and restarts.
d. Button Cancel: To cancel a Button Press without changing anything, Press and hold the button until the LED
stops flashing, 15+ seconds. Once the LED goes out, release the button.
4. STATUS LED: Multi-function LED attributes:
a. AC Power Up: LED blinks slowly 5 times (200 ms on/off).
b. Audio Signal Present: One additional blink after AC Power Up, if an audio signal is present or with an Ethernet
/ 12v trigger command to turn on.
c. Adjustment Confirmation: LED flashes slowly and continuously (200ms on/off) while making adjustments
via the Episode MEGA Subwoofer app.
d. Wireless Pairing Assistance: For use and guidance when pairing to the optional wireless transmitter
(ES-SUB-WIFI-TX-MEGA).
e. Product On: LED is OFF.
5. VOLUME: Controls overall output for the subwoofer.
6. SERVICE: USB port for future firmware updates.
x
y
z
ES-SUB-MEGA-S8/S10 ES-SUB-MEGA-S12/S15
{
u
v
w
}
|
}
|
u
v w
y
z {
x

www.snapav.com Support 866.838.5052
page | 11
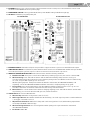
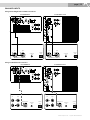
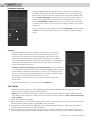
1. BALANCED LINE IN: XLR balanced inputs are provided to support receivers or processors with balanced outputs.
2. UNBALANCED LINE IN: For unbalanced, stereo RCA line-level connections. The RIGHT RCA unbalanced input doubles
as an LFE (low-frequency effects) input for a direct connection from the receiver or processor.
3. WIRELESS PAIRING/RESET BUTTON: Multi-function button with the following attributes:
a. Manual Power ON: Short press on the button: LED shows powering up process (see section 4. Status LED).
b. Wireless Pairing: Press and hold the button until the LED starts blinking slowly (200 ms on/off @ 10
seconds). Release the button subwoofer now in wireless pairing mode. The LED will continue to blink slowly
for 1 min, and goes OFF if pairing is not successful.
Wireless pairing requires the Episode Subwoofer Wireless Transmitter (ES-SUB-WIFI-TX-MEGA), sold
separately. See the ES-SUB-WIFI-TX-MEGA installation manual for complete pairing set-up guide.
c. Factory Reset: Press and hold the button until the LED starts blinking quickly (100ms on/off - @ 10 to 15
seconds). If the button is released, subwoofer executes factory reset and restarts.
d. Button Cancel: To cancel a Button Press without changing anything, Press and hold the button until the LED
stops flashing, 15+ seconds. Once the LED goes out, release the button.
4. STATUS LED: Multi-function LED attributes:
a. AC Power Up: LED blinks slowly 5 times (200 ms on/off).
b. Audio Signal Present: One additional blink after AC Power Up, if an audio signal is present or with an Ethernet
/ 12v trigger command to turn on.
c. Adjustment Confirmation: LED flashes slowly and continuously (200ms on/off) while making adjustments
via the Episode MEGA Subwoofer app.
d. Wireless Pairing Assistance: For use and guidance when pairing to the optional wireless transmitter
(ES-SUB-WIFI-TX-MEGA).
e. Product On: LED is OFF.
y
7. ETHERNET: Allows for IP control. Currently supported drivers and IP control protocol documentation can be found
on the associated MEGA subwoofer product page.
8. MAIN POWER SWITCH: Primary power On/Off. Auto-power On/Off setting available through app
9. AC INLET: Standard 2-prong IEC power jack.
ES-SUB-MEGA-D8 ES-SUB-MEGA-D10/D12
x
y
z
{
u
v
w
}
|
~
u
v
w
x
z
{
|
}
~

www.snapav.com Support 866.838.5052
page | 12
www.snapav.com Support 866.838.5052
5. VOLUME: Controls overall output for the subwoofer.
6. 12V TRIGGER: For remote on/off functionality without the need of IP connectivity.
7. SERVICE: USB port for future firmware updates.
8. ETHERNET: Allows for IP control. Currently supported drivers and IP control protocol documentation can be found
on the associated MEGA subwoofer product page.
9. HI LEVEL INPUTS: Gold-plated, five-way, binding post inputs for speaker-level connections.
10. MAIN POWER SWITCH: Primary power On/Off. Auto-power On/Off setting available through app
11. AC INLET: Standard 2-prong IEC power jack.
NOTE: The ES-SUB-MEGA-D10 and D12 ship without an AC Power Fuse inserted. Initial use requires the appropriate
fuse selection and insertion into the fuse compartment, at the bottom of the AC Inlet.
For 100-120V (50/60Hz) use the supplied T12A H250V fuse.
For 220-240V (50/60Hz) use the supplied T6.3A H250V fuse.
Always use an appropriate IEC power cord to support the respective regional power utility.
(Fuses and detailed fuse installation guide included with product accessory package.)

www.snapav.com Support 866.838.5052
page | 13
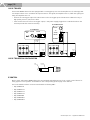
GETTING CONNECTED
Episode MEGA powered subwoofers are among the most flexible on the market today and can be configured for
use in many different applications, as shown in the figures below.
• For line level connections, use high-quality RCA cables that feature low-impedance shielding and high-quality
connectors.
• Use two-conductor loudspeaker wire for high-level connections to the subwoofer.
NOTE: Do not connect wiring to more than one set of left/right inputs simultaneously. Example: If using
loudspeaker-level inputs, do not connect RCA cables and/or XLR cables to the subwoofer at the same time.
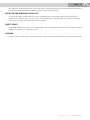
LINE
-
LEVEL/UNBALANCED INPUTS
L
R
CEN
SUB
RS
LS
AV RECEIVER/PROCESSOR
Sub Balanced Out
+12V Trigger
Out
Switched
Outlet
L
R
CEN
SUB
RS
LS
AV RECEIVER/PROCESSOR
Sub Balanced Out
+12V Trigger
Out
Switched
Outlet
ES-SUB-MEGA-S8/S10
ES-SUB-MEGA-S12/S15
or Unbalanced LFE
Left & Right
Unbalanced Preamp Out
or Unbalanced LFE
Left & Right
Unbalanced Preamp Out
L
R
CEN
SUB
RS
LS
AV RECEIVER/PROCESSOR
Sub Balanced Out
+12V Trigger
Out
Switched
Outlet
L
R
CEN
SUB
RS
LS
AV RECEIVER/PROCESSOR
Sub Balanced Out
+12V Trigger
Out
Switched
Outlet
ES-SUB-MEGA-D8
ES-SUB-MEGA-D10/D12
or Unbalanced LFE
or Unbalanced LFE
Left & Right
Unbalanced Preamp Out
Left & Right
Unbalanced Preamp Out

www.snapav.com Support 866.838.5052
page | 14
www.snapav.com Support 866.838.5052
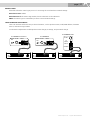
UNBALANCED HI LEVEL INPUTS
AV RECEIVER/PROCESSOR
Sub Balanced Out
+12V Trigger
Out
Switched
Outlet
Left
Right
AV RECEIVER/PROCESSOR
Sub Balanced Out
+12V Trigger
Out
Switched
Outlet
Left
Right
ES-SUB-MEGA-S8/S10
ES-SUB-MEGA-S12/S15
AV RECEIVER/PROCESSOR
Sub Balanced Out
+12V Trigger
Out
Switched
Outlet
Left
Right
AV RECEIVER/PROCESSOR
Sub Balanced Out
+12V Trigger
Out
Switched
Outlet
Left
Right
ES-SUB-MEGA-D8
ES-SUB-MEGA-D10/D12

www.snapav.com Support 866.838.5052
page | 15
BALANCED INPUTS
Using Left and Right balanced XLR connections:
Using an LFE balanced connection:
ES-SUB-MEGA-D8
ES-SUB-MEGA-D10/D12
AV RECEIVER/PROCESSOR
Sub Balanced Out
+12V Trigger
Out
Switched
Outlet
Left Right
AV RECEIVER/PROCESSOR
Sub Balanced Out
+12V Trigger
Out
Switched
Outlet
Left Right
AV RECEIVER/PROCESSOR
Sub Balanced Out
+12V Trigger
Out
Switched
Outlet
Left
Right
AV RECEIVER/PROCESSOR
Sub Balanced Out
+12V Trigger
Out
Switched
Outlet
Left
Right
ES-SUB-MEGA-D8
ES-SUB-MEGA-D10/D12

www.snapav.com Support 866.838.5052
L
R
CEN
SUB
RS
LS
AV RECEIVER/PROCESSOR
Sub Balanced Out
+12V Trigger
Out
Switched
Outlet
L
R
CEN
SUB
RS
LS
AV RECEIVER/PROCESSOR
Sub Balanced Out
+12V Trigger
Out
Switched
Outlet
ES-SUB-MEGA-D10/D12
ETHERNET
SERVICE
VOLUME
WIRELESS
PAIR
12V
TRIGGER
VOLUME
12V
TRIGGER
SERVICE
ETHERNET
ES-SUB-MEGA-D8
or
or
page | 16
www.snapav.com Support 866.838.5052
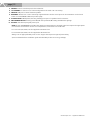
12V DC TRIGGER
The D Series MEGA subwoofers are equipped with a 12V trigger input to turn the amplifier on/off, reducing power
consumption when not in use. When this input receives a 12V signal, the amplifier turns on; when the signal goes
away, the amplifier turns off.
• Connect the 12V trigger output of the AV receiver to the 12V trigger input of the D Series subwoofer using a
high-quality 3.5 mm (1/8”) mono cable.
• If the receiver does not have a 12V trigger output, a 12V power supply plugged into a switched outlet on the
receiver provides the same functionality.
12V DC TRIGGER PIN CONFIGURATION
12V DC
(Tip)
Ground
(Sleeve)
IP CONTROL
Both S Series and D Series MEGA subwoofers are equipped with Ethernet ports for IP control. Control drivers for
many popular control systems are available on the corresponding product page of the website.
The local network interface can be accessed with the following URLs:
• http://MEGA-S8
• http://MEGA-S10
• http://MEGA-S12
• http://MEGA-S15
• http://MEGA-D8
• http://MEGA-D10
• http://MEGA-D12

www.snapav.com Support 866.838.5052
page | 17
15W OUT
ACTIVE PoE/+
30W IN
15W OUT
ACTIVE PoE/+
30W IN
15W OUT
ACTIVE PoE/+
30W IN
ETHERNET
SERVICE
VOLUME
WIRELESS
PAIR
12V
TRIGGER
VOLUME
12V
TRIGGER
SERVICE
ETHERNET
ES-SUB-MEGA-S8/S10/S12/S15
ETHERNET
SERVICE
VOLUME
WIRELESS
PAIR
12V
TRIGGER
ES-SUB-MEGA-D8
ES-SUB-MEGA-D10/D12
DEFAULT LOGIN
All models follow the same log-in process for accessing the Local interface network settings:
Default User Name: admin
Default Password: The Service Tag number, found on the back of the subwoofer.
NOTE: The above log-in is reinstated if product is reset to default settings.
LOCAL INTERFACE ADJUSTMENTS
The Local interface will show basic product information, such as product name, model, MAC address, firmware
version, and Service Tag number.
Local interface adjustments include product name change, IP settings, and password change.

www.snapav.com Support 866.838.5052
page | 18
www.snapav.com Support 866.838.5052
EPISODE MEGA SUBWOOFER CONTROL AND SETUP APPLICATION
Your Episode MEGA Subwoofer app allows you to fine-tune the output using your Android or iOS device. Download
the app from the App Store or Google Play Store.
Knobs and switches have been replaced by a digital signal processor (DSP), which enables you to make precise
adjustments to your subwoofer. You can adjust individual parameters such as volume, phase, and cutoff frequency,
or use automatic calibration through the app.
A Bluetooth 4.0 low-energy iOS or Android device is required for setup and operation of your Episode MEGA
subwoofer. If your mobile device asks for a 4-digit code to pair to the subwoofer, use 0000.
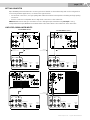
SETUP
Setup mode allows you to adjust various parameters so your subwoofer sounds the way you like it.
PRESETS/VOLUME
EQ Mode: The Episode MEGA subwoofer comes with four sound presets.
a. Normal is the setting used for most applications.
b. Music adds emphasis to the lower bass range
c. Cinema boosts the frequencies around 50 Hz, giving the bass a more dramatic
effect.
d. Night reduces the maximum volume, so you can still use your subwoofer
without annoying the rest of the household.
Volume: Adjust the volume slider so your subwoofer’s output is balanced with the
volume of your stereo/surround speakers. If you set your subwoofer’s output too
high, it blurs the room’s sound image, which isn’t desirable.
Phase
Sit in the best listening spot of the room while making this adjustment. Pick a
song with substantial bass, and pay attention to it as you adjust the slider. While
adjusting, make sure the bass sounds musical and not too punchy or flat.
Delay
The Delay parameter allows you to delay playback of the Epsiode MEGA
subwoofer’s audio signal. Delay is typically used if the subwoofer is physically
closer to you than the rest of your speakers. Setting the delay to 1 millisecond is
the same as moving the subwoofer approximately 33cm (13“) away from your
listening position. Setting the delay to 20 milliseconds would be like moving the
sub 6.6m (21.5’) away.
If your amplifier or surround sound receiver has an automatic calibration feature, it
automatically sets the delay time internally. This should keep you from having to
adjust the delay on your subwoofer.

www.snapav.com Support 866.838.5052
page | 19
Auto On/Off
Your subwoofer is set to Auto On, by default. This turns your subwoofer on when a
bass signal is received through any of the inputs. If it does not detect a signal for 15
minutes, the subwoofer goes into standby mode. Depending on the amplifier being
used, you can adjust the sensitivity between 1–10mV.
Two options available - Auto Off/On via signal or Ethernet.
Low Pass
Sets the frequency at which the Episode MEGA subwoofer starts to perform. You
can adjust the cutoff frequency by adjusting the slider. You want to match your
stereo/surround speakers so the subwoofer can blend in seamlessly.

www.snapav.com Support 866.838.5052
page | 20
www.snapav.com Support 866.838.5052
PARAMETRIC EQUALIZER
The Episode MEGA Subwoofer app allows you to adjust the center frequency,
bandwidth and gain with the Parametric Equalizer. To key in the perfect sound,
find an audio test disc to play. Many audio test disc options are available online.
Set your Central Frequency to the level listed on your audio test disc. With your
audio test disc playing, listen for any unnatural-sounding bass notes. Slowly
reduce the Bandwidth and Gain if the bass notes sound too loud. Increase them
if the bass notes sound too soft. Your goal is to match the loudness of your other
frequencies.
To boost a particular frequency range, increase the Bandwidth and slowly adjust
the Gain. Listen closely to make sure you don’t create any unnatural-sounding
effects.
AUTO EQ
Your Episode MEGA subwoofer is equipped with an easy-to-use automatic
calibration feature, which activates your subwoofer through the app. The
app instructs your subwoofer to play a measurement signal and uses your
smartphone’s built-in microphone to display the measurement curve, within
range. Auto EQ will calibrate the subwoofer for the environment’s measurements,
including the microphone and sound reproduction chain. Then it measures the
room’s actual frequency response.
Follow the instructions in the app for a successful calibration. First, the app asks
you to hold your smartphone near the front of the Episode MEGA subwoofer. After
a short frequency sweep the app will ask you to move to your listening position
and run a second frequency sweep. With both measurements complete, the app
will show the corrected sound curve tailored to your room.
The equalization curve is kept in memory until you overwrite it with a new
measurement.
You can turn Auto EQ off or on at any time from the SETUP menu.
FINE TUNING
After making all the connections and calibrating the sub via the Episode MEGA Subwoofer app, you can still
perform some fine tuning using the following guidelines:
NOTE: When using an AV receiver with an automatic calibration system, perform the Episode MEGA subwoofer
auto calibration via the app first, and then run the AV receiver’s full-room calibration. Then, perform the following
steps if needed:
1. Ensure the subwoofer is plugged in.
2. Play a movie scene or music track and set the system volume to an average level. Listen to the bass level from your
favorite listening position and adjust the VOLUME control as desired.
3. If deeper bass is desired, adjust the LOW PASS control toward the lower frequencies. Experiment with different
frequency settings until you find one that sounds best.
4. Continue listening to your favorite music and movie sources using the settings chosen for volume and crossover.
Now, try experimenting with the PHASE and DELAY until you find the best setting for the installation. Depending on
La page est en cours de chargement...
La page est en cours de chargement...
La page est en cours de chargement...
La page est en cours de chargement...
-
 1
1
-
 2
2
-
 3
3
-
 4
4
-
 5
5
-
 6
6
-
 7
7
-
 8
8
-
 9
9
-
 10
10
-
 11
11
-
 12
12
-
 13
13
-
 14
14
-
 15
15
-
 16
16
-
 17
17
-
 18
18
-
 19
19
-
 20
20
-
 21
21
-
 22
22
-
 23
23
-
 24
24


Episode ES-SUB-MEGA-D10-BLK Le manuel du propriétaire
- Catégorie
- Matériel musical
- Taper
- Le manuel du propriétaire
dans d''autres langues
Documents connexes
-
Episode ES-SUB-WIFI-TX-MEGA Guide d'installation
-
-
Control4 EA-RSP-8D-100 Guide d'installation
-
-
-
-
-
-
-
Autres documents
-
Paradigm PDR 100 Le manuel du propriétaire
-
Cerwin-Vega SL-5M Le manuel du propriétaire
-
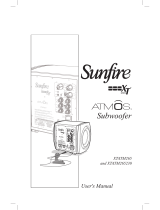 Sunfire Atmos XTATM265 Manuel utilisateur
-
WattBox WB-OVRC-UPS-350-6 Guide de démarrage rapide
-
 Blue Aura WS10i Mode d'emploi
-
REL G1 Mkii Sub-Bass System Manuel utilisateur
-
 watt box WB-OVRC-UPS-850-8 Guide de démarrage rapide
-
Araknis Networks AN-510-AP-IW-AC Guide de démarrage rapide
-
-
Monitor Audio Silver W12 Manuel utilisateur


