Haier HLF11PC Le manuel du propriétaire
- Catégorie
- Sèche-linge
- Taper
- Le manuel du propriétaire

E_ectric D_er
User Manua_
Mode_ # HLF11 PC
Guide de _'UtiHsateur
Mod6_e # HLF11 PC

IMPORTANT SAFEGUARDS
Warning = To reduce the risk of fire, electric shock, or injury to per=
sons when using your appliance, follow basic precautions, including
the following:
1.
2.
3.
4.
5.
6.
Read all instructions before using the appliance.
Do not dry articles that have been previously cleaned in, washed in,
soaked in, or spotted with gasoline, dry-cleaning solvents, or other
flammable or explosive substances, as they give off vapors that
could ignite or explode.
Do not allow children to play on or in the appliance. Close supervision
of children is necessary when the appliance is used near children.
Before the appliance is removed from service or discarded, remove the
door to the drying compartment.
Do not reach into the appliance if the drum is moving.
Do not install or store this appliance where it will be exposed to water
and/or to the weather.
7.
8.
9.
Do not tamper with controls.
Do not repair or replace any part of the appliance or attempt any
servicing unless specifically recommended in the user-maintenance
instructions or in published user-repair instructions that you understand
and have skills to carry out.
Do not use fabric softeners or products to eliminate static unless
recommended by the manufacturer of the fabric softener or product.
10. Do not use heat to dry articles containing foam rubber or similarly
textured rubber-like materials.
11. Clean lint screen before or after each load.
12. Keep area around the exhaust opening and adjacent surrounding
areas free from the accumulation of lint, dust and dirt.
13. The interior of the appliance and the exhaust duct should be cleaned
periodically by qualified service personnel.
14. Do not place items exposed to cooking oils in your dryer. Items
contaminated with cooking oils may contribute to a chemical
reaction that could cause a load to catch fire.
15. If material has been used with any flammable liquids or solids it should
not be used in the dryer until all traces of the flammable liquids and its
fumes have been removed.

iiiiiiiiiiiiiiiiiiiiiiiiiiiiiiiiiiiiiiiiiiiiiiiiiiiii iii ! ! i i i i i !ii ii ii ii ii ii ii ii ii ii ii ii ii ii ii ii ii ii ii ii i !ii!!i
16. This dryer must be properly installed in accordance with the
installation instructions before it is used. See grounding instructions
in the installation section.
17. Proper grounding must be ensured to reduce the risk of electric shock
and fire. Check with a qualified electrician or service personnel if you
are in doubt as to whether the dryer is properly grounded.
18. Use the dryer only for its intended purpose, drying clothes.
19. Always disconnect dryer from electrical supply before attempting any
service. Disconnect power cord by grasping the plug, not the cord.
20. Replace worn power cords and/or loose plugs.
21. To reduce the risk of electric shock or fire, do not use extension cords
or adapters to connect dryer to electrical power source.
SAVE THESE INSTRUCTIONS
Risk of child entrapment, Before you throw away your oW appliance,
take off the doors, Leave the she_ves in p_ace so that children
may not easily climb inside°

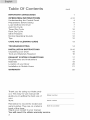
Table Of Contents PAGE
iMPORTANT SAFEGUARDS
OPERATING INSTRUCTIONS
Understanding the Control Panel
Preparations before Drying
Load Clothes into Dryer
Auto Dry Cycle
Timed Dry Cycle
Rack Dry Cycle
Other Features
Normal Operating Sounds
Tips
CARE AND CLEANING GUIDE
TROUBLESHOOTING
iNSTALLATiON iNSTRUCTiONS
Unpacking your Dryer
Tools and Materials Required
EXHAUST SYSTEM CONNECTIONS
Requirements and Instructions
Materials
Location of your Dryer
Installation in Mobile Home
WARRANTY
4-12
4
6
7
7
10
11
11
12
12
13
14
9-10
16
16
17
17
18
2O
21
22
Thank you for using our Haler prod-
uct. This easy-to-use manual will
guide you in getting the best use of
your
dryer.
Model number
Serial number
Remember to record the model and
serial number. They are on a label in Date of purchase
back of the dryer.
Staple your receipt to your manual.
You will need it to obtain warranty service.

.-. /
_J
t.......... !__, i_'_
J
t,o ,y _softe,
_ Til,_ed Dry _ Off /
Rackdry
Timed
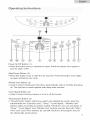
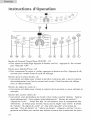
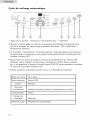
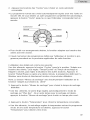
Power On/Off Button: (1)
Press the button once to operate the dryer. Press the button once again to
turn the dryer "OFF".
Start/Pause Button: (2)
Press this button once to start the dry process. Press this button once again
to pause during the dry cycle.
Wrinkle Care Button: (3)
Used to select wrinkle-proof function. Automatically sets as off after powering
on. This function is used together with delay start function.
Cycle Signal Button: (4)
Used to select buzzing volume or to turn off the buzzer.
Timed/Cycles Button: (5)
"Timed/Cycles" button will let you select your desired dry mode. Auto Dry:
automatically set "Dryness Level," "Temp," "Cycle Signal," "Wrinkle Care"
buttons status according to clothes loaded. Timed Dry: You can set status of
"Temp," "Cycle Signal" and "Wrinkle Care" buttons and dry time with "More
Time" and "Less Time" buttons by yourself. Rack Dry: the program used to
dry articles like sports shoes.
4

MoreTime&LessTimeButton:(6)
• Settimefrom0to180minutewhenTimedDryorRackDryselected.
CycleButtons:(7)
"Cycle"buttonwillletyouselectyourdesireddrycycles.Foryourconve-
nience,therearesevenfabriccaredrycyclesprogrammedinthismode:
Customized,Normal,Heavy,Cotton,Delicate,CasualandBulkyItems.
Customized The drying program is defined by the user and stored.
Normal Normal drying
Heavy Heavy clothes drying like jeans
Cotton Special drying for cotton clothes
Delicate Drying small quantity clothes and delicates
Casual Drying casual everyday clothes
Bulky Items Drying bulky clothing
Delay Start Button: (8)
This convenient feature lets you delay the start of the dry cycle between 3 to
24 hours. Press the "Delay Start" to choose the number of hours you want to
delay the start of the cycle.
If "Delay Start" is not selected, the digital display indicates remaining time of
selected program.
If setting "Delay Start" is in standby status, the digital display indicates 3 hr,
which will increase by 1 hr with each pressing (until 24 and return to 3) of the
button. If it is pressed for 1.5 seconds, the display indicated value will
increase continuously.
Temp Button: (9)
Used to set drying temperature, There are 4 available drying temperatures:
High, Medium, Low, and Air only (no heat).
Dryness Level Button: (10)
Used to set drying time of auto-programs.
Status lights: (11)
Status lights give notification of which part of the cycle the machine is in.
Digital Display: (12)
Indicates remaining time (min) during cycle operation. Indicates remaining
delay time (hr) during delay.
Note: If door opened during cycle running, indicator displays a code
"E2" and an alarm will sound.

iiiiiiiiiiiiiiiiiiiiiiiiiiiiiiiiiiiiiiiiiiiiiiiiiiiii ii i ! ! i i i i i !ii ii ii ii ii ii ii ii ii ii ii ii ii ii ii ii ii ii ii ii i !ii!!i
Function Light Indicator:
• The function "display light" indicates selected feature is "ON" or the cycle is
about to begin.
During the dry cycle, "flashing light" indicates current running program.
Rapidly flashing light indicates that the dryer is not operating properly.
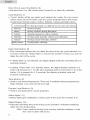
Preparations Before Drying
Group the clothes of the same kind (cotton, synthetics, woolen) to dry.
Dark and light colored clothes should be separately dried. Fabrics prone to
falling lint should be turned inside out before putting into the dryer.
Make sure buttons and ornaments on the clothes are high temperature resis-
tant and won't damage drum surface. Before loading, the clothes should
have their zippers zipped up, buttons and hooks done up and belts tied so
as to avoid entanglement or other obstacles.
If possible, turn out the clothes pockets for uniform drying.
Check if clothes remain soiled. If yes, wash it again, otherwise the soils after
drying may stain permanently.
Small articles should be collected in a mesh bag before loading and drying,
so as to avoid entanglement and ensure easy removal.
Make sure power socket is reliably grounded. The grounding terminal should
not be connected to gas or tap water pipelines.
Make sure exhaust duct has been connected with extension pipe.
Make sure lint filter is clean and then assemble it properly. If lint filter is not in
place, tumbling items could enter the exhaust system and cause damage to
the dryer.
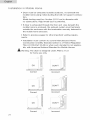
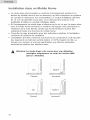
Note: It applies to Auto Dry cycle and Timed Dry cycle. For Rack Dry
cycle, remove the lint filter and assemble the drying rack. Raise
the front end and lock it into the lint filter slot. The assemble is
as shown in the following figure:

Load Clothes into Dryer
Auto Dry Cycle and Timed Dry Cycle
• The appropriate load is 1/3 to 1/2 of the drum volume. Avoid to overload the
dryer, as space is needed to allow clothes to tumble for uniform and wrinkle
proof drying.
When drying big articles, only 2-3 pieces should be loaded at a time and
supplemented with medium and small articles.
Avoid excessive drying of clothes to prevent wrinkles, shrinkage, roughness,
electrostatic charge accumulation and lint.
Avoid high temperature drying on delicate and synthetic clothes.
Rack Dry cycle:
WARNING: In Rack Drying mode, remember the drum is still rotating. If drying
rack is not in place, rotating inner tub could collide with drying rack and causes
damage to the dryer and drying rack.
This program is designed specially for articles like sports shoes. During dry-
ing please make sure the items stay on the rack with no risk of entanglement
while the drum is rotating.
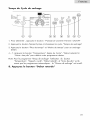
Auto Dry Cycle
i_ _,_ ¸
llil ©........
@ Rack d,y
1. Press "Power On/Off" button to power on
• Turn on the power, the computer board beeps once and the dryer transfers
from off status to the stand by status (Normal program).
• If no "Start/Pause" button is pressed in 5 min after powering on, it automati-
cally cuts off power and returns to off status.
• It returns to off status immediately upon end of a cycle; Whatever status the
computer board is (start, pause, alarm, etc.), pressing "Power On/Off" button
will stop all operations and it enters off status.

• Variousbuttoninitialstatusfor"Normalprogram."
CycleSignal Softer
WrinkleCare Off
Cycles Normal
DigitalDisplayIndicatecurrentprogramremainingtime
Temp High
DrynessLevelMoreDry
Timed/CyclesAutoProgram
2.Press"Cycles"buttontoselectasuitablefullautomaticcycle
TheNormalprogramwillbeautomaticallyselectedafterpoweringtheunit
"ON".Ifotherfullautomaticprogramisdesired,press"Cycle"buttonuntil
correspondingindicatorturnson.
Customized
Normal Bulky Items
l Cas a'l
Cotton Delicate
• To select your desired settings the "Customized" function should be chosen.
It can memorize programs defined by user and display the previous program
upon next application of this function.
Use details are as follows:
After powering on, press "Cycles" until "Customized" status, then set
"Timed/Cycles" to Timed Dry or Rack Dry, and set status of other buttons.
Press "Start/Pause" button or after half a minute, the program defined by user
will be stored and will be directly displayed upon next use.
Note: Pressing "Dryness Level" button will be inactive during use of
"Customized" function.

3.Press"DrynessLevel"buttontoselectasuitabledryingtime
• Afterpoweringon,theclothesdryerautomaticallysetsdrynessat"More
Dry."Ifotherdryingtimeisdesired,press"DrynessLevel"buttontoselecta
shortertime.
4.Press"Temp"buttontosetasuitabledryingtemperature
Afterswitchingon,thedryersetscorrespondingtemperatureadaptingtodif-
ferentprogramselected.Ifotherdryingtemperatureisrequired,press"Temp"
buttontoenablesuchaselection.
5.Press"CycleSignal"button,youwillberemindedupuponendofacycle.
Afterswitchingon,thedryerautomaticallysetsabuzzerat"Softer,"whilethe
usermaychoosefromthreepromptsoundconditions"Louder,""Softer"and
"Off."
6.Press"DelayStart"buttontoselectasuitabledelaydryingprogram
When"DelayStart"isenabled,yourselectedprogramindicatorturnsoff
while"DelayStart"indicatorandremainingdelaytimeindicationturnon.
Duringdelayperiod,pressing"DelayStart"buttoncanindicatedelaystatus.
Tochangeoperatingprogramorcanceldelay,youshouldpoweroffthedryer
andre-select.
7.Press"WrinkleCare"buttontoselectwrinkle-proofdryingmode
WrinkleCareautomaticallysets"Off"uponpoweringon.Press"Wrinkle
Care"button,itsetswrinklecaredryingmode.
Note:"WrinkleCare"functionisprovidedtomatch"DelayStart"pro-
gram.Whena"DelayStart"dryingcycleends,clothesremained
inhotdrumispronetocreasing."WrinkleCare"functionoper-
atesintumblingclothesbyintermittentlyrotatingdrumtoavoid
clotheswrinkling.
8.Press"Start/Pause"button
Ifstartingthemachine,firstclosethefrontdoorandthenpressthisbutton.
Ifpauseisneededduringmachineoperating,pressthisbutton.Pressing
againwillresumeoperation.

iiiiiiiiiiiiiiiiiiiiiiiiiiiiiiiiiiiiiiiiiiiiiiiiiiiii
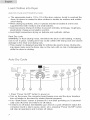
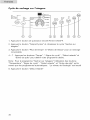
Timed Dry Cycle
© ........
1. Press "Power On/Off" button to power on.
@
_s_yCle_
_ed Si
/
2. Press "Timed/Cycles" button and select "Timed Dry" cycle.
3. Press "More Time" and "Less Time" buttons to set a suitable dry time.
4-7. Press buttons "Temp," "Cycle Signal," "Delay Start," and "Wrinkle Care,"
to define your desired program.
Note: For "Timed Dry" program, use of buttons "Temp," "Cycle
Signal," "Delay Start," and "Wrinkle Care" is the same as for
auto-programs. "Dryness Level" is here inactive, pressing of
which will get alarms.
8. Press "Start/Pause" button
10

Rack Dry Cycle
i Louder _On _
i o,
_ned
1. Press "Power On/Off" button to power on.
2. Press "Timed/Cycles" button and select "Rack Dry" cycle.
3. Press "More Time" and "Less Time" buttons to set a suitable dry time.
4-7. Press buttons "Temp," "Cycle Signal," "Delay Start," and "Wrinkle Care,"
to define your desired program.
Note: For "Rack Dry" program, use of buttons "Temp," "Cycle Signal,"
"Delay Start," and "Wrinkle Care" is the same as for
auto-programs. "Dryness Level" is here inactive, pressing of
which will get alarms.
8. Press "Start/Pause" button
Other Features
Your dryer also has the following features for your convenience:
Lint Filter:
• All dryers come with a lint filter that needs to be cleaned before or after every
use (read Care and Cleaning Guide Section).
Leveling Legs:
Your dryer has four leveling legs which are located in the front and rear cor-
ners of your dryer. After installing your dryer in its final position, you can level
your dryer.
Leveling legs can be adjusted by turning them clockwise to lower your dryer
or by turning them counterclockwise to raise your dryer.
Note: It is very important that you level your dryer to prevent it from
moving during operation.
11

iiiiiiiiiiiiiiiiiiiiiiiiiiiiiiiiiiiiiiiiiiiiiiiiiiiii
Normal Operating Sounds
Following sounds are normally heard during the operation of the dryer.
• Tumbling sounds. This is normal as the heavy wet clothes in the
dryer are continuously being tossed around.
Air rushing noise. This happens as the dryer drum spins at very
high RPM and the air is rushing through the dryer drum.
Timer clicks may be heard.
Tips
For best drying results, clean the lint filter before every use.
Do not overload the dryer.
Balance the dryer load evenly throughout the dryer for the best
results.
Drying time depends on many variables: load size, type of fabric
and moisture in it, heat and moisture in the room, electric voltage,
length of the exhaust duct, etc.
To eliminate guessing and conserve energy, we recommend for cer-
tain clothes to choose and Auto Drying setting.
Always follow the fabric care instructions supplied by the garment
manufacturer.
12

CARE AND CLEANING
• Lint filter needs to be cleaned before or after each use for
your unit to operate at optimum efficiency. The filter can be slid out,
by pulling on the tab located on the inside of the dryer door. The fil-
ter may be washed or vacuumed. Remove the excess water from
the filter by gently shaking the filter. This will remove dust and parti-
cles trapped in the filter. Lint build-up in screen restricts air flow,
which causes
longer drying times. After cleaning, slide the filter back in place.
DO NOT USE YOUR DRYER WITHOUT THE LINT FILTER.
WARNING: Unplug the dryer before cleaning.
• Do not use any type of spray cleaner when cleaning the interior.
Hazardous fumes or electric shock could occur.
• Clean cabinet with mild soap and water. Do not use harsh or abra-
sive cleaners, as this could damage the dryer.
• Clean the duct and the vent on a regular basis to avoid clogging
which could affect the efficiency of the dryer.
13

Dryerdoesnotoperate:
• Checkifunitispluggedin.Theplugmayhavecomeloose.
• Checkiftheelectricalwallreceptacleisofpropervoltage.
• Checkifthecircuitbreakerneedstoberesetorifthefuseneedsto
bereplaced.
• Checkiftheunitisin"Off"mode.PressStartbuttonagainafter
poweringonthedryer.
• Checkifdoorisopen.
Dryerisworkingbutnotdryingtheclothes:
• Unitmaybeoverloaded.Thedryerdrumshouldonlybehalffull.
• Checkexhaustductsandvent.Ventshouldbefreeofall
obstructions.
• Ductshouldbelintanddustfree.Ductsshouldbecleanedregularly.
• Dryerloadneedstoberesorted.Heavyclothesmayneedtobe
separatedfromregularclothes.
• Bulkyclothesmayrequirerepositioning.
• Ifclothesdryunevenlyahigherdrysettingmayberequiredor
clothesinthedryermayneedtoberesorted.
Dryermakingnoisewhendrying:
• Coins,loosechange,buttonsandotherheavyobjectscouldmake
noise.
• Dryermayneedtobeleveledevenly.ReadOperatingGuide-
NormalOperatingSounds.
Static:
• Causedbyoverdrying.Adjustforshorterdryingtime.
• Mixedwithsyntheticfabric.Sortandseparatedifferentfabrics.
• Useafabricsoftener.
14

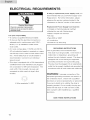
ELECTRiCAL R EQU!REME hiTS
E_ectr_¢a| Shock Ha_rd
P_ug_nto _ g_oended 4 prong cut,eL
F_ure _ do so _a_ res_| _ d_|h _r
e_ec_Jca] shock,
it is your responsibility
• To contact a qualified electrical installer.
To be sure that the electrical connection is
adequate and in conformance with CAN 1-
B149 (.1 or .2)installation codes and/or
local codes.
A 4 wore. somg;e Base. 115/230-volt. 60 Hz.,
AC-only electrical supply is required on a sepa-
rate 30-amp circuit, fused on both sides of the
line. A time-delay fuse or circuit breaker is
recommended. Connect to an individual
branch circuit.
This dryer is equipped with a CSA International
Certified Power Cord intended to be plugged
into a standard 14-30R wall recepatacle. The
cord is 5ft (1.52) in length. Be sure wall
receptacle is within reach of dryer's final
location.
4-Wire receptacle 14-30R
if using a replacement power supply cord, it is
recommended that you use Power Supply Cord
Replacement. For further information, please
reference the service numbers located in the
"Assistance or Service" section of this manual.
Replacement Power Supply Cord must be:
UI listed or CSA International Certified
Marked for use with Clothes dryer.
• Rated 115/230 volt minimum
30 amp
Type SRD or SRDT
• 4 conductors
• At least 5 ft (1.52m) long
GROUNDING INSTRUCTIONS
For a grounded, cord-connected dryer:
This dryer must be grounded. In the event of
malfunction or breakdown, grounding will
reduce the risk of electric current. This dryer is
equipped with a cord having an equipment
grounding conductor and a grounding plug.
The plug must be plugged into an appropriate
outlet that is properly installed and grounded in
accordance with all local codes and ordiances.
tVARNING: Improper connection of the
equipment grounding conductor can result in a
risk of electric shock. Check with a qualified
electrician or service representative or personnel
if you are in doubt as to whether the dryer is
properly grouded. Do not modify the plug pro-
vided with the dryer: if if will not fit the outlet,
have a proper outlet installed byu a qualified
electrician.
SAVE THESE iNSTRUCTiONS
15

iNSTALLATION _NSTRUCTJ©NS
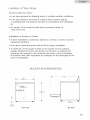
Select a suitable location for the dryer on a hard even surface away from direct
sunlight or heat source e.g. radiators, baseboard heaters, cooking appliances
etc. Any floor unevenness should be corrected with the leveling legs located on
the
bottom of the dryer.
Unpacking Your Dryer
1. Remove all packaging material. This includes the foam base and all
adhesive tape holding the dryer accessories inside and outside.
2. Inspect and remove any remains of packaging, tape or printed
materials before using the dryer.
Tools and Materials Required
• Phillips head and flathead screwdrivers
Channel-lock adjustable pliers
® 1/2 inch open end wrench
Carpenter's level
Measuring tape
Duct tape
Rigid or flexible metal 4 inch (10.2 cm) duct
16

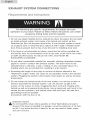
EXHAUST SYSTEM CONNECTIONS
Requirements and Instructions
The following are specific requirements for proper and safe
operation of your dryer. Failure to follow these instructions can create
excessive drying times and fire hazards.
1. Do not use plastic flexible duct to exhaust the dryer. Excessive lint can build
up inside exhaust system and create a fire hazard and restrict air flow.
Restricted air flow will increase dryer times. If your present system is made
up of plastic duct or metal foil duct, replace it with a rigid or flexible metal
duct. Ensure present duct is free of any lint prior to installing dryer duct.
2. If the dryer is not exhausted out doors, some fine lint will be expelled into
the laundry area. An accumulation of lint in any area of the home can create
a health and fire hazard. To reduce risk of fire, dryer MUST BE
EXHAUSTED OUTDOORS.
3. Do not allow combustible material (for example: clothing, draperies/curtains,
paper) to come in contact with exhaust system. The dryer must not be
exhausted into a chimney, a wall, a ceiling, or any concealed space of a
building which can accumulate lint, resulting in a fire hazard.
4. Exceeding the length of duct pipe or number of elbows allowed in the
"Maximum Length" charts can cause an accumulation of lint in the exhaust
system. Plugging the system could create a fire hazard, as well as increase
drying times.
5. Do not screen the exhaust ends of the vent system, nor use any screws or
rivets to assemble the exhaust system. Lint can become caught in the
screen, on the screws or rivets, clogging the duct work and creating a fire
hazard as well as increasing drying times. Use an approved vent hood to ter-
minate the duct outdoors, and seal all joints with duct tape. All male duct
pipe fittings must be installed
downstream with the flow of air.
Explosion hazard:
_l_DO not install the dryer where gasoline or other flammables are kept or
stored. If the dryer is installed in a garage, it must be minimum of 18 inch-
es (45.7 cm) above the floor. Failure to do so can result in death, explo-
sion, fire or burns.
17

iiiiiiiiiiiiii ! i i ! i :i !ii ii ii ii ii ii ii ii ii ii ii ii ii ii ii ii ii ii ii ii ii ii i:! i! !
Use only 4 inch (10.2 cm) diameter (minimum) rigid or flexible metal duct and
approved vent hood which has a swing-out damper hat open when the dryer is
in operation. When the dryer stops, the dampers automatically close to prevent
drafts and the entrance of insects and rodents. To avoid restricting the outlet,
maintain a minimum of 12 inches (30.5 cm) clearance between the vent hood
and the ground or any other obstruction. The vent flap should be able to move
freely.
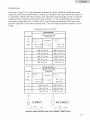
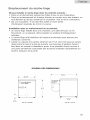
MAXIMUM EXHAUST LENGTH
Rigid Metal Duct
VENT HOOD TYPE
Number (preferred)
of
Louvered
90 °
o,bows-'14"I" -'12'21`-
(10,2 cm) 16.35 crn)
0 60ft. 11828 m) 48ft. 114.63 m}
1 52ff. 115.84 m) 40ft. 112.19 m)
2 44fl. (13.41 m) 32fl. (9.75 m)
3 32ft (9.75 m) 24ft. 17.31 m)
4 28ff. (&53 m) 16fl. (4.87 m)
Number
of
90 °
elbows
0
1
2
FlexibleMetal Duct
VENT HOOD TYPE
(preferred)
"',, Louvered
14"1-
(10.2cm)
30ft.(9.14 m)
22fl.16.71m)
14ff 14.27m)
-_12v_"l*
(6.35 cm)
18ft. (5.49 m)
14ft. (4.27 m)
1OPt.(3.05 m)
INSTALLMALEFI1TINGSIN THECORRECTDIRECTION
18

Afterinstallationiscompleted,thefollowingmethodmustbeusedto
determineiftheexhaustsystemisacceptable:
1.
2.
Connect an inclined or digital manometer between the dryer and
the point the exhaust connects to the dryer.
Set the dryer timer and temperature to air fluff (cool down)
and start the dryer.
3. Read the measurement on the manometer.
4.
The system back pressure must not be higher than 0.75 inches
of water column. If the system back pressure is less than 0.75
inches of water column, the system is acceptable. If the
manometer reading is higher than 0.75 inches of water column, the
system is too restrictive and the installation is unacceptable.
Although vertical orientation of the exhaust system is acceptable, cer-
tain extenuating circumstances could affect the performance of the
dryer:
1.
2.
3.
4.
Only the rigid metal duct work should be used.
Venting vertically through a roof may expose the exhaust
system to down drafts causing an increase in vent restriction.
Running the exhaust system through an area not insulated
may cause condensation and faster accumulation of lint.
Compression or crimping of the exhaust system will
cause an increase in vent restriction.
The exhaust system should be inspected and cleaned a minimum of
every 18 months with normal usage. The more the dryer is used, the
more often you should check the exhaust system and vent hood for
proper operation.
19
La page charge ...
La page charge ...
La page charge ...
La page charge ...
La page charge ...
La page charge ...
La page charge ...
La page charge ...
La page charge ...
La page charge ...
La page charge ...
La page charge ...
La page charge ...
La page charge ...
La page charge ...
La page charge ...
La page charge ...
La page charge ...
La page charge ...
La page charge ...
La page charge ...
La page charge ...
La page charge ...
La page charge ...
La page charge ...
La page charge ...
La page charge ...
La page charge ...
La page charge ...
La page charge ...
-
 1
1
-
 2
2
-
 3
3
-
 4
4
-
 5
5
-
 6
6
-
 7
7
-
 8
8
-
 9
9
-
 10
10
-
 11
11
-
 12
12
-
 13
13
-
 14
14
-
 15
15
-
 16
16
-
 17
17
-
 18
18
-
 19
19
-
 20
20
-
 21
21
-
 22
22
-
 23
23
-
 24
24
-
 25
25
-
 26
26
-
 27
27
-
 28
28
-
 29
29
-
 30
30
-
 31
31
-
 32
32
-
 33
33
-
 34
34
-
 35
35
-
 36
36
-
 37
37
-
 38
38
-
 39
39
-
 40
40
-
 41
41
-
 42
42
-
 43
43
-
 44
44
-
 45
45
-
 46
46
-
 47
47
-
 48
48
-
 49
49
-
 50
50


Haier HLF11PC Le manuel du propriétaire
- Catégorie
- Sèche-linge
- Taper
- Le manuel du propriétaire
dans d''autres langues
- English: Haier HLF11PC Owner's manual
Documents connexes
-
Haier HLF11PC Manuel utilisateur
-
-
-
-
-
-
Haier CRDE400AW Manuel utilisateur