
/

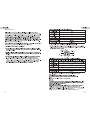
Deteccion y solucion de problemas
La secadora no funciona:
La secadora funciona pero no seca las prendas:
La secadora hace ruidos cuando seca:
Estatica:

Gu a de cuidado y limpieza

Sonidos normales del funcionamiento
Consejos

Otras funciones

Power supply:
3 or 4 wire, 240 Volt, 30 Amp, 60Hz, 1 Phase Power Supply Cord Kit (not supplied
when sold in the United States)
Purchase to meet local electrical codes. The dryer MUST employ a 3-conductor
power supply cord NEMA 10-30 Type SPDT RATED AT 240 Volt AC minimum, 30
Amp. with 3 open end spade lug connectors with upturned ends or closed loop
connectors and marked for use with clothes dryers. If being installed in a
manufactured (mobile) home the dryer MUST employ a 4-conductor power
supply cord. NEMA 14-30 type SRDT or ST (as required) rated at 240 Volt AC
Minimum, 30 Amp., with 4 open end spade lug connectors with upturned ends
or closed loop connectors and marked for use with clothes dryers. See Electrical
Connections for A 4-Wire System.
Ciclo de secado programado
Ciclo de secado en rejilla


Notas:

Colocar las prendas en la secadora
Ciclo de Secado automatico y ciclo de Secado
programado.
Ciclo de secado automatico
On carpet, the floor must be solid with a maximum slope of 1 inch (2.54 cm).

Preparativos antes de secar
Notas:


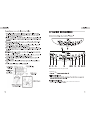
INSTRUCCIONES DE FUNCIONAMIENTO
Nota:
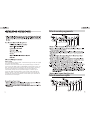
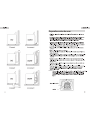
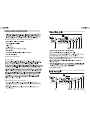
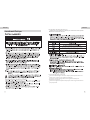
Explication del panel de control

4
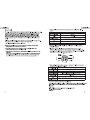
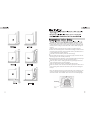
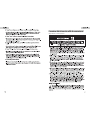
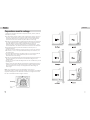
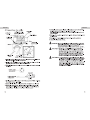
White

Blanco
Bloque
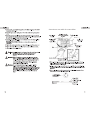
Conexiones con cable de cuatro hilos

Off Button: (1)
Not on when unit is turned on.
Off
Note: Features may vary by model

Conexiones electricas
Requisitos e instrucciones

Dark and light colored clothes should be separately dried. Fabrics prone to
creating lint and those prone to accumulating lint should be separately dried.
Clothes prone to creating lint should be turned inside out before putting into
the dryer.
Make sure buttons and ornaments on the clothes are high temperature
resistant and won't damage drum surface. Before loading, the clothes should
have their zippers zipped up, buttons and hooks done up and belts tied so as
to avoid entanglement or other obstacles.
If possible, turn out the clothes pockets for uniform drying.
Check if clothes remain soiled. If yes, wash it away again, otherwise the soils
after drying may not be removed permanently.
Small articles should be collected in a mesh bag before loading and drying to
avoid entanglement and ensure that they can be found easily.
Make sure power socket is reliably grounded. The grounding terminal must
not be connected to gas or tap water pipelines.
Make sure exhaust duct has been connected with extension pipe.
Make sure lint filter is clean and then assemble it properly. If lint filter is not in
place, tumbling items could enter the exhaust system and cause damage to
the dryer.
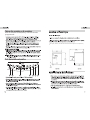
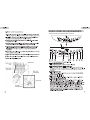
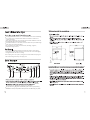
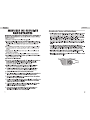
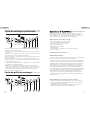
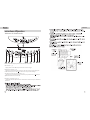
Notes: This applies to Auto Dry cycle and Timed Dry cycle. For Rack Dry cycle,
remove the lint filter and assemble the drying rack with its rear end slightly
downward inclined. The assembled status is as shown in the following figure:

The appropriate load shall be 1/3 ~ 1/2 of the drum volume. Avoid overloading,
for a certain space is needed to allow clothes free rotation for uniform and
wrinkle-proof drying.
When drying large articles, only 2-3 large pieces should be loaded at a time and
supplemented with medium and small articles.
For elaborate clothes or a small load, two towels without lint may be added to get
better drying and wrinkle-proof effects.
Do not excessively dry clothes to avoid wrinkles, shrinkage, roughness,
electrostatic charges, and lint.
This program is designed especially for articles like sneakers. During drying
please make sure the clothes reliably stay on the rack with no risk of entangling
the agitation blade while drum is rotating.
Note: If drying rack is not in place, rolling inner tub could collide with drying rack
and causes damage to the dryer and drying rack.
The unit returns to Off status immediately upon end of a cycle; Pressing
Off button will stop all operations and power the unit off during any status.
the unit
automatically cuts Off power and returns to off status;
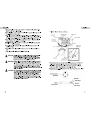
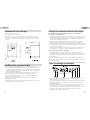
Ubicacion de la secadora
Instalacion en construcciones manufacturadas

Materiales
Notes:
conditions
Customized
function.

Conexiones del sistema de salida de emanaciones
Requisitos e instrucciones
La page est en cours de chargement...
La page est en cours de chargement...
La page est en cours de chargement...
La page est en cours de chargement...
La page est en cours de chargement...
La page est en cours de chargement...
La page est en cours de chargement...
La page est en cours de chargement...
La page est en cours de chargement...
La page est en cours de chargement...
La page est en cours de chargement...
La page est en cours de chargement...
La page est en cours de chargement...
La page est en cours de chargement...
La page est en cours de chargement...
La page est en cours de chargement...
-
 1
1
-
 2
2
-
 3
3
-
 4
4
-
 5
5
-
 6
6
-
 7
7
-
 8
8
-
 9
9
-
 10
10
-
 11
11
-
 12
12
-
 13
13
-
 14
14
-
 15
15
-
 16
16
-
 17
17
-
 18
18
-
 19
19
-
 20
20
-
 21
21
-
 22
22
-
 23
23
-
 24
24
-
 25
25
-
 26
26
-
 27
27
-
 28
28
-
 29
29
-
 30
30
-
 31
31
-
 32
32
-
 33
33
-
 34
34
-
 35
35
-
 36
36


Haier CRDE400AW Manuel utilisateur
- Taper
- Manuel utilisateur
- Ce manuel convient également à
dans d''autres langues
- English: Haier CRDE400AW User manual