Toro 53cm Recycler Lawn Mower Manuel utilisateur
- Catégorie
- Tondeuses à gazon
- Taper
- Manuel utilisateur

FormNo.3376-643-ASMRevA
53cmRecycler
®
LawnMower
ModelNo.20995—SerialNo.313000001andUp
ModelNo.20996—SerialNo.313000001andUp
Operator'sManual
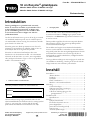
Introduction
Thisrotary-blade,walk-behindlawnmowerisintended
tobeusedbyresidentialhomeowners.Itisdesigned
primarilyforcuttinggrassonwell-maintainedlawns
onresidentialproperties.Itisnotdesignedforcutting
brushorforagriculturaluses.
Readthisinformationcarefullytolearnhowtooperateand
maintainyourmachineproperlyandtoavoidinjuryand
equipmentdamage.Youareresponsibleforoperatingthe
machineproperlyandsafely.
YoumaycontactTorodirectlyatwww.Toro.comforproduct
andaccessoryinformation,helpndingadealer,ortoregister
yourproduct.
Wheneveryouneedservice,genuineToroparts,oradditional
information,contactanAuthorizedServiceDealerorToro
CustomerServiceandhavethemodelandserialnumbersof
yourmachineready.Figure1identiesthelocationofthe
modelandserialnumbersontheproduct.
Figure1
1.Modelandserialnumberlocation
Writetheproductmodelandserialnumbersinthefollowing
space:
ModelNo.
SerialNo.
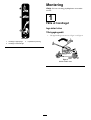
Thismanualidentiespotentialhazardsandhassafety
messagesidentiedbythesafetyalertsymbol(Figure2),
whichsignalsahazardthatmaycauseseriousinjuryordeath
ifyoudonotfollowtherecommendedprecautions.
Figure2
1.Safetyalertsymbol
Thismanualuses2wordstohighlightinformation.
Importantcallsattentiontospecialmechanicalinformation
andNoteemphasizesgeneralinformationworthyofspecial
attention.
ThisproductcomplieswithallrelevantEuropeandirectives.
Fordetails,seetheseparateproduct-specicDeclarationof
Conformity(DOC)sheet.
Formodelswithstatedenginehorsepower,thegross
horsepoweroftheenginewaslaboratoryratedbytheengine
manufacturerinaccordancewithSAEJ1940.Ascongured
tomeetsafety,emission,andoperatingrequirements,the
actualenginehorsepoweronthisclassoflawnmowerwill
besignicantlylower.
Donottamperwiththeenginecontrolsoralterthegovernor
speed;doingsomaycreateanunsafeconditionresultingin
personalinjury.
Contents
Introduction..................................................................1
GeneralLawnMowerSafety.....................................2
SoundPressure......................................................3
SoundPower..........................................................3
Hand/ArmVibration..............................................3
SafetyandInstructionalDecals.................................4
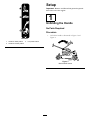
Setup............................................................................5
1UnfoldingtheHandle............................................5
2InstallingtheRecoil-starterRopeintheRope
Guide.................................................................6
3FillingtheEnginewithOil......................................6
4InstalltheMulchPlugortheGrassBag....................7
ProductOverview..........................................................8
Specications.........................................................9
Operation.....................................................................9
FillingtheFuelTank................................................9
CheckingtheEngineOilLevel..................................9
AdjustingtheCuttingHeight....................................10
AdjustingtheUpperHandleHeight..........................10
StartingtheEngine.................................................11
UsingtheSelf-propelDrive......................................12
©2012—TheToro®Company
8111LyndaleAvenueSouth
Bloomington,MN55420
Registeratwww.Toro.com.
OriginalInstructions(EN)
PrintedintheUSA
AllRightsReserved
*3376-643-ASM*A

UsingtheSelf-propelDrive......................................12
StoppingtheEngine...............................................12
MulchingtheClippings...........................................12
BaggingtheClippings.............................................13
Side-dischargingtheClippings..................................14
OperatingTips......................................................15
Maintenance.................................................................16
RecommendedMaintenanceSchedule(s)......................16
PreparingforMaintenance.......................................16
ReplacingtheAirFilter............................................16
ChangingtheEngineOil.........................................17
LubricatingtheWheelGears....................................18
LubricatingtheUpperHandle..................................18
AdjustingtheSelf-propelDriveCable........................18
AdjustingtheSelf-propelDriveCable........................19
ReplacingtheBlade................................................19
CleaningtheUndersideoftheMachine
Housing............................................................20
Storage........................................................................21
PreparingtheMachineforStorage............................21
FoldingtheHandle.................................................21
FoldingtheHandle.................................................21
RemovingtheMachinefromStorage.........................22
TestingtheMachineSafetySystem............................22
Safety
Improperlyusingormaintainingthismowercanresult
ininjury.Toreducethepotentialforinjury,complywith
thesesafetyinstructions.
Torodesignedandtestedthismachineforreasonablysafe
service;however,failuretocomplywiththefollowing
instructionsmayresultinpersonalinjury.
Toensuremaximumsafety,bestperformance,and
togainknowledgeoftheproduct,itisessentialthat
youandanyotheroperatorofthemowerreadand
understandthecontentsofthismanualbeforethe
engineiseverstarted.Payparticularattentiontothe
safetyalertsymbol(Figure2),whichmeansCaution,
Warning,orDanger—“personalsafetyinstruction.”
Readandunderstandtheinstructionbecauseithasto
dowithsafety.Failuretocomplywiththeinstruction
mayresultinpersonalinjury.
GeneralLawnMowerSafety
ThefollowinginstructionshavebeenadaptedfromEN836.
Thiscuttingmachineiscapableofamputatinghandsandfeet
andofthrowingobjects.Failuretoobservethefollowing
safetyinstructionscouldresultinseriousinjuryordeath.
Training
•Readtheinstructionscarefully.Befamiliarwiththe
controlsandtheproperuseoftheequipment.
•Neverallowchildrenorpeopleunfamiliarwiththese
instructionstousethemower.Localregulationscan
restricttheageoftheoperator.
•Keepinmindthattheoperatororuserisresponsiblefor
accidentsorhazardsoccurringtootherpeopleortheir
property.
•Understandexplanationsforallpictogramsusedonthe
mowerorintheinstructions.
Gasoline
WARNING-Gasolineishighlyammable.Takethe
followingprecautions.
•Storefuelincontainersspecicallydesignedforthis
purpose.
•Refueloutdoorsonlyanddonotsmokewhilerefueling.
•Addfuelbeforestartingtheengine.Neverremovethe
capofthefueltankoraddgasolinewhiletheengineis
runningorwhentheengineishot.
•Ifgasolineisspilled,donotattempttostarttheengine
butmovethemowerawayfromtheareaofspillageand
avoidcreatinganysourceofignitionuntilgasolinevapors
havedissipated.
•Replaceallfueltankandcontainercapssecurely.
Preparation
•Whilemowing,alwayswearsubstantialfootwearandlong
trousers.Donotoperatetheequipmentwhenbarefoot
orwearingopensandals.
•Thoroughlyinspecttheareawheretheequipmentisto
beusedandremoveallstones,sticks,wires,bonesand
otherforeignobjects.
•Beforeusing,alwaysvisuallyinspecttoseethatguards,
andsafetydevices,suchasdeectorsand/orgrass
catchers,areinplaceandworkingcorrectly.
•Beforeusing,alwaysvisuallyinspecttoseethattheblades,
bladeboltsandcutterassemblyarenotwornordamaged.
Replacewornordamagedbladesandboltsinsetsto
preservebalance.
Starting
•Donottiltthemowerwhenstartingtheengineunlessthe
mowerhastobetiltedforstarting.Inthiscase,donot
tiltitmorethanabsolutelynecessaryandliftonlythepart
whichisawayfromtheoperator.
•Starttheenginecarefullyaccordingtoinstructionsand
withfeetwellawayfromtheblade(s)andnotinfrontof
thedischargechute.
Operation
•Nevermowwhilepeople,especiallychildren,orpetsare
nearby.
•Mowonlyindaylightoringoodarticiallight.
•Stayalertforholesintheterrainandotherhiddenhazards.
2

•Donotputhandsorfeetnearorunderrotatingparts.
Keepclearofthedischargeopeningatalltimes.
•Neverpickuporcarryalawnmowerwhiletheengineis
running.
•Useextremecautionwhenreversingorpullinga
pedestriancontrolledlawnmowertowardsyou.
•Walk,neverrun.
•Slopes:
–Donotmowexcessivelysteepslopes.
–Exerciseextremecautionwhenonslopes.
–Mowacrossthefaceofslopes,neverupanddown,
andexerciseextremecautionwhenchangingdirection
onslopes.
–Alwaysbesureofyourfootingonslopes.
•Reducespeedonslopesandinsharpturnstoprevent
overturningorlossofcontrol.
•Stopthebladeifthelawnmowerhastobetiltedfor
transportationwhencrossingsurfacesotherthangrass
andwhentransportingthelawnmowertoandfromthe
areatobemowed.
•Donotoperatetheengineinaconnedspacewhere
dangerouscarbonmonoxidefumescancollect.
•Stoptheengine
–wheneveryouleavethelawnmower.
–beforerefueling.
–beforeremovingthegrasscatcher.
–beforemakingheightadjustmentunlessadjustment
canbemadefromtheoperator'sposition.
•Stoptheengineanddisconnectthespark-plugwire.
–beforeclearingblockagesoruncloggingchute.
–beforechecking,cleaningorworkingonthelawn
mower.
–afterstrikingaforeignobject,inspectthelawnmower
fordamageandmakerepairsbeforerestartingand
operatingthelawnmower.
–iflawnmowerstartstovibrateabnormally(check
immediately).
•Lightningcancausesevereinjuryordeath.Ifyousee
lightningorhearthunderinthearea,donotoperatethe
machine;seekshelter.
•Watchoutfortrafcwhencrossingornearroadways.
MaintenanceandStorage
•Keepallnuts,bolts,andscrewstighttobesurethe
equipmentisinsafeworkingcondition.
•Donotusepressure-cleaningequipmentonmachine.
•Neverstoretheequipmentwithgasolineinthetankand
insideabuildingwherefumescanreachanopename
orspark.
•Allowtheenginetocoolbeforestoringinanyenclosure.
•Toreducetherehazard,keeptheengine,silencer,
batterycompartmentandgasolinestorageareafreeof
grass,leaves,orexcessivegrease.
•Checkgrasscatchercomponentsandthedischargeguard
frequentlyandreplacewithmanufacturer'srecommended
parts,whennecessary.
•Replacewornordamagedpartsforsafety.
•Replacefaultysilencers.
•Ifthefueltankhastobedrained,dothisoutdoors.
•Donotchangetheenginegovernorsettingsoroverspeed
theengine.Operatinganengineatexcessivespeedcan
increasethehazardofpersonalinjury.
•Becarefulduringadjustmentofthelawnmowerto
prevententrapmentofthengersbetweenmovingblades
andxedpartsofthelawnmower.
•Toensurethebestperformanceandsafety,
purchaseonlygenuineTororeplacementpartsand
accessories.Donotuse
willt
partsandaccessories;
theymaycauseasafetyhazard.
SoundPressure
Thisunithasasoundpressurelevelattheoperator’searof89
dBA,whichincludesanUncertaintyValue(K)of1dBA.
Thesoundpressurelevelwasdeterminedaccordingtothe
proceduresoutlinedinEN836.
SoundPower
Thisunithasaguaranteedsoundpowerlevelof98dBA,
whichincludesanUncertaintyValue(K)of1dBA.
Thesoundpowerlevelwasdeterminedaccordingtothe
proceduresoutlinedinISO11094.
Hand/ArmVibration
Measuredvibrationlevelforrighthand=5.1m/s
Measuredvibrationlevelforlefthand=4.8m/s
UncertaintyValue(K)=2.0m/s2
Measuredvaluesweredeterminedaccordingtotheprocedures
outlinedinEN836.
3

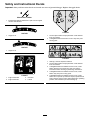
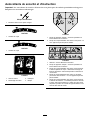
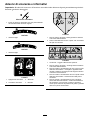
SafetyandInstructionalDecals
Important:Safetyandinstructiondecalsarelocatednearareasofpotentialdanger.Replacedamageddecals.
Manufacturer'sMark
1.Indicatesthebladeisidentiedasapartfromtheoriginal
machinemanufacturer.
108-7450
1.Heightofcut
108-7451
1.Heightofcut
110-9457
1.EngineswitchOff
3.Unlocked
2.EngineswitchOn
4.Locked
112-8760
1.Thrownobjecthazard—keepbystandersasafedistance
fromthemachine.
2.Cutting/dismembermentofhandorfoot—stayawayfrom
movingparts.
114-7982
1.Warning—readtheOperator'sManual.
2.Thrownobjecthazard—keepbystandersasafedistance
fromthemachine.
3.Cutting/dismembermenthazardofhandorfoot,mower
blade—disconnectthesparkplugwireandreadthe
instructionsbeforeservicingorperformingmaintenance.
4.Cutting/dismembermenthazardofhandorfoot,mower
blade—stayawayfrommovingparts.
5.Cutting/dismembermenthazardofhandorfoot,mower
blade—donotoperateupanddownslopes;operatesideto
sideonslopes;stoptheenginebeforeleavingtheoperating
position;andlookbehindyouwhenbackingup.
4


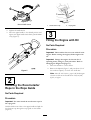
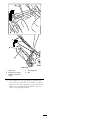
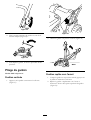
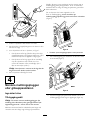
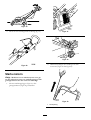
Figure4
Model20995shown
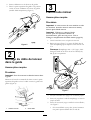
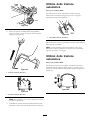
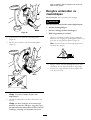
2.Tightenallhandleknobs.
3.Movetheupperhandletothedesiredpositionand
tightentheupperhandleknobrmly(model20996
only)(Figure5).
Figure5
2
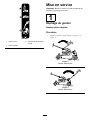
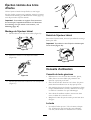
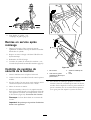
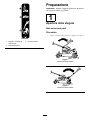
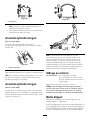
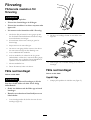
InstallingtheRecoil-starter
RopeintheRopeGuide
NoPartsRequired
Procedure
Important:Youmustinstalltherecoil-starterropein
theropeguide.
Holdtheblade-controlbartotheupperhandleandpullthe
recoil-starterropethroughtheropeguideonthehandle
(Figure6).
Figure6
1.Recoil-starterrope2.Ropeguide
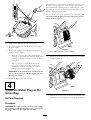
3
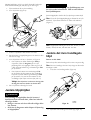
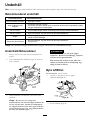
FillingtheEnginewithOil
NoPartsRequired
Procedure
Important:Thismachinedoesnotcomewithoilinthe
engine.Beforestartingtheengine,lltheenginewith
oil.
Important:Changetheengineoilaftertherst5
operatinghours;changeityearlythereafter.Referto
ChangingtheEngineOil(page17).
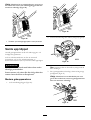
1.Movethemachinetoalevelsurface.
2.Removethedipstick(Figure7)andpourabout3/4of
thecrankcasecapacityofoilintotheoil-lltube.
Note:Max.ll:0.59l(20oz.),type:SAE30detergent
oilwithanAPIserviceclassicationofSF,SG,SH,
SJ,SL,orhigher.
6

Figure7
3.Wipeoffthedipstickendwithacleancloth.
4.Insertthedipstickintotheoil-lltube,andscrewit
inuntilitstops.
5.Removethedipstickandreadtheoillevelonthe
dipstick;refertoFigure7.
•Iftheoillevelistoolow,addasmallamountof
oilslowlytotheoil-lltube,andthenrepeatsteps
3through5untiltheoilleveliscorrectasshown
inFigure7.
•Iftheoillevelistoohigh,draintheexcess
oiluntilyouobtainthecorrectoillevelon
thedipstick.Todraintheexcessoil,referto
ChangingtheEngineOil(page17).
Important:Iftheoillevelinthecrankcaseistoo
lowortoohighandyouruntheengine,youmay
damagetheengine.
6.Installthedipsticksecurelybyhand.
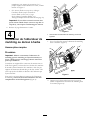
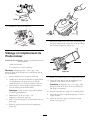
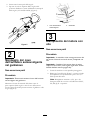
4
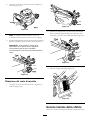
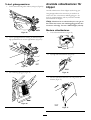
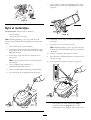
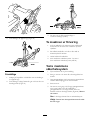
InstalltheMulchPlugorthe
GrassBag
NoPartsRequired
Procedure
Important:Youmustcorrectlyinstallthemulchplug
(formulchingorside-discharging)orthegrassbag(for
bagging);otherwise,theenginewillnotstart.
Themachinehasasafetyswitch,locatedatthebottomofthe
channelatthetop,rightrearofthemachine,thatprevents
themachinefromoperatingwithoutamulchplugoragrass
bag.Thispreventsthemachinefromthrowingdebrisatthe
operatorthroughtherearchute.
Fortheswitchtodetectthepresenceofthemulchplug,the
topofthemulchpluglevermustliefullyinthebottom
ofthechannel(Figure8).
Figure8
1.Topofmulchplugleverinchannelbottom
1.Insertthemulchplugintothemachineifitisn'talready
installed(Figure9).
Figure9
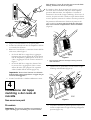
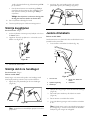
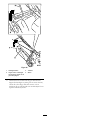
2.Squeezethebuttonontheleverwithyourthumb,and
fullyinsertthemulchplugintotheopening(Figure10).
7

Figure10
3.Releasethebuttonontheleverandensurethatthe
topoftheleverisliesfullyintheswitchchannel
(Figure11).Ifthetopoftheleverisnotinthe
switchchannel,yourmachinewillnotstart.
Figure11
Note:Iftheleverdoesnotlatchproperly,disconnect
thewirefromthesparkplugandcheckforandremove
anydebrisbuildupinthetunnel.
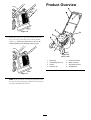
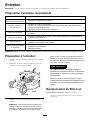
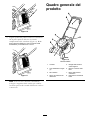
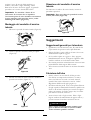
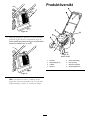
ProductOverview
Figure12
Model20995
1.Sparkplug
5.Recoil-starthandle
2.Cutting-heightlever(4)
6.Blade-controlbar
3.Airlter7.Self-propel-drivebar
4.Fuel-tankcap
8.Oilll/Dipstick
8

G020408
Figure13
Model20996
1.Cutting-heightlever(4)
6.Recoil-starthandle
2.Airlter
7.Blade-controlbar
3.Fuel-tankcap8.Upper-handleknob
4.Oilll/Dipstick9.Sparkplug
5.Footpedal
Figure14
1.Grassbag3.Mulchplug(installed)
2.Side-dischargechute
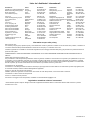
Specications
ModelWeightLengthWidthHeight
2099535kg
(77lb)
145cm
(57in)
56cm
(22in)
99cm
(39in)
2099637kg
(82lb)
157cm
(62in)
56cm
(22in)
112cm
(44in)
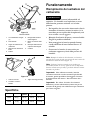
Operation
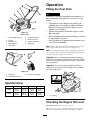
FillingtheFuelTank
DANGER
Gasolineisextremelyammableandexplosive.A
reorexplosionfromgasolinecanburnyouand
others.
•Topreventastaticchargefromignitingthe
gasoline,placethecontainerand/ormachine
directlyonthegroundbeforelling,notina
vehicleoronanobject.
•Fillthetankoutdoorswhentheengineiscold.
Wipeupspills.
•Donothandlegasolinewhensmokingoraround
anopenameorsparks.
•Storegasolineinanapprovedfuelcontainer,out
ofthereachofchildren.
Note:Fillthefueltankwithfreshunleadedregulargasoline
fromamajorname-brandservicestation(Figure15).
Note:Useunleadedregulargasolinesuitableforautomotive
use(87pumpoctaneminimum).Leadedregulargasolinemay
beusedifunleadedregularisnotavailable.
Important:Neverusemethanol,gasolinecontaining
methanol,orgasoholcontainingmorethan10%ethanol
becausetheycoulddamagethefuelsystem.Donotmix
oilwithgasoline.
Important:Toreducestartingproblems,addfuel
stabilizertothefuelallseason,mixingitwithgasoline
lessthan30daysold.
Figure15
1.1cm(1/2in)
CheckingtheEngineOilLevel
ServiceInterval:Beforeeachuseordaily
Max.ll:0.59l(20oz.),type:SAE30detergentoilwithan
APIserviceclassicationofSF,SG,SH,SJ,SL,orhigher.
9

1.Movethemachinetoalevelsurface.
2.Removethedipstick(Figure16).
Figure16
3.Wipeoffthedipstickendwithacleancloth.
4.Insertthedipstickintotheoil-lltubeandscrewitin
untilitstops.
5.Removethedipstickandreadtheoillevel;referto
Figure16.
•IftheoillevelisbelowtheAddmarkonthe
dipstick,slowlyaddasmallamountofoiltothe
oil-lltube,andthenrepeatsteps3through5until
theoillevelisattheFullmarkonthedipstick.
•IftheoillevelisabovetheFullmarkonthe
dipstick,draintheexcessoiluntiltheoillevelisat
theFullmarkonthedipstick.Todraintheexcess
oil,refertoChangingtheEngineOil(page17).
Important:Iftheoillevelinthecrankcaseis
toolowortoohighandyouruntheengine,
youmaydamagetheengine.
6.Installthedipsticksecurelybyhand.
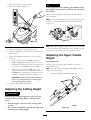
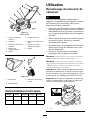
AdjustingtheCuttingHeight
WARNING
Adjustingthecuttingheightmaybringyouinto
contactwiththemovingblade,causingserious
injury.
•Stoptheengineandwaitforallmovingparts
tostop.
•Donotputyourngersunderthehousingwhen
adjustingthecuttingheight.
CAUTION
Iftheenginehasbeenrunning,themuferwillbe
hotandcanseverelyburnyou.Keepawayfromthe
hotmufer.
Adjustthecuttingheightasdesired.Setallfourwheelsto
thesameheight.
Note:Toraisethemachine,moveall4cuttingheightlevers
forward;tolowerthemachine,movethemallrearward
(Figure17).
Figure17
Note:Thecuttingheightsettingsare25mm(1in);38mm
(1-1/2in);51mm(2in);64mm(2-1/2in);76mm(3in);89
mm(3-1/2in);102mm(4in);and114mm(4-1/2in).
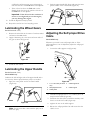
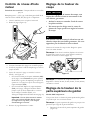
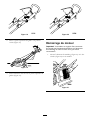
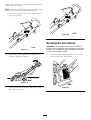
AdjustingtheUpperHandle
Height
Model20996only
Youmayraiseorlowertheupperhandletoaposition
comfortableforyou.
Note:Youcannotraisetheupperhandlehigherthanthe
angleofthelowerhandle.
1.Loosentheupper-handleknob(Figure18).
Figure18
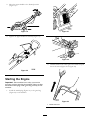
10

2.Movetheupperhandletothedesiredposition
(Figure19).
Figure19
3.Tightentheupper-handleknobrmly(Figure19).
Figure20
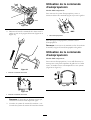
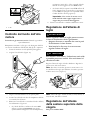
StartingtheEngine
Important:Themachinehasasafetysystemthat
preventsyoufromstartingthemachineunlessyourst
installthemulchplugorthegrassbagsecurelyonthe
machine.
1.Installthemulchplug(Figure21)orthegrassbag
(Figure22)onthemachine.
Figure21
Figure22
2.Holdtheblade-controlbaragainstthehandleandpull
therecoilstarter(Figure23orFigure24).
Figure23
1.Blade-controlbar
11

Figure24
1.Blade-controlbar
Note:Ifthemachinestilldoesnotstart,contactan
AuthorizedServiceDealer.
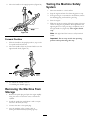
3.Testthemachinesafetysystem;refertoTestingthe
MachineSafetySysteminStorage.
UsingtheSelf-propelDrive
Model20995only
Tooperatetheself-propeldrive,squeezetheself-propeldrive
bar(Figure25)towardthehandleandholdit.
Figure25
1.Self-propel-drivebar
Todisengagetheself-propeldrive,releasetheself-propel-drive
bar.
Note:Themaximumself-propelgroundspeedisxed.To
reducethegroundspeed,increasethespacebetweenthe
self-propel-drivebarandthehandle.
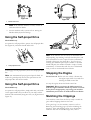
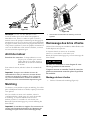
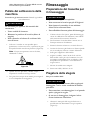
UsingtheSelf-propelDrive
Model20996only
Tooperatetheself-propeldrive,simplywalkwithyourhands
ontheupperhandleandyourelbowsatyoursides,andthe
machinewillautomaticallykeeppacewithyou(Figure26and
Figure27).
Figure26
Figure27
Note:Ifthemachinedoesnotfreelyrollbackwardafter
self-propelling,stopwalking,holdyourhandsinplace,and
allowthemachinetorollacoupleofinches(centimeters)
forwardtodisengagethewheeldrive.Youcanalsotry
reachingjustunderthepersonalpacehandletothemetal
handleandpushthemachineforwardacoupleofinches
(centimeters).Ifthemachinestilldoesnotrollbackward
easily,contactanAuthorizedServiceDealer.
StoppingtheEngine
ServiceInterval:Beforeeachuseordaily—Ensurethat
theenginestopswithin3secondsafter
releasingtheblade-controlbar.
Tostoptheengine,releasetheblade-controlbar.
Important:Whenyoureleasetheblade-controlbar,
boththeengineandbladeshouldstopwithin3seconds.
Iftheydonotstopproperly,stopusingyourmachine
immediatelyandcontactanAuthorizedServiceDealer.
MulchingtheClippings
Yourmachinecomesfromthefactoryreadytomulchthe
grassandleafclippingsbackintothelawn.
Ifthegrassbagisonthemachine,removeit;referto
RemovingtheGrassBag(page14)beforemulchingthe
clippings.Iftheside-dischargechuteisonthemachine,
removeitandlocktheside-dischargedoor;referto
12

RemovingtheSide-dischargeChute(page15)before
mulchingtheclippings.
Important:Themachinehasasafetyswitchthat
preventsyoufromstartingthemachineunlessyou
rstinstallthemulchplugsecurelyonthemachine
(Figure28).
Figure28
1.Topofmulchplugleverinchannelbottom
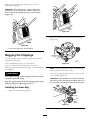
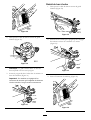
BaggingtheClippings
Usethegrassbagwhenyouwanttocollectgrassandleaf
clippingsfromthelawn.
Iftheside-dischargechuteisonthemachine,
removeitandlocktheside-dischargedoor;referto
RemovingtheSide-dischargeChute(page15)beforebagging
theclippings.
WARNING
Thebladeissharp;contactingthebladecanresult
inseriouspersonalinjury.
Stoptheengineandwaitforallmovingpartstostop
beforeleavingtheoperatingposition.
InstallingtheGrassBag
1.Removethemulchplug(Figure29).
Figure29
2.Routethestarterropearoundthelower-ropeguide
(Figure30).
Figure30
Note:Thelower-ropeguidereleasesthestarterrope
whenyoupulltherecoil-starthandle.
3.Insertthegrass-baghandleintothegroovesatthetop
ofthemachine(Figure31).
Important:Themachinehasasafetyswitchthat
preventsyoufromstartingthemachineunlessyou
rstinstallthegrassbagsecurelyonthemachine.
Figure31
13

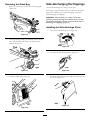
RemovingtheGrassBag
1.Routethestarterropearoundthelower-ropeguide
(Figure32).
Figure32
2.Liftthegrass-baghandleoutfromthegroovesatthe
topofthemachineandremovethebagfromthe
machine(Figure33).
Figure33
3.Insertthemulchplug(Figure34).
Figure34
Side-dischargingtheClippings
Usethesidedischargeforcuttingverytallgrass.
Ifthebagisonthemachine,removeitandinsertthemulch
plug;refertoRemovingtheGrassBag(page14)before
side-dischargingtheclippings.
Important:Themachinehasasafetyswitchthat
preventsyoufromstartingthemachineunlessyourst
installthemulchplugsecurelyonthemachine;referto
MulchingtheClippings(page12).
InstallingtheSide-dischargeChute
1.Unlocktheside-dischargedoor(Figure35).
Figure35
2.Liftopentheside-dischargedoor(Figure36).
Figure36
3.Installtheside-dischargechuteandclosethedooronto
thechute(Figure37).
Figure37
14

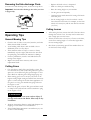
RemovingtheSide-dischargeChute
Toremovethesidedischargechute,reversethestepsabove.
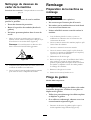
Important:Locktheside-dischargedoorafteryouclose
it(Figure38).
Figure38
OperatingTips
GeneralMowingTips
•Cleartheareaofsticks,stones,wire,branches,andother
debristhatthebladecouldhit.
•Avoidstrikingsolidobjectswiththeblade.Never
deliberatelymowoveranyobject.
•Ifthemachinestrikesanobjectorstartstovibrate,
immediatelystoptheengine,disconnectthewirefrom
thesparkplug,andexaminethemachinefordamage.
•Forbestperformance,installanewbladebeforethe
cuttingseasonbegins.
•ReplacethebladewhennecessarywithaToro
replacementblade.
CuttingGrass
•Cutonlyaboutathirdofthegrassbladeatatime.Do
notcutbelowthe51mm(2in)settingunlessthegrassis
sparseoritislatefallwhengrassgrowthbeginstoslow
down.RefertoAdjustingtheCuttingHeight(page10).
•Whencuttinggrassover15cm(6in)tall,mowatthe
highestcutting-heightsettingandwalkslower;thenmow
againatalowersettingforthebestlawnappearance.If
thegrassistoolong,themachinemayplugandcause
theenginetostall.
•Mowonlydrygrassorleaves.Wetgrassandleavestend
toclumpontheyardandcancausethemachinetoplug
ortheenginetostall.
WARNING
Wetgrassorleavescancauseseriousinjuryif
youslipandcontacttheblade.Mowonlyindry
conditions.
•Alternatethemowingdirection.Thishelpsdispersethe
clippingsoverthelawnforevenfertilization.
•Ifthenishedlawnappearanceisunsatisfactory,tryone
ormoreofthefollowing:
–Replacethebladeorhaveitsharpened.
–Walkataslowerpacewhilemowing.
–Raisethecuttingheightonyourmachine.
–Cutthegrassmorefrequently.
–Overlapcuttingswathsinsteadofcuttingafullswath
witheachpass.
–Setthecuttingheightonthefrontwheels1notch
lowerthantherearwheels.Forexample,setthefront
wheelsat51mm(2in)andtherearwheelsat64mm
(2-1/2in).
CuttingLeaves
•Aftercuttingthelawn,ensurethathalfofthelawnshows
throughthecutleafcover.Youmayneedtomakemore
thanasinglepassovertheleaves.
•Iftherearemorethan13cm(5in)ofleavesonthelawn,
setthefrontcuttingheight1or2notcheshigherthan
therearcuttingheight.
•Slowdownyourmowingspeedifthemachinedoesnot
cuttheleavesnelyenough.
15

Maintenance
Note:Determinetheleftandrightsidesofthemachinefromthenormaloperatingposition.
RecommendedMaintenanceSchedule(s)
MaintenanceService
Interval
MaintenanceProcedure
Aftertherst5hours
•Changetheengineoil.
Beforeeachuseordaily
•Checktheengineoillevel.
•Ensurethattheenginestopswithin3secondsafterreleasingtheblade-controlbar.
•Cleantheundersideofthemachinehousing.
Every25hours
•Replacetheairlteryearly;replaceitmorefrequentlyindustyoperatingconditions.
Every50hours
•Changetheengineoil;changeitmorefrequentlyindustyoperatingconditions.
Yearly
•Lubricatethewheelgears.
•Lubricatetheupperhandle.
Yearlyorbeforestorage
•Changetheengineoil;changeitmorefrequentlyindustyoperatingconditions.
•Replacetheblade.
Important:RefertoyourEngineOperator'sManualforadditionalmaintenanceprocedures.
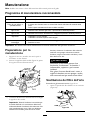
PreparingforMaintenance
1.Stoptheengineandwaitforallmovingpartstostop.
2.Disconnectthespark-plugwirefromthesparkplug
(Figure39)beforeperforminganymaintenance
procedure.
Figure39
3.Afterperformingthemaintenanceprocedure(s),
connectthespark-plugwiretothesparkplug.
Important:Beforetippingthemachinetochange
theoilorreplacetheblade,allowthefueltankto
rundrythroughnormalusage.Ifyoumusttip
themachinepriortorunningoutoffuel,usea
handfuelpumptoremovethefuel.Alwaystipthe
machineontoitssidewiththeairlterup.
WARNING
Tippingthemachinemaycausethefuelto
leak.Gasolineisammable,explosiveand
cancausepersonalinjury.
Runtheenginedryorremovethegasoline
withahandpump;neversiphon.
ReplacingtheAirFilter
ServiceInterval:Every25hours
1.Useascrewdrivertoopentheair-ltercover
(Figure40).
Figure40
2.Replacetheairlter(Figure41).
16

Figure41
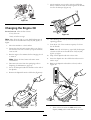
ChangingtheEngineOil
ServiceInterval:Aftertherst5hours
Every50hours
Yearlyorbeforestorage
Note:Max.ll:0.59l(20oz),type:SAE30detergentoil
withanAPIserviceclassicationofSF,SG,SH,SJ,SL,or
higher.
1.Movethemachinetoalevelsurface.
2.Ensurethatthefueltankcontainslittleornofuelso
thatfueldoesnotleakoutwhenyoutipthemachine
ontoitsside.
3.Runtheengineafewminutesbeforechangingtheoil
towarmit.
Note:Warmoilowsbetterandcarriesmore
contaminants.
4.Disconnectthewirefromthesparkplug;referto
PreparingforMaintenance(page16).
5.Setanoil-drainpanbesidethemachineonthesideof
thedipstick.
6.Removethedipstickfromtheoil-lltube(Figure42).
Figure42
7.Tipthemachineontoitsside,withtheoil-lltube
down,todraintheusedoiloutthroughtheoil-lltube
intotheoil-drainpan(Figure43).
G019342
Figure43
8.Afterdrainingtheusedoil,returnthemachinetothe
operatingposition.
9.Pourabout3/4ofthecrankcasecapacityofoilinto
theoil-lltube.
Note:Max.ll:0.59l(20oz),type:SAE30detergent
oilwithanAPIserviceclassicationofSF,SG,SH,
SJ,SL,orhigher.
10.Wipeoffthedipstickendwithacleancloth.
11.Insertthedipstickintotheoil-lltubeandscrewitin
untilitstops.
12.Removethedipstickandreadtheoillevel;referto
Figure44.
Figure44
•IftheoillevelisbelowtheAddmarkonthe
dipstick,slowlyaddasmallamountofoiltothe
17

oil-lltube,andthenrepeatsteps10through12
untiltheoillevelisattheFullmarkonthedipstick.
•IftheoillevelisabovetheFullmarkonthe
dipstick,draintheexcessoiluntiltheoillevelisat
theFullmarkonthedipstick.
Important:Iftheoillevelinthecrankcaseis
toolowortoohighandyouruntheengine,
youmaydamagetheengine.
13.Installthedipsticksecurelybyhand.
14.Recycletheusedoilatalocalrecyclingcenter.
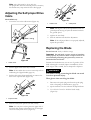
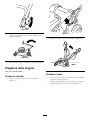
LubricatingtheWheelGears
ServiceInterval:Yearly
1.Removethewheelboltinthecenterofeachrearwheel
andremovetherearwheels.
2.Applyalubricatingoiltotheinnerandoutersidesof
thegearasshowninFigure45.
Figure45
3.Installtherearwheels.
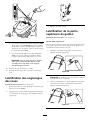
LubricatingtheUpperHandle
ServiceInterval:Yearly
Model20996only
Lubricatetheleftandrightsidesoftheupperhandlewitha
low-viscositysiliconespraylubricantyearlyorasneeded.
1.Spraytheouterplasticendoftheinnerhandle
(Figure46).
Figure46
Note:Usethestrawthatcomeswiththespraycanto
directthespray.
2.Pushtheupperhandlefullydownandspraytheinner
plasticsurfaceoftheouterhandle(Figure47).
Figure47
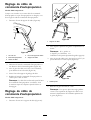
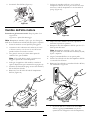
AdjustingtheSelf-propelDrive
Cable
Model20995only
Wheneveryouinstallanewself-propelcableorifthe
self-propeldriveisoutofadjustment,adjusttheself-propel
drivecable.
1.Loosenthecablesupportnut(Figure48).
Figure48
1.1to1-1/2inches(25to38
mm)
4.Cable-supportnut
2.Self-propel-drivebar5.Cablesupport
3.Cablejacket
2.Holdtheself-propelbail1to1-1/2inches(25to38
mm)fromthehandle(Figure48).
3.Pulldownthecablejacket(towardthemachine)until
thereisnoslackinthecable(Figure48).
4.Tightenthenutonthecablesupport.
5.Releasetheself-propel-drivebarandensurethatthe
cableisloose.
18

Note:Thecablemustbeloosewiththe
self-propel-drivebarinthereleasedposition;otherwise,
themachinemaycreepwhenthebarisdisengaged.
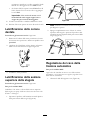
AdjustingtheSelf-propelDrive
Cable
Model20996only
1.Loosenthenutonthecablemount(Figure49).
G009696
1
Figure49
1.Cablemount
2.Pulltheupperhandlebackfullyrearward.
Note:Ifthehandledoesnotmovesmoothly,referto
LubricatingtheUpperHandle(page18).
3.Pullthecablejacketdownwarduntilyouremovethe
slackintheexposedcable(Figure50).
Figure50
1.Exposedcable
4.Pushthecablejacketupward1/8inch(3mm).
Note:Youcanplacearuleragainsttheuppersideof
theblackcablemountandmeasurehowfartheupper
endofthecablejacketmoves(Figure51).
Figure51
1.Cablemount2.Cablejacket
Note:Movingthecablejacketupwarddecreasesthe
groundspeed;movingthejacketdownwardincreases
thegroundspeed.
5.Tightenthenutrmly.
6.Startthemachineandchecktheadjustment.
Note:Iftheself-propeldriveisnotproperlyadjusted,
repeatthisprocedure.
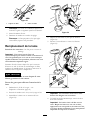
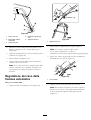
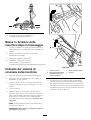
ReplacingtheBlade
ServiceInterval:Yearlyorbeforestorage
Important:
Youwillneedatorquewrenchtoinstallthe
bladeproperly.
Ifyoudonothaveatorquewrenchorare
uncomfortableperformingthisprocedure,contactan
AuthorizedServiceDealer.
Examinethebladewheneveryourunoutofgasoline.Ifthe
bladeisdamagedorcracked,replaceitimmediately.Ifthe
bladeedgeisdullornicked,haveitsharpenedorreplaceit.
WARNING
Thebladeissharp;contactingthebladecanresult
inseriouspersonalinjury.
Weargloveswhenservicingtheblade.
1.Disconnectthespark-plugwirefromthesparkplug;
refertoPreparingforMaintenance(page16).
2.Tipthemachineontothesidewiththedipstickdown.
3.Useablockofwoodtoholdthebladesteady
(Figure52).
19

Figure52
4.Removetheblade,savingallmountinghardware
(Figure52).
5.Installthenewbladeandallmountinghardware
(Figure53).
Figure53
Important:Positionthecurvedendsoftheblade
topointtowardthemachinehousing.
6.Useatorquewrenchtotightenthebladeboltto82
N-m(60ft-lb).
Important:Abolttorquedto82N-m(60ft-lb)is
verytight.Whileholdingthebladewithablock
ofwood,putyourweightbehindtheratchetor
wrenchandtightentheboltsecurely.Thisboltis
verydifculttoovertighten.
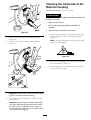
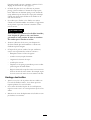
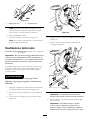
CleaningtheUndersideofthe
MachineHousing
ServiceInterval:Beforeeachuseordaily
WARNING
Themachinemaydislodgematerialfromunderthe
machinehousing.
•Weareyeprotection.
•Stayintheoperatingposition(behindthe
handle).
•Donotallowbystandersinthearea.
1.Withtheenginerunningonaatpavedsurface,spray
astreamofwaterinfrontoftherightrearwheel
(Figure54).
Note:Thewaterwillsplashintothepathoftheblade,
cleaningouttheclippings.
Figure54
2.Whennomoreclippingscomeout,stopthewaterand
movethemachinetoadryarea.
3.Runtheengineforafewminutestodrythehousing
topreventitfromrusting.
20
La page est en cours de chargement...
La page est en cours de chargement...
La page est en cours de chargement...
La page est en cours de chargement...
La page est en cours de chargement...
La page est en cours de chargement...
La page est en cours de chargement...
La page est en cours de chargement...
La page est en cours de chargement...
La page est en cours de chargement...
La page est en cours de chargement...
La page est en cours de chargement...
La page est en cours de chargement...
La page est en cours de chargement...
La page est en cours de chargement...
La page est en cours de chargement...
La page est en cours de chargement...
La page est en cours de chargement...
La page est en cours de chargement...
La page est en cours de chargement...
La page est en cours de chargement...
La page est en cours de chargement...
La page est en cours de chargement...
La page est en cours de chargement...
La page est en cours de chargement...
La page est en cours de chargement...
La page est en cours de chargement...
La page est en cours de chargement...
La page est en cours de chargement...
La page est en cours de chargement...
La page est en cours de chargement...
La page est en cours de chargement...
La page est en cours de chargement...
La page est en cours de chargement...
La page est en cours de chargement...
La page est en cours de chargement...
La page est en cours de chargement...
La page est en cours de chargement...
La page est en cours de chargement...
La page est en cours de chargement...
La page est en cours de chargement...
La page est en cours de chargement...
La page est en cours de chargement...
La page est en cours de chargement...
La page est en cours de chargement...
La page est en cours de chargement...
La page est en cours de chargement...
La page est en cours de chargement...
La page est en cours de chargement...
La page est en cours de chargement...
La page est en cours de chargement...
La page est en cours de chargement...
La page est en cours de chargement...
La page est en cours de chargement...
La page est en cours de chargement...
La page est en cours de chargement...
La page est en cours de chargement...
La page est en cours de chargement...
La page est en cours de chargement...
La page est en cours de chargement...
La page est en cours de chargement...
La page est en cours de chargement...
La page est en cours de chargement...
La page est en cours de chargement...
La page est en cours de chargement...
La page est en cours de chargement...
La page est en cours de chargement...
La page est en cours de chargement...
La page est en cours de chargement...
La page est en cours de chargement...
La page est en cours de chargement...
La page est en cours de chargement...
La page est en cours de chargement...
La page est en cours de chargement...
La page est en cours de chargement...
La page est en cours de chargement...
La page est en cours de chargement...
La page est en cours de chargement...
La page est en cours de chargement...
La page est en cours de chargement...
La page est en cours de chargement...
La page est en cours de chargement...
La page est en cours de chargement...
La page est en cours de chargement...
La page est en cours de chargement...
La page est en cours de chargement...
La page est en cours de chargement...
La page est en cours de chargement...
-
 1
1
-
 2
2
-
 3
3
-
 4
4
-
 5
5
-
 6
6
-
 7
7
-
 8
8
-
 9
9
-
 10
10
-
 11
11
-
 12
12
-
 13
13
-
 14
14
-
 15
15
-
 16
16
-
 17
17
-
 18
18
-
 19
19
-
 20
20
-
 21
21
-
 22
22
-
 23
23
-
 24
24
-
 25
25
-
 26
26
-
 27
27
-
 28
28
-
 29
29
-
 30
30
-
 31
31
-
 32
32
-
 33
33
-
 34
34
-
 35
35
-
 36
36
-
 37
37
-
 38
38
-
 39
39
-
 40
40
-
 41
41
-
 42
42
-
 43
43
-
 44
44
-
 45
45
-
 46
46
-
 47
47
-
 48
48
-
 49
49
-
 50
50
-
 51
51
-
 52
52
-
 53
53
-
 54
54
-
 55
55
-
 56
56
-
 57
57
-
 58
58
-
 59
59
-
 60
60
-
 61
61
-
 62
62
-
 63
63
-
 64
64
-
 65
65
-
 66
66
-
 67
67
-
 68
68
-
 69
69
-
 70
70
-
 71
71
-
 72
72
-
 73
73
-
 74
74
-
 75
75
-
 76
76
-
 77
77
-
 78
78
-
 79
79
-
 80
80
-
 81
81
-
 82
82
-
 83
83
-
 84
84
-
 85
85
-
 86
86
-
 87
87
-
 88
88
-
 89
89
-
 90
90
-
 91
91
-
 92
92
-
 93
93
-
 94
94
-
 95
95
-
 96
96
-
 97
97
-
 98
98
-
 99
99
-
 100
100
-
 101
101
-
 102
102
-
 103
103
-
 104
104
-
 105
105
-
 106
106
-
 107
107
-
 108
108


Toro 53cm Recycler Lawn Mower Manuel utilisateur
- Catégorie
- Tondeuses à gazon
- Taper
- Manuel utilisateur
dans d''autres langues
Documents connexes
-
Toro 53cm Recycler Lawn Mower Manuel utilisateur
-
-
-
Toro 22in Recycler Lawn Mower Manuel utilisateur
-
-
-
-
-
-
