Panasonic CT 34WX50 Manuel utilisateur
- Catégorie
- Téléviseurs CRT
- Taper
- Manuel utilisateur
Ce manuel convient également à

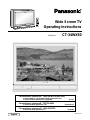
Wide Screen TV
Operating Instructions
Model No.
English
TQBC0213-2
CT-34WX50
For assistance, please call : 1-888-VIEW-PTV(843-9788)
or send e-mail to : [email protected]
or visit us at www.panasonic.co.jp/global/ (U.S.A)
For assistance, please call : 787-750-4300
or visit us at www.panasonic.com (Puerto Rico)
For assistance, please call : 1-800-561-5505
or visit us at www.panasonic.ca (Canada)

MBS0100S0(MS) 1
MBS0100S1020(MS)
MBS0100S2020(MS)

2
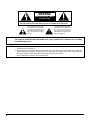
WARNING: To reduce the risk of electric shock do not remove cover or back. No
user-serviceable parts inside. Refer servicing to qualified service personnel.
The lightning flash with
arrow-head within a triangle
is intended to tell the user
that parts inside the product
are a risk of electric shock to
persons.
The exclamation point within
a triangle is intended to tell
the user that important
operating and servicing
instructions are in the papers
with the appliance.
WARNING
RISK OF ELECTRIC SHOCK
DO NOT OPEN
WARNING: 1) To prevent electric shock, do not remove cover. No user serviceable parts inside. Refer servicing to
qualified service personnel.
2) Do not remove the grounding pin on the power plug. This apparatus is equipped with a three pin
grounding-type power plug. This plug will only fit a grounding-type power outlet. This is a safety feature.
If you are unable to insert the plug into the outlet, contact an electrician.
Do not defeat the purpose of the grounding plug.
WARNING: To reduce the risk of fire or electric shock, do not expose this apparatus to rain or moisture.
Do not place containers with water (flower vase, cups, cosmetics, etc.) above the set. (including
on shelves above, etc.)

3
Important Safety Instructions
1) Read these instructions.
All the safety and operating instructions should be read before the appliance is operated.
2) Keep these instructions.
The safety and operating instructions should be retained for future reference.
3) Heed all warnings.
All warnings on the appliance and in the operating instructions should be adhered to.
4) Follow all instructions.
All operating and use instructions should be followed.
5) Do not use this apparatus near water.
For example, near a bathtub, wash bowl, kitchen sink, or laundry tube, in a wet basement, or near a swimming pool,
and the like.
6) Clean only with dry cloth.
Do not use liquid cleaners or aerosol cleaners. Use a dry cloth for cleaning.
7) Do not block any ventilation openings. Install in accordance with the manufacture’s instructions.
Slots and Openings in the cabinet are provided for ventilation and to ensure reliable operation of the product and to
protect it from overheating. The openings should never be blocked by placing the product on a bed, sofa, rug, or other
similar surface.
8) Do not install near any heat sources such as radiators, heat registers, stoves, or other apparatus (including amplifiers)
that produce heat.
This product should not be placed in a built-in installation such as a bookcase or rack unless proper ventilation is
provided or the manufacturer’s instructions have been adhered to.
9) Do not defeat the safety purpose of the polarized or grounding-type plug. A polarized plug has two blades with one wider
than the other. A grounding type plug has two blades and a third grounding prong. The wide blade or the third prong are
provided for your safety. If the provided plug does not fit into your outlet, consult an electrician for replacement of the
obsolete outlet.
10) Protect the power cord from being walked on or pinched particularly at plugs, convenience receptacles, and the point
where they exit from the apparatus.
11) Only use attachments / accessories specified by the manufacturer.
12) Use only with the cart, stand, tripod, bracket, or table specified by the manufacturer, or sold with the
apparatus. When a cart is used, use caution when moving the cart / apparatus combination to avoid
injury from tip-over.
Quick stops, excessive force, and uneven surfaces may cause the appliance and cart combination
to overturn.
13) Unplug this apparatus during lightning storms or when unused for long periods of time.
This will prevent damage to the product due to Lightning and power-line surges.
14) Refer all servicing to qualified service personnel. Servicing is required when the apparatus has been damaged in any
way, such as power-supply cord or plug is damaged, liquid has been spilled or objects have fallen into the apparatus,
the apparatus has been exposed to rain or moisture, does not operate normally. or has been dropped.
CAUTION : This TV set for use only with TV-stand. (Model: TY-S34WX50) Use with other stand is capable of resulting
in stability causing possible injury.

4
AVERTISSEMENT: Pour réduire les risques de secousse électrique, ne pas retirer le
couvercle ni le panneau arrière. Cet appareil ne contient aucune pièce qui puisse être
réparée par l'utilisateur; l'entretien doit être effectué par du personnel qualifié.
Le symbole de l'éclair, inscrit dans un
triangle équilatéral, a pour objet
d'appeler l'attention de l'utilisateur sur la
présence, à l'intérieur du produit, de
pièces non isolées portées à une
"tension dangereuse" qui peut avoir une
amplitude suffisante pour provoquer une
secousse électrique.
Le symbole du point d'exclamation,
inscrit dans un triangle équilatéral, a pour
objet d'appeler l'attention de l'utilisateur
sur la présence, dans la documentation
accompagnant le produit, d'importantes
instructions concernant son mode
opératoire et son entretien.
AVERTISSEMENT
Risque de secousse électrique
Ne pas ouvrir
AVERTISSEMENT: Pour éviter tout dommage pouvant entraîner un incendie ou une secousse électrique,
n'exposez pas l'appareil à la pluie ou à l'humidité.
Ne placez aucun récipient contenant de l’eau (vase de fleur, tasse, bouteille de produit
de beauté, etc.) sur l’appareil (ou sur une étagère le dominant).
AVERTISSEMENTS:1) Pour réduire les risques de secousse électrique, ne pas retirer le couvercle. Cet appareil ne
contient aucune pièce qui puisse être réparée par l'utilisateur; l'entretien doit être effectué par
du personnel qualifié.
2) Ne supprimez pas la broche de mise à la terre de la fiche du cordon d'alimentation. Cet
appareil est équipé d'une fiche à 3 broches qui ne peut être introduite que dans une prise
secteur dont la troisième broche est reliée à la terre. Cette disposition concerne la sécurité.
Si la fiche ne pénètre pas complètement dans la prise, consultez un électricien qui remplacera
la prise ou la fiche hors norme.
Ne tentez pas de contourner la sécurité de la fiche avec broche de mise à la terre.

5
Précautions de sécurité importantes
1) Lisez ces instructions.
Lisez toutes les instructions de sécurité et de fonctionnement avant d’utiliser l’appareil.
2) Conservez ces instructions.
Les instructions de sécurité et de fonctionnement doivent être conservées à titre d’information.
3) Prenez en compte tous les avertissements.
Tous les avertissements marqués sur l’appareil ou dans le mode d’emploi doivent être pris en compte.
4) Suivez toutes les instructions.
Toutes les instructions de fonctionnement et d’utilisation doivent être suivies.
5) N’utilisez pas cet appareil près de l’eau.
Par exemple, près d’une baignoire, d’un lavabo, d’un évier, d’une machine à laver, dans un sous-sol humide, près
d’une piscine, etc.
6) Nettoyez l’appareil uniquement avec un chiffon sec.
N’utilisez pas des nettoyants liquides ou aérosols. Pour le nettoyage, utilisez un chiffon sec.
7) Ne bloquez pas les orifices de ventilation. Installez l’appareil en suivant les instructions du fabricant. Les fentes et les orifices
du boîtier servent à la ventilation, aident au bon fonctionnement de l’appareil et le protègent des échauffements anormaux.
Ces orifices ne doivent jamais être bloqués en plaçant l’appareil sur un lit, un canapé, un tapis ou une autre surface similaire.
8) N’installez pas l’appareil près d’une source de chaleur telle qu’un radiateur, une chaudière, un poêle ou un autre appareil
(y compris les amplificateurs) produisant de la chaleur.
Cet appareil ne doit pas être placé à l’intérieur d’un meuble tel qu’une bibliothèque ou un bâti électronique sauf si une
ventilation suffisante peut être assurée ou que les instructions du fabricant sont respectées.
9) N’invalidez pas les caractéristiques de sécurité de la fiche polarisée ou avec mise à la terre. Une fiche polarisée possède
deux broches, une plus large que l’autre. Une fiche avec mise à la terre possède deux broches et une troisième broche de
mise à la terre. La lame large et la troisième broche de mise à la terre ont été faites pour des raisons de sécurité. Si la broche
de la fiche ne se branche pas dans la prise, consultez un électricien pour faire remplacer la prise.
10) Protégez le cordon d’alimentation et empêchez qu’il soit piétiné, ou pincé, particulièrement au niveau de la prise
secteur murale et de la sortie de l’appareil.
11) Utilisez uniquement des dispositifs auxiliaires/accessoires spécifiés par le fabricant.
12) Utilisez uniquement un chariot, socle, trépied, support ou table spécifié par le fabricant ou vendu
avec l’appareil. Si vous utilisez un chariot, faites attention lors du déplacement du chariot avec
l’appareil qu’il ne tombe et ne vous blesse pas.
Un arrêt brusque, une force excessive et une surface inégale peuvent causer le renversement de
l’ensemble.
13) Débranchez l’appareil pendant un orage ou lorsqu’il ne doit pas être utilisé pendant une période prolongée.
Cela évitera qu’il soit endommagé pendant un orage ou par une surtension.
14) Pour toute réparation, consultez une personne qualifiée. L’appareil doit être réparé s’il a été endommagé de n’importe
quelle façon, comme quand, par exemple, le cordon ou la fiche d’alimentation est endommagé, un liquide ou un objet
a pénétré à l’intérieur de l’appareil, l’appareil a été exposé à la pluie ou l’humidité, ne fonctionne pas normalement ou
est tombé.
AVIS : Ce téléviseur doit être utilisé uniquement avec le meuble de téléviseur (modèle: TY-S34WX50). L’utilisation
d’un autre modèle peut rendre l’ensemble instable et être cause de blessures.

6
Note:
This product utilizes both a Cathode Ray Tube (CRT) and other components that contain lead. Disposal of these
materials may be regulated in your community due to environmental considerations. For disposal or recycling information
please contact your local authorities, or the Electronics Industries Alliance: <http:// www.eiae.org.>
Dear Panasonic Customer
Welcome to the Panasonic family of customers. We hope that you will have many years of enjoyment
from your new color television set.
To obtain maximum benefit from your set, please read these Instructions before making any adjustments,
and retain them for future reference.
Retain your purchase receipt also, and note down the model number and serial number of your set in
the space provided on the back cover of these instructions.
Visit our Panasonic Web Site for USA : www.panasonic.com
for canada : www.panasonic.ca
FCC CAUTION:
Pursuant to 47CFR, Part 15.21 of the FCC rules, any changes or modifications to this monitor not expressly approved by
Matsushita Electric Corporation of America could result in harmful interference and would void the user’s authority to
operate this device.
For assistance, please call : 1-888-VIEW-PTV(843-9788)
or send e-mail to : [email protected]
or visit us at www.panasonic.co.jp/global/ (U.S.A)
For assistance, please call : 787-750-4300
or visit us at www.panasonic.com (Puerto Rico)
For assistance, please call : 1-800-561-5505
or visit us at www.panasonic.ca (Canada)

7
Table of Contents
Important Safety Instructions .......................................2
Installation ......................................................................8
Receiver Location .........................................................8
Optional External Equipment ........................................8
AC Power Supply Cord .................................................8
Safety Precaution..........................................................8
Remote Control Battery Installation ..............................9
Connecting the Antenna Cable to the RF In Terminal....
10
Antenna / Cable Connection .......................................11
How to connect the “1, 2, 3, 4” input terminals ...........13
How to connect the COMPONENT VIDEO Input Terminals ....
14
How to connect the AV Prog. Out Terminals ...............14
Connecting Headphones / Earphones ........................15
Location of Controls ....................................................16
Illuminated Remote Control ........................................16
Controls and Terminals on the TV...............................18
Power ON / OFF............................................................19
Connecting the Plug to the Wall Outlet ........................
19
How to Turn the Power On...........................................
19
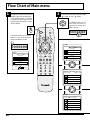
Flow Chart of Main Menu ............................................20
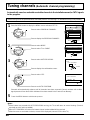
Tuning channels
(Automatic channel programming)..................
22
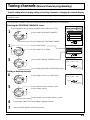
Tuning channels
(Manual channel programming)......................
23
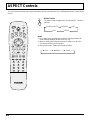
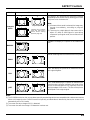
ASPECT Controls.........................................................24
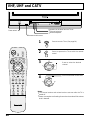
VHF, UHF and CATV .....................................................26
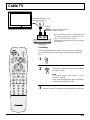
Cable TV........................................................................27
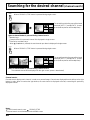
Searching for the desired channel
(channel search)........
28
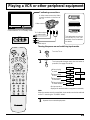
Playing a VCR or other peripheral equipment
(changing input modes)..............................................................
29
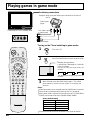
Playing games in game mode.....................................30
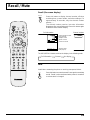
Recall / Mute .................................................................31
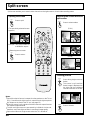
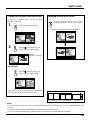
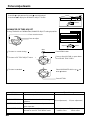
Split screen...................................................................32
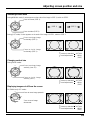
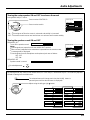
Adjusting screen position and size............................34
Audio Adjustments ......................................................36
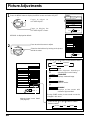
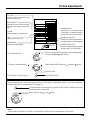
Picture Adjustments ....................................................38
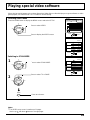
Playing special video software...................................41
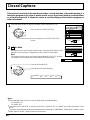
Closed Captions...........................................................42
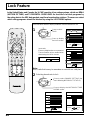
Lock Feature.................................................................44
Customizing the VIDEO INPUT labels ........................48
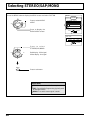
Selecting STEREO/SAP/MONO...................................50
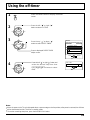
Using the off-timer .......................................................51
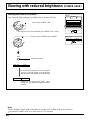
Viewing with reduced brightness
(POWER SAVE)...........
52
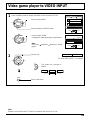
Video game player to VIDEO INPUT...........................53
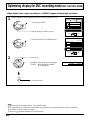
Optimizing display for DVC recording mode
(DVC PLAYBACK MODE)......
54
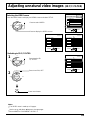
Adjusting unnatural video images
(3D Y/C FILTER) ........
55
Automatically changing screen size for VIDEO INPUT modes .....
56
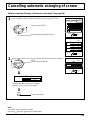
Cancelling automatic enlarging of screen.................57
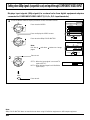
Setting when 480p signals (sequential scan) are
input through COMPONENT VIDEO INPUT ........58
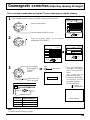
Geomagnetic correction
(Adjusting skewing of images)........
59
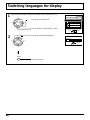
Switching languages for display ................................60
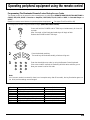
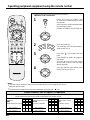
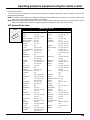
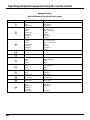
Operating peripheral equipment using the remote control.....
61
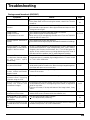
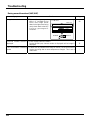
Troubleshooting ...........................................................69
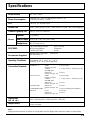
Specifications...............................................................71

8
The Video/Audio connection between components can be made with shielded video and audio cables. For best performance,
video cables should utilize 75 ohm coaxial shielded wire. Cables are available from your dealer or electronic supply store.
Before you purchase any cables, be sure you know what type of output and input connectors your various components
require. Also determine the length of cable you’ll need.
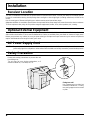
Installation
Receiver Location
This unit is intended to be used with an optional stand or entertainment center. Consult your dealer for available options.
Locate for comfortable viewing. Avoid placing where sunlight or other bright light (including reflections) will fall on the
screen.
Use of some types of fluorescent lighting can reduce remote control transmitter range.
Adequate ventilation is essential to prevent internal component failure. Keep away from areas of excessive heat or moisture.
To insure optimum color purity do not position magnetic equipment (motors, fans, other speakers, etc.) nearby.
Optional External Equipment
AC Power Supply Cord
CAUTION: To prevent electric shock, match wide blade of plug to wide slot of AC outlet and fully insert. Do not use this
(polarized) plug with a receptacle or other outlet unless the blade can be fully inserted to prevent blade exposure.
Please take safety precautions to prevent the unit
from falling over.
The unit may fall over during earthquakes, or if
someone stands on, or shakes, the TV.
Safety Precaution
Fixing to a wall
Use a strong rope or a chain (not
included) to fasten the TV firmly
to a strong support such as a wall
or pillar.

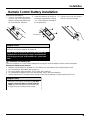
9
Remote Control Battery Installation
Helpful Hint:
For frequent remote control users, replace old
batteries with Alkaline batteries for longer life.
Note: In order to maximize the life of the batteries, the
lighted buttons on the Remote Control can be turned OFF
and ON by pressing R-TUNE and RECALL at the same
time.
Precaution on battery use
Incorrect installation can cause battery leakage and corrosion that will damage the remote control transmitter.
Observe the following precautions:
1. Batteries should always be replaced as a pair. Always use new batteries when replacing the old set.
2. Do not combine a used battery with a new one.
3. Do not mix battery types (example: “Zinc Carbon” with “Alkaline”).
4. Do not attempt to charge, short-circuit, disassemble, heat or burn used batteries.
5. Battery replacement is necessary when remote control acts sporadically or stops operating the TV set.
Helpful Hint:
Whenever you remove the batteries, you may
need to reset the remote control infrared
codes. We recommend that you record the code
on page 62, prior to setting up the remote.
Requires two AA batteries.
1. Turn the Transmitter face down.
Remove top cover by pressing
down on marking and sliding cover
off in the direction indicated.
2. Install the batteries as shown in
the battery compartment. (Polarity
+ or – must match the markings in
the compartment).
3. Replace the cover and slide in
reverse until the lock snaps.
Installation
Two AA size

10
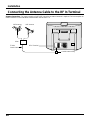
Connecting the Antenna Cable to the RF In Terminal
1
23
INPUT
COMPONENT VIDEO INPUT
PROG.
OUT
S - V I D E O
V I D E O
A U D I O - L
A U D I O - R
Y
P
B
P
R
L
R
AUDIO
VIDEO
UHF Antenna
RF In Terminal
VHF Antenna
Mixer
75 Ohm
Coaxial Cable
Coaxial Antenna Plug
Antenna Connection - For proper reception of VHF/UHF channels, an external antenna is required. For best reception an
outdoor antenna is recommended. Antenna Mode must be set to TV.
Installation

11
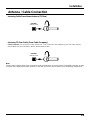
Installation
Antenna / Cable Connection
Incoming Cable From Home Antenna (75 Ohm)
VHF/UHF
on Back of Set
Cable Connection - For reception of cable channels (01 - 125) connect the cable supplied by your local cable company.
Antenna Mode must be set to CABLE. (Refer to Antenna Mode section.)
Incoming 75 Ohm Cable (From Cable Company)
VHF/UHF
on Back of Set
Note:
Certain cable systems offset some channels to reduce interference or have Premium (scrambled) channels. A cable
converter box is required for proper reception. Check with your local Cable company for its compatibility requirements.

12
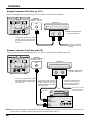
Antenna Connection (Cable Box, no VCR)
Use this configuration when connecting the TV to a cable TV system using a Cable Box.
Antenna Connection (Cable Box, and VCR)
Use this configuration when connecting the TV to a cable TV system using a Cable Box and VCR.
Connect the cable from the Output
terminal on the back of the Cable
Box to the ANT terminal on the back
of the TV.
ANTENNA
TERMINAL ON THE
BACK OF THE TV
CABLE BOX
TERMINAL ON THE BACK
OF THE CABLE BOX
Incoming Cable from
Antenna or Cable TV
System
OUTPUT
S-VIDEO
VIDEO
L-AUDIO-R
Connect the cable from the Output
terminal on the back of the VCR to
the Antenna input terminal on the
back of the TV.
Connect the cable from the
Output terminal on the back
of the Cable Box to the
Antenna input terminal on the
back of the VCR.
ANTENNA
TERMINALS ON THE
BACK OF THE TV
VCR
CABLE BOX
TERMINAL ON THE BACK
OF THE CABLE BOX
Incoming Cable
from Antenna or
Cable TV System
OUTPUT INPUT
ANT
ANT
OUTPUT INPUT
TO VCR
Connect the cable from the
antenna or cable system to
the Input terminal on the
back of the CABLE BOX.
ANT OUTPUT
ANT INPUT
Installation
Note: When the antenna cable is connected to the TV antenna terminal via a cable box or VCR, set the TV channel to CH3
or CH4, cable. This does not apply when signal is input from VIDEO INPUT.

13
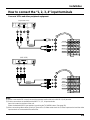
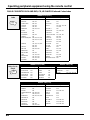
Notes:
(1) When a monaural VCR is used, connect the monaural audio cable to the AUDIO-L (Left) terminal.
(2) Similar connections are available at the INPUT 1, 2, 3, 4 input terminals.
Input 4 is located on the front of the unit.
Select the desired VIDEO input position by pushing the TV/VIDEO button. (See page 29)
(3) When connecting video cables, priority is given to the S-Video cable when the S-Video input terminal and the video
input terminal are connected at the same time.
How to connect the “1, 2, 3, 4” input terminals
Installation
(Super-VHS VCR)
Audio
OUT
Video
OUT
S-Video
OUT
RL
VIDEO
AUDIO
1
23
INPUT
PROG.
OUT
S - V I D E O
V I D E O
A U D I O - L
A U D I O - R
(VHS VCR)
VIDEO
AUDIO
Audio
OUT
Video
OUT
R
L
1
23
INPUT
PROG.
OUT
S - V I D E O
V I D E O
A U D I O - L
A U D I O - R
Connects VCRs and other peripheral equipment

14
Installation
Audio
OUT
P
B
YP
R
DVD(Y•P
B
•P
R
)
AUDIO
DVD(Y•P
B
•P
R
) OUT
LR
DVD Player
COMPONENT VIDEO INPUT
Y
P
B
P
R
Y
P
B
P
R
L
R
AUDIO
VIDEO
1
2
Recording Equipment
(VHS VCR)
VIDEO
AUDIO
Audio
IN
Video
IN
S-Video
IN
S-VIDEO Cable
R
L
1
23
INPUT
PROG.
OUT
S - V I D E O
V I D E O
A U D I O - L
A U D I O - R
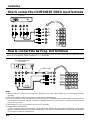
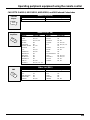
How to connect the COMPONENT VIDEO Input Terminals
How to connect the AV Prog. Out Terminals
The “Prog. Out” Terminals output the same signals as main picture on the TV screen and sound from the speaker at that
time, e.g. TV programs or signals from INPUT 1, 2, 3, 4 terminals.
Notes:
(1) Never connect the VIDEO IN and Prog. OUT terminals to the same video recorder, as this could cause incorrect
operation.
(2) The monitor output emits the main picture normal video and audio signals.
(3) Even if the television is in picture-out-picture condition, Prog. OUT terminals output the same signals as main picture on
the screen and sound from speaker. Sub picture including strobe, still, channel search, etc. will not be output at the
PROG. OUT terminals.
(4) DVD signal (Y, PB, PR) is not output at the Prog. OUT terminals.
(5) COMPONENT VIDEO INPUT
In order to prevent colors from interfering, image signals are divided into three signals of brightness, red and blue
(green is created automatically from these three signals). Each signal is processed from its own circuit and combined
on the screen, creating a natural picture.

15
Installation
Connecting Headphones / Earphones
Connect headphones / earphones as follows.
(Optional)
HPJ
LEFT P.
EPJ
RIGHT P.
INPUT4
S-VIDEO
VIDEO
L-AUDIO-R
You can listen to sound from each of the headphones Jacks as shown below.
LEFT headphones plug:
When a LEFT headphones plug is inserted into the LEFT headphones socket, all speakers will be automatically disconnected;
only the headphones will function.
Use Volume Up or Down button to control volume level.
Front jack
M3 plug jack
Headphones (stereo) or
earphones (monaural)
•
Volume and sound effects will
vary, depending on the
connected headphones or
earphones.
HPJ
LEFT P.
EPJ
RIGHT P.
Sounds from
speakers are turned
off.
Speakers also
function.
RIGHT P. (PICTURE)
•
During single screen, volume adjustments can be made.
•
During split screen, sound from the right screen is played
and its volume adjustments can be made.
1. Press the RH-SPLIT
button.
2. Immediately make
volume adjustments.
VCR
DVD
AUX
RCVR
TV
DTV
CBL
DBS
CH
VOL VOL
CH
MENU
INFO/RECALL
AV-ADJ
NORMAL
GAME
RH-SPLIT
EXIT
VCR REC
GUIDE
REW
SEARCH
STOP
PLAY
SPLIT
FF
ACTION
RH-EPJ VOLUME
0
– +
(M3 plug)

16
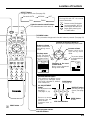
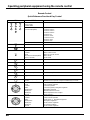
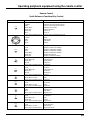
Illuminated Remote Control
Location of Controls
Power button
Press to turn the TV ON or OFF (See page 19).
Note:
The TV’s power cord must first be plugged into the wall outlet and then turned on at the
POWER switch (standby mode).
VCR
DVD
AUX
RCVR
TV
DTV
CBL
DBS
Operation of other Device
R-TUNE button
Switches to previously view
to channel or video mode.
Mode Selection buttons
Selects the operation mode for the remote control. (See page 60)
VCR Mode Selection for Remote Control
Digital Video Disk Mode Selection for Remote Control
Aux Mode Selection for Remote Control
TV Mode Selection for Remote Control
Digital Broadcasting Satellite for
Remote Control
Receiver/Amplifier Mode Selection
for Remote Control
Digital TV Mode Selection for Remote Control
Cable TV Mode Selection for Remote Control
Buttons
TV
VCR
CABLE/DBS
DVD/LD/CD
RCVR
Split Freeze
TV/VCR switch
Open/Close
Channel down
Channel down
Center –
Channel up
Channel up
Center +
Split Swap
Pause
Still/Pause
Slow -/LD-sideB
/Random
Slow +/LD-sideA
/Repeat
MUTE button
Push this button to mute the sound (See page 31).
R-TUNE
Buttons
TV
VCR
CABLE/DBS
DVD/LD/CD
RCVR
REW
Skip Search REW
Surround –
Split Search
STOP
STOP
PLAY
PLAY
Split ON/OFF
FF
Skip Search FF
Surround +

17
LIGHT
ASPECT
MUTE TV/VIDEO
VCR
DVD
AUX
RCVR
TV
DTV
CBL
DBS
CH
VOL VOL
CH
MENU
INFO/RECALL
AV-ADJ
NORMAL
GAME
RH-SPLIT
EXIT
VCR REC
GUIDE
REW
SEARCH
STOP
PLAY
SPLIT
FF
FREEZE
TV/VCR
SLOW
SWAP
PAUSE
OPEN/CLOSE
VCR/DBS CHANNEL
STILL
123
456
789
0
R-TUNE PROG
ACTION
POWER
CH
VOL VOL
CH
MENU
INFO/RECALL
ACTION
MENU
ADJUST
CUSTOM
PICTURE
AUDIO
PICTURE ADJUST
POSITION/SIZE
SELECT
AUDIO ADJUST
SET UP
EXIT
PAGE
ACTION
STEREO
SAP
MONO
PanasonicAUTO
STANDARD
CH6
AV-ADJ
NORMAL
GAME
RH-SPLIT
EXIT
VCR REC
GUIDE
NORMALIZATION button
Each setting in the MENU screen
is reset to its standard values
(PICTURE, ADVANCE, AUDIO,
POSITION/SIZE)
GAME button
(See page 30)
RH-SPLIT button
Operates the right
screen (See page
33).
AV ADJUSTMENT
button
AV-adjustments are
displayed.
(See page 37, 39)
Direct program number
selection buttons
Reduces volume
Moves cursor to the
left during menu
mode.
Displays menu
Press the Menu
button to display
the Menu screen.
Changes to the next
channel down
Moves cursor downward
during menu mode.
Increase volume
Moves cursor to the
right during menu
mode.
Changes to the next channel up
Moves cursor upward during menu mode.
Lights the remote control buttons.
The selected button blinks when lit.
Panasonic AUTO NORMAL JUST
FULL ZOOM
ASPECT button
Change of screen size (See page 24).
PROG button
The screen below
is displayed for 10
seconds
Returns to normal
viewing from the
MENU screen.
Previous item in
MENU.
VCR Record button
TV/VIDEO button.
This input mode changes each time this button is pressed. (See page 29)
PROG
GUIDE button
for DBS.
R-TUNE
INFO/RECALL
Turning ON and OFF the remote
control illumination
Remote control illumination
can be turned ON OFF by
pressing the INFO/RECALL
button while pressing the
R-TUNE button.
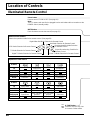
Location of Controls

18
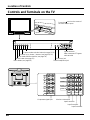
Location of Controls
Controls and Terminals on the TV
Action button (see page 21)
Volume up(+) / down(–) buttons (see page 20, 26)
Program number selection buttons (see page 21, 26)
ACTION TV/VIDEO
MENU
HPJ
LEFT P.
EPJ
RIGHT P.
INPUT4
S-VIDEO
VIDEO
L-AUDIO-R
VOLUME
CHANNEL
1
23
INPUT
COMPONENT VIDEO I NPUT
PROG.
OUT
S - V I D E O
V I D E O
A U D I O - L
A U D I O - R
Y
P
B
P
R
L
R
AUDIO
VIDEO
1
23
INPUT
COMPONENT VIDEO INPUT
PROG.
OUT
S - V I D E O
V I D E O
A U D I O - L
A U D I O - R
Y
P
B
PR
L
R
AUDIO
VIDEO
Input mode selection buttons (see page 29)
Menu button (see page 20)
Stereo headphone jack
Input4 terminals
Video camera and TV game
cable terminal
Press the
mark on the center of
the front cover to open.
Earphone jack
Open
Monitor out terminals
Input1 terminals
Input2 terminals
Input3 terminals
Component signal input

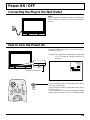
19
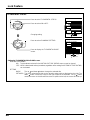
Power ON / OFF
Note:
Main plug types vary between countries. The power plug
shown at left may, therefore, not be the type fitted to
your set.
Push the POWER switch on the TV to turn the set on.
POWER-ON: Green
Example: The screen below is displayed for a while after
the TV is turned on. (setting condition is an
example.)
Press the POWER button on the remote control to turn
the TV off: Red (standby)
Press the POWER button on the remote control to turn
the TV on: Green
Turn the power to the TV set off by pressing the POWER
switch on the TV when the TV is on or in standby mode.
Connecting the Plug to the Wall Outlet
How to Turn the Power On
STEREO
SAP
MONO
PanasonicAUTO
STANDARD
CH6
LIGHT
ASPECT
MUTE TV/VIDEO
VCR
D
V
D
AUX
RCVR
TV
DTV
CBL
DBS
CH
VOL VOL
ACTION
POWER
POWER
Remote Control Sensor
La page est en cours de chargement...
La page est en cours de chargement...
La page est en cours de chargement...
La page est en cours de chargement...
La page est en cours de chargement...
La page est en cours de chargement...
La page est en cours de chargement...
La page est en cours de chargement...
La page est en cours de chargement...
La page est en cours de chargement...
La page est en cours de chargement...
La page est en cours de chargement...
La page est en cours de chargement...
La page est en cours de chargement...
La page est en cours de chargement...
La page est en cours de chargement...
La page est en cours de chargement...
La page est en cours de chargement...
La page est en cours de chargement...
La page est en cours de chargement...
La page est en cours de chargement...
La page est en cours de chargement...
La page est en cours de chargement...
La page est en cours de chargement...
La page est en cours de chargement...
La page est en cours de chargement...
La page est en cours de chargement...
La page est en cours de chargement...
La page est en cours de chargement...
La page est en cours de chargement...
La page est en cours de chargement...
La page est en cours de chargement...
La page est en cours de chargement...
La page est en cours de chargement...
La page est en cours de chargement...
La page est en cours de chargement...
La page est en cours de chargement...
La page est en cours de chargement...
La page est en cours de chargement...
La page est en cours de chargement...
La page est en cours de chargement...
La page est en cours de chargement...
La page est en cours de chargement...
La page est en cours de chargement...
La page est en cours de chargement...
La page est en cours de chargement...
La page est en cours de chargement...
La page est en cours de chargement...
La page est en cours de chargement...
La page est en cours de chargement...
La page est en cours de chargement...
La page est en cours de chargement...
La page est en cours de chargement...
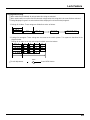
-
 1
1
-
 2
2
-
 3
3
-
 4
4
-
 5
5
-
 6
6
-
 7
7
-
 8
8
-
 9
9
-
 10
10
-
 11
11
-
 12
12
-
 13
13
-
 14
14
-
 15
15
-
 16
16
-
 17
17
-
 18
18
-
 19
19
-
 20
20
-
 21
21
-
 22
22
-
 23
23
-
 24
24
-
 25
25
-
 26
26
-
 27
27
-
 28
28
-
 29
29
-
 30
30
-
 31
31
-
 32
32
-
 33
33
-
 34
34
-
 35
35
-
 36
36
-
 37
37
-
 38
38
-
 39
39
-
 40
40
-
 41
41
-
 42
42
-
 43
43
-
 44
44
-
 45
45
-
 46
46
-
 47
47
-
 48
48
-
 49
49
-
 50
50
-
 51
51
-
 52
52
-
 53
53
-
 54
54
-
 55
55
-
 56
56
-
 57
57
-
 58
58
-
 59
59
-
 60
60
-
 61
61
-
 62
62
-
 63
63
-
 64
64
-
 65
65
-
 66
66
-
 67
67
-
 68
68
-
 69
69
-
 70
70
-
 71
71
-
 72
72
-
 73
73


Panasonic CT 34WX50 Manuel utilisateur
- Catégorie
- Téléviseurs CRT
- Taper
- Manuel utilisateur
- Ce manuel convient également à
dans d''autres langues
- English: Panasonic CT 34WX50 User manual
Documents connexes
-
Panasonic Flat Panel Television CT-26WC15 Manuel utilisateur
-
-
-
-
-
-
-
-
Autres documents
-
Citizen C27401 Manuel utilisateur
-
Philips 32PFL7332D-37E Manuel utilisateur
-
-
Sony RHT-G1000 Manuel utilisateur
-
Philips 32PFL5332D-37E Manuel utilisateur
-
Pioneer PDP-4214HD Manuel utilisateur
-
Jensen JE1907DC Le manuel du propriétaire
-
-
LG 32LX4DC Le manuel du propriétaire
-
Quasar EUR511166 Manuel utilisateur